Latest Experiment…Failure!
 04-28-08, 06:42 AM
#1
"Elusive, not deceptive!”
Thread Starter
Latest Experiment…Failure!
Latest Experiment…Failure!
Water jacket leaking at rear rotor trailing plug. This experiment was to try to improve the cooling of the rotor housing in the area of the spark plugs to minimize heat distortion.
OK you already know the results are failure but let me tell how I got to this point. Let’s go back to my previous engine failure.
Whenever an engine is disassembled I do a failure analysis (an old habit of mine from working on helicopter turbine engines for a large oil company) and attempt to determine the Root Cause.
Sounds so simple but like they say,” the devil is in the details”.
So first we have the broken apex seal. The very common type failure with the apex seal chip imbedded in the rear rotor and it gouging the housing.
Next we have the cracks at the spark plug holes and lifting of the apex seals in that area.
Add to that chafing of the side plates to rotor housing interface that same spark plug area.
At this point we have two contingents drawing different conclusions. One thinks we should secure the area better with dowels and or studs. The other group thinks better cooling of the area is appropriate.
I started looking for 3 studs to reinforce that area. In my search for studs and reamers I contacted Carlos Lopez. He changed my direction.
Carlos thought that creep was a symptom but not the root cause. The problem was high heat and low water flow in that area. He mentioned that the 3rd gen pump was one of the poorest designs.
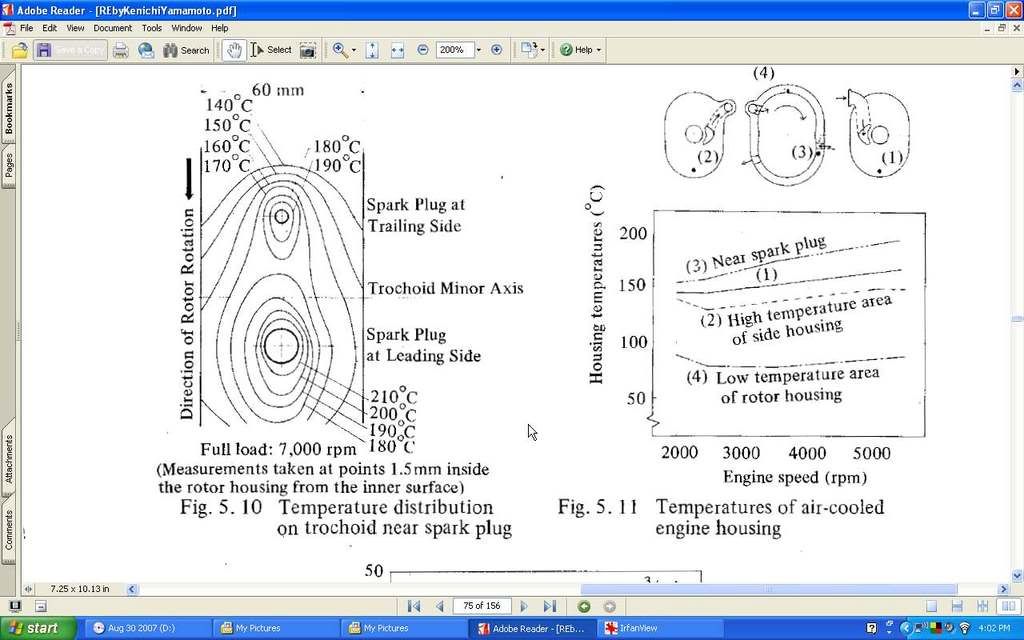
Kenichi Yamamoto's book shows the temps around the plug area.
My thought then went to a better water pump (mazmart) and porting the rotor housing in the hot spots as shown above.
Great plans! But is where the problem started. I had just gotten some new long shank carbide burs. Boy do they cut fast. I cut a little too fast and nicked a spark plug thread causing a leak at start-up.
Any thoughts?
Barry
Water jacket leaking at rear rotor trailing plug. This experiment was to try to improve the cooling of the rotor housing in the area of the spark plugs to minimize heat distortion.
OK you already know the results are failure but let me tell how I got to this point. Let’s go back to my previous engine failure.
Whenever an engine is disassembled I do a failure analysis (an old habit of mine from working on helicopter turbine engines for a large oil company) and attempt to determine the Root Cause.
Sounds so simple but like they say,” the devil is in the details”.
So first we have the broken apex seal. The very common type failure with the apex seal chip imbedded in the rear rotor and it gouging the housing.
Next we have the cracks at the spark plug holes and lifting of the apex seals in that area.
Add to that chafing of the side plates to rotor housing interface that same spark plug area.
At this point we have two contingents drawing different conclusions. One thinks we should secure the area better with dowels and or studs. The other group thinks better cooling of the area is appropriate.
I started looking for 3 studs to reinforce that area. In my search for studs and reamers I contacted Carlos Lopez. He changed my direction.
Carlos thought that creep was a symptom but not the root cause. The problem was high heat and low water flow in that area. He mentioned that the 3rd gen pump was one of the poorest designs.
Kenichi Yamamoto's book shows the temps around the plug area.
My thought then went to a better water pump (mazmart) and porting the rotor housing in the hot spots as shown above.
Great plans! But is where the problem started. I had just gotten some new long shank carbide burs. Boy do they cut fast. I cut a little too fast and nicked a spark plug thread causing a leak at start-up.
Any thoughts?
Barry
 04-28-08, 09:45 AM
#2
Red Pill Dealer
iTrader: (10)

So your saying you cut into the backside of the spark plug thread while porting the water passage?
04-28-08, 09:56 AM
#3
"Elusive, not deceptive!”
Thread Starter
The car is up and running. So the experiment is continuing.
I made a temporary fix by removing the shorter Iridium BR10EIX plug and installing the two thread longer BUR9EQP and 620 Loctite.
Barry
I made a temporary fix by removing the shorter Iridium BR10EIX plug and installing the two thread longer BUR9EQP and 620 Loctite.
Barry
04-28-08, 10:04 AM
#4
"Elusive, not deceptive!”
Thread Starter
 04-28-08, 10:34 AM
#5
"Elusive, not deceptive!”
Thread Starter
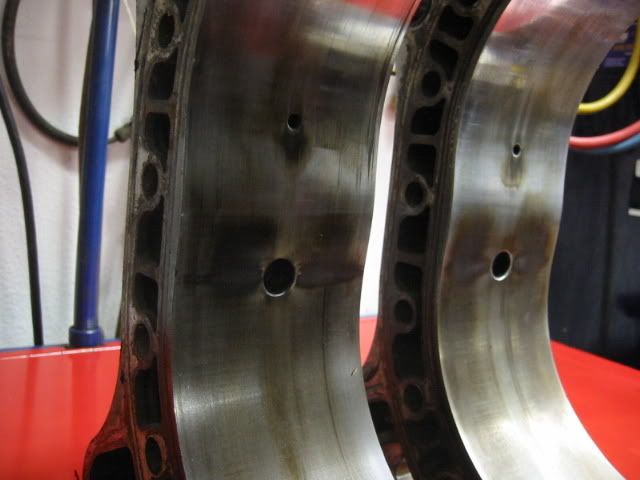
The stock 3rd gen water pump with its square leading edges causes cavitation. Notice the damage is at the leading edge area of the housing.

An early attempt at getting the stock pump to not cavitate by contouring the leading edge.

An early attempt at getting the stock pump to not cavitate by contouring the leading edge.
04-28-08, 06:17 PM
#6
Moderator
iTrader: (3)
Join Date: Mar 2001
Location: https://www2.mazda.com/en/100th/
Posts: 30,829
Received 2,597 Likes
on
1,845 Posts
ive seen engines that have rotted away in the spark plug thread area, its thin!
your fix is a good one though.
your fix is a good one though.
04-28-08, 10:53 PM
#7
Barry,
If you notice Mazda did take a step in addressing this very problem by removing aluminum around the spark plug area with their latest s6 rotor housings. Though I agree 100% that even more needs to be removed from that area to really have an effect. Every little bit counts.....
The BIG question to me is, if Carlos stated that he thought heat was the main cause NOT stress then what does he do to "bring down" the heat? Modify the housing like you? Water pump mods? Are maybe something different.... I think information like this needs to be shared with the rotary community more freely. These little engines have enough going against them for important info like this to not be more freely discussed amongst the community. So, how about it ya'll.... I know all those race prepped engines that the "big" boys build (like Mr. Lopez etc.), aren't keeping cool etc. with just hopes, dreams, duct tape and bubble gum. Come on enlighten us!?
-J
Trending Topics
04-29-08, 09:53 AM
#10
"Elusive, not deceptive!”
Thread Starter
Barry,
If you notice Mazda did take a step in addressing this very problem by removing aluminum around the spark plug area with their latest s6 rotor housings. Though I agree 100% that even more needs to be removed from that area to really have an effect. Every little bit counts.....
The BIG question to me is, if Carlos stated that he thought heat was the main cause NOT stress then what does he do to "bring down" the heat? Modify the housing like you? Water pump mods? Are maybe something different.... I think information like this needs to be shared with the rotary community more freely. These little engines have enough going against them for important info like this to not be more freely discussed amongst the community. So, how about it ya'll.... I know all those race prepped engines that the "big" boys build (like Mr. Lopez etc.), aren't keeping cool etc. with just hopes, dreams, duct tape and bubble gum. Come on enlighten us!?
-J
If you notice Mazda did take a step in addressing this very problem by removing aluminum around the spark plug area with their latest s6 rotor housings. Though I agree 100% that even more needs to be removed from that area to really have an effect. Every little bit counts.....
The BIG question to me is, if Carlos stated that he thought heat was the main cause NOT stress then what does he do to "bring down" the heat? Modify the housing like you? Water pump mods? Are maybe something different.... I think information like this needs to be shared with the rotary community more freely. These little engines have enough going against them for important info like this to not be more freely discussed amongst the community. So, how about it ya'll.... I know all those race prepped engines that the "big" boys build (like Mr. Lopez etc.), aren't keeping cool etc. with just hopes, dreams, duct tape and bubble gum. Come on enlighten us!?
-J
Carlos Lopez probably tops the list with his wringing-out high-temp power, for long periods of time, on ALMS endurance racing rotaries. So his opinion is one of the most valuable, but there are many more. It would be great to learn from them.
Barry
04-29-08, 10:17 AM
#11
"Elusive, not deceptive!”
Thread Starter
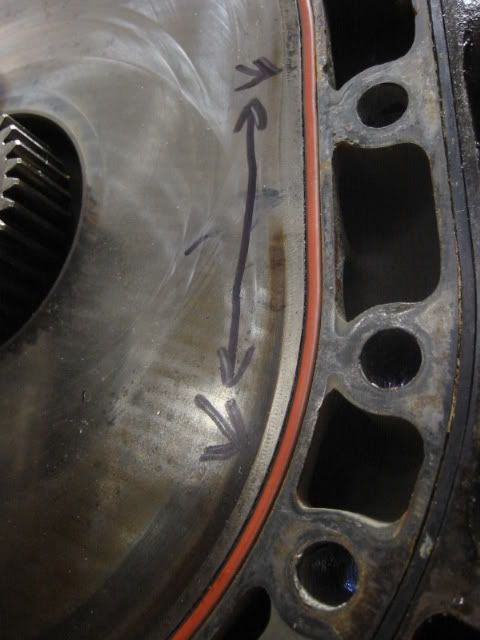
We need more surface area to be cooled so the fins or grooves will help.
Barry
 04-29-08, 11:43 AM
#12
Old [Sch|F]ool
You want to INCREASE, not decrease, pressure to reduce cavitation. Decrease water pump speed or increase the pump's effective range.
 04-29-08, 12:39 PM
#13
"Elusive, not deceptive!”
Thread Starter
Cavitation is basically caused by the blades moving too fast and creating cavities of water vapor (the water boils under the too-low pressure). So slowing the pump down reduces cavitation.
You want to INCREASE, not decrease, pressure to reduce cavitation. Decrease water pump speed or increase the pump's effective range.
You want to INCREASE, not decrease, pressure to reduce cavitation. Decrease water pump speed or increase the pump's effective range.

 04-29-08, 02:19 PM
#15
"Elusive, not deceptive!”
Thread Starter
I should add a little Quiz!
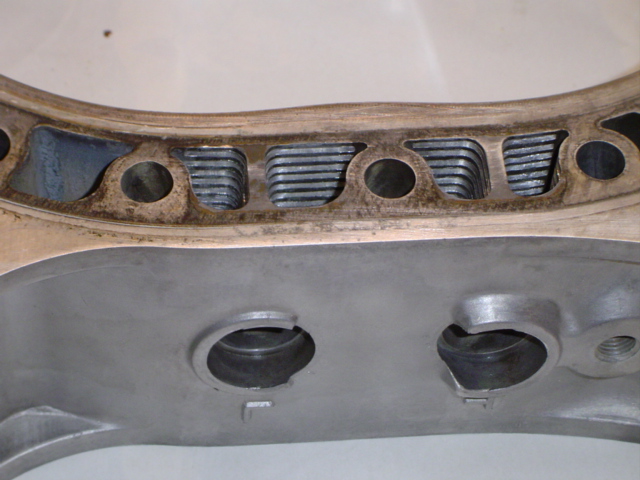
Can anyone guess how I added over 8 square inches of aluminum to help cool this critical plug area?
Barry
04-29-08, 03:07 PM
#16
Can anyone guess how I added over 8 square inches of aluminum to help cool this critical plug area?
I run Evans NPG+ in a zero pressure system and it really helps eliminate minor leaks and its properties should alleviate the problems of lack of heat transfer at the plugs due to vapor barrier.
04-29-08, 03:29 PM
#18
Senior Member

Join Date: Jul 2007
Location: fl
Posts: 306
Likes: 0
Received 0 Likes
on
0 Posts
awesomeness
keep in mind that the more material that is removed there will be slower overall coolant speed through the engine. u could counter that by filling in the cooler passages. it seems to me that stock the housings flow coolant nearly equally in all areas when i think it should be modified to concentrate flow more in the areas that need it.
keep in mind that the more material that is removed there will be slower overall coolant speed through the engine. u could counter that by filling in the cooler passages. it seems to me that stock the housings flow coolant nearly equally in all areas when i think it should be modified to concentrate flow more in the areas that need it.
04-29-08, 03:34 PM
#19
"Elusive, not deceptive!”
Thread Starter
I used a Dremel carbide cutting tool with an aluminum spacer to limit the cut depth locked at desired height in a drill press as I moved the rotor housing around on the drill press table.
I run Evans NPG+ in a zero pressure system and it really helps eliminate minor leaks and its properties should alleviate the problems of lack of heat transfer at the plugs due to vapor barrier.
I run Evans NPG+ in a zero pressure system and it really helps eliminate minor leaks and its properties should alleviate the problems of lack of heat transfer at the plugs due to vapor barrier.
An extra 8.8 sq. inches beyond your great groove mod.
Barry
04-29-08, 03:50 PM
#20
"Elusive, not deceptive!”
Thread Starter
awesomeness
keep in mind that the more material that is removed there will be slower overall coolant speed through the engine. u could counter that by filling in the cooler passages. it seems to me that stock the housings flow coolant nearly equally in all areas when i think it should be modified to concentrate flow more in the areas that need it.
keep in mind that the more material that is removed there will be slower overall coolant speed through the engine. u could counter that by filling in the cooler passages. it seems to me that stock the housings flow coolant nearly equally in all areas when i think it should be modified to concentrate flow more in the areas that need it.
We only want to remove material in order to increase flow in the critical sparkplug area.
So we revert to Mazda's original flow rate using original size pulleys, a better pump (Mazmart), and added cooling area (8.8sq. inches).
Barry
04-29-08, 04:07 PM
#21
"Elusive, not deceptive!”
Thread Starter
Keep in mind also that the rear rotor is seeing the discarded coolant from the front rotor with some interaction from the intermediate plate.
A loop line to this area could be beneficial.
Barry
A loop line to this area could be beneficial.
Barry
04-29-08, 04:54 PM
#22
"Elusive, not deceptive!”
Thread Starter
One thing that “J-“ said about spark plugs made me consider something about cold plugs and why we need them so badly. They are trying very hard to stay cool through heat transfer in this same super heated area and when they can’t keep cool they may cause preignition! Bad Karma as Lynn Hanover says.
Barry
04-29-08, 08:58 PM
#24
Increasing heat transfer surface area would be something to keep in mind. As long as you have constant flowrate increasing volume does only so much. Rate of heat transfer will be gained more by the amount of surface area coolant has in contact with. Ie internal heat exchange fins, but inline with the direction of coolant flow to reduce flow losses.
Last edited by afgmoto1978; 04-29-08 at 09:05 PM.