REPU Creamsicle Build
 01-27-16, 04:48 PM
#1

REPU Creamsicle Build
Hi everyone, not getting much interest in my project on the other forum and since I'm constantly lurking here I figured I would continue my progress here.
Starting point:
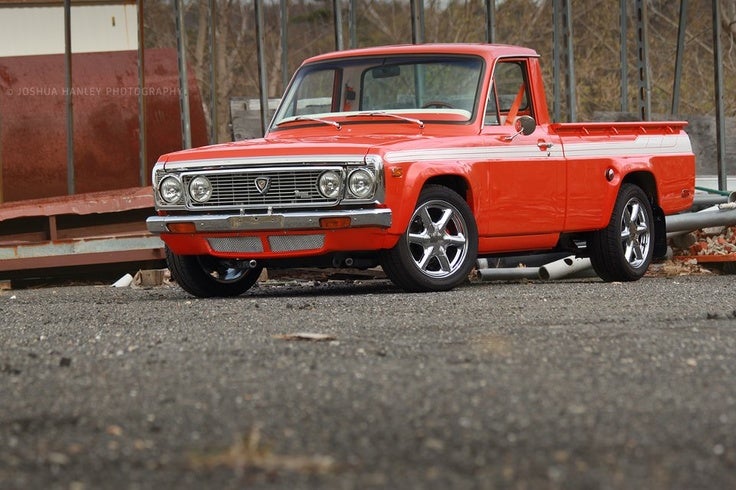
This 1975 was restored by Gary in California. He did some amazing work but his style wasn't completely to my liking. I purchased it about 5 years ago and this is how it looked back then.
I quickly got the truck ready for camping duty and since it had only been shuttled back and forth to a few car shows my TODO list was pretty long.
1) New Clutch master/slave
2) Raise the suspension back up
3) Install hitch
4) Install brake controller and 7 pin harness
5) Get the heater working
6) Get the wipers working
7) Get the turn signals working
8) Get the horn working
9) Interior and dash lights
10) Radio
11) Speedometer cable
12) Exhaust work (it was way too loud below 3,500RPM)
13) New wheels (harder than it looked to find something)
14) New battery
I'm sure there were a few other items on the list, despite the beautiful body work, the car's restoration wasn't up to the task of doing much more than a few cruise nights and car shows. Most of the wiring under the dash was missing or not connected. Even the headlight bulbs were incorrect and causing fuses to blow with the high beams on. Anyway, I got everything up to snuff and I used it several times a year for camping trips, car shows, and driving around town in fair weather. It has been out in the rain a few times but it stays garaged all winter.


Plans for this winter are as follows...
1) More power
2) Safer wiring
3) Fresh Interior
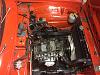
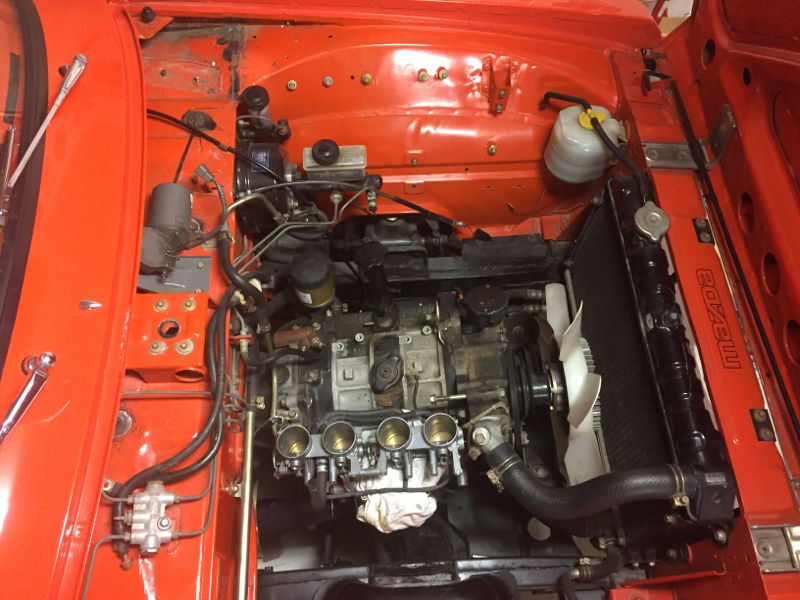
I started by getting a dyno of its current state. With a racing beat header and 2.5" exhaust and the emissions equipment removed, it put down a respectable 114 hp to the wheels. I'm not shooting for massive power gains, but the build will be something a little different. I haven't been towing with it as much lately so the focus is more on making the engine bay pop at car shows, and the wheels spin around town.

Starting point:
This 1975 was restored by Gary in California. He did some amazing work but his style wasn't completely to my liking. I purchased it about 5 years ago and this is how it looked back then.
I quickly got the truck ready for camping duty and since it had only been shuttled back and forth to a few car shows my TODO list was pretty long.
1) New Clutch master/slave
2) Raise the suspension back up
3) Install hitch
4) Install brake controller and 7 pin harness
5) Get the heater working
6) Get the wipers working
7) Get the turn signals working
8) Get the horn working
9) Interior and dash lights
10) Radio
11) Speedometer cable
12) Exhaust work (it was way too loud below 3,500RPM)
13) New wheels (harder than it looked to find something)
14) New battery
I'm sure there were a few other items on the list, despite the beautiful body work, the car's restoration wasn't up to the task of doing much more than a few cruise nights and car shows. Most of the wiring under the dash was missing or not connected. Even the headlight bulbs were incorrect and causing fuses to blow with the high beams on. Anyway, I got everything up to snuff and I used it several times a year for camping trips, car shows, and driving around town in fair weather. It has been out in the rain a few times but it stays garaged all winter.
Plans for this winter are as follows...
1) More power
2) Safer wiring
3) Fresh Interior
I started by getting a dyno of its current state. With a racing beat header and 2.5" exhaust and the emissions equipment removed, it put down a respectable 114 hp to the wheels. I'm not shooting for massive power gains, but the build will be something a little different. I haven't been towing with it as much lately so the focus is more on making the engine bay pop at car shows, and the wheels spin around town.
Last edited by chuyler1; 01-27-16 at 05:16 PM.


 01-27-16, 07:01 PM
#4
Before I started taking things apart. https://picasaweb.google.com/m/zoom?...portHeight=416 https://picasaweb.google.com/m/zoom?...portHeight=416
And its current state.
And its current state.
Last edited by chuyler1; 01-27-16 at 07:24 PM.

 01-31-16, 03:29 PM
#7
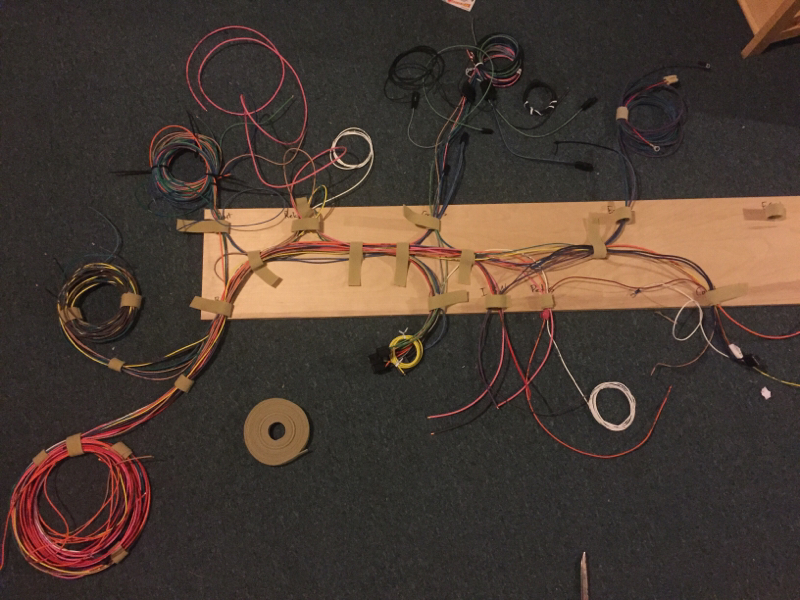
Made progress on the new wiring harness using everything supplied by the AAW Highway 22 kit. However there is a lot missing and I need to come up with a few solutions to completely replace the factory harness.
Missing or requires modification:
* relays and harness for wipers
* relays for low/high headlights
* relays to combine turn signals and brake
* relay for fuel pump
* relay for ignition
* reverse light wiring
* alternator warning light wiring

Missing or requires modification:
* relays and harness for wipers
* relays for low/high headlights
* relays to combine turn signals and brake
* relay for fuel pump
* relay for ignition
* reverse light wiring
* alternator warning light wiring
Trending Topics


 02-25-16, 12:59 PM
#9
Drilled and tapped the holes for bucket seats. Only issue is that I will have to remove the exhaust and heat shield to get the bolts in from the other side. I'll wait until I'm ready to install the seats permanently before I do that.
Since all the holes are placed I decided to get started on the sound deadening.

Since all the holes are placed I decided to get started on the sound deadening.
02-26-16, 11:15 AM
#11
I hang out in 4th gear on the highway at about 60 mph and it buzzes along quite nicely. I don't have a 5th gear (yet) so I'd be doing that anyway. The only time I've had to downshift to maintain speed on the highway is through Franconia Notch which I think has a grade over 6%. I add a few extra PSI to the Gabriel air shocks to level the suspension and as long as the trailer is loaded properly there isn't any sway unless I get up over 65 mph. I also add a little extra air to the rear tires. Braking isn't spectacular so I up the boost on my brake controller. I would not advise hauling more than 1,000lbs without electronic brakes. If you plan to tackle the Rockies, this truck isn't going to cut it, but short trips under a few hours are OK. Gas mileage is around 12-13 which is pretty much identical to the mileage I get towing the same camper with my 2013 CX9.
Keep in mind that RV and trucking magazines back in the day wrote great reviews for using this truck with in-bed campers because it had quiet revving power. It outclassed the typical 1.6L and 1.8L motors in the majority of the mini trucks. Until Toyota offered the 2.2L 20R in the Hilux, the 13B had the most torque available by a long shot.
Keep in mind that RV and trucking magazines back in the day wrote great reviews for using this truck with in-bed campers because it had quiet revving power. It outclassed the typical 1.6L and 1.8L motors in the majority of the mini trucks. Until Toyota offered the 2.2L 20R in the Hilux, the 13B had the most torque available by a long shot.
03-04-16, 11:45 PM
#12
Some work on the wiring harness this week.
Ignition switch and steering column all terminated.

Tail light module for a trailer will serve as relay for brakes and turn signals. Easy to replace if it fails because I added quick release terminals. This particular model has a separate 12v power supply so I won't have high current running through steering column switch.

Additional bank of relays for low/high wipers and low/high headlights. This along with the trailer module should tuck up under the gauge cluster out of sight.

Took me a while to translate the OEM wiper relay box into a dual SPDT format I could understand.

The OEM harness had full power for headlights going through the steering column so I'm going to intercept those feeds and power the lights from a higher gauge cable.

I also added some RAAMatt BXT to the transmission hump and rear of the cab. I ordered the wrong carpet so finishing it off didn't happen.


Ignition switch and steering column all terminated.
Tail light module for a trailer will serve as relay for brakes and turn signals. Easy to replace if it fails because I added quick release terminals. This particular model has a separate 12v power supply so I won't have high current running through steering column switch.
Additional bank of relays for low/high wipers and low/high headlights. This along with the trailer module should tuck up under the gauge cluster out of sight.
Took me a while to translate the OEM wiper relay box into a dual SPDT format I could understand.
The OEM harness had full power for headlights going through the steering column so I'm going to intercept those feeds and power the lights from a higher gauge cable.
I also added some RAAMatt BXT to the transmission hump and rear of the cab. I ordered the wrong carpet so finishing it off didn't happen.


 09-11-16, 09:50 AM
#16
Working on installing the Atkins pulley kit.

Had to grind off this rivet on the original pulley.

Got the water pump and crank pulleys on. Side mount installed. Also mounted the new Spal 16" electric fan. However the alternator I bought won't work with the side mount kit so I'm going to get an FD alternator instead.


Had to grind off this rivet on the original pulley.
Got the water pump and crank pulleys on. Side mount installed. Also mounted the new Spal 16" electric fan. However the alternator I bought won't work with the side mount kit so I'm going to get an FD alternator instead.
09-20-16, 11:14 PM
#21
I did a little more wiring tonight. Just tucking things in and making sure all the runs are the right length. I still have to install a ton of harness terminals but the fuse box is in, relays are in, and steering column is all hooked up.


09-22-16, 10:26 AM
#23
Yeah, I didn't want to cut into the harness and I knew I was adding so much more. This is a thankless job though. Understanding how all the OEM switches and relays worked was a nightmare but I've made improvements to every circuit. I'm selling the old unmolested harness to anyone wanting to keep things original, but after adding up the cost of all the terminals and wire I had to purchase to replicate it, I'm not letting it go cheap.
I don't have any photos but last night I started working on the gauge cluster. I was about to wire it up but then I remembered the speedometer flutter I was having. I opened up the gauge and cleaned off all the gunk on the screw gears and oiled them with some bicycle chain lube. I'm not a clocksmith but I'm hoping that helps.
Tonight I'm going to direct wire all the gauges and lights to the pigtail harness from the AAW kit. My circuit board has seen better days and the last time I was poking around with it I noticed a few connections between the round oem harness and the gauges weren't working or had poor connectivity but the gauges and lights themselves work fine. I'll take a bunch of photos. I should be able to get all of them working again. The only one I'm worried about is the tach honestly. I'm not sure how that will function with the Adaptronic ECU controlling the coils.