
Megasquirt no spark!


Okay I have everything wired up and I can get my car to crank over no problem but I'm having a spark issue, as in not getting any at all.
the setup is Megasquirt 2 VB3 with the dual VR mod for unmodded CAS on an NA streetport.
the coils ran the car a few days ago when it had stock harness.
I'm using MSII for fuel/ignition
the coils are getting 12v
the coils are within resistance spec
tried even "jumping" the coils to see if there was spark and I don't get any
there is continuity between the CAS wiring
the MS isn't reading engine speed
and voltage across shows 12v when it should be 0v after the coil (like its not building up current so it won't fire)
voltage drop test reads 9v rather than 0v, like its only working at 1/3 capacity...
the stock ECU has only the body harness connected
aaaaaand aaroncakes guide differs from DIYautotunes setups, tried both and it didn't work.
AC's:
Trigger Offset (deg) 60.00
Skip Pulses 3
Ignition Input Capture Falling Edge
Spark mode (dizzy, EDIS, wheel) Toothed wheel
Spark Output Going Low (Normal)
Number of coils Wasted spark
Spark A output pin D14
Setting Value
Fixed Advance Use Table
Use Prediction No Prediction
Timing for Fixed Advance (degrees) -5.0 (Disabled)
Cranking Dwell (ms) 6.0
Cranking Advance (degrees) 8.0
Dwell type Standard Dwell
Maximum Dwell Duration (ms) 3.6
Acceleration Compensation (ms) 1
Maximum Spark Duration (ms) 0.5
Dwell duty (%) Disabled
Dwell time (ms) 1.0
Spark Hardware Latency (usec) 0
Rotary Mode Rotary On
here is DIY's:
* Spark mode: Toothed Wheel
* Trigger angle: 0
* Ignition input capture; Rising Edge
* Spark Output: Going Low (Normal)
* Number of coils: Wasted Spark
* Spark A Output Pin: D14
* Dwell type: Standard Dwell
* Maximum dwell duration: 3.0
* Trigger wheel arrangement: Dual wheel
* Trigger wheel teeth: 24
* Tooth #1 angle: 0
* Wheel speedL Cam wheel
* Second trigger active on: Rising Edge
* And every rotation of: Crank
* Enable rotary mode: Rotary on
* Output mode: FC mode
* RX8 mode: Disabled
even the MS pinouts differ from aaroncakes guide to DIY's settings!

I'm using stock FC ignition and I don't see my stock tach working during cranking, I see it initially move when I give the car power but it doesn't actually work.
I'm stumped, anyone have any clues or suggestions?
the setup is Megasquirt 2 VB3 with the dual VR mod for unmodded CAS on an NA streetport.
the coils ran the car a few days ago when it had stock harness.
I'm using MSII for fuel/ignition
the coils are getting 12v
the coils are within resistance spec
tried even "jumping" the coils to see if there was spark and I don't get any
there is continuity between the CAS wiring
the MS isn't reading engine speed
and voltage across shows 12v when it should be 0v after the coil (like its not building up current so it won't fire)
voltage drop test reads 9v rather than 0v, like its only working at 1/3 capacity...
the stock ECU has only the body harness connected
aaaaaand aaroncakes guide differs from DIYautotunes setups, tried both and it didn't work.
AC's:
Trigger Offset (deg) 60.00
Skip Pulses 3
Ignition Input Capture Falling Edge
Spark mode (dizzy, EDIS, wheel) Toothed wheel
Spark Output Going Low (Normal)
Number of coils Wasted spark
Spark A output pin D14
Setting Value
Fixed Advance Use Table
Use Prediction No Prediction
Timing for Fixed Advance (degrees) -5.0 (Disabled)
Cranking Dwell (ms) 6.0
Cranking Advance (degrees) 8.0
Dwell type Standard Dwell
Maximum Dwell Duration (ms) 3.6
Acceleration Compensation (ms) 1
Maximum Spark Duration (ms) 0.5
Dwell duty (%) Disabled
Dwell time (ms) 1.0
Spark Hardware Latency (usec) 0
Rotary Mode Rotary On
here is DIY's:
* Spark mode: Toothed Wheel
* Trigger angle: 0
* Ignition input capture; Rising Edge
* Spark Output: Going Low (Normal)
* Number of coils: Wasted Spark
* Spark A Output Pin: D14
* Dwell type: Standard Dwell
* Maximum dwell duration: 3.0
* Trigger wheel arrangement: Dual wheel
* Trigger wheel teeth: 24
* Tooth #1 angle: 0
* Wheel speedL Cam wheel
* Second trigger active on: Rising Edge
* And every rotation of: Crank
* Enable rotary mode: Rotary on
* Output mode: FC mode
* RX8 mode: Disabled
even the MS pinouts differ from aaroncakes guide to DIY's settings!
I'm using stock FC ignition and I don't see my stock tach working during cranking, I see it initially move when I give the car power but it doesn't actually work.
I'm stumped, anyone have any clues or suggestions?

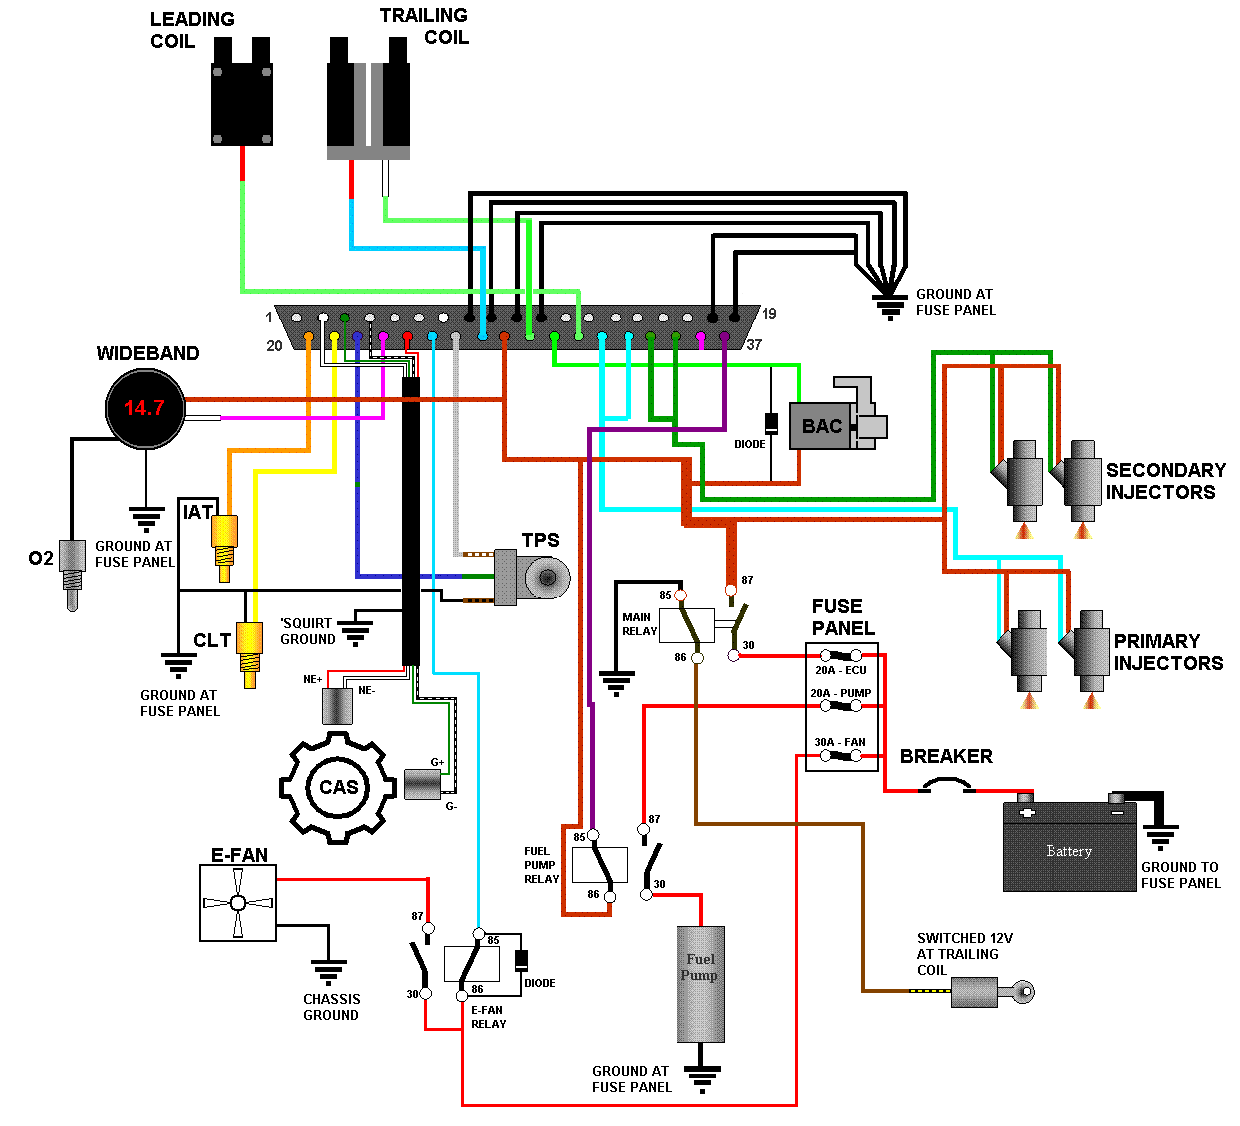
The coils will be wired up according to how you have it setup internally. Its not just a matter of copying someone else's wiring diagram. Also for the falling edge and rising edge, its also a matter of how it is setup internally. The screen setups will look differently depending on which firmware you're using. I believe that Aaron and the
guide attached are all 1.0.2 firmware, the other is a 2.1.0 firmware.
Did you use another shielded wire for the CAS? Its better to have all 4 of the CAS wires in a shielded cable. I have mine wired in a 4 conductor cable that is dual shielded. Also make sure that the case of the MS is all closed up. I have learned in the past couple of days that leaving the case open brings in noise and doesn't make the RPM work properly.
You should get your RPM working before trying to get the coils working, they'll never work without getting an RPM signal. To the coils, the engine isn't moving and the ECU isn't giving it a signal.
I went by this guide and it helps explain how to do what easier I think:
https://www.rx7club.com/showthread.p...da%2520CAS.pdf
yes I have shielded wire for the CAS.
but the engine is moving, it cranks and turns over.
from my understanding the LEDs are supposed to blink when the coils fire but the LEDs stay on continuously.
so its like the CAS isn't reading correctly to the MS and thus not providing the rpm signal?
but the engine is moving, it cranks and turns over.
from my understanding the LEDs are supposed to blink when the coils fire but the LEDs stay on continuously.
so its like the CAS isn't reading correctly to the MS and thus not providing the rpm signal?
Well, your biggest problem is that the MS isn't getting the CAS signal, and therefore doesn't know the engine is running. It won't provide fuel or spark if it can't synchronize to the CAS events that its expecting to receive.
The car will still crank even if the MS is disconnected, since there's nothing about turning the starter motor that requires the ECU with stock wiring. You won't get a tach signal on the dashboard since the tach gauge works off of the trailing spark coil, which is now controlled by the MS and is not getting a signal.
To start, I'm noticing a couple problems, that may or may not be related.
-First, you need to have G+ going to the normal DB37 plug for tach input, and G- going to sensor ground; right now it looks like you have G- going to one of the spare pins, and I don't know where you have it going after that.
-Second, make sure that NE+ and NE- are making it to the 2nd VR circuit with the LM1815N.
-Third, on the topic of the LM1815N, the circuit construction shown in the link that dj55b posted is mostly correct, EXCEPT that pin 14 of the LM1815 should go directly to ground.
-Fourth, the sensor grounds (TPS, CLT, MAT) should all go directly back to the MS's sensor ground pin (the one that you should connect G- to as well).
-Fifth, the MS, each of the injector channels, the bac, and ideally your wideband and fuel pump relay should be fused independently, with values of approx 2A for the MS and BAC, 6A (slow-blow fuses) for each injector channel. I don't remember the LC-1's recommendation for fusing, or what you should use for the relay (but 1A should be more than sufficient).
Wiring is all about being consistent. What you need to do is make sure that you have continuity all the way from the Ne wires at the CAS plug to the MS, since this signal travels through the engine harness to the body harness to the stock ECU (so into the DIYAutotune adapter that you mentioned), and from the DB37 connector to the 2nd VR circuit. Do the same for the G wires to the MS tach input and sensor ground. Also, make sure the G+ and Ne+ wires aren't shorted to ground (there should be some finite resistance there, I don't remember what it is off the top of my head tho).
Good luck!
DIYauto tune chart shows different pinouts for VB3 than the posted above PDF which also varies from aaroncake guide.
WTF!?!?!
I dont know which one to belive:
AC:
Pin 2 = NE-
Pin3 = GE+
Pin4 = GE-
Pin24 = NE+
Pin 27 = trailing coil IGT
Pin 29 = trailing coil select
Pin 31 = primary coil MS signal
Pin 36 = empty
DIY:
Pin 2 = NE-
Pin 25 = GE+
Pin 27 = GE-
Pin 24 = NE+
Pin 31 = trailing coil IGT
Pin 29 = trailing coil select
Pin 36 = primary coil MS signal
PDF:
Pin 7 = NE-
Pin 31 = G+
Pin 36 = G-
Pin 24 = NE+
Pin 25 = trailing coil trigger
Pin 27 = trailing coil select
Pin 29 = lead coil trigger
sooooo which one am I supposed to follow? I have a 2.X firmware
all of these instructions differ.....
Well, most of those pins are spares or unused, so all you're doing is passing the signal through the DB37 instead of running another wire and connector. Basically, there is no "right" way, as long as you stay consistent with one person's write-up/guide for where things are connected not only to the DB37 in the harness, but where they're connected inside the MS too. The schematic for the V3 board is here, so you can trace everything; i've found it very helpful when troubleshooting.
http://www.bgsoflex.com/megasquirt.html
As for the pins:
Pin 2 is a ground, and I have G- connected to it
Pins 3-6 are spares 1-3, labeled as spr1, spr2, spr3 and spr4 on the board. You can run whatever you want to these pins, as long as you continue it on the other side of the connector. Like if you run the G+ signal to spr1, you need to run a wire from the spr1 hole on the V3 PCB to the VR2 circuit input, etc.
Pins 7-19 are all grounds, pin 7 and 19 are typically called the sensor grounds, but there isnt any real difference between any of them AFAIK. I have NE- on pin 7
Pin 24 is the tach in pin, this one NEEDS to have NE+ on it, since thats the primary (24 tooth wheel) tach signal.
Pins 25,27,29 & 31 are also essentially spares, they were intended for stepper-motor-driven idle valves that require 4 outputs, but since we don't use them for that (ours is just a 2-wire solenoid valve that we drive with PWM), they are re-purposed for anything else, used in the same way SPR1 - SPR4 are. Again, to use these, you need to connect, say, IGT-L to one of them, and then from it's associated hole on the PCB you need to run a wire to the negative lead of LED14 to finish that circuit.
Its all about consistency, and knowing what each output is for/should go to
Just for confusions sake, I use:
Pin: Signal: Acquired from: Goes To:
2 G- body harness pin 1P LM1815 ground (general MS ground)
3 G+ body harness pin 1N LM1815 VR2 in *
4 IGL-T LED14 neg. lead * pin 1V
5 IGT-S LED15 neg. lead * pin 1U
6 IGT-T LED16 neg. lead * pin 1X
7 NE- body harness pin 1Q sensor ground (general MS ground)
24 NE+ body harness pin 1T normal MS tach input
*The ones with asterisks required an additional wire from the DB37's pin's hole on the PCB to whereever it needed to go.
Also, to head off another possible question, what did you do in regards to the fuel pump? Are you keeping the stock AFM (even tho its main signal isnt used) to switch it on and off, or did you connect the wire as it passes through the emissions harness (brown wire, comes from connector to rear harness) and connect it directly to pin 37?
Trending Topics
Joined: Feb 2001
Posts: 29,798
Likes: 128
From: London, Ontario, Canada
The problem is that you are not following one full set of instructions. Whoever wires up the inside of the 'Squirt decides which pins on the DB37 go to which function. So if you follow DIY AutoTune when building the 'Squirt and then follow my guide when wiring up the harness to the DB37, nothing will line up. You need to pick a guide and stay with it. Since you have already wired your harness side of the DB37 with my diagram, here is how you need to wire the inside of the 'Squirt to match:
http://www.aaroncake.net/rx-7/Megasq...AndModding.asp
http://www.aaroncake.net/rx-7/Megasq...AndModding.asp
Joined: Feb 2001
Posts: 29,798
Likes: 128
From: London, Ontario, Canada
The point of the base maps on the writeup is to run super rich.  It's to almost guarantee that the car starts and at least drives. Just reduce fuel 20% across the light load areas of the map and things should be better. Then fine tune using the standard tuning process.
It's to almost guarantee that the car starts and at least drives. Just reduce fuel 20% across the light load areas of the map and things should be better. Then fine tune using the standard tuning process.

Thread
Thread Starter
Forum
Replies
Last Post
Prediict
2nd Generation Specific (1986-1992)
32
Nov 18, 2015 08:41 AM