
WRITE UP: Fiberglass FD Rear Speakers!

Thread Starter
Registered User
iTrader: (61)
Joined: Apr 2004
Posts: 7,334
Likes: 8
From: Los Angeles, CA
WRITE UP: Fiberglass FD Rear Speakers!
As many of you know I am a real audio buff, and have done my best right now to achieve the best overall sound in my fd - this has turned out to be quite the daunting task. I didn�t get any pics of the project before I used any bondo, but will do my best to give good descriptions:
MATERIALS
Wire Strippers
Wire
Speakers
Wire Caps
Paint
Fiberglass resin and matte
Bondo
MDF Board
PATIENCE
Total Time- Two SOLID days
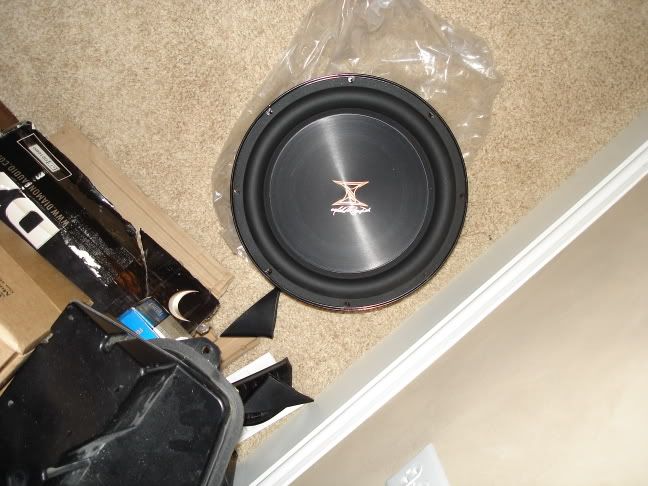
I used Rainbow sl co-axel speakers, I had a pair of their components, and IMO they make some of the best speakers around. I would compare them to Dynaudio, but not as laid back but not as bright as focals either. They were $125 shipped to my door and they are worth every penny. For my front speakers, I am running Monitor1 components; they are extremely rare and sound out of this world. After everything was complete, I noticed a nice difference in the sound stage. I always read that when adding rear speakers the sound system usually drones down and you loose some of the front stage. I found that while loosing a very small amount of front stage the rear stage picked up a lot, and it sounds a lot better with the rear speakers added. Comparing this system to my father�s $6000 focal utopia system in his jag, my highs are 10x better and more crisp/detailed/dynamic, although the mid-bass isn�t quite as good as the utopias. Even he mentioned that when in my car it felt like a movie theater and it was impossible to pinpoint where the sound was coming from.
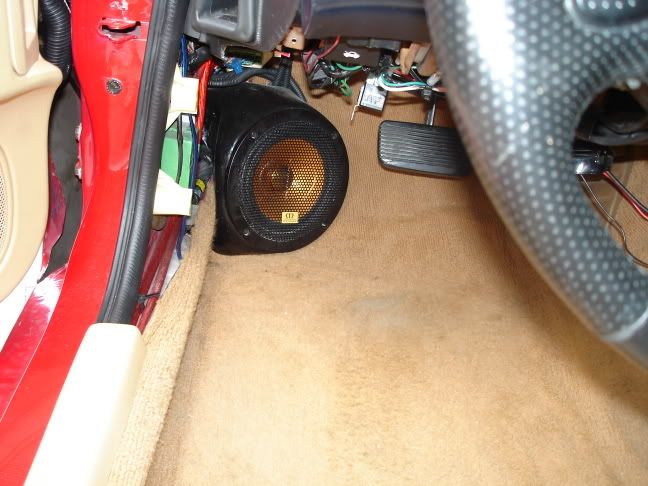
1. Cut out the rings for the speakers, use MDF wood, don�t go cheap and use particle board or something else, as I used particle board on a previous project and the bass sounded horrible compared to the MDF.
2. Take out the rear panels and clamp the rings you cut to the back.
3. Now fiberglass the rings on the backside of the panel, use ATLEAST 4 layers of fiberglass. When it�s all try it should look like this - disregard the speaker, it shouldn�t be mounted at this point.

4. Now once that�s dry, flip it over and we need to bondo all the remaining gaps to make it flush. Shouldn�t be too much bondo as it�s a very limited work space. Sand the bondo and paint.
5. Now your ready to mount the speakers. This should be self-explanatory, just make sure all four screws are screwed firmly into the MDF ring on the other side.
6. All that�s left is to install and run all the wires, negative to negative and positive to positive.
That is it, when you�re done it should look something like this:

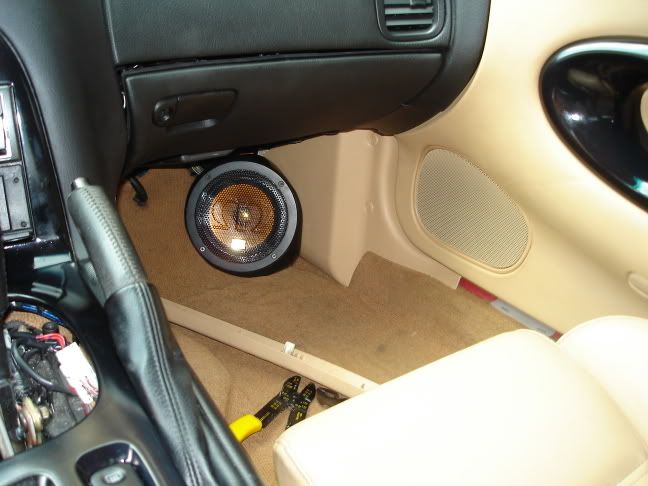
And this is what it looks like installed:

Here are some pics of my custom kick panels I did awhile ago:
My next project -12" SOUND SPLINTER rl-p box and an amp rack for 2 McIntosh amps and 1 Diamond d7 amp.
MATERIALS
Wire Strippers
Wire
Speakers
Wire Caps
Paint
Fiberglass resin and matte
Bondo
MDF Board
PATIENCE
Total Time- Two SOLID days
I used Rainbow sl co-axel speakers, I had a pair of their components, and IMO they make some of the best speakers around. I would compare them to Dynaudio, but not as laid back but not as bright as focals either. They were $125 shipped to my door and they are worth every penny. For my front speakers, I am running Monitor1 components; they are extremely rare and sound out of this world. After everything was complete, I noticed a nice difference in the sound stage. I always read that when adding rear speakers the sound system usually drones down and you loose some of the front stage. I found that while loosing a very small amount of front stage the rear stage picked up a lot, and it sounds a lot better with the rear speakers added. Comparing this system to my father�s $6000 focal utopia system in his jag, my highs are 10x better and more crisp/detailed/dynamic, although the mid-bass isn�t quite as good as the utopias. Even he mentioned that when in my car it felt like a movie theater and it was impossible to pinpoint where the sound was coming from.
1. Cut out the rings for the speakers, use MDF wood, don�t go cheap and use particle board or something else, as I used particle board on a previous project and the bass sounded horrible compared to the MDF.
2. Take out the rear panels and clamp the rings you cut to the back.
3. Now fiberglass the rings on the backside of the panel, use ATLEAST 4 layers of fiberglass. When it�s all try it should look like this - disregard the speaker, it shouldn�t be mounted at this point.
4. Now once that�s dry, flip it over and we need to bondo all the remaining gaps to make it flush. Shouldn�t be too much bondo as it�s a very limited work space. Sand the bondo and paint.
5. Now your ready to mount the speakers. This should be self-explanatory, just make sure all four screws are screwed firmly into the MDF ring on the other side.
6. All that�s left is to install and run all the wires, negative to negative and positive to positive.
That is it, when you�re done it should look something like this:
And this is what it looks like installed:
Here are some pics of my custom kick panels I did awhile ago:
My next project -12" SOUND SPLINTER rl-p box and an amp rack for 2 McIntosh amps and 1 Diamond d7 amp.
Lives on the Forum
Joined: Feb 2001
Posts: 9,617
Likes: 8
From: Dallas
Looks nice but it's only a matter of time before those heavy rear speakers start making the sail panels rattle when music is playing. The speakers may be solidly mounted to the trim, but the trim mounts to the car with only a few spring clips.
I wasn't aware Monitor Audio made mobile components. I have always really liked their home stuff.
I wasn't aware Monitor Audio made mobile components. I have always really liked their home stuff.
Missin' my FD
Joined: Aug 2002
Posts: 1,755
Likes: 0
From: Seminole, FL (Tampa Bay Area)
Looks good. I thought of doing something similar in my car, but I had the same concerns as DamonB. My car is (and will be) too loud to really appreciate high-end quality car audio stuff, so I'll just stick with my Kappa Perfect Components in the doors and throw a 10" in back for the low end.