DIY HID retrofit!
#1
DIY HID retrofit!
Tools:
philips/flat screwdriver
oven
dremel with sanding drums and cutoff wheel
Materials:
stock/aftermarket housing (polished lenses if using stock)
morimoto d2s projector
d2s bulbs (oem or morimoto)
ballast
e55 shrouds
projector/bulbs/ballast/shrouds can be purchased at theretrofitsource.com
Step1. Removing lens
Preheat your oven to 200f, then take a baking sheet cover it with foil and place your headlight housing on it and place it in the oven. Set you timer for 10 minutes and watch your housing carefully. DO NOT WALK AWAY, since every oven is different it may take a longer/shorter time to remove the lens.
Take the headlight out and stick a small flat head screwdriver between the lens and housing and twist slowly. Do this all the way around until you can get your fingers behind the lens and Slowly pull it off. IF the glue starts to harden again simply put it in the oven for a few minutes and try again.
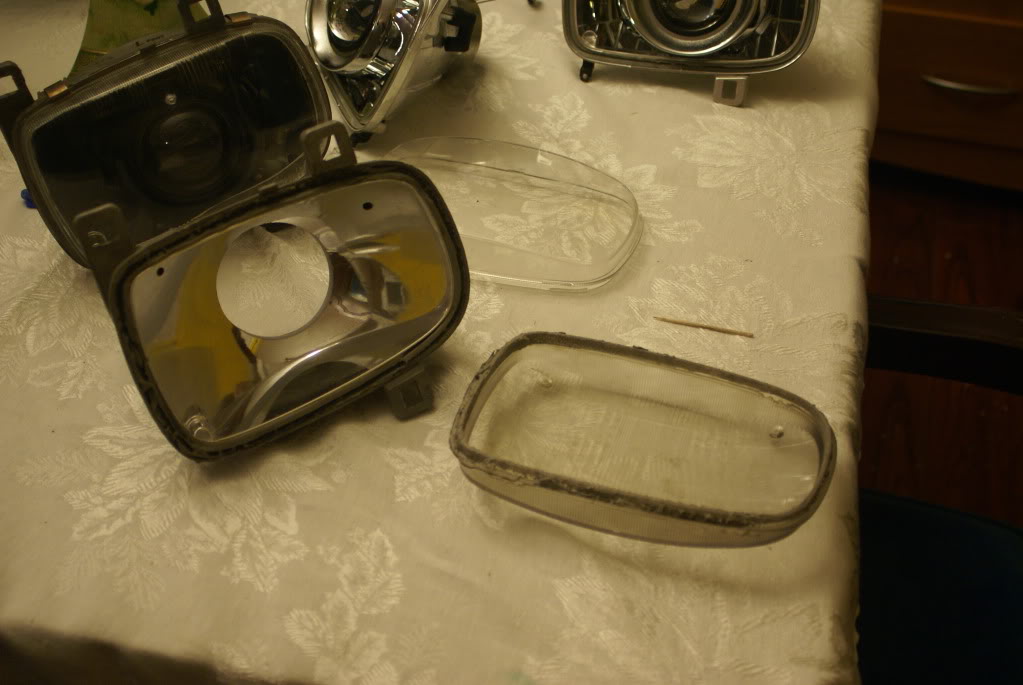
You should end up having something like this.
Step 2. Modify housing
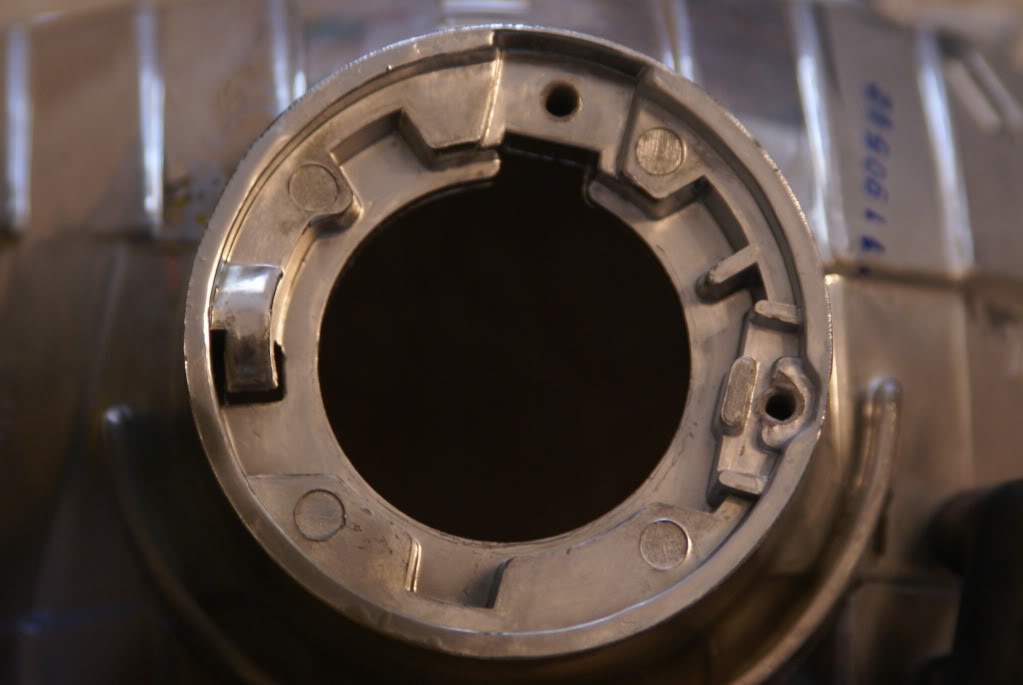
This is where you break out the dremel. you have the housing looking like this at first.
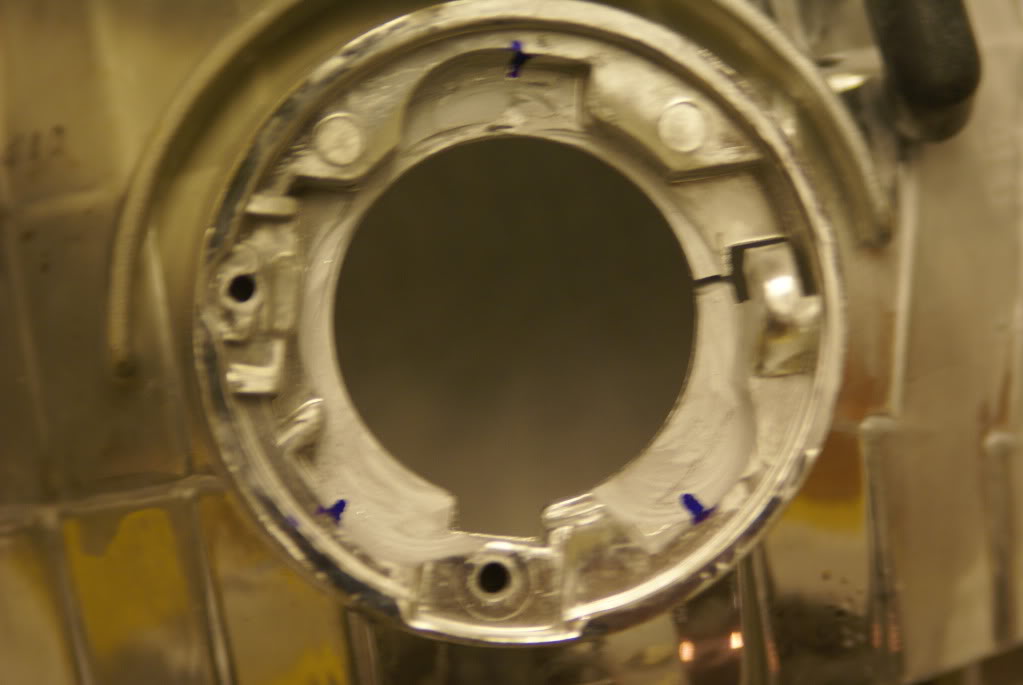
You want to cut and sand until it looks like this.
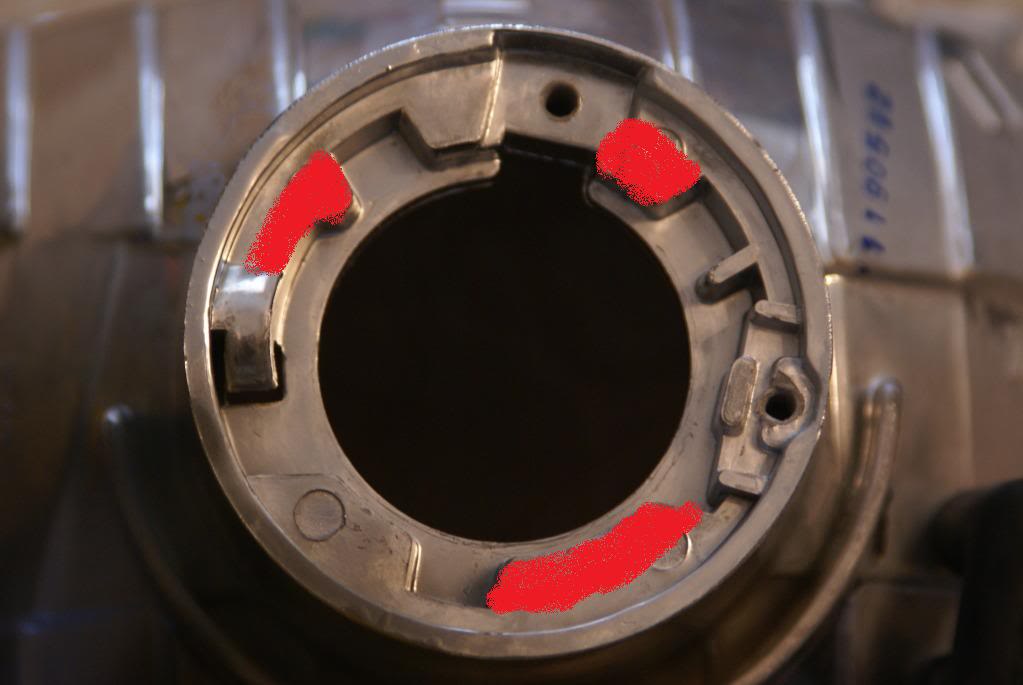
Here are the cuts made in red.
Next make a slit in the housing to run the bixenon solenoid wire through as seen in the picture.
Now for the inside. Sand up into the housing, this is so the projector can be angle up to fit the shroud. You should end up with it looking like this.
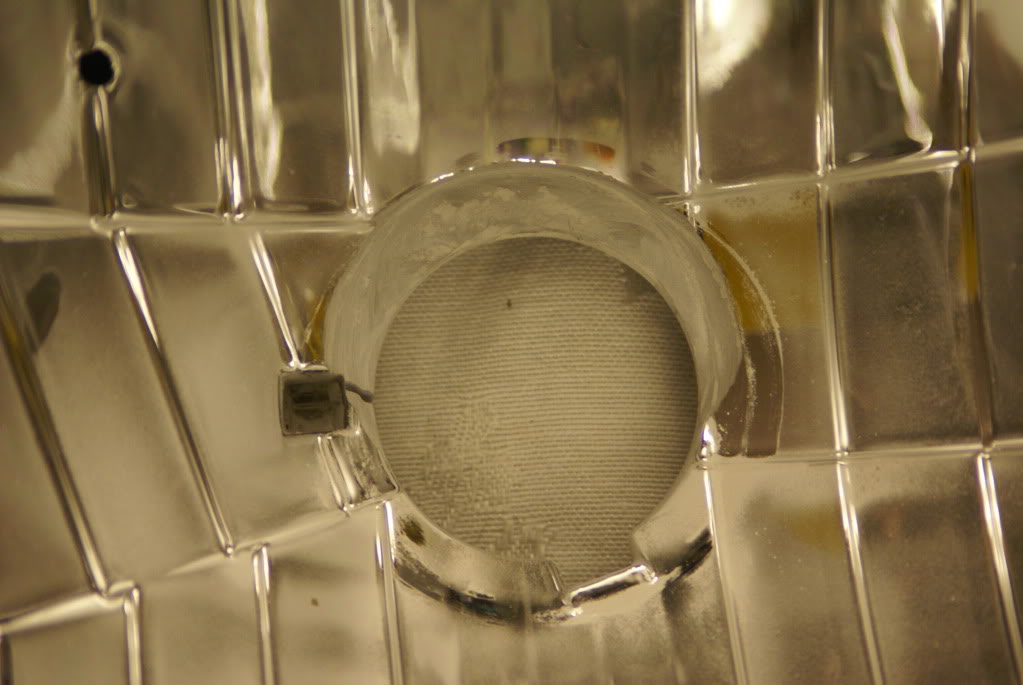
Step 3. Bolt in projector
Insert projector from the front side, place bracket on the back of the projector then screw the nut on. Pretty self explainatory.
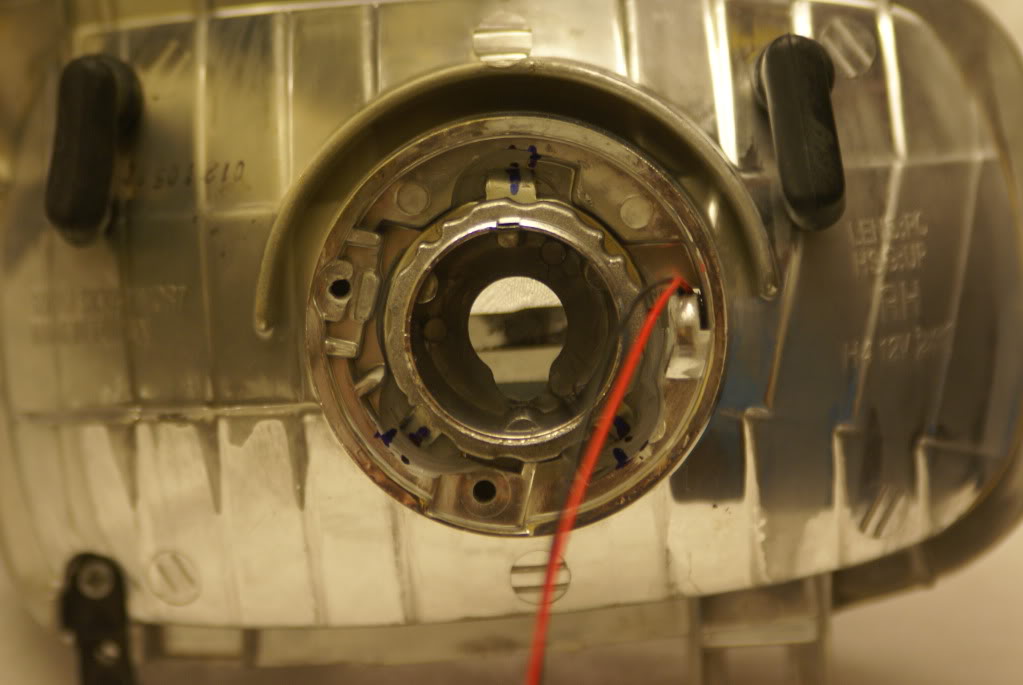
Step 4. Adjusting rotational cutoff.
After everything is all bolted up you have to run your relay harnes and mount your ballast to your car. When your finished mount your lights to your car plug your bulbs in and turn on your HID's. You will notice your cutoff isn't horizontal. To fix this you have have to twist the projector until you get your cutoff adjusted.
Next make reference marks as i did in the above photo just in case they move out of adjustment.
Step 5. Mount your shrouds
This step is pretty simple. First mount your shroud to test fit it you may have to sand the inside edge a little bit for it to fit. You might have to move the projector up/down to fit it into the middle of the shroud, the projector has a some wiggle room since there is a rubber washer on the back of it.
When everything looks fine remove shroud and apply epoxy between the shroud and projector and push it on. I would let it dry over night after completing this step. This is what you should have so far.
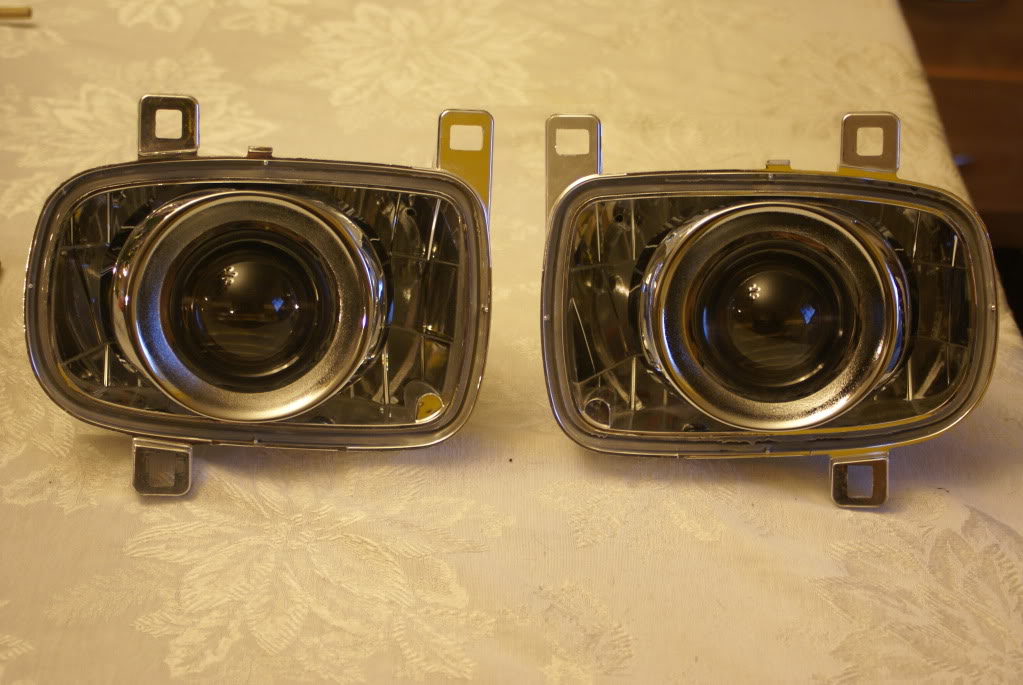
Step 6. Replacing lens
Now your project is almost complete. Simply follow the same steps as removing the lens. First place lens on the housing and gently push on it so it stays. Preheat oven to 200 then place your headlight in it but make sure you take out your bulbs before you do. After about ten minutes take out your lights and push on the lens firmly until it is fully seated into the housing. You can now put on the clips and screws back on.
CONGRATS! YOU ARE NOW FINISHED!

I am not responsible for messing up your car/lights or anything related to this modification.
philips/flat screwdriver
oven
dremel with sanding drums and cutoff wheel
Materials:
stock/aftermarket housing (polished lenses if using stock)
morimoto d2s projector
d2s bulbs (oem or morimoto)
ballast
e55 shrouds
projector/bulbs/ballast/shrouds can be purchased at theretrofitsource.com
Step1. Removing lens
Preheat your oven to 200f, then take a baking sheet cover it with foil and place your headlight housing on it and place it in the oven. Set you timer for 10 minutes and watch your housing carefully. DO NOT WALK AWAY, since every oven is different it may take a longer/shorter time to remove the lens.
Take the headlight out and stick a small flat head screwdriver between the lens and housing and twist slowly. Do this all the way around until you can get your fingers behind the lens and Slowly pull it off. IF the glue starts to harden again simply put it in the oven for a few minutes and try again.
You should end up having something like this.

Step 2. Modify housing
This is where you break out the dremel. you have the housing looking like this at first.

You want to cut and sand until it looks like this.

Here are the cuts made in red.

Next make a slit in the housing to run the bixenon solenoid wire through as seen in the picture.
Now for the inside. Sand up into the housing, this is so the projector can be angle up to fit the shroud. You should end up with it looking like this.

Step 3. Bolt in projector
Insert projector from the front side, place bracket on the back of the projector then screw the nut on. Pretty self explainatory.

Step 4. Adjusting rotational cutoff.
After everything is all bolted up you have to run your relay harnes and mount your ballast to your car. When your finished mount your lights to your car plug your bulbs in and turn on your HID's. You will notice your cutoff isn't horizontal. To fix this you have have to twist the projector until you get your cutoff adjusted.
Next make reference marks as i did in the above photo just in case they move out of adjustment.
Step 5. Mount your shrouds
This step is pretty simple. First mount your shroud to test fit it you may have to sand the inside edge a little bit for it to fit. You might have to move the projector up/down to fit it into the middle of the shroud, the projector has a some wiggle room since there is a rubber washer on the back of it.
When everything looks fine remove shroud and apply epoxy between the shroud and projector and push it on. I would let it dry over night after completing this step. This is what you should have so far.

Step 6. Replacing lens
Now your project is almost complete. Simply follow the same steps as removing the lens. First place lens on the housing and gently push on it so it stays. Preheat oven to 200 then place your headlight in it but make sure you take out your bulbs before you do. After about ten minutes take out your lights and push on the lens firmly until it is fully seated into the housing. You can now put on the clips and screws back on.
CONGRATS! YOU ARE NOW FINISHED!

I am not responsible for messing up your car/lights or anything related to this modification.
#6
¿¿What are pistons??
iTrader: (7)
Join Date: May 2003
Location: Queens NYC
Posts: 1,261
Likes: 0
Received 0 Likes
on
0 Posts
Those are for pairs. All the parts come out to less than $300 before the discount for buying multiple items, that's not bad at all. Great writeup OP, I think I may do this very soon. My cheap plug and play HIDs arent cutting it after seeing real projector HID setups lately.
Trending Topics
#8
Senior Member
iTrader: (10)
Join Date: Aug 2005
Location: Hudson WI
Posts: 415
Likes: 0
Received 0 Likes
on
0 Posts
Can you just buy this kit?
http://www.theretrofitsource.com/pro...09227529838d1c
But obviously change the shrouds... and do we have H11 with high beam tap?
http://www.theretrofitsource.com/pro...09227529838d1c
But obviously change the shrouds... and do we have H11 with high beam tap?
#9
Can you just buy this kit?
http://www.theretrofitsource.com/pro...09227529838d1c
But obviously change the shrouds... and do we have H11 with high beam tap?
http://www.theretrofitsource.com/pro...09227529838d1c
But obviously change the shrouds... and do we have H11 with high beam tap?
#13
I just did a quick google search and found these http://www.streetbeatcustoms.com/4-C...X7C_YD/774895/
call them first to make sure they have it in stock.
call them first to make sure they have it in stock.
#14
Senior Member
iTrader: (10)
Join Date: Aug 2005
Location: Hudson WI
Posts: 415
Likes: 0
Received 0 Likes
on
0 Posts
I just did a quick google search and found these http://www.streetbeatcustoms.com/4-C...X7C_YD/774895/
call them first to make sure they have it in stock.
call them first to make sure they have it in stock.
#15
Those are for pairs. All the parts come out to less than $300 before the discount for buying multiple items, that's not bad at all. Great writeup OP, I think I may do this very soon. My cheap plug and play HIDs arent cutting it after seeing real projector HID setups lately.
#21


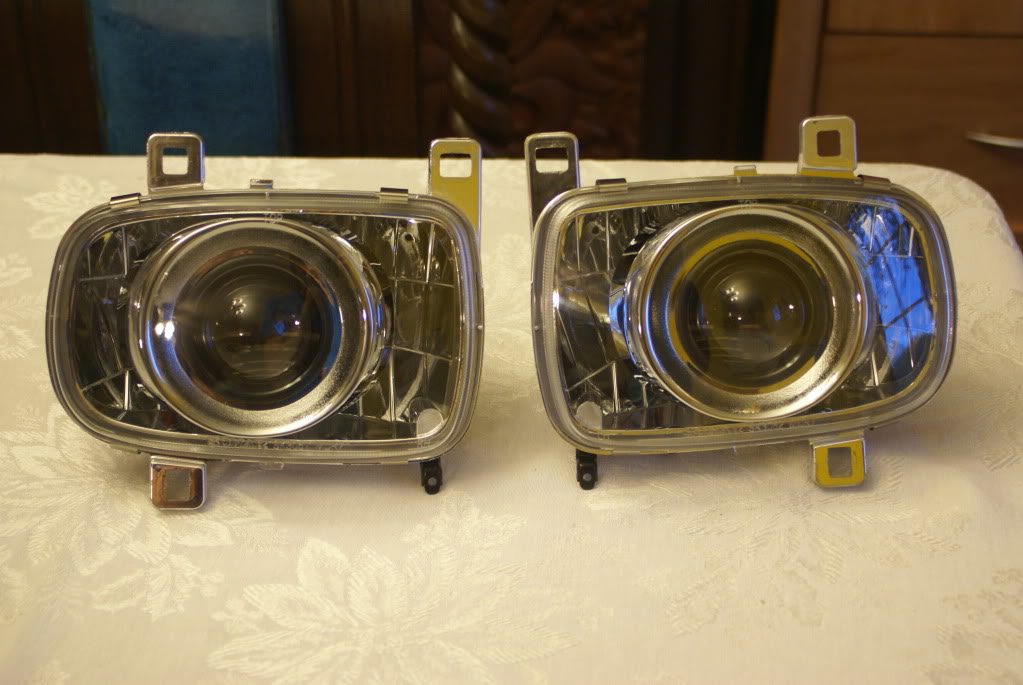
 We use a different projector that requires much more work to fit properly. Nice write up!