
E Production Rx-7 Build

Thread Starter
Fabrineer
Joined: Oct 2002
Posts: 976
Likes: 1
From: Charlotte, NC
Looks like one of those security laser mock-ups!
If I may make a suggestion, run all the tubes in the rear to the actual shock mount tower. All the load is coming into the car from the springs inside those towers. Going anywhere but there and you lose the performance advantage you might gain from all the required safety weight.
I just wrapped a plate around the whole tower so I could put a bunch of tubes to the same spot.
Be sure to keep your plates under 100 sq in., 10" max in any one dimension.
I could alternitavely go to the shock tower and build an elaborate brace to the frame rail for rollover protection.
I think the largest it can be is up to 144 in^2 (i could be mistaken)... I'm well below that. Does this count for multi-plane plates such as mine?
I had to go look at the rules, 144sq.in. is correct. 15" max in any dimension. They figure the dimensions if you lay the plate flat, not contact with the car.
The rules used to read 100 sq. in. maximum, 2" minimum in any dimension. The rule was re- written after I called Jim Litehauser for a clarification about 8 years ago. The rules consider the plate as the point and any number of tubes could go to it. I said,"So theoretically I could have a two by fifty inch plate in an IT car?" I was going to run the plates up the sides of the car to attach the cage to more of the chassis. His answer was, "Well, you could do that this year..." I could here him making notes. The next GCR had the 10" limit that we had for so long.
The rules used to read 100 sq. in. maximum, 2" minimum in any dimension. The rule was re- written after I called Jim Litehauser for a clarification about 8 years ago. The rules consider the plate as the point and any number of tubes could go to it. I said,"So theoretically I could have a two by fifty inch plate in an IT car?" I was going to run the plates up the sides of the car to attach the cage to more of the chassis. His answer was, "Well, you could do that this year..." I could here him making notes. The next GCR had the 10" limit that we had for so long.
Thread Starter
Fabrineer
Joined: Oct 2002
Posts: 976
Likes: 1
From: Charlotte, NC
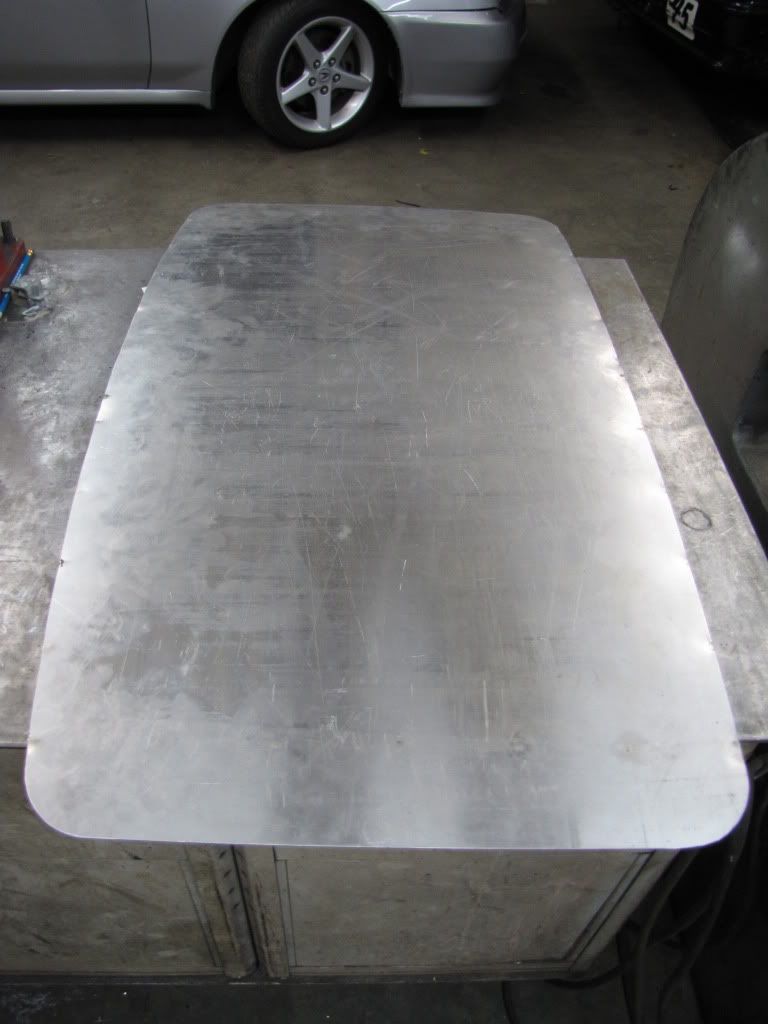
Sunroof and More Lightening
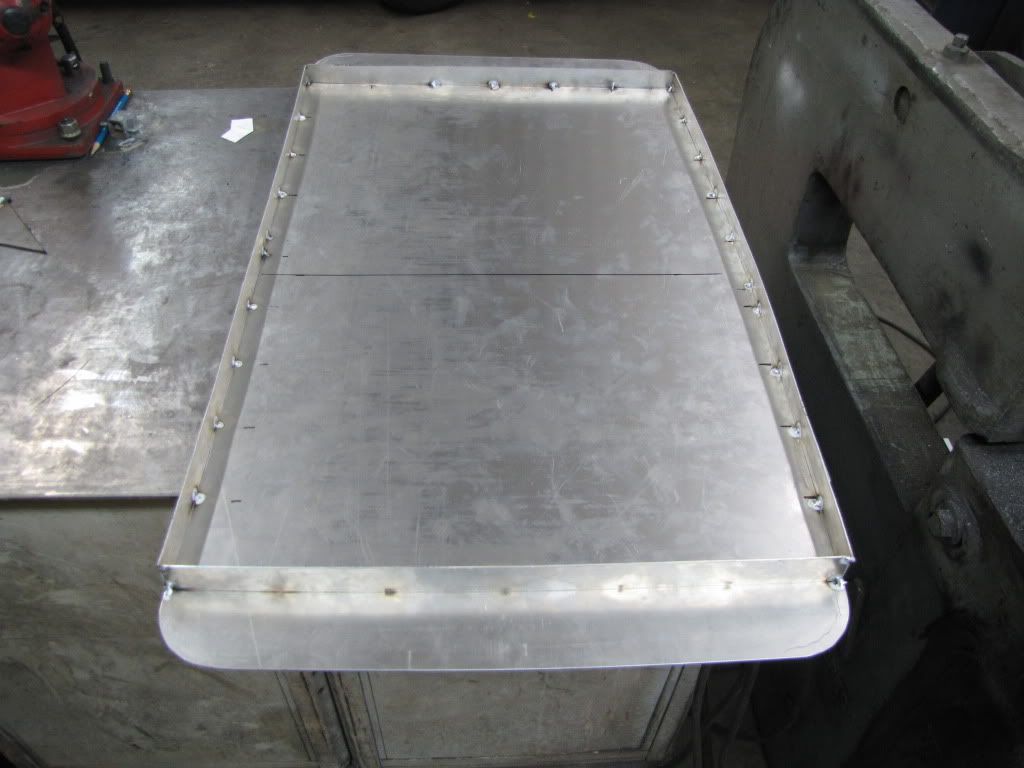
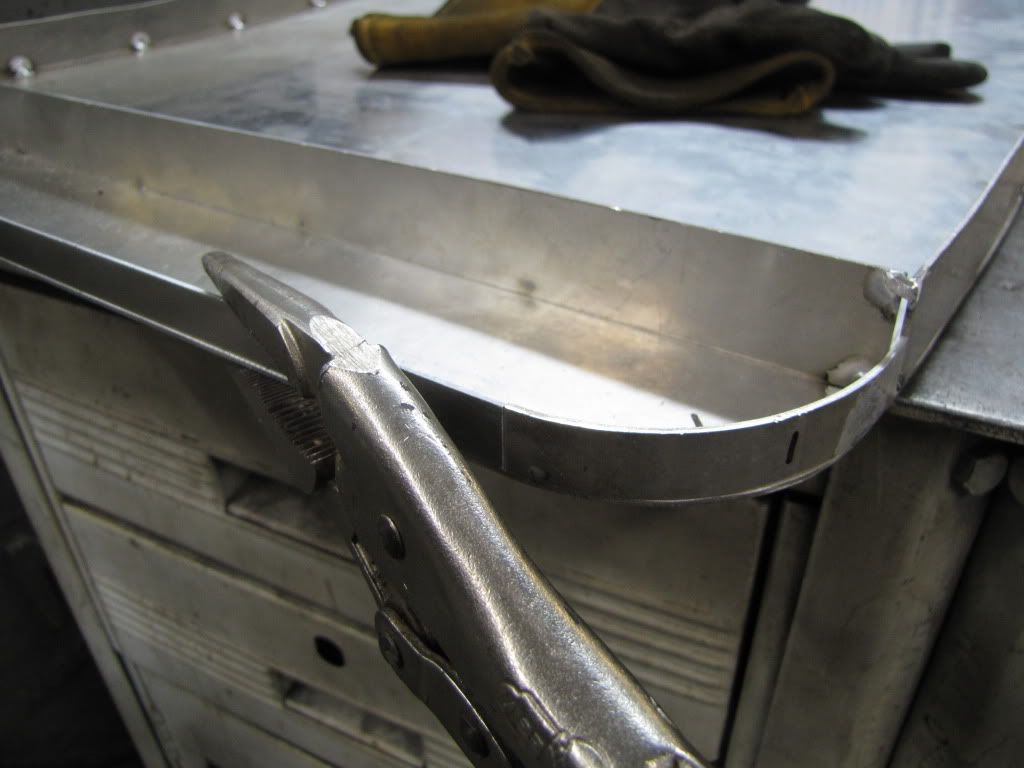
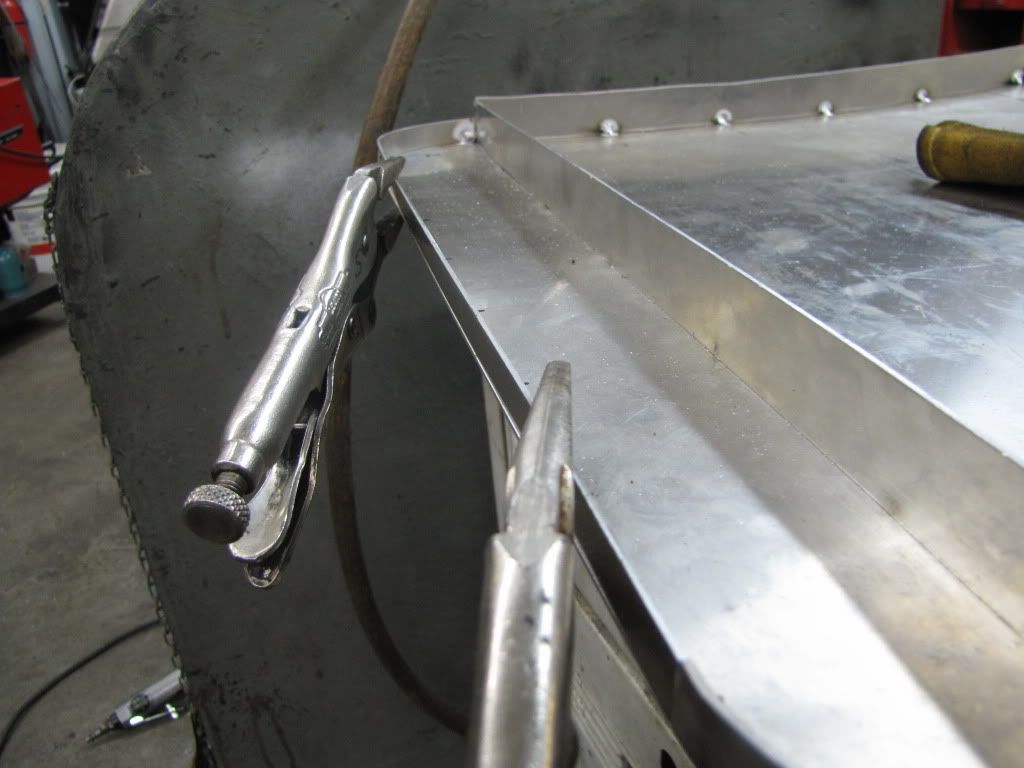
Welding 0.063" Aluminum sheet is such a bitch. Tube is nowhere near as hard to weld as this stuff, as you have to watch for warpage. And when its a visible body panel, too much penetration looks horrible. I've never built a body panel before, so keep that in mind as you look at the pictures:
I had to chop out my seat mounts. The dental floss is a great tool (thanks to Crue Blakeley for the idea) to check head clearance and get a visual idea of what the cage will look like. Turns out, I would have hit my head on the X-brace. I also was going to hit my head on the A-pillar bar. So I cut the seat mounts out. I will mount my seat directly to the floor and reinforce it from the outside of the floor panel.
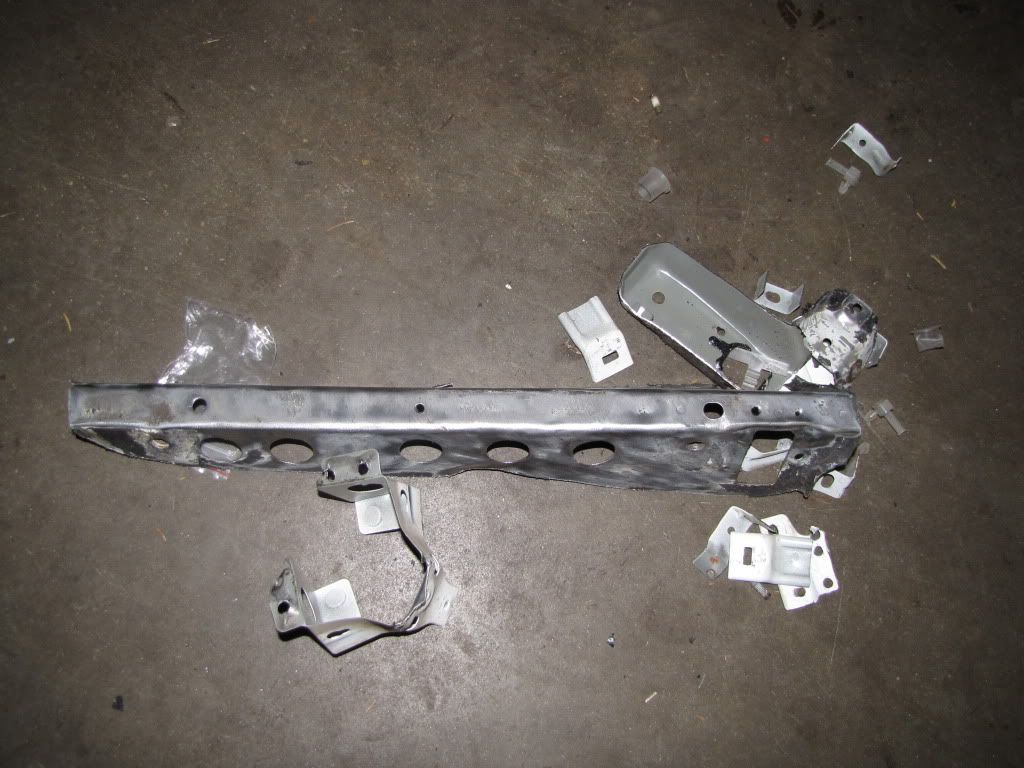
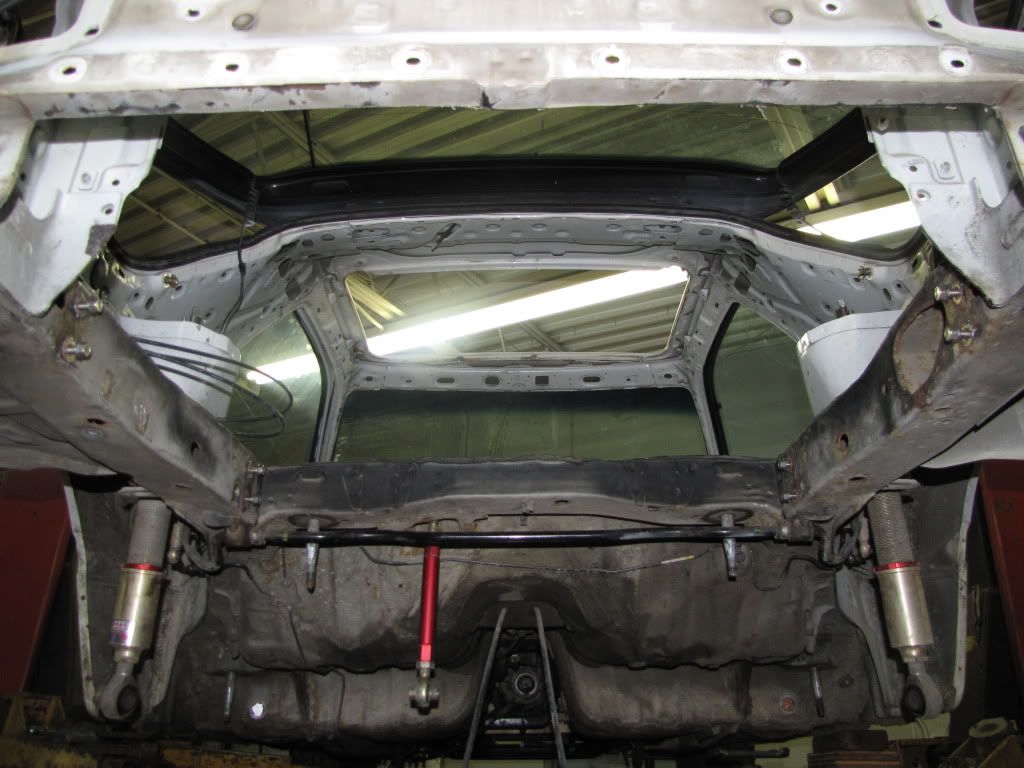
Here are some more pictures of the rear's cut out for the fuel cell and lightening of the vehicle.
I started making the sunroof. I am almost done. I have a few more hours to put into this thing to make the brackets and mount it to the car. I will most likely make it not easy to remove, as I don't see a need to remove it once its in. It will be bolted in, and the gap will be filled with Windo-Weld (3M's polyeurethane window sealer). If I ever need to take it out for any reason, I can just cut the sealer out with piano wire or a razor blade, then unbolt it. I contemplated using either half-round or square extruded rubber that is glued to the sunroof panel and butts up to the car, but I am unsure as to how well that will seal and how good the fitment will be.
I may still buy a strip of that rubber extrusion from mcmaster and play with it to see if it works. It would be nice not to have to cut sealant out every time i need the sunroof out. However, a few people I know with race cars just permenantly seal them in place and never have problems.
I had to use this nifty machine:
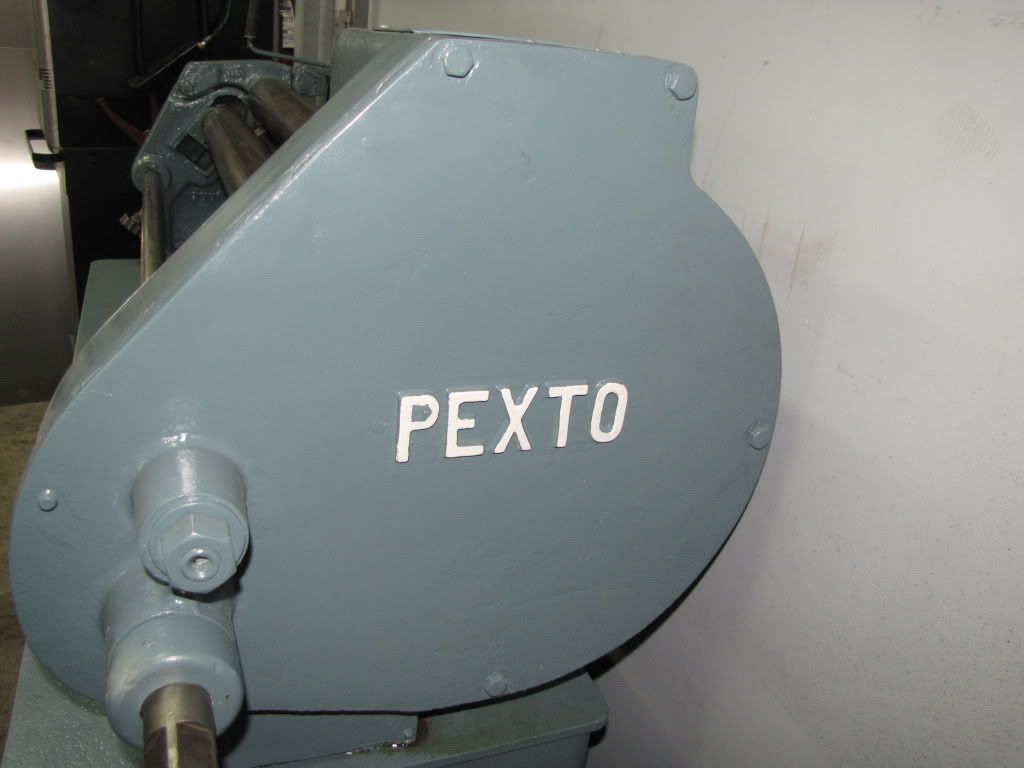
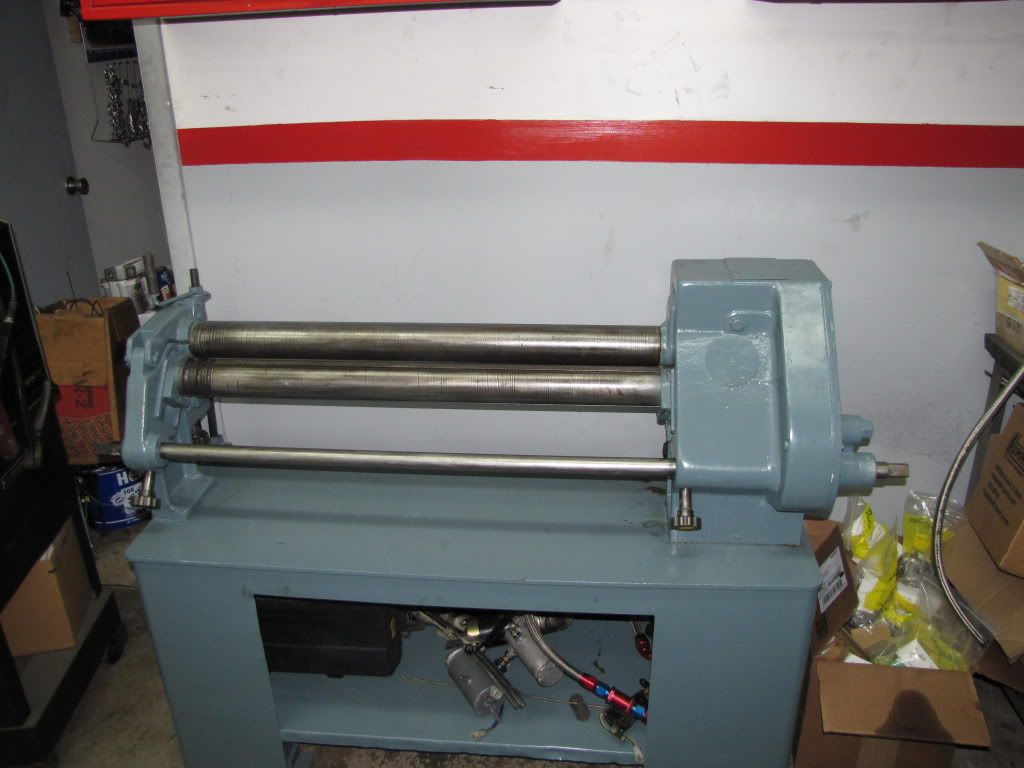
to do this:
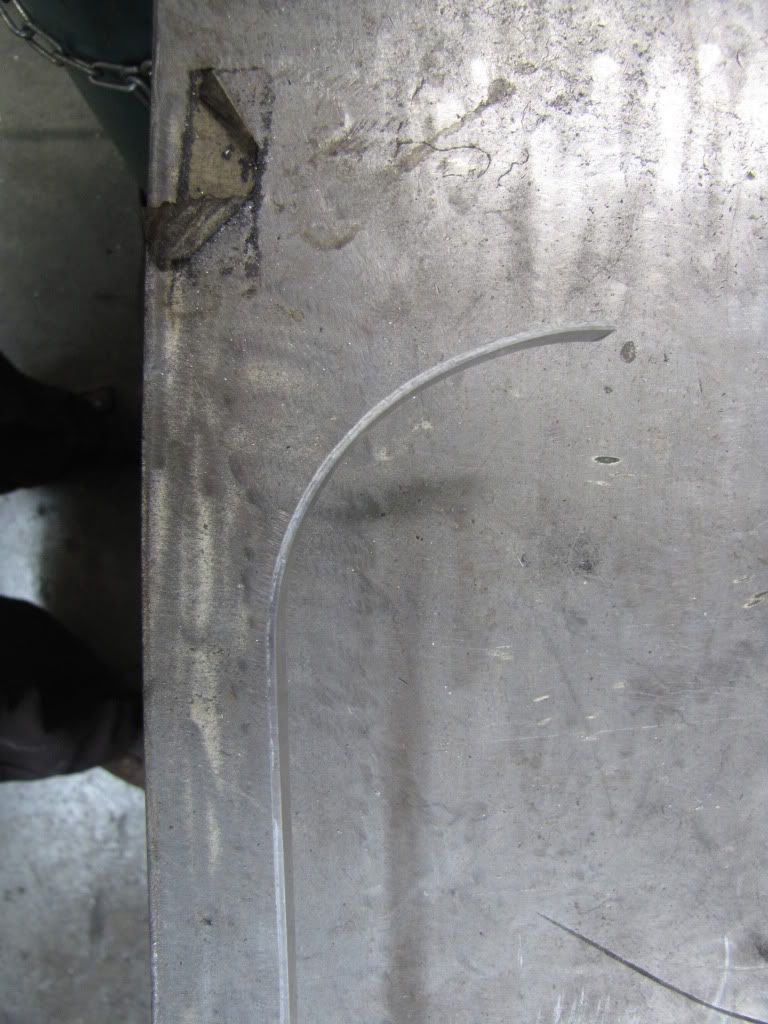
Ribbing for strength
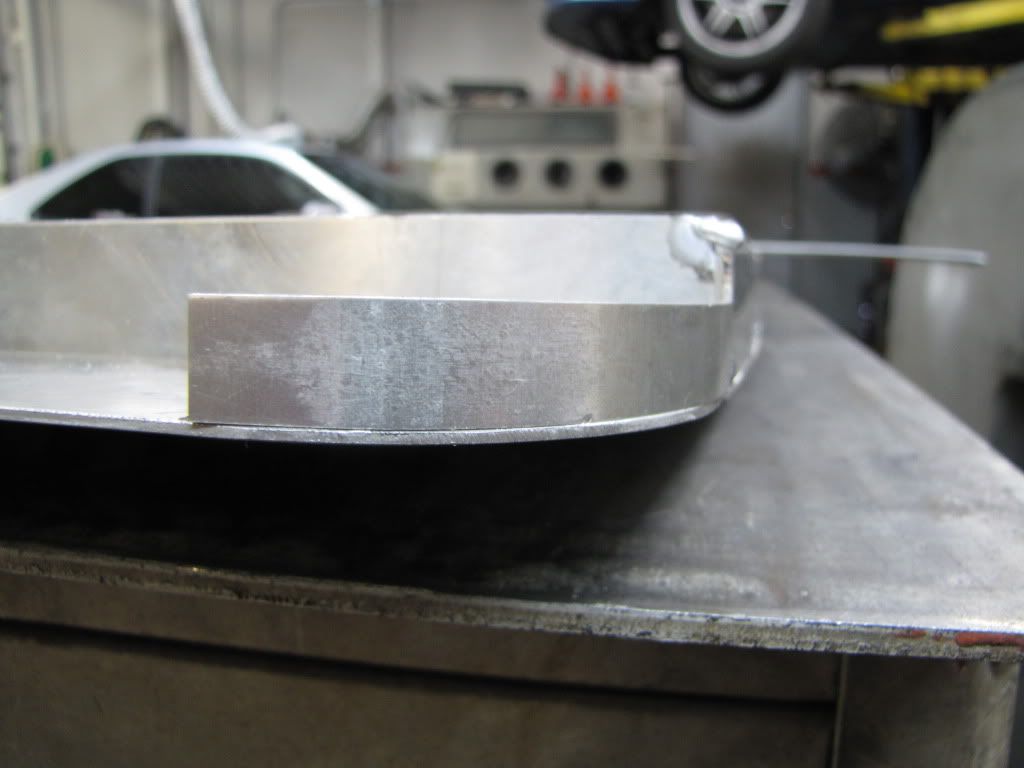
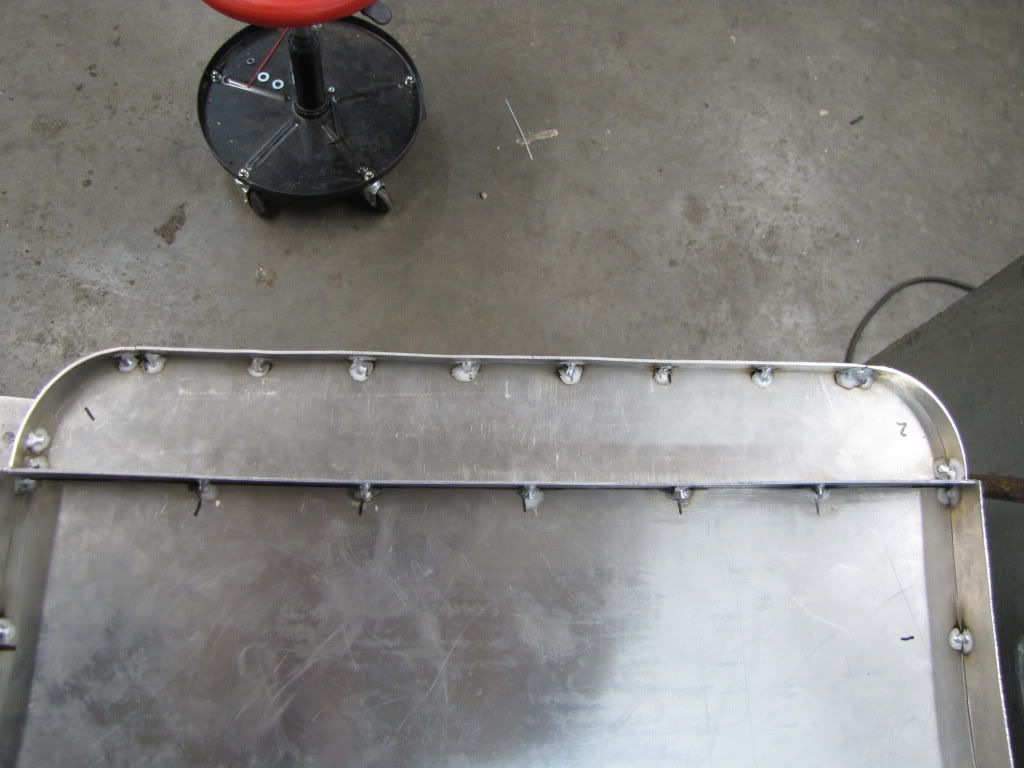
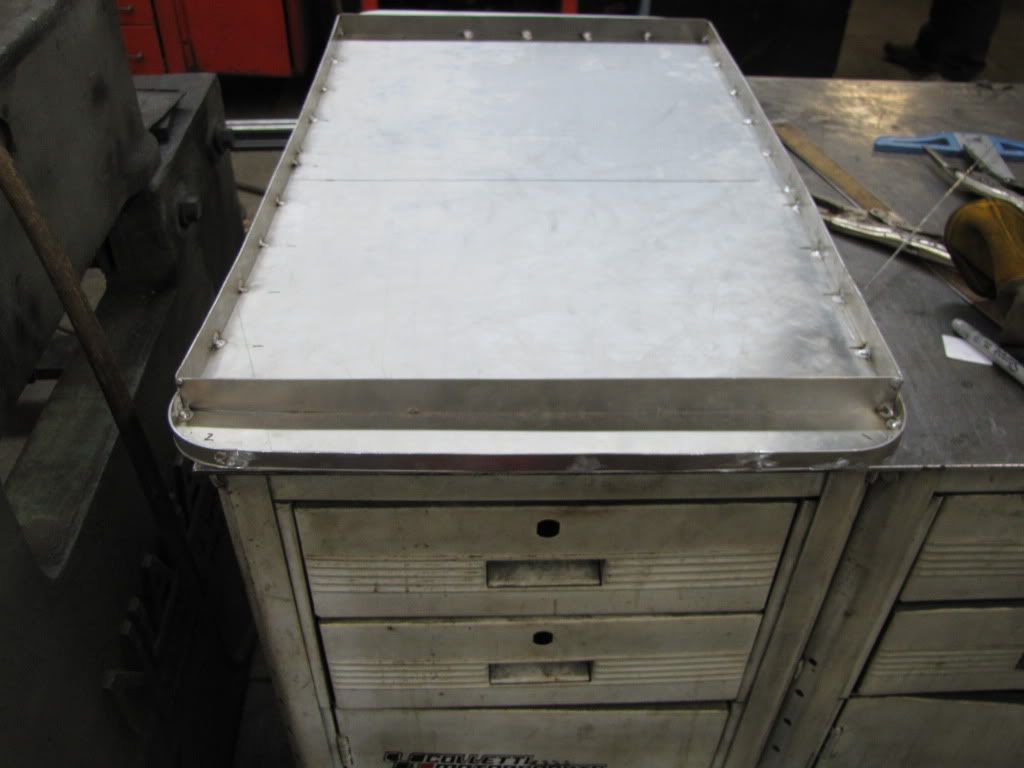
The sunroof is almost finished, it just needs a center rib so it doesnt vibrate in the wind at 130+ mph.
I weighed the factory sunroof panel (basically just the steel part that I ripped out from the frame and slider) at 12 lbs. This aluminum one is about 4 lbs, and its not rusting. I saved about 8 lbs at the highest point in the car.
Then I'll add a bunch of weight back with the cage :P
That slip roll will come in handy when I do my inner fender liners, my intake, and my heat shielding.
I had to chop out my seat mounts. The dental floss is a great tool (thanks to Crue Blakeley for the idea) to check head clearance and get a visual idea of what the cage will look like. Turns out, I would have hit my head on the X-brace. I also was going to hit my head on the A-pillar bar. So I cut the seat mounts out. I will mount my seat directly to the floor and reinforce it from the outside of the floor panel.
Here are some more pictures of the rear's cut out for the fuel cell and lightening of the vehicle.
I started making the sunroof. I am almost done. I have a few more hours to put into this thing to make the brackets and mount it to the car. I will most likely make it not easy to remove, as I don't see a need to remove it once its in. It will be bolted in, and the gap will be filled with Windo-Weld (3M's polyeurethane window sealer). If I ever need to take it out for any reason, I can just cut the sealer out with piano wire or a razor blade, then unbolt it. I contemplated using either half-round or square extruded rubber that is glued to the sunroof panel and butts up to the car, but I am unsure as to how well that will seal and how good the fitment will be.
I may still buy a strip of that rubber extrusion from mcmaster and play with it to see if it works. It would be nice not to have to cut sealant out every time i need the sunroof out. However, a few people I know with race cars just permenantly seal them in place and never have problems.
I had to use this nifty machine:
to do this:
Ribbing for strength
The sunroof is almost finished, it just needs a center rib so it doesnt vibrate in the wind at 130+ mph.
I weighed the factory sunroof panel (basically just the steel part that I ripped out from the frame and slider) at 12 lbs. This aluminum one is about 4 lbs, and its not rusting. I saved about 8 lbs at the highest point in the car.
Then I'll add a bunch of weight back with the cage :P
That slip roll will come in handy when I do my inner fender liners, my intake, and my heat shielding.
Thread Starter
Fabrineer
Joined: Oct 2002
Posts: 976
Likes: 1
From: Charlotte, NC
Bent bars are stronger than straight bars; s-bent bars aren't quite as strong as single bent bars. Those are going away in favor of single bent bars. Bent bars have the advantage of getting the bars away from the driver by putting them into the door panel allowing for more deflection before they touch the driver. Another advantage is a higher strength by shortening the length in which the tube is straight and perpendicular to a side impact load (in an impact, the middle of the door bar will experience mostly bending - which is the weakest form of resistance to loading on a tube), thereby stiffening the bar in a side impact scenario.
You're just building this car so you can use all the cool toys! I was about to order a set of wheels to make an English wheel but the best company to buy from up in Indiana stopped making them.
One thing you can do to pick up more head room above the door window is to slice the inner roof support front to back and hammer it in toward the roof skin. I started doing it on FB's a long time ago and you can pick up about an inch. Don't be afraid to tilt your seat in at the top a little as well. Once you're buckled in you'll never notice.
One thing you can do to pick up more head room above the door window is to slice the inner roof support front to back and hammer it in toward the roof skin. I started doing it on FB's a long time ago and you can pick up about an inch. Don't be afraid to tilt your seat in at the top a little as well. Once you're buckled in you'll never notice.
Thread Starter
Fabrineer
Joined: Oct 2002
Posts: 976
Likes: 1
From: Charlotte, NC
You're just building this car so you can use all the cool toys! I was about to order a set of wheels to make an English wheel but the best company to buy from up in Indiana stopped making them.
One thing you can do to pick up more head room above the door window is to slice the inner roof support front to back and hammer it in toward the roof skin. I started doing it on FB's a long time ago and you can pick up about an inch. Don't be afraid to tilt your seat in at the top a little as well. Once you're buckled in you'll never notice.
One thing you can do to pick up more head room above the door window is to slice the inner roof support front to back and hammer it in toward the roof skin. I started doing it on FB's a long time ago and you can pick up about an inch. Don't be afraid to tilt your seat in at the top a little as well. Once you're buckled in you'll never notice.
I'll see where the seat mounts and then I'll go from there, but that's some good advice. I may have to do that, being 6'.
What wheels are you running? Cost?
Diamond Racing with the "D" window, buy them raw and paint them myself, about $85 IIRC. Zero offset puts you right at the track limit in the rules, well within a 1/4" of it. In the front you need a spacer to clear the caliper so I made some 1/2 spacers and get 4" backspace for the fronts.
I just got all the stuff to powdercoat so the next stuff that crosses my path will be thrown in the oven.
I just got all the stuff to powdercoat so the next stuff that crosses my path will be thrown in the oven.
Rotary Apprentice
Joined: Jan 2005
Posts: 2,181
Likes: 0
From: USA
Thread Starter
Fabrineer
Joined: Oct 2002
Posts: 976
Likes: 1
From: Charlotte, NC
I can't add any more adjustability into the arm, as far as i can interperet.

Senior Member
Joined: Jan 2002
Posts: 313
Likes: 0
From: kc
Just found your thread, looks like fun. I race an EP RX8, by my interpretation you can build control arms with adjustable links as long as your pivot/pick up points remain the same. This is for level 2 prep. Level 1 I think you can do whatever you want, but your car will be level 2.
Watch the weight on that thing, you don't want to finish up and have to rework anything to get it down. The RX8 has been a difficult car to get to weight (2450), the final 50 lbs are coming off 1 at a time. 2358 with alt synchro gear box, I am sure you can do it but pay attention so you don't have trouble. You will weigh more than you think with your gear, coolshirt, firebottle, it all adds up fast.
As far as tranny goes, look at the miata box. Many 1st gen rx7 EP race cars around here use them and I have only seen one break in my first few years racing. The rest seem to use jerico 4spd dogbox setup but it kills the budget.
Rotary Apprentice
Joined: Jan 2005
Posts: 2,181
Likes: 0
From: USA
ohhhhhhhhhhhh the rears. gotcha. please continue with more updates on the double.
Thread Starter
Fabrineer
Joined: Oct 2002
Posts: 976
Likes: 1
From: Charlotte, NC
Just found your thread, looks like fun. I race an EP RX8, by my interpretation you can build control arms with adjustable links as long as your pivot/pick up points remain the same. This is for level 2 prep. Level 1 I think you can do whatever you want, but your car will be level 2.
Watch the weight on that thing, you don't want to finish up and have to rework anything to get it down. The RX8 has been a difficult car to get to weight (2450), the final 50 lbs are coming off 1 at a time. 2358 with alt synchro gear box, I am sure you can do it but pay attention so you don't have trouble. You will weigh more than you think with your gear, coolshirt, firebottle, it all adds up fast.
As far as tranny goes, look at the miata box. Many 1st gen rx7 EP race cars around here use them and I have only seen one break in my first few years racing. The rest seem to use jerico 4spd dogbox setup but it kills the budget.
Watch the weight on that thing, you don't want to finish up and have to rework anything to get it down. The RX8 has been a difficult car to get to weight (2450), the final 50 lbs are coming off 1 at a time. 2358 with alt synchro gear box, I am sure you can do it but pay attention so you don't have trouble. You will weigh more than you think with your gear, coolshirt, firebottle, it all adds up fast.
As far as tranny goes, look at the miata box. Many 1st gen rx7 EP race cars around here use them and I have only seen one break in my first few years racing. The rest seem to use jerico 4spd dogbox setup but it kills the budget.
I will look at designing some front arms as well, the added adjustability can be an advantage, but this will occur later in the build process. I already own JIC coilovers, so if I chose to sell those, I will redesign the arms (and possibly knuckles) to be able to use remote resevoir shocks, which are legal.
LOL.
I will be getting the original control arms from the CMM (coordinate measuring machine) guy tomorrow, I should have a preliminary design by the end of the week. The final design will take a few weeks. I will need to CAD, FEA, and do a simple fatigue analaysis, then iterate those steps until weight is preserved while life of the part is not greatly sacrificed.

Rotary Apprentice
Joined: Jan 2005
Posts: 2,181
Likes: 0
From: USA
DAMN!!!!!!!!
technically I didn't forget, I remember exactly what the fronts look like!! and what they're made out of!! I could draw one from memory with my left hand and my eyes closed!! which is why i thought to myself:
"self, what he gonna do to them? they already pretty tight....!!"
The thought of messing with the rears never crossed my mind. It's not a piece people usually talk about/mess with.
so, in conclusion. GFY. and please, continue with the updates.


Thread Starter
Fabrineer
Joined: Oct 2002
Posts: 976
Likes: 1
From: Charlotte, NC
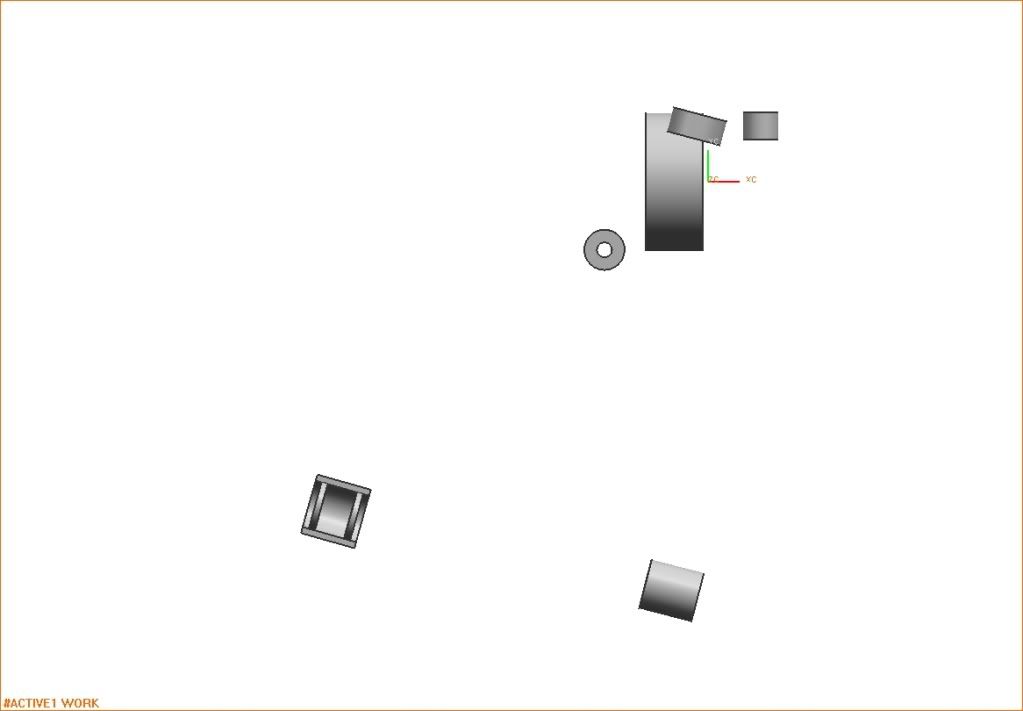
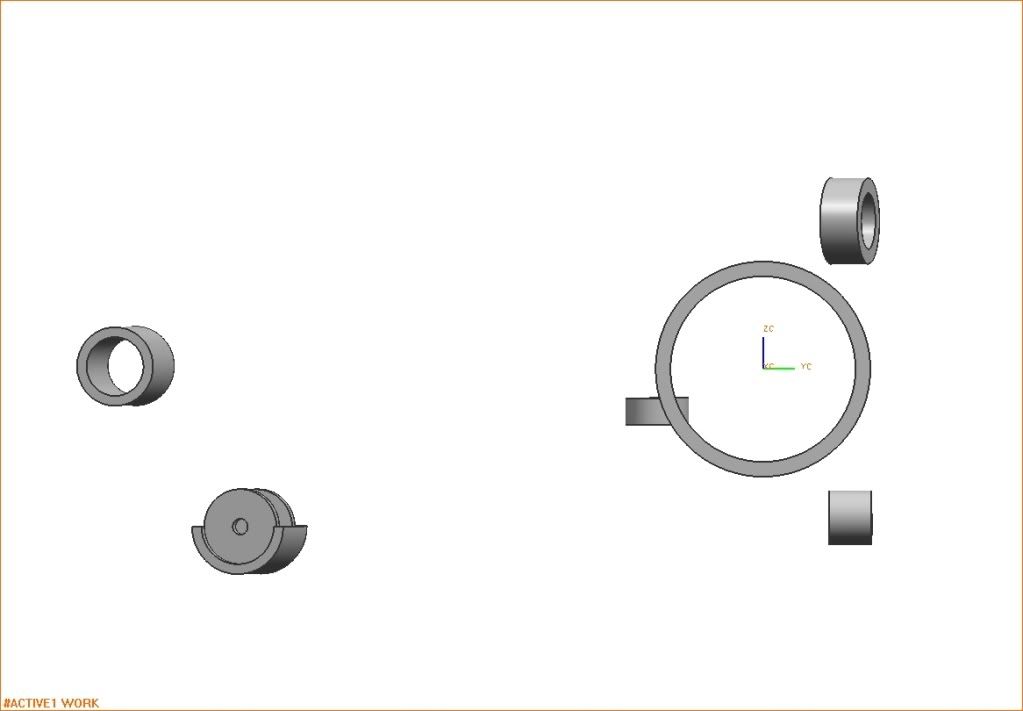
Rear Control Arm
Here is just some preliminary CAD pictures. I sent the control arm to a local company for reverse engineering using a CMM. I took the file and built this in CAD. This gave me a way to visualize how I will "connect the dots" structurally.
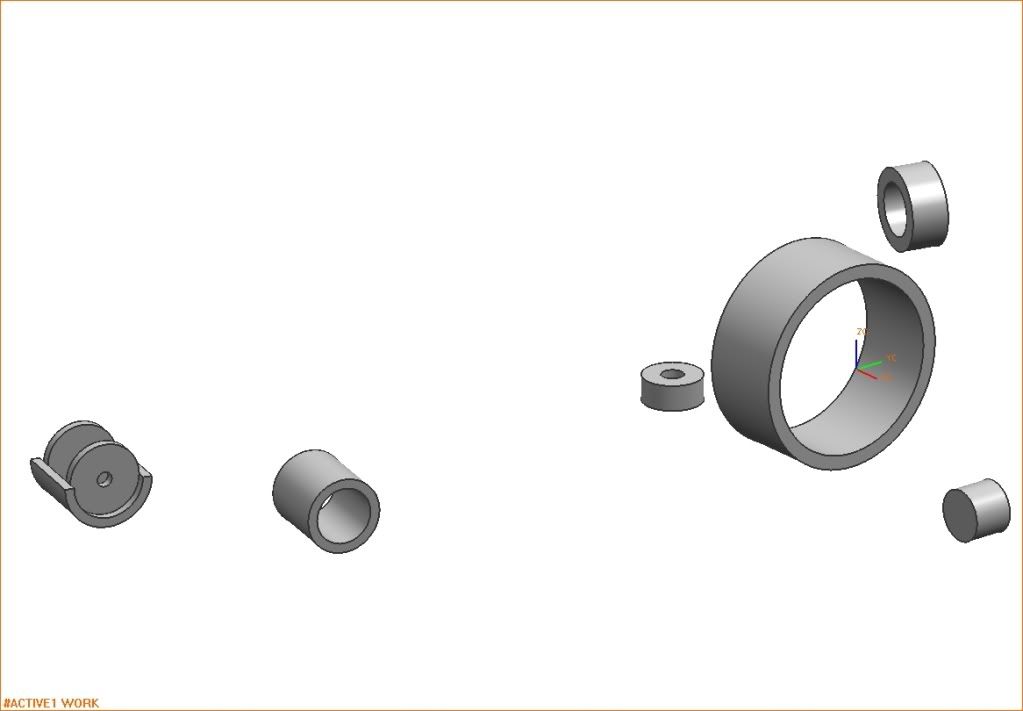
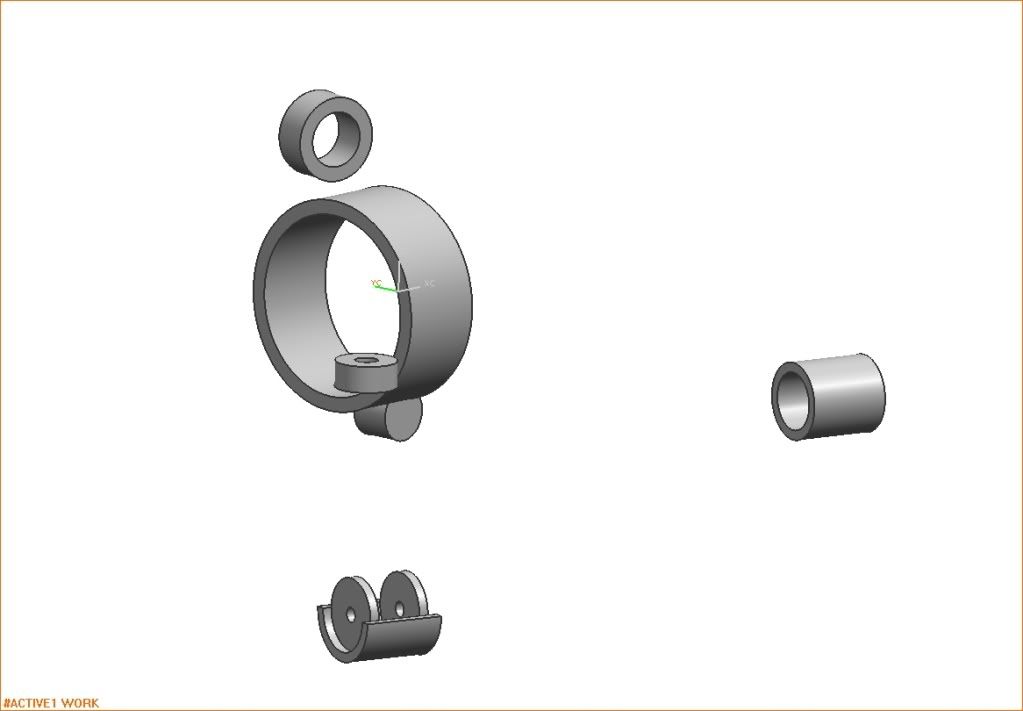
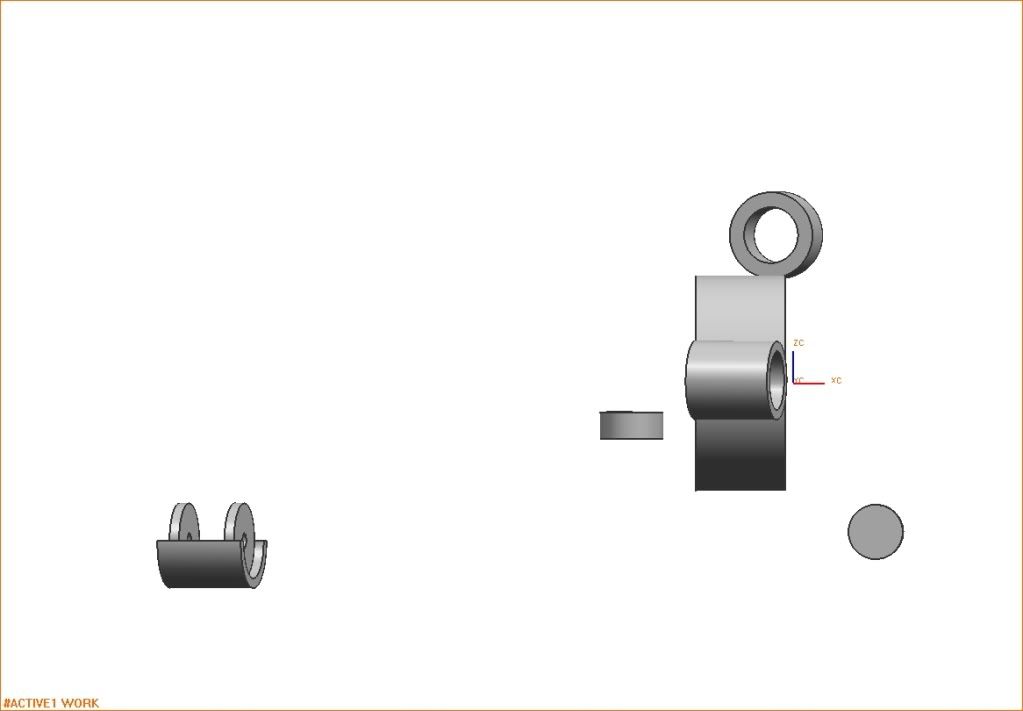
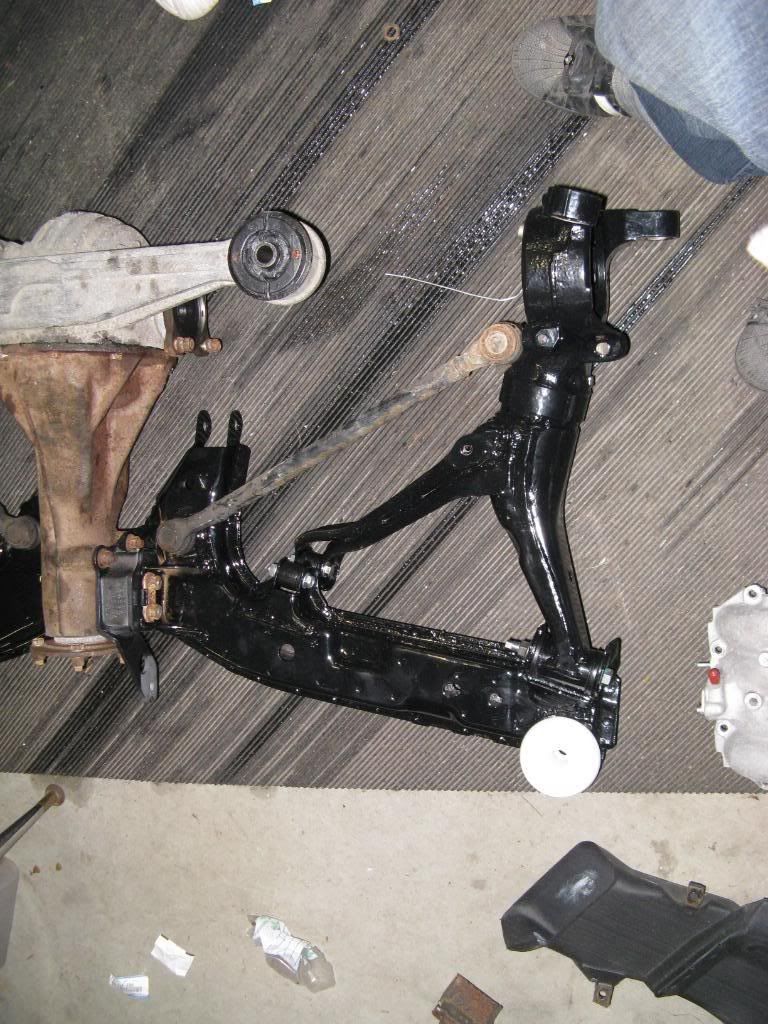
Thanks to NATEFRAME for that real picture, that's his nicely powder coated suspension
Thanks to NATEFRAME for that real picture, that's his nicely powder coated suspension
Old [Sch|F]ool


Joined: May 2001
Posts: 12,876
Likes: 575
From: Cleveland, Ohio, USA
Bent bars are stronger than straight bars; s-bent bars aren't quite as strong as single bent bars. Those are going away in favor of single bent bars. Bent bars have the advantage of getting the bars away from the driver by putting them into the door panel allowing for more deflection before they touch the driver. Another advantage is a higher strength by shortening the length in which the tube is straight and perpendicular to a side impact load (in an impact, the middle of the door bar will experience mostly bending - which is the weakest form of resistance to loading on a tube), thereby stiffening the bar in a side impact scenario.
A bent tube will deform first, and by the time it starts loading the cage, it may have twisted around so much that it's tearing away from the cage. Certainly the tube is now part of the driver.
I understand the problem with driver room, but it's still a bad idea.

Urban Explorer
Joined: May 2009
Posts: 86
Likes: 0
From: dexter mi
I am under the impression that the door bar is there for only one purpose, to protect the driver from a side impact. It seems that the door bar would provide zero protection in the advent of a roll over, however freak accidents have and will happan again.
Analyzing from the side impact point of view...
Imagine the straight bar, it will essentally be put into a case of pure bending, which creates very high stress within the material, not to mention being bend directly into the driver, which could trap and driver depending on the amount of deflection, you want the jaws of life to be able to get you out as soon as possible.
Take the trapezoidal door bar, its geometric design effectivly shortens the amount of straight bar in the middle( between the two angled portions ) which will inturn significantally reduce the stress due to bending. Alot more of that impact force can be absorbed in compression by the two angled bars, which if properly attached to the rest of the cage should protect the driver and channel the impact forces around him, instead of into or completly thru him.
The simplest analogy I can think of is hanging or doing pull up's from a tree, notice how the long straight branchs bend the most, but the shorter angled ones dont. Wood is an extreme example in this case becasue its a very anisotropic material, but the general idea is still the same.
SHM is correct about keeping the driver to steel bar distance as high as possible, just think about it.