Tornado Silver Time - Now with 100% more REPU and 20b

 07-11-13, 10:56 PM
#252
Thanks!
The list is finally shrinking...I stabbed the CAS (hope I did it right...), Wired the fan electric fan relay to the megasquirt (need to put a fuse in there somewhere...), made up a new turbo oil drain, and clamped down the coolant hoses.
I think it turned out pretty well!
The list is finally shrinking...I stabbed the CAS (hope I did it right...), Wired the fan electric fan relay to the megasquirt (need to put a fuse in there somewhere...), made up a new turbo oil drain, and clamped down the coolant hoses.
I think it turned out pretty well!
 07-15-13, 09:22 AM
#254
I appreciate the kind words!
This weekend's task was installing a FMIC on a speed3. took roughly 6 hours due to custom brackets being needed. Let's just say I will nevvvvvvverr do that to my speed. totally not worth having a different intercooler core that isnt the one in the kit.
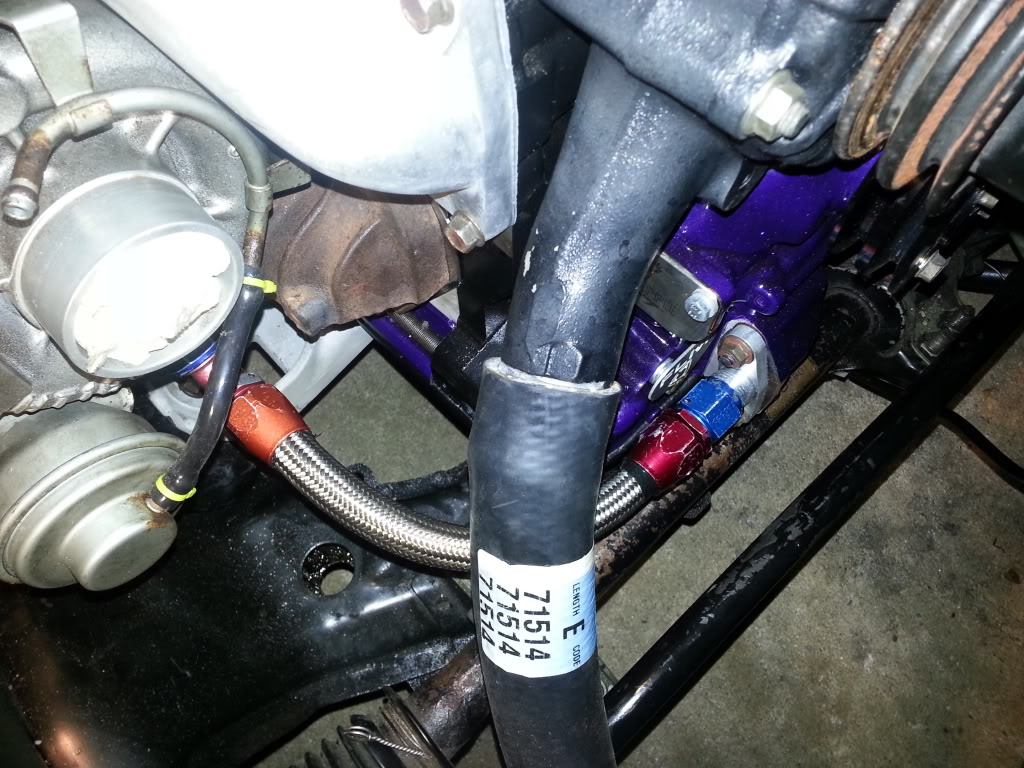
I did take a small break from assisting with the FMIC to get the turbo mounted for good. coolant lines are hooked up, drain line is hooked up, waiting on a m12x1.5 to -4AN fitting to arrive so I can attach the feed. Full Function Engineering just released a set of ID injector spacers that replace the space occupied for the injector bleeders. I did not want to spend $120 on new bleeds and did not want to even considering using the old ones. $45 for a set of spacers that should be arriving in the mail today...then I can attach the fuel system and start working on the UIM. I'm shooting for another week or two before starting it up.
This weekend's task was installing a FMIC on a speed3. took roughly 6 hours due to custom brackets being needed. Let's just say I will nevvvvvvverr do that to my speed. totally not worth having a different intercooler core that isnt the one in the kit.
I did take a small break from assisting with the FMIC to get the turbo mounted for good. coolant lines are hooked up, drain line is hooked up, waiting on a m12x1.5 to -4AN fitting to arrive so I can attach the feed. Full Function Engineering just released a set of ID injector spacers that replace the space occupied for the injector bleeders. I did not want to spend $120 on new bleeds and did not want to even considering using the old ones. $45 for a set of spacers that should be arriving in the mail today...then I can attach the fuel system and start working on the UIM. I'm shooting for another week or two before starting it up.
 07-16-13, 01:59 PM
#256
The LIM wasnt that bad with the right (but dangerous) tools. I was using a dremel which was taking forever...so my dad handed me his angle grinder. The bulk of the runners were gone in less than 2 hours. After that I got a sanding disk for the angle grinder to smooth out the gashed I created with the cutting disk, and after that I took a palm sander with 120 grit sand paper for a couple hours. The time consuming part was the sanding to make sure you dont stop in one spot and go too deep causing an uneven spot, and I failed to get some of the deep crevices. Honestly with it on the car you cant see, and I do plan on covering it with gold heat reflective foil - becuz racecar
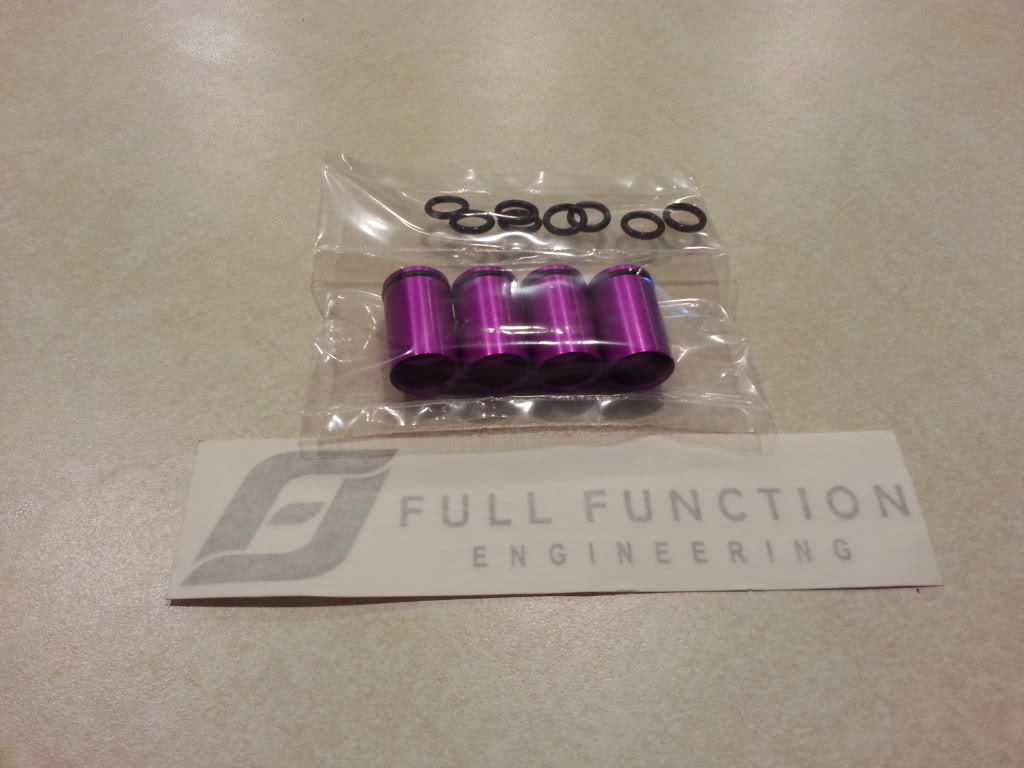
As for the car, last night I received some Full Function Engineering injector spacers. These spacers replace the factory plastic injector diffusers which get brittle and break. I did not want to risk that with this pretty new engine. Total cost for 4? $45. Basically the cost of one injector diffuser!
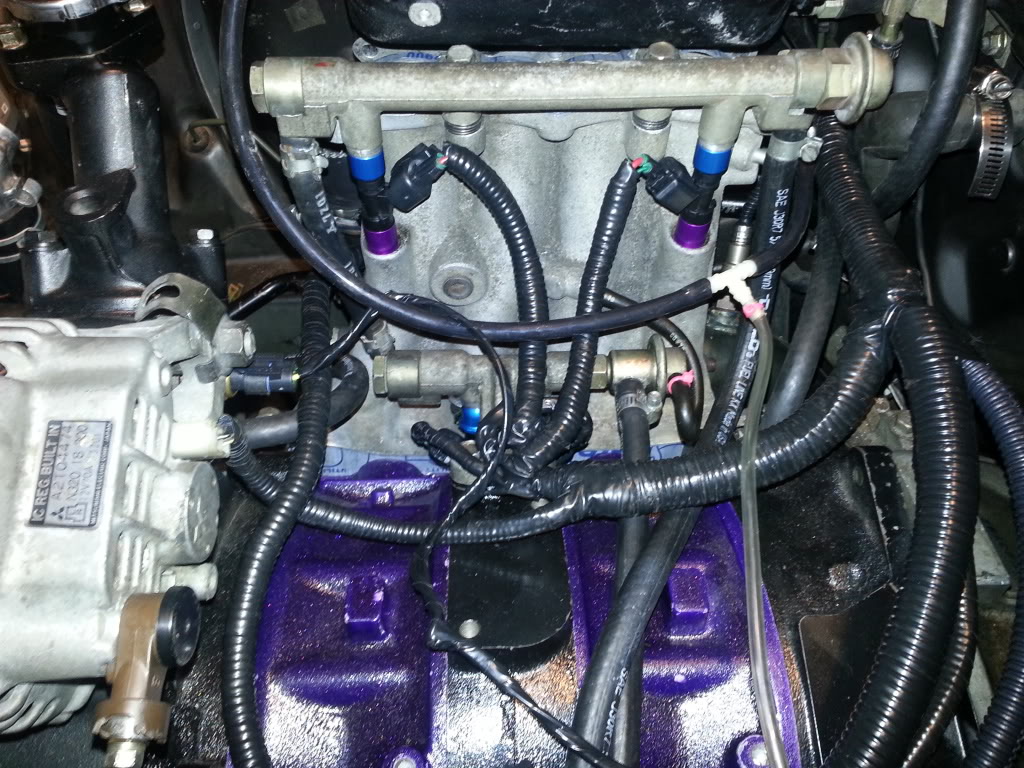
I have "JDM" manifolds with no EGR valve so I believe I need to speak with FFE and get shorter secondary spacers. This should fix my little spacer issue you may have noticed. For now I have primed the fuel system and did not smell any fuel so I think everything is good to go....
edit can someone chime in - is the vacuum hose on the FPR going to an appropriate location? I assume any vacuum nipple works works.
Also I have no idea how the heatshield is mounted to/around the turdblow
As for the car, last night I received some Full Function Engineering injector spacers. These spacers replace the factory plastic injector diffusers which get brittle and break. I did not want to risk that with this pretty new engine. Total cost for 4? $45. Basically the cost of one injector diffuser!
I have "JDM" manifolds with no EGR valve so I believe I need to speak with FFE and get shorter secondary spacers. This should fix my little spacer issue you may have noticed. For now I have primed the fuel system and did not smell any fuel so I think everything is good to go....
edit can someone chime in - is the vacuum hose on the FPR going to an appropriate location? I assume any vacuum nipple works works.
Also I have no idea how the heatshield is mounted to/around the turdblow
 07-20-13, 10:59 PM
#260
P.S....can someone tell me why it keeps wanting to stop and then start again? its almost like its firing wayyyyyyyyyy too early and stopping the rotor from spinning in the rigth direction.
edit: please dont mind the low quality. it was sent from a friend's iphone, so i couldnt get a high quality video. i'll take another the next time i start it.
edit: please dont mind the low quality. it was sent from a friend's iphone, so i couldnt get a high quality video. i'll take another the next time i start it.
07-23-13, 10:08 AM
#261
I played with the crank sensor and still could not get it to start at all. The only major thing that changed that could cause this is the purchase of the racing beat e-shaft pulley. That or I am using the wrong CAS. (S4 and S5 were different I believe...)
I may just pull the ECU and get the FFE trigger kit now. That would alleviate this issue I would hope...heh.
I may just pull the ECU and get the FFE trigger kit now. That would alleviate this issue I would hope...heh.
07-23-13, 10:58 AM
#262
07-23-13, 11:13 PM
#263
It's fuel hose that was purchased at pepboys. I assume fuel hose is fuel hose? I will look into it.
I am going to copy this from my post in the megasquirt section for more viewers. maybe someone can help me out...
Okay so I'm gonna do my best to keep this somewhat organized.
Old engine
S4 NA rotors
S6 rotor housings
S5 NA irons
Hybrid turbo
stock pulley
stock flywheel
ID1000 primary + secondaries
New engine
S6 rotors
S4 T2 rotor housings
S5 turbo irons
Hybrid turbo
RB dual sheave pulley
RB lightweight steel flywheel
ID1000 primary + secondaries
The car ran prior to the new engine. it detonated due to 180* intake temps cracking the rear iron on the stock intercooler. oops.
So I spent way too much money getting a new engine rebuilt since I want to take it to track days. I got it all wired in, same as before the replacement
Got it to run for roughly 8 minutes. Here it is for the first few seconds. It ran for 7 minutes and change and then once it was up to temp I tried locking the timing to 0* to check with a timing light and it died and would not start back up.
After I couldnt get it to restart, I assumed it was the tune due to the new engine, break-in etc etc. I tried it the next day. Could not get it to restart. I messed with a bunch of settings all of which made no difference. I get a sputter every once in a while, and sometimes it almost wants to catch but no start. I then reset them to Aaron Cake's provided defaults. I did add a bunch of 2 cycle and gas, is it possible I added too much 2 cycle?
Here it is as of now
So as in the video, I'm not sure if I'm even timed right, I dont know why it only sputters. I have verified I have fuel and spark. I added a bunch of 2 cycle and gas, is it possible I added too much 2 cycle?
The gas is only 1 year old, could that be the culprit?
why when I set the pulley to "TDC" is the CAS 180* off after a rotation and how can I find it? (I've spent hours researching.... all I see is set crank to 9 o clock, stab CAS, I've done this!)
Please help
edit: tomorrow I plan on emptying the fuel tank and putting in all new fresh gas. I will purge out any fuel in the fuel lines and start new.
07-24-13, 07:15 AM
#264
Ban Peak
iTrader: (49)

You do have the wrong fuel hose. Make sure to replace it with "Fuel Injection Hose". It's much more expensive.
You probably have the timing off, set it at TDC and pull the cap off the CAS. If your search the 2nd gen section about timing you should find an image of what the CAS position should look like when the engine is at TDC, make sure yours looks the same.
You probably have the timing off, set it at TDC and pull the cap off the CAS. If your search the 2nd gen section about timing you should find an image of what the CAS position should look like when the engine is at TDC, make sure yours looks the same.
 07-24-13, 10:50 PM
#266
Probably 3-5 feet. I'm gonna try and bring it to 95 this friday. I just gotta get it put back on insurance.
wanna bring it there?
Turns out the car was just super flooded. It runs great now Time to finish the break-in and then hit some boosties
wanna bring it there?
Turns out the car was just super flooded. It runs great now
Time to finish the break-in and then hit some boosties
07-30-13, 08:03 AM
#270
It does sound good. It was very enjoyable going down the highway. I spent roughly 2 hours tuning last night, half way highway, half was stop and go so the low end of the map is pretty smooth, very light throttle needs more work, and so does low RPM high load situations. I've hit 2-3 PSI so far and it feels so good to be driving a rotary again !!!
The Bride seat is great. I was concerned with the high bolsters long trips would be annoying but its rather comfortable since your leg cant just flop to the side, it's held in so leg fatigue really wasnt an issue.
Here is why I spent 2 hours in the car yesterday.
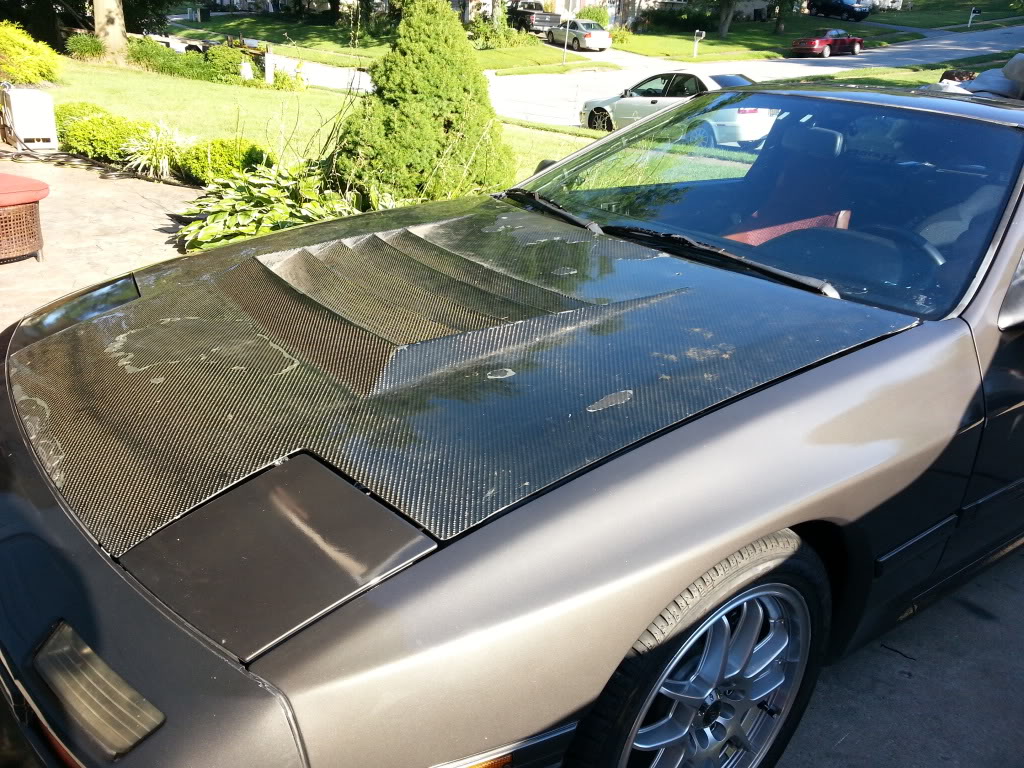
I got this for a great deal from a local. In return for the hood I'm going to help him build up his car. It's basically an empty S5 GTU shell so we're going to be dropping in a complete T2 drivetrain, taking out the rest of the already cleared interior and wiring in a microtech a well as a nice sized turbo. I feel fairly confident in helping him since I have now taken my car almost down to the shell. Almost everything has been touched besides the rear subframe (that will be addessed before august 31st)
Back to the hood. On the drive down with the stock NA hood my coolant temps hovered around 190-195. Manifold air temp between low 100s up to around 120. On the drive home t was at ambient temps (80-85). Very exciting On the downside the top coat is peeling, so I'll be looking for someone in the Delmarva area who works on CF. If i cannot locate someone I will sand it down and paint it to match the car. Or if I'm feeling really lazy I'll just clean it, wax it and throw some plastidip on it.
!!!The Bride seat is great. I was concerned with the high bolsters long trips would be annoying but its rather comfortable since your leg cant just flop to the side, it's held in so leg fatigue really wasnt an issue.
Here is why I spent 2 hours in the car yesterday.
I got this for a great deal from a local. In return for the hood I'm going to help him build up his car. It's basically an empty S5 GTU shell so we're going to be dropping in a complete T2 drivetrain, taking out the rest of the already cleared interior and wiring in a microtech a well as a nice sized turbo. I feel fairly confident in helping him since I have now taken my car almost down to the shell. Almost everything has been touched besides the rear subframe (that will be addessed before august 31st)
Back to the hood. On the drive down with the stock NA hood my coolant temps hovered around 190-195. Manifold air temp between low 100s up to around 120. On the drive home t was at ambient temps (80-85). Very exciting
On the downside the top coat is peeling, so I'll be looking for someone in the Delmarva area who works on CF. If i cannot locate someone I will sand it down and paint it to match the car. Or if I'm feeling really lazy I'll just clean it, wax it and throw some plastidip on it.
08-03-13, 12:14 PM
#272
Get to it!
I got my bearings in for the rear end and I got the 5 lug hubs off of the suspension arm. I'm going to get them pressed in tonight at a friends shop and then wait for the DTSS eliminators to come in.
Eage8, is it worth while to replace the other hub bushings while down there or are they okay as is?
I hit 10psi last night while tuning on my way home...man it feels good i'll try and get a video sometime soon.
I got my bearings in for the rear end and I got the 5 lug hubs off of the suspension arm. I'm going to get them pressed in tonight at a friends shop and then wait for the DTSS eliminators to come in.
Eage8, is it worth while to replace the other hub bushings while down there or are they okay as is?
I hit 10psi last night while tuning on my way home...man it feels good
i'll try and get a video sometime soon.
08-03-13, 02:10 PM
#273
As for the car, last night I received some Full Function Engineering injector spacers. These spacers replace the factory plastic injector diffusers which get brittle and break. I did not want to risk that with this pretty new engine. Total cost for 4? $45. Basically the cost of one injector diffuser!

I have "JDM" manifolds with no EGR valve so I believe I need to speak with FFE and get shorter secondary spacers. This should fix my little spacer issue you may have noticed. For now I have primed the fuel system and did not smell any fuel so I think everything is good to go....

I have "JDM" manifolds with no EGR valve so I believe I need to speak with FFE and get shorter secondary spacers. This should fix my little spacer issue you may have noticed. For now I have primed the fuel system and did not smell any fuel so I think everything is good to go....
Hmmm, so you are running no diffusers, but these spacers provide a seal to the EV-14s and the lower side seals where the diffuser would? Do you have to account for any space with the adapters?
Whats with all the o-rings?
I have EV-14s that are a direct replacement of FC in terms of size (60mm length, 11mm top) but I used the spacers and just put em in where the lower black thing seals to the plastic of the diffusers with no leaks. But, these do seem tempting since they are a bit cleaner and probably a proper seal...
08-03-13, 02:21 PM
#274
theoretically with the other 2 points being solid (DTSS elim. and bearing) the top bushing shouldn't matter much... but I replaced mine anyway because I'm a fan of overkill. and also like saying there is zero rubber bushings left in my suspension

The problem is those bushings only come in packs with DTSS eliminators and outer control arm bushings (which you definitely don't want to use) like this:
Mazda RX7 Rear Lower Control Arm Kit, 1986-1992, by Drop Engineering

farberio:
I have ID injectors with the black cushions currently and they always looked moist near the cusions... I've talked to ID about it and they swear the fuel pressure should be great enough so the boost won't push the injector up but I have my doubts... (there is a lot more surface area on the bottom of the injector than the top)
the o-rings are because each black cushion gets replaced with 2 small o-rings before you put it in the adapter.