Project IIc: The road to 350 rwhp


 07-13-15, 09:36 PM
#77
Full Member
Thread Starter
iTrader: (3)
Join Date: Mar 2013
Location: Minnesota
Posts: 54
Likes: 0
Received 0 Likes
on
0 Posts
Quick Update
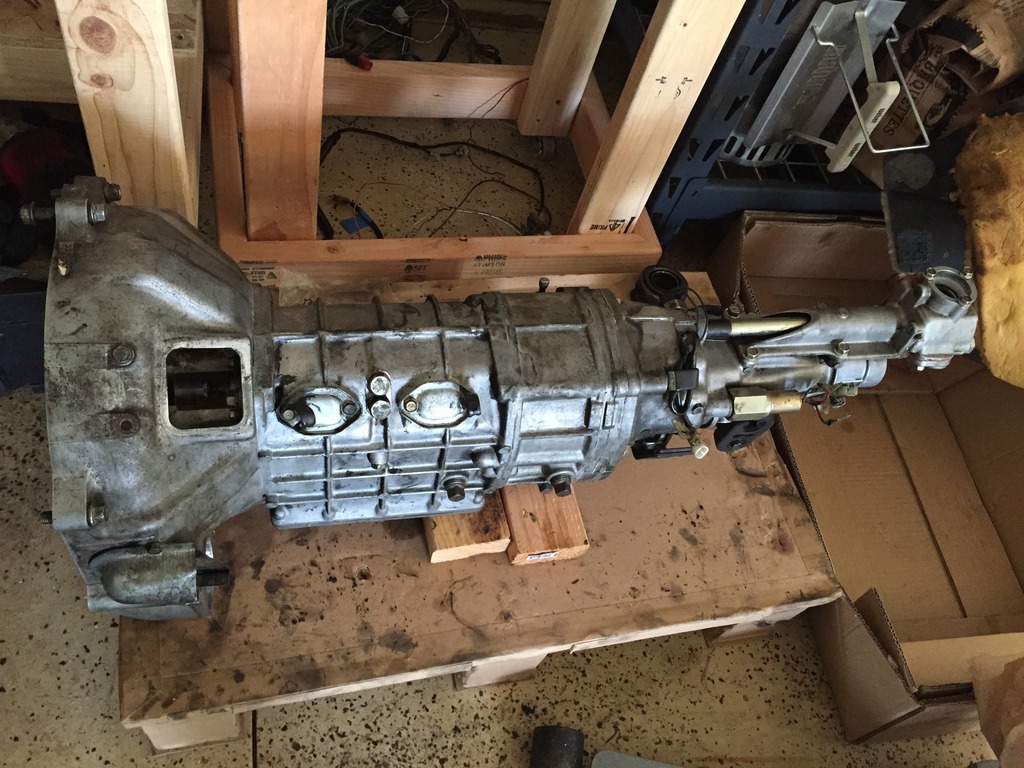
I had a few hours to spend on the car this weekend. I took a power washer with some Simple Green solution to the transmission. Then a nice scrub down with some WD-40 and paper towels. I'm impressed with how nicely it cleaned up. Next weekend, the engine and tranny will go back in the car!!
11-08-15, 12:54 PM
#78
Full Member
Thread Starter
iTrader: (3)
Join Date: Mar 2013
Location: Minnesota
Posts: 54
Likes: 0
Received 0 Likes
on
0 Posts
Update
Hey everyone. It's been a long time since my last update, it's not because I haven't worked on the car; I just didn't have the time to update the thread. BIG PROGRESS: The engine and transmission went back into the car. It took me a while to properly grease all of the transmission pieces and carefully put both the engine and transmission back together without scratching/deforming the splines.
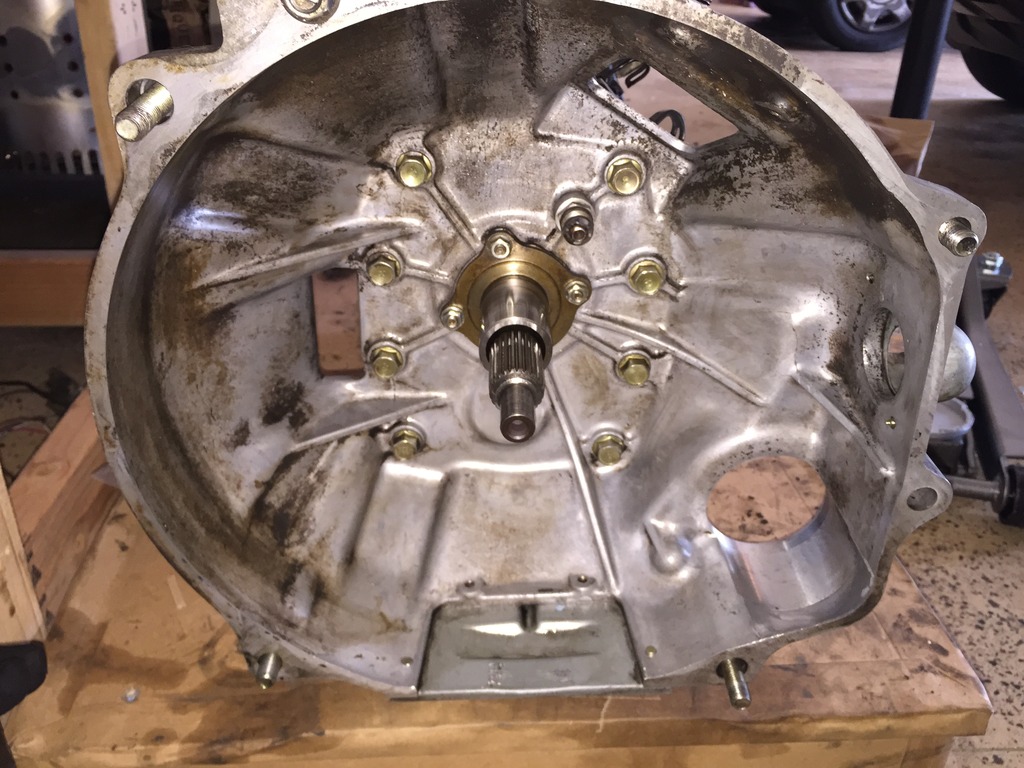
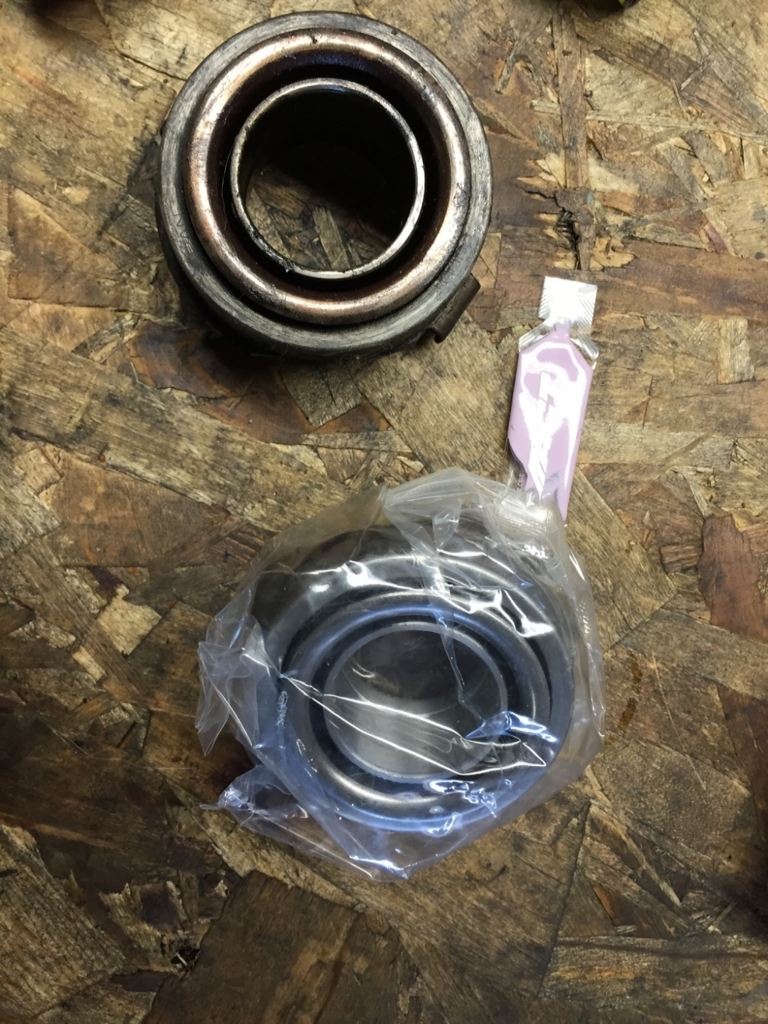
Greasing the splines, release and pilot bearing:
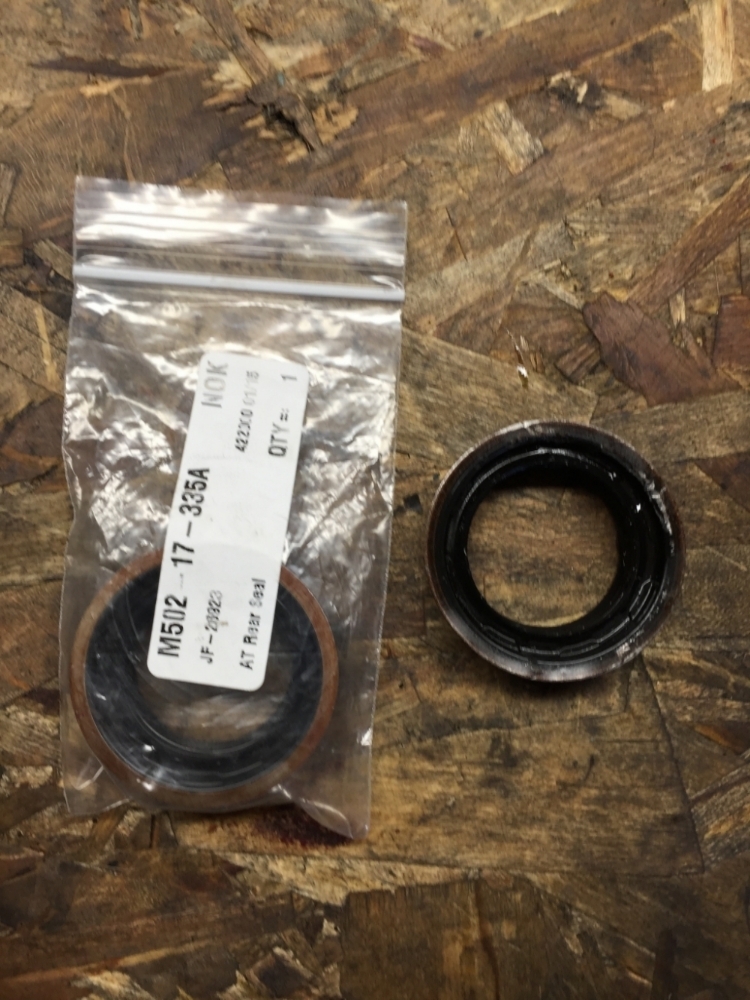
Changed the front and rear main transmission seals with OEM ones:

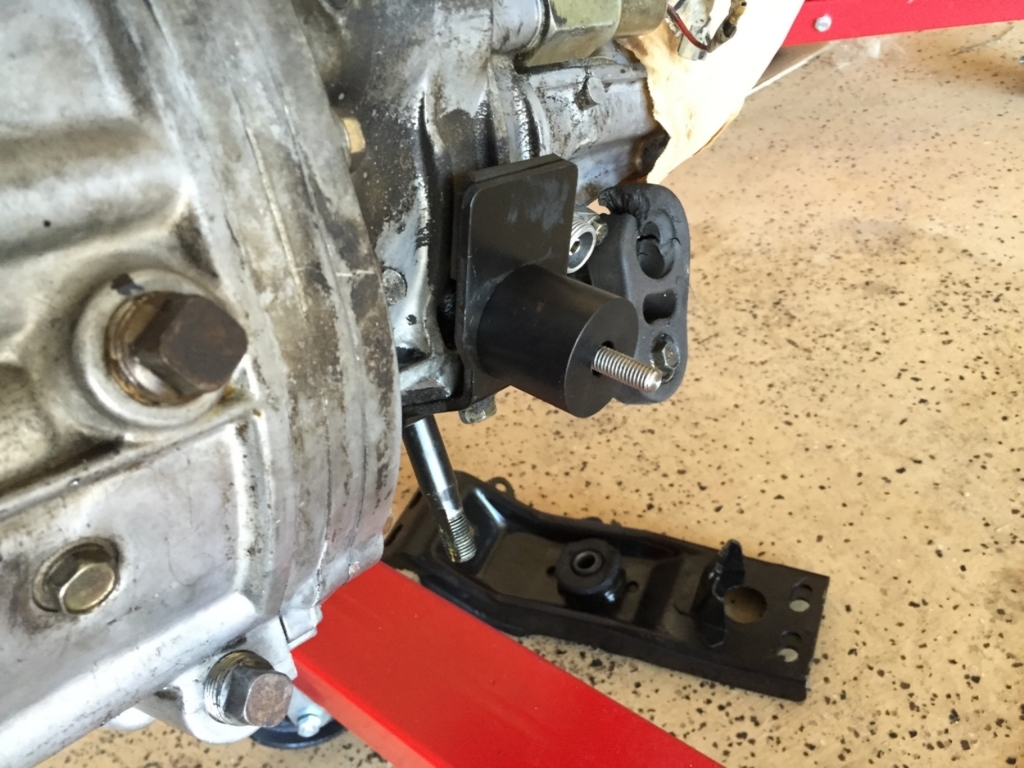
Replaced the transmission mounts with MMR UHMW mounts:
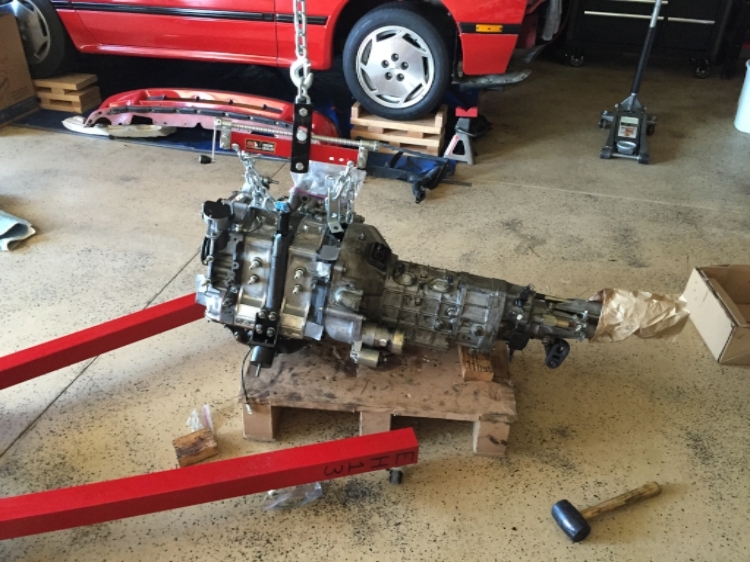
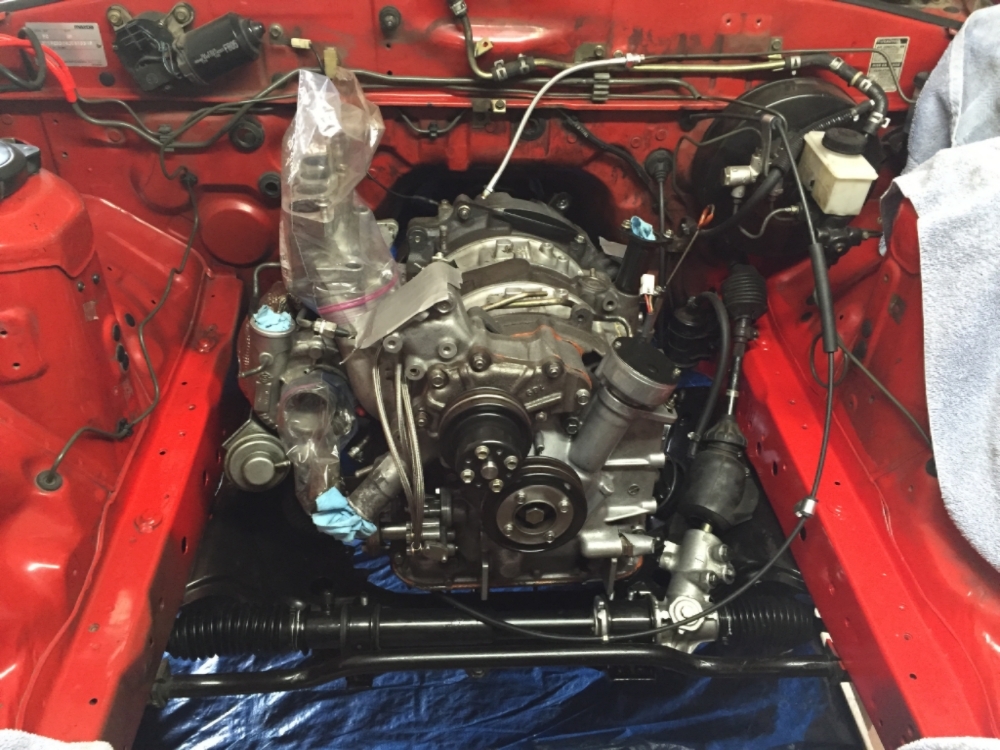
With great care, I put the transmission and engine block back together and dropped it in the car (Pain in the A$$):
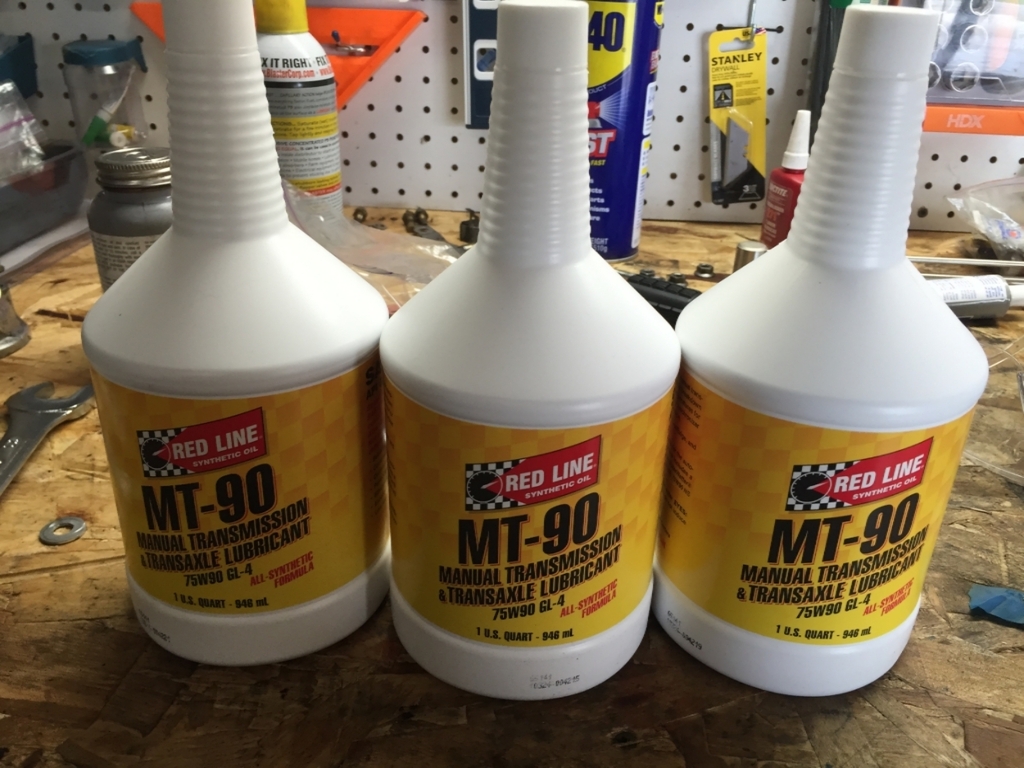
Drained and replaced transmission oil with Redline MT-90 75W90 GL-4 synthetic oil:
When I tried to replace the clutch fluid, the bleeder screw on slave cylinder snapped. I ended up buying a new OEM slave cylinder and SS clutch line from Banzai Racing. This time I made sure to put some anti-seize on the bleeder screw. Then I replaced the fluid and bled the line:
With the winter coming up, there will be very little progress on the car. My plan will be to work a few night shifts, save money and buy the parts I need to run the standalone EFI with the goal of cranking the engine in early spring.
Greasing the splines, release and pilot bearing:
Changed the front and rear main transmission seals with OEM ones:
Replaced the transmission mounts with MMR UHMW mounts:
With great care, I put the transmission and engine block back together and dropped it in the car (Pain in the A$$):
Drained and replaced transmission oil with Redline MT-90 75W90 GL-4 synthetic oil:
When I tried to replace the clutch fluid, the bleeder screw on slave cylinder snapped. I ended up buying a new OEM slave cylinder and SS clutch line from Banzai Racing. This time I made sure to put some anti-seize on the bleeder screw. Then I replaced the fluid and bled the line:
With the winter coming up, there will be very little progress on the car. My plan will be to work a few night shifts, save money and buy the parts I need to run the standalone EFI with the goal of cranking the engine in early spring.
04-17-16, 08:53 PM
#79
Full Member
Thread Starter
iTrader: (3)
Join Date: Mar 2013
Location: Minnesota
Posts: 54
Likes: 0
Received 0 Likes
on
0 Posts
Warm Weather
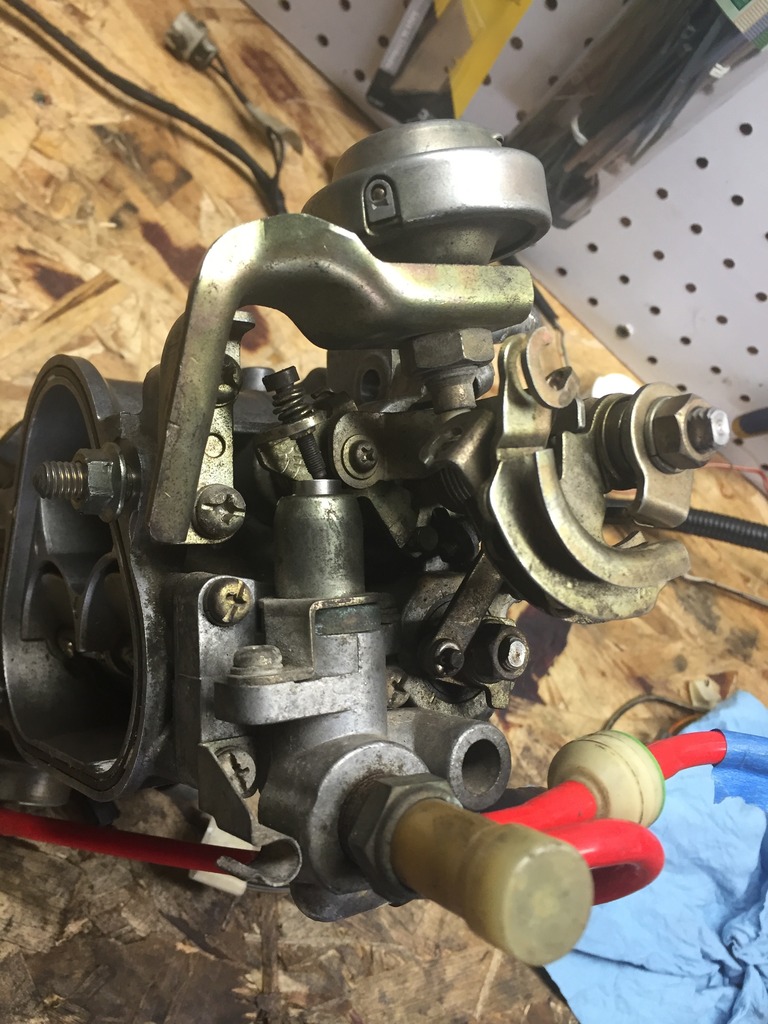
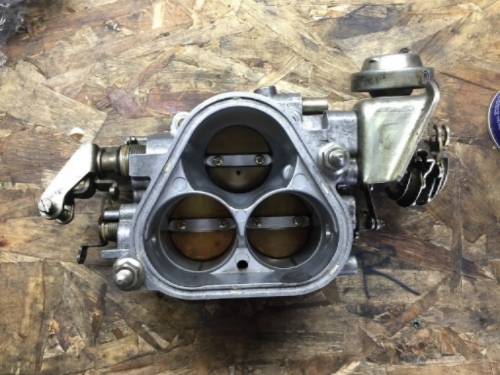
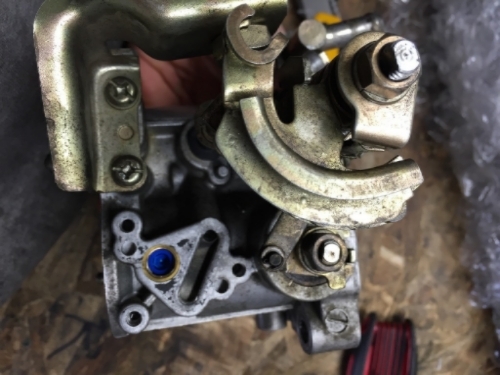
It's starting to warm up finally and I'm back at it. I started off by removing the secondary flaps in throttle body. I tapped the holes where the rotating rod came through with 1/8" NPT and plugged it with aluminum plugs. I also removed the fast warm up system.
BEFORE:
AFTER:
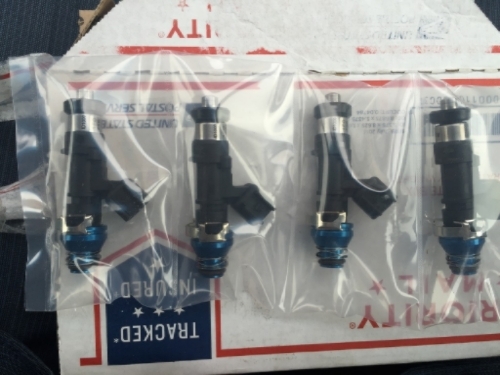
I had been working extra hours and saving a bunch of money over winter. Here is a quick shot of some of the goodies that came in through the mail. I decided to go with Adaptronics e420d, AEM coils and Injector Dynamics 1000 cc/min all around. I switched over the AEM UEGO AFR sensor. All the wiring for the harness will be GXL cross-linked wire. I will be incorporating Aaron Cake's wiring guide into building the harness and ECU panel.
BEFORE:

AFTER:
I had been working extra hours and saving a bunch of money over winter. Here is a quick shot of some of the goodies that came in through the mail. I decided to go with Adaptronics e420d, AEM coils and Injector Dynamics 1000 cc/min all around. I switched over the AEM UEGO AFR sensor. All the wiring for the harness will be GXL cross-linked wire. I will be incorporating Aaron Cake's wiring guide into building the harness and ECU panel.
05-21-16, 11:43 AM
#80
Full Member
Thread Starter
iTrader: (3)
Join Date: Mar 2013
Location: Minnesota
Posts: 54
Likes: 0
Received 0 Likes
on
0 Posts
ECU panel and E-fan
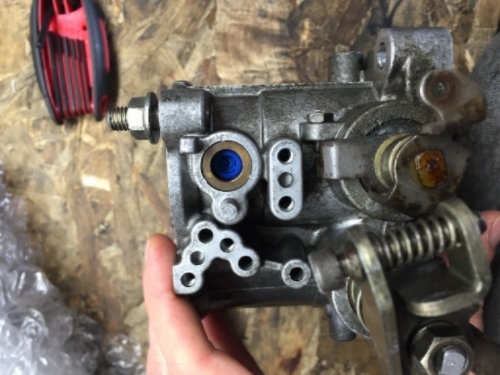
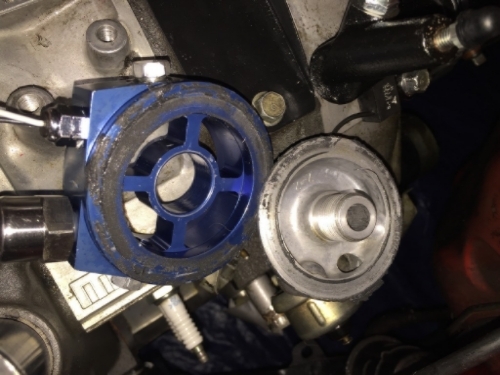
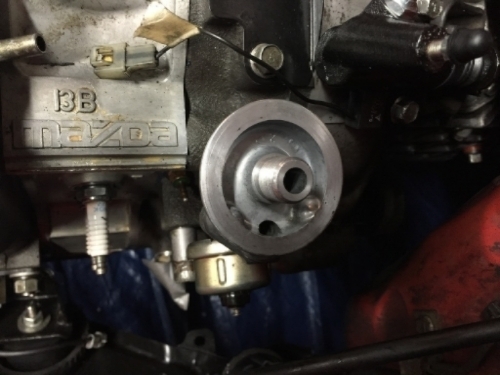
When I started putting the Prosport gauges back, I noticed an issue with the oil filter pedestal adaptor. It appears that it was previously installed upside down. In this orientation, the sealing washer that was meant to mate with the pedestal would seal against the oil filter washer... There must have been a bad oil leak as a result and that's why the entire under surfaced was covered with gasket sealer. I wonder if this was the cause of the previous oil leak or a combination of this and the OMP. Since the washer was never installed, I was unable to reuse the adaptor and ended up ordering a new one from Prosport.
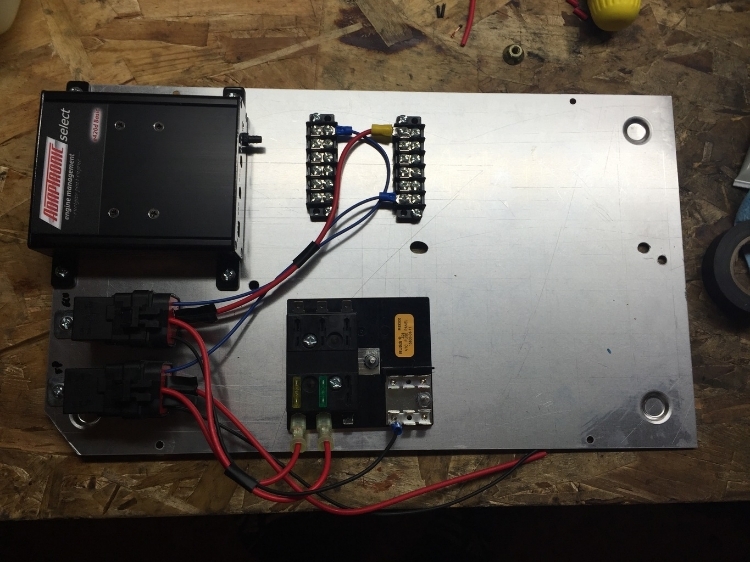
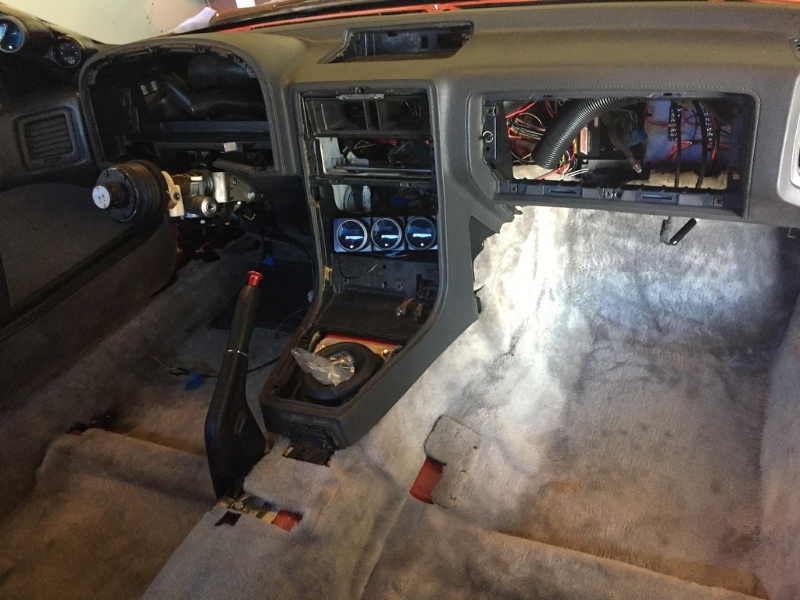
I started working on the ECU panel. I used Aaron Cake's guide as a template and here is a picture of some progress:
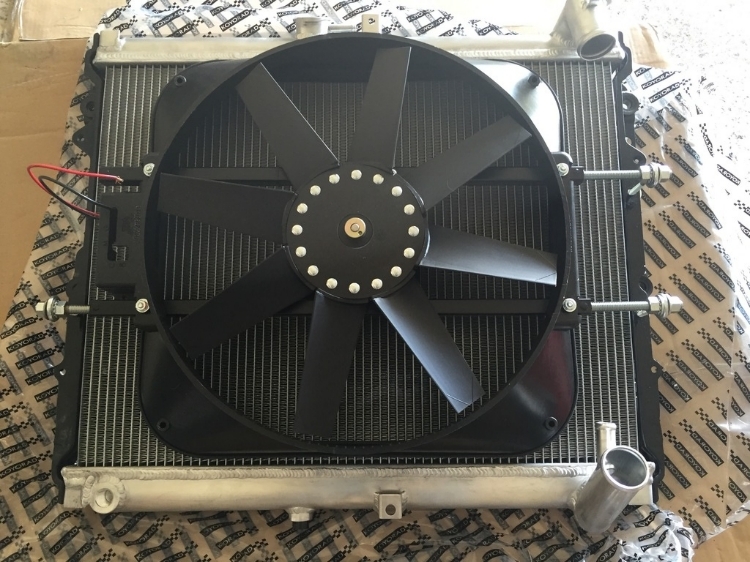
The all aluminum Koyo Radiator came in the mail along with my electric fan. There were a lot of option for the e-fan and the forum has really good information on it. I ended up going with the Flex-a-lite 155. It produces 2800 cfm and only draws 15 amps. It's light and the shroud fits the radiator without any modification. I ended up fabricating my own brackets out of eyelet bolts and lock nuts, since the brackets it came with were ugly and bulky. The original Rx radiator mounting brackets had a good amount of rust, which I cleaned up with the wire wheel and gave them a few coats of pain. Here is the finished product:
I started working on the ECU panel. I used Aaron Cake's guide as a template and here is a picture of some progress:
The all aluminum Koyo Radiator came in the mail along with my electric fan. There were a lot of option for the e-fan and the forum has really good information on it. I ended up going with the Flex-a-lite 155. It produces 2800 cfm and only draws 15 amps. It's light and the shroud fits the radiator without any modification. I ended up fabricating my own brackets out of eyelet bolts and lock nuts, since the brackets it came with were ugly and bulky. The original Rx radiator mounting brackets had a good amount of rust, which I cleaned up with the wire wheel and gave them a few coats of pain. Here is the finished product:
06-02-16, 07:27 PM
#81
Senior Member

While that fan may flow very well, you may find that adding more of a shroud to cover over the rest of the radiator may very well help your cause in cooling. The setup looks clean. Keep up the good work
06-11-16, 10:17 AM
#82
Full Member
Thread Starter
iTrader: (3)
Join Date: Mar 2013
Location: Minnesota
Posts: 54
Likes: 0
Received 0 Likes
on
0 Posts
Getting ready for the 1st Start up
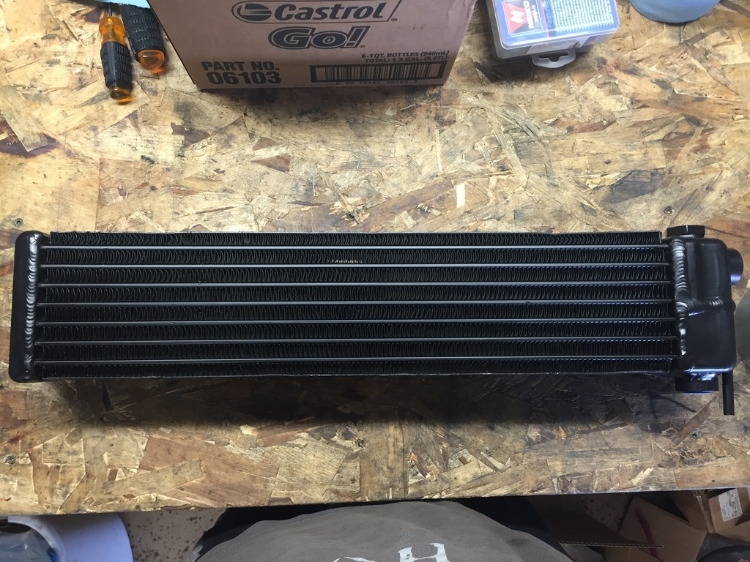
I received the oil cooler from American Cooler Service last week. They have done an amazing job: they straightened the fins, ran the cooler through their high pressure cleaner (I think 70 PSI), re-anodized the aluminum and painted it black for a lump sum of $125 plus shipping. Not to mention that they are extremely professional and the cooler came back in a nicely packed box with spray foam around the cooler to make sure it's not damaged. I highly recommend them.
End result:
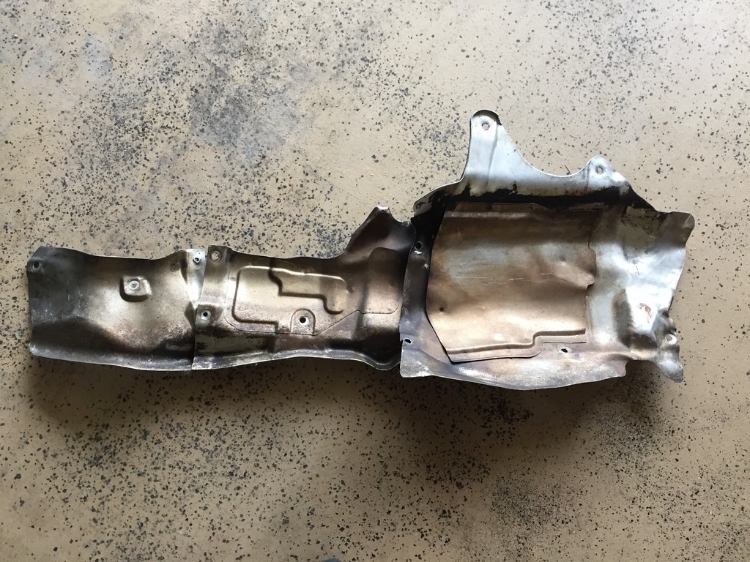
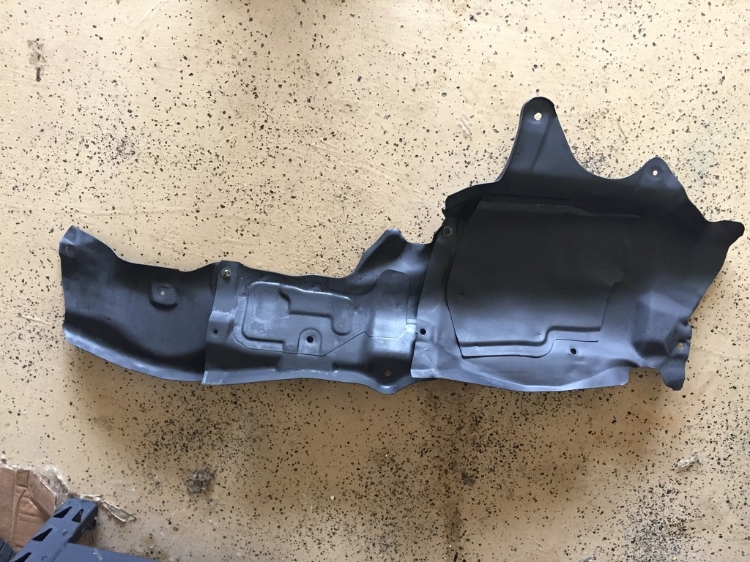
Then I wanted to put the exhaust back but the heat shields had a lot of grime and dirt on them. So I ran them through the parts washer a few times, then cleaned them by hand and some brake cleaner. I spray painted them with 4 coats of black high heat paint (2000 F).
Before:
After:
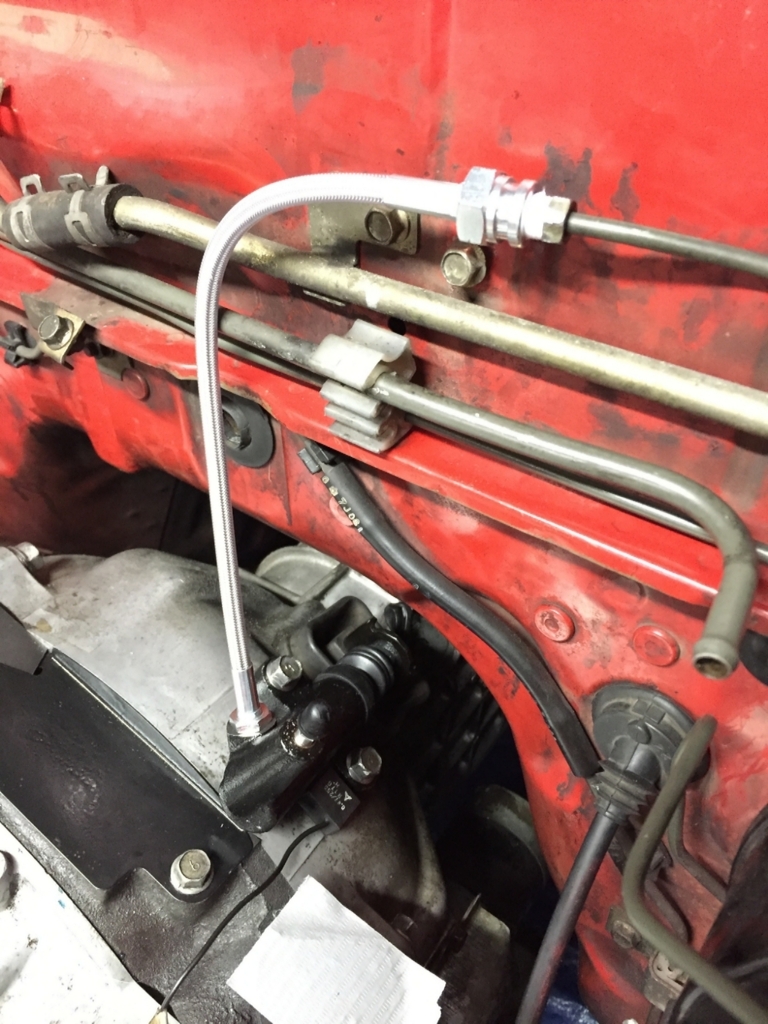
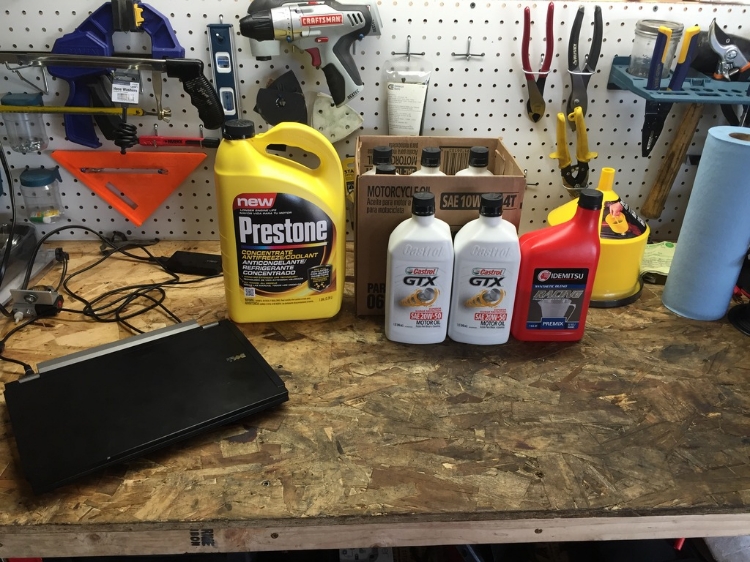
Now everything essential to start up the car is back in the car. I also changed the inline fuel filter since I have no idea when it was last changed, and I didn't want the beautiful ID 1000's getting clogged with debris. I'm planning on starting her up in a few days. Here is a pic of all the cocktails that she'll be drinking. After a lot of research on the forum, for the start up and break in I'll be using castrol GTX 20w50 conventional engine oil. Despite having an OMP, I'll be premixing with Idemitsu for the first 1000 miles .5-1oz per gallon. Coolant will be prestone Ethylene glycol 35/65 mix with distilled water. For battery I decided on the Deka Intimitador AGM batter and relocated to the passenger bin (I'll be showing pics of this later):
It's a little nerve-racking to realize that the results of year and a half of work and $7000 of parts going into the car will be determined by the turn of the key in a few days. I haven't cut any corners so I hope she starts right up. I'll keep my fingers crossed and keep you guys posted.

 08-20-16, 02:30 PM
#84
Full Member
Thread Starter
iTrader: (3)
Join Date: Mar 2013
Location: Minnesota
Posts: 54
Likes: 0
Received 0 Likes
on
0 Posts
I know it's been a while. Thankfully, it's not because the engine blew on the start up... I've actually put quite a bit of work into the car, I just haven't had the time to update the site. Here is a quick update with my wife filming and remaining my number #1 fan; Enjoy:
This video was shot on June 2nd 2016. She is idling a bit high around 2000 in that video but after a few adjustments, now she seems to be happy around 1100 idle, pulling 18 inHg vacuum with AFR's of 12.5. I'm assuming the higher stats is because of porting and lightened flywheel. I will update you guys soon on what has been happening in the interim.
This video was shot on June 2nd 2016. She is idling a bit high around 2000 in that video but after a few adjustments, now she seems to be happy around 1100 idle, pulling 18 inHg vacuum with AFR's of 12.5. I'm assuming the higher stats is because of porting and lightened flywheel. I will update you guys soon on what has been happening in the interim.
10-15-16, 01:13 PM
#85
Full Member
Thread Starter
iTrader: (3)
Join Date: Mar 2013
Location: Minnesota
Posts: 54
Likes: 0
Received 0 Likes
on
0 Posts
Small details
Hi guys, I have some time to update the thread and wanted to add a bit of details to the start up as well as a quick update:
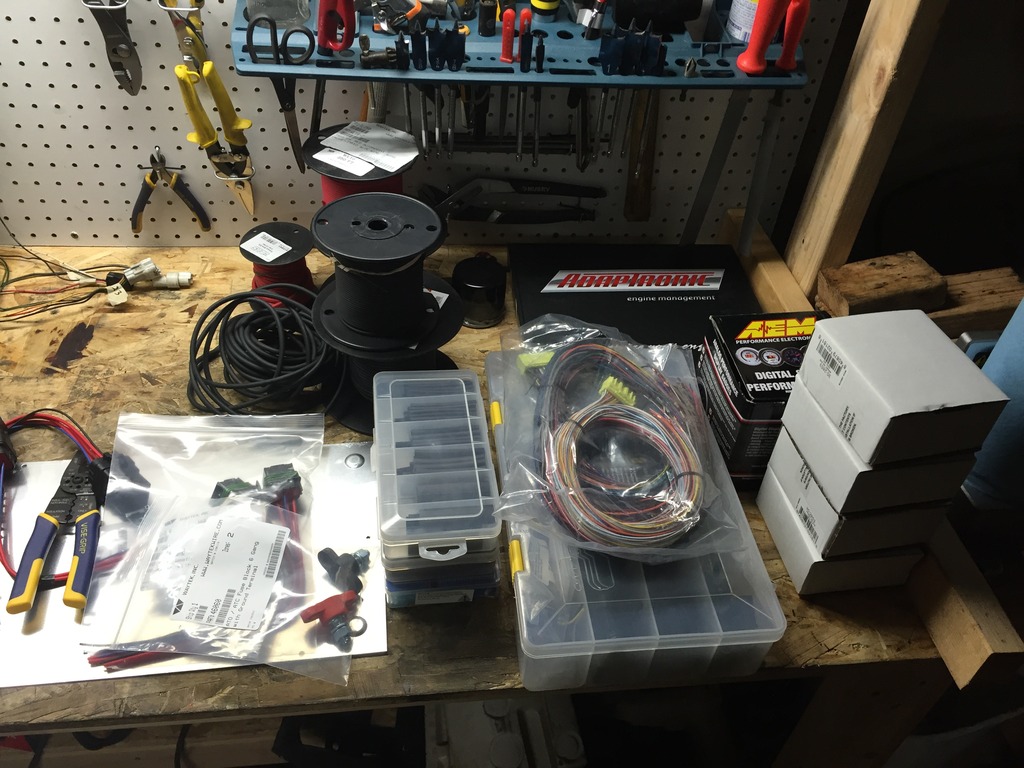
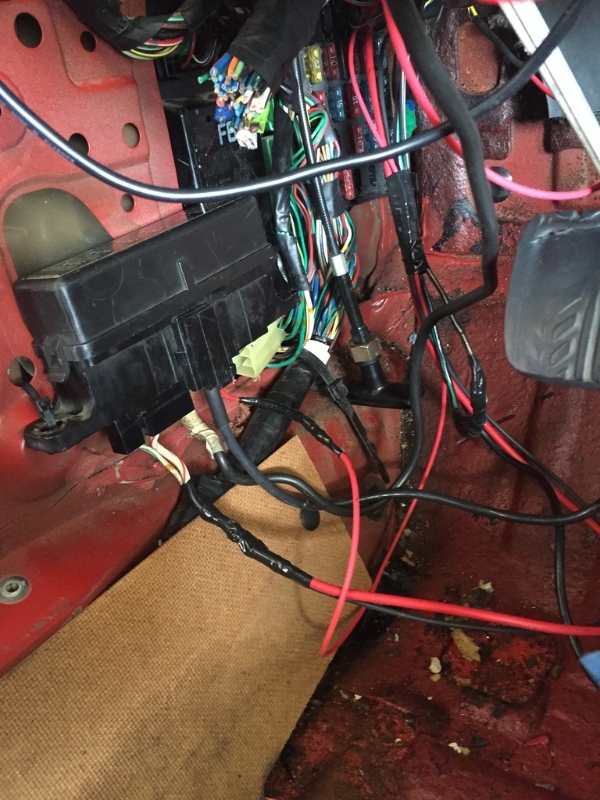
Let me show you a bit of the wiring for the ECU panel:
There are 3 coils; one supplies the ECU and the ignition switch terminal strip (fuel injectors, boost solenoid, Idle valve, switch power to the other coils, and gauges), another one supplies the fan, and the last one supplies the ignition coils. Just below the panel, there is a large red terminal stud that I screwed into the where the stock ECU was. The thick red wire comes from the battery which is located to the passenger bin (I'll get some pics later). This splits to power going to the ECU fuse panel, stock fuse panel, alternator and starter.
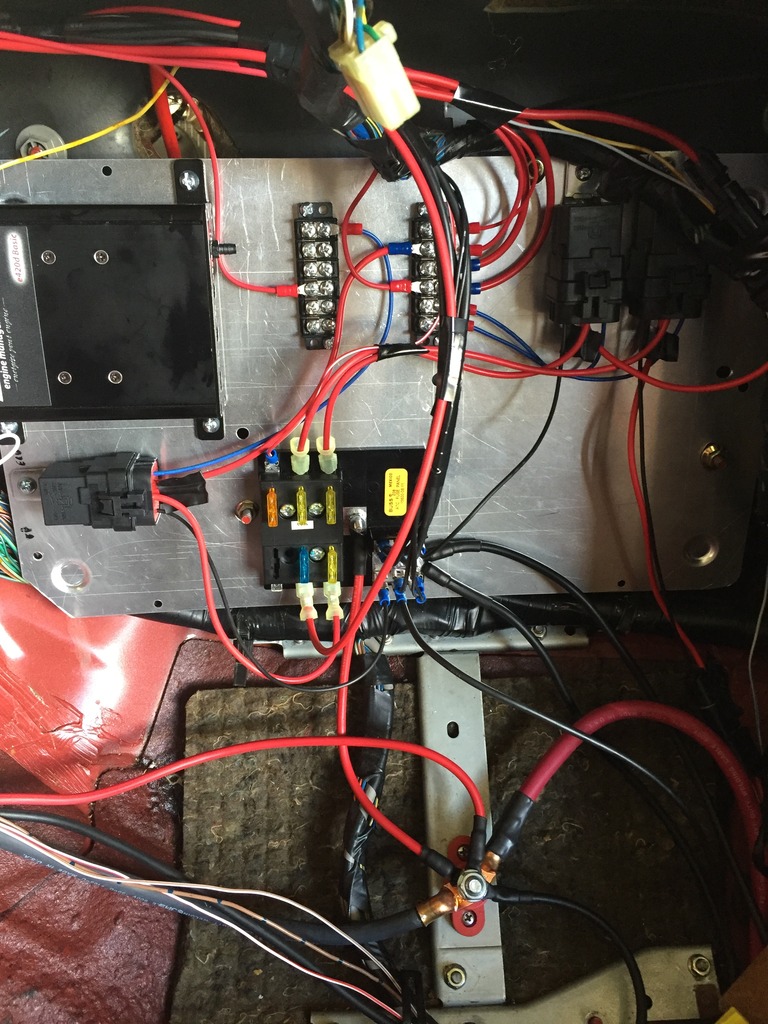
The passenger foot panel fits right on top.
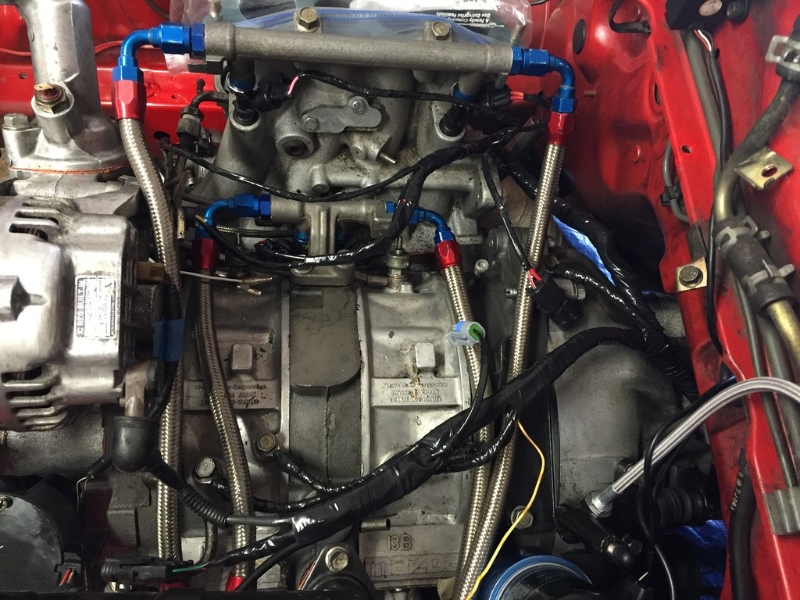
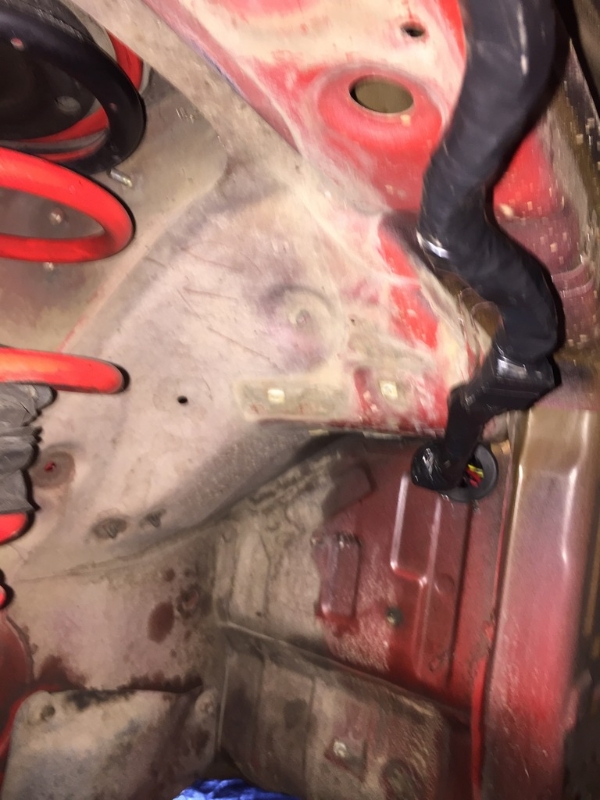
Here is a view of the engine harness. Every wire is brand new GXL cross-linked. I used a combination of soldering and crimping. Every soldered connection was cleaned with flux cleaner, dried, and wrapped in dual-wall adhesive heat shrink tubing. Every crimp connection received a small amount of dielectric grease and also wrapped in dual-wall heat shrink tubing. The wires were then wrapped with 3 layers of high heat electric tape. There is a little plastic piece on the inside close the firewall right on top of the transmission. I drilled a 2 inch hole in that, placed a grommet and fed the wires through to the engine bay.
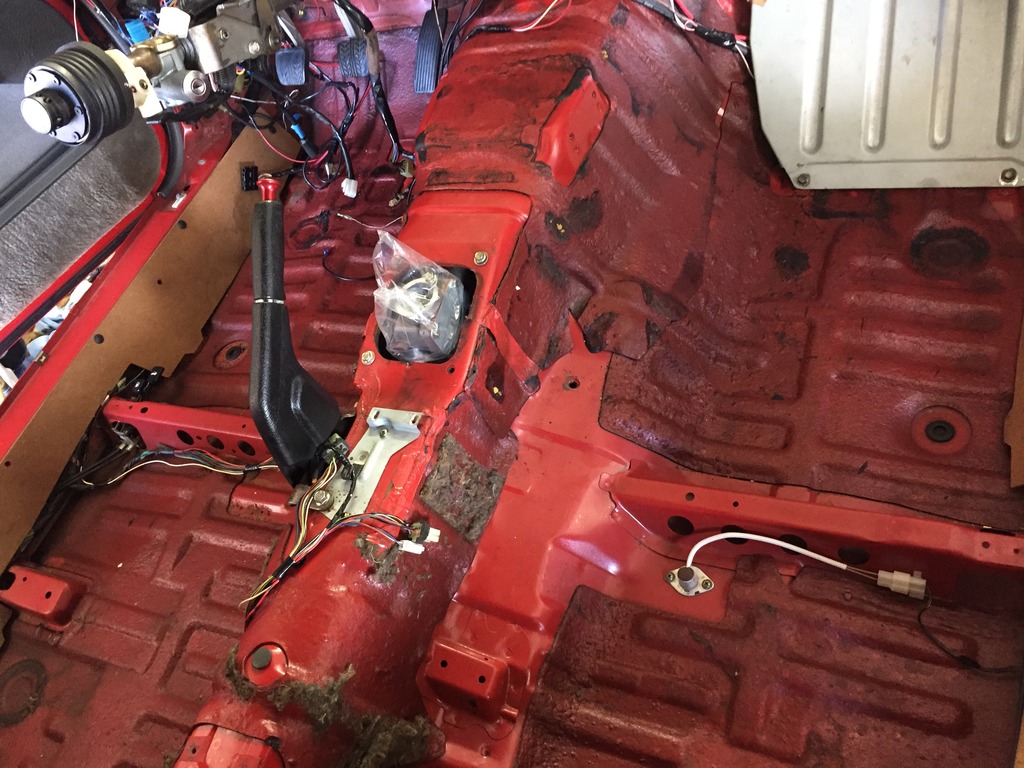
The front harness wires were re-routed under the driver wheel well. I had to extend a few of the connections by soldering splicing wires to make it work. The finished product looks really clean. Earlier in the build, I had cut and removed the unnecessary old and crusty wires from the front harness.
I used this guide: http://www.norotors.com/index.php?topic=2874.0
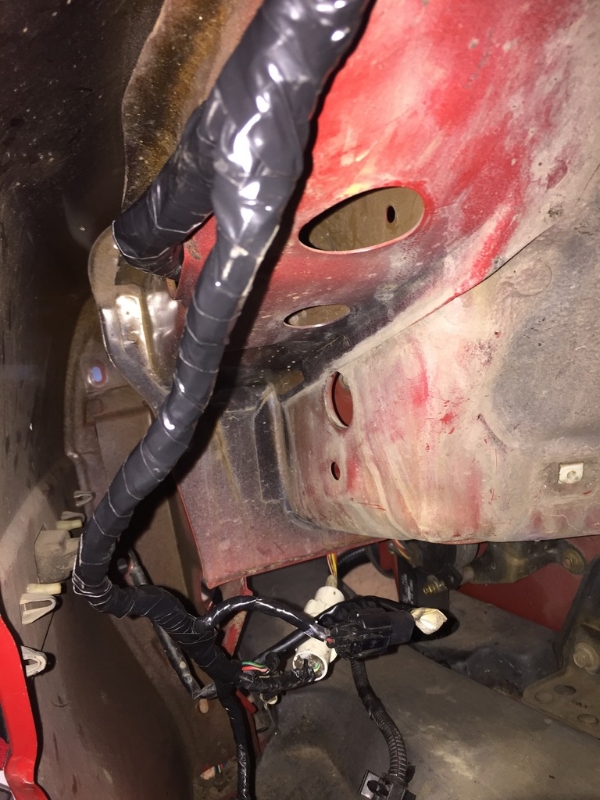
I also relocated the stock fuse panel to the driver side. There are two holes that perfectly match the holes on the fuse panel and secured it with Zipties through the holes. You can get a glimpse of the mass of wires that were cut and removed from the front harness.
I also had the carpet professionally cleaned. It looks much better although some of the really old stains didn't come out.
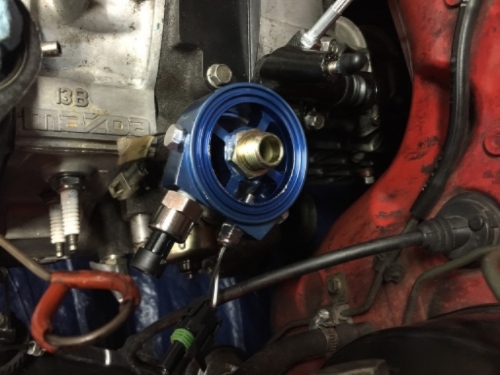
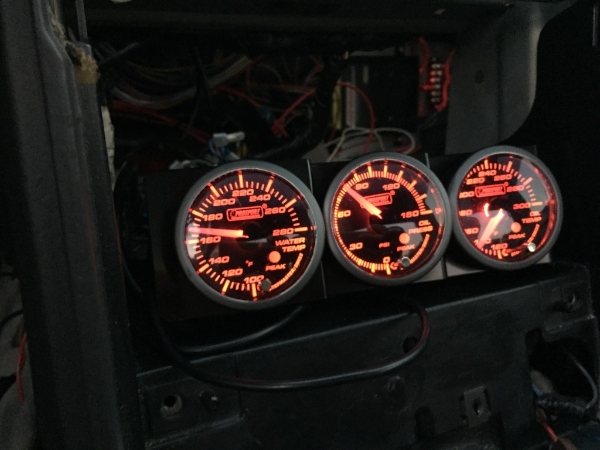
Here is a shot of the gauges while cruising on the highway at 70 mph and 3k RPM: The afr reads 13.5 but you can't see the "1". With the oil pressure regulator mod, I get 90 PSI on start up and 50-80 psi while driving.
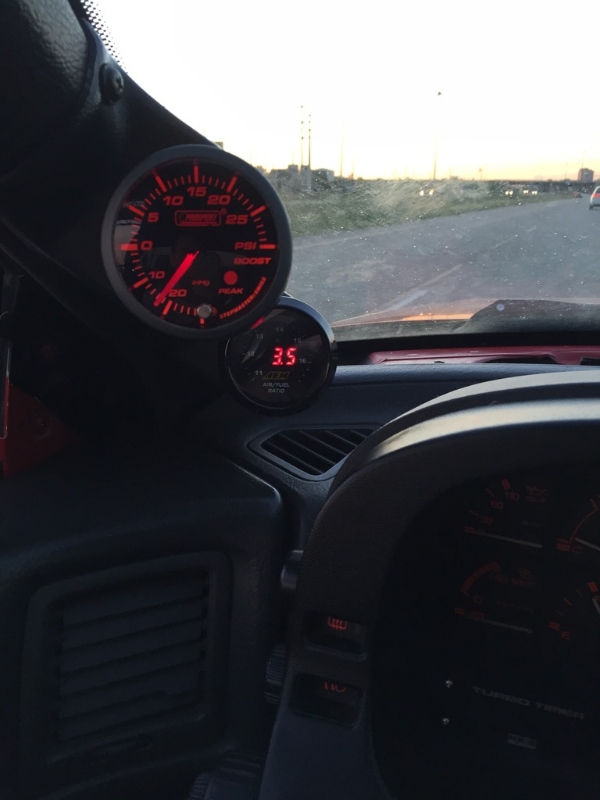
I have put close to 300 miles on the car. It starts right up cold or hot and idles nicely around 1000 with 12.5 AFR. With the cold weather coming, I'll have to winterize the car soon. Unfortunately I didn't get to the point I wanted to this summer. My goal next year is to continue breaking in the engine for 1000 miles. I keep RPM's below 3000 and no boost until then. Then I can slowly work in boost while tuning to 5 psi. Then I'll get it professionally tuned. At some point the turbo will get an upgrade, I'm thinking BNR 3 as of now.
Let me show you a bit of the wiring for the ECU panel:
There are 3 coils; one supplies the ECU and the ignition switch terminal strip (fuel injectors, boost solenoid, Idle valve, switch power to the other coils, and gauges), another one supplies the fan, and the last one supplies the ignition coils. Just below the panel, there is a large red terminal stud that I screwed into the where the stock ECU was. The thick red wire comes from the battery which is located to the passenger bin (I'll get some pics later). This splits to power going to the ECU fuse panel, stock fuse panel, alternator and starter.
The passenger foot panel fits right on top.
Here is a view of the engine harness. Every wire is brand new GXL cross-linked. I used a combination of soldering and crimping. Every soldered connection was cleaned with flux cleaner, dried, and wrapped in dual-wall adhesive heat shrink tubing. Every crimp connection received a small amount of dielectric grease and also wrapped in dual-wall heat shrink tubing. The wires were then wrapped with 3 layers of high heat electric tape. There is a little plastic piece on the inside close the firewall right on top of the transmission. I drilled a 2 inch hole in that, placed a grommet and fed the wires through to the engine bay.
The front harness wires were re-routed under the driver wheel well. I had to extend a few of the connections by soldering splicing wires to make it work. The finished product looks really clean. Earlier in the build, I had cut and removed the unnecessary old and crusty wires from the front harness.
I used this guide: http://www.norotors.com/index.php?topic=2874.0
I also relocated the stock fuse panel to the driver side. There are two holes that perfectly match the holes on the fuse panel and secured it with Zipties through the holes. You can get a glimpse of the mass of wires that were cut and removed from the front harness.
I also had the carpet professionally cleaned. It looks much better although some of the really old stains didn't come out.
Here is a shot of the gauges while cruising on the highway at 70 mph and 3k RPM: The afr reads 13.5 but you can't see the "1". With the oil pressure regulator mod, I get 90 PSI on start up and 50-80 psi while driving.
I have put close to 300 miles on the car. It starts right up cold or hot and idles nicely around 1000 with 12.5 AFR. With the cold weather coming, I'll have to winterize the car soon. Unfortunately I didn't get to the point I wanted to this summer. My goal next year is to continue breaking in the engine for 1000 miles. I keep RPM's below 3000 and no boost until then. Then I can slowly work in boost while tuning to 5 psi. Then I'll get it professionally tuned. At some point the turbo will get an upgrade, I'm thinking BNR 3 as of now.
10-20-16, 11:32 PM
#86
Banned. I got OWNED!!!

Nice progress!

Thread
Thread Starter
Forum
Replies
Last Post
Jeff20B
1st Generation Specific (1979-1985)
73
09-16-18 07:16 PM