
Naomi: Can't keep a good bitch down!


Thread Starter
Joined: May 2006
Posts: 3,881
Likes: 3
From: Jacksonville, Tampa & Tallahassee
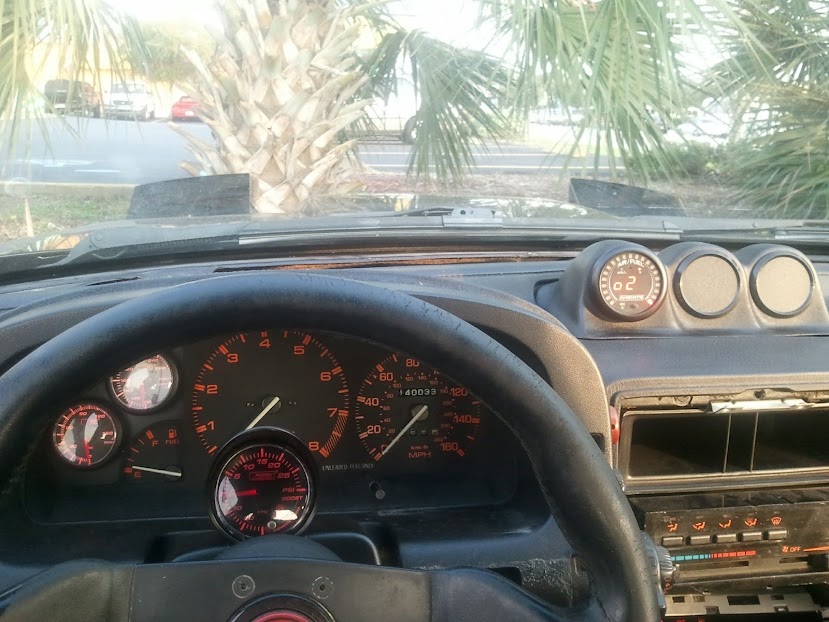
Stock S4 Cluster

Cool enough I suppose, I thought about converting to S5 for a little bit but I could never find one that wasn't pink, plus the gauges are LESS accurate than the S4 cluster, so no real point there.
I bought a set of pro-sport premium amber gauges try to retro-fit them into the stock cluster, but 52mm gauges take up a decent amount of space. Once they came out with the 45mm series it was a different story however.
Full J-spec gauge cluster thread: https://www.rx7club.com/2nd-generation-specific-1986-1992-17/writeup-jspec-gauge-cluster-938512/
Testing

Complete, with boost gague reinstalled

 NO PISSTONS BABY!
Thread Starter
Joined: May 2006
Posts: 3,881
Likes: 3
From: Jacksonville, Tampa & Tallahassee
Thanks man! I figured I might as well doing something useful/unique since I had no confidence in my ability to match the door to the glossy stock paint.
Death Before Dishonor. No Pistons!
Death Before Dishonor. No Pistons!
Thread Starter
Joined: May 2006
Posts: 3,881
Likes: 3
From: Jacksonville, Tampa & Tallahassee
So my brother had recently picked up an FC shell back home that he planned to use for an LS1 swap/race car/daily driver/ drift machine......yea...I know. However that project would be a ways off so for the time being it made for the perfect paint stand.
Duplicolor High Build primer for the "trouble spots"
Sanded with 320 grit and given a complete coat of regular automotive primer.
Sanded with 500 grit
Rattle Can FTW!
Duplicolor High Build primer for the "trouble spots"
Sanded with 320 grit and given a complete coat of regular automotive primer.
Sanded with 500 grit
Rattle Can FTW!
Last edited by sharingan 19; Jul 5, 2012 at 09:21 AM. Reason: Add pics
Thread Starter
Joined: May 2006
Posts: 3,881
Likes: 3
From: Jacksonville, Tampa & Tallahassee
About that.....my album took longer to upload than I thought, so I was locked out of editing. Lets try that again...
Rustoleum High Build primer for the "trouble spots"

Sanded with 320 grit and given a complete coat of regular automotive primer.

Sanded with 500 grit

Rattle Can FTW!

Duplicolor OEM colormatch paint (Universal Black)
Rustoleum High Build primer for the "trouble spots"
Sanded with 320 grit and given a complete coat of regular automotive primer.
Sanded with 500 grit
Rattle Can FTW!
Duplicolor OEM colormatch paint (Universal Black)
Thread Starter
Joined: May 2006
Posts: 3,881
Likes: 3
From: Jacksonville, Tampa & Tallahassee
I really wrestled with whether or not to install the front bumper before heading back up to north Florida. I eventually decided to give the paint time to fully cure, and just pack it up and install it at the same time as the other s5 enhancements.........good thing I did

So I make it all the way to Tallahassee, in the rain without incident and I'm taking the 270* corkscrew offramp into town. I've completed about 260 degrees and I'm merging onto the main road, when all of a sudden the rear just starts sliding out like I'm filming a backwards Junkhouse video...

...I start to counter steer......more counter steer.......more counter steer.......full lock.......****. It's still sliding, at this point I hit the brakes and it stopped spining, instead deciding to do a 4 wheel drift perpendicular to the street.

After 200 ft or so I went off the road under the overpass, smacking a few reflector sticks across the driver front corner before coming to a stop. Fortunately I had these bumper vents, as the hood release was jammed and needed to be manually operated.

Fortunately there are very few things that can't be fixed by a friend and a trip to Harbor Freight! I picked up a selection of various bodywork hammers and got it straight enough for everything to work properly.

On to the topic of this post:
To this point I had never had the car properly aligned and suspected that wacky rear camber, caster, or toe settings contributed to the sudden loss of control.
However once I started to unpack I was reminded of the 2 disassembled rotary shortblocks I had in the back. I'm sure that didn't help.
When I checked the air pressure and inspected the tires, it was apparent that they were too worn to be trusted in wet conditions. Wonderful
But the icing on the cake was when I went to replace the aforementioned tires a couple weeks later and discovered that only one side of the sway bar was connected!
Oh, and just so we're clear THIS WAS NOT AN ATTEMPT AT STREET DRIFTING!!! so lets nip all that in the bud. I was basically moving and the car was completely filled with clothes, books, engine parts, a bumper , and inflatable mattress etc. So I never for a second thought about trying to get sideways on purpose.
So I make it all the way to Tallahassee, in the rain without incident and I'm taking the 270* corkscrew offramp into town. I've completed about 260 degrees and I'm merging onto the main road, when all of a sudden the rear just starts sliding out like I'm filming a backwards Junkhouse video...
...I start to counter steer......more counter steer.......more counter steer.......full lock.......****. It's still sliding, at this point I hit the brakes and it stopped spining, instead deciding to do a 4 wheel drift perpendicular to the street.
After 200 ft or so I went off the road under the overpass, smacking a few reflector sticks across the driver front corner before coming to a stop. Fortunately I had these bumper vents, as the hood release was jammed and needed to be manually operated.
Fortunately there are very few things that can't be fixed by a friend and a trip to Harbor Freight! I picked up a selection of various bodywork hammers and got it straight enough for everything to work properly.
On to the topic of this post:
To this point I had never had the car properly aligned and suspected that wacky rear camber, caster, or toe settings contributed to the sudden loss of control.
However once I started to unpack I was reminded of the 2 disassembled rotary shortblocks I had in the back. I'm sure that didn't help.
When I checked the air pressure and inspected the tires, it was apparent that they were too worn to be trusted in wet conditions. Wonderful
But the icing on the cake was when I went to replace the aforementioned tires a couple weeks later and discovered that only one side of the sway bar was connected!
Oh, and just so we're clear THIS WAS NOT AN ATTEMPT AT STREET DRIFTING!!! so lets nip all that in the bud. I was basically moving and the car was completely filled with clothes, books, engine parts, a bumper , and inflatable mattress etc. So I never for a second thought about trying to get sideways on purpose.
Passion for Racing
Joined: Aug 2010
Posts: 1,066
Likes: 2
From: Crown Point, Indiana
 I know how much it sucks. My accident was a little more avoidable, provided I was driving further behind the next guy and wasn't distracted. At least yours is more repairable and should just need a bumper and fender. Get her goin again and start having fun again
Thread Starter
Joined: May 2006
Posts: 3,881
Likes: 3
From: Jacksonville, Tampa & Tallahassee
Yeah, I had already planned the s5 conversion and that fender was screwed from before so that needed to be replaced anyway. I'll work on aligning thee front end better when I install the new bumper.
Thread Starter
Joined: May 2006
Posts: 3,881
Likes: 3
From: Jacksonville, Tampa & Tallahassee
Thread Starter
Joined: May 2006
Posts: 3,881
Likes: 3
From: Jacksonville, Tampa & Tallahassee
Rtek 2.1, wideband and fuel pump re-wire
Finally got around to installing my Rtek 2.1 , I had been waiting until I got a wideband O2 sensor because datalogging is half the point of getting it in the first place....also because I didn't feel like ripping up the carpet twice to install it later.

Pay no attention to the half-finished soldering job, I was completed and heat-shrinked before install.
I went with the Innovative LC-1 wideband, install was fairly straight forward and it tucks in nicely next to the ecu under the cover plate. Although not putting a plug on the actual O2 sensor cable made it somewhat annoying to screw into the downpipe.


When I installed my gauge cluster I thought about how much easier it would have been if I had a centralized source for the various power/ground/illumination sources for gauges. This is what I came up with for the time being, it mounts by the heater core on the drivers side under the dash.

It's bulky and cumbersome so I'll keep my eye out for a more elegant factory solution the next time I hit the junk yard.
I picked up this gauge pod in a group buy a while back and now I finally had something to use it for. It angles the gauges toward the driver and keeps the gauges in the line of site.

Here it is, all installed, no looking down below the radio while driving, no ricer pillar pod to attract attention. Just gotta figure out what other 2 gauges I need?
Since I had problems with the fuel system in the past I decided to be proactive this time around and rewire the fuel pump. Unlike most people I chose not to delete the variable resistor function I simply added in a relay to provide the whole circuit with a fresh lead directly to the battery which has been relocated to the passenger storage bin. First, cut the stock resistor wires up front...

Rewired the stock fuel pump connector for new direct (fused) power to battery and fresh ground, as well as added in the relay...

Got everything buttoned up and tucked away...

Pay no attention to the half-finished soldering job, I was completed and heat-shrinked before install.
I went with the Innovative LC-1 wideband, install was fairly straight forward and it tucks in nicely next to the ecu under the cover plate. Although not putting a plug on the actual O2 sensor cable made it somewhat annoying to screw into the downpipe.
When I installed my gauge cluster I thought about how much easier it would have been if I had a centralized source for the various power/ground/illumination sources for gauges. This is what I came up with for the time being, it mounts by the heater core on the drivers side under the dash.
It's bulky and cumbersome so I'll keep my eye out for a more elegant factory solution the next time I hit the junk yard.
I picked up this gauge pod in a group buy a while back and now I finally had something to use it for. It angles the gauges toward the driver and keeps the gauges in the line of site.
Here it is, all installed, no looking down below the radio while driving, no ricer pillar pod to attract attention. Just gotta figure out what other 2 gauges I need?
Since I had problems with the fuel system in the past I decided to be proactive this time around and rewire the fuel pump. Unlike most people I chose not to delete the variable resistor function I simply added in a relay to provide the whole circuit with a fresh lead directly to the battery which has been relocated to the passenger storage bin. First, cut the stock resistor wires up front...
Rewired the stock fuel pump connector for new direct (fused) power to battery and fresh ground, as well as added in the relay...
Got everything buttoned up and tucked away...
Thread Starter
Joined: May 2006
Posts: 3,881
Likes: 3
From: Jacksonville, Tampa & Tallahassee
Since the idiot light cluster real estate was now taken up by more pertinent gauges, I had to either accept loosing them or come up with a way to relocate them.
Since I'm not the type to swap to a manual door because my power window switch stops working, I decided to move them to the radio area.
Step one was to get the thing out and disassembled. The low fuel light has never worked (although I suspect that is a sender issue) and the brake light works sporadically.
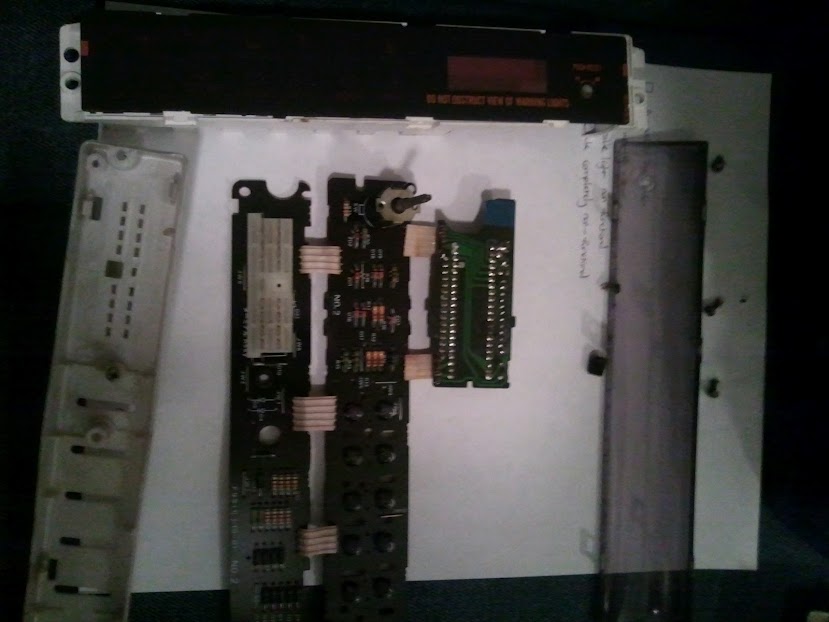
I wonder why....? Ohh....yeah, that'll do it.

First I had to de-solder all the contacts, then after re-soldering them I had to cross my fingers and hope it worked better. I thought about rigging up a way to test it before I started modifying it to fit the new location, but I've got extras so i just hoped for the best.

Since I'm not the type to swap to a manual door because my power window switch stops working, I decided to move them to the radio area.
Step one was to get the thing out and disassembled. The low fuel light has never worked (although I suspect that is a sender issue) and the brake light works sporadically.
I wonder why....? Ohh....yeah, that'll do it.
First I had to de-solder all the contacts, then after re-soldering them I had to cross my fingers and hope it worked better. I thought about rigging up a way to test it before I started modifying it to fit the new location, but I've got extras so i just hoped for the best.
Thread Starter
Joined: May 2006
Posts: 3,881
Likes: 3
From: Jacksonville, Tampa & Tallahassee
Next I was time to work out how this thing was going to fit into the radio panel that I bought ( Iirc it was like $16 on ebay).

Got it trimmed up and test fitted

Won't be needing these end pieces in its new home...

OK, so now it fits, but how do I get it to stay in place? After a hour or so of pondering I came up with these brackets that mount in the same location as the radio surround itself, ensuring a secure base.

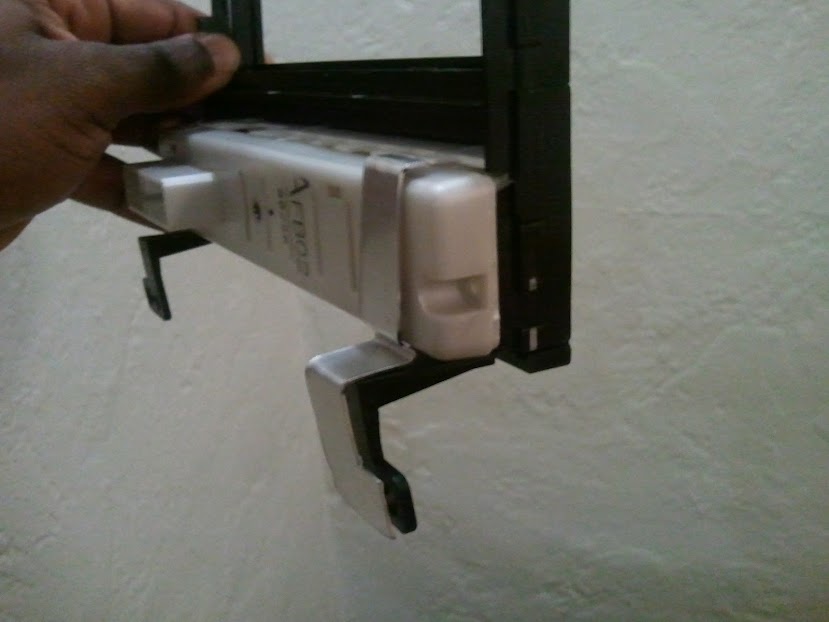
And done! Magically upon installation the clock decided to start working, this was especially odd since even during testing it remained non-operative. My only guess is that the pressure from the bracket after final install squeezed the contacts together firmly enough for it to work

Got it trimmed up and test fitted
Won't be needing these end pieces in its new home...
OK, so now it fits, but how do I get it to stay in place? After a hour or so of pondering I came up with these brackets that mount in the same location as the radio surround itself, ensuring a secure base.
And done! Magically upon installation the clock decided to start working, this was especially odd since even during testing it remained non-operative. My only guess is that the pressure from the bracket after final install squeezed the contacts together firmly enough for it to work
Thread Starter
Joined: May 2006
Posts: 3,881
Likes: 3
From: Jacksonville, Tampa & Tallahassee
Time to finish the s5 conversion, just gotta figure out how many cans of paint I need to do two fenders, a door, front bumper, rear bumper, and a sunroof.


Thread Starter
Joined: May 2006
Posts: 3,881
Likes: 3
From: Jacksonville, Tampa & Tallahassee
Deals are what keep this build going and this ended up being a fairly important one. A buddy of mine found a guy selling 3 rotary engines for $50 on craigslist. We borrowed a van and rode out to go pick them up

Unloading them at his house

Let the breakdown begin! 3 rotor Chevelle anyone?

As it turned out we ended up with 2 complete S4 engines (one coupe one vert) and one s5 engine (vert). we also got a bunch of other goodies, downpipe, FCD, oil coolers, oil filters, S5 manifold set and some other stuff I'm sure I forgot

One of the S4 engines apparently had a coolant leak before it was parked....Surprisingly the housing was in great shape.

S5 engine was a mazda reman,

Unloading them at his house
Let the breakdown begin! 3 rotor Chevelle anyone?
As it turned out we ended up with 2 complete S4 engines (one coupe one vert) and one s5 engine (vert). we also got a bunch of other goodies, downpipe, FCD, oil coolers, oil filters, S5 manifold set and some other stuff I'm sure I forgot
One of the S4 engines apparently had a coolant leak before it was parked....Surprisingly the housing was in great shape.
S5 engine was a mazda reman,
omg dude its hearing about **** like this makes me want to go over fill up a shipping container and bring it back and get rich lol.
good score man and love the idiot cluster relocation
good score man and love the idiot cluster relocation
Thread Starter
Joined: May 2006
Posts: 3,881
Likes: 3
From: Jacksonville, Tampa & Tallahassee
Yeah, I could barely believe it myself, granted there was a little vagueness in the wording of the ad, and what I he was looking for was $50 each, but between my buddy and I we made it work.
The most tedious part of the cluster relocation was definitely the extenstion harness.....

The most tedious part of the cluster relocation was definitely the extenstion harness.....