Naomi: Can't keep a good bitch down!


 07-29-12, 01:45 PM
#104
S5 conversion and paint touch up
I'd been holding onto a complete S5 conversion for a couple years, but now since the driver fender, front bumper, rear bumper and both rocker panels were damaged, it seemed like the time to put it to good use.
Step one was to strip off the old crap and start the masking process


This can't be good for airflow and looks like ****...

A little better
Step one was to strip off the old crap and start the masking process
This can't be good for airflow and looks like ****...
A little better
08-05-12, 11:32 AM
#107
Time for another day of work...

Replacement S5 fenders were unfortunately red...

But they turned out ok I suppose...

Driver door idn't turn out too bad for a rattle can job...

S5 bumper fits the exhaust so much better

And a sport spoiler to round out the package...

Just gotta finish up the front bumper and core support.
Replacement S5 fenders were unfortunately red...
But they turned out ok I suppose...
Driver door idn't turn out too bad for a rattle can job...
S5 bumper fits the exhaust so much better
And a sport spoiler to round out the package...
Just gotta finish up the front bumper and core support.
 08-14-12, 04:07 PM
#110
Mock up for the cuts I had to make for the VMIC ducts through the core support. I decided to retaining the core support as opposed to going the lazy route and just removing it altogether. The old S4 support was trashed already, but the S5 bumper came with one (side note: the S4 and S5 core supports are NOT interchangeable).

This was a big PITA because I lacked the proper tools to make it easy, and with a dissasembled daily driver, picking them up was not an option. I had to drill a series of holes around the entire cut out then I had to use a hacksaw blade BY HAND to "connect the dots. I'll go back with the dremel and smooth out the edges/corners later

I re-used the plastic panel(s) that used to reside in front of the radiator for some make shift duct work. It's quite durable and the contours actually work like it was meant to be

Semi-finalized mock up. I've got to find a better way to mount the foam pieces so that they stay on while I'm installing the bumper.

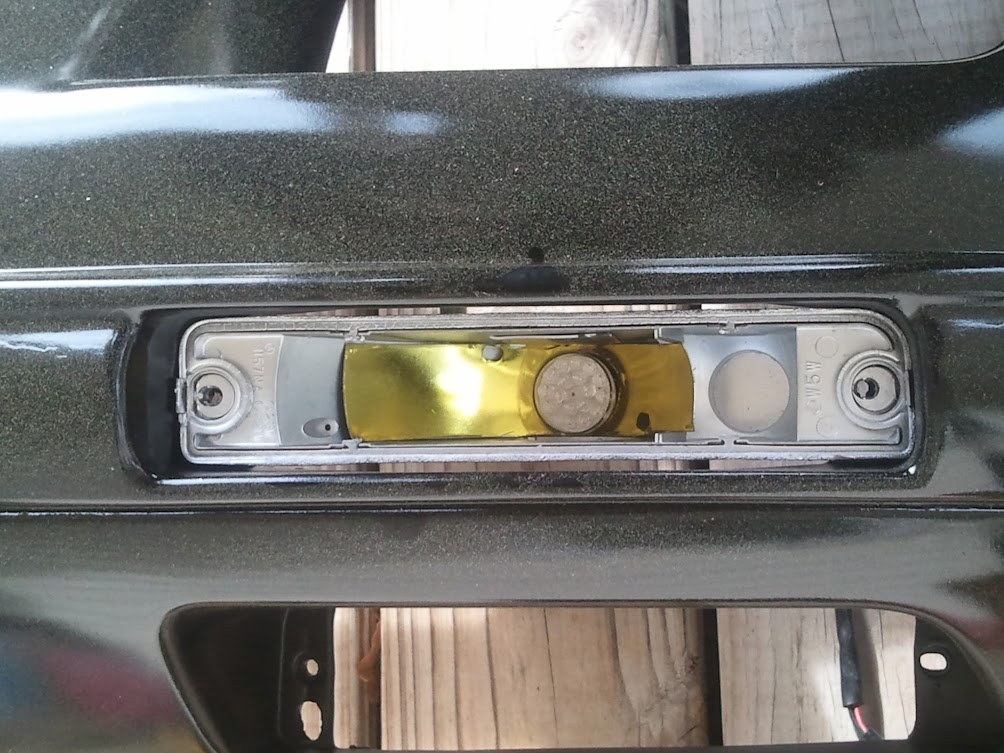
The turn signals were installed in the bumper the entire time I've owned it, upon removal I discovered one wa in pretty rough shape. I ended up having to cut the back off one of my S4 turn signals and grafting it on using JB weld....voila'

Stock horns, pathetic though they may be are better than nothing, so I cleaned them up and re located them since their original home is now being used for more important things.

Props to Clokker for the hood prob idea. Although he insists his came from "some other nissan" This particular unit came from a 3000gt and it fits/works PERFECTLY.

Final Mock up more or less...

This was a big PITA because I lacked the proper tools to make it easy, and with a dissasembled daily driver, picking them up was not an option. I had to drill a series of holes around the entire cut out then I had to use a hacksaw blade BY HAND to "connect the dots. I'll go back with the dremel and smooth out the edges/corners later
I re-used the plastic panel(s) that used to reside in front of the radiator for some make shift duct work. It's quite durable and the contours actually work like it was meant to be
Semi-finalized mock up. I've got to find a better way to mount the foam pieces so that they stay on while I'm installing the bumper.
The turn signals were installed in the bumper the entire time I've owned it, upon removal I discovered one wa in pretty rough shape. I ended up having to cut the back off one of my S4 turn signals and grafting it on using JB weld....voila'
Stock horns, pathetic though they may be are better than nothing, so I cleaned them up and re located them since their original home is now being used for more important things.
Props to Clokker for the hood prob idea. Although he insists his came from "some other nissan" This particular unit came from a 3000gt and it fits/works PERFECTLY.
Final Mock up more or less...
 11-14-12, 03:13 PM
#115
Drive Train Refresh
Next up I needed to address the drive train. I headed down to my buddy's house in Sarasota since he had more tools and the the sexy style hood I bought from him over a year ago and never had a chance to pick up.
We planned to do more but this is what we got accomplished:
Worth noting* All TII half shafts are NOT created equal. The pre-88' shafts are longer than the 88 and later shafts and thus are difficult to fit when using the 88 and later diff. (this resulted in one of the boots being torn when I tried to only swap the one shaft with the torn boot and leave the other 87 shaft in place)


This is what happens when you don't know that the half shafts are different lengths and you try to force them on and tear the boot and you have to leave and the parts store only has universal boots in stock


We planned to do more but this is what we got accomplished:
- Spec stage 3 clutch
- ACT streetlite flywheel
- S4 AT counterweight
- Replace Pilot Bearing
- Replace TO bearing
- Replace Trans cross member w/ new unit from Mazdatrix
- Swap Diff for low(er) milage unit from 10AE
- Swap out the half shafts for some low(er) milage units from the 10AE
- Install Pinion Snubber
- Install MMR individual camber adjusters
- Install RB single camber adjuster
- Install &*$##@#$ing shifter return spring in trans
- Flush and replace Trans fluid with Lucas
- Flush and replace Diff fluid with Lucas
- Install Sexy Style Hood
Worth noting* All TII half shafts are NOT created equal. The pre-88' shafts are longer than the 88 and later shafts and thus are difficult to fit when using the 88 and later diff. (this resulted in one of the boots being torn when I tried to only swap the one shaft with the torn boot and leave the other 87 shaft in place)
This is what happens when you don't know that the half shafts are different lengths and you try to force them on and tear the boot and you have to leave and the parts store only has universal boots in stock
Last edited by sharingan 19; 11-14-12 at 03:32 PM. Reason: wrong pic
11-17-12, 09:41 AM
#116
Post-refresh Evaluation
On the way home I noticed some very light clutch chatter around 3k. I also noticed a light thump and associated shifting feeling in the rear on acceleration/deceleration occasionally, I figured that was probably the result of installing that 10 AE diff (w/ stock mounts) into an otherwise solid mounted drive train.
08-17-13, 11:52 PM
#118
Well, shortly after finishing up the s5 conversion, a dumb bitch (in a mazda 3 no less) slammed on brakes at a green light and it didn't end well...

Of course there was literally zero damage to her car as my front end was completely underneath her bumber. Fortunately I didn't have my FTP's in and I also took the time to cut out the bumper support because I really makes a big difference in low speed collisions.
Of course there was literally zero damage to her car as my front end was completely underneath her bumber. Fortunately I didn't have my FTP's in and I also took the time to cut out the bumper support because I really makes a big difference in low speed collisions.
08-18-13, 12:19 AM
#120
S5 front bumber redux
So, it was time to go back to the drawing board on the front bumper. After removing the metal support along the top edge, the bumper went back to shape. I found another at a junkyard and we were pretty much back in business as far as fitment. Oh, and I had to grab another bumper support, and I had to cut it with a hand held hack saw blade....again.

Then I figured, why not enlarge the bumper cut outs a bit to improve airflow...
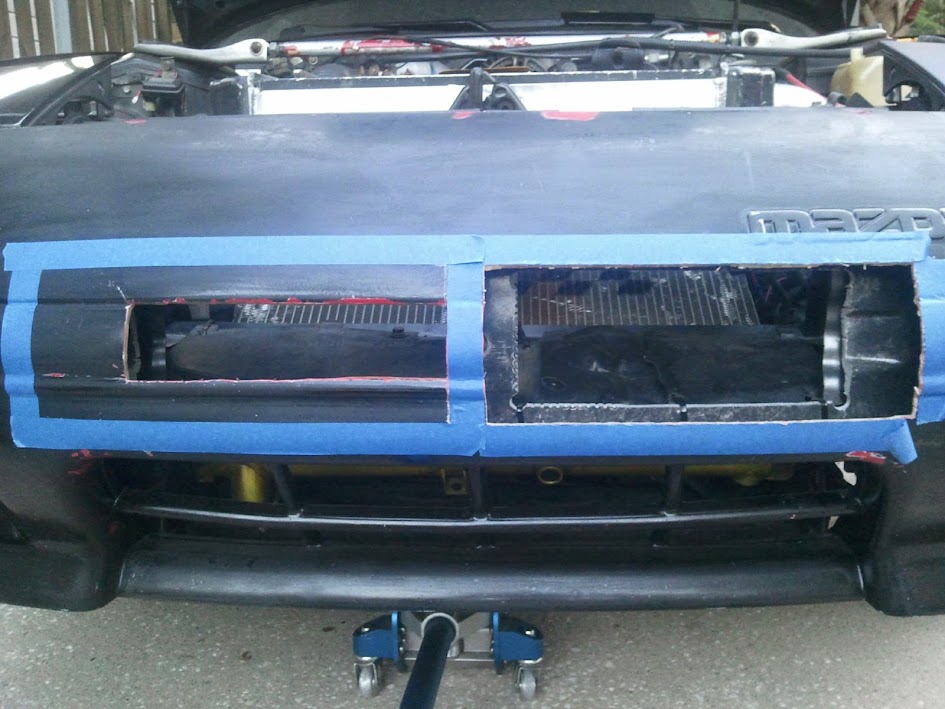

"But wait, you've cut too much " ..... maybe....maybe not; more on that in just a bit
Then I figured, why not enlarge the bumper cut outs a bit to improve airflow...
"But wait, you've cut too much
" ..... maybe....maybe not; more on that in just a bit
08-18-13, 12:32 AM
#122
Put in an order for a few parts and decided to tackle a little problem that had been bothering me for a few months..... the dreaded "sticky starter" issue.

Not familiar with the problem? ....http://www.
rx7club.com/2nd-generation-specific-1986-1992-17/ive-solves-2nd-gen-sticky-starter-mystery-896013/?highlight=sticky+starter
Not familiar with the problem? ....http://www.
rx7club.com/2nd-generation-specific-1986-1992-17/ive-solves-2nd-gen-sticky-starter-mystery-896013/?highlight=sticky+starter


 08-18-13, 01:01 AM
#125
Oil mods!
***Disclaimer***First of all let me say that removing/installing an oil pan on an engine in-car is a huge pain in the ***. NOT reccomended.
That being said, here's what I set out to do:
I'll skip the boring/messy part, after straightening the oil pan flange I gave it a quick coat of wheel paint.

While that was drying I rebuilt the OMP
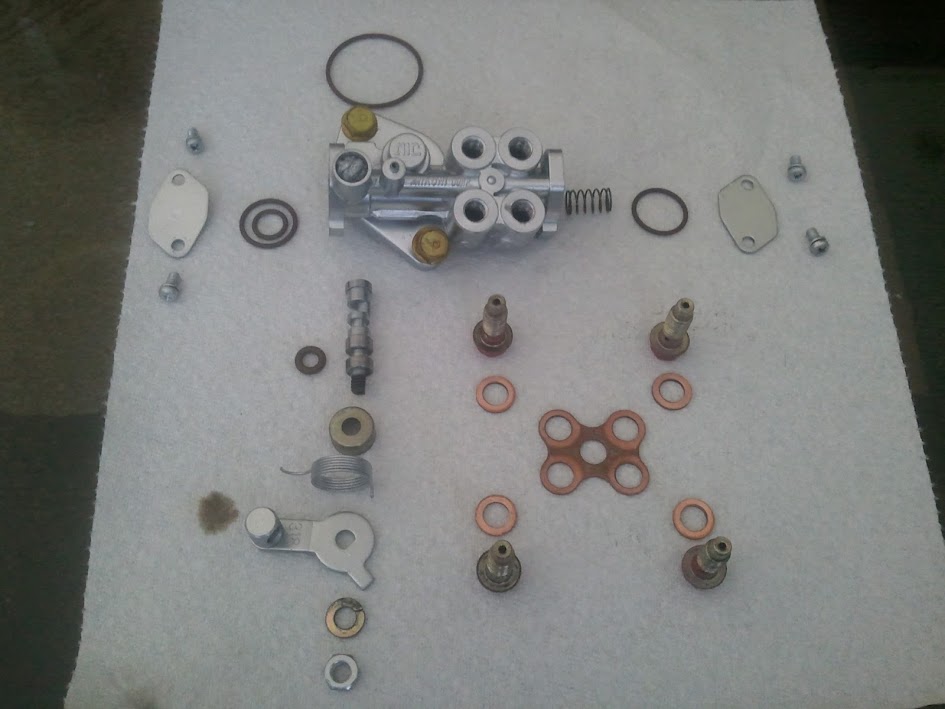
...and crushed the oil pressure regulator to up the psi a bit. I was hoping for 80psi, ended up with 75psi, not too shabby for a free mod.

Pan installed and sealed up with "The Right stuff". On a whim I decided to spray the hardware match the drain plug

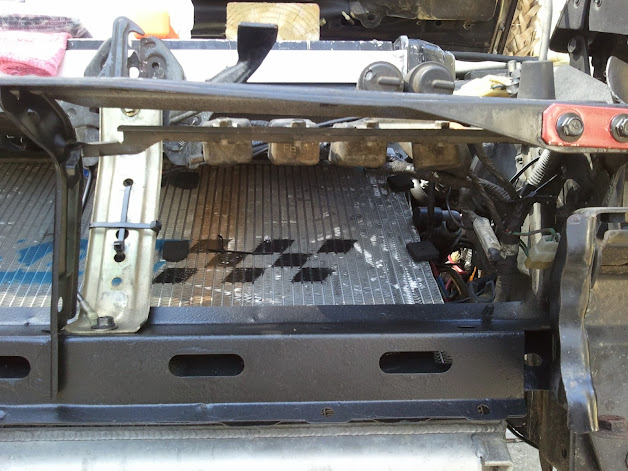
And what underside would be complete without the aluminum aero tray?

That being said, here's what I set out to do:
- Fix leaking oil pan
- Install RB oil pan baffle
- Install oil pan brace
- Shim / modify oil pressure regulators
- rebuild leaking OMP
I'll skip the boring/messy part, after straightening the oil pan flange I gave it a quick coat of wheel paint.
While that was drying I rebuilt the OMP
...and crushed the oil pressure regulator to up the psi a bit. I was hoping for 80psi, ended up with 75psi, not too shabby for a free mod.
Pan installed and sealed up with "The Right stuff". On a whim I decided to spray the hardware match the drain plug
And what underside would be complete without the aluminum aero tray?