Maybe an official Build Thread will keep me on task
 04-16-10, 09:52 AM
#1
*insert clever title here
Thread Starter
Join Date: Nov 2005
Location: Des Moines, IA
Posts: 332
Likes: 0
Received 0 Likes
on
0 Posts
Maybe an official Build Thread will keep me on task
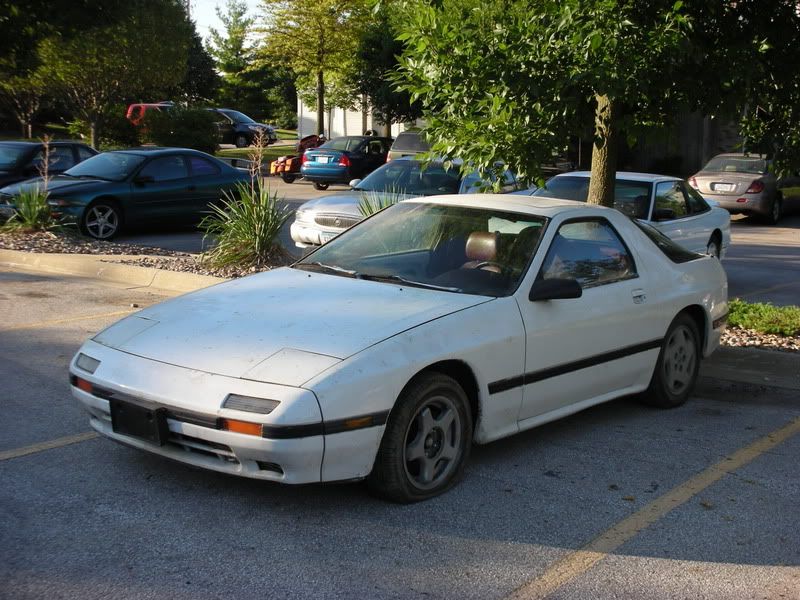
I bought my '86 GXL from a friend of a friend on July 12th, 2007. I bought the car with a blown engine and planned on doing a rebuild. To this day, the furthest I've "driven" the car is backing it off the trailer and pushing it into a garage stall. It has been sitting for far too long and I need to finally get this car running.
A few weeks ago, I picked up a supposedly running S5 N/A engine. I also have most of the parts as well as a rebuild kit for a second S5 N/A I bought a while back, with a bad rotor and e-shaft. My plan is to install the running engine to get the car on the road while I build a ported S5 with the other engine and install it this winter.
It is a hassle working in my apartment's garage stall so I don't get out there nearly as often as I should, but I am hoping having a build thread will help give me the encouragement and drive I need to finally get this car on the road.
Day after I got it home:
Pulling the bad engine:
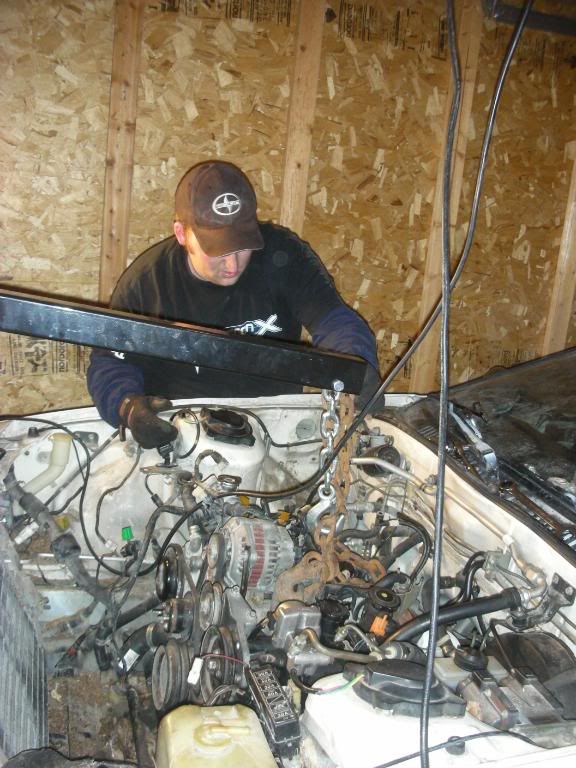
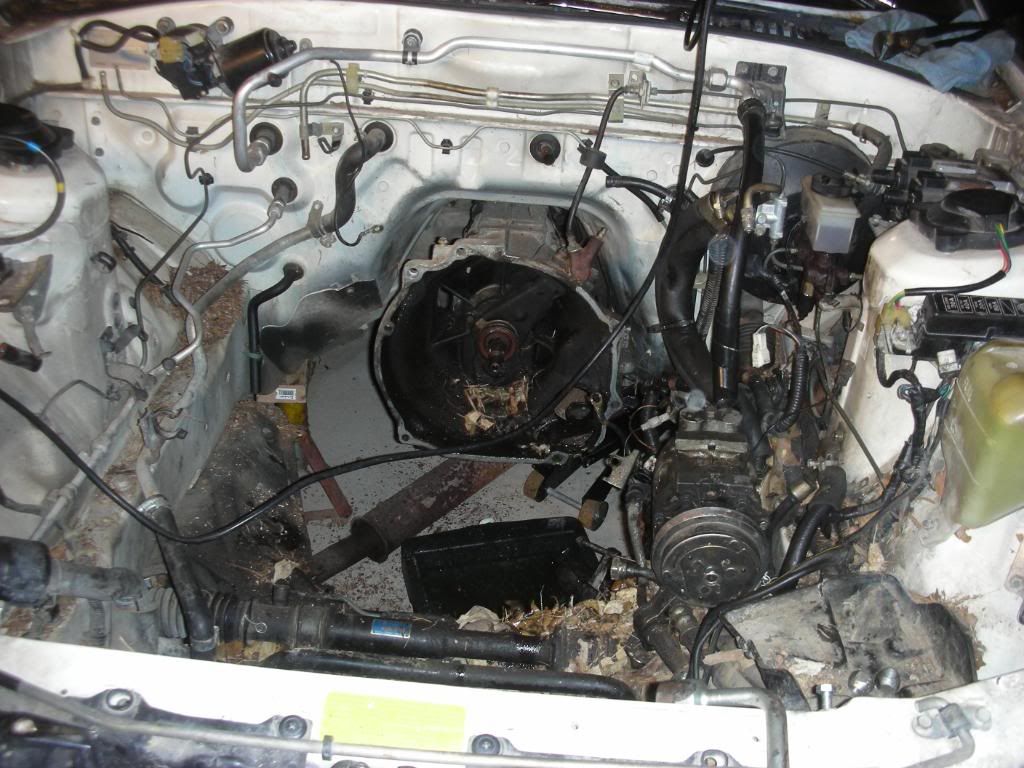
Tons of pine needles and leaves found their way into the engine bay:
More pics to come soon!
A few weeks ago, I picked up a supposedly running S5 N/A engine. I also have most of the parts as well as a rebuild kit for a second S5 N/A I bought a while back, with a bad rotor and e-shaft. My plan is to install the running engine to get the car on the road while I build a ported S5 with the other engine and install it this winter.
It is a hassle working in my apartment's garage stall so I don't get out there nearly as often as I should, but I am hoping having a build thread will help give me the encouragement and drive I need to finally get this car on the road.
Day after I got it home:
Pulling the bad engine:
Tons of pine needles and leaves found their way into the engine bay:
More pics to come soon!
 04-26-10, 09:09 AM
#2
*insert clever title here
Thread Starter
Join Date: Nov 2005
Location: Des Moines, IA
Posts: 332
Likes: 0
Received 0 Likes
on
0 Posts
Not much progress. I was up at my parents' this weekend and did a little cleaning on the "new" engine. I'm hoping to get it down to my RX-7 garage in the next week or so. Until then, I'll be working on getting the engine bay ready for it.
The freshly cleaned engine (Simple Green and pressure washer FTW!):
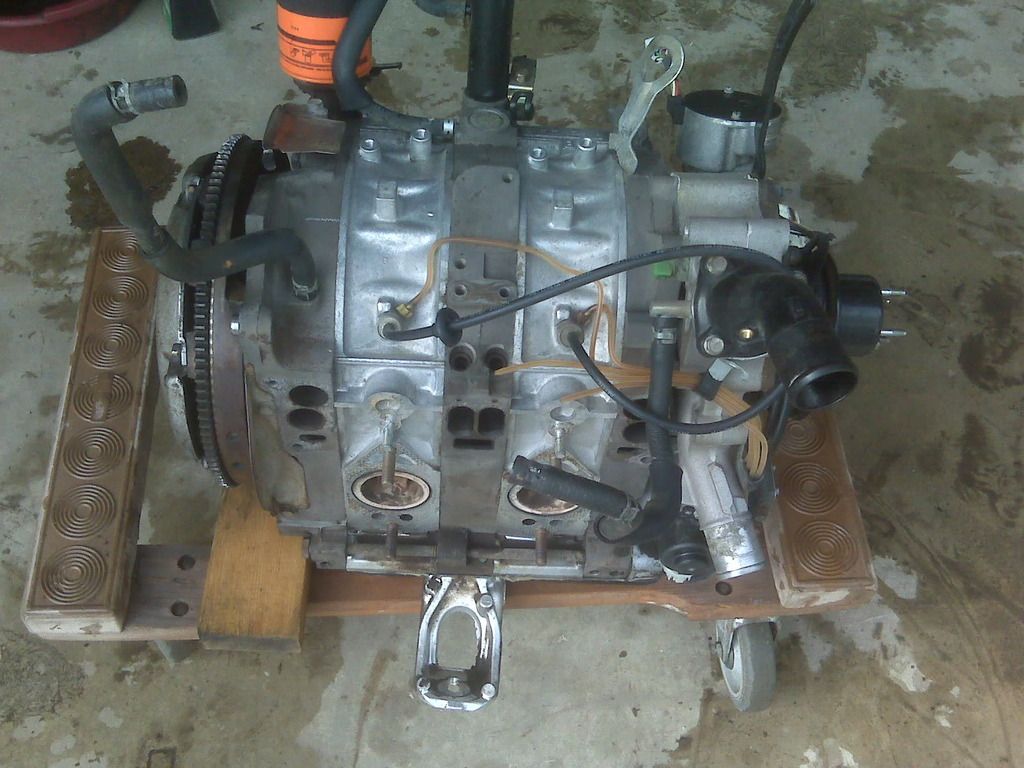
The freshly cleaned engine (Simple Green and pressure washer FTW!):
04-28-10, 08:20 AM
#3
*insert clever title here
Thread Starter
Join Date: Nov 2005
Location: Des Moines, IA
Posts: 332
Likes: 0
Received 0 Likes
on
0 Posts
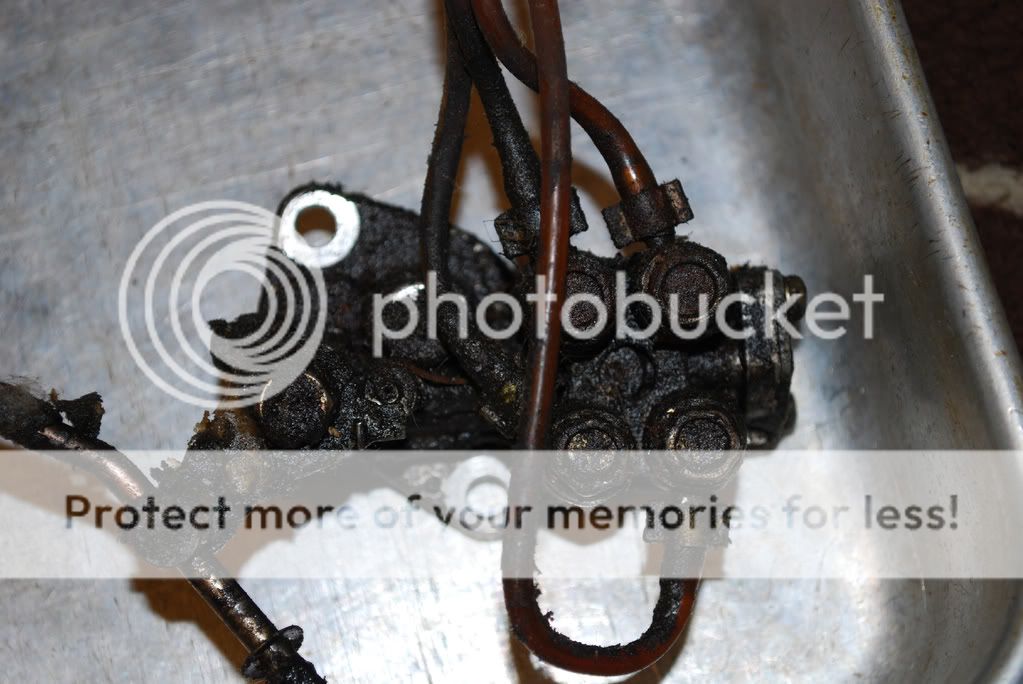
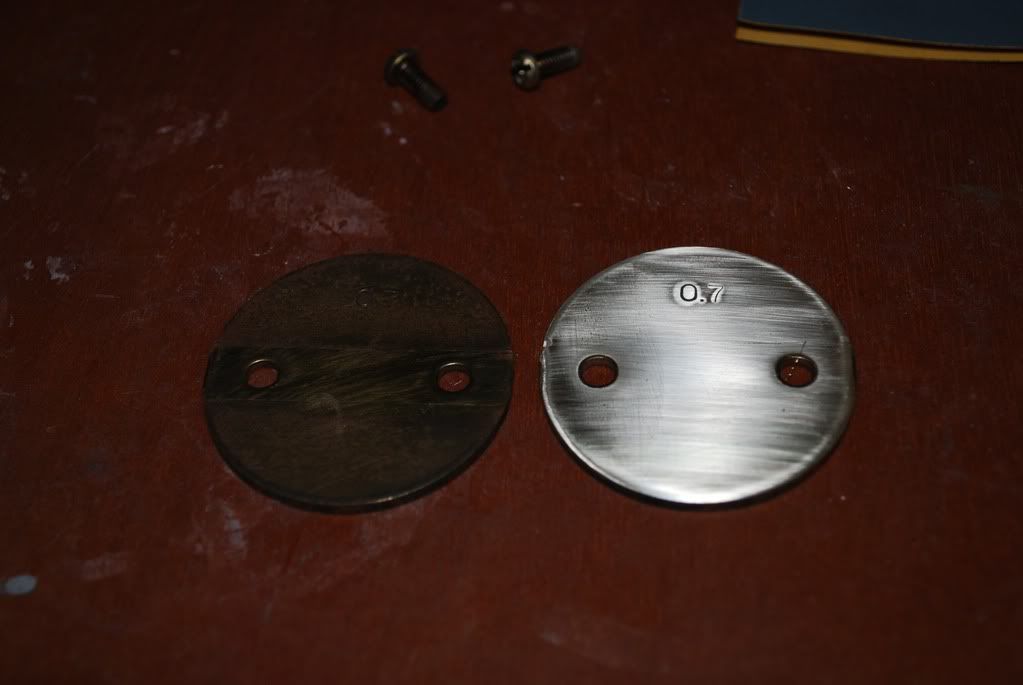
Didn't get much done on the RX-7 last night because I had to go out for dinner with the fiance and her cousin, but I did get the metering oil pump from my S4 engine brought inside to clean up and rebuild. It is pretty nasty (as you can see below), but after a little engine cleaner, it should look much better.
I already have new lines and line clamps on the way to rebuild the notoriously fragile oil injection lines. It isn't much, but its still progress. I'm hoping to get this done tonight and start working on the S4 throttle body and getting the S5 upper intake manifold cleaned up and ready to install.
Nasty S4 MOP:
04-28-10, 09:22 AM
#5
MECP Certified Installer
 04-29-10, 10:32 AM
#7
*insert clever title here
Thread Starter
Join Date: Nov 2005
Location: Des Moines, IA
Posts: 332
Likes: 0
Received 0 Likes
on
0 Posts
Thanks. The engine bay pic is older and I have spent some time cleaning out all of the pine needles. Now, I need to go through and remove some of the brackets and hoses that needles have found there way behind so that I can totally clean it out and get it ready for the engine.
Trending Topics
04-29-10, 04:28 PM
#8
Excessive Heavy Foot
Hey good luck, Im in the same situation as you are in at this point.
I finally have everything (I hope ) I need to put mine back together...
What side of town do you live on?
I finally have everything (I hope
) I need to put mine back together... What side of town do you live on?
04-30-10, 09:04 AM
#10
*insert clever title here
Thread Starter
Join Date: Nov 2005
Location: Des Moines, IA
Posts: 332
Likes: 0
Received 0 Likes
on
0 Posts
I got it from http://www.corbincorp.com I ordered 10 feet of tubing (#48701031) and 12 clamps (#48547962) so that I have plenty of extra in case I screw anything up. After a quick search online, I found two coupon codes that got me 25% off my order and free shipping. I got my box in the mail two days later.
04-30-10, 11:02 AM
#11
Excessive Heavy Foot
Sweet, I just moved from the West side, but from 13th and Grand.. Let me know if you ever need a hand, it'll probably help me out in the long run if I dont have mine rolling yet..
05-03-10, 08:55 AM
#12
*insert clever title here
Thread Starter
Join Date: Nov 2005
Location: Des Moines, IA
Posts: 332
Likes: 0
Received 0 Likes
on
0 Posts
Awesome. I might take you up on your offer for help sometime. It would be nice to have an extra set of hands that is familiar with rotaries. Feel free to let me know if you need any help as well.
05-03-10, 09:25 AM
#13
*insert clever title here
Thread Starter
Join Date: Nov 2005
Location: Des Moines, IA
Posts: 332
Likes: 0
Received 0 Likes
on
0 Posts
This weekend, I got my "good" S5 engine down to Des Moines and did some deconstruction of the S4 throttle body to get it cleaned up and ported a little.
I am getting married in the beginning of August, but planning on moving to a new apartment mid-July so I need to get working. Putting a third engine in my RX-7 garage made me realize that I really need to kit the build into high gear so that I can have at least one engine out of the garage and in my car for the move.
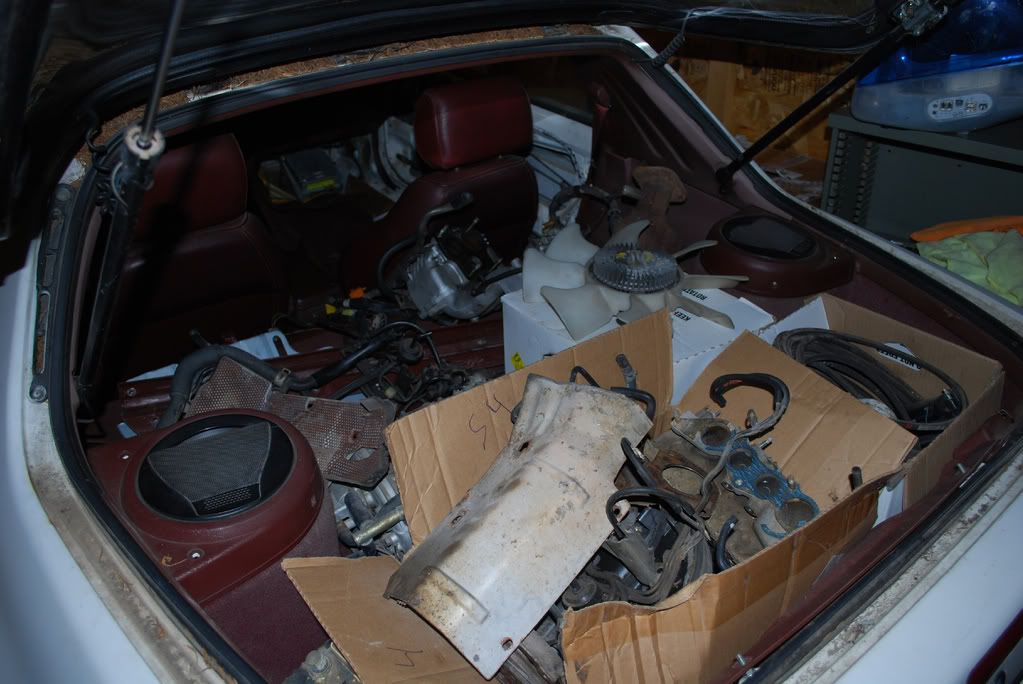
Most of my RX-7 parts:

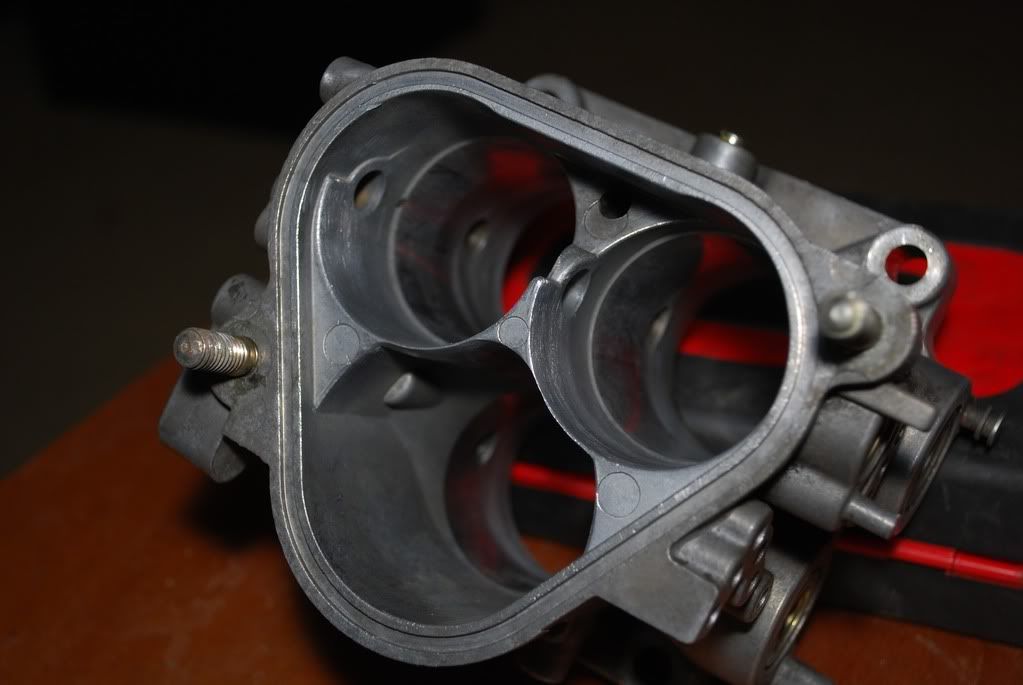
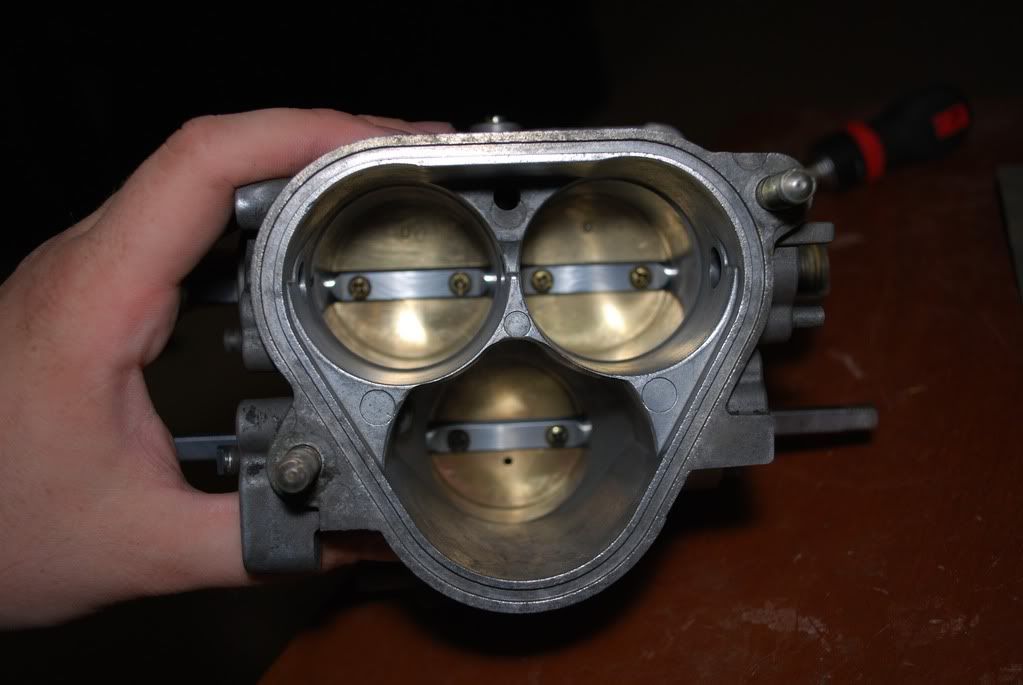
As I mentioned above, I spent some time this weekend disassembling the S4 throttle body. It was pretty dirty so I wanted to take it completely apart and clean everything. While I have it apart, I am planning on doing some minor smoothing/porting to encourage smoother airflow coming into the throttle body. I don't know now much it will help, but it couldn't really hurt either. Hopefully, I can remember how everything goes together. I took some reference pictures before, but there are always angles you don't get. I have some extra S5 throttle bodies that I can look at for reference if I need to.

Here is another shot of my work. You can see the 95% stripped throttle body in the pan, oil injection banjo fittings, the clean MOP, baggies of parts from the throttle body, and a rotor clock I made a while back.

I am getting married in the beginning of August, but planning on moving to a new apartment mid-July so I need to get working. Putting a third engine in my RX-7 garage made me realize that I really need to kit the build into high gear so that I can have at least one engine out of the garage and in my car for the move.
Most of my RX-7 parts:
As I mentioned above, I spent some time this weekend disassembling the S4 throttle body. It was pretty dirty so I wanted to take it completely apart and clean everything. While I have it apart, I am planning on doing some minor smoothing/porting to encourage smoother airflow coming into the throttle body. I don't know now much it will help, but it couldn't really hurt either. Hopefully, I can remember how everything goes together. I took some reference pictures before, but there are always angles you don't get. I have some extra S5 throttle bodies that I can look at for reference if I need to.
Here is another shot of my work. You can see the 95% stripped throttle body in the pan, oil injection banjo fittings, the clean MOP, baggies of parts from the throttle body, and a rotor clock I made a while back.
05-04-10, 09:31 AM
#15
*insert clever title here
Thread Starter
Join Date: Nov 2005
Location: Des Moines, IA
Posts: 332
Likes: 0
Received 0 Likes
on
0 Posts
You are right. Take a look at the picture of the MOP though. The throttle body wasn't quite that bad, but close. There was junk and grime all over it and I want to make sure the throttle body is in good working condition. It sucks scrubbing everything, but hopefully, reassembly will begin tonight.
05-05-10, 10:26 AM
#16
*insert clever title here
Thread Starter
Join Date: Nov 2005
Location: Des Moines, IA
Posts: 332
Likes: 0
Received 0 Likes
on
0 Posts
Another night of not getting much done. All I really did was clean up the oil injector "rings" and put the tubing on the MOP side of them. I got a 10 foot chunk of clear hose from MSI along with the crimp fittings. After cleaning up the "rings" and making sure I could blow through them, I slid on the hose and crimped the fittings. They are held on there pretty snug. I am missing one of the "rings" so I need to find that before I put the rest on. Sorry, I forgot to take pics. I'll post them up in the next day or two. They look really nice though.
I still need to get a little bit of grime off the throttle body before I start reassembly. I want to make sure it is nice and clean before I start putting everything back on. I'm guessing reassembly will be a slow process because I'll be cleaning each of the little individual pieces before putting it back on the throttle body. I am really hoping this hard work pays off in that I'll have a reliable throttle body on the car.
Since I'm planning on removing the emissions stuff, I have been looking into how to control the 5/6 ports and VDI with an air pump and RPM activated circuit. I found a DIY circuit that I am trying to decypher and started another thread asking for some help figuring it out: https://www.rx7club.com/2nd-generation-specific-1986-1992-17/need-some-help-electronics-geeks-901889/#post9976759 If I can't get this circuit working before I install the engine, I think I'll probably just rig up two switches in the cabbin that I can depress when I get to the appropriate RPM's if I need to. It will be annoying, but also cheap and incentive to get the RPM switch working.
05-07-10, 08:55 AM
#17
*insert clever title here
Thread Starter
Join Date: Nov 2005
Location: Des Moines, IA
Posts: 332
Likes: 0
Received 0 Likes
on
0 Posts
After getting stuff cleaned to my satisfaction, I finally started on reassembling the throttle body. I didn't get much done because I got a new phone (Droid Incredible) and was playing with that most of the night, but I got a little done.
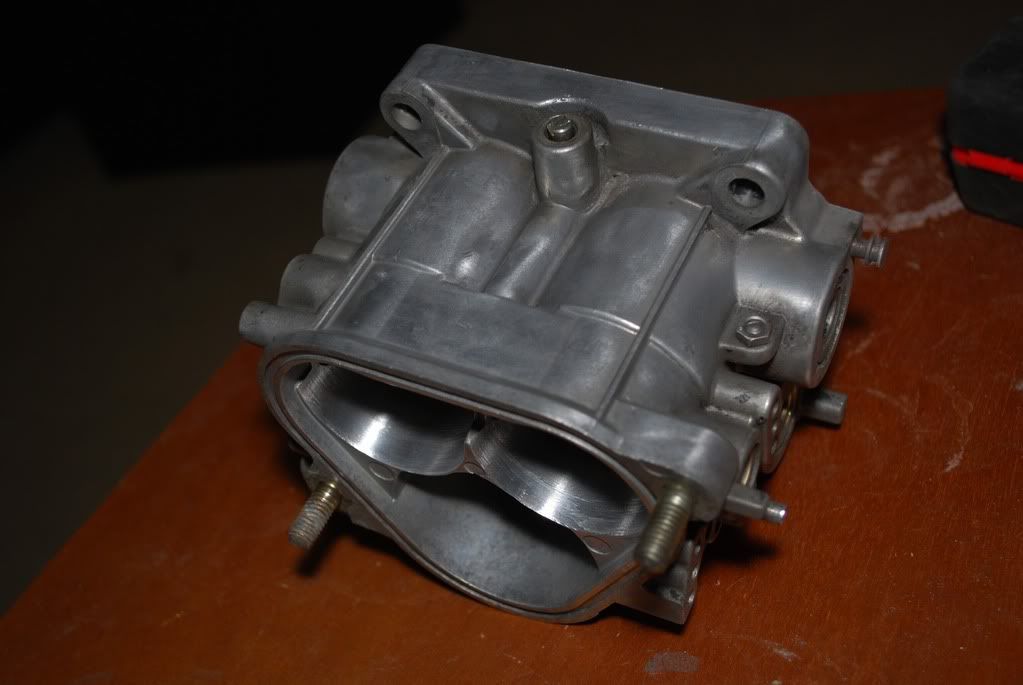
The naked throttle body. You can see some of the minor porting on the edges.
Took some 2000 grit sandpaper to the butterflies after they were degreased. This was taken partway through the sanding to show the difference.
The first hints of reassembly. Now I get the fun task of trying to remember how everything goes back on.
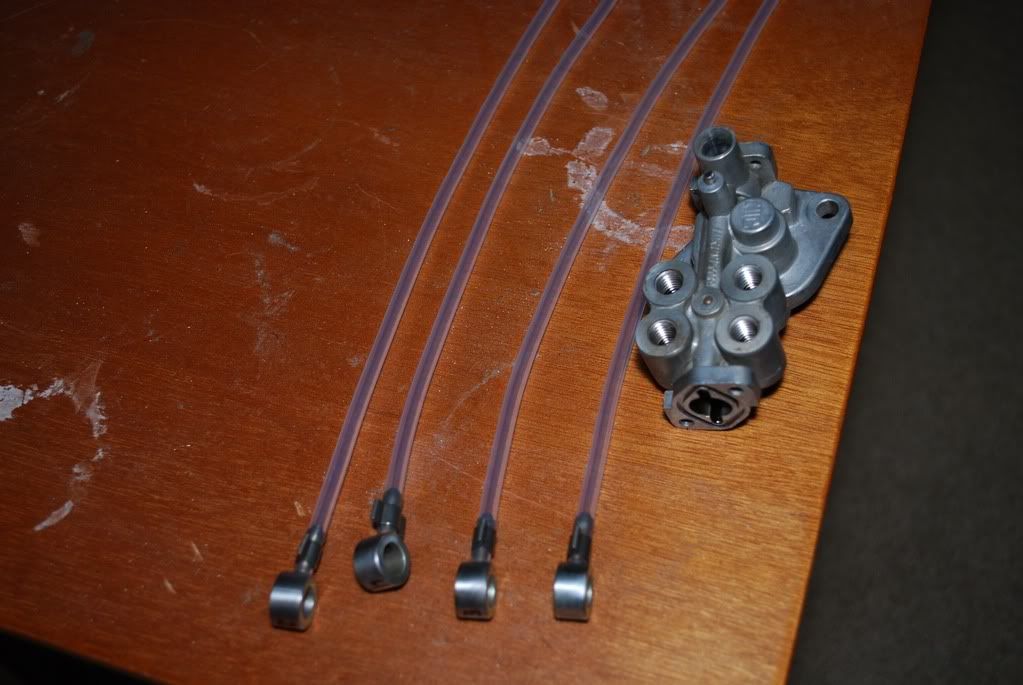
The clean MOP and rebuilt oil lines. Take a look a few posts up to see how grimey the MOP was before cleaning.
The naked throttle body. You can see some of the minor porting on the edges.
Took some 2000 grit sandpaper to the butterflies after they were degreased. This was taken partway through the sanding to show the difference.
The first hints of reassembly. Now I get the fun task of trying to remember how everything goes back on.
The clean MOP and rebuilt oil lines. Take a look a few posts up to see how grimey the MOP was before cleaning.
06-07-10, 10:29 AM
#18
*insert clever title here
Thread Starter
Join Date: Nov 2005
Location: Des Moines, IA
Posts: 332
Likes: 0
Received 0 Likes
on
0 Posts
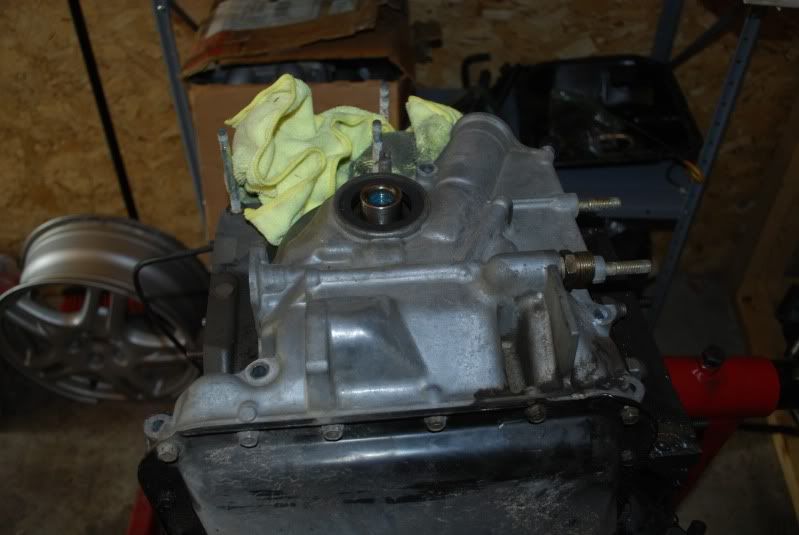
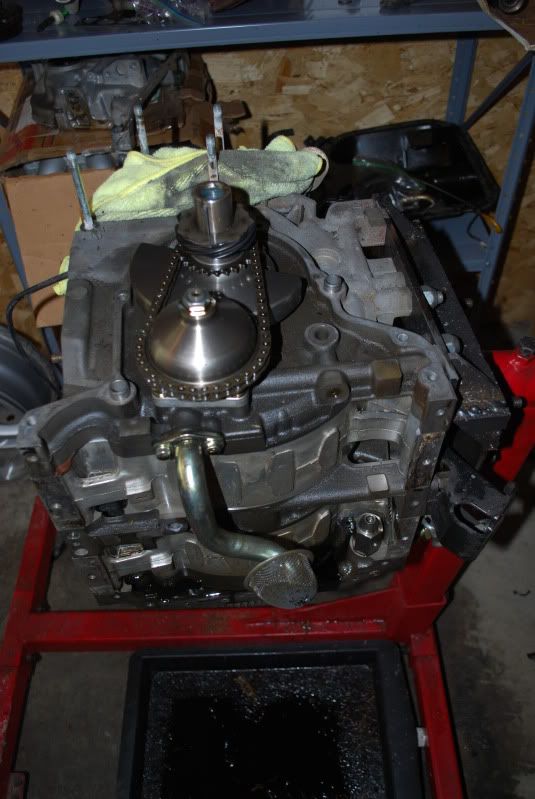
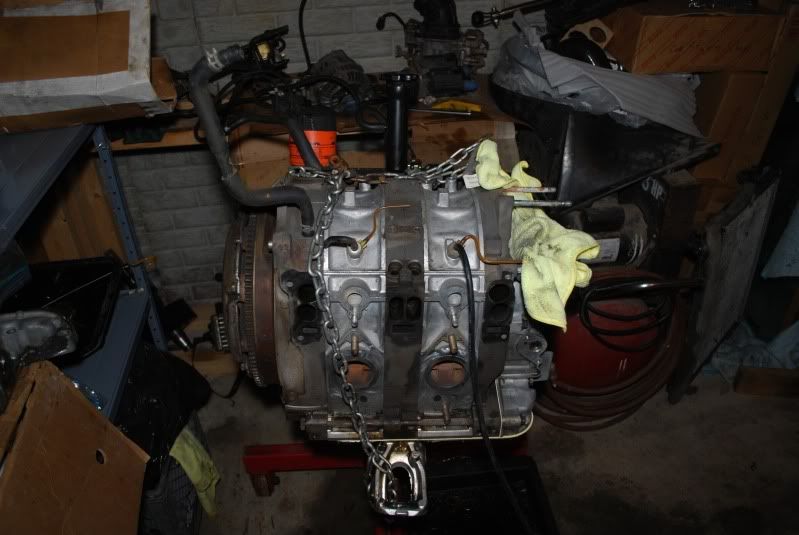
It has been far too long, but I got a little bit more done on the 7 this weekend. I pulled the grimey front cover off the S4 engine and removed the S4 from my engine stand. The S5 engine went on the stand got the water pump pulled and the front cover ready to come off. I wanted to clean up the S4 front cover before putting it on.
It was really nice getting the S5 engine on the stand because I know I'm getting closer to getting it in the car. Once I get the front cover on, I'll be working on getting the rest of the pulleys, intake, etc. put on so that I can drop the engine into the car. Small steps, but I hope to make some good progress in the next week or two.
It was really nice getting the S5 engine on the stand because I know I'm getting closer to getting it in the car. Once I get the front cover on, I'll be working on getting the rest of the pulleys, intake, etc. put on so that I can drop the engine into the car. Small steps, but I hope to make some good progress in the next week or two.
06-15-10, 02:12 PM
#19
*insert clever title here
Thread Starter
Join Date: Nov 2005
Location: Des Moines, IA
Posts: 332
Likes: 0
Received 0 Likes
on
0 Posts
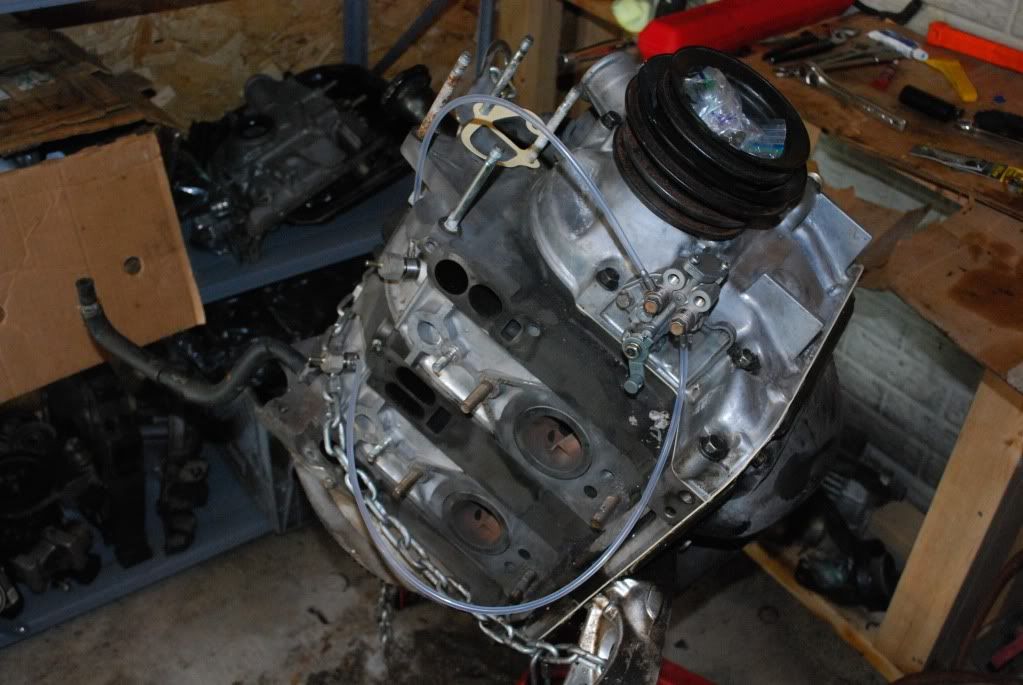
Baby steps are better than no steps I guess. Got a little work done on the 7 before the fiance came over yesterday (had to put the car on hold to work on wedding invitations). I got the front cover completely pulled off the S5 engine and was working with a paint scraper to get the old gasket off. After getting frustrated, I tried a razor blade and realized that worked MUCH better.
I had hoped to keep the oil pan on the engine and simply run a bead of sealant along the exposted oil pan lip when I reinstalled the front cover. After seeing several chunks of gasket fall down into the pan, I realized it would be safer to just pull the pan and do it the right way.
As the car sits now, the S4 front cover is on the engine with a new gasket being used. I am planning on using silicone to reseal the oil pan once I get the front cover torqued down. After that, I just need to reinstall the MOP and the engine should be just about ready to be dropped back in the car. There will be a lot of stuff to do once it is back in the car (intake manifold, emissions hole plugging, etc.), but I am excited to get to that point.
S5 front cover waiting to come off:
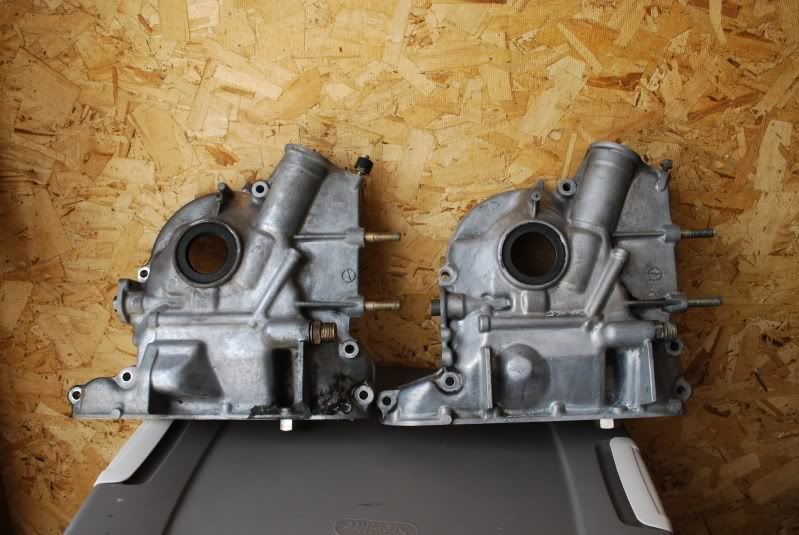
S5 cover on the left and S4 on the right:
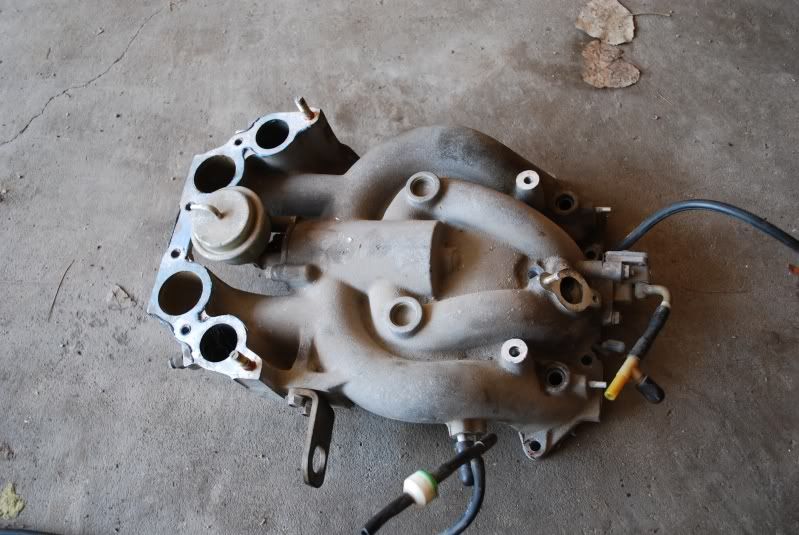
The dirty S5 VDI intake manifold before I sprayed it down with engine cleaner:
The S5 engine waiting for the S4 front cover (had to finish scraping the gasket material off)
I had hoped to keep the oil pan on the engine and simply run a bead of sealant along the exposted oil pan lip when I reinstalled the front cover. After seeing several chunks of gasket fall down into the pan, I realized it would be safer to just pull the pan and do it the right way.
As the car sits now, the S4 front cover is on the engine with a new gasket being used. I am planning on using silicone to reseal the oil pan once I get the front cover torqued down. After that, I just need to reinstall the MOP and the engine should be just about ready to be dropped back in the car. There will be a lot of stuff to do once it is back in the car (intake manifold, emissions hole plugging, etc.), but I am excited to get to that point.
S5 front cover waiting to come off:
S5 cover on the left and S4 on the right:
The dirty S5 VDI intake manifold before I sprayed it down with engine cleaner:
The S5 engine waiting for the S4 front cover (had to finish scraping the gasket material off)
06-25-10, 09:31 AM
#20
*insert clever title here
Thread Starter
Join Date: Nov 2005
Location: Des Moines, IA
Posts: 332
Likes: 0
Received 0 Likes
on
0 Posts
I made a little bit more progress last night. I had a hockey camp 3 nights this week and last night was my last night of it. I was super tired putting my gear away (it hangs in my RX-7 garage), but I saw the engine and did a little work. I had picked up a 3/8" torque wrench earlier this week for getting the bolts correctly torqued and wanted to try it out.
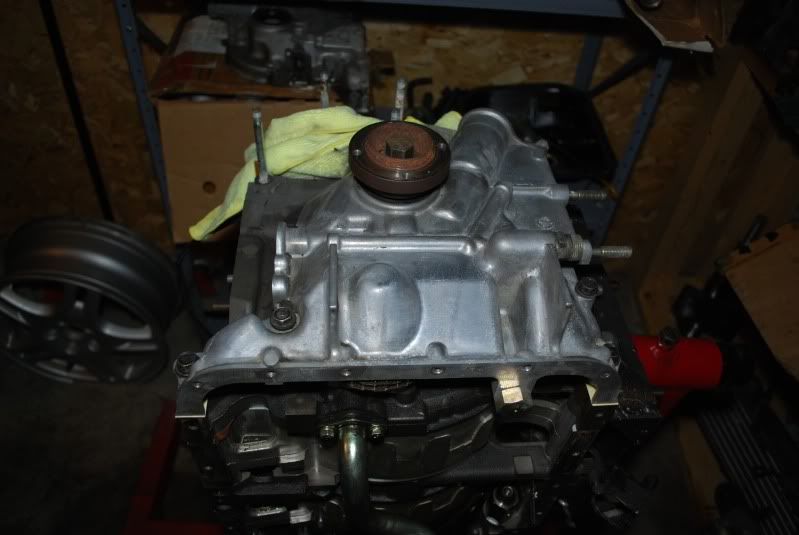
I started by finally getting the front cover bolted on, followed by the front pulley bolt.
I also got the oil pan bolted on to complete the short block (except for the MOP)
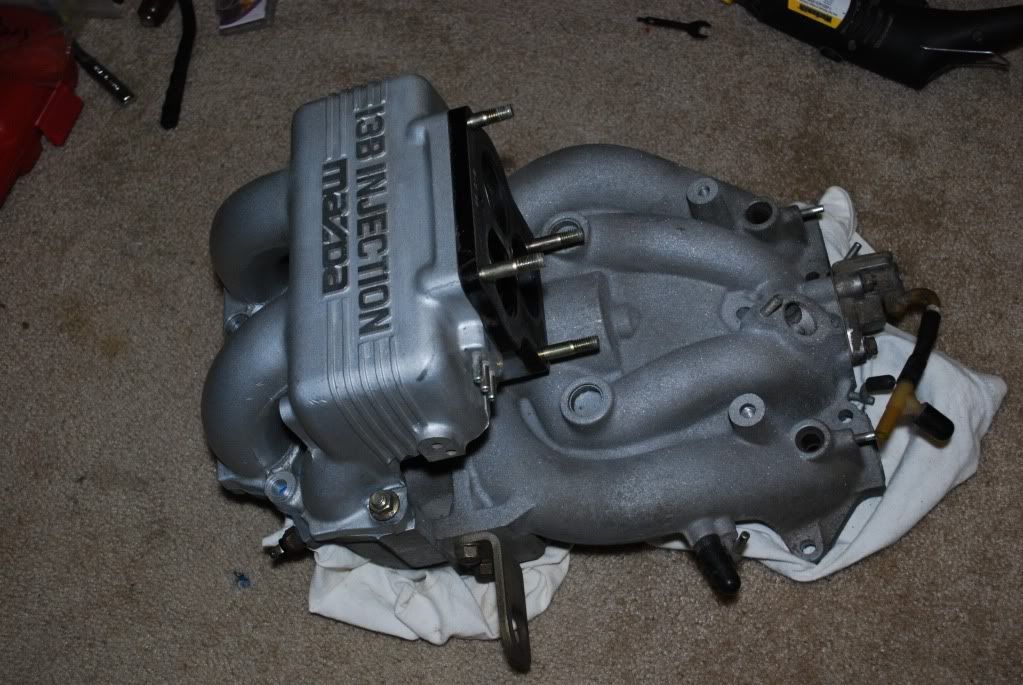
Last weekend, I sandblasted my upper intake manifold and I scrubbed the plenum earlier in the week. Last night, I brought up the lower intake manifold to get cleaned up and to make sure the actuators are working correctly.
Hopefully, this weekend will allow me to get the MOP and lines hooked up, the intake and exhaust bolted on, and possibly (keeping fingers crossed), the engine dropped back into the car.
I started by finally getting the front cover bolted on, followed by the front pulley bolt.
I also got the oil pan bolted on to complete the short block (except for the MOP)
Last weekend, I sandblasted my upper intake manifold and I scrubbed the plenum earlier in the week. Last night, I brought up the lower intake manifold to get cleaned up and to make sure the actuators are working correctly.
Hopefully, this weekend will allow me to get the MOP and lines hooked up, the intake and exhaust bolted on, and possibly (keeping fingers crossed), the engine dropped back into the car.
06-25-10, 05:23 PM
#21
You should be 'OK' since you had the flywheel down but I would suggest you to carefully turn your engine over by hand before completing installation to be sure the 'torrington' bearings in the front didn't drop. But you should be OK.
http://www.mazdatrix.com/faq/pulley.htm
Looking good!
http://www.mazdatrix.com/faq/pulley.htm
Looking good!
06-25-10, 09:08 PM
#22
Senior Member
iTrader: (1)
Join Date: Sep 2006
Location: Oakville Ontario Canada
Posts: 700
Likes: 0
Received 0 Likes
on
0 Posts
I've never seen an apartment have a stall like that! keep up the work! It's starting to get me thinking about pulling everything out this winter for a full clean up....
06-28-10, 10:02 AM
#24
*insert clever title here
Thread Starter
Join Date: Nov 2005
Location: Des Moines, IA
Posts: 332
Likes: 0
Received 0 Likes
on
0 Posts
You should be 'OK' since you had the flywheel down but I would suggest you to carefully turn your engine over by hand before completing installation to be sure the 'torrington' bearings in the front didn't drop. But you should be OK.
http://www.mazdatrix.com/faq/pulley.htm
Looking good!
http://www.mazdatrix.com/faq/pulley.htm
Looking good!
Got a little work done this weekend so I'll have more pics up shortly.
06-28-10, 02:00 PM
#25
*insert clever title here
Thread Starter
Join Date: Nov 2005
Location: Des Moines, IA
Posts: 332
Likes: 0
Received 0 Likes
on
0 Posts
I finally had a few hours to work in the garage this weekend. Not as much as I would have liked, but got some work done. The short block is ready to go and now, its just installing the extra stuff and accessories.
I got the MOP back on and attached a few lines loosely. They are going to be rerouted, but wanted to make sure they were long enough. I have parts for 3 engines (one S4 and two S5's) in my garage. I found both S5 water pumps, but for some reason, I don't know where I put the S4. I need that one since I am using a S4 front cover. Guess I'll have to dig deeper in the garage and look for it tonight.
Several posts up, I posted a picture of the dirty upper intake manifold. A little over a week ago, I went up to my parents' and used my dad's little sandblaster to clean it up. It worked pretty well. The cold start assist is coming off since it doesn't really do anything. I loosely attached it to the plenum to see how it looked.
The lower intake manifold is my current project. One of the actuator rods was siezed up pretty good and took some effort to get it out. The inside of the runner was super dirty so I spent a lot of time cleaning it out. I am having a little problem now with the actuator rods not wanting to rotate in the sleeves, but a little polishing with some fine grit sandpaper should help that.
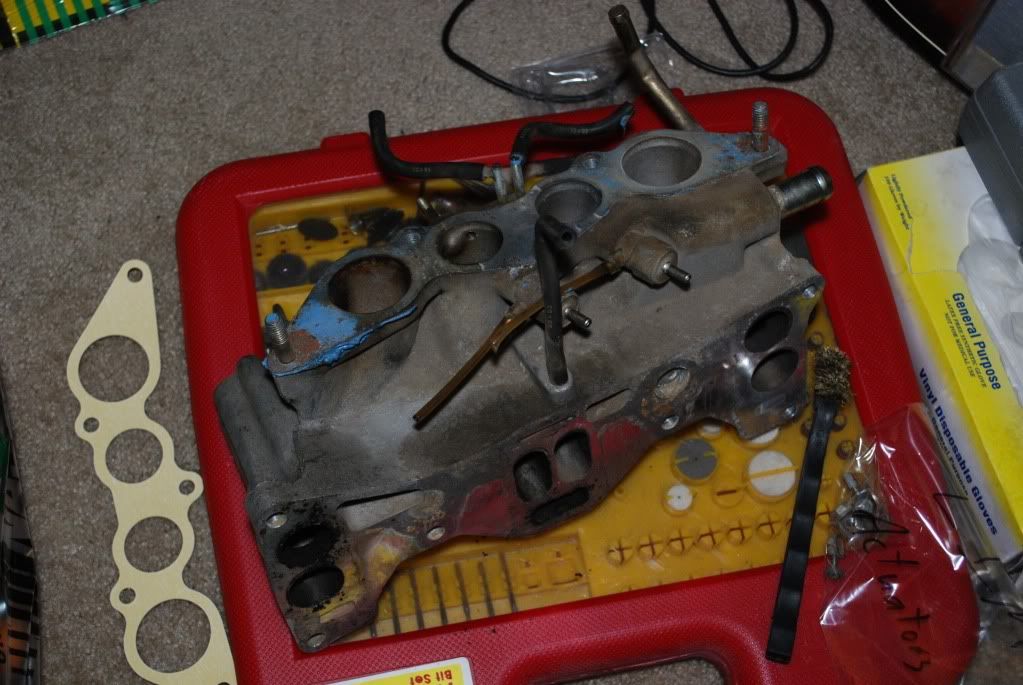
This is the picture before cleaning. Can you tell which port wasn't working? Shortly after taking this picture, I lost one of the clips for the actuator rod. I'm going to pull my spare LIM apart tonight to get the clip and hopefully, get the freshly cleaned one bolted onto the motor tonight.

I got the MOP back on and attached a few lines loosely. They are going to be rerouted, but wanted to make sure they were long enough. I have parts for 3 engines (one S4 and two S5's) in my garage. I found both S5 water pumps, but for some reason, I don't know where I put the S4. I need that one since I am using a S4 front cover. Guess I'll have to dig deeper in the garage and look for it tonight.
Several posts up, I posted a picture of the dirty upper intake manifold. A little over a week ago, I went up to my parents' and used my dad's little sandblaster to clean it up. It worked pretty well. The cold start assist is coming off since it doesn't really do anything. I loosely attached it to the plenum to see how it looked.
The lower intake manifold is my current project. One of the actuator rods was siezed up pretty good and took some effort to get it out. The inside of the runner was super dirty so I spent a lot of time cleaning it out. I am having a little problem now with the actuator rods not wanting to rotate in the sleeves, but a little polishing with some fine grit sandpaper should help that.
This is the picture before cleaning. Can you tell which port wasn't working? Shortly after taking this picture, I lost one of the clips for the actuator rod. I'm going to pull my spare LIM apart tonight to get the clip and hopefully, get the freshly cleaned one bolted onto the motor tonight.