Maybe an official Build Thread will keep me on task
 06-29-10, 02:56 PM
#26
*insert clever title here
Thread Starter
Join Date: Nov 2005
Location: Des Moines, IA
Posts: 332
Likes: 0
Received 0 Likes
on
0 Posts
Last night, my main goal was to get the lower intake manifold bolted on. When I reinserted the actuator rods into the manifold, they didn't want to turn very well and one of them was really bad. If you look closely at the top rod in the picture above, you can see that where the clip goes, it is bent. I think that when I was trying to get the rod out, I bent it and that made it not fit in the sleeve.
So, I got my extra manifold and unbolted one of the rods to get an extra clip that I lost from the previous post. I figured I'd use the rod too once I realized the original one was bent. Of course, I unbolted the wrong rod (I unbolted the rear and needed the front). The front rod had a stripped out screw. So, I took the manifold over to my drill press and drilled out the screw to get the rod out.
The rods were still a little sticky so I decided to polish them up a bit. Using my handy-dandy drill press again, I lightly secured the rods in the chuck and turned it on a low speed. Using some 1,000 grit sandpaper, I polished them up real nice.

The picture doesn't really do the polishing justice. If you look close, you can see that the bottom rod has more of a matte finish and the top is polished up to a nice shine. It really made a big difference when I reinstalled them in the lower intake manifold. (EDIT: You can see the bend well in the polished rod where the clip goes in. I didn't realize it was bent until after I had already polished it. Oh well.)

Once I got them bolted in, I got the manifold reattached to the engine itself. Again, I made sure that the rods operated freely by blowing into the actuator lines.

After that, I figured I'd better put on the exhaust manifold and shield. I plan on getting a Racing Beat header in the future, but for now, I'll rock stock. When I rebuild my other S5 motor and get that one ported, I'll reinstall it with the RB headera and some other upgrades. I just want to get the car on the road for now.
After the exhaust I attached the other oil injection lines and the secondary fuel injectors and rail. The injectors look to be kind of rough, but I am hoping they still do their job for the time being. I wiped them down and will most likely run some seafoam or other injector cleaner through the car once I have it running to clean out anything. When I do my rebuild, I'll have to pick up some new injectors as well.

And I still can't find the stupid water pump.

So, I got my extra manifold and unbolted one of the rods to get an extra clip that I lost from the previous post. I figured I'd use the rod too once I realized the original one was bent. Of course, I unbolted the wrong rod (I unbolted the rear and needed the front). The front rod had a stripped out screw. So, I took the manifold over to my drill press and drilled out the screw to get the rod out.
The rods were still a little sticky so I decided to polish them up a bit. Using my handy-dandy drill press again, I lightly secured the rods in the chuck and turned it on a low speed. Using some 1,000 grit sandpaper, I polished them up real nice.
The picture doesn't really do the polishing justice. If you look close, you can see that the bottom rod has more of a matte finish and the top is polished up to a nice shine. It really made a big difference when I reinstalled them in the lower intake manifold. (EDIT: You can see the bend well in the polished rod where the clip goes in. I didn't realize it was bent until after I had already polished it. Oh well.)
Once I got them bolted in, I got the manifold reattached to the engine itself. Again, I made sure that the rods operated freely by blowing into the actuator lines.
After that, I figured I'd better put on the exhaust manifold and shield. I plan on getting a Racing Beat header in the future, but for now, I'll rock stock. When I rebuild my other S5 motor and get that one ported, I'll reinstall it with the RB headera and some other upgrades. I just want to get the car on the road for now.
After the exhaust I attached the other oil injection lines and the secondary fuel injectors and rail. The injectors look to be kind of rough, but I am hoping they still do their job for the time being. I wiped them down and will most likely run some seafoam or other injector cleaner through the car once I have it running to clean out anything. When I do my rebuild, I'll have to pick up some new injectors as well.
And I still can't find the stupid water pump.
 06-29-10, 06:23 PM
#27
Tenseiga
iTrader: (1)
Join Date: Apr 2003
Location: Iowa
Posts: 2,252
Likes: 0
Received 0 Likes
on
0 Posts
I think once you find you WP you'll realize you need to route those OMP lines the way they are stock (underneath WP).
Your S5 vs S4 keg will have different compression rations btw.
Do you plan to compensate?
Your S5 vs S4 keg will have different compression rations btw.
Do you plan to compensate?
06-30-10, 09:07 AM
#28
*insert clever title here
Thread Starter
Join Date: Nov 2005
Location: Des Moines, IA
Posts: 332
Likes: 0
Received 0 Likes
on
0 Posts
From what I've read, the stock ECU can compensate for the different compression ratio. I'm hoping to eventually get a S-AFC to play around with, but for the time being, I'm just going to let the S4 ECU control it.
On a side note, I lowered the front end of the car off jack stands last night and pushed it most of the way out of the garage. I wanted to sweep up all the junk that was under the car so I'm ready to get under it to hook stuff up. I'm planning on getting the motor put back in the car this weekend.
07-01-10, 12:28 AM
#29
Tenseiga
iTrader: (1)
Join Date: Apr 2003
Location: Iowa
Posts: 2,252
Likes: 0
Received 0 Likes
on
0 Posts
Yep, the oil injection lines haven't been tightened securely to the OMP itself yet. I just found my water pump housing last night so that will be going on tonight and I'll get the line routing finalized then.
From what I've read, the stock ECU can compensate for the different compression ratio. I'm hoping to eventually get a S-AFC to play around with, but for the time being, I'm just going to let the S4 ECU control it.
On a side note, I lowered the front end of the car off jack stands last night and pushed it most of the way out of the garage. I wanted to sweep up all the junk that was under the car so I'm ready to get under it to hook stuff up. I'm planning on getting the motor put back in the car this weekend.
Granted it's lonly like .3 or something IIRC and stock cars run rich enough to be ok I would imagine.
They key is getting the right flywheel (I assume you keg came with a flywheel/counter weight).
Other than that the build is looking good - just missing a turbo.
07-01-10, 09:29 AM
#30
*insert clever title here
Thread Starter
Join Date: Nov 2005
Location: Des Moines, IA
Posts: 332
Likes: 0
Received 0 Likes
on
0 Posts
The ecu has no way to tell the difference in CR.
Granted it's lonly like .3 or something IIRC and stock cars run rich enough to be ok I would imagine.
They key is getting the right flywheel (I assume you keg came with a flywheel/counter weight).
Other than that the build is looking good - just missing a turbo.
Granted it's lonly like .3 or something IIRC and stock cars run rich enough to be ok I would imagine.
They key is getting the right flywheel (I assume you keg came with a flywheel/counter weight).
Other than that the build is looking good - just missing a turbo.
The engine came with a flywheel and actually, I never even took it off the engine. I didn't disassemble this one since it came out of a running car. I'm hoping it will get me by until I get my other engine built.
I'm planning on keeping this car N/A for the time being. Cheaper engine parts. I do miss hearing a turbo spool up though.
------------------------------------------------------------------------------------------------
In other car news, I found my water pump and installed it last night. The engine should be going back in the car in the next day or two. Then, its just trying to remember/figure out where all the wires and tubing goes.
07-06-10, 01:42 PM
#31
*insert clever title here
Thread Starter
Join Date: Nov 2005
Location: Des Moines, IA
Posts: 332
Likes: 0
Received 0 Likes
on
0 Posts
As has been the case so far in this thread, I didn't get nearly as much accomplished this weekend as I had hoped. With it being a long holiday weekend, I wanted to get more done, but life took over. The next few weeks will be busy moving and getting ready for the wedding, but I hope to continue forward in getting the car running.
Though I didn't get a whole lot done, I did make a big step. The engine is back in the car. I still need to get it bolted in, but since I was doing it by myself, I was happy to just get it bolted up to the transmission and sitting in the car.
A few days prior to the engine install, I pushed the car out of the garage to clean up under the engine bay. There was a lot of engine goo, pine needles (this car has them all over), and kitty litter from cleaning up oil spills. It was the first time the car saw sunlight in over 2 years.

The engine on the stand ready to go in the car:

The engine was in the air for a while so that I could find TDC on the front pulley. Before I knew better, I bolted the S4 pulley onto the S5 engine. Only later did I realize that the timing marks were different on the pulleys. I really didn't feel like busting the pulley nut loose since I used a good amount of loctite on it.
Instead, I found where the apex seal was centered in the leading spark plug hole and marked it on the pulley. Then, I rotated the e-shaft until the apex seal was centered in the trailing plug hole. Halfway between those marks is TDC on the front pulley. I marked it well on the pulley so that I know which one is the wrong stock marking and which is the correct TDC mark.

Finally, after about 2 hours, I got everything lined back up and the transmission bolted to the engine. Now, I just need to get the engine bolted to the frame so I can get working on hooking everything back up. In this last picture, you can see the two painted lines on the pulley. Those are the old markings. If you look at about the 4:00 position on the pulley, you can see the new marking to help locate TDC on the engine.

Though I didn't get a whole lot done, I did make a big step. The engine is back in the car. I still need to get it bolted in, but since I was doing it by myself, I was happy to just get it bolted up to the transmission and sitting in the car.
A few days prior to the engine install, I pushed the car out of the garage to clean up under the engine bay. There was a lot of engine goo, pine needles (this car has them all over), and kitty litter from cleaning up oil spills. It was the first time the car saw sunlight in over 2 years.
The engine on the stand ready to go in the car:
The engine was in the air for a while so that I could find TDC on the front pulley. Before I knew better, I bolted the S4 pulley onto the S5 engine. Only later did I realize that the timing marks were different on the pulleys. I really didn't feel like busting the pulley nut loose since I used a good amount of loctite on it.
Instead, I found where the apex seal was centered in the leading spark plug hole and marked it on the pulley. Then, I rotated the e-shaft until the apex seal was centered in the trailing plug hole. Halfway between those marks is TDC on the front pulley. I marked it well on the pulley so that I know which one is the wrong stock marking and which is the correct TDC mark.
Finally, after about 2 hours, I got everything lined back up and the transmission bolted to the engine. Now, I just need to get the engine bolted to the frame so I can get working on hooking everything back up. In this last picture, you can see the two painted lines on the pulley. Those are the old markings. If you look at about the 4:00 position on the pulley, you can see the new marking to help locate TDC on the engine.
 07-06-10, 02:37 PM
#33
*insert clever title here
Thread Starter
Join Date: Nov 2005
Location: Des Moines, IA
Posts: 332
Likes: 0
Received 0 Likes
on
0 Posts
Good eye! I actually got them for free from a friend that was cleaning out his garage. Plenty of tread left on the tires. Not sure I'm sold on the look of the rims. Plus, I'm going to need to get a 5-10mm spacer for the front wheels because they rub a bit. They'll do for the time being though.
10-26-10, 11:25 AM
#34
*insert clever title here
Thread Starter
Join Date: Nov 2005
Location: Des Moines, IA
Posts: 332
Likes: 0
Received 0 Likes
on
0 Posts
I suppose I had better give an update to bring this thread back from the dead. At the beginning of August, I got married and had to put the RX-7 on hold for a while. Wedding preperations, then moving in and getting settled after the wedding took priority. Finally, stuff has started settling down and I've been able to get back in the (new) garage and get some work done on the car.
This past Friday was the first time I have been able to put any amount of time into the car since moving. I got the wiring harness laid back in the engine bay to start things out. I still have a lot of plugs to hook up, but its there.
I also had to get the oil cooler lines hooked back up. When I installed the motor, I had the lines pulled parallel to the front of the car. I didn't realize that the hardlines would be pretty much impossible to run to the back of the engine once the engine was in. Luckily, I was able to remove the undertray and get the lines run to where they belong.
Finally, I sacrificed an old license plate to make blockoff plates for the intake manifold. I made several and used plenty of high temp RTV to seal them up. I'll try to take some pics tonight.
As far as looking at the engine bay itself, I didn't get a whole lot done, but I feel I made some good progress because I had been dreading the oil lines and blockoff plates for a while now.
The wife is working late tonight and I just got a new wireless adapter in the mail yesterday so I should be able to get Pandora out in my garage now (Wireless N FTW). Hopefully, I'll make some more progress this evening towards getting the 7 on the road finally.
10-26-10, 12:25 PM
#35
three spinning triangles
Join Date: Oct 2003
Location: SE Wisconsin
Posts: 1,441
Likes: 0
Received 0 Likes
on
0 Posts
not totally true. the lines in my 86 when i removed them were still quite flexable.
10-26-10, 01:20 PM
#36
*insert clever title here
Thread Starter
Join Date: Nov 2005
Location: Des Moines, IA
Posts: 332
Likes: 0
Received 0 Likes
on
0 Posts
For the small price of ordering new lines and clamps, it will offer great peace of mind when I get the engine running. I'll know that I don't have to worry about these new lines getting brittle any time soon as opposed to leaving the old lines on that may still be flexable, but likely to crack down the road. The parts are cheap enough that the original oil lines should be replaced if you are doing an engine rebuild.
10-26-10, 10:11 PM
#37
*insert clever title here
Thread Starter
Join Date: Nov 2005
Location: Des Moines, IA
Posts: 332
Likes: 0
Received 0 Likes
on
0 Posts
I figured that even though not a whole lot has changed, I wanted to add a couple of pictures. I'm getting the wiring harness in place and put a few vacuum lines on as well. There is still a long way to go, but I got a little done.

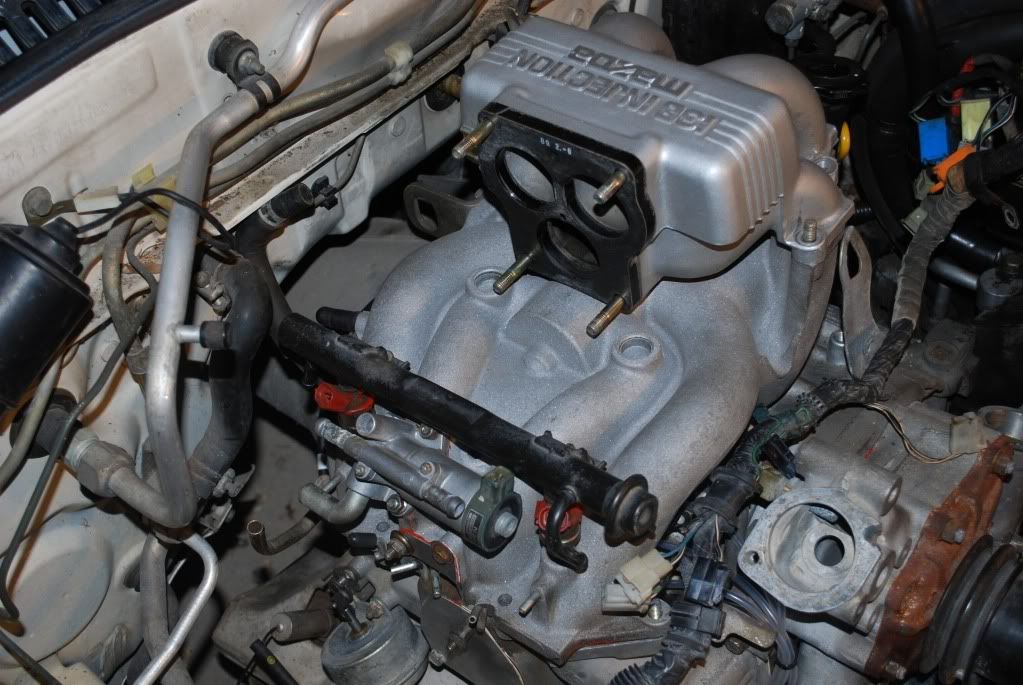
While getting the oil injector vacuum lines routed, I found another vacuum port on the lower intake manifold that I can't figure out where it goes. I looked in the service manual, but couldn't find what line went there. It is on the lower intake manifold and faces upwards. Can someone help me figure out what plugs into this?

While getting the oil injector vacuum lines routed, I found another vacuum port on the lower intake manifold that I can't figure out where it goes. I looked in the service manual, but couldn't find what line went there. It is on the lower intake manifold and faces upwards. Can someone help me figure out what plugs into this?
10-27-10, 03:31 AM
#38
Full Member
iTrader: (13)

Join Date: Jul 2010
Location: L town Indiana
Posts: 213
Likes: 0
Received 0 Likes
on
0 Posts
Is it in between the injectors? If so it just loops up to the upper and helps aromatize(hope I used the right word for that) the fuel. If you still cant figure it out I can look at my s4 lower and see this weekend since I am tearing it down...well the whole car down...I will start a build tread sometime....when I am unlazy....
10-27-10, 09:15 AM
#40
*insert clever title here
Thread Starter
Join Date: Nov 2005
Location: Des Moines, IA
Posts: 332
Likes: 0
Received 0 Likes
on
0 Posts
Thanks guys. That helped me figure out where I need to route the line. I'll have to swing by an auto parts store on my way home to pick up more vacuum line and caps. Also, I stopped by one yesterday to check on the price on fuel injection line since I am removing the emissions rack and rerouting stuff a bit. That stuff is a lot more expensive than I thought it would be.
10-28-10, 11:32 AM
#42
*insert clever title here
Thread Starter
Join Date: Nov 2005
Location: Des Moines, IA
Posts: 332
Likes: 0
Received 0 Likes
on
0 Posts
Last night, I didn't have time to really do much out in the garage. I did pick up a can of PB Blaster for the clutch line flare nut that has been giving me problems. I started to round it off because it was stuck on so tight. I sprayed it after work, before my hockey game, and after my hockey game as well. Once I got my gear hung up, I gave the flare nut one last try. Luckily, the PB Blaster had soaked in enough and the nut popped loose. The clutch slave cylinder is junk so I pulled the slave off my spare tranny to put on the car. I got it installed and the flare nut tightened up. Baby steps....baby steps.
10-30-10, 07:23 PM
#43
*insert clever title here
Thread Starter
Join Date: Nov 2005
Location: Des Moines, IA
Posts: 332
Likes: 0
Received 0 Likes
on
0 Posts
I did some work on my intake manifold today and a few other small things around the engine bay. I'm planning on finally getting some fuel line early next week so that I can get the intake manifold bolted together.
I got a little impatient while I was out working and hooked up a battery in the car to check out the electrical system. It is the first time the car has actually done anything since I have owned it. I bought it with a blown engine and no battery so this was a first for me. I had a huge smile when I popped the headlights, tested the power windows and sunroof, checked the turn signals, and saw some idiot lights turn on. It definitely helped with motivation.
I really want to get my throttle body put back together this weekend so that I can get that installed back on the car and be done with the majority of the intake system. I had to sit the upper intake back on the lower intake to see how it looked since I got some stuff bolted to the middle portion of the intake.
11-01-10, 09:19 AM
#44
*insert clever title here
Thread Starter
Join Date: Nov 2005
Location: Des Moines, IA
Posts: 332
Likes: 0
Received 0 Likes
on
0 Posts
After just shy of 6 months of being apart, my throttle body is back together. Thankfully, I had some spare throttle bodies laying around to compare to while reassembling to make sure I was doing it correctly.
This is what it looked like at the start of the evening (partially reassembled S4 TB on the bottom; S5 TB for comparison on top)

After about an hour or two, this was the final product:


I know that I'll probably have some fine tuning to do, but I'm glad its back together again. This was one of the things I was dreading. It had been so long since it had been in one piece, I figured I'd be missing pieces for sure. Luckily, I was able to get it back together. I'm super excited to get it bolted to the intake manifold and start plumbing all of the vacuum and fuel lines.
This is what it looked like at the start of the evening (partially reassembled S4 TB on the bottom; S5 TB for comparison on top)
After about an hour or two, this was the final product:
I know that I'll probably have some fine tuning to do, but I'm glad its back together again. This was one of the things I was dreading. It had been so long since it had been in one piece, I figured I'd be missing pieces for sure. Luckily, I was able to get it back together. I'm super excited to get it bolted to the intake manifold and start plumbing all of the vacuum and fuel lines.
11-02-10, 10:20 AM
#45
*insert clever title here
Thread Starter
Join Date: Nov 2005
Location: Des Moines, IA
Posts: 332
Likes: 0
Received 0 Likes
on
0 Posts
A little more progress was made last night. The throttle body is now bolted to the upper intake manifold and I had to put it in the car just to see how it looked. I still have a little bit of line routing to do before I bolt it together, but it shouldn't be too much longer.

After that, I layed down in the passenger side of the car to work on getting the wiring finished up under the dash. Removing the passenger seat really helped. I got under there and tried to contort my wrists around for about an hour. I still have two connectors that I need to find connections for:
1) A yellow connector that was already under the dash connected to a tab under the dash with the connector's pins facing upwards. Is this connector from the engine wiring harness that just hasn't come all the way through yet?
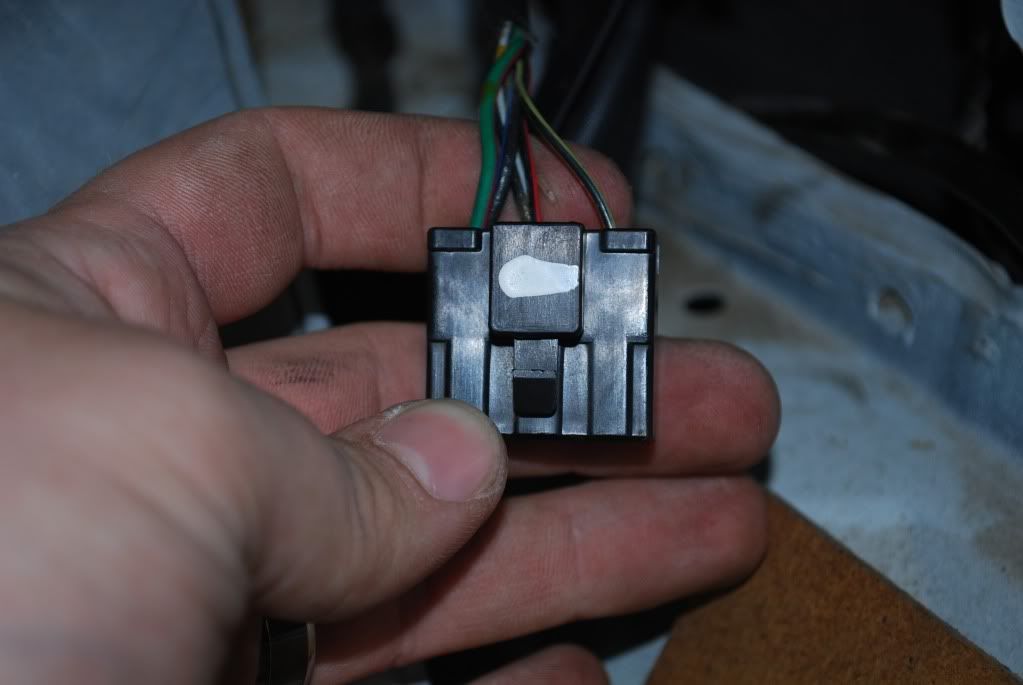
2) A 6 pin (with only 5 connectors) that is on the engine wiring harness. It is a bit lower on the harness and can reach the top of the ECU, but I can't find a corresponding connector under the dash. I managed to grab a pic of this one:
Another problem I have run into is my clutch. I replaced the slave cylinder because the original one was shot. Granted, I only have a cheap Harbor Freight vacuum pump for doing brakes, but I couldn't pull any fluid through the bleeder valve on the slave. Even with 25 inHg of vacuum.
The clutch petal doesn't return up when pressed down. It simply goes to the floor and stays or stays in the upper position if pulled. It won't stay between and there is no resistance from fluid despite me filling up the reservoir. I was thinking about disconnecting the hardline from the master and pulling fluid through the hardline and slave with the pump to at least make sure the lines are purged of air, but am unsure if that is my problem or if it is the master cylinder itself.
After that, I layed down in the passenger side of the car to work on getting the wiring finished up under the dash. Removing the passenger seat really helped. I got under there and tried to contort my wrists around for about an hour. I still have two connectors that I need to find connections for:
1) A yellow connector that was already under the dash connected to a tab under the dash with the connector's pins facing upwards. Is this connector from the engine wiring harness that just hasn't come all the way through yet?
2) A 6 pin (with only 5 connectors) that is on the engine wiring harness. It is a bit lower on the harness and can reach the top of the ECU, but I can't find a corresponding connector under the dash. I managed to grab a pic of this one:
Another problem I have run into is my clutch. I replaced the slave cylinder because the original one was shot. Granted, I only have a cheap Harbor Freight vacuum pump for doing brakes, but I couldn't pull any fluid through the bleeder valve on the slave. Even with 25 inHg of vacuum.
The clutch petal doesn't return up when pressed down. It simply goes to the floor and stays or stays in the upper position if pulled. It won't stay between and there is no resistance from fluid despite me filling up the reservoir. I was thinking about disconnecting the hardline from the master and pulling fluid through the hardline and slave with the pump to at least make sure the lines are purged of air, but am unsure if that is my problem or if it is the master cylinder itself.
 11-02-10, 11:24 AM
#47
*insert clever title here
Thread Starter
Join Date: Nov 2005
Location: Des Moines, IA
Posts: 332
Likes: 0
Received 0 Likes
on
0 Posts
 11-02-10, 11:40 AM
#49
*insert clever title here
Thread Starter
Join Date: Nov 2005
Location: Des Moines, IA
Posts: 332
Likes: 0
Received 0 Likes
on
0 Posts
You mean in the fan in the engine bay? I'm still lost on what fan this controls. I have the stock clutch fan to pull air through the radiator.
11-02-10, 11:44 AM
#50
That's not the electric fan. On some cars there is an electric fan located between the radiator and the front end and was found on automatics and turbos. If your thermostat neck doesn't have a water temp switch then you have no electric fan. If the car was never a factory turbo or auto then you don't have this feature.