
Jap Spec Series 5 FC3S - Twin turbo rew conversion!


Thread Starter
Full Member
Joined: Feb 2011
Posts: 186
Likes: 5
From: Australia
Mostly done,
have used the conduit over the first part as its too close to the exhaust, the braid can cope with the heat but not direct fire and if there was a bit of an exhaust leak or something, conduit is safer and proven.
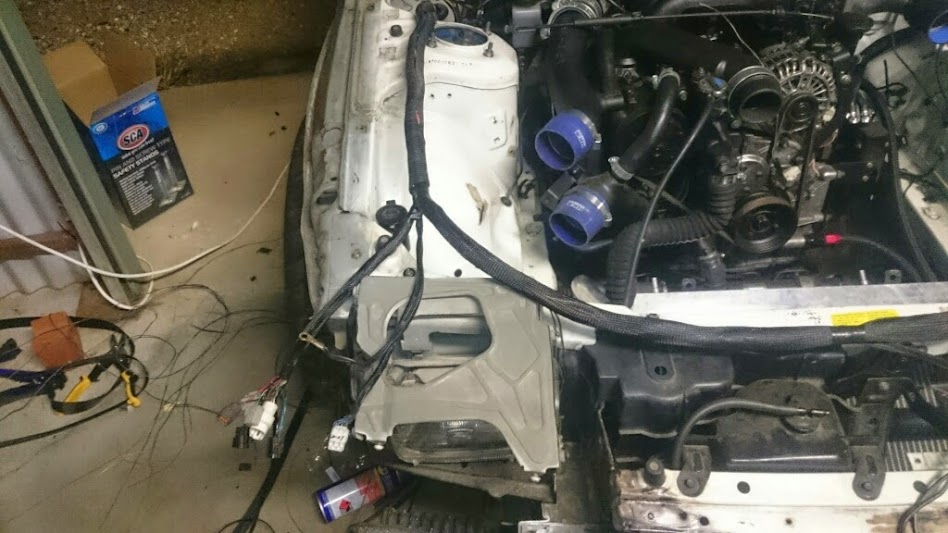
Spark side

Have to use tape over larger joins

Comes out soo clean thou

Just have to shorten the fuse box and relay section, braid.

Soo hopefully i can start her tomorrow,
althou i was having trouble connecting my laptop to the power fc today.
when it was connected however, all the inputs appeared to be working correctly, i have no idea what voltage to set the tps at thou and i also was only getting 0c as water temp?
Now i just have to hope these dont ******* foul!!!

have used the conduit over the first part as its too close to the exhaust, the braid can cope with the heat but not direct fire and if there was a bit of an exhaust leak or something, conduit is safer and proven.
Spark side
Have to use tape over larger joins
Comes out soo clean thou
Just have to shorten the fuse box and relay section, braid.
Soo hopefully i can start her tomorrow,
althou i was having trouble connecting my laptop to the power fc today.
when it was connected however, all the inputs appeared to be working correctly, i have no idea what voltage to set the tps at thou and i also was only getting 0c as water temp?
Now i just have to hope these dont ******* foul!!!
Thread Starter
Full Member
Joined: Feb 2011
Posts: 186
Likes: 5
From: Australia
Soo i the superpro bushings came in, got their performance front lower rear bushings that increase caster, standard replacement front lower arm and the 24mm sway bar links as for the standard s5 size.
Also got a splined steering hub release but unfortunately it doesnt fit my wheel, which i really should have checked first, haha

Got to it, wd40 is your friend here ball joints are a bitch to get out,
I pulled the steering links off too so i could clean the back of the hub

Then fire and angle grinder was my approach, i hear air chisel goes alright too.

Getting them cleaned up


Cleaned up the hardware and primed up the arms and the mounts

Painted!
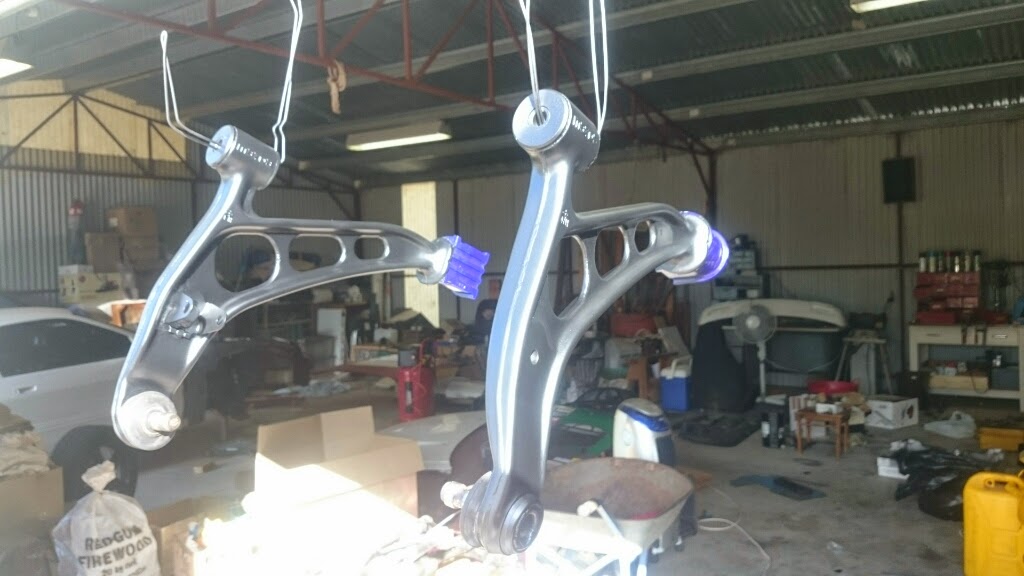
Here you can see the caster increase

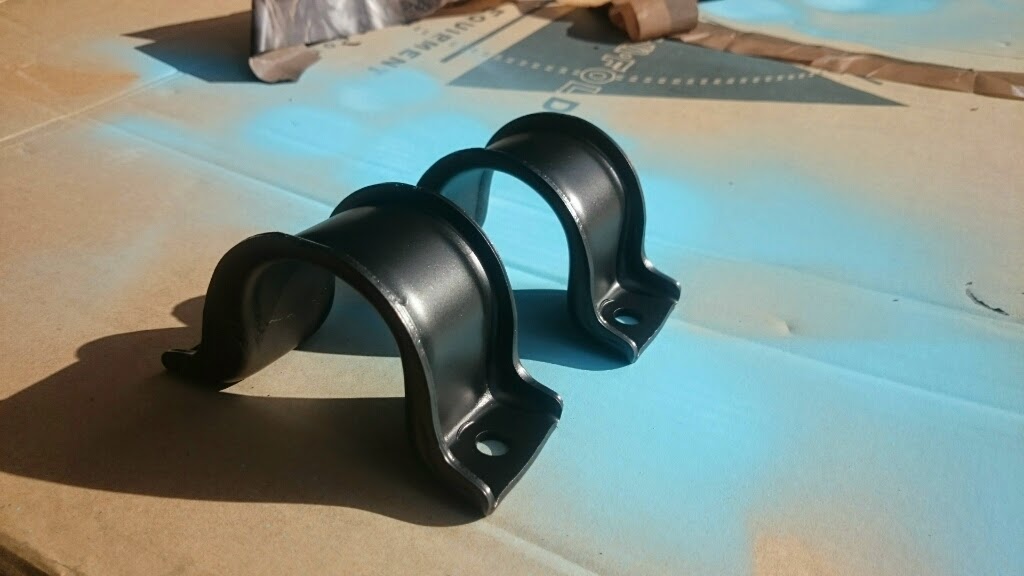
sway bar bushing installed

Installed!!


Also got a splined steering hub release but unfortunately it doesnt fit my wheel, which i really should have checked first, haha
Got to it, wd40 is your friend here ball joints are a bitch to get out,
I pulled the steering links off too so i could clean the back of the hub
Then fire and angle grinder was my approach, i hear air chisel goes alright too.
Getting them cleaned up
Cleaned up the hardware and primed up the arms and the mounts
Painted!
Here you can see the caster increase
sway bar bushing installed
Installed!!
Thread Starter
Full Member
Joined: Feb 2011
Posts: 186
Likes: 5
From: Australia
And then it all came back out.
actually wasnt too difficult at all, but then again the front isnt on and neither is anything else that will get in the way.

Flushed the coolant and oil, i swear i managed to get some coolant in the catch...

For those playing at home im using,
Nulon 15-40 full mineral oil
Nulon coolant
Ryco oil filter
Nulon gearbox oil
Bendix brake fluid
bur7-9eq platiniums
3 layer hks air filters
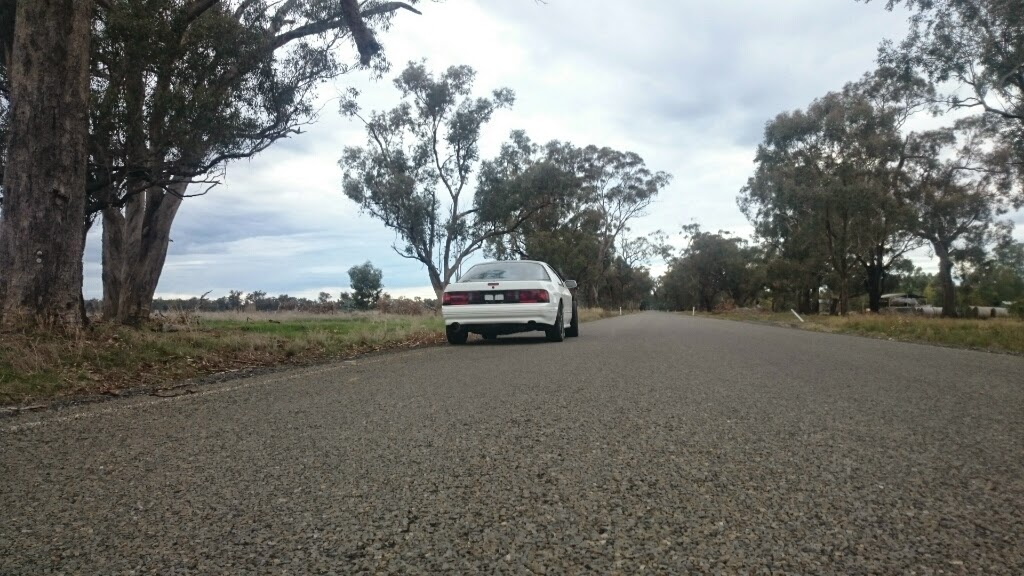
One of her first drive also you can see the dyno ill be using for tuning tomorrow


Put it back in the garage and started putting some interior back together so took some more picture of the gauge setup


Then noticed this happened...

i think i put an older bushing on it

Im not to woried its bound to happen at some point, especially when she starts shooting fireballs!!
Soo tuning tomorrow, nervous as **** but its running super well, much better then expected the original tune on the PowerFC was for 550 primary and 725 secondaries ill be using 850 secondaries which means everything should be well safe althou he had the boost set to 1.5 bar or 22psi!!!
I suspect he wasnt actually using the PFC to control boost at least i hope not.
Igntion maps looks pretty good and have evened out some of the numbers i felt like there was a possible staging issue with the injectors thou when building revs. have had max 1 point of knock the entire time too which is great.
Tomorrow will tell all.
actually wasnt too difficult at all, but then again the front isnt on and neither is anything else that will get in the way.
Flushed the coolant and oil, i swear i managed to get some coolant in the catch...
For those playing at home im using,
Nulon 15-40 full mineral oil
Nulon coolant
Ryco oil filter
Nulon gearbox oil
Bendix brake fluid
bur7-9eq platiniums
3 layer hks air filters
One of her first drive also you can see the dyno ill be using for tuning tomorrow
Put it back in the garage and started putting some interior back together so took some more picture of the gauge setup
Then noticed this happened...
i think i put an older bushing on it
Im not to woried its bound to happen at some point, especially when she starts shooting fireballs!!
Soo tuning tomorrow, nervous as **** but its running super well, much better then expected the original tune on the PowerFC was for 550 primary and 725 secondaries ill be using 850 secondaries which means everything should be well safe althou he had the boost set to 1.5 bar or 22psi!!!
I suspect he wasnt actually using the PFC to control boost at least i hope not.
Igntion maps looks pretty good and have evened out some of the numbers i felt like there was a possible staging issue with the injectors thou when building revs. have had max 1 point of knock the entire time too which is great.
Tomorrow will tell all.

Junior Member
Joined: May 2015
Posts: 22
Likes: 0
From: Bloomfield Township, MI
awesome work. Good luck on the tune, always a scary time letting it loose for the first time. Try and stay back from knock for a little while (like 1/2 or a full degree) while it breaks in and get used to how sensitive it is.. Can always push harder later. I hate seeing guys going for that last little bit of spark fry there baby on the first day.


Thread Starter
Full Member
Joined: Feb 2011
Posts: 186
Likes: 5
From: Australia
Soo havent been able to get any tuning done, i've either fucked the plugs cleaning them everytime its fowled or i havent got a good enough earth and its just not sparking.
going to run an earth from the battery straight to the engine now and see if that fixes it. and have some new plugs coming.
Got my pbm solid diff bush to complete the rear end swap but when i've removed the rubber mount i found a completely fucked mount. not happy and will be getting some money back from the seller.


Soo went ahead and started fitting the panels back up, pretty much guessed the bonnet which ended up turning out alright

Had to move the lights and i still think the cover heights is a bit off but all the gaps are good


Then started on the front, i knew the front would require some work cos of the oil coolers, first picture is before any cutting, then few shots showing the cuts. not too much work really.
Used a dia-grinder and the bumper was previously red hence the amount of plastic dust crap.


going to run an earth from the battery straight to the engine now and see if that fixes it. and have some new plugs coming.
Got my pbm solid diff bush to complete the rear end swap but when i've removed the rubber mount i found a completely fucked mount. not happy and will be getting some money back from the seller.
Soo went ahead and started fitting the panels back up, pretty much guessed the bonnet which ended up turning out alright
Had to move the lights and i still think the cover heights is a bit off but all the gaps are good
Then started on the front, i knew the front would require some work cos of the oil coolers, first picture is before any cutting, then few shots showing the cuts. not too much work really.
Used a dia-grinder and the bumper was previously red hence the amount of plastic dust crap.
Thread Starter
Full Member
Joined: Feb 2011
Posts: 186
Likes: 5
From: Australia
Then pushed it out side for some photos and then a wash, should have done it the other way i know haha.

Cant wait to wind the coilover down

Pretty happy with how the front sits and the oil cooler lines


Back inside after a wash, i had pretty much forgotten what an fc actually looks like haha


Cant wait to wind the coilover down
Pretty happy with how the front sits and the oil cooler lines
Back inside after a wash, i had pretty much forgotten what an fc actually looks like haha
Thread Starter
Full Member
Joined: Feb 2011
Posts: 186
Likes: 5
From: Australia
Soo i read that its pretty easy to change your car to a registered 2 seater at the time of first rego,
just have to completely remove the seats and seat belt mounts.
And so i bought a cheap replica harness too just to see if it would fit and how i like it.

the included eye bolts fitted the standard seat belt mounts perfectly.


Trying to decide what to do with the boot now im not happy with it, not sure if i could do a good enough job my self but a little worried about how much a trimmer will charge.
Also bought a half a cage,
cleaned it up and painted it chome cast red pretty hard **** to use on large objects but i think it came up pretty awesome
Original what appears to be cusco blue

Silver base coat

Shiney!

Comparison


The interior trim piece needs trimming for it to fit and i will have to make backing plates myself.

just have to completely remove the seats and seat belt mounts.
And so i bought a cheap replica harness too just to see if it would fit and how i like it.
the included eye bolts fitted the standard seat belt mounts perfectly.
Trying to decide what to do with the boot now im not happy with it, not sure if i could do a good enough job my self but a little worried about how much a trimmer will charge.
Also bought a half a cage,
cleaned it up and painted it chome cast red pretty hard **** to use on large objects but i think it came up pretty awesome
Original what appears to be cusco blue
Silver base coat
Shiney!
Comparison
The interior trim piece needs trimming for it to fit and i will have to make backing plates myself.
Last edited by squeakm; Jul 24, 2015 at 08:25 AM.
Thread Starter
Full Member
Joined: Feb 2011
Posts: 186
Likes: 5
From: Australia
Just a quick couple of photos on the spark plugs
Top plug is a bureq and the bottom is a breg. You can see how a socket will really struggle to get any bite.

and simply grinded down the socket till i got this

Bam!
Top plug is a bureq and the bottom is a breg. You can see how a socket will really struggle to get any bite.
and simply grinded down the socket till i got this
Bam!

There is some nice stuff here but the shoulder belt mounting ain't one of 'em.
Not sure of the exact numbers but I believe you're only allowed a couple of degrees off horizontal for those mounts.
As currently arranged, those belts will take out your collarbones first chance they get.
Not sure of the exact numbers but I believe you're only allowed a couple of degrees off horizontal for those mounts.
As currently arranged, those belts will take out your collarbones first chance they get.
Thread Starter
Full Member
Joined: Feb 2011
Posts: 186
Likes: 5
From: Australia
This probably seems like a weird thing to do for you guys but in australia if i could find some storage bins id be looking at about $750, also I've really got to fully finish something before moving to the next but aye,
Diy infini rear,


And the second half, decided to do multiple peices here for easy of installation,
[img]https://lh3.googleusercontent.com/IJPOXzNBN5tIq3NVi-LqaX45Wmw8qpltd1jYdcwZza8=w1024-h576-no[/im
g]


New spot for the amp and the battery will now sit on top of the jack spot,

Trimming of the interior plastic
Storage area cut out,


Needs a alot of sanding, finishing and carpet but im super happy with the result thus far
Diy infini rear,
And the second half, decided to do multiple peices here for easy of installation,
[img]https://lh3.googleusercontent.com/IJPOXzNBN5tIq3NVi-LqaX45Wmw8qpltd1jYdcwZza8=w1024-h576-no[/im
g]
New spot for the amp and the battery will now sit on top of the jack spot,
Trimming of the interior plastic
Storage area cut out,
Needs a alot of sanding, finishing and carpet but im super happy with the result thus far
Thread Starter
Full Member
Joined: Feb 2011
Posts: 186
Likes: 5
From: Australia
This was a **** time layers of body filler on some 3mm mdf

Inbetween the layers decided to black all my ic piping and clamps, not sure if i want to do the IC all black also now.


Got a cusco oval type front strut brace, unfortunately it fowls on the ic piping thou.

And some fun jdm'ness i found in the door card.

Inbetween the layers decided to black all my ic piping and clamps, not sure if i want to do the IC all black also now.
Got a cusco oval type front strut brace, unfortunately it fowls on the ic piping thou.
And some fun jdm'ness i found in the door card.
Thread Starter
Full Member
Joined: Feb 2011
Posts: 186
Likes: 5
From: Australia
Storage lids, finished with bride material insert.


Re-trimmed the door cards in the left over bride material.
Suprisingly easy job, the door cards mostly unscrew, few cuts through the foam for the tabs to release the pocket vinyl and your left with this.

Straight over the old material with some contact adhesive.

Comparison...

Laid the carpet, put the lids and mounted the fire extinguisher!


Door trim installed,

Got a rep nardi off a mate, its really nice might save for a legit one.

Also have managed to chase up all the missing interior pieces! just need to go pick up the rear carpet sides.


Re-trimmed the door cards in the left over bride material.
Suprisingly easy job, the door cards mostly unscrew, few cuts through the foam for the tabs to release the pocket vinyl and your left with this.
Straight over the old material with some contact adhesive.
Comparison...
Laid the carpet, put the lids and mounted the fire extinguisher!
Door trim installed,
Got a rep nardi off a mate, its really nice might save for a legit one.
Also have managed to chase up all the missing interior pieces! just need to go pick up the rear carpet sides.
Interior looking quite spiffy, angling the Bride logo on the doorpanels was a nice touch.
I think you put the horse before the cart in the rear though.
You cut the floor pieces to a nice tight fit on the metal but left no room for the paneling, which should go on first, overlapped by the floor piece.
I'm thinking you'll have to remove and recut the floor pieces.
Then again, you may have a clever plan for that...the rest looks nice enough.
Thread Starter
Full Member
Joined: Feb 2011
Posts: 186
Likes: 5
From: Australia
Been a long time since an update things have been happening slowly but i went through a few phones and current phone has a **** camera.
anyway got some better pictures of the interior now, will wait till it has plates before bolting the cage in but traded my un-molested rear plastic wheel covers for some that were in a half caged car and finished up the carpets.

Rear strut brace was a bitch to install its a mazdaspeed copy with the 2 piece mounting platform


poor girl needs a good clean

bought a wiper delete thing from ebay for like $5 money well spent!

good camera makes a difference

anyway got some better pictures of the interior now, will wait till it has plates before bolting the cage in but traded my un-molested rear plastic wheel covers for some that were in a half caged car and finished up the carpets.
Rear strut brace was a bitch to install its a mazdaspeed copy with the 2 piece mounting platform
poor girl needs a good clean
bought a wiper delete thing from ebay for like $5 money well spent!
good camera makes a difference


Thread Starter
Full Member
Joined: Feb 2011
Posts: 186
Likes: 5
From: Australia
Then got playing making a cooling panel, I wanted to make mine with folded edges to make sure it captured the air. probably should have gone thicker then 0.5mm thou it looks a little beaten on.


First one came up a little rough and had a few bad measurements soo decided to redo it, action shot of me actually using my bender


still will get a bit more shape when bolted doww


First one came up a little rough and had a few bad measurements soo decided to redo it, action shot of me actually using my bender
still will get a bit more shape when bolted doww
Thread Starter
Full Member
Joined: Feb 2011
Posts: 186
Likes: 5
From: Australia
Soo ive been wanting to do this for ages and had played with a lot of images of the two cars trying to work out if it was possible.
Brz/86 Rocket Bunny Front Lip on a s5 Front!!!!

Stages of install,
first mock up i dig this and for an all out track car could work,

IMO i think it follows the contours of the s5 bar awesome and i really like how it turns up as the centre section goes back and opens for the air intake.

just a wee bit too wide thou,

Hack saw time!

How much i ended up cutting out of the centre

im happy!

Roughly bolted in!
Will work the angle back to level as its tilting forward a little heavy at the moment

Brz/86 Rocket Bunny Front Lip on a s5 Front!!!!
Stages of install,
first mock up i dig this and for an all out track car could work,
IMO i think it follows the contours of the s5 bar awesome and i really like how it turns up as the centre section goes back and opens for the air intake.
just a wee bit too wide thou,
Hack saw time!
How much i ended up cutting out of the centre
im happy!
Roughly bolted in!
Will work the angle back to level as its tilting forward a little heavy at the moment
Thread Starter
Full Member
Joined: Feb 2011
Posts: 186
Likes: 5
From: Australia
No idea what happened to those last set of pictures so repost sorry guys.
Soo ive been wanting to do this for ages and had played with a lot of images of the two cars trying to work out if it was possible.
Brz/86 Rocket Bunny Front Lip on a s5 Front!!!!

Stages of install,
first mock up i dig this and for an all out track car could work,

IMO i think it follows the contours of the s5 bar awesome and i really like how it turns up as the centre section goes back and opens for the air intake.

just a wee bit too wide thou,

Hack saw time!

How much i ended up cutting out of the centre

im happy!

Roughly bolted in!
Will work the angle back to level as its tilting forward a little heavy at the moment

Soo ive been wanting to do this for ages and had played with a lot of images of the two cars trying to work out if it was possible.
Brz/86 Rocket Bunny Front Lip on a s5 Front!!!!
Stages of install,
first mock up i dig this and for an all out track car could work,
IMO i think it follows the contours of the s5 bar awesome and i really like how it turns up as the centre section goes back and opens for the air intake.
just a wee bit too wide thou,
Hack saw time!
How much i ended up cutting out of the centre
im happy!
Roughly bolted in!
Will work the angle back to level as its tilting forward a little heavy at the moment
Thread Starter
Full Member
Joined: Feb 2011
Posts: 186
Likes: 5
From: Australia
After i gave her a wash i parked her up under some better lighting and got a few snaps with a decent camera, will be booking her in for a tune early next year when the shops start back up sent out some emails todays


Thread Starter
Full Member
Joined: Feb 2011
Posts: 186
Likes: 5
From: Australia
Cheers man,
Soo i got to the point i thought i could write a list that would actually fit on a piece of cardboard,

Also finally upgraded my poor jack

That awkward moment you go to swap in your mint cluster and realize its the wrong series

Soo cheaped out and made my own gear hole cover thingo

Finished it off with my new gear **** and new shifter boot, which i hand sew my self and hand bashed a nut into a bike handle bar.

Then got to fixing the thermo relays, had me stumped for ages why they wouldnt turn on, realized im the idiot that put a 15amp in line fuse for both relays, it also seems like i dont have quite enough amps going to throw the relays from the ecu source, so im in the process of wiring a dummy switch for them also.

Soo i got to the point i thought i could write a list that would actually fit on a piece of cardboard,
Also finally upgraded my poor jack
That awkward moment you go to swap in your mint cluster and realize its the wrong series
Soo cheaped out and made my own gear hole cover thingo
Finished it off with my new gear **** and new shifter boot, which i hand sew my self and hand bashed a nut into a bike handle bar.
Then got to fixing the thermo relays, had me stumped for ages why they wouldnt turn on, realized im the idiot that put a 15amp in line fuse for both relays, it also seems like i dont have quite enough amps going to throw the relays from the ecu source, so im in the process of wiring a dummy switch for them also.