
Jap Spec Series 5 FC3S - Twin turbo rew conversion!


Thread Starter
Full Member
Joined: Feb 2011
Posts: 186
Likes: 5
From: Australia
Long overdue update (hardly)
changed my mind on a few things too
definately going to non power steering, bridging the lines will be too much of a bitch and if i get rid of the lines on the rack i can remove the engine spacers and then the bonet will probably close too :laugh:
Unfortunately for the car it had to move home soo i had to pack her up, put on anything that i could and boxed up all the other parts


Some bastard mice have been in the car too, aparently they love tennis ***** and after an extensive search apears to be the only thing they went for, call it a mice sacrificial anode!

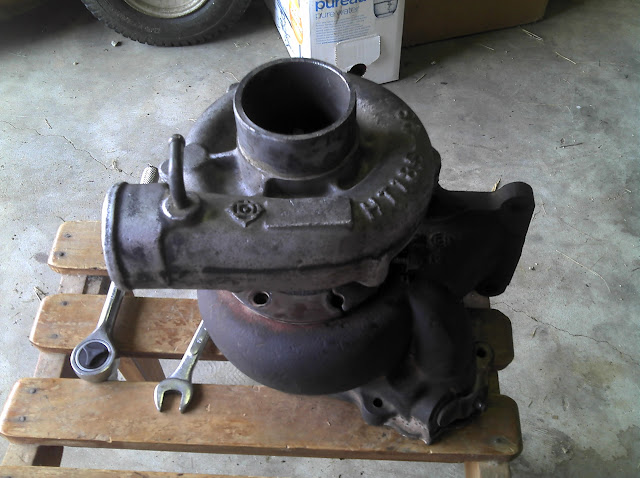
Started pulling down the turbo more aswell,
wasnt able to clock the rear housing and get to the 2 last screws thou any tips?


As for a rew conversion update,
dump pipe clears everything fine. will need to remove the lower mounting bracket properly thou,
didnt realise how bad the picture was but there is about 30cm between my fc exhaust and the rew dump pipe


And shutting the door behind the poor unfinished girl once again

changed my mind on a few things too
definately going to non power steering, bridging the lines will be too much of a bitch and if i get rid of the lines on the rack i can remove the engine spacers and then the bonet will probably close too :laugh:
Unfortunately for the car it had to move home soo i had to pack her up, put on anything that i could and boxed up all the other parts
Some bastard mice have been in the car too, aparently they love tennis ***** and after an extensive search apears to be the only thing they went for, call it a mice sacrificial anode!
Started pulling down the turbo more aswell,
wasnt able to clock the rear housing and get to the 2 last screws thou any tips?
As for a rew conversion update,
dump pipe clears everything fine. will need to remove the lower mounting bracket properly thou,
didnt realise how bad the picture was but there is about 30cm between my fc exhaust and the rew dump pipe
And shutting the door behind the poor unfinished girl once again
Thread Starter
Full Member
Joined: Feb 2011
Posts: 186
Likes: 5
From: Australia
Sorry for just dumping my post from ausrotory
But i just found out you now need to be a member to see the build threads, and as i want others to be able to learn from my mistakes that just wouldnt do,
This pretty much brings me up to the last few weeks, where i almost sold the car but decided to keep it and now have been making a lot of progress with the motor its self rather then the other bullshit
Thread Starter
Full Member
Joined: Feb 2011
Posts: 186
Likes: 5
From: Australia
Decided to keep it!
Soo i bought a very rare and on paper the most suited ecu for my setup, hopefully...
Ap-eng D-jetro Apexi Power FC Yeah that looks like i just smashed the keypad a few times
Pretty much this ecu is a modified version of the a Power FC by Ap-eng and d-jetro means it is airflow metre LESS
Got it for an absolute steal! I paid a full $1k less then what i've seen the ap-eng FCs go for on ebay soo im definately happy with that. No Hand controller thou
I Depowered my rack the other day which also meant i dont have anymore clearance issues and was able to lower the motor,
im yet to see if the bonnet will fit now but certainly looks a lot better!


Also I bought these like 2 years ago finally got to see if they fit looks good althou will probably end up black, not a fan of chrome


Top one will end up coming forward quite a bit just wanted to mock them up.
Soo i bought a very rare and on paper the most suited ecu for my setup, hopefully...
Ap-eng D-jetro Apexi Power FC Yeah that looks like i just smashed the keypad a few times
Pretty much this ecu is a modified version of the a Power FC by Ap-eng and d-jetro means it is airflow metre LESS
Got it for an absolute steal! I paid a full $1k less then what i've seen the ap-eng FCs go for on ebay soo im definately happy with that. No Hand controller thou
I Depowered my rack the other day which also meant i dont have anymore clearance issues and was able to lower the motor,
im yet to see if the bonnet will fit now but certainly looks a lot better!
Also I bought these like 2 years ago finally got to see if they fit looks good althou will probably end up black, not a fan of chrome
Top one will end up coming forward quite a bit just wanted to mock them up.
Thread Starter
Full Member
Joined: Feb 2011
Posts: 186
Likes: 5
From: Australia
Started trying to pull the turbos.
Got this far then fucked my knuckles on a very stubborn bolt

Space wise its fine but definately wish i had of done this when the motor was out.
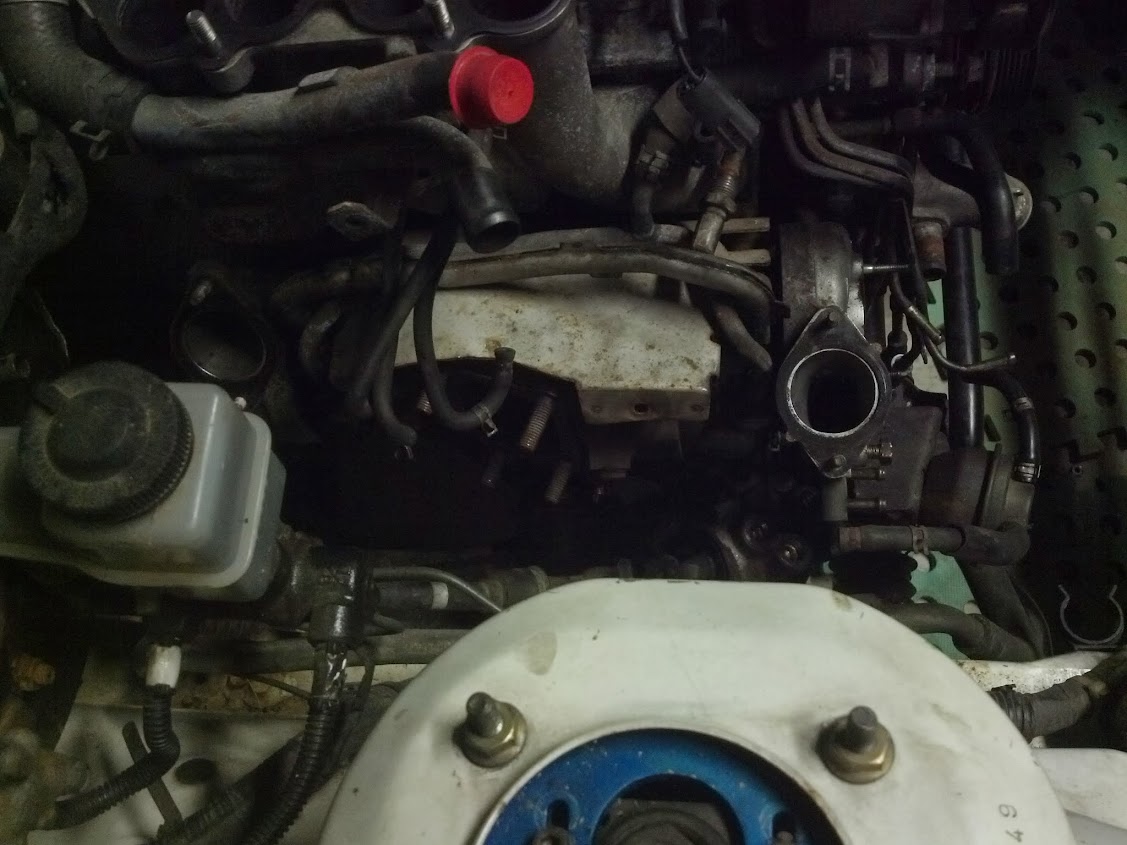
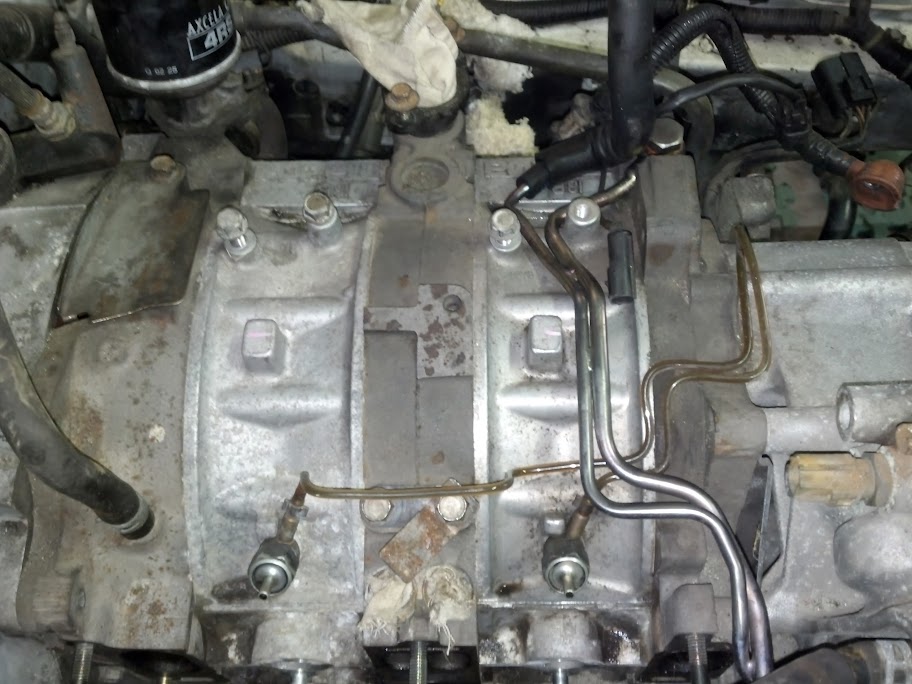
Also did notice this when i had the UIM before that the FD doesnt have 3 fuel lines like i thought. The top one simply goes back to the charcoal canister

Got this far then fucked my knuckles on a very stubborn bolt
Space wise its fine but definately wish i had of done this when the motor was out.
Also did notice this when i had the UIM before that the FD doesnt have 3 fuel lines like i thought. The top one simply goes back to the charcoal canister


Thread Starter
Full Member
Joined: Feb 2011
Posts: 186
Likes: 5
From: Australia
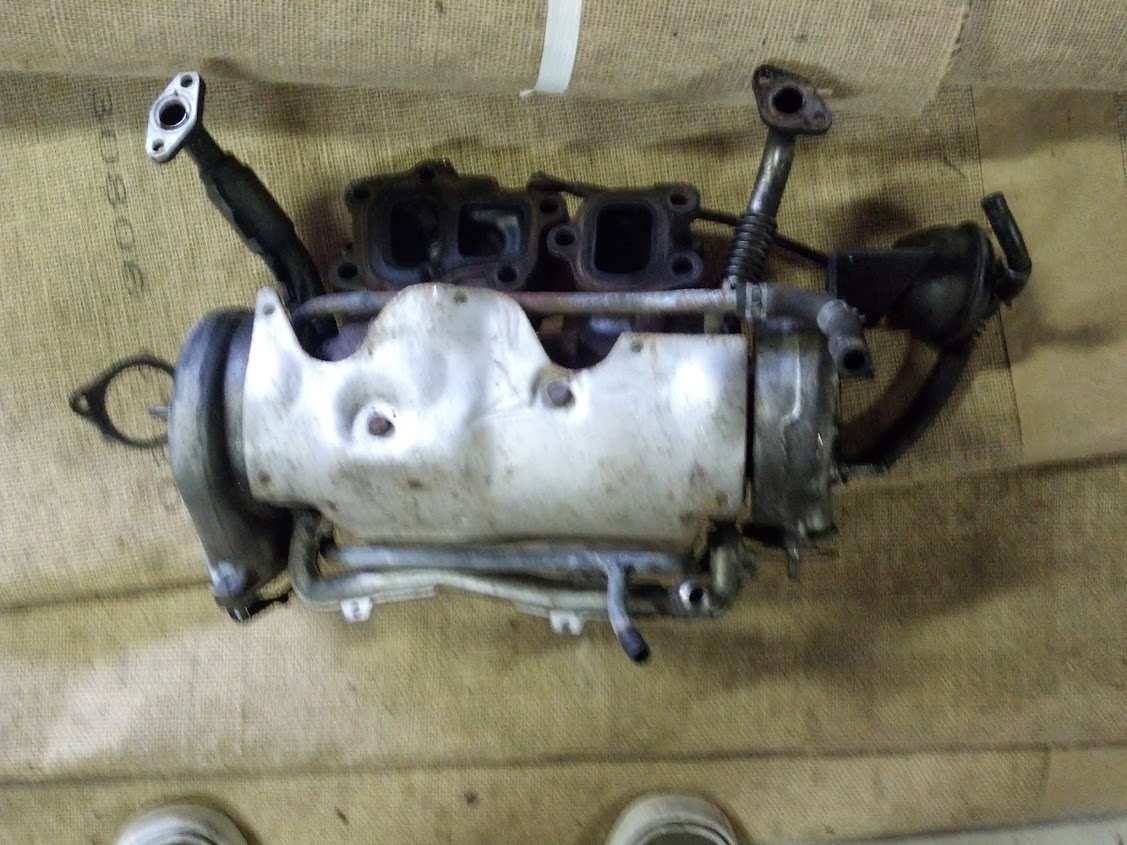
Turbos off! well the manifold is still there but thats a couple of minute job,
easy enough even in an fc chassis without lifting the motor.
If i can find someone with a dremel i'll atempt the porting and wastegate removals my self.
Then all i need is to get some vacuum hose and plugs and start swapping the loom and remove the rats nest.

easy enough even in an fc chassis without lifting the motor.
If i can find someone with a dremel i'll atempt the porting and wastegate removals my self.
Then all i need is to get some vacuum hose and plugs and start swapping the loom and remove the rats nest.
Thread Starter
Full Member
Joined: Feb 2011
Posts: 186
Likes: 5
From: Australia
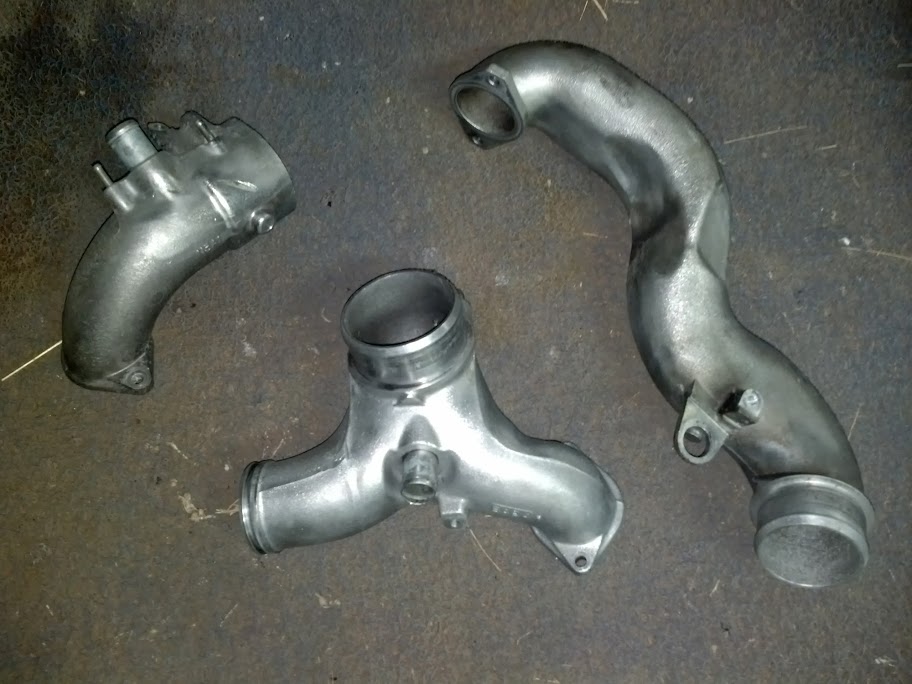
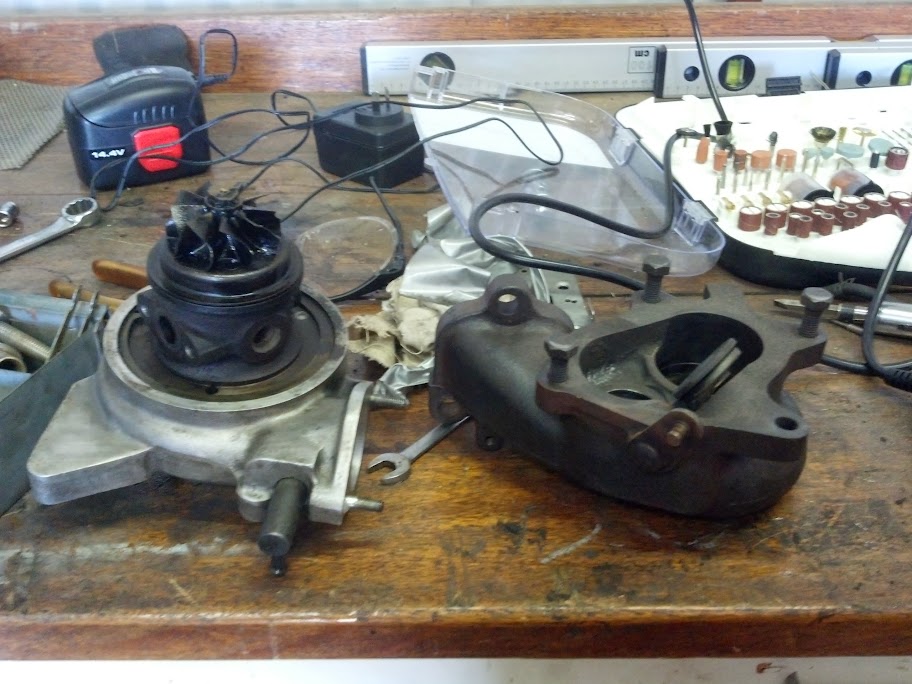
Turbos pulled apart, going to take them to be machined early this week hopefully,

First wastegate/flapper that is to be completely removed

This is the primary turbos wastegate its getting ported as its highly recomended at this point

And the butterfly removed the Y Pipe junction


Love cleaning stuff up, will need to get some more black engine enamel paint then give them a hit too

First wastegate/flapper that is to be completely removed
This is the primary turbos wastegate its getting ported as its highly recomended at this point
And the butterfly removed the Y Pipe junction
Love cleaning stuff up, will need to get some more black engine enamel paint then give them a hit too
Thread Starter
Full Member
Joined: Feb 2011
Posts: 186
Likes: 5
From: Australia
And very annoying job, but semi completed!
Rats nats solenoids removed!!

Engine is going to very close to a block again, cos i'll be removing the loom pretty soon


Found what would have been a nasty leak dont know if the sequential system woulda worked at all with it like this

Rats nats solenoids removed!!
Engine is going to very close to a block again, cos i'll be removing the loom pretty soon
Found what would have been a nasty leak dont know if the sequential system woulda worked at all with it like this
Thread Starter
Full Member
Joined: Feb 2011
Posts: 186
Likes: 5
From: Australia
And boom! pretty much bare block :thrust:

Slightly cleaner
Dont know if anyone will approve of my colour choice but it should be a lot more subtle with the rest of the parts black...


With UIM on gives a better idea still a loom and alternator to break it up

doesnt help the UIM is dirty as **** at the moment
Slightly cleaner
Dont know if anyone will approve of my colour choice but it should be a lot more subtle with the rest of the parts black...
With UIM on gives a better idea still a loom and alternator to break it up
doesnt help the UIM is dirty as **** at the moment
Thread Starter
Full Member
Joined: Feb 2011
Posts: 186
Likes: 5
From: Australia
Pretty proud of myself with this arvos effort,
The only thing that stopped me was i couldnt clock or remove the primary turbos exhaust housing...
But
Flapper removed

Much better!

I completely removed the shaft, hoping to tap then put a bolt in it rather then welding

Y pipe modification

I just cut the actuator bracket then made my own washer sealer thing

I was really disapointed a 5c coin didnt fit it was amazingly close.
The only thing that stopped me was i couldnt clock or remove the primary turbos exhaust housing...
But
Flapper removed
Much better!
I completely removed the shaft, hoping to tap then put a bolt in it rather then welding
Y pipe modification
I just cut the actuator bracket then made my own washer sealer thing
I was really disapointed a 5c coin didnt fit it was amazingly close.
Thread Starter
Full Member
Joined: Feb 2011
Posts: 186
Likes: 5
From: Australia
Got the exhaust housing off, using the spacer and bolt method
and ported they say it doesnt need much not much to give really and the wastegate barely opens i reacon i i woulda had better results porting back side of the other manifold so the flapper could actually open more no pictures of that but maybe before i put it back together

Gave the housing and everything a really good clean,
While that was happening i was also painting up the turbo bits they came up amazing!

Then re-assembled


Back on i must have clocked the CHR a little in the proccess but nothing that will make too much a difference you can tell by the water feed connection

The Y pipe

Again now everything else looks dirty as ****

and ported they say it doesnt need much not much to give really and the wastegate barely opens i reacon i i woulda had better results porting back side of the other manifold so the flapper could actually open more no pictures of that but maybe before i put it back together
Gave the housing and everything a really good clean,
While that was happening i was also painting up the turbo bits they came up amazing!
Then re-assembled
Back on i must have clocked the CHR a little in the proccess but nothing that will make too much a difference you can tell by the water feed connection
The Y pipe
Again now everything else looks dirty as ****
Thread Starter
Full Member
Joined: Feb 2011
Posts: 186
Likes: 5
From: Australia
Soo apparently the s5 ran 4 oil injectors while the s6 ran 2, the electrical components however were the same soo i swapped them over, very simple job wire lengths and everything near the same too.


Re fitted

Cleaned the alternator adjustment bracket up aswell no need for the powersteering pump anymore

Cleaned and painted the lower section of exhaust shielding too

was pretty beaten but looks much nicer now
Re fitted
Cleaned the alternator adjustment bracket up aswell no need for the powersteering pump anymore
Cleaned and painted the lower section of exhaust shielding too
was pretty beaten but looks much nicer now
Thread Starter
Full Member
Joined: Feb 2011
Posts: 186
Likes: 5
From: Australia
Port matched and painted the LIM
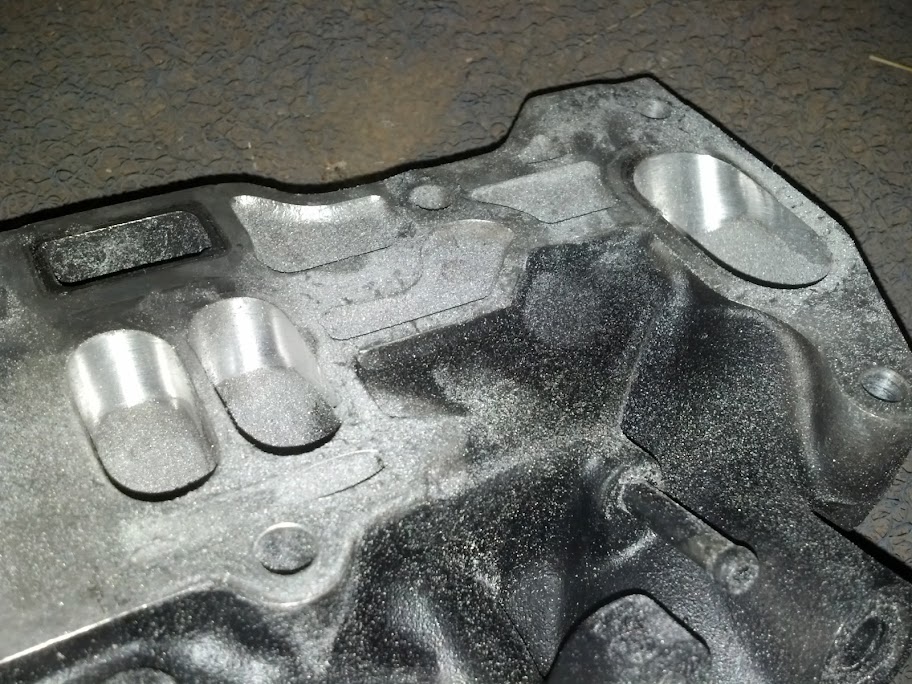


Uim same treatment


As you can see i had removed the secondary butterflies and was going to take out the middle section but didnt think my little dremel was up to it
Its all about the little touches, cleaned and painted

Uim same treatment
As you can see i had removed the secondary butterflies and was going to take out the middle section but didnt think my little dremel was up to it
Its all about the little touches, cleaned and painted
Thread Starter
Full Member
Joined: Feb 2011
Posts: 186
Likes: 5
From: Australia
Wiring modifications, sensor swaps and massive coincidences
OMP s5 drivers installed on the s6 pump
Upper water sensor( on the pump no idea?) swapped for s5
Injectors all plug in fine
Wastegate control solenoid swapped for s5 (soon to be replaced for an apexi for PFC control)
Sensors and what near oil filter all fitted no issues
s6 alt all plugs in no issues
All the emmission gear shares the same electirical drivers and what not except for the air pump its self which requires an "ON" signal
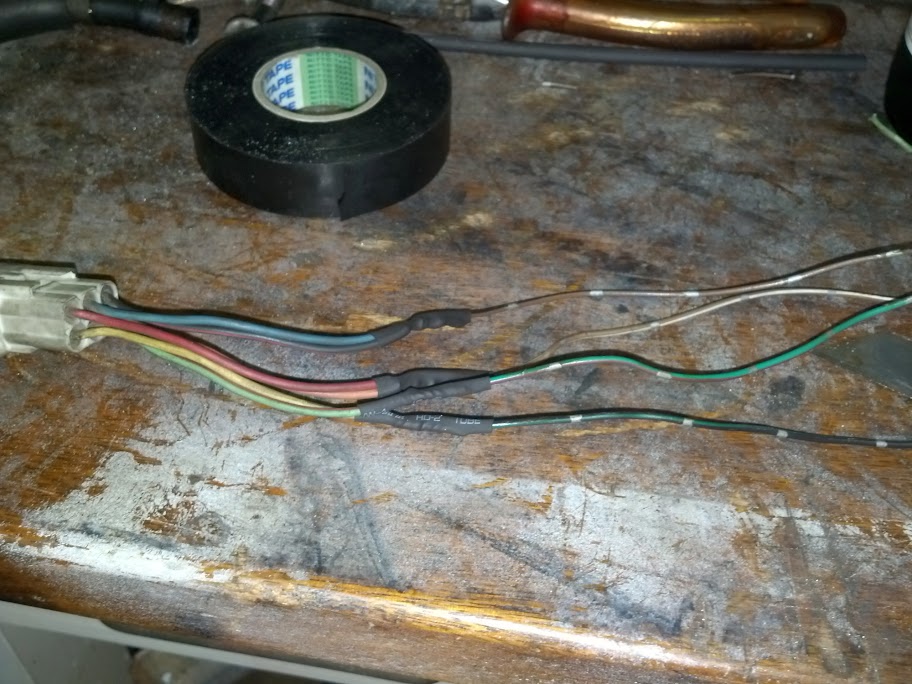
And I've made some of my own harnesses for other connections
CAS and TPS send the same signals just using different sensors
IAT im not sure i assume its should be changeable within the PFC
I will be running the wires for the air pump and Fuel temp in my own loom back to ecu and will wrap it with a few spares for any gauges or what not just incase
Anyway Pictures!!!!


My harnesses!!
well construction of s5 tps bellow


OMP s5 drivers installed on the s6 pump
Upper water sensor( on the pump no idea?) swapped for s5
Injectors all plug in fine
Wastegate control solenoid swapped for s5 (soon to be replaced for an apexi for PFC control)
Sensors and what near oil filter all fitted no issues
s6 alt all plugs in no issues
All the emmission gear shares the same electirical drivers and what not except for the air pump its self which requires an "ON" signal
And I've made some of my own harnesses for other connections
CAS and TPS send the same signals just using different sensors
IAT im not sure i assume its should be changeable within the PFC
I will be running the wires for the air pump and Fuel temp in my own loom back to ecu and will wrap it with a few spares for any gauges or what not just incase
Anyway Pictures!!!!
My harnesses!!
well construction of s5 tps bellow


Thread Starter
Full Member
Joined: Feb 2011
Posts: 186
Likes: 5
From: Australia
Forgot to post the photos of some of the wiring mods
CAS wired here

Currently what it looks like under the UIM
wont be trimming the loom till tune


Then hooked up the battery,
turned the key to the ON position and waited for smoking wires.
Nothing happened so i put the window back up after 3 years of it being down played and the fuel pump started working!


after putting some fluid in it and dry cranking it, still with everything seaming fine
decided to hook up spark and fuel!

CAS wired here
Currently what it looks like under the UIM
wont be trimming the loom till tune
Then hooked up the battery,
turned the key to the ON position and waited for smoking wires.
Nothing happened so i put the window back up after 3 years of it being down played and the fuel pump started working!
after putting some fluid in it and dry cranking it, still with everything seaming fine
decided to hook up spark and fuel!
Thread Starter
Full Member
Joined: Feb 2011
Posts: 186
Likes: 5
From: Australia
couldnt work out how to post the video from picasa but heres the same uploaded to facebook.
It started!!!
Twin turbo FC First start
It started!!!
Twin turbo FC First start
Last edited by squeakm; Nov 16, 2013 at 01:21 AM. Reason: bad link

Thread Starter
Full Member
Joined: Feb 2011
Posts: 186
Likes: 5
From: Australia
Then got to work making my block off plates
I cant understand why you'd pay someone else to do these theyre really quite simple...
This was the hardest one as the connecting butterfly actuator doesnt provide a traceable template
Step 1 drill holes i just measured the centres with a tape
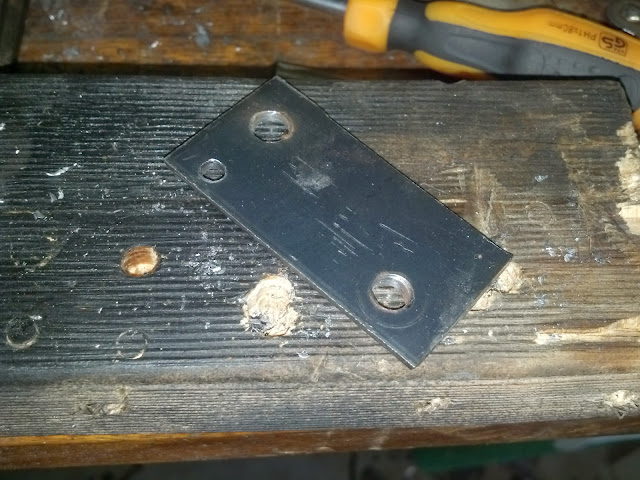
Slowly work at the desired shape with a grinder, i got a alot better at this by the end but still a more then acceptable result
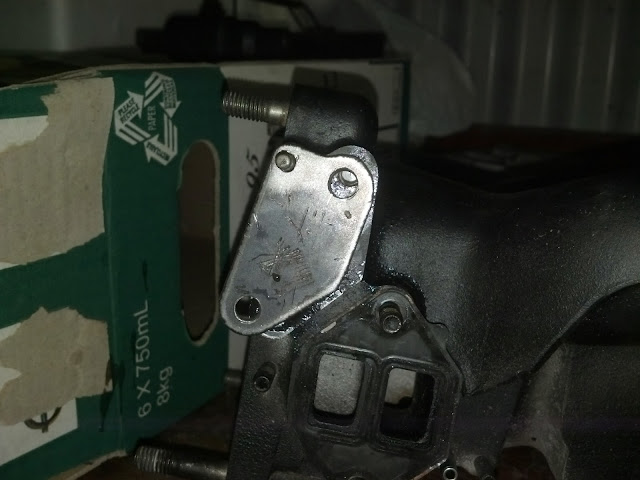

ACV to exhaust.

ACV to Intake installed

I thought i had more pictures of the ACV one as i was really happy with the end result.
I'll have to pull it off again at some point as i want to put proper spacers on it .

I cant understand why you'd pay someone else to do these theyre really quite simple...
This was the hardest one as the connecting butterfly actuator doesnt provide a traceable template
Step 1 drill holes i just measured the centres with a tape
Slowly work at the desired shape with a grinder, i got a alot better at this by the end but still a more then acceptable result
ACV to exhaust.
ACV to Intake installed
I thought i had more pictures of the ACV one as i was really happy with the end result.
I'll have to pull it off again at some point as i want to put proper spacers on it .
Thread Starter
Full Member
Joined: Feb 2011
Posts: 186
Likes: 5
From: Australia
My Vacuum Lines and Block off plugs arived soo i routed all them total cost of about $50 for everything i ordered way too much 4mm and barely enough 6mm but it got the job done.
I also re routed the washer line and bonet release cable through the wheel arch with the left over 4mm
and pictures for those who are playing at home


I also re routed the washer line and bonet release cable through the wheel arch with the left over 4mm
and pictures for those who are playing at home
Thread Starter
Full Member
Joined: Feb 2011
Posts: 186
Likes: 5
From: Australia
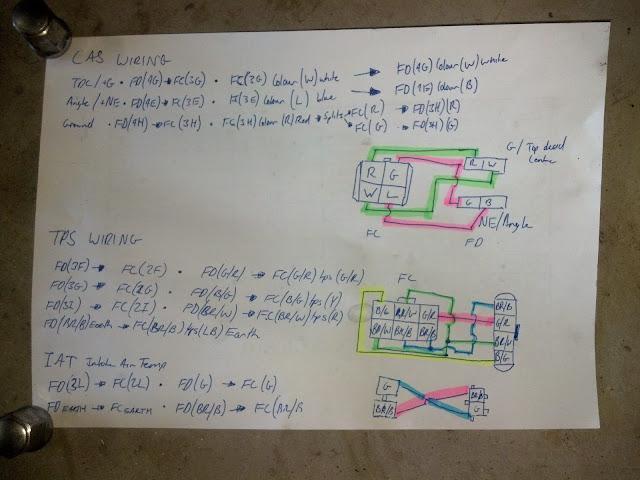
Should have probably put this up a while ago
This is the wiring changes i did, it probably doesnt make sense to anyone as its certainly not a legit wiring diagram haha
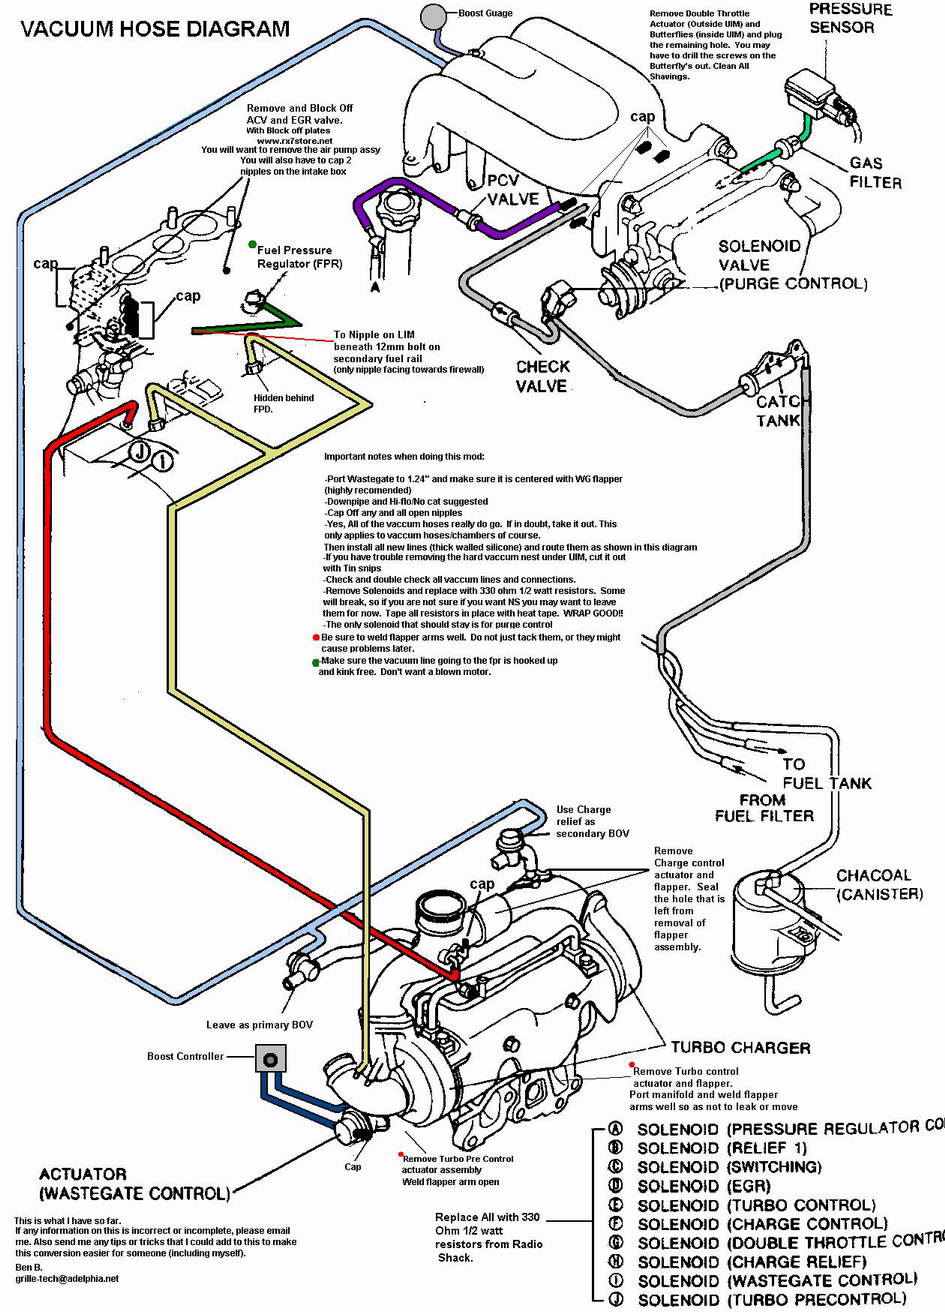
And this is vacuum line diagram i went with
This is the wiring changes i did, it probably doesnt make sense to anyone as its certainly not a legit wiring diagram haha
And this is vacuum line diagram i went with
Thread Starter
Full Member
Joined: Feb 2011
Posts: 186
Likes: 5
From: Australia
Pushed it out of the shed yesterday for a clean took a while and i had forgotten how good it looks!
front coilovers are raised right up thou and exhaust sits back another 5cm or soo its still not hooked up but still 8)


Black beast hiding in there

front coilovers are raised right up thou and exhaust sits back another 5cm or soo its still not hooked up but still 8)
Black beast hiding in there
Thread Starter
Full Member
Joined: Feb 2011
Posts: 186
Likes: 5
From: Australia
I still havent got water, air or oil plumbed up soo i have only every had it going for a second or two.
And no commander to see what the apexi saying but im hoping its just a cold start function or something as once its started it revs to 3k and holds it there.
I tried adjusting the tps but it then is very hard to start and doesnt idle
im not too worried about this yet as its probably a tuning thing.
But as it was going i certainly wasnt pushing it up hill back into the shed!!!
I have used a brass clutch in a while soo ended up doing a bit of a skid... :bounce:
