Project Resurrection: Running Log
 08-06-11, 11:17 PM
#201
Day 1123, part 2
Ran into a problem with fitting the louvers. Even when the center supports are resting firmly on the glass, the sides don't fit down any close to how they shoud.


Also, at least one side seems to be fitting lower than intended:
My guess is that they got tweaked 'flat' in shipping, but there's also an issue with the way the top row fits on the hinges and upper rest. I may have something together wrong, so more work is needed. They may not make their public debut until JCCS next month, but I'm not giving up in them. Too invested now.
The new-storage-bin-carpet project is going along nicely. The 'test' piece made from scrap cloth fits quite well:
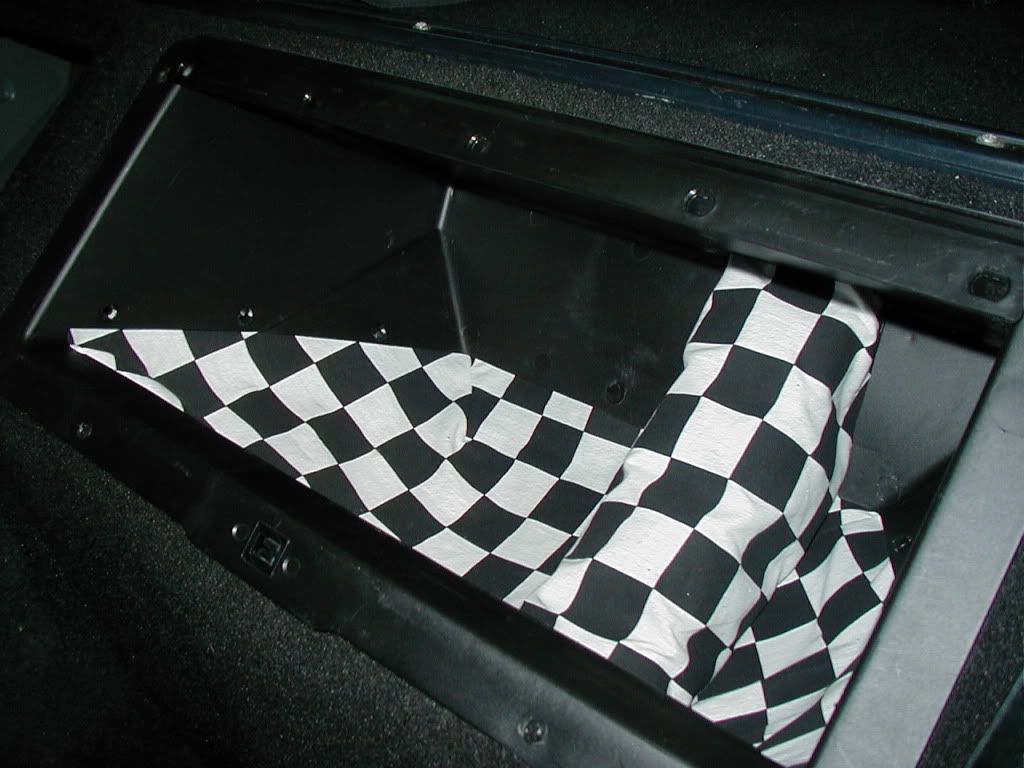
And turning it inside out fits the opposing bin just fine, so tomorrow I'll cut carpet and try assembling the actuals. Sewing carpet is a lot tougher than thin cloth.
15 hours, start to finish today. Time to collapse.
Ran into a problem with fitting the louvers. Even when the center supports are resting firmly on the glass, the sides don't fit down any close to how they shoud.
Also, at least one side seems to be fitting lower than intended:
My guess is that they got tweaked 'flat' in shipping, but there's also an issue with the way the top row fits on the hinges and upper rest. I may have something together wrong, so more work is needed. They may not make their public debut until JCCS next month, but I'm not giving up in them. Too invested now.
The new-storage-bin-carpet project is going along nicely. The 'test' piece made from scrap cloth fits quite well:
And turning it inside out fits the opposing bin just fine, so tomorrow I'll cut carpet and try assembling the actuals. Sewing carpet is a lot tougher than thin cloth.
15 hours, start to finish today. Time to collapse.
 08-09-11, 10:01 AM
#203
Day 1126
Pics PM'ed, Chris. Thanks for your offer to help me work out the louver fitment.
One funny thing I noted looking at the older weatherstrip I pulled off the louvers before painting; it seems pretty clear from the wear patterns that, even on the original car they came off of, they fitted a lot tighter at the top corners than they did at the bottom.
I feel the tingling of an upcoming modification in the wind, heh.
I finished the Bin Liner project last night. I discovered some simplifications in assembling the second one that would have shaved an hour or so off the assembly time on the first one - - as always, just when you really get good at doing something, you no longer need to do it.
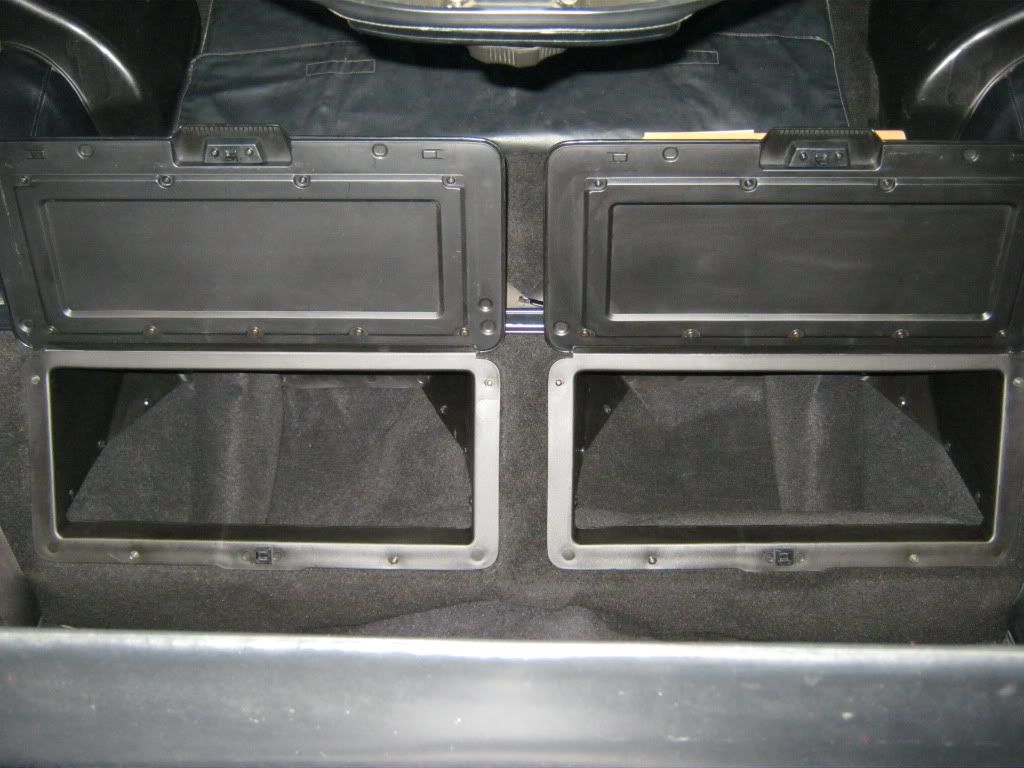
Quite happy with the results:
As promised in Zero5360's thread, I'll do a proper write-up of the bin SA-Mod process after I'm out from under the time pressure for the event. And I still have the write-up to do on rear axle seal replacement that I promised Stu.
Sad part of course is that no one will ever see them but me.
I've got a night or two left that I can carry on futzing with the louvers before I have to devote some focused hours to final detailing prior to MazFest on Saturday.
The raccoons are back after neighbor's fig tree again. It's damn distracting working in the garage at night, hearing the furry little nuisances scramble around in that tree, stuffing themselves into a serious sugar high. Saw one fall clean out of the tree the other night - -
it grunted when it hit the ground.
The most annoying part, though, is that figs apparently don't agree with raccoon digestion. Disgusting.
Pics PM'ed, Chris. Thanks for your offer to help me work out the louver fitment.
One funny thing I noted looking at the older weatherstrip I pulled off the louvers before painting; it seems pretty clear from the wear patterns that, even on the original car they came off of, they fitted a lot tighter at the top corners than they did at the bottom.
I feel the tingling of an upcoming modification in the wind, heh.
I finished the Bin Liner project last night. I discovered some simplifications in assembling the second one that would have shaved an hour or so off the assembly time on the first one - - as always, just when you really get good at doing something, you no longer need to do it.
Quite happy with the results:
As promised in Zero5360's thread, I'll do a proper write-up of the bin SA-Mod process after I'm out from under the time pressure for the event. And I still have the write-up to do on rear axle seal replacement that I promised Stu.
Sad part of course is that no one will ever see them but me.
I've got a night or two left that I can carry on futzing with the louvers before I have to devote some focused hours to final detailing prior to MazFest on Saturday.
The raccoons are back after neighbor's fig tree again. It's damn distracting working in the garage at night, hearing the furry little nuisances scramble around in that tree, stuffing themselves into a serious sugar high. Saw one fall clean out of the tree the other night - -
it grunted when it hit the ground.
The most annoying part, though, is that figs apparently don't agree with raccoon digestion. Disgusting.
08-11-11, 10:14 AM
#205
Day 1128
With the aid of Chris' pix of the louvers installed on his own -7, I was able to discover a couple things I was doing wrong, including having the top attachment plates swapped left and right, which makes a bit of a difference in how high up the glass the louvers mount.
That said, fitment still isn't right, so I can see I have to do some gently forceful reshaping to get things to line up. I suspect that these took a bit of squashing during shipment, even though they were carefully packed by the gent I bought them from.
I also managed to scratch the crap out of one of my hatch hinges playing with them last night, so work on louvers had to stop while I stripped and re-painted it.
With MazFest coming up on Saturday morning, I think I'm essentially out of time to get these squared away. Seems to me that I need to pull the hatch glass off and set it out level to get the fitment right; having to deal with the varying slope of hatch open, hatch closed, and controlling the lift shocks while loosening hinges and shock attachment points is making this harder than it needs to be.
And clearly I need to smooth some sharp edges on the louvers themselves and then touch up the paint, to avoid more 'mishaps'.
Not giving up, but just out of time before Saturday. I don't want to rush them and wreck them in the process, or tear up any more bodywork.
Rolled the car down the driveway after work to get the engine bay in sunlight for an hour or so, for a little judicious dusting and wiping. Still looking sharp.
I swapped a few things around, installed the sweet-looking replated headlight rods Banzai traded me for a set of my repro rod bushings, repainted the hood prop rod, few other ticky-tack little details. Need to polish a couple bits tonight, nothing major. biggest problem under the hood is dusting, heh.
Time to start cleaning the interior tonight.
One fun note; when I had the wheels off, I pulled what seemed like a half-pound of sharp little tar-covered granite pebbles out of the wheel wells and undercarriage. little suckers were stuck onto everywhere. Leftovers from the freshly-oiled road in the Malibu hills we ended up on during the Pizza Run earlier this year.
It was kinda sad to start the car up & then just drive it back into the garage so it stays clean - - it seemed to be saying "let's go play!"
08-11-11, 10:33 AM
#206
Waffles - hmmm good
iTrader: (1)
Next thing you know and you will be towing it on a trailer to the events.
Just busted on ya! It sounds like you may have a show winner again. Good luck.
The bins turned out nice, but if you want an FB just get one. You could use two
for double the fun anyway.
Just busted on ya! It sounds like you may have a show winner again. Good luck.
The bins turned out nice, but if you want an FB just get one. You could use two
for double the fun anyway.
08-11-11, 11:43 AM
#207
I'm not trying to turn the Beastie into an FB; but the waste of all that cubic space behind the seats offended my engineering sensibilities.
My new liners are deeper than the original FB liners; they go all the way down to the floor pads.
I've barely got room for all the SA spare parts; if I had to support an FB too, I'd need a bigger house.
My new liners are deeper than the original FB liners; they go all the way down to the floor pads.
I've barely got room for all the SA spare parts; if I had to support an FB too, I'd need a bigger house.
08-14-11, 01:58 PM
#208
Day 1130
MazFest 2011: great day, damn hot (upper 90's), bone dry, but fun. Got a lot of fine compliments on the car. "Best RX7" went to a highly-modified wide-body FC; only one division for -7's at the show. Still had a great time, and made out like a bandit in the raffle, heh. Got "Mother's" products to last me for years now.
Pix at the link.
http://smg.photobucket.com/albums/v2...2013th%202011/
08-25-11, 05:35 PM
#210
I'm hoping on getting back to them this weekend. I've been doing a bunch of non-car stuff the last week or so, and also worked out how to do brush-on chrome-look nickel electroplating on the cheap, for small parts and touchups. Forwarding my plan for the worn-away chrome on my wheel lug-bolts inserts. Nickel being corrosion-resistant, and all.
Plated a shiny penny last night; looks awesome.
Plated a shiny penny last night; looks awesome.
 08-26-11, 09:40 AM
#213
Yep. 2 weeks and counting. My basic to-do prior to the show, other than routine cleaning, is:
1) Louvers if I can get them worked out proper
2) Some front-end work I've been putting off, including my 'clunking' brake pads & a touch of wander-steer that has crept into the system
3) Fiddle with my bowl floats a tad, in the endless pursuit of my hot-shutdown flood curse
4) The above-mentioned plating project for the lug inserts on my crispy waffles
08-26-11, 11:22 AM
#214
Senior Member
iTrader: (1)
Join Date: Oct 2010
Location: oregon
Posts: 484
Likes: 0
Received 0 Likes
on
0 Posts
yayyy missing brake hardware! I had that for a while. every time i touched the brakes my pads made an annoying Clunking sound. :[ when i changed my pads the first time somehow i lost some of those metal clips that go in there, and didn't realize it. had to go to pick n pull to get the correct pieces.
Last edited by Mr_Miles; 08-26-11 at 11:24 AM.
08-26-11, 05:36 PM
#215
Originally Posted by Mr Miles
yayyy missing brake hardware! I had that for a while. every time i touched the brakes my pads made an annoying Clunking sound. :[ when i changed my pads the first time somehow i lost some of those metal clips that go in there, and didn't realize it. had to go to pick n pull to get the correct pieces.
They may however be old and/or sprung, esp. the end-of-pad clips; I have a brand new set still in the box, sitting on the bench this moment. And new brake pads.
08-26-11, 06:40 PM
#216
Senior Member
iTrader: (1)
Join Date: Oct 2010
Location: oregon
Posts: 484
Likes: 0
Received 0 Likes
on
0 Posts
A very plausible answer, sir, but all my required shims & springs are in place, including the imfamous z-shaped one up top that most people find to be such a hound to get in right. I had them apart a couple weeks back to re-grease them - - all present and accounted for.
They may however be old and/or sprung, esp. the end-of-pad clips; I have a brand new set still in the box, sitting on the bench this moment. And new brake pads.
They may however be old and/or sprung, esp. the end-of-pad clips; I have a brand new set still in the box, sitting on the bench this moment. And new brake pads.
08-28-11, 02:34 PM
#217
Well, this weekend turned out to be a bust for any progress; Power went out Friday about 4pm (outdoor temp, 103), and they didn't get it working at all till noon Saturday. Then it failed again an hour later. 105 on Saturday. Finally fixed (looked like they had to pull the whole distribution panel out of the buried vault; cranes, trucks, etc) last night about 10pm.
Well past 100 outside now, too, & I'm having 'eye trouble;' I just can't see going out there in the heat after sweltering inside for two days.
Helluva way to celebrate my birthday.
Well past 100 outside now, too, & I'm having 'eye trouble;' I just can't see going out there in the heat after sweltering inside for two days.
Helluva way to celebrate my birthday.
09-03-11, 04:16 PM
#222
Day 1151
OK, some progress updates at last:
First, as documented in THIS LINK, I've solved my clunking brake problem. The short version is that sometime in the past, I got a set of brake clips (aka "shims" or "brake hardware" ) that are not correct for the car, even though they were ordered based on year and model, and did fit in place. These clips didn't exert enough spring pressure to hold the pads in place after they had worn down some, apparently, and so were allowing too much pad motion.
The tricky part was finding out, once I got proper clips, which clip type goes in which position on the pad holder. This turned out to be a real stumper with no adequate documentation anywhere. After getting excellent advice from several other members, I decided on a test arrangement, which turned out to be correct. So now, we all know. The beauty of a forum such as this; we all benefit from watching the first penguin get tossed off the iceberg.
Along the way, I discovered something that may have been contributing to the sudden increase in 'wander steer' that I felt coming back from MazFest;
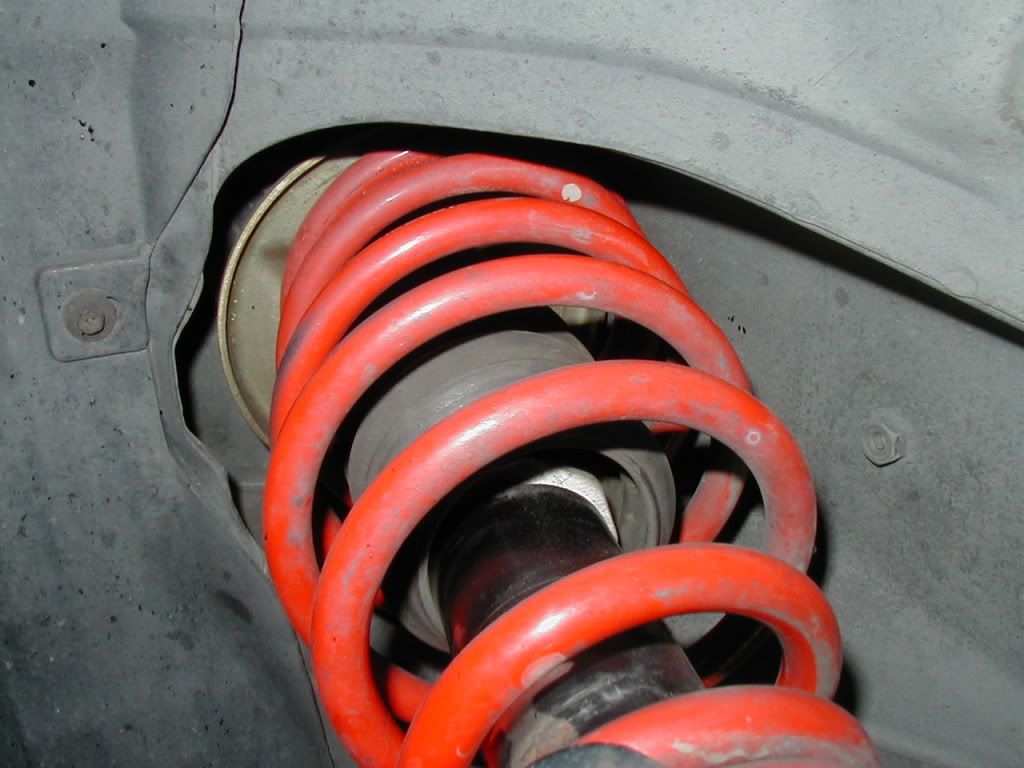
The front right spring had dropped out of the upper perch, and was riding on just the edges of the perch, which has the effect of raising the vehicle on that coner.
The RB springs I have date from May of 1995, as do my front struts. The springs are slightly lower than stock, and when first installed had almost zero compression when the car is lifted off them. They may have settled just a bit in the intervening 17 YEARS, but I don't have any issue with the left side being able to pull out.
I used a pry bar to get the spring back into the perch, and then did a lift test attempting to raise the front axle by hand while the car's up on stands. The right side showed an easier lift than the left. Which means the right strut is overtravelling downward, and therefore is probably pretty much dead. Overtravel plus inadequate damping plus a big bump equals spring came out of perch. Equals screwed up front-end geometry.
So, time for new struts, looks like , which sucks because my fronts are Tokicos with 'lifetime warranty"... but Tokico doesn't even make struts for SA's any more. So I guess the warranty isn't much good at this point.
I'll probably end up getting some KYBs. Along the way, though, I'm going to once and for all work out the dimensional differences between the SA and FB strut carts.
I've also completed the "My wheel inserts shall rust no more!" project; I've learned and tooled up for the simple process for doing brush-based nickel electroplating at home, and have used it to replate the areas on my wheel inserts where chrome had worn away over the years, allowing the steel inserts to rust when water gets trapped there from car washing.
First, you need a power supply that can deliver 4.5v DC power up to at least half an amp; you can buy these ($$$) from the same supply houses that sell the chemicals, but I just happen to still have a supply I built when I was about 11 years old and electronics was my major hobby in life:
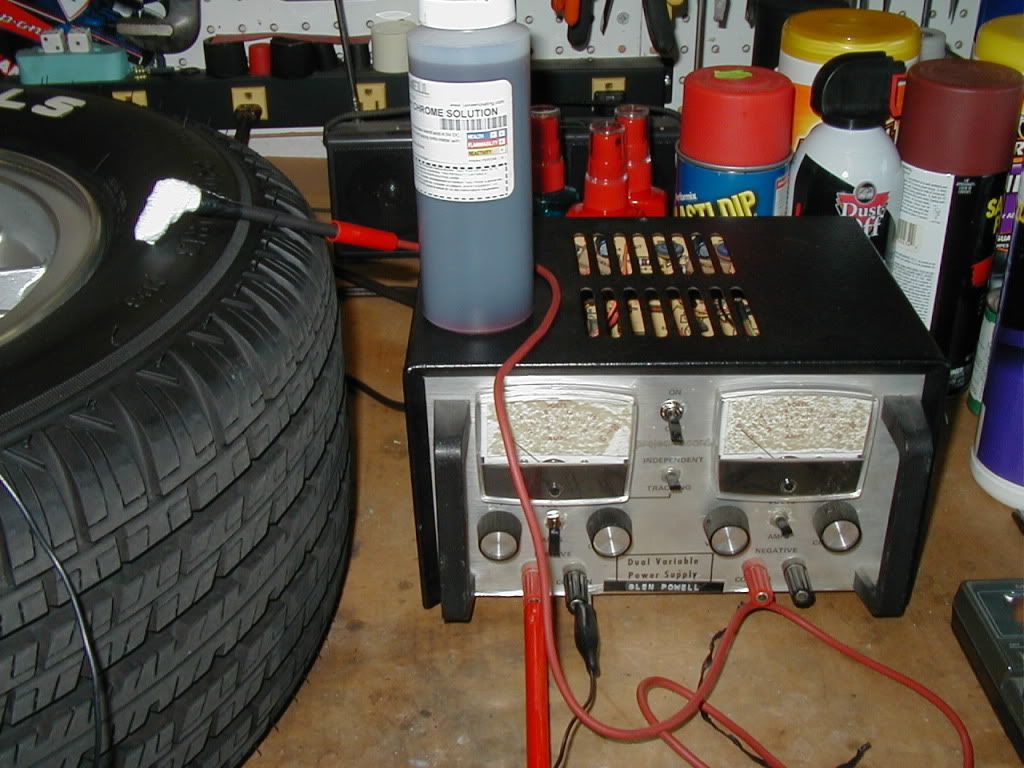
Next, you need the appropriate nickel-rich chemical solution, a stainless steel 'brush' electrode, and some absorptive fiber 'socks' which wrap the electrode and hold the solution while you plate. I bought this stuff from Caswell Plating via the web, for about $35. The leads to connect things to the power supply I also already had.
You have to have the metal you plan to plate super-clean, so I had to carefully burnish the inserts and then swab them with acetone (without messing up my fresh wheel paint) & let them dry.
The process is simple; the brush goes to the positive supply connection and becomes the anode, the wheel itself gets clipped via an alligator clip to the negative supply side and becomes the cathode. After wrapping the brush loosely
with the sock, you soak up some of the solution, and stroke it over the area to be plated - no pressure is needed.
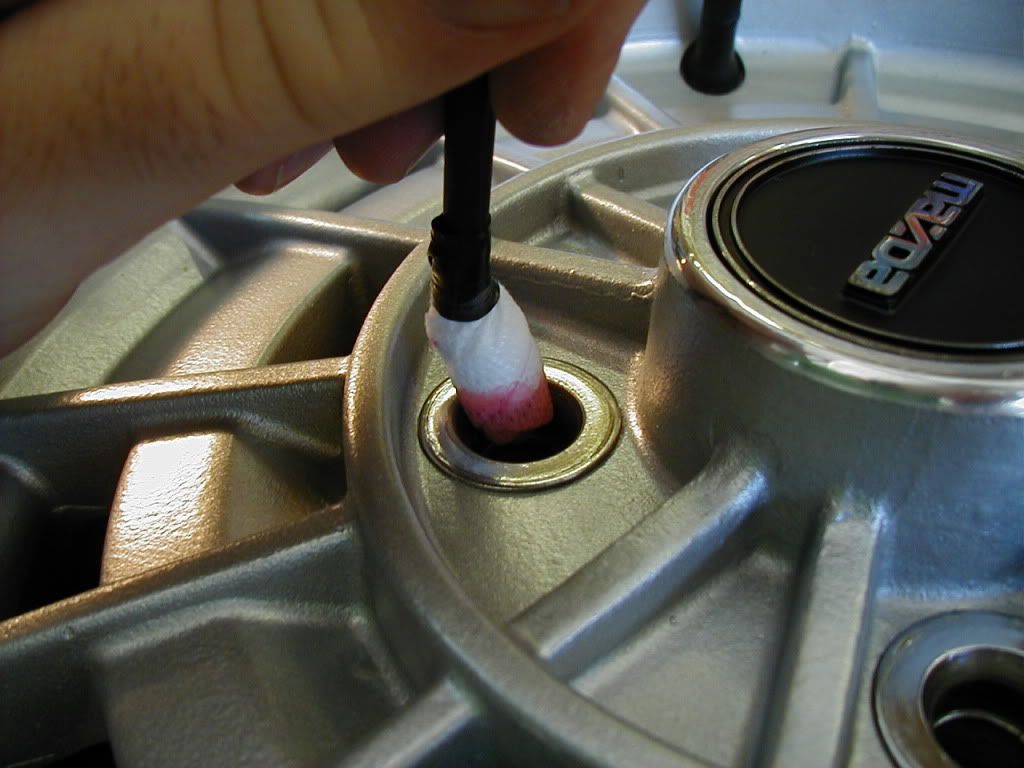
The electric current moves nickel ions from the solution and adheres them to the negatively-charged wheel insert, creating a strong bond. Takes about 5 minutes to actualy re-plate the inside of the insert. Then you rinse off leftover solution and you're done.
An example; This was the worst-damaged insert; some cleaning solution or something had actually eaten the chrome off the outer face in one direction, see the discoloration at the side of the hole closest to the camera?

Nickel isn't exactly the same color as chrome, but this solution (called "copy chrome") has a bluing agent in it that gets it pretty close - - and being nickel, is corrosion resistant, which was really my goal here.
Same hole, after re-plating:

A little buffing (but only a little as the plating is thin) and it looks tolerable good - - and will rust no more!
I'm looking forward to trying this out on small engine parts, like distributor diaphragms, which can't be re-plated ina tank without damaging the diaphragms, but which have lost their original coatings. It works on steel and copper, but not on aluminum - aluminum needs an intermediate plating step. And sadly, it won't work on non-conductive materials like plastic.
Next, I can finally get back to these accursed louvers. Which means pulling the hatch glass to make working on them easier and safer.
One week to JCCS!
OK, some progress updates at last:
First, as documented in THIS LINK, I've solved my clunking brake problem. The short version is that sometime in the past, I got a set of brake clips (aka "shims" or "brake hardware" ) that are not correct for the car, even though they were ordered based on year and model, and did fit in place. These clips didn't exert enough spring pressure to hold the pads in place after they had worn down some, apparently, and so were allowing too much pad motion.
The tricky part was finding out, once I got proper clips, which clip type goes in which position on the pad holder. This turned out to be a real stumper with no adequate documentation anywhere. After getting excellent advice from several other members, I decided on a test arrangement, which turned out to be correct. So now, we all know. The beauty of a forum such as this; we all benefit from watching the first penguin get tossed off the iceberg.
Along the way, I discovered something that may have been contributing to the sudden increase in 'wander steer' that I felt coming back from MazFest;
The front right spring had dropped out of the upper perch, and was riding on just the edges of the perch, which has the effect of raising the vehicle on that coner.
The RB springs I have date from May of 1995, as do my front struts. The springs are slightly lower than stock, and when first installed had almost zero compression when the car is lifted off them. They may have settled just a bit in the intervening 17 YEARS, but I don't have any issue with the left side being able to pull out.
I used a pry bar to get the spring back into the perch, and then did a lift test attempting to raise the front axle by hand while the car's up on stands. The right side showed an easier lift than the left. Which means the right strut is overtravelling downward, and therefore is probably pretty much dead. Overtravel plus inadequate damping plus a big bump equals spring came out of perch. Equals screwed up front-end geometry.
So, time for new struts, looks like , which sucks because my fronts are Tokicos with 'lifetime warranty"... but Tokico doesn't even make struts for SA's any more. So I guess the warranty isn't much good at this point.
I'll probably end up getting some KYBs. Along the way, though, I'm going to once and for all work out the dimensional differences between the SA and FB strut carts.
I've also completed the "My wheel inserts shall rust no more!" project; I've learned and tooled up for the simple process for doing brush-based nickel electroplating at home, and have used it to replate the areas on my wheel inserts where chrome had worn away over the years, allowing the steel inserts to rust when water gets trapped there from car washing.
First, you need a power supply that can deliver 4.5v DC power up to at least half an amp; you can buy these ($$$) from the same supply houses that sell the chemicals, but I just happen to still have a supply I built when I was about 11 years old and electronics was my major hobby in life:
Next, you need the appropriate nickel-rich chemical solution, a stainless steel 'brush' electrode, and some absorptive fiber 'socks' which wrap the electrode and hold the solution while you plate. I bought this stuff from Caswell Plating via the web, for about $35. The leads to connect things to the power supply I also already had.
You have to have the metal you plan to plate super-clean, so I had to carefully burnish the inserts and then swab them with acetone (without messing up my fresh wheel paint) & let them dry.
The process is simple; the brush goes to the positive supply connection and becomes the anode, the wheel itself gets clipped via an alligator clip to the negative supply side and becomes the cathode. After wrapping the brush loosely
with the sock, you soak up some of the solution, and stroke it over the area to be plated - no pressure is needed.
The electric current moves nickel ions from the solution and adheres them to the negatively-charged wheel insert, creating a strong bond. Takes about 5 minutes to actualy re-plate the inside of the insert. Then you rinse off leftover solution and you're done.
An example; This was the worst-damaged insert; some cleaning solution or something had actually eaten the chrome off the outer face in one direction, see the discoloration at the side of the hole closest to the camera?
Nickel isn't exactly the same color as chrome, but this solution (called "copy chrome") has a bluing agent in it that gets it pretty close - - and being nickel, is corrosion resistant, which was really my goal here.
Same hole, after re-plating:
A little buffing (but only a little as the plating is thin) and it looks tolerable good - - and will rust no more!
I'm looking forward to trying this out on small engine parts, like distributor diaphragms, which can't be re-plated ina tank without damaging the diaphragms, but which have lost their original coatings. It works on steel and copper, but not on aluminum - aluminum needs an intermediate plating step. And sadly, it won't work on non-conductive materials like plastic.
Next, I can finally get back to these accursed louvers. Which means pulling the hatch glass to make working on them easier and safer.
One week to JCCS!
09-04-11, 07:16 PM
#223
Day 1152
These damned louvers will be the death of me.
I've spent most of the day re-tweaking them (by hand, and they are not the easiest things in the world to bend by hand) and have nearly worked out the major gaps I had at the left side... but now the individual slats are no longer flat when compared to each other.
I also had to unrivet the catch on the left side, and bend it in the vise, to ensure it engaged the hold-down loop. Along the way, two rivets started to work loose, so they had to be drilled out and replaced as well.
And naturally, all this man-handling is accumulating scratches and dings in the fresh paint, which means I'll need to touch-up the paint before actually mounting them. Which really compresses my timetable.
I'm now looking at them and seriously wondering if they are going to look good enough when finished to consider having them on for JCCS. I thought they'd be a good choice for that show since they were a dealer-installed option at the time and are unusual to see now... which mades them both 'rare' and 'period-correct', but if they don't look right, they'll be a net negative at a very competitive show.
Arg, conflict. If I finish putting them on, demounting them is a major pain (double-sided tape under stainless sheet metal brackets, which go under the hatch hinges and lift buttons).
Grrrr.
Photos:
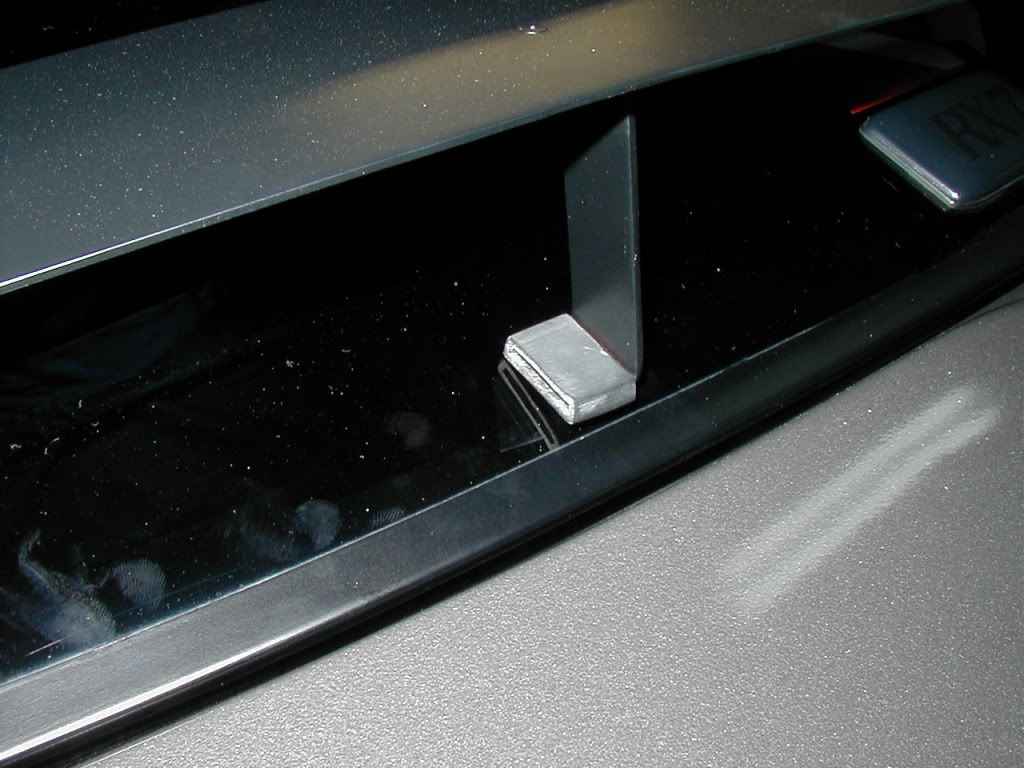
Starting out today; Gap on left center of about 1 fingerwidth.
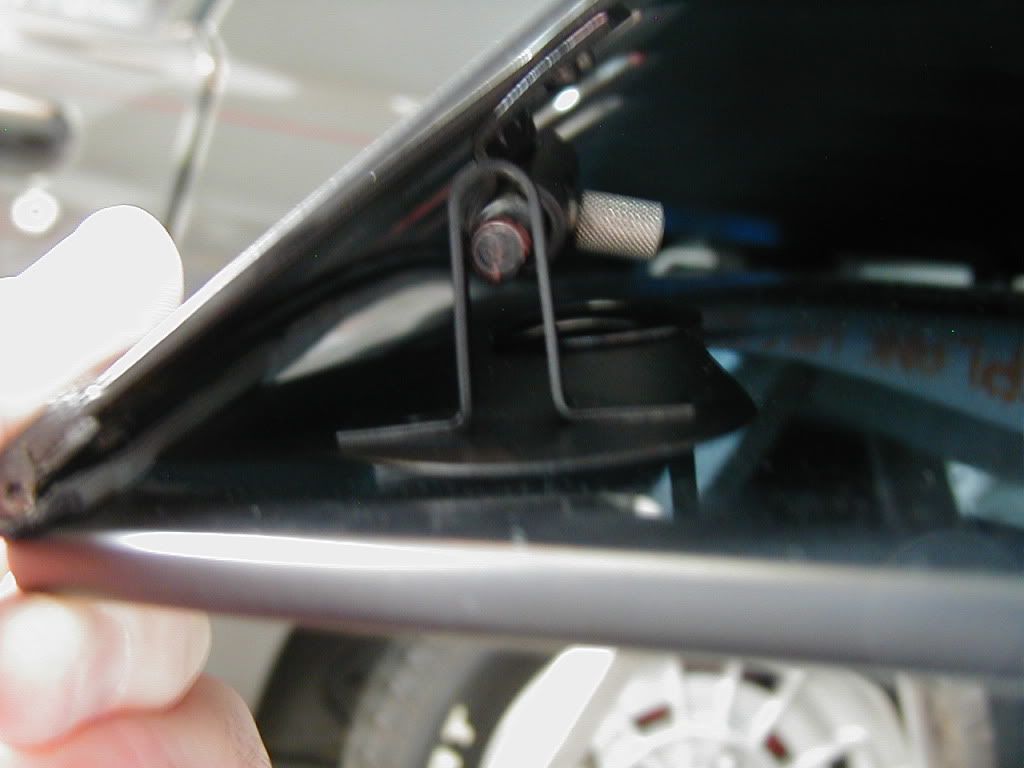
Also (sorry, blurry) 1/4" gap between latch bolt and hold-down loop was letting the louvers on the left side move freely up and down; not good.
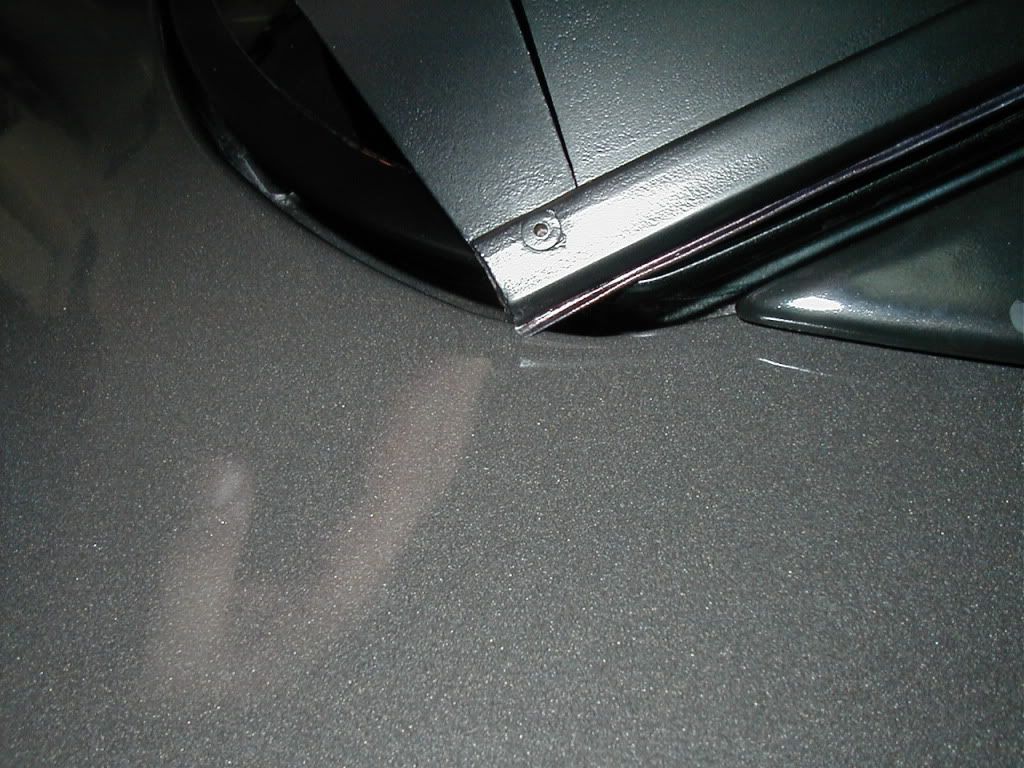
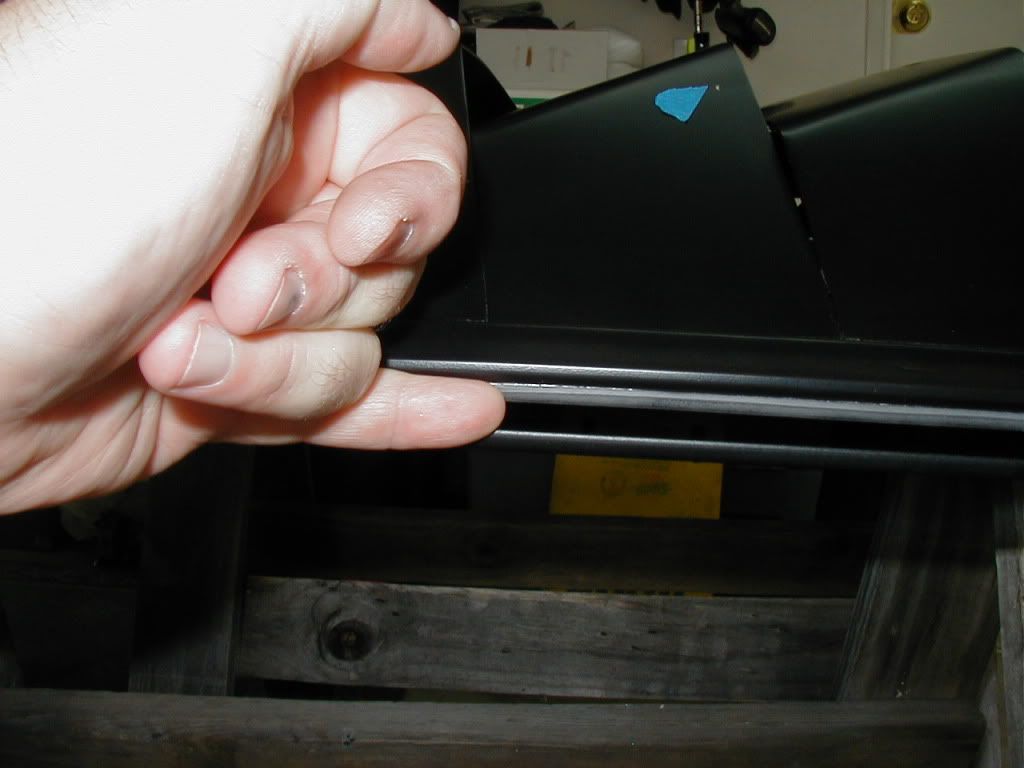
Comparison; gap on right side, though noticeable, is pretty acceptable; the rubber seal is almost touching the glass.
For some reason, these things are also about a half-inch too long...?
Progress at this point:
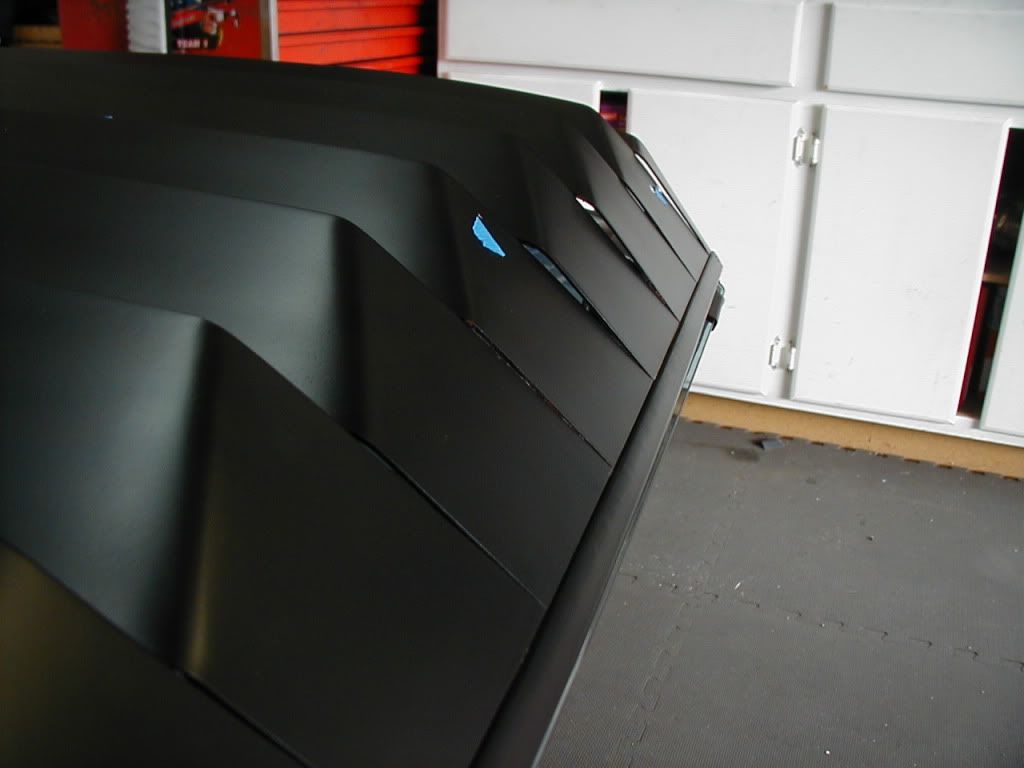
Left side gap now resembles original right-side gap:
...But the sides of the louver are no longer as flush to each other as they used to be...
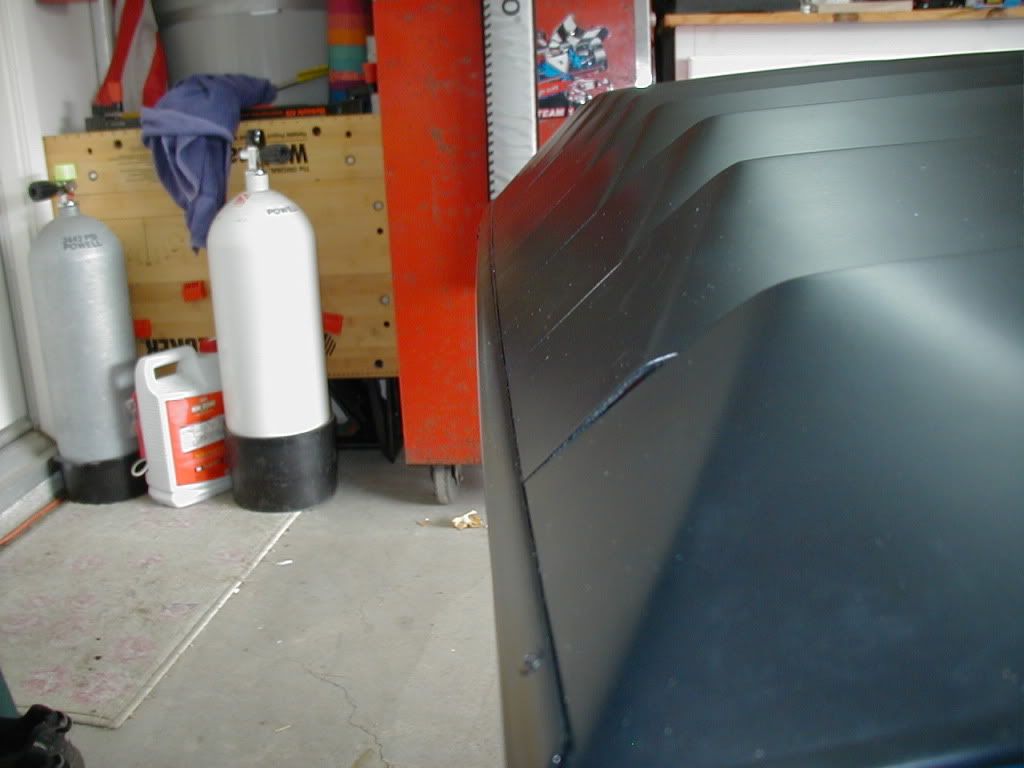
...when compared to the right side.
My suspicion is that the culprit here is the original manufacturing method used to assemble the side stringer to the slats. They are neither welded nor rivetted, but instead are held into a groove in the extruded edge stringer by a pattern of crimps:

It looks like over the years this crimp pattern has loosened up to the point that the slats have migrated from their original positions somewhat, and that this combined with the need to try to re-bend the angles into them (iether from damage or just from having lost shape from age while stored) has let the bottom edges loose alignment.
I don't think there's any way I can fix that crimped fastening; there's now way short of building some special jigs that would allow me to apply pressure to get the slats re-seated in the bottom of the slot. And clearly, there's no way to unfasten, fix, and then refasten them. Too bad they didn't just TIG them; they'd have lasted a lot longer.
So I need to decide tonight if I spend the time to finsih attaching hte mounting poits, then paint them tomorrow, looking as gap-toothed as they do.
Or should I just table them and get the hatch glass back on the car, and call it until after JCCS?
Grrrrr...
These damned louvers will be the death of me.
I've spent most of the day re-tweaking them (by hand, and they are not the easiest things in the world to bend by hand) and have nearly worked out the major gaps I had at the left side... but now the individual slats are no longer flat when compared to each other.
I also had to unrivet the catch on the left side, and bend it in the vise, to ensure it engaged the hold-down loop. Along the way, two rivets started to work loose, so they had to be drilled out and replaced as well.
And naturally, all this man-handling is accumulating scratches and dings in the fresh paint, which means I'll need to touch-up the paint before actually mounting them. Which really compresses my timetable.
I'm now looking at them and seriously wondering if they are going to look good enough when finished to consider having them on for JCCS. I thought they'd be a good choice for that show since they were a dealer-installed option at the time and are unusual to see now... which mades them both 'rare' and 'period-correct', but if they don't look right, they'll be a net negative at a very competitive show.
Arg, conflict. If I finish putting them on, demounting them is a major pain (double-sided tape under stainless sheet metal brackets, which go under the hatch hinges and lift buttons).
Grrrr.
Photos:
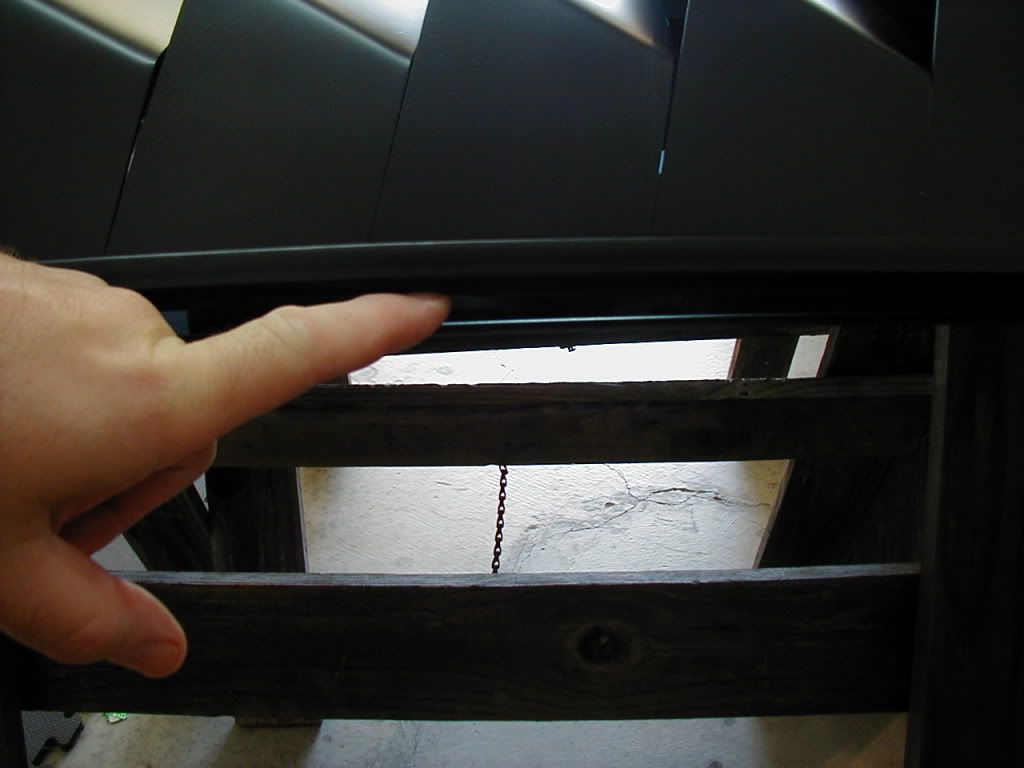
Starting out today; Gap on left center of about 1 fingerwidth.
Also (sorry, blurry) 1/4" gap between latch bolt and hold-down loop was letting the louvers on the left side move freely up and down; not good.
Comparison; gap on right side, though noticeable, is pretty acceptable; the rubber seal is almost touching the glass.
For some reason, these things are also about a half-inch too long...?
Progress at this point:
Left side gap now resembles original right-side gap:
...But the sides of the louver are no longer as flush to each other as they used to be...
...when compared to the right side.
My suspicion is that the culprit here is the original manufacturing method used to assemble the side stringer to the slats. They are neither welded nor rivetted, but instead are held into a groove in the extruded edge stringer by a pattern of crimps:
It looks like over the years this crimp pattern has loosened up to the point that the slats have migrated from their original positions somewhat, and that this combined with the need to try to re-bend the angles into them (iether from damage or just from having lost shape from age while stored) has let the bottom edges loose alignment.
I don't think there's any way I can fix that crimped fastening; there's now way short of building some special jigs that would allow me to apply pressure to get the slats re-seated in the bottom of the slot. And clearly, there's no way to unfasten, fix, and then refasten them. Too bad they didn't just TIG them; they'd have lasted a lot longer.
So I need to decide tonight if I spend the time to finsih attaching hte mounting poits, then paint them tomorrow, looking as gap-toothed as they do.
Or should I just table them and get the hatch glass back on the car, and call it until after JCCS?
Grrrrr...
09-04-11, 09:13 PM
#224
Lurking on thread near U
Join Date: Dec 2008
Location: Huntsville, Alabama
Posts: 143
Likes: 0
Received 0 Likes
on
0 Posts
Bent louvers can be a real pain in the derriere. If you know how to weld, you could always open the crimpings up with a chisel and (very carefully, and not too hot) tack the slats in the correct locations. The only jig you would need would be for support on the four corners, to hold the louvers upright while you weld from underneath. I have been working lately on a good method of building a matching set of louvers for my quarter windows, although it falls around number 15 on my prioritized list of projects-in-progress. (The rounded ones from black dragon are hideous). My main stumbling block on the project has been finding an acceptable method of compound bending the aluminum slats to follow the curvature of the glass without deforming them. I just don't work with sheetmetal enough to have mastered the level of patience and finesse for such a job. I will be posting a thread on the process in a few months when I get back to the project. Looking good, your attention to detail is mind-boggling. The next time someone calls me a perfectionist, I will gladly show them this thread. Keep it up, Ben