Project Resurrection: Running Log
 07-25-11, 07:33 AM
#176
Waffles - hmmm good
iTrader: (1)
Louvers look nice.
Yeah that chrome won't hold up to an impact. I bought new chrome lug nuts for my
truck awhile back and after a couple of rotations using the impact to get them off
the lug nuts chrome is cracking off. Thats what I get for buying cheap bling at the
zone.
If I were you I would just reshine them and save up for brandy new ones from
Mazda since they still offer them.
 07-25-11, 10:12 AM
#177
T G, I thought it over across the weekend, and I'm gonna go for the re-chrome, partly because I'm interested to see how it comes out. If they look iffy, I'll start buying NOS ones for when they give up.
I could afford a set of new ones now; it's not a matter of saving up as much as it is revulsion at the idea of spending that much money for a fistful of bolts if I don't need to.
I paid less than that for the full set of tires on the car.
Heading to the chrome place at lunch today; When I go to pick them up (about a week, they said) I'm going to get a quote on re-chroming of original shift surround trim and armrest trim, too, for those who are interested.
Stu; I'll put up mounted pix once they are on, and the car's out in the sun. No wheels at the moment, and I still need to refurb the vinyl trim pieces for the louvers, and get some thin double-stick tape for the mounts.
07-25-11, 03:08 PM
#179
Thanks, Chris.
Hey could you favor me with some close-ups of the fitment of yours; especially how they sit down on the glass at the sides and rear?
I'm thinking these may be a bit 'flatter" than they originally were, and may need some shape tweaking. I want to know how they SHOULD look!
Hey could you favor me with some close-ups of the fitment of yours; especially how they sit down on the glass at the sides and rear?
I'm thinking these may be a bit 'flatter" than they originally were, and may need some shape tweaking. I want to know how they SHOULD look!
07-26-11, 10:31 PM
#182
Day 1112
Wrapped up a refurb of my center console, details of which can be found in a couple places:
https://www.rx7club.com/1st-generation-specific-1979-1985-18/has-anyone-ever-found-950456/ Which discusses proper touch-up paint for the 80 center surrounds.
https://www.rx7club.com/1st-gen-general-discussion-207/original-1980-console-screws-what-color-962407/ Covers the 'proper' color for the visible Philips screws that retain the shifter surround.
Dropped the last lug bolt off at the chrome shop today (long story short, got there yesterday to discover only 15 in my little bag... one got left behind on the workbench, arg) and hada chance to discuss with the shop owner the possibilites of re-chroming the plastic trim ring and arm-rest inserts for the 80 interior.
He said it would be possible to re-chrome the shift surround trim ring, because it is fairly rigid and is mounted where it won't flex, but that doing so would be costly (around $150-$200) due to the many steps involved to chrome plastic using the lines his shop is set up for. Additionally, he said that the multiple layers of special primers and metals (two primers, three metals, with polishing between) would increase the dimensions of the part by as much as two or three hundredths of an inch in all directions.
The arm rest trim inserts he said were too flexible to be plated with the processes available to him. The chrome would just crack off.
He did say that if there was enough call to do short production runs, he knows a guy who could cast reproductions of the trim rings and arm rest inserts in brass or bronze, which is then really easy to polish and plate, and greatly durable besides. He said that 10 or more was usually the break-even point, and the total cost would likely still be seveal hundred dollars (depends on total quantity) but that they'd last virtually forever. And those damned fragile retaining pins, being replaced either with brass or threaded holes for screws, would never break again.
Might be something to consider a group buy approach for; I'll find out more when I go pick up my bolts next week.
I have another approach that worked well for the arm rest trim (have pix, need writing time) but I haven't experimented with it for surrounds yet. Got a couple ideas in that direction I want to try.
I discovered a rear axle seal leak just starting when I pulled my wheels; I ordered parts to go ahead and replace both seals and bearings from Rock Auto; got some decent prices on some closeouts, came to about 1/3 what the same parts cost from Mazdatrix and about 1/2 of Black Dragon. Name brand bearings, seals, collars, and a spare right-side brake cylinder (just in case) for $50, hard to beat.
next up; wheel cleaning and refurb as I wait for my parts, and also I need to sew up new carpet liners for my modified FB bins behind the seats. The old ones are seriously grotty. I'll shoot some pix on how to modify FB bins to fit an SA as I go.
07-27-11, 09:42 AM
#183
Rotary Freak
iTrader: (19)
Join Date: Oct 2007
Location: Colorado Springs, CO
Posts: 2,014
Likes: 0
Received 0 Likes
on
0 Posts
For the chrome what about using something like Alclad? http://www.alclad2.com/
Or maybe something like this: http://www.spazstix.com/xcart/Mirror...Aerosol-Paint/
there is also this place: http://www.chrometechusa.com/
Or maybe something like this: http://www.spazstix.com/xcart/Mirror...Aerosol-Paint/
there is also this place: http://www.chrometechusa.com/
07-27-11, 10:05 AM
#184
All worthy of research probably, Chris.
The Alclad paint looks like it might be an easy option, and not too much money to test out. I have a good modeling airbrush, so I may give it a go. Happily, I currently have a good-looking surround ring, & the rest of my interior chrome is looking good for now.
The Spazstix aerosol might work, though my past experience with other "chrome" rattle-can paints has been that they do not live up to their labeling... they clearly look spray-painted. Maybe the tech has improved.
Chrometech might be a good "proper" approach; they may use the proper process for chroming plastic, which the guy I'm working with said was called "chrome over electroless nickel" & is specifically intended for plastic, and for which he is not tolled up for - said it's a specialty, and not one he has pursued not tooled for.
07-27-11, 12:16 PM
#185
Waffles - hmmm good
iTrader: (1)
I tried one of the chrome paints I found in an autostore and it sucked. I did my
shifter trim surround and it just doesn't look like chrome at all plus it had issues
like extreme drying time and getting soft in the heat. Anyway, I'm looking to redo
it with something better. That chrometech site looks like the best bet.
shifter trim surround and it just doesn't look like chrome at all plus it had issues
like extreme drying time and getting soft in the heat. Anyway, I'm looking to redo
it with something better. That chrometech site looks like the best bet.
07-27-11, 12:26 PM
#186
Rotary Freak
iTrader: (19)
Join Date: Oct 2007
Location: Colorado Springs, CO
Posts: 2,014
Likes: 0
Received 0 Likes
on
0 Posts
there are a number of other places that will chrome plastic. Take a look in muscle car and classic car magazines. I usually see 3 or 4 different places advertised in the back.
07-28-11, 07:09 PM
#187
Day 1114
The chrome place called; bolts are ready for pickup. I'll be getting them tomorrow at lunch. I wasn't expecting them until Monday earliest, so that's great. Pix of the results to follow.
Rear axle seals and bearings are on the way from Rock Auto, due Monday. If THEY show up early too, I'm gonna have a great weekend! Tracking says they're now in Ft Worth, so that's iffy, seeing as they left Houston yesterday and just got to Ft. Worth.
Time to go out and work on my rims; clean, polish, paint.
07-29-11, 07:25 PM
#188
Day 1115
Oh... my... gawd... They're amazing...
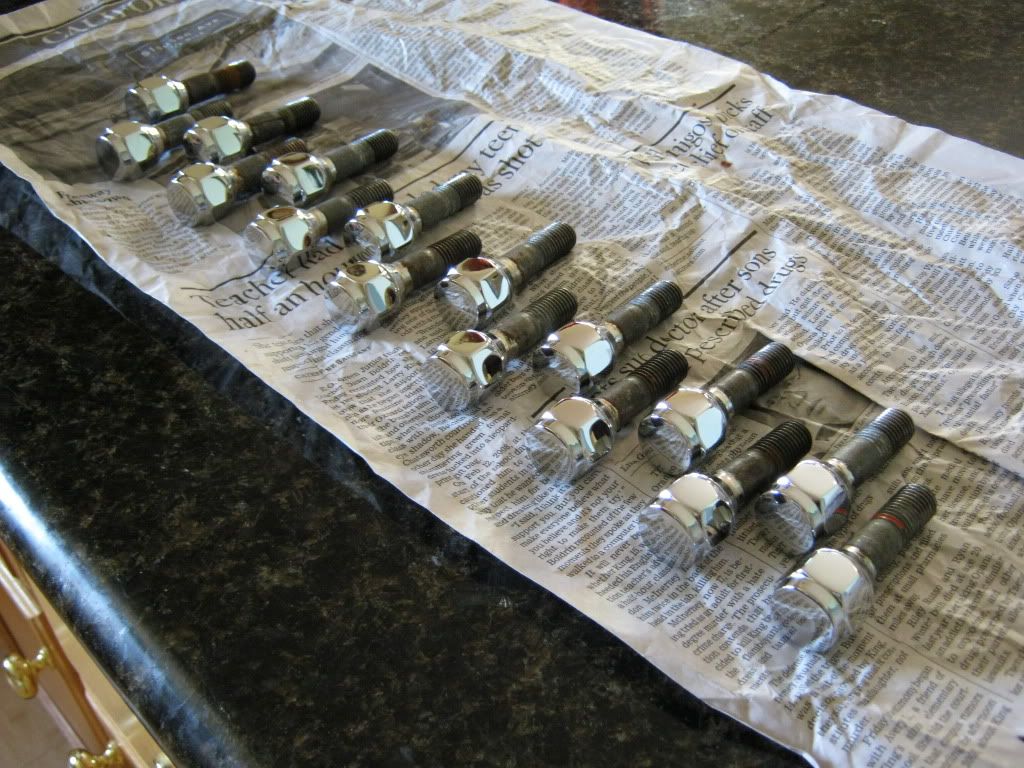
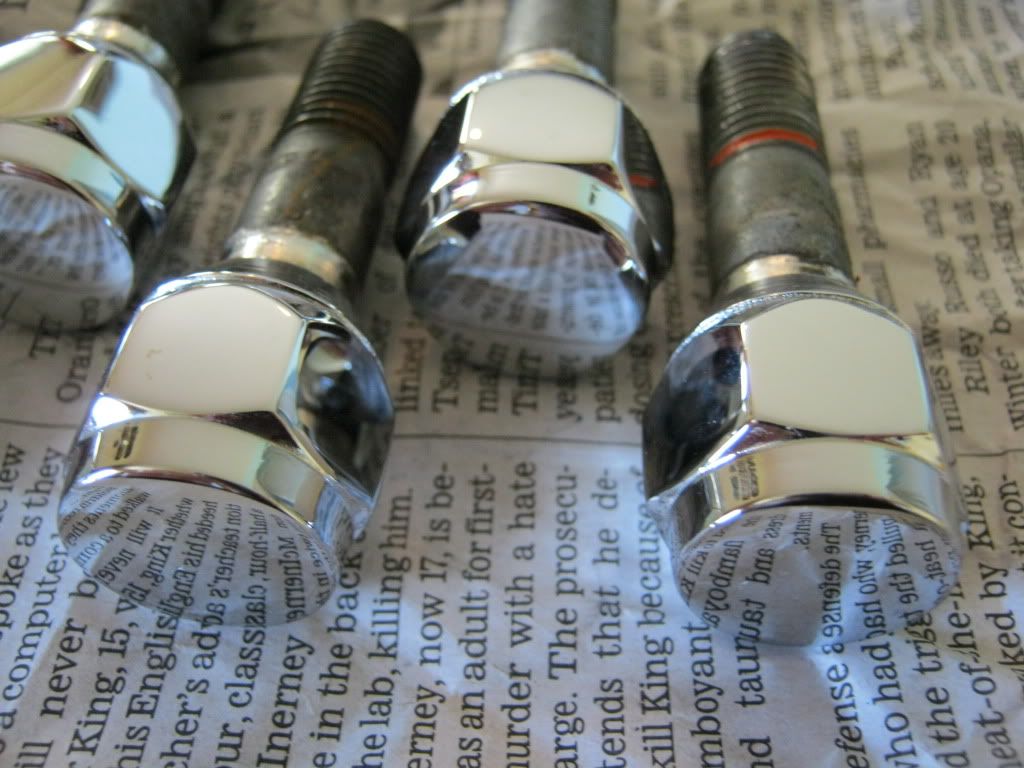
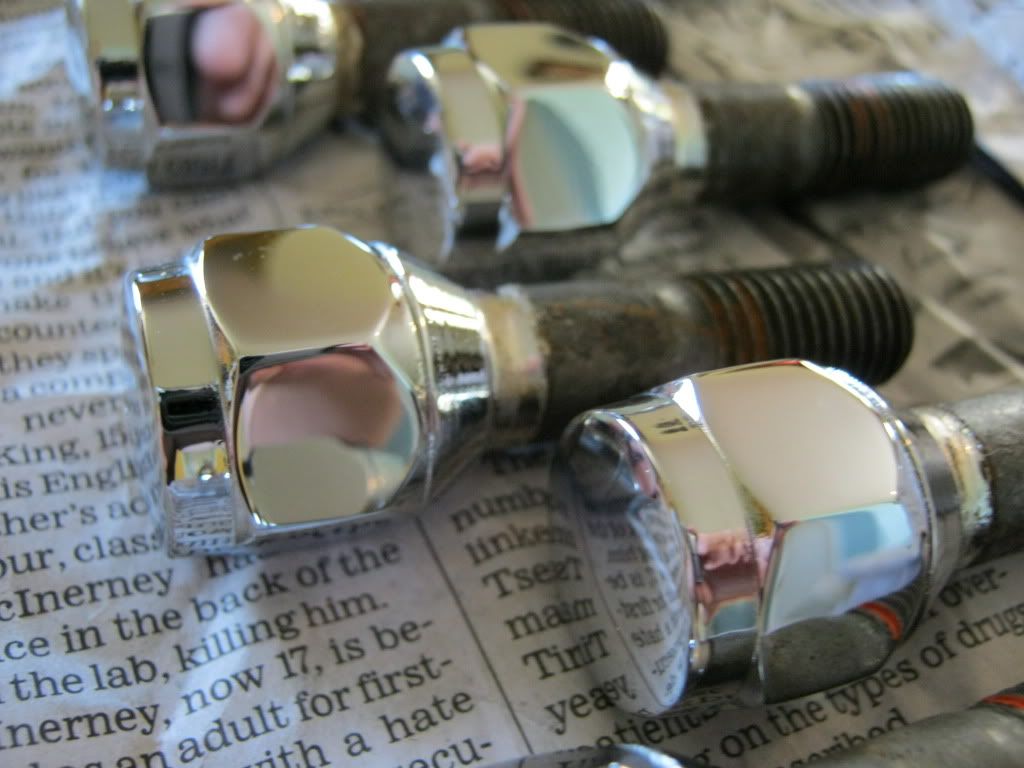
Difficult to believe these are the same bolts.

I had these done by South Bay Chrome, in Santa Ana; having seen my results, I can highly recommend these folks for decorative chrome work, as I've gotten both great service and a lot of personal attention from them for this little project.
Weblink for those interested in them: http://southbaychrome.com/
Now, I need to clean the shafts and threads, and then coat the shafts (but not threads) with cold zinc to prevent further rust where the cad is gone.
I can't wait to see these on the car. Lot of work ahead this in the next couple days before that can happen, though.
I got 1.5 wheels cleaned/lip-buffed yesterday before the sun went down, so 2.5 left to clean before I can mask and paint. Plus I still have the axles seals to replace, and the bearings - but they have not shown up yet. Monday, FedEx says.
A couple other projects to try to wrap beforeMazFest too. Gonna be a busy couple weeks.
So, out to the garage I go!
Oh... my... gawd... They're amazing...
Difficult to believe these are the same bolts.
I had these done by South Bay Chrome, in Santa Ana; having seen my results, I can highly recommend these folks for decorative chrome work, as I've gotten both great service and a lot of personal attention from them for this little project.
Weblink for those interested in them: http://southbaychrome.com/
Now, I need to clean the shafts and threads, and then coat the shafts (but not threads) with cold zinc to prevent further rust where the cad is gone.
I can't wait to see these on the car. Lot of work ahead this in the next couple days before that can happen, though.
I got 1.5 wheels cleaned/lip-buffed yesterday before the sun went down, so 2.5 left to clean before I can mask and paint. Plus I still have the axles seals to replace, and the bearings - but they have not shown up yet. Monday, FedEx says.
A couple other projects to try to wrap beforeMazFest too. Gonna be a busy couple weeks.
So, out to the garage I go!
07-30-11, 07:30 PM
#189
Junior Member

Join Date: Jul 2011
Location: Sacramento, CA
Posts: 29
Likes: 0
Received 0 Likes
on
0 Posts
man what a beautiful resurrection, recently picked up a '79 and will probably use this thread as a starting point and for future reference. Great read man and that new chrome finish looks awesome!
07-30-11, 10:28 PM
#190
Day 1116
Well, that was a full day of scrubbing, sanding, even sometimes filing out curb rash, then masking, and painting. I thought my wheels were clean before, but they are CLEAN now.
Basic process was:
1) Wash with detergent.
2) Scrub out rear of wheel, getting rid of old tar, and paint/rust stuck on the contact area from years of pressing against the disk/drum.
3) Grey scrubbie pad rear to clean metal - rinse.
4) Green scubbie pad rear to smooth shine - rinse
5) Flip wheel over, wash wheel and tire with deter.gent & stiff brush.
6) Use SOS pad on raised white letters.
7) Fix any major dings, scratches, scuffs on rim, wsing anything from a mill bastard file to 600-grit wet sandpaper.
8) Green scrubbie pad rim and center polised area - rinse.
9) SOS pad all non-painted bright rim/center to beautiful glow - rinse.
10) Inspect and touch up.
11) Let dry - (repeat 1-11 on other three wheels).
12) Scrub all areas to be painted with isopropyl alcohol - make sure spotless.
At that point, it's ready for masking. Takes a while to mask carefully - one major secret is, when cutting tape along the mask line between the bright rim and the painted area, cut with the blade vertical and cut only on the down stroke, to the tape is cleaved between the blade and the wheel metal, like scissors.
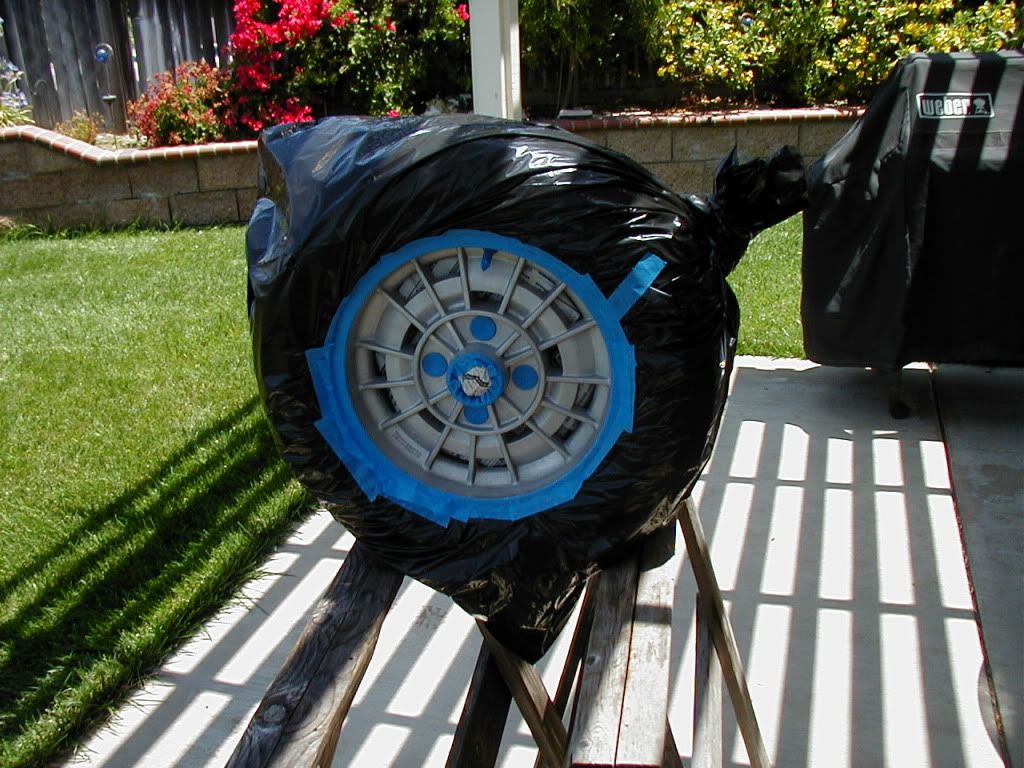
Here's the first one prepped for paint: Made more complicated because I didn't demount the tires, and masking tape does NOT stick to tire rubber (or valve stems) worth a hoot. Holding the paper in place without wasting huge amounts of tape was a problem.
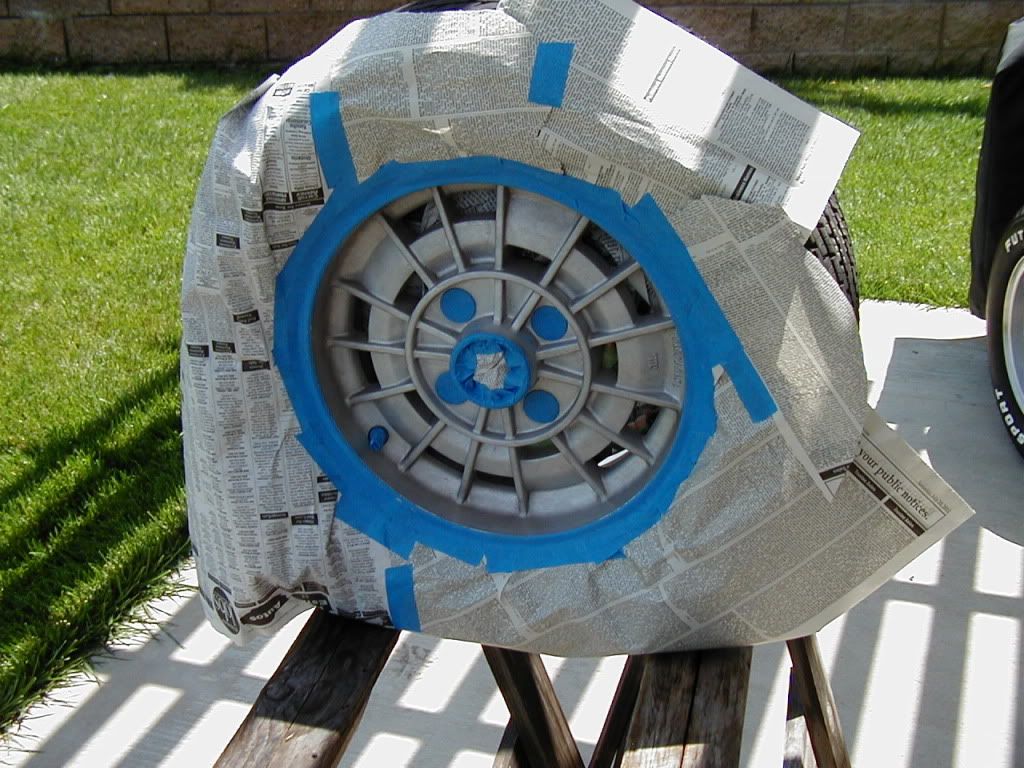
The solution was to get rid of the paper; masking tape sticks to trash bags better than just about anything else. So tie the wheel in a bag, cut a hole with scissors, and then mask the edge of the hole to the wheel. Much faster.
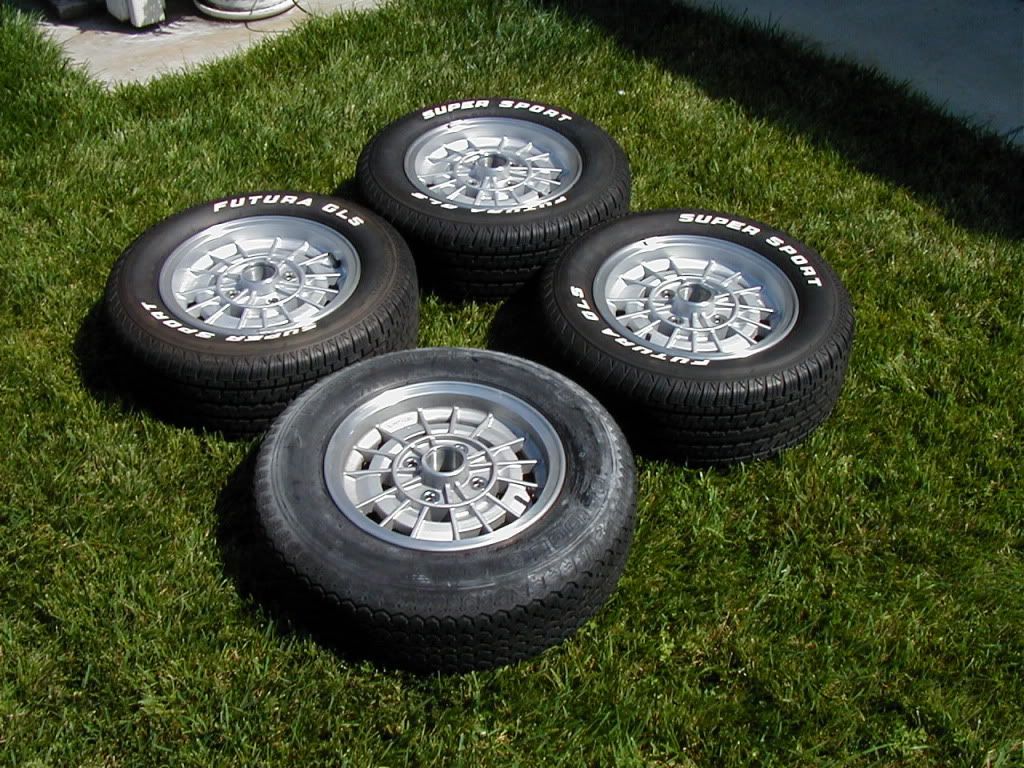
First one done; looking xlnt.
Three finished, with my 32-years-in-the-trunk no miles spare for comparison. You can just barely see that the new paint is a bit lighter than the original paint.
As of tonight, all wheels are painted, I've re-done my center caps, the lug bolts have been cleaned and tomorrow I will rust-inhibit their shafts.
Next up is tearing down the rear brakes/axles, and also replacing the "carpet bags" and top carpet for my modified FB bins, as the old carpet is gross - dirty, oil-soaked, smelly. Eck. I'm going to document both processes, and hopefully will end up with a useful pattern for the carpet bags.
My hands are sore from scrubbing. Time for beer.
Well, that was a full day of scrubbing, sanding, even sometimes filing out curb rash, then masking, and painting. I thought my wheels were clean before, but they are CLEAN now.
Basic process was:
1) Wash with detergent.
2) Scrub out rear of wheel, getting rid of old tar, and paint/rust stuck on the contact area from years of pressing against the disk/drum.
3) Grey scrubbie pad rear to clean metal - rinse.
4) Green scubbie pad rear to smooth shine - rinse
5) Flip wheel over, wash wheel and tire with deter.gent & stiff brush.
6) Use SOS pad on raised white letters.
7) Fix any major dings, scratches, scuffs on rim, wsing anything from a mill bastard file to 600-grit wet sandpaper.
8) Green scrubbie pad rim and center polised area - rinse.
9) SOS pad all non-painted bright rim/center to beautiful glow - rinse.
10) Inspect and touch up.
11) Let dry - (repeat 1-11 on other three wheels).
12) Scrub all areas to be painted with isopropyl alcohol - make sure spotless.
At that point, it's ready for masking. Takes a while to mask carefully - one major secret is, when cutting tape along the mask line between the bright rim and the painted area, cut with the blade vertical and cut only on the down stroke, to the tape is cleaved between the blade and the wheel metal, like scissors.
Here's the first one prepped for paint: Made more complicated because I didn't demount the tires, and masking tape does NOT stick to tire rubber (or valve stems) worth a hoot. Holding the paper in place without wasting huge amounts of tape was a problem.
The solution was to get rid of the paper; masking tape sticks to trash bags better than just about anything else. So tie the wheel in a bag, cut a hole with scissors, and then mask the edge of the hole to the wheel. Much faster.
First one done; looking xlnt.
Three finished, with my 32-years-in-the-trunk no miles spare for comparison. You can just barely see that the new paint is a bit lighter than the original paint.
As of tonight, all wheels are painted, I've re-done my center caps, the lug bolts have been cleaned and tomorrow I will rust-inhibit their shafts.
Next up is tearing down the rear brakes/axles, and also replacing the "carpet bags" and top carpet for my modified FB bins, as the old carpet is gross - dirty, oil-soaked, smelly. Eck. I'm going to document both processes, and hopefully will end up with a useful pattern for the carpet bags.
My hands are sore from scrubbing. Time for beer.
08-02-11, 03:19 AM
#191
Nice DD! Wish I could work up the nerve to re-do my Goldies like these 
Hey - what did the lug bolt chroming bill come too?? I couldn't find that in your thread. Did you need to do any Pre-Prep before dropping them off? They are effing SIN-sational!
Stu Aull
80GS
Alaska
Hey - what did the lug bolt chroming bill come too?? I couldn't find that in your thread. Did you need to do any Pre-Prep before dropping them off? They are effing SIN-sational!
Stu Aull
80GS
Alaska
08-02-11, 09:52 AM
#193
Total ticket was about $77 with tax. Not cheap, but much less than new stock bolts would have cost.
I also bought a brand new 6-pt socket, which I plan to spray internally with a very light coat of Plasti-Dip, to protect the finish. Or I may fab an aluminum liner out of thin shim stock.
Me either. I've got a few things left to do before the wheels can go back on; for example, my rear axles are currently in the hatch of my Z, on their way to get new bearings pressed.
08-02-11, 12:29 PM
#195
Senior Member
iTrader: (1)
Join Date: Oct 2010
Location: oregon
Posts: 484
Likes: 0
Received 0 Likes
on
0 Posts
I've always wanted a set of louvers; I sure hope I like how they look, as these have taken HOURS.
08-02-11, 11:32 PM
#196
Day 1119
Got the new axle bearings pressed over lunchtime. Tomorrow I'll clean them up and carry on with installing the new seals and reassembling my rear brakes. The old bearings weren't in too bad a shape, but now I won't have to worry about them for a decade or so.
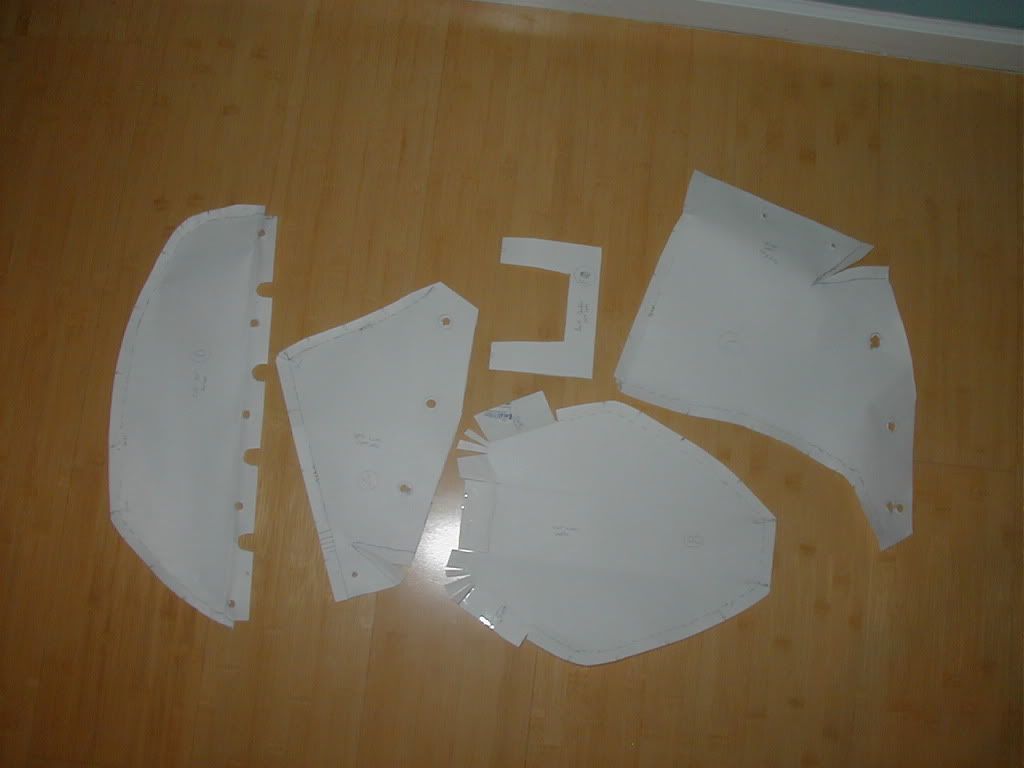
The storage bin bags are coming along; finished the pattern mockup for the left side:
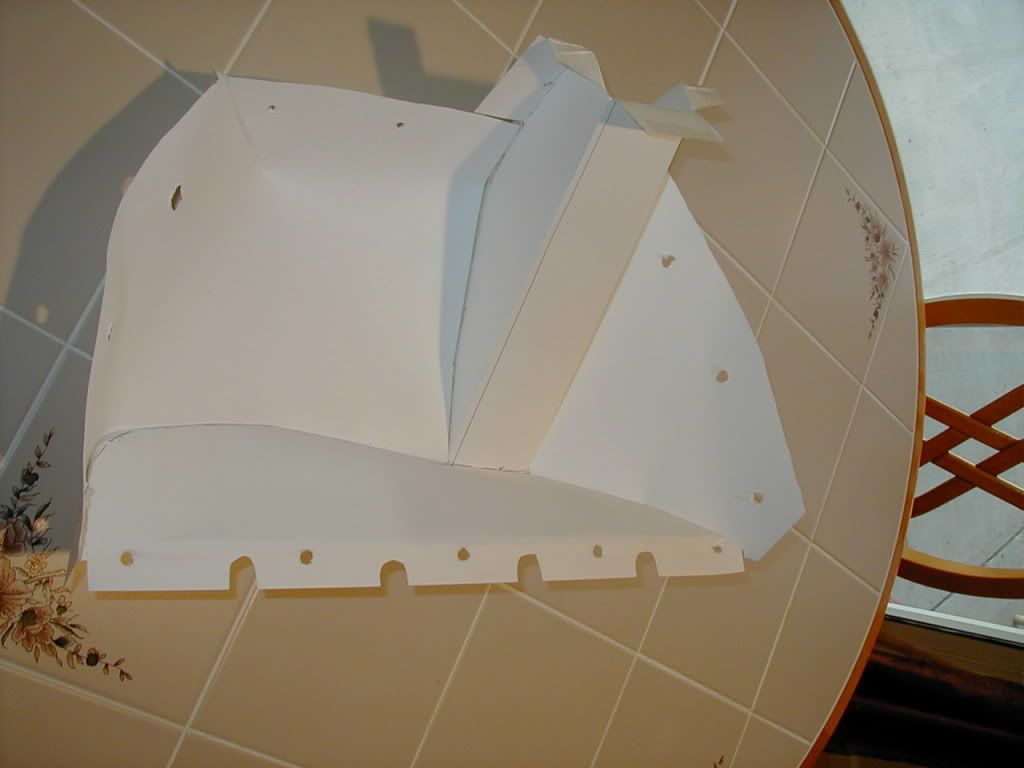
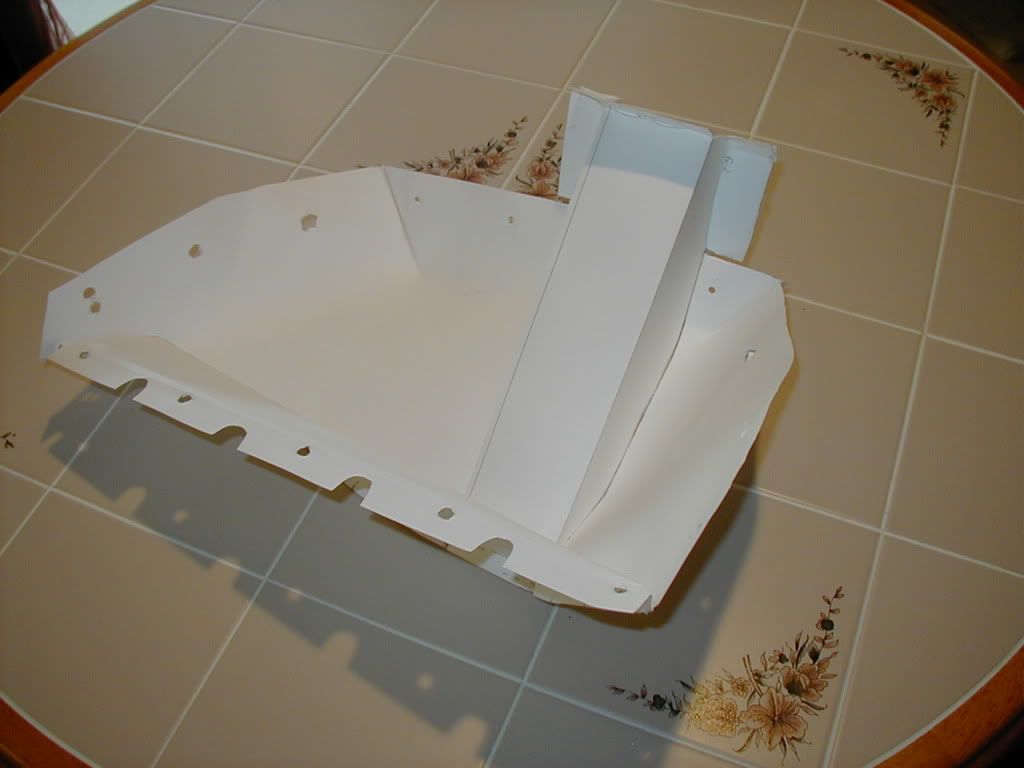
...took it apart to convert to flat patterns with markups...
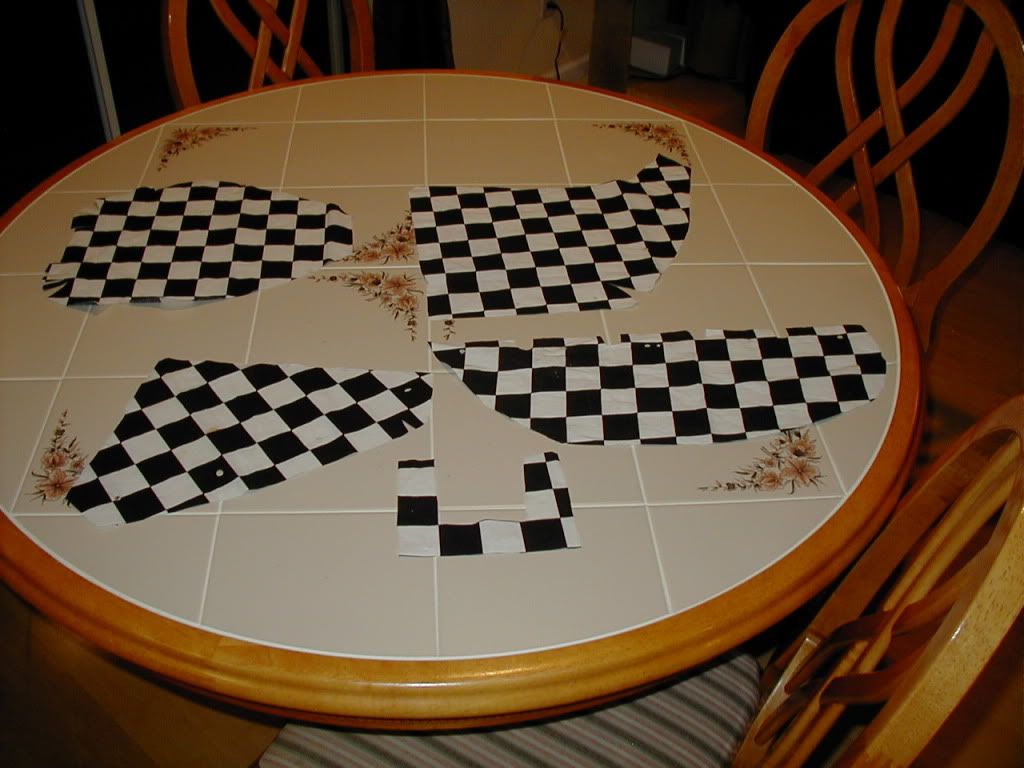
...And cut a "test" set from some cheap old cloth I had. I'll stitch these up to check fit, so I don't ruin the harder-to-work-with carpet I've got set aside.
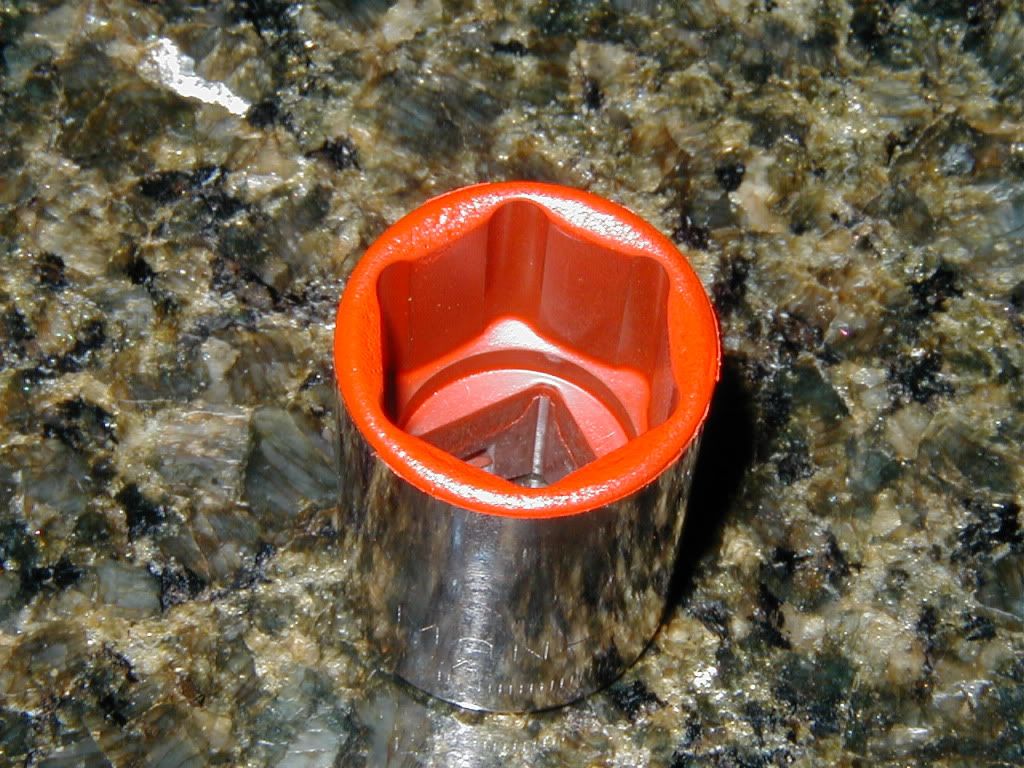
Here's my freshly-made, rubber-lined, chrome-protective lug bolt socket. Craftsman 21mm six point, coated with a couple thousandths of red spray-on Plasti-Dip. Easier than trying to find a pre-made one, and if it ever gets messed up I can just re-spray it.
Nothing you should feel "lame" about, Sarah - - you've got a great start going on with your FC. It's all just "figure it out as you go" land.
Got the new axle bearings pressed over lunchtime. Tomorrow I'll clean them up and carry on with installing the new seals and reassembling my rear brakes. The old bearings weren't in too bad a shape, but now I won't have to worry about them for a decade or so.
The storage bin bags are coming along; finished the pattern mockup for the left side:
...took it apart to convert to flat patterns with markups...
...And cut a "test" set from some cheap old cloth I had. I'll stitch these up to check fit, so I don't ruin the harder-to-work-with carpet I've got set aside.
Here's my freshly-made, rubber-lined, chrome-protective lug bolt socket. Craftsman 21mm six point, coated with a couple thousandths of red spray-on Plasti-Dip. Easier than trying to find a pre-made one, and if it ever gets messed up I can just re-spray it.
Nothing you should feel "lame" about, Sarah - - you've got a great start going on with your FC. It's all just "figure it out as you go" land.
 08-06-11, 04:31 PM
#199
Too true, Stu; the rubber spray worked great for about 6 bolts, then started tearing loose from the chromed socket. Ended up just peeling it right back out. The sandwich bag approach is actually a better, easier solution!
Thank you, sir; we're heading for Ludicrous Long with the thread, I think.
Day 1123 (first part)
I finished the rear seals/bearings replacement, and refurbed the drum brakes (Yes, Stu, I took pictures - writeup to come).
Checked out the front brakes for the source of a "clunk" sound I've been hearing on engagement/reversing. Appears the result of the brake pads being just slightly short so that they move front/rear in the calipers, combined with all my brake grease having dried up. Regreasing eliminated much of it; new pads will be needed to fix completely, but it's just an annoyance at this point.
New rear swaybar end bushings and links (via Re-Speed) are in, and are much meatier than the old parts-store-specials I've had on forever.
Rolled the car out into the sunilight so I could get a washing in. One week to MazFest out here, so cleaning has to get started.
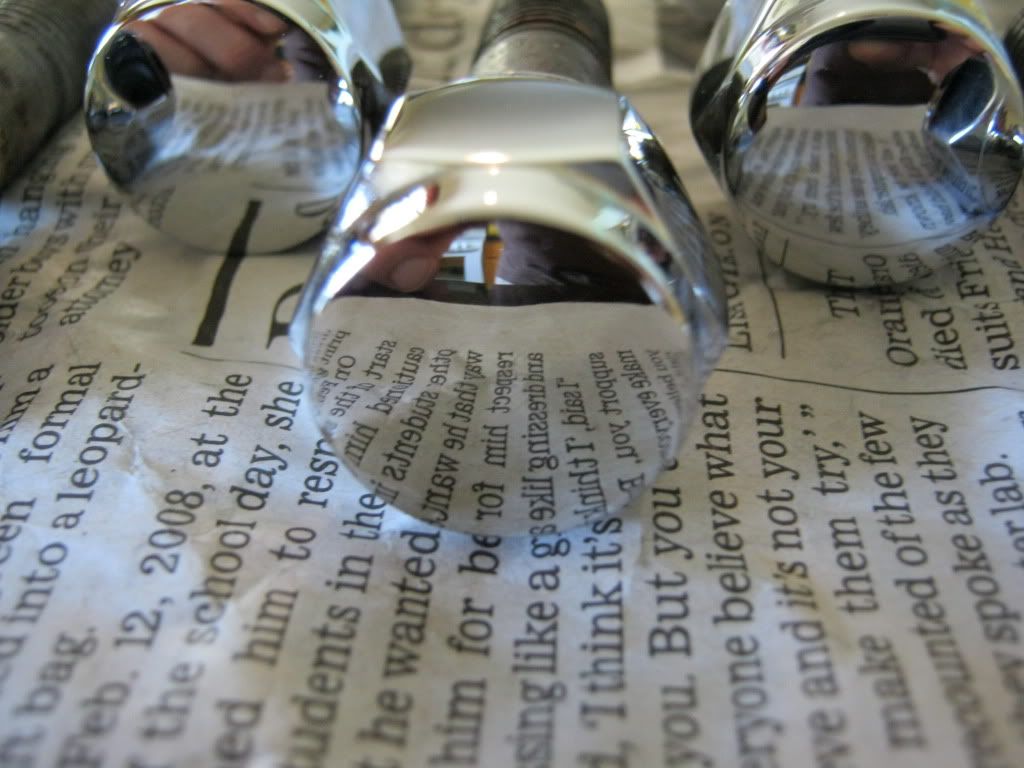
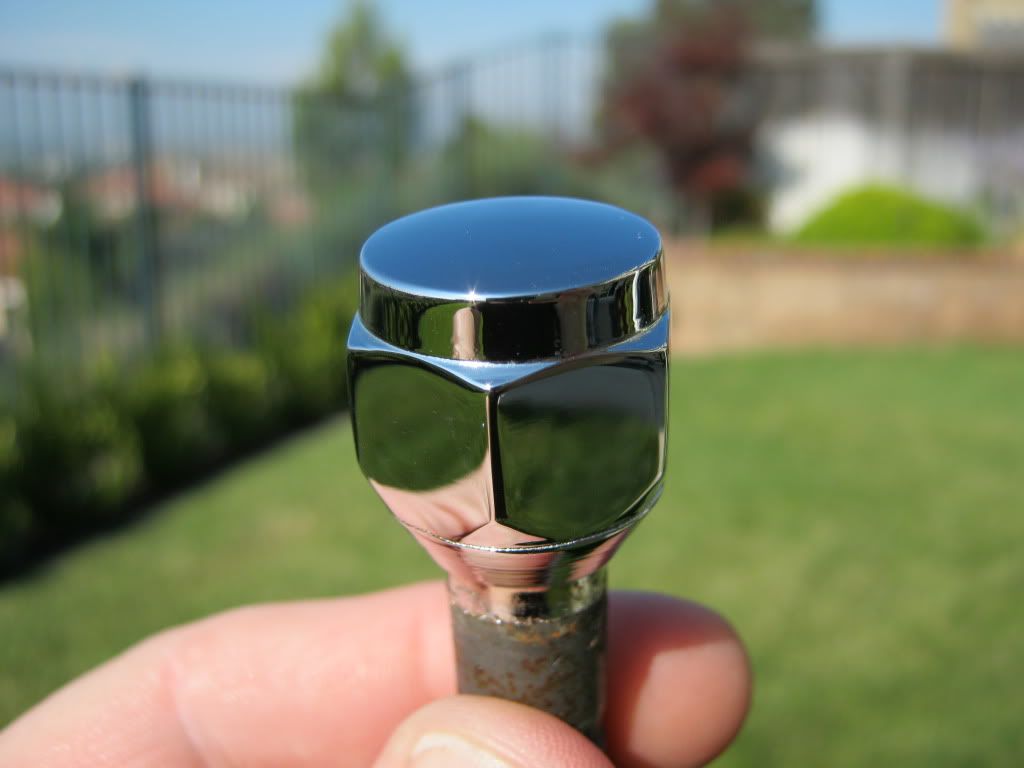
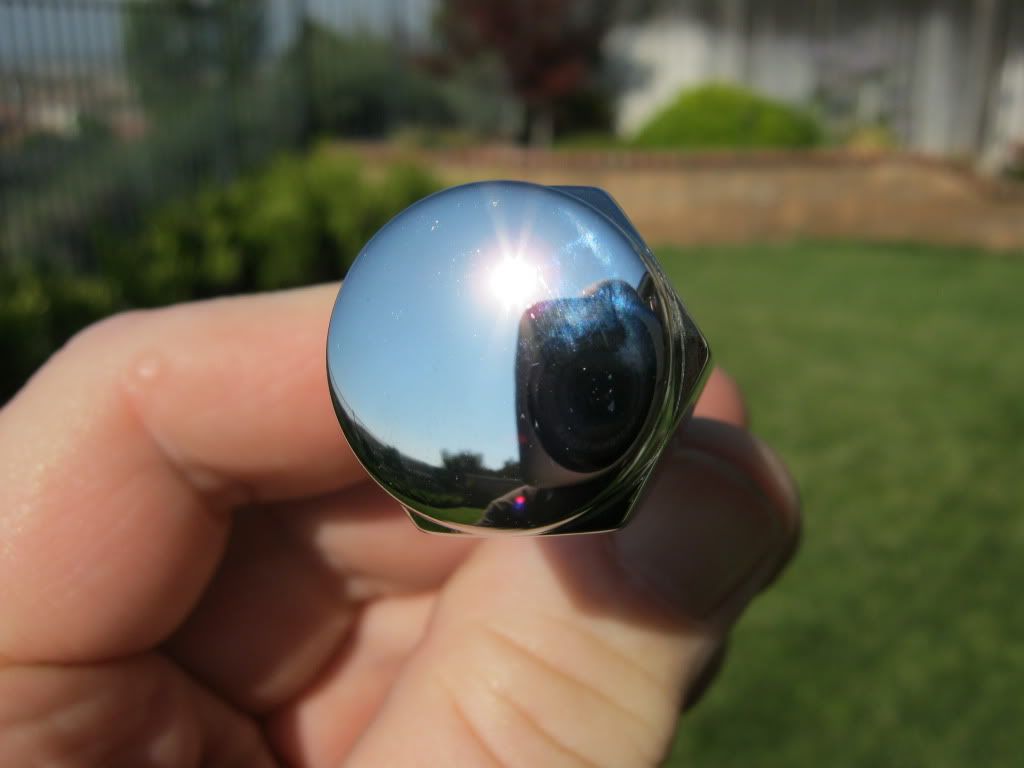
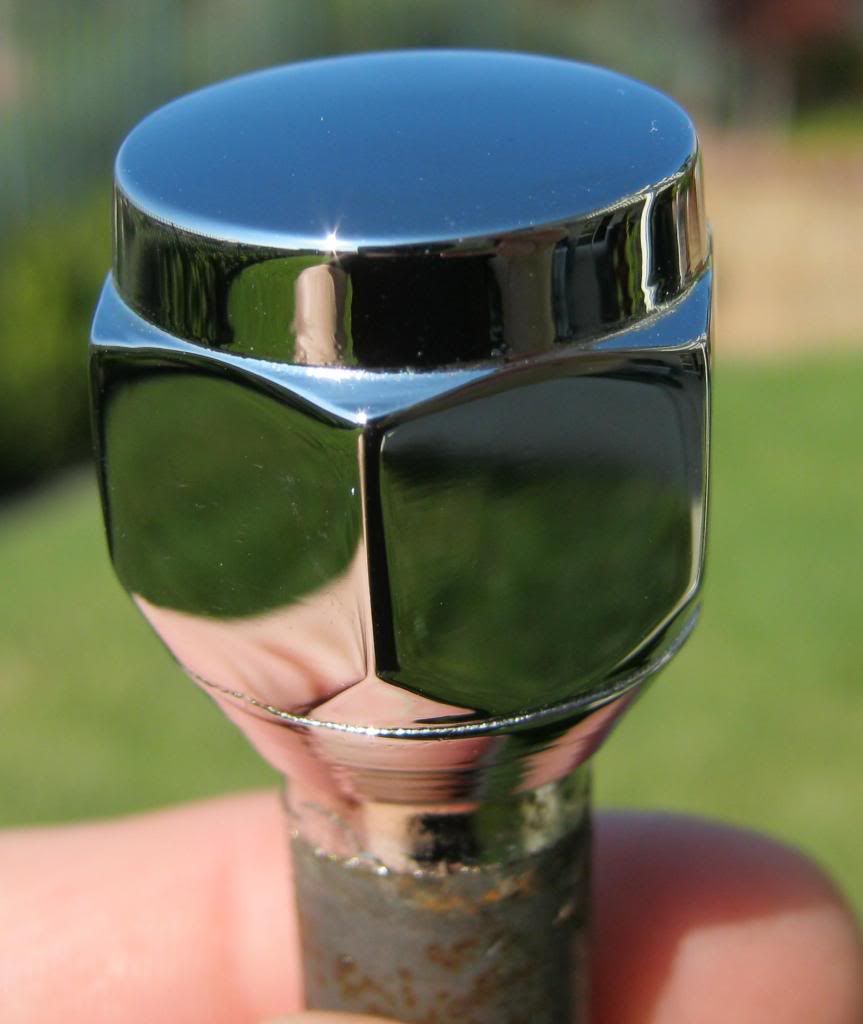
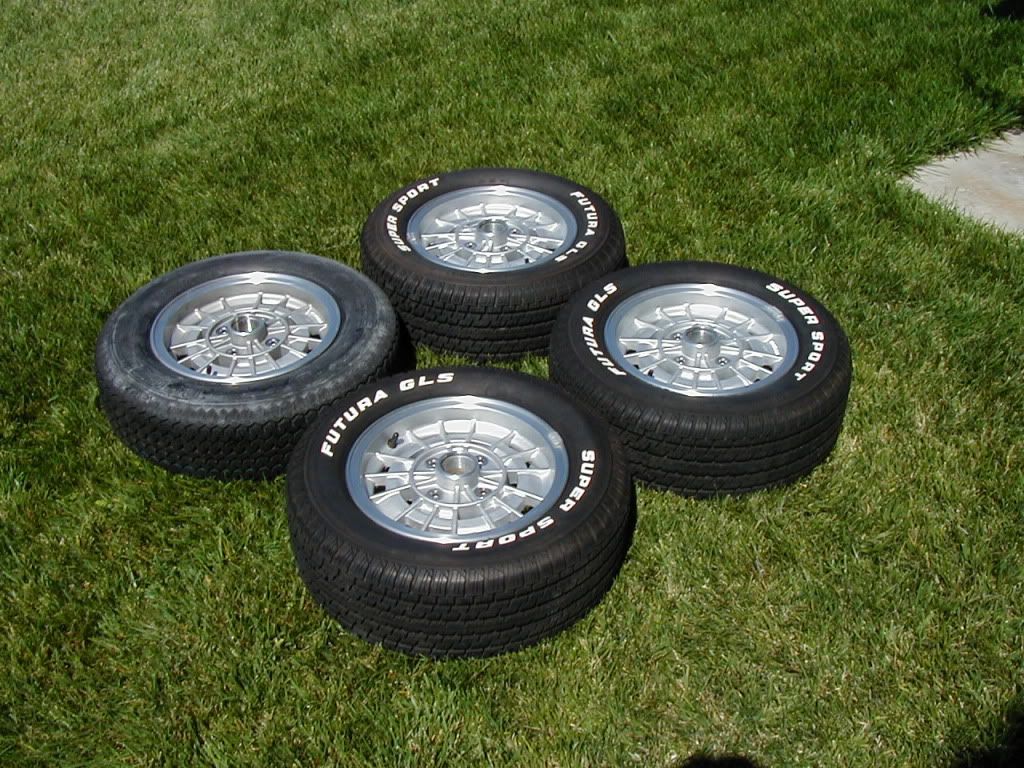
How the wheels and lug bolts turned out (pre-carwash):
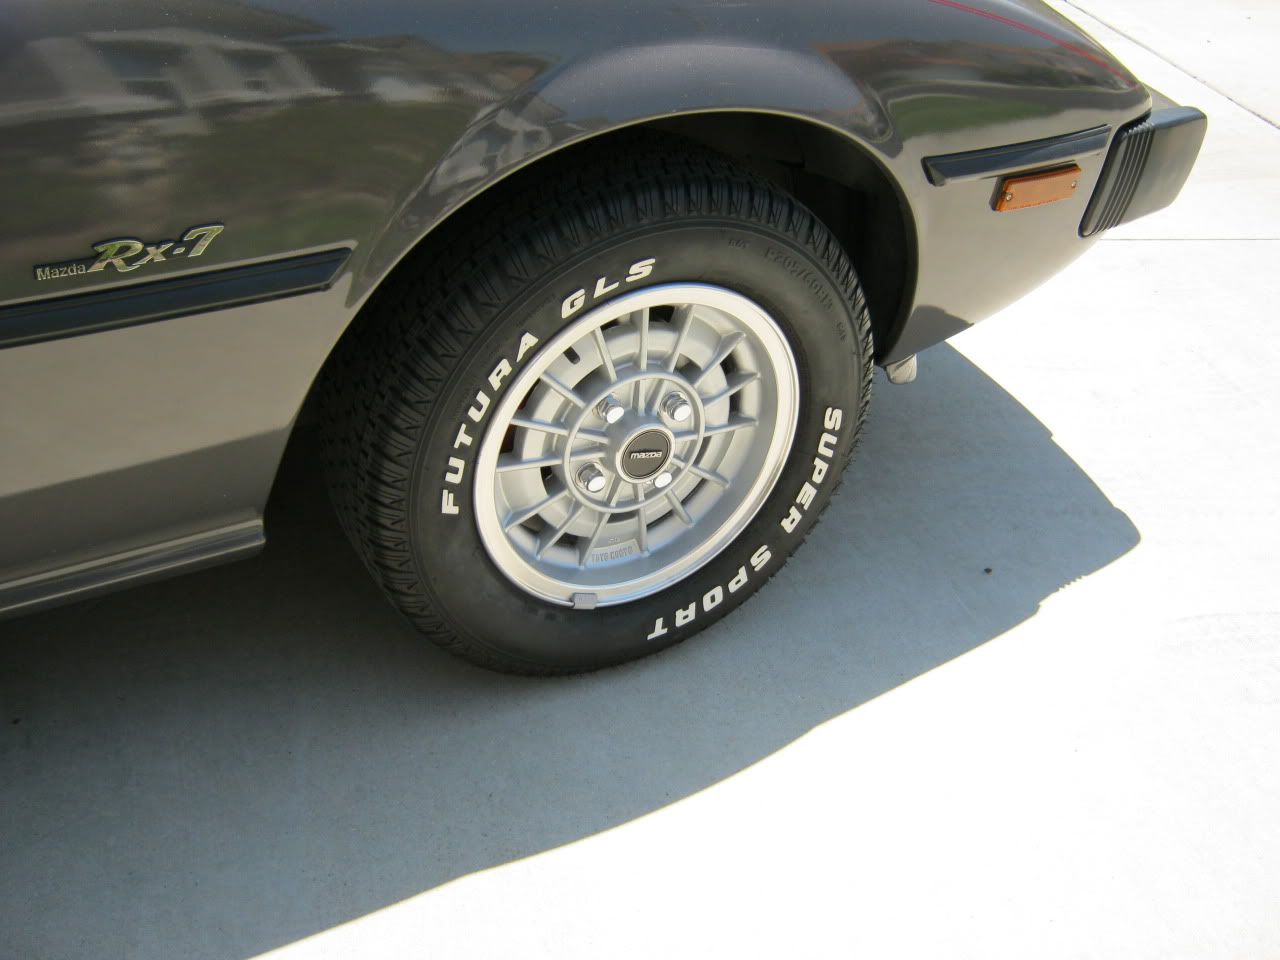
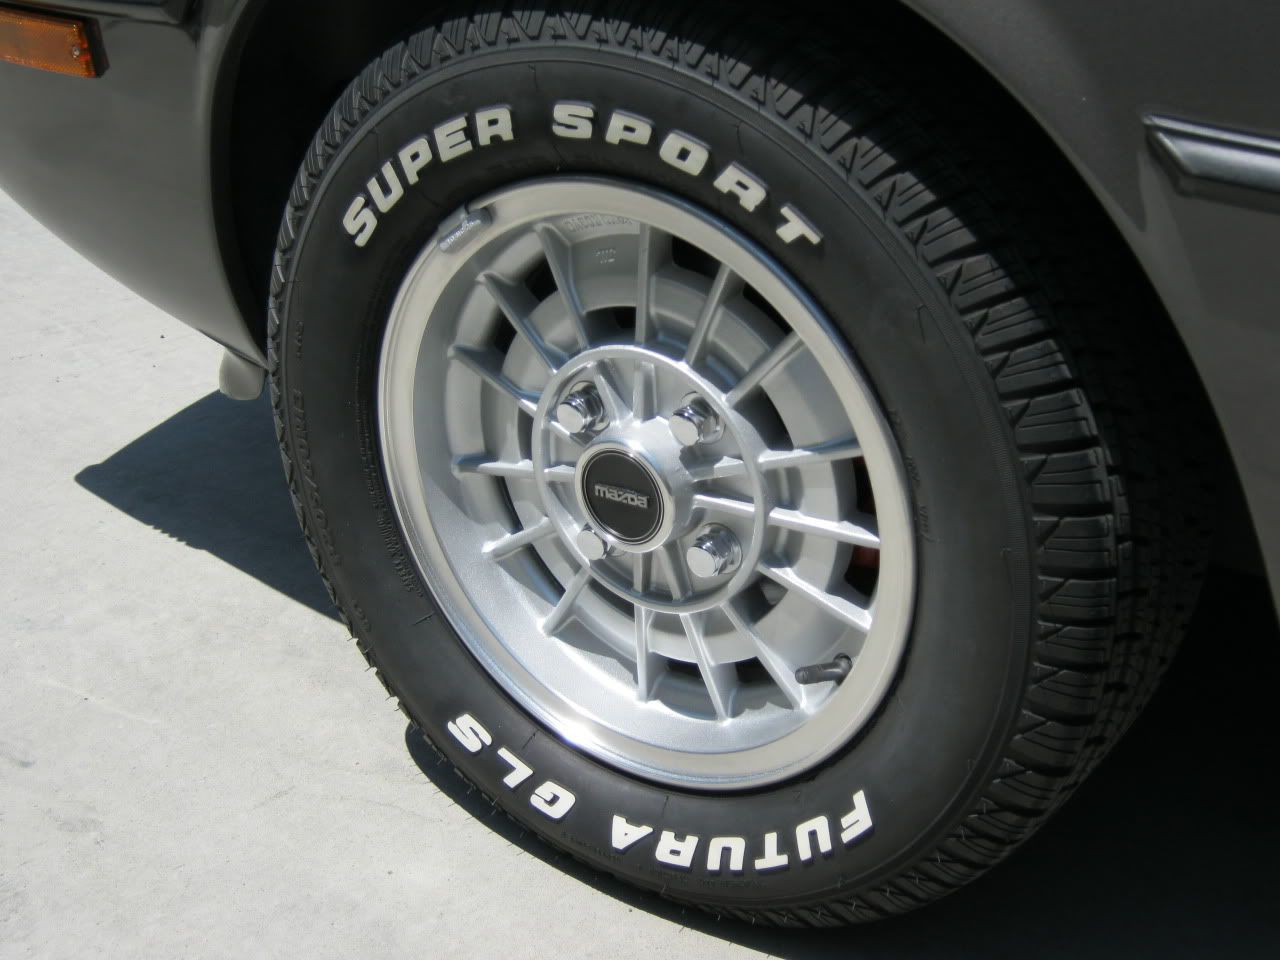
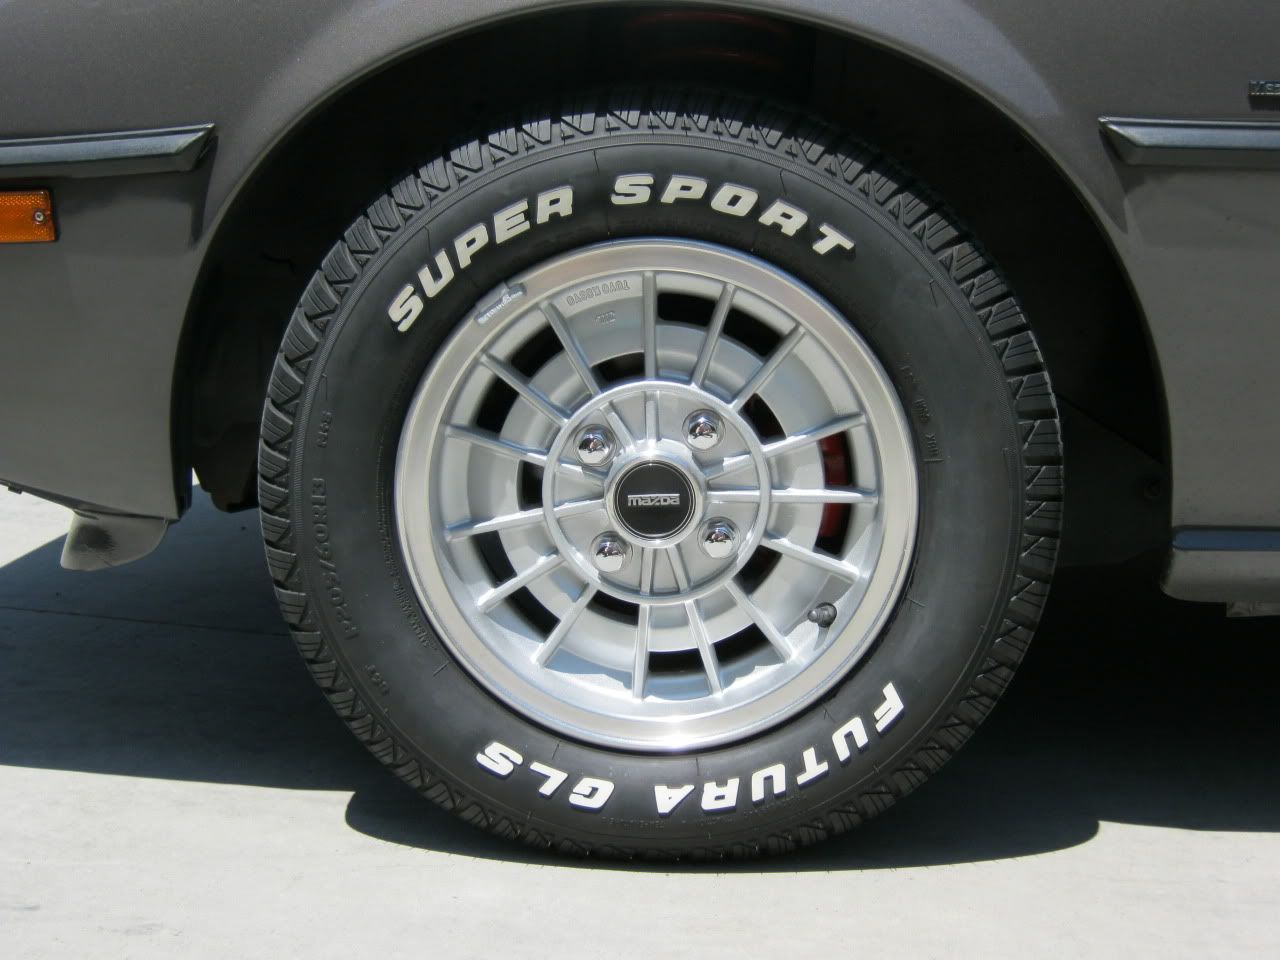
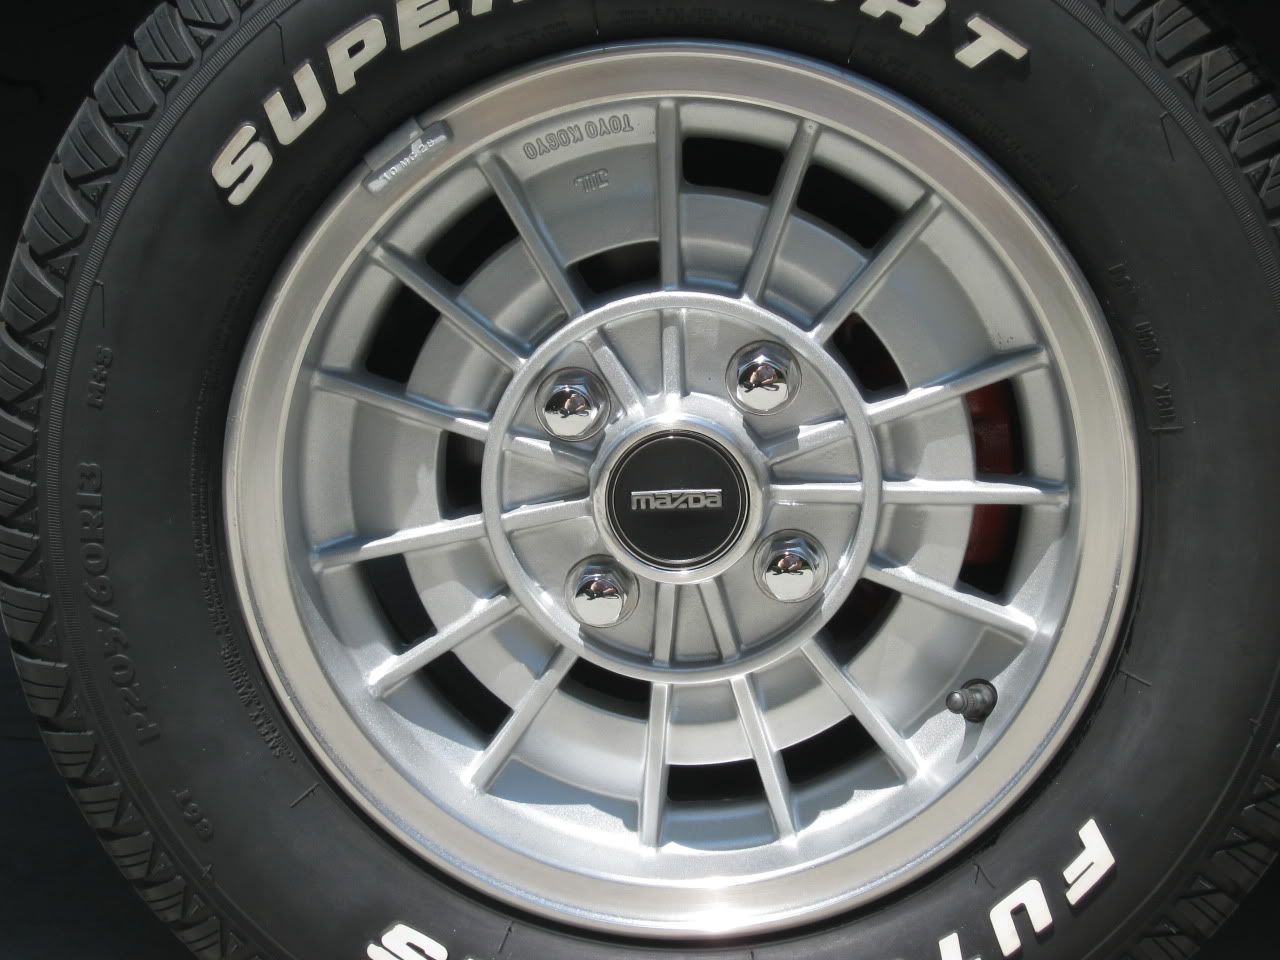
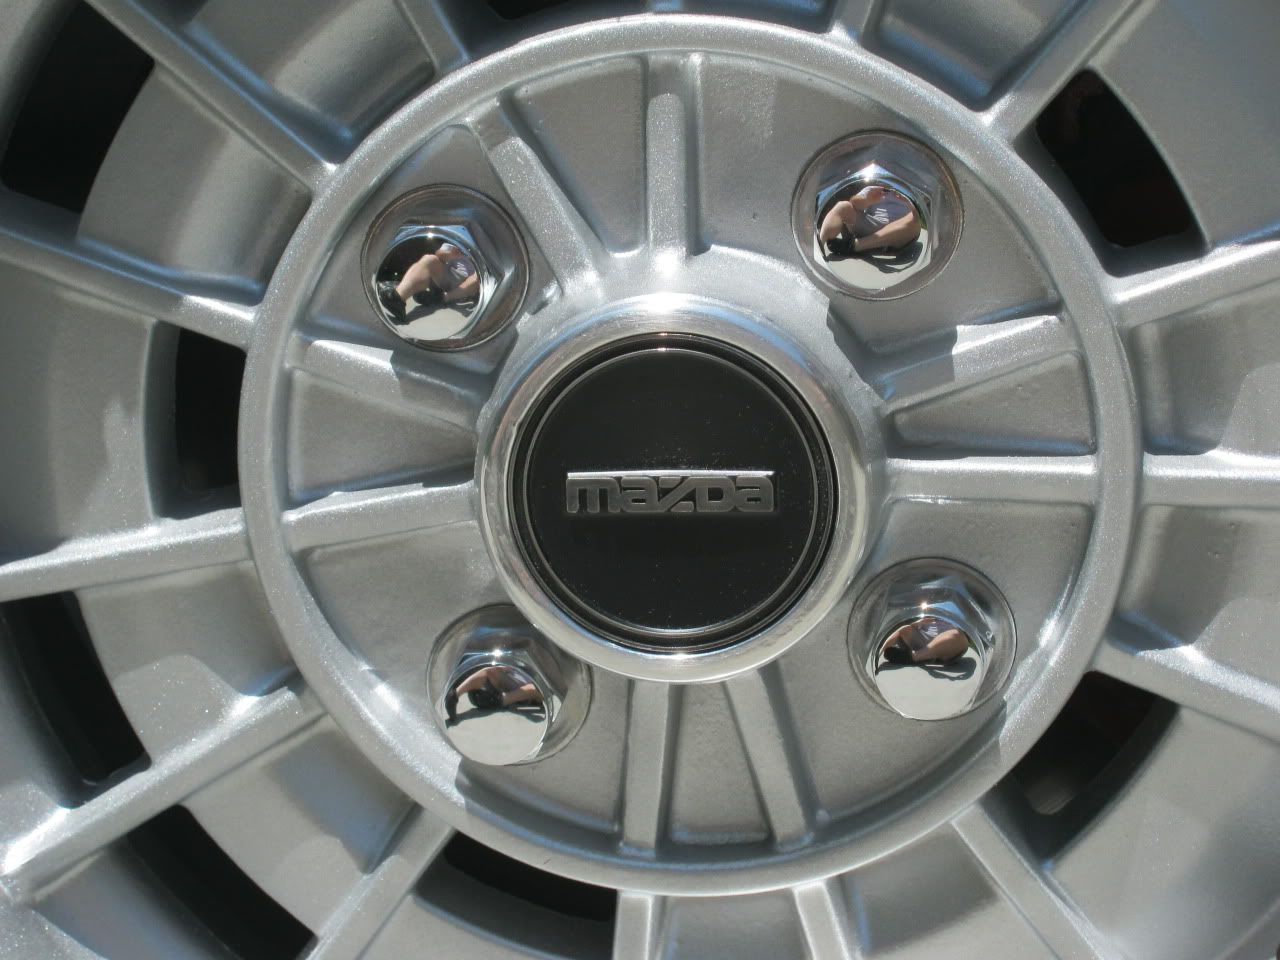
In a word: outstanding.
Looking closely at the reflections in the bolts in that last shot, it's a good thing I'm not a Scotsman, or you'd all know me a whole lot better than any of us wanted.
Got a good washing in after covering the wheels with trashbags (they being already clean) and fired her up to climb the light grade back into the garage. Looking sweet, sounding sassy.
Next up today is louver fitment, and some small touchups on paint. Followed by completion of the bag project.
So far, so good.
Day 1123 (first part)
I finished the rear seals/bearings replacement, and refurbed the drum brakes (Yes, Stu, I took pictures - writeup to come).
Checked out the front brakes for the source of a "clunk" sound I've been hearing on engagement/reversing. Appears the result of the brake pads being just slightly short so that they move front/rear in the calipers, combined with all my brake grease having dried up. Regreasing eliminated much of it; new pads will be needed to fix completely, but it's just an annoyance at this point.
New rear swaybar end bushings and links (via Re-Speed) are in, and are much meatier than the old parts-store-specials I've had on forever.
Rolled the car out into the sunilight so I could get a washing in. One week to MazFest out here, so cleaning has to get started.
How the wheels and lug bolts turned out (pre-carwash):
In a word: outstanding.
Looking closely at the reflections in the bolts in that last shot, it's a good thing I'm not a Scotsman, or you'd all know me a whole lot better than any of us wanted.
Got a good washing in after covering the wheels with trashbags (they being already clean) and fired her up to climb the light grade back into the garage. Looking sweet, sounding sassy.
Next up today is louver fitment, and some small touchups on paint. Followed by completion of the bag project.
So far, so good.
08-06-11, 09:39 PM
#200
Waffles - hmmm good
iTrader: (1)
There's nothing finer than new looking waffles.
They look great. Those lug nuts look amazing.
Make sure you take a ton of pics at Mazfest and post up a thread in the
ono-tech section with em.
They look great. Those lug nuts look amazing.
Make sure you take a ton of pics at Mazfest and post up a thread in the
ono-tech section with em.