
My 83 GS "pandafb" gets restored - Again! (lots of rust/metal work)

Thread Starter
Joined: Feb 2002
Posts: 8,389
Likes: 120
From: North Jersey
My 83 GS "pandafb" gets restored - Again! (lots of rust/metal work)
Hey guys, this is a thread I�ve been meaning to type up for a while but just haven�t gotton around to doing. Those who have been on here for a while will recognize my car the �Pandafb� For those who don�t I�ll give a quick history of the car and then get into what I�m doing on it now.
The car is an 83 GS which I purchased from a junkyard back in October 2002. Some kid owned it who obviously didn�t care much about it and had left it for dead. I bought it with intentions of just making a winter beater out of it (it was really rough) since it sort of ran, and was mostly complete, but those plans soon fell by the wayside. The car sat for a few years behind my barn and in early 2004 I decided it would be the car that I�d teach myself welding/metal work/body work/paint and just general project/time management on. I tore it completely down to a shell (including removing the glass, wiring etc, everything) and began the 2 year long restoration of the car. Keep in mind I was 19 at the time and while I think I did pretty good work considering my experience (basically 0) at the time it was certainly not destined to last forever.
I won�t bother going into too many details involving that build, some searching will find my old threads if you really want to see some mediocre metal fab and welding lol. Fast forward to October 2012, The car was still looking halfway decent on the surface, and running decent as well (40k miles later) but there was a ton of rust coming back (por15 doesn�t last forever kids, do yourself a favor and sandblast it all back to clean metal � if that leaves you with swiss cheese then cut it out and put new metal in). The previous owner had done quarter panels on this car at some point and did a real shitty job of it, both were starting to rust badly, and basically the whole area around the lower control arm mount was non existent as well as the control arm mount itself.
I�ve had it in the back of my mind for the last few years that I�d be restoring this car again and with that in mind collected parts whenever they came up to do the job. A few years back I got a set of 99% rust free quarter panels from a junkyard in Oklahoma, I got wheel wells out of another parts car, and some other random patches here and there. I figured anything beyond that I would just make myself. I�ve done several other restorations between doing this car initially and now, and while I still just consider myself a hobbyist I think I�m getting halfway decent, so work began!
From October till now I�ve been working away at all the rust on the back half of the car. Some illnesses and family issues, along with Hurricane Sandy and the resulting 2 week power outage has put me behind schedule, but I�m hoping to have this car back together sometime in spring. The plan is basically to fix all the rust, repaint the car (it�ll still have its Panda stripes, but I�m changing the white to something else, stay tuned to find out ) and replace the good running, but oil burning 12a, with a S5 T2 I�ve had laying around for a few years. I�ll be sure to document the swap better than I did last time since I get a lot of questions about the wiring etc�
Since I have 4 months worth of pictures I�ll split them up over the next few posts. Hopefully I can keep this thing organized lol� Oh and a word of warning, the majority of the pics will be metal working related so if you�re not interested in that kind of thing then this probably isn�t the thread for you lol.
To be continued!
-Sean
Thread Starter
Joined: Feb 2002
Posts: 8,389
Likes: 120
From: North Jersey
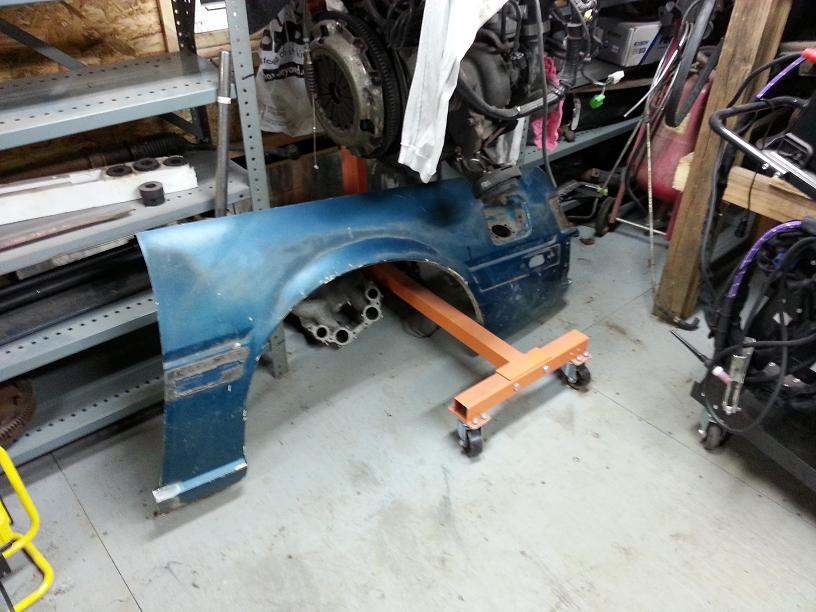
Ok, so here’s a quick inventory of what was rusted out and needed replacing – The quarter panels, inner wheel wells on both sides, outer wheel well on the driver side, “floor” section that the lower control arm mount attaches to, the lower control arm mounts themselves, the rear inner rocker section and it’s internal frame structure (basically the rocker section next to the control arm mount, at the bottom of the quarter panel), two small floor sections behind the rear shock mount (not done yet), a section of frame below the drivers feet and adjoining floor panel (not done yet) and a few small patches in the engine bay (also not done yet)
Current status, I’m finishing up the driver side quarter panel this weekend/next week and with exception of the few things above listed as not done, the rest is completed. Undoing both my previous work, and the previous owners work, as well as battling damage from the elements/age has been a TON of work, and honestly if I could go back to October I’d probably just get another shell and use this one for patch panels etc, but seeing as I’ve gone this far I might as well finish it.
Anyway, on to some pics. Many of them are repetitive so I’ll post mostly driver side pics (it was slightly worse and require me to farther to get back to good metal – plus I took more “in process” pics of that side anyway)
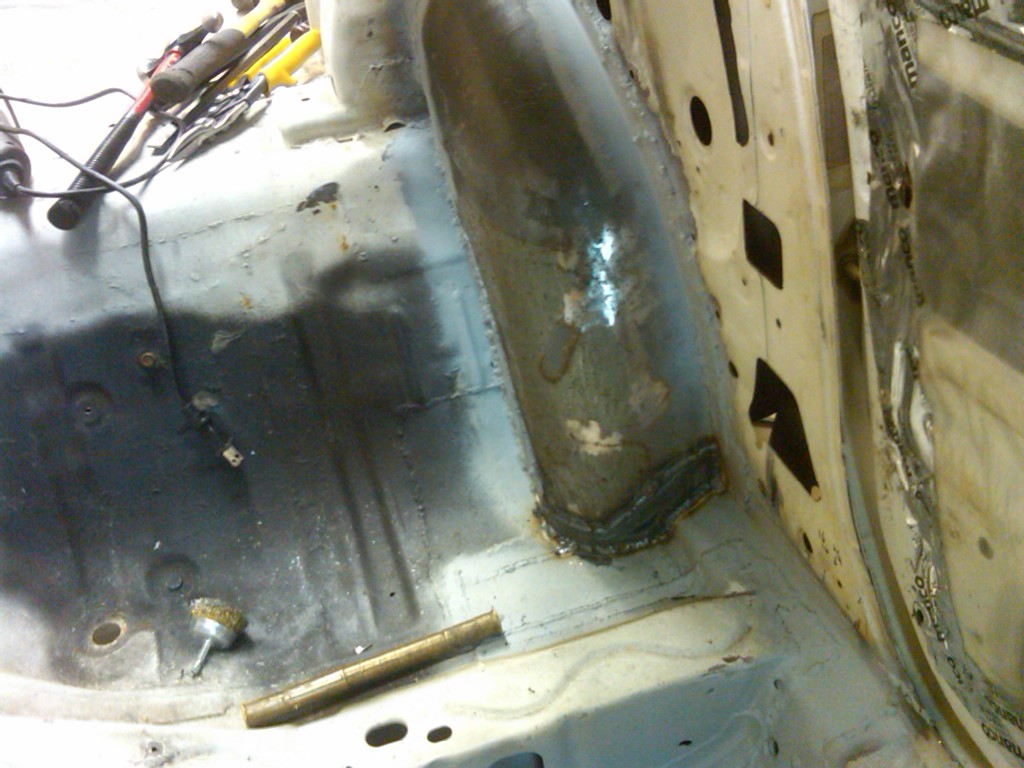
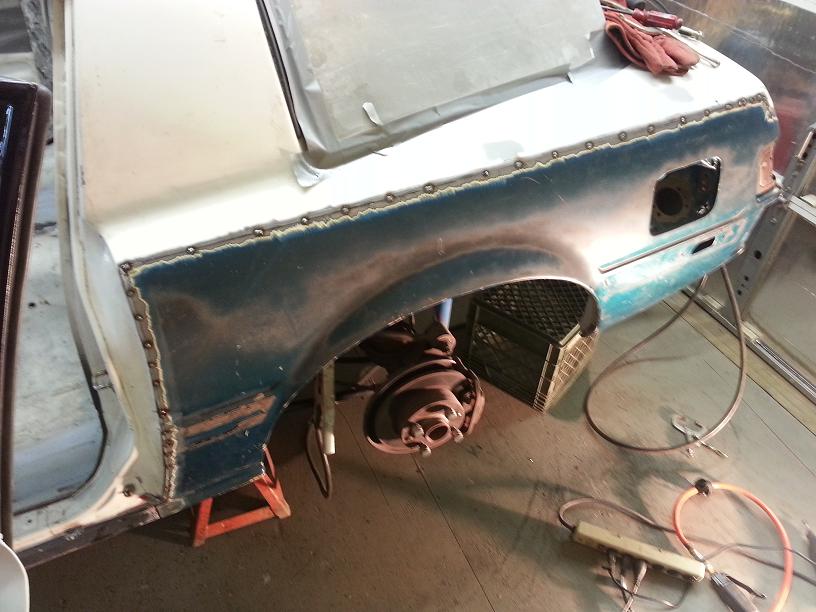
This gives you a good idea of what I was starting with. The rust had made its way up into the “frame” rail that runs inside the rear section of the rocker panel, halfway to the driveshaft tunnel inside that “cross member” that the bins attach to, as well and making swiss cheese out of the control arm mount along with the floor it attaches too. Not pretty!
This is jumping forward a few weeks of work, but the frame inside the rocker has been replaced, along with panel attaching the floor to the crossmember and rocker, as well as part of the new floor. All these pics are work in progress shots (obviously) so ignore some fitment as things get trimmed and formed slightly as adjacent panels are installed.
Gives a good shot of how far the rust got into the frame, slowly plugging away at reconstructing it.
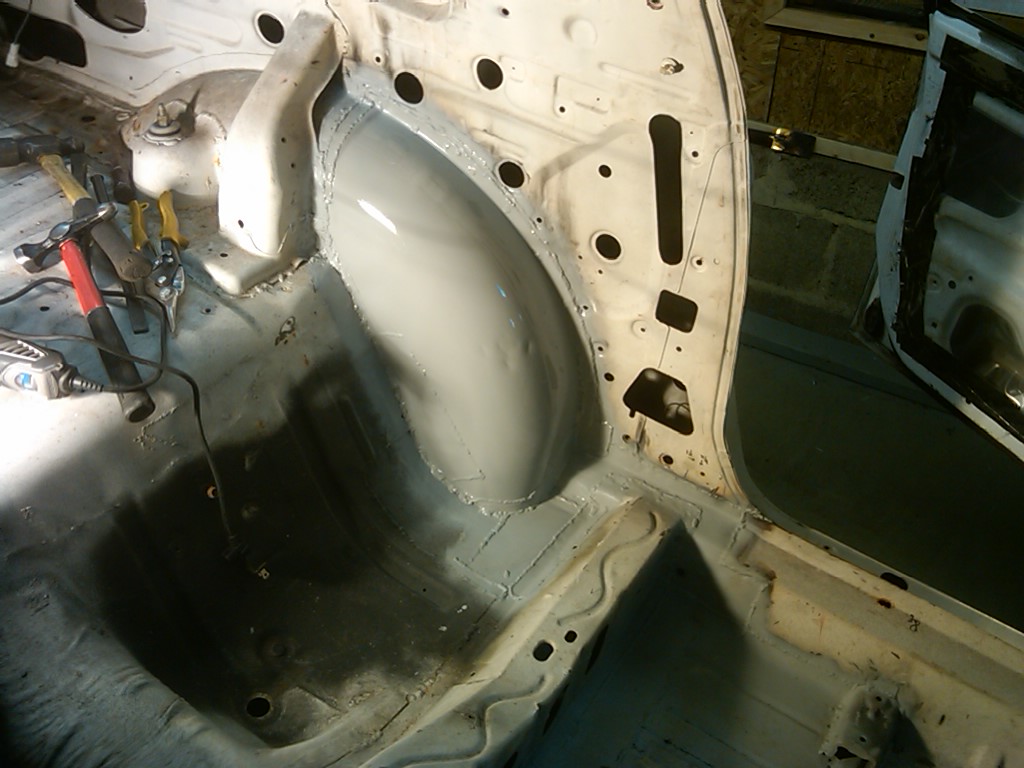
Old boxy wheel well I made in 2004 out and in with the new
Continued...
Current status, I’m finishing up the driver side quarter panel this weekend/next week and with exception of the few things above listed as not done, the rest is completed. Undoing both my previous work, and the previous owners work, as well as battling damage from the elements/age has been a TON of work, and honestly if I could go back to October I’d probably just get another shell and use this one for patch panels etc, but seeing as I’ve gone this far I might as well finish it.
Anyway, on to some pics. Many of them are repetitive so I’ll post mostly driver side pics (it was slightly worse and require me to farther to get back to good metal – plus I took more “in process” pics of that side anyway)
This gives you a good idea of what I was starting with. The rust had made its way up into the “frame” rail that runs inside the rear section of the rocker panel, halfway to the driveshaft tunnel inside that “cross member” that the bins attach to, as well and making swiss cheese out of the control arm mount along with the floor it attaches too. Not pretty!
This is jumping forward a few weeks of work, but the frame inside the rocker has been replaced, along with panel attaching the floor to the crossmember and rocker, as well as part of the new floor. All these pics are work in progress shots (obviously) so ignore some fitment as things get trimmed and formed slightly as adjacent panels are installed.
Gives a good shot of how far the rust got into the frame, slowly plugging away at reconstructing it.
Old boxy wheel well I made in 2004 out and in with the new
Continued...
Last edited by 82transam; Feb 1, 2013 at 09:32 AM.
Thread Starter
Joined: Feb 2002
Posts: 8,389
Likes: 120
From: North Jersey
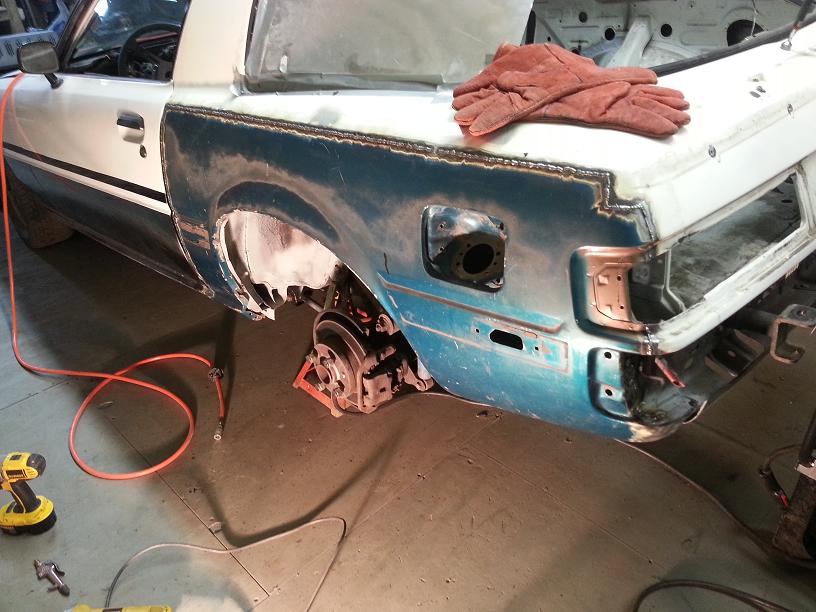
New wheel well in:

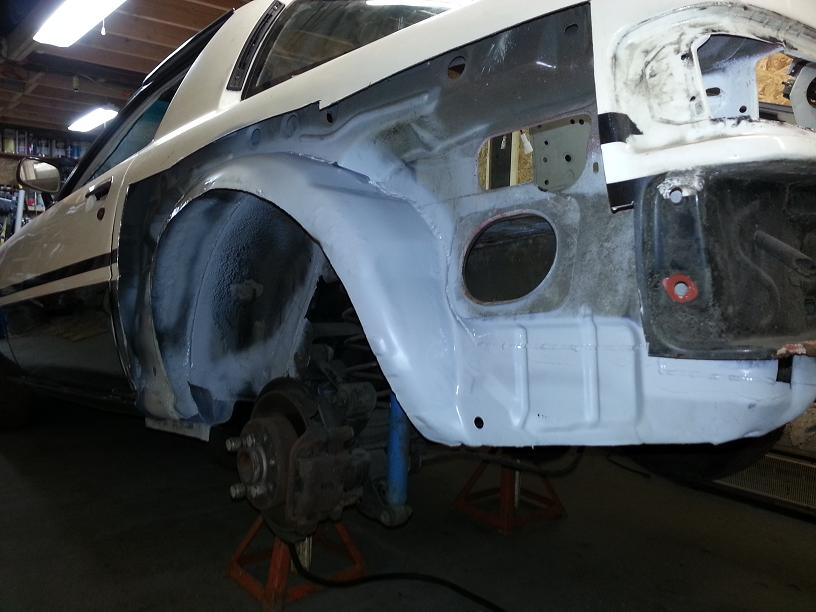
New lower control arm mount I made out of 1/8� steel and copied the S3 design (20mm lower than the 83 and older design). You can also see the new rocker frame, new floor section etc. Still much trimming to do on the bottom of that rocker seam of course.
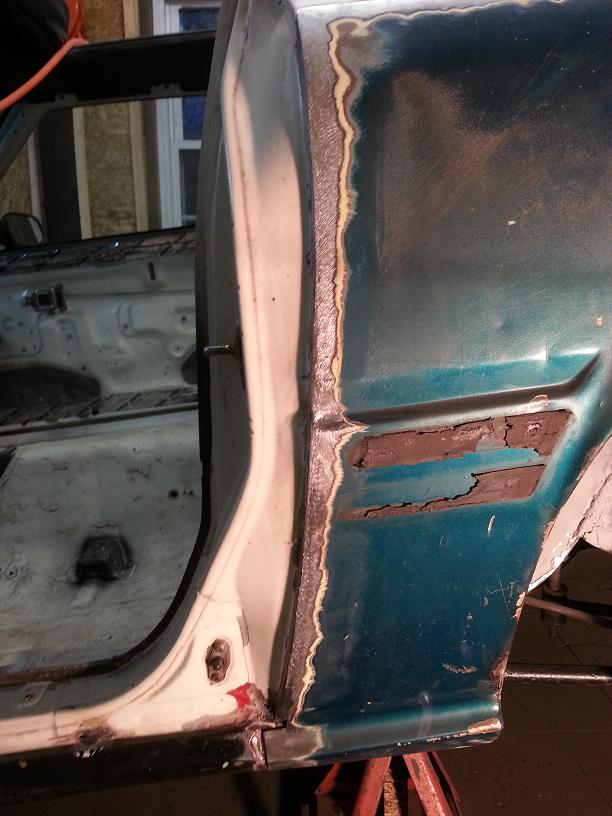
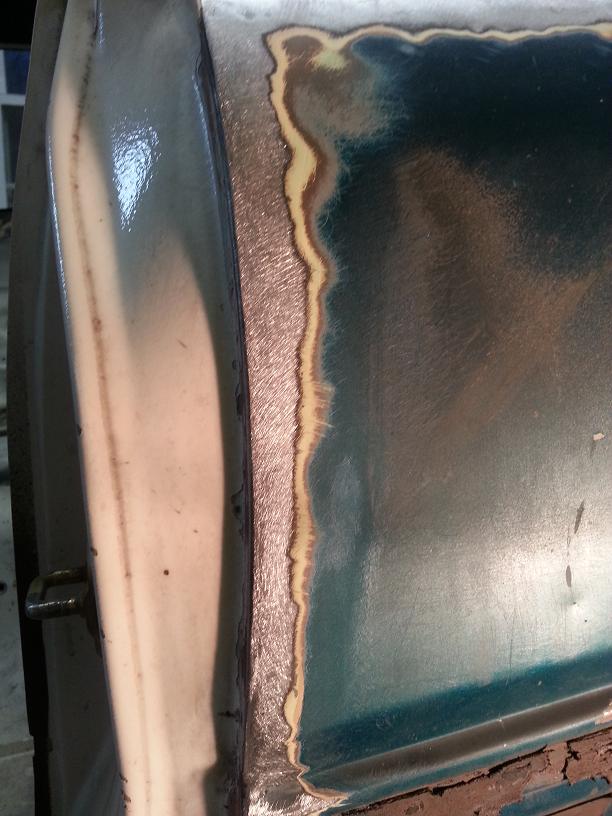
New outer wheel well, lower inner quarter (whatever you�d call the section below the gas filler) installed. Previous owner did quarters (poorly) and butchered this piece on the driver side (thankfully not on the passenger side since this was a ton of work to get right). Unfortunately for me, the donor from Oklahoma ALSO had a mediocre repair done on it�s quarter panel (collision damage though, not rust related) so this piece took quite a bit of work fit, and as you can see, the lip the quarter panel welds to was no good, need to rebuild that�
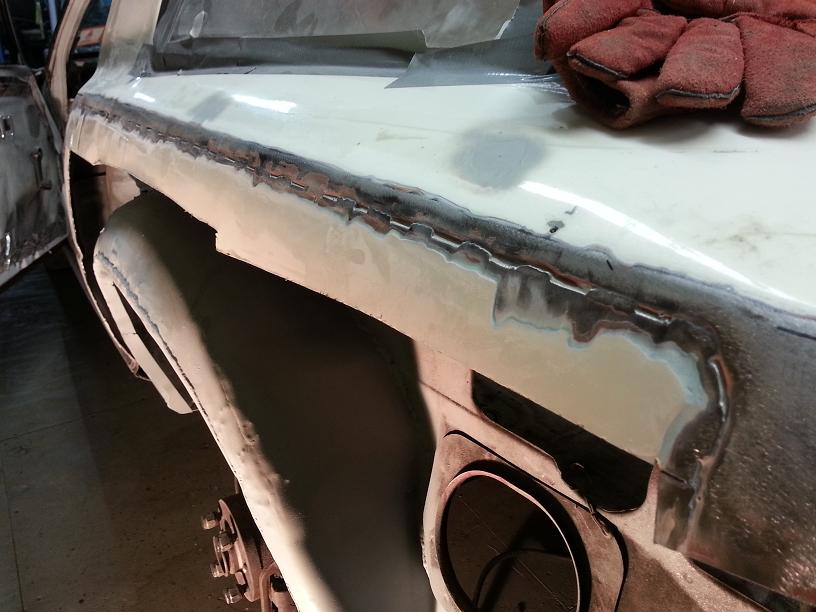
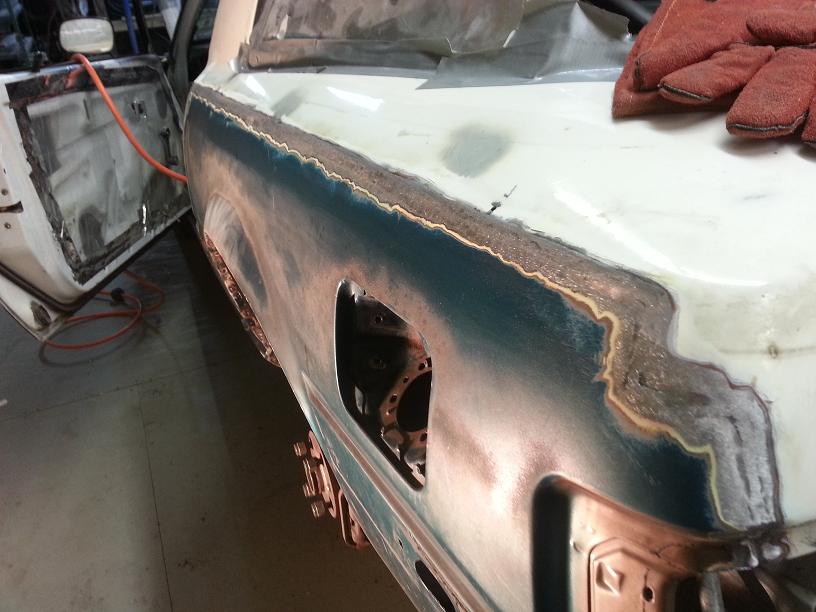
How NOT to do a quarter panel patch. I included this shot because I want to show how you don�t do a quarter panel replacement. After hacking off the old quarter panel, the previous owner then bend the surrounding metal in, overlapped his new panel (like a huge overlap, lots of space for rust to form) pop riveted it on then ran a few short welds and paved the whole thing with bondo� what a mess.
Continued...
New lower control arm mount I made out of 1/8� steel and copied the S3 design (20mm lower than the 83 and older design). You can also see the new rocker frame, new floor section etc. Still much trimming to do on the bottom of that rocker seam of course.
New outer wheel well, lower inner quarter (whatever you�d call the section below the gas filler) installed. Previous owner did quarters (poorly) and butchered this piece on the driver side (thankfully not on the passenger side since this was a ton of work to get right). Unfortunately for me, the donor from Oklahoma ALSO had a mediocre repair done on it�s quarter panel (collision damage though, not rust related) so this piece took quite a bit of work fit, and as you can see, the lip the quarter panel welds to was no good, need to rebuild that�
How NOT to do a quarter panel patch. I included this shot because I want to show how you don�t do a quarter panel replacement. After hacking off the old quarter panel, the previous owner then bend the surrounding metal in, overlapped his new panel (like a huge overlap, lots of space for rust to form) pop riveted it on then ran a few short welds and paved the whole thing with bondo� what a mess.
Continued...
Last edited by 82transam; Feb 1, 2013 at 09:34 AM.
Thread Starter
Joined: Feb 2002
Posts: 8,389
Likes: 120
From: North Jersey
The last few shots I’ll post for now:
The replacement quarter panel! Rust free and with only a few dings.
Here you can see the new quarter panel tacked in and then completely welded. It is a butt joint, so once it’s ground flush you’ll barely be able to tell it was ever done. This is where I’m up to at this point. The passenger side is basically done with some minor body work still needed. It’s been a long road so far, but overall I’m happy with the way it’s looking. Some of the uglier welds will be hidden under seam sealer and undercoating so I’m not going crazy grinding everything smooth.
Questions/comments welcome.
Thanks for looking.
-Sean
Last edited by 82transam; Feb 1, 2013 at 09:37 AM.
wow sean looking great man, thats one hell of a project. i ditched my last shell due to rust, now you got me thinking i should done some cutting and welding  cant wait to see the finished product.
cant wait to see the finished product.


That's freakin' awesome! I know I need to do some rust repair myself but also have zero experience welding and fabricating, and no tools to do so. May have to contract that part out, but I'd love to learn how!
But hey, this is awesome inspiration. Keep the pics coming. Can never have too many pics.
Great work!
But hey, this is awesome inspiration. Keep the pics coming. Can never have too many pics.
Great work!

the pics look great! better than the ones you texted me! the car really is coming a long way and i look forward to following the thread in anticipation of a Daytona Blue FB!
Trending Topics
Thread Starter
Joined: Feb 2002
Posts: 8,389
Likes: 120
From: North Jersey
Thanks everyone! Lol yeah Dave did spill the beans on the color haha. It's not written in stone, but I did get a pint of Daytona blue to shoot on a fender or something. If it looks as good in person as it does in pics (and in the paint can) then Daytona blue with panda stripes it is!
I'm self taught will all this stuff, so I'm sure you guys could do it too!
I'm self taught will all this stuff, so I'm sure you guys could do it too!

Joined: Aug 2011
Posts: 3,078
Likes: 42
From: Cambridge, Minnesota
I wouldn't call that mediocre, it looks better than some of the work I found on my old blue 83 pars car. Bondo, angle iron, cheap bolts, and chicken wire. 'Nough said.
Will keep checking in, looks awesome!
Will keep checking in, looks awesome!
Thread Starter
Joined: Feb 2002
Posts: 8,389
Likes: 120
From: North Jersey
Yeah I guess mediocre isn't the word, it was just novice work on my part (seeing as I was a novice at that point I guess that makes sense lol) I tried (and still try) to do as much metal work as possible, and do minimal filler work etc. The biggest downfall to my original work honestly was not sandblasting all the surface rust, and just wire wheeling/por15'ing it. Por15 doesn't last forever as you can see...
Anyway, made some more progress this weekend. Finished up attaching the quarter panel to the wheel well (didn't really take pics of that, just a bunch of plug welds) and then ground down my butt weld along the quarte panel skin.
Very happy with the results, will only take some very minimal hammer and dolly work with a very light skim of bondo to smooth it out. The seam along the door jam almost needs nothing, it came out great.
Plan is to have everything wrapped up with this quarter panel/wheel well area this week. We'll see how that goes.
Very nicely done. Rust repair is always a pain. Keeping the bondo to a minimum is the sign of a well done repair. It's not easy keeping the thin sheetmetal panel from warping when the heat is applied. Kudos.
Thread Starter
Joined: Feb 2002
Posts: 8,389
Likes: 120
From: North Jersey
Thanks guys  Yeah I'm really trying to keep the filler to a bare minimum on this one. I'm slowly plugging away at the remaining rust on the rear. Nothing really picture worthy at the moment but I'll have some more updates soon.
Yeah I'm really trying to keep the filler to a bare minimum on this one. I'm slowly plugging away at the remaining rust on the rear. Nothing really picture worthy at the moment but I'll have some more updates soon.
ACBron Motorsport
Joined: Aug 2001
Posts: 608
Likes: 0
From: Melbourne Australia
Great work as always Sean!!!
How are you sealing the back side of the welded areas to prevent rust??
i'm redoing my quarters (as well as most of the car lol), as i just wasen't happy with the inners more so than the outers, but the outers wern't that great either...
I'll be keeping an eye on this :-)
How are you sealing the back side of the welded areas to prevent rust??
i'm redoing my quarters (as well as most of the car lol), as i just wasen't happy with the inners more so than the outers, but the outers wern't that great either...
I'll be keeping an eye on this :-)
Thread Starter
Joined: Feb 2002
Posts: 8,389
Likes: 120
From: North Jersey
You thread is awesome, I just subscribed to it lol. Sealing the backsides of all those welds has been annoying. I am able to get my hand with a small rattle can of primer (not the toughest stuff ever, but should do the job) through the tail light openings, but that only gets about halfway in.
For the rest I'm using a brush on a long stick to get primer and truck bed liner in there. It's sloppy looking but then again once the tail light is in it's all hidden. To get to front seam on the quarter panel patches (by the door jam) I drilled a few small access holes on the inside of the car so I could spray some primer in there.
Far from perfect methods, but they seem to be working, and anything is better than leaving it exposed like the previous owner did when they worked on the car....
While I had the quarter panels off I made sure to clean all the exposed frame areas etc and prime them to make sure they stay nice and solid.
Thanks again for all the compliments, it's coming together pretty well for a cobbled together rat of a shell lol
Thread Starter
Joined: Feb 2002
Posts: 8,389
Likes: 120
From: North Jersey
Carl! I haven't seen you post in ages. I didn't think you ever came on here anymore
Thanks, it's coming along nicely, I've gone through like 5 spools of wire and two tanks of gas on my welder on this already lol.
I'll have more pics/update typed up later today. Made some good progress this weekend.
Thanks, it's coming along nicely, I've gone through like 5 spools of wire and two tanks of gas on my welder on this already lol.
I'll have more pics/update typed up later today. Made some good progress this weekend.
Thread Starter
Joined: Feb 2002
Posts: 8,389
Likes: 120
From: North Jersey
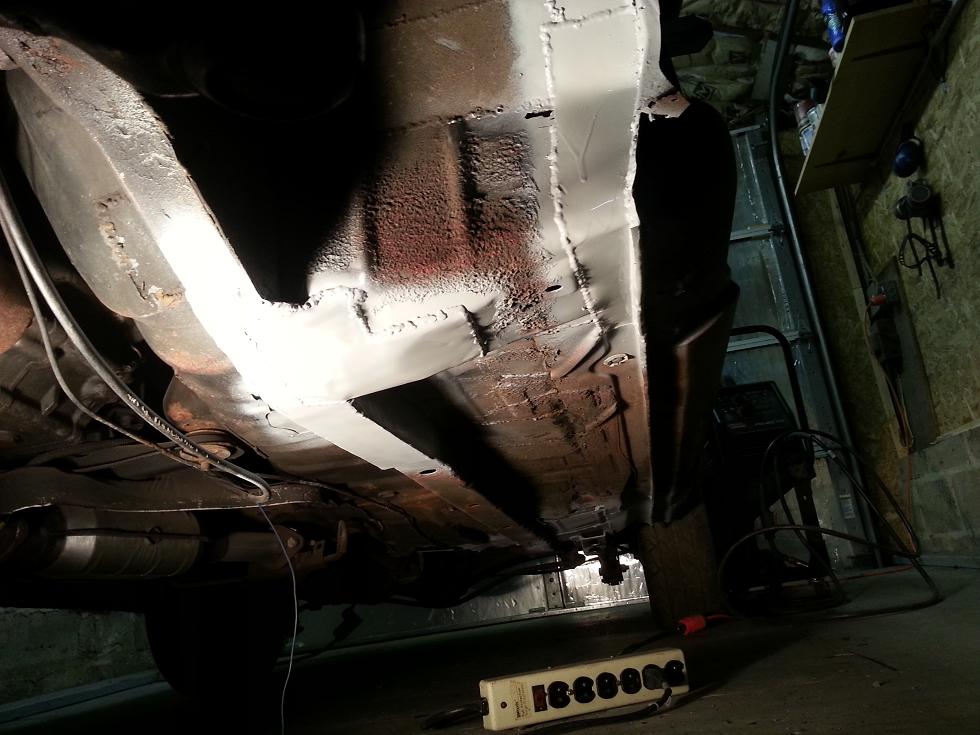
Ok, next update. At this point all the metal work on the rear half of the car has been completed. There is still much sandblasting/priming/seam sealing/undercoating etc etc to be done, but all the cutting/welding/grinding is done from the bin area back.
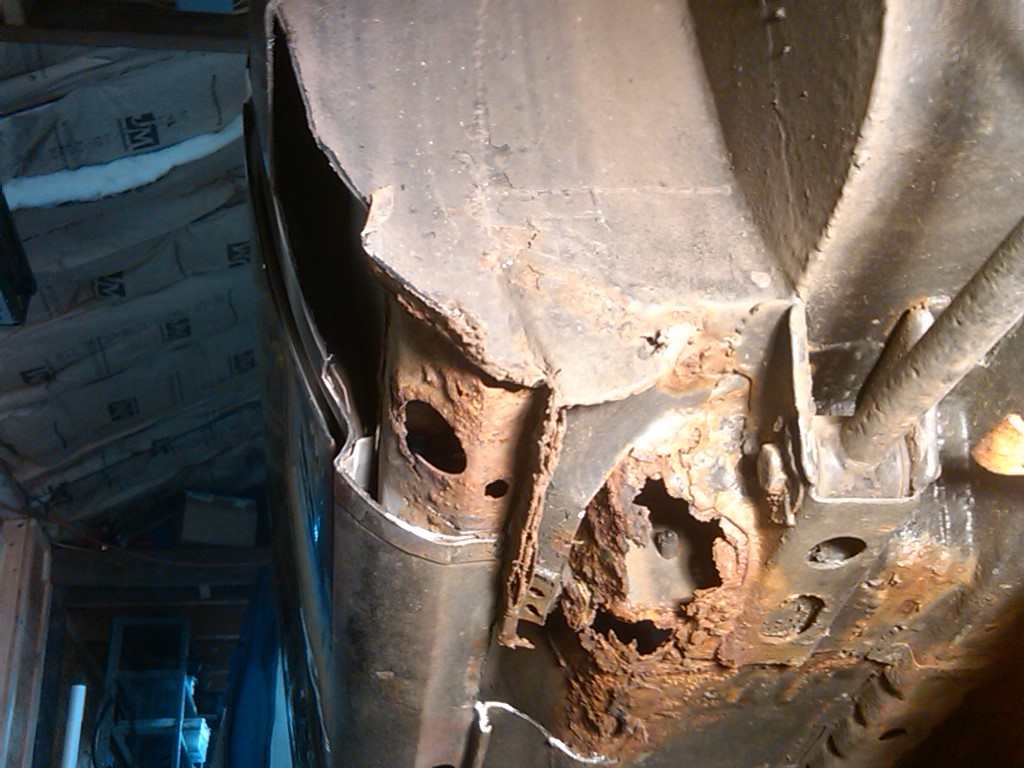
I've turned my attention to the very rough pinch weld seam (I guess that's what it's called) and frame rail section up under where the occupants feet would go. It's where the frame rail from the engine bay and the floor pan's frame rail meet. I commonly use it as a jack/jack stand point and since it's an overlapping seam it was rusted to hell. A few light taps and I was left with this mess
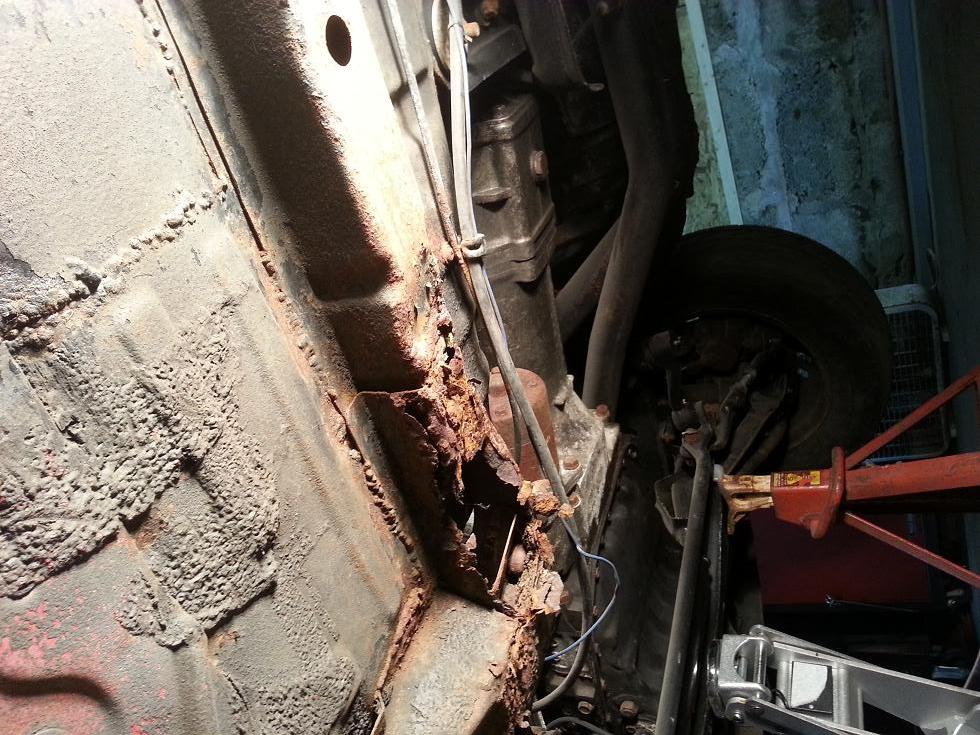
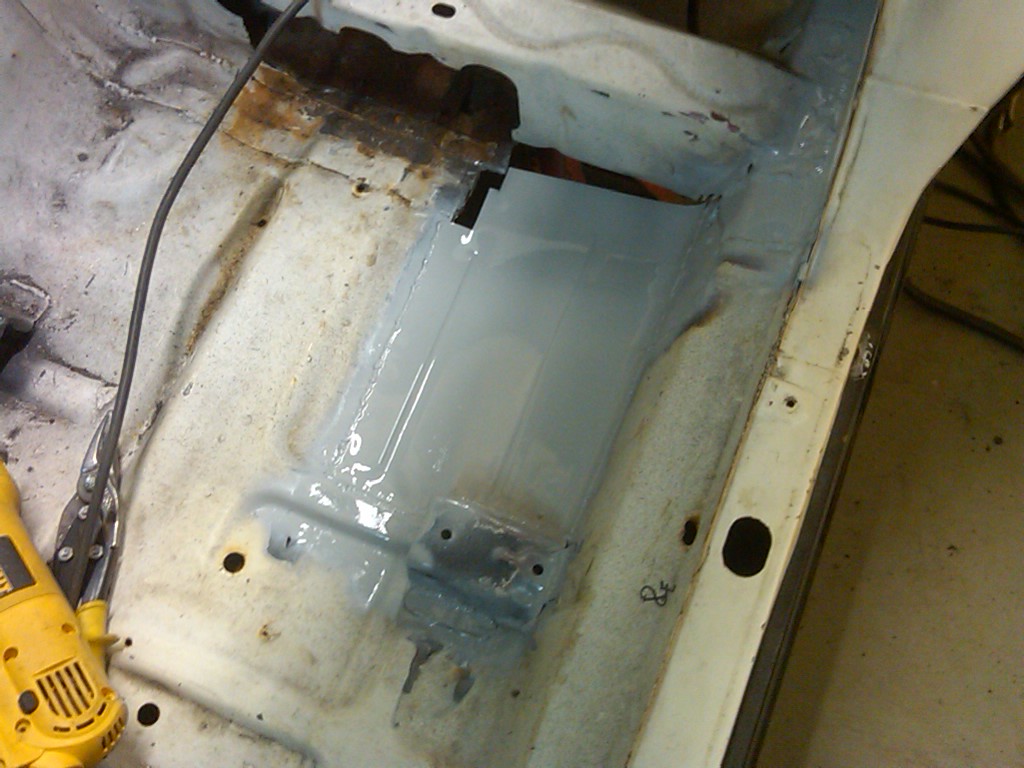
Pretty nasty eh? Took quite a while, but some time later and some 1/8" steel (might as well overbuild it) and we have this:
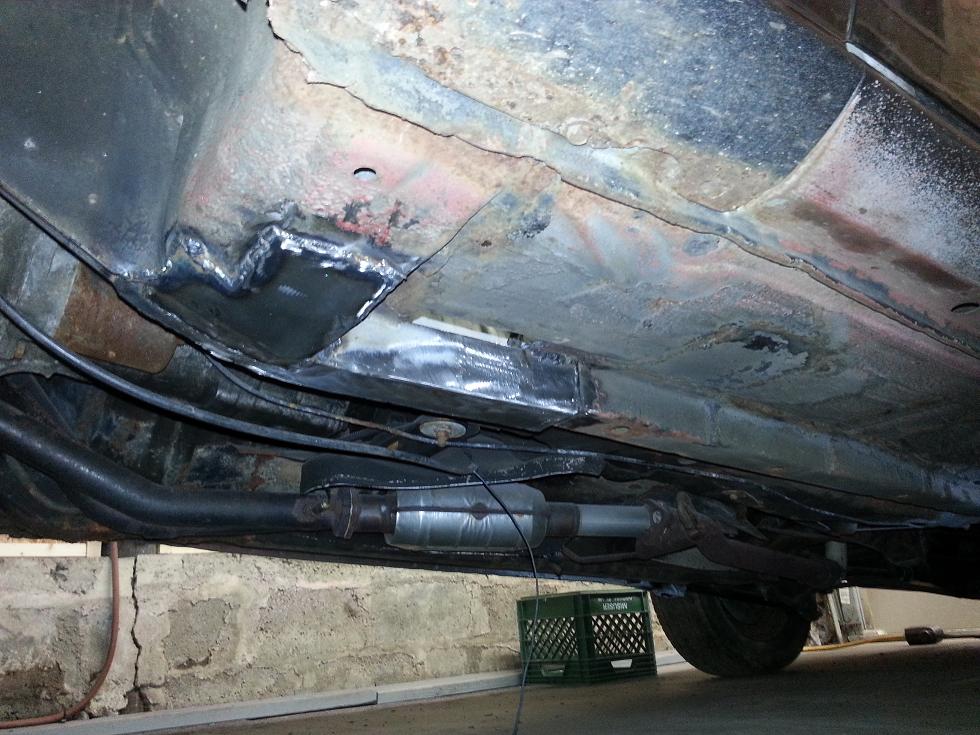
Not pictured is the floor pan patch I did above that section, but everything is all welded together and solid as a rock. It also doesn't have the overlap that the factory piece did so hopefully the rust stays away this time...
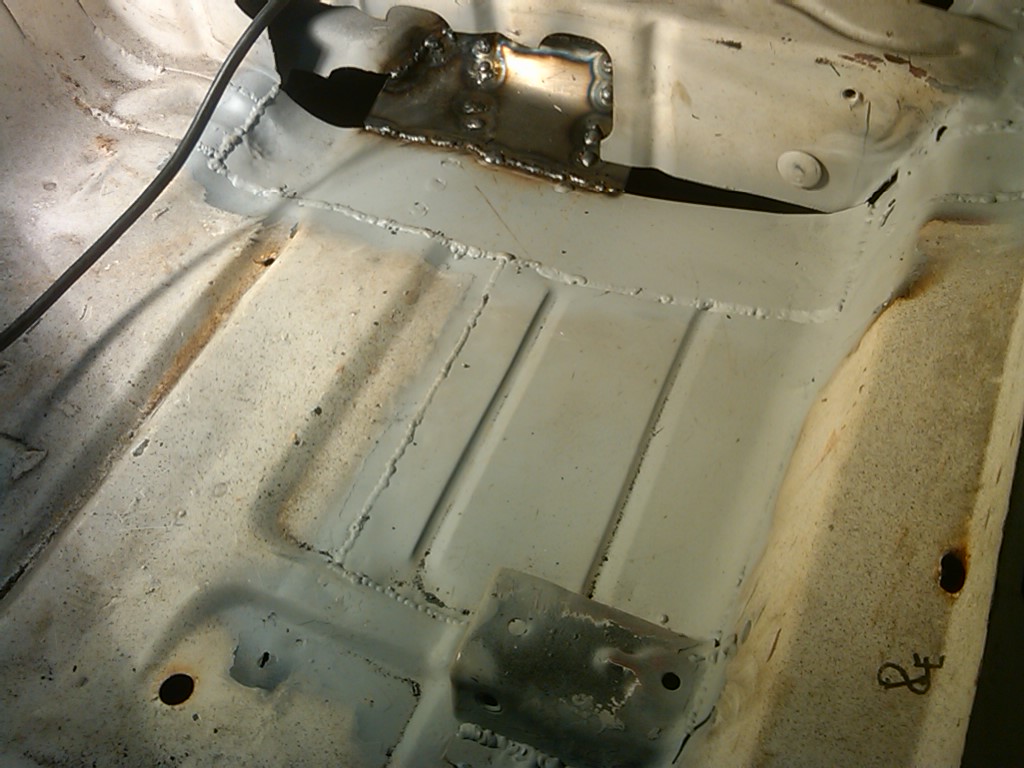
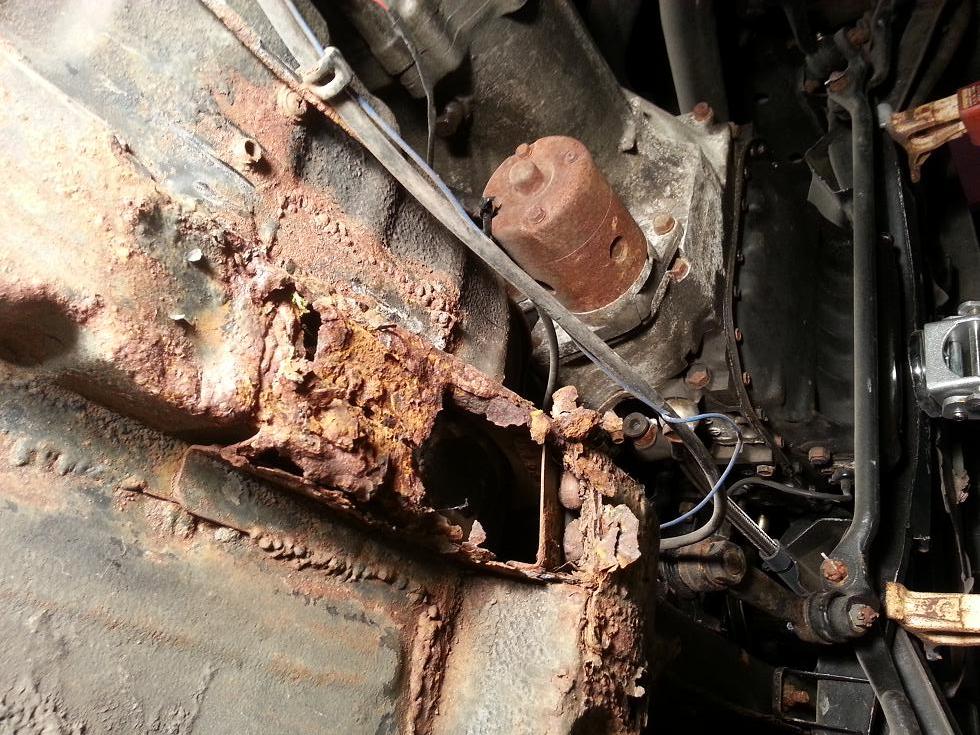
Then I turned my attention to the pinch weld (if that's not what it's called someone correct me lol) where the floor, rocker panel, kick panel and frame brace all meet together. It's also a common jack point (although I don't typically use it) that gets crushed and full of water and salt. I haven't finished with it yet, but you'll get the idea of the extent of the rust. It had gotton into the inner rocker frame piece (basically a brace that is hidden inside the rocker panel) so that had to be replaced and the outer panel also replaced. Lots of work, but it's almost done... The pics are pretty crappy on this one, but it was hard to get a good angle...
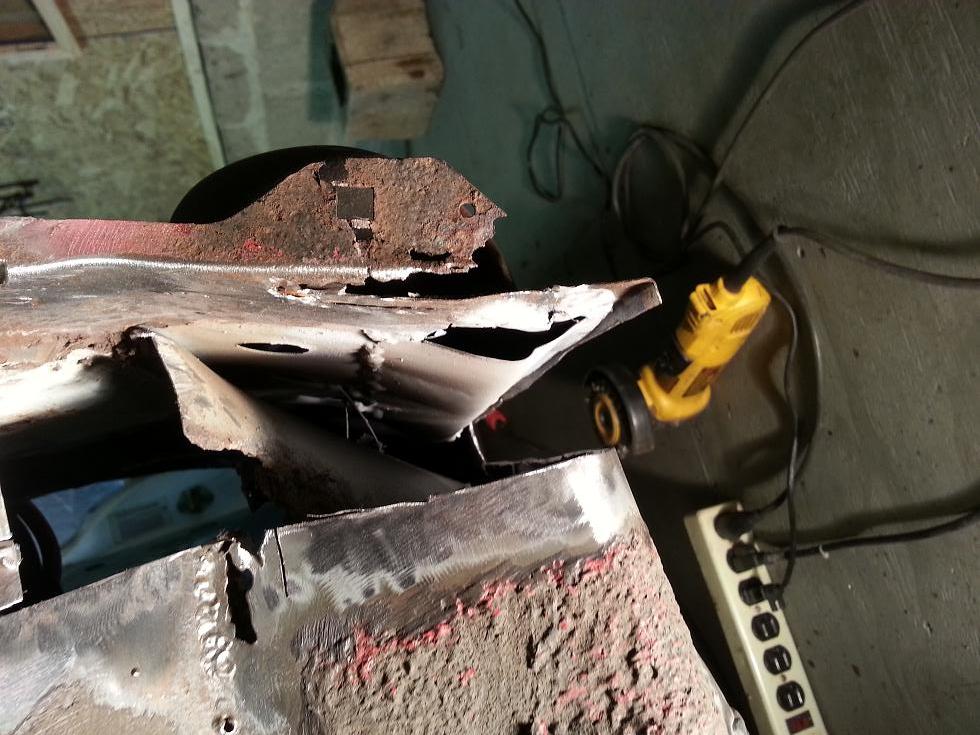
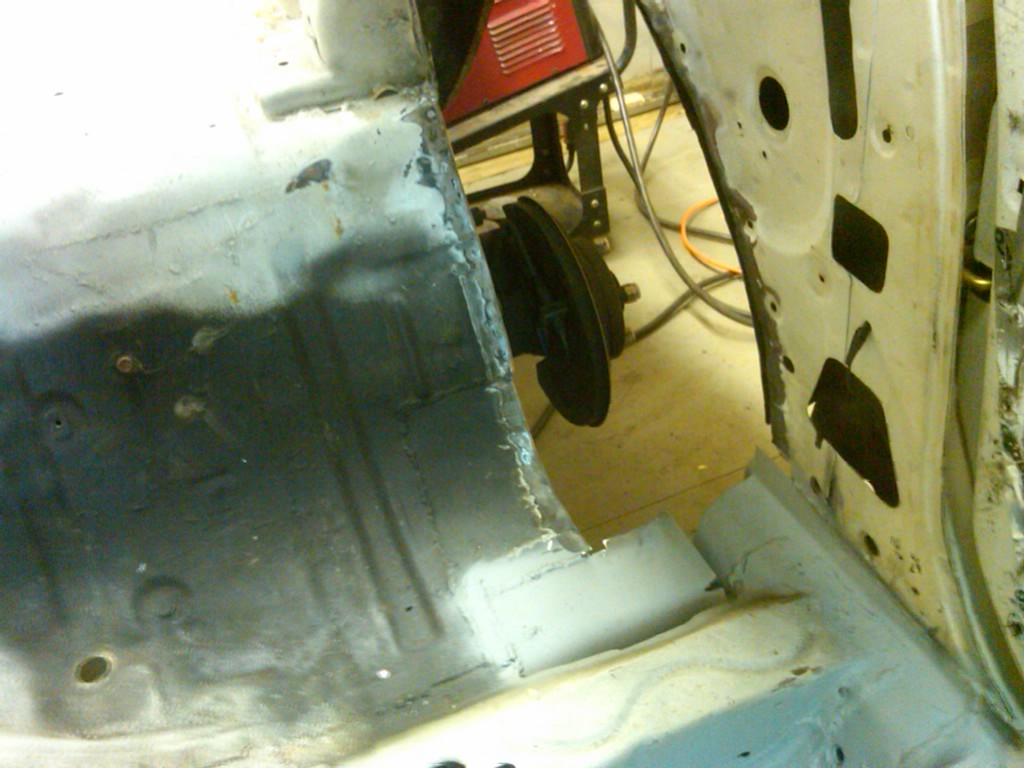
Terrible pic, but I wanted to show the patch I made:
Anyway, thats where I'm at right now. The passenger side is just about as crappy, so i'll be working on that this week. Never a dull moment...
I've turned my attention to the very rough pinch weld seam (I guess that's what it's called) and frame rail section up under where the occupants feet would go. It's where the frame rail from the engine bay and the floor pan's frame rail meet. I commonly use it as a jack/jack stand point and since it's an overlapping seam it was rusted to hell. A few light taps and I was left with this mess
Pretty nasty eh? Took quite a while, but some time later and some 1/8" steel (might as well overbuild it) and we have this:
Not pictured is the floor pan patch I did above that section, but everything is all welded together and solid as a rock. It also doesn't have the overlap that the factory piece did so hopefully the rust stays away this time...
Then I turned my attention to the pinch weld (if that's not what it's called someone correct me lol) where the floor, rocker panel, kick panel and frame brace all meet together. It's also a common jack point (although I don't typically use it) that gets crushed and full of water and salt. I haven't finished with it yet, but you'll get the idea of the extent of the rust. It had gotton into the inner rocker frame piece (basically a brace that is hidden inside the rocker panel) so that had to be replaced and the outer panel also replaced. Lots of work, but it's almost done... The pics are pretty crappy on this one, but it was hard to get a good angle...
Terrible pic, but I wanted to show the patch I made:
Anyway, thats where I'm at right now. The passenger side is just about as crappy, so i'll be working on that this week. Never a dull moment...
Thread Starter
Joined: Feb 2002
Posts: 8,389
Likes: 120
From: North Jersey
Thanks, it's good to see you back here. I remember asking you all sorts of questions 10 years ago when I started building this thing the first time lol. Man times flies