
My 83 GS "pandafb" gets restored - Again! (lots of rust/metal work)

Thread Starter
Joined: Feb 2002
Posts: 8,389
Likes: 120
From: North Jersey
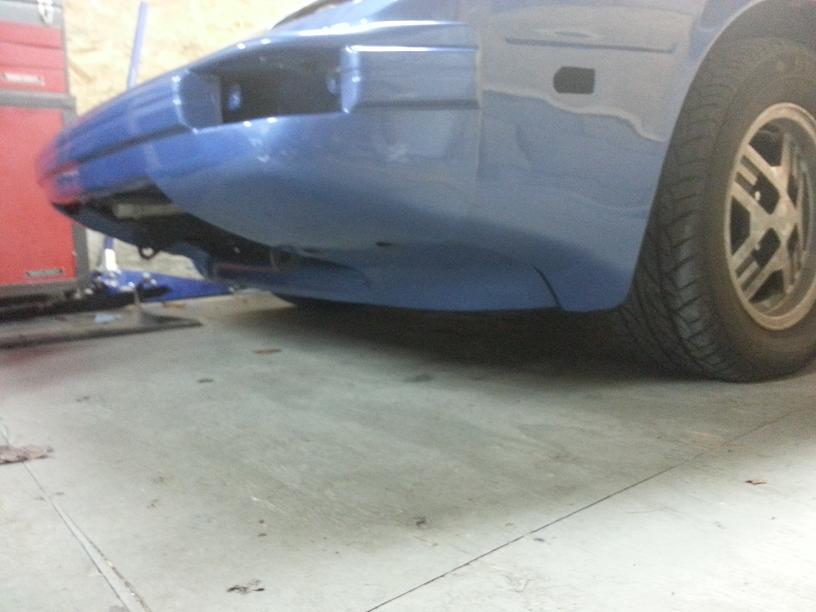
After much sanding, and more sanding, and another few heavy coats of Durabuild primer (fills in scratches really well) and a final wetsand with 400 grit I was ready for paint, and paint I did! It came out damn near perfect given that my paint "booth" was yet again the great outdoors. I'm very happy with the result. A bit of colorsanding and polishing once it's all back together and we're golden. The doors and hood are nearly ready to be painted as well, hoping to finish it all next weekend. Both doors needed a ton of rust repair, the bottom 3/4" of the door skin had to be replaced as did the lower portion of the door frame, but they are solid as a rock now and looks damn near factory. I'll have to get a few pics of them..
The paint is PPG singlestage urethane. Lays down really well and dries hard as a rock. Keeps a real good shine too (I've done other cars with this paint and it lasts really well) Oh and the paint is completely dry to the touch too in these pics, so that shine is how it will look, I didn't take the pics while it was still wet to make it look like it has more shine or anything like that
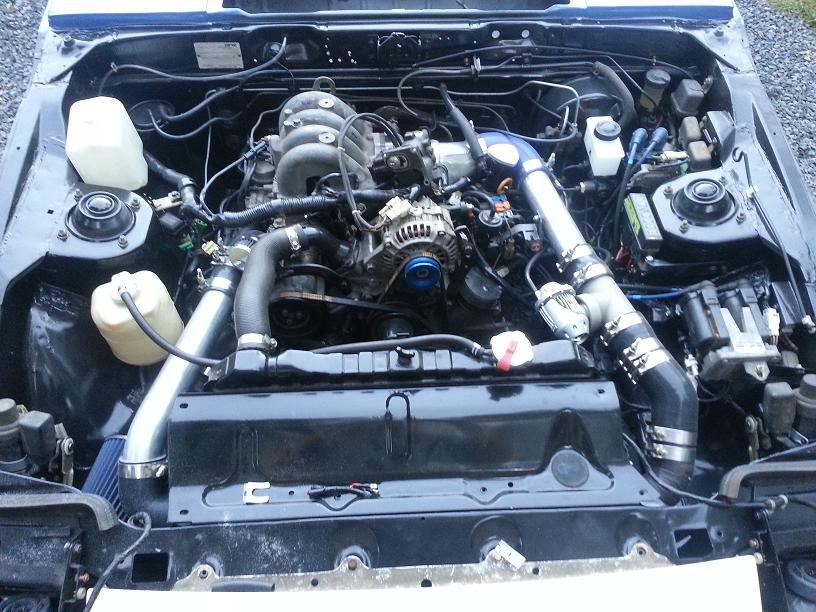
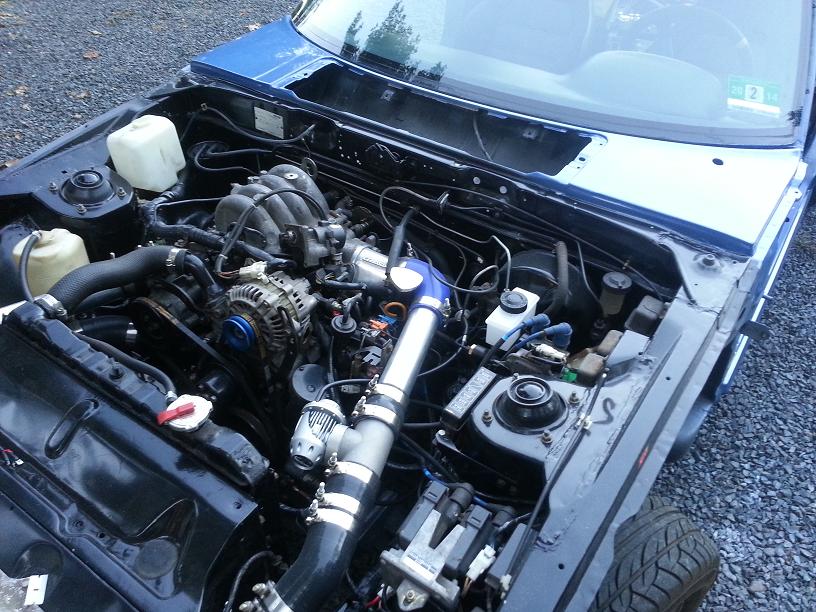
Also, a few pics of the engine bay, also very happy with how that came out and it runs damn good too.
Anyway, enjoy!
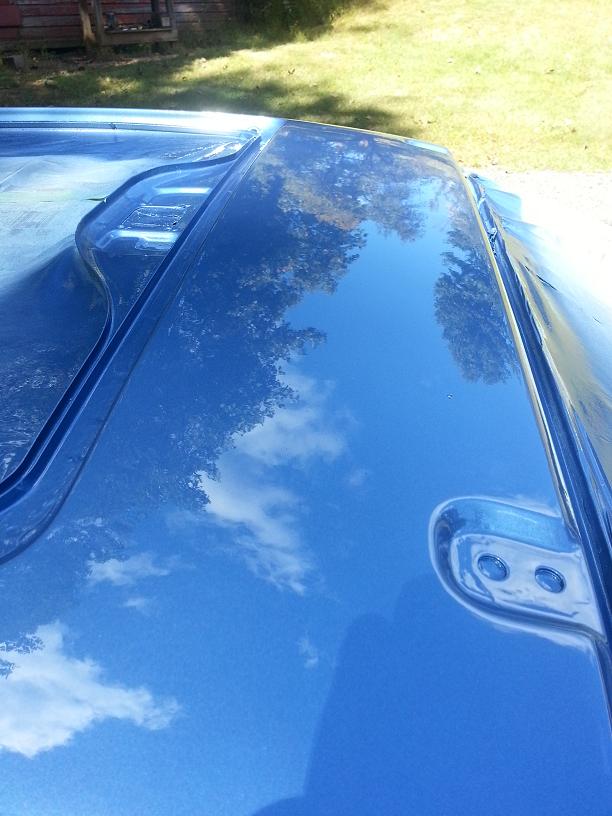
The paint is PPG singlestage urethane. Lays down really well and dries hard as a rock. Keeps a real good shine too (I've done other cars with this paint and it lasts really well) Oh and the paint is completely dry to the touch too in these pics, so that shine is how it will look, I didn't take the pics while it was still wet to make it look like it has more shine or anything like that
Also, a few pics of the engine bay, also very happy with how that came out and it runs damn good too.
Anyway, enjoy!
Last edited by 82transam; Sep 30, 2013 at 08:48 AM.


Thread Starter
Joined: Feb 2002
Posts: 8,389
Likes: 120
From: North Jersey
Thanks! I really like it, makes me wonder why Mazda only used it on the one year and never had a dark blue first gen after that... Guess everyone wanted the lighter silver/blue back in the early 80's eh

Thread Starter
Joined: Feb 2002
Posts: 8,389
Likes: 120
From: North Jersey
Thanks for the compliments, I'm really loving the color too. Can't wait to get the rest of the parts done and reassemble it...

Thread Starter
Joined: Feb 2002
Posts: 8,389
Likes: 120
From: North Jersey
Thanks for the compliments guys Yeah Austin, where's my a/c lol
No pics to speak of at the moment, but last night I managed to get the headlight lids, cowl plate, header panel and gas door stripped down (chemical stripper ftw!). Still need to smooth out a few dings on the header panel and one light lid, but they should be in primer by end of the night tonight. I'm hoping to get everything minus the fenders and bumpers painted tomorrow, and with any luck get the fenders and bumpers done over the weekend. Will have to see how the weather goes.
Yeah Austin, where's my a/c lolNo pics to speak of at the moment, but last night I managed to get the headlight lids, cowl plate, header panel and gas door stripped down (chemical stripper ftw!). Still need to smooth out a few dings on the header panel and one light lid, but they should be in primer by end of the night tonight. I'm hoping to get everything minus the fenders and bumpers painted tomorrow, and with any luck get the fenders and bumpers done over the weekend. Will have to see how the weather goes.
Thread Starter
Joined: Feb 2002
Posts: 8,389
Likes: 120
From: North Jersey
Making good progress although the weather has not been cooperating. If it hadn't rained on Sunday I would have had all the paint done, and it's been either too cold or raining everyday this week. If I don't get usable weather this weekend then I'll have to make a paintbooth in the corner of my shop to get the last few things painted (fenders and bumpers) but I'm hoping to avoid that since overspray gets everywhere!
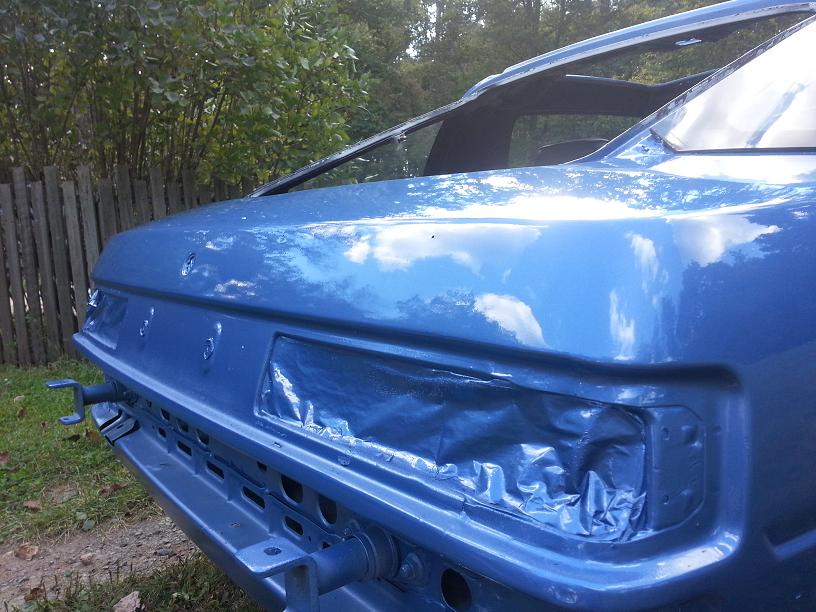
Anyway, speaking of fenders I managed to get the rest of the dent/rust repair and prep work done last night. The passenger fender that was on the car is repairable, but had a ton of rust. I had another passenger fender from a parts car that's been sitting around for years that is in better shape so I decided to use that. It just needed a bunch of chemical stripper (I had used this fender as my paint gun setup test panel on the last 6 cars I painted so to say the paint on there was thick is an understatement lol) and some minor hammer/dolly work and a bit of filler then some epoxy primer - no big deal, didn't bother with pics.
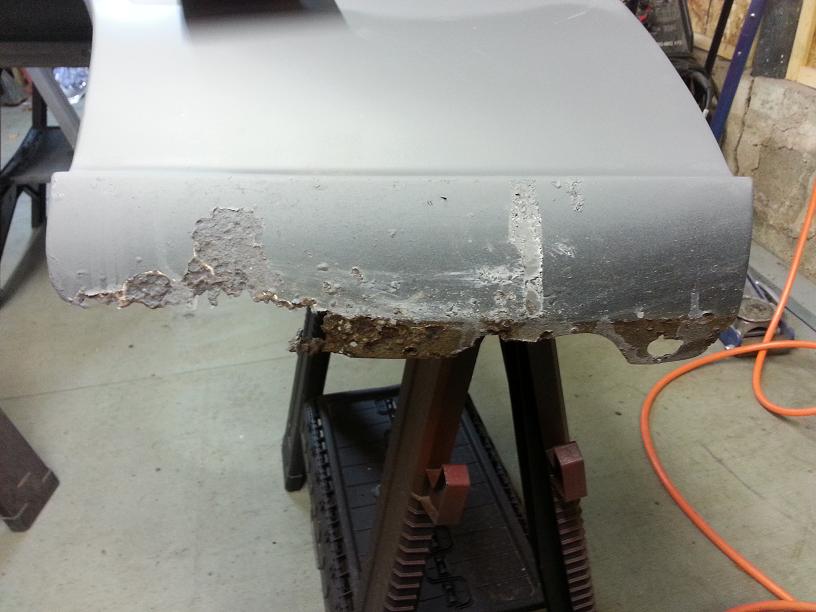
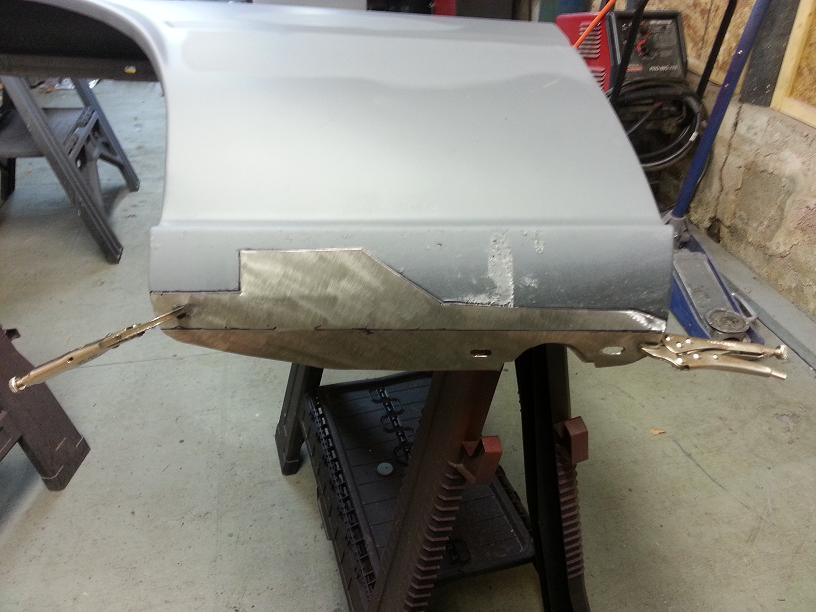
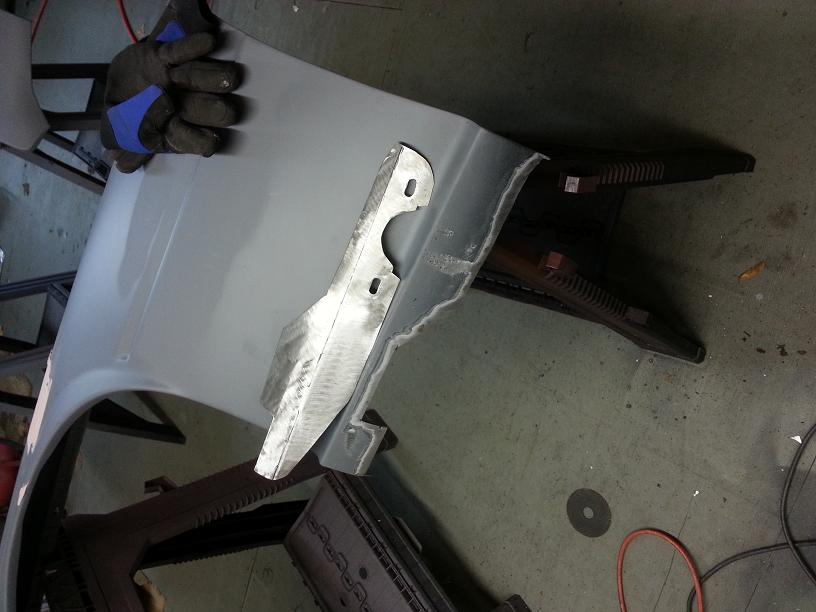
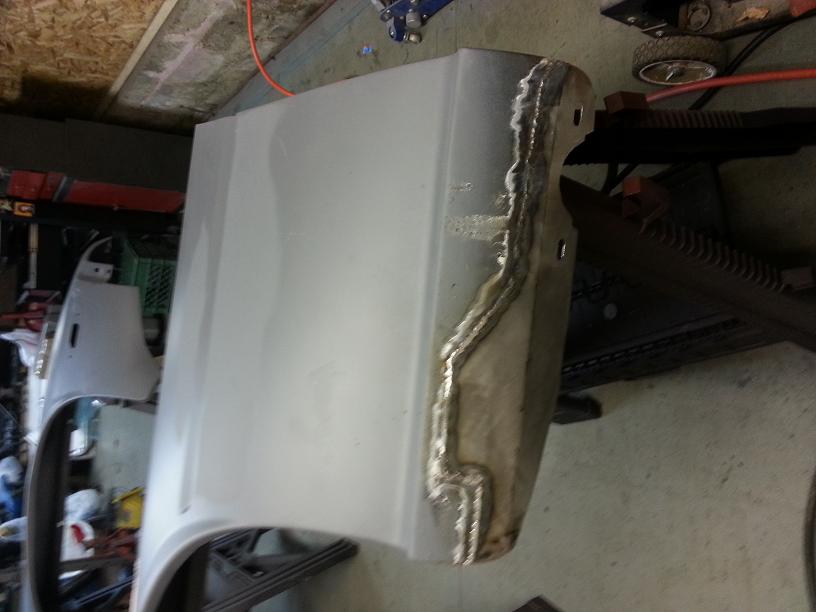
The driver side fender also had some rust, but I don't have a spare and didn't really want to spend money on something that I could fix in a hour or two, so fix it I did! The "visual" surfaces of this fender had only minor surface rust in a few spots where the paint had chipped - nothing a quick pass with a flap wheel can't handle, the major rust was along the rear lower edge, where it bolts to the rocker panel. As you'll see in the pics, there wasn't much left to it (the passenger side was worse though haha) Didn't take too long to make the patch panel or to weld it in, came out pretty good, and it's low enough on the car that even if it hadn't you wouldn't really notice, but I'm a perfectionist haha
I'll let the pics speak for themselves, but at this point both fenders have been srtipped, dents repaired, and all sealed up with epoxy primer, and the backsides covered in undercoating. I just need to let it all fully cure so I can scuff it and lay down some durabuild, then block that and paint it. Not much left!
Rust!
Patch made, marking where to cut out
Old rusty crap cut out and edges prepped
Welded in and starting to grind smooth
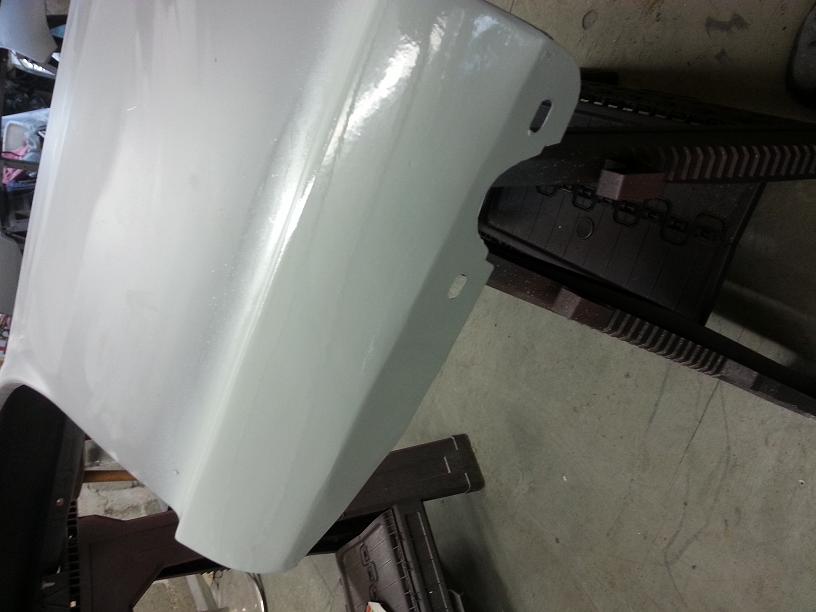
Grinding done, quick skim of filler and some primer to keep it from soaking up dampness - done!
Anyway, speaking of fenders I managed to get the rest of the dent/rust repair and prep work done last night. The passenger fender that was on the car is repairable, but had a ton of rust. I had another passenger fender from a parts car that's been sitting around for years that is in better shape so I decided to use that. It just needed a bunch of chemical stripper (I had used this fender as my paint gun setup test panel on the last 6 cars I painted so to say the paint on there was thick is an understatement lol) and some minor hammer/dolly work and a bit of filler then some epoxy primer - no big deal, didn't bother with pics.
The driver side fender also had some rust, but I don't have a spare and didn't really want to spend money on something that I could fix in a hour or two, so fix it I did! The "visual" surfaces of this fender had only minor surface rust in a few spots where the paint had chipped - nothing a quick pass with a flap wheel can't handle, the major rust was along the rear lower edge, where it bolts to the rocker panel. As you'll see in the pics, there wasn't much left to it (the passenger side was worse though haha) Didn't take too long to make the patch panel or to weld it in, came out pretty good, and it's low enough on the car that even if it hadn't you wouldn't really notice, but I'm a perfectionist haha
I'll let the pics speak for themselves, but at this point both fenders have been srtipped, dents repaired, and all sealed up with epoxy primer, and the backsides covered in undercoating. I just need to let it all fully cure so I can scuff it and lay down some durabuild, then block that and paint it. Not much left!
Rust!
Patch made, marking where to cut out
Old rusty crap cut out and edges prepped
Welded in and starting to grind smooth
Grinding done, quick skim of filler and some primer to keep it from soaking up dampness - done!
Thread Starter
Joined: Feb 2002
Posts: 8,389
Likes: 120
From: North Jersey
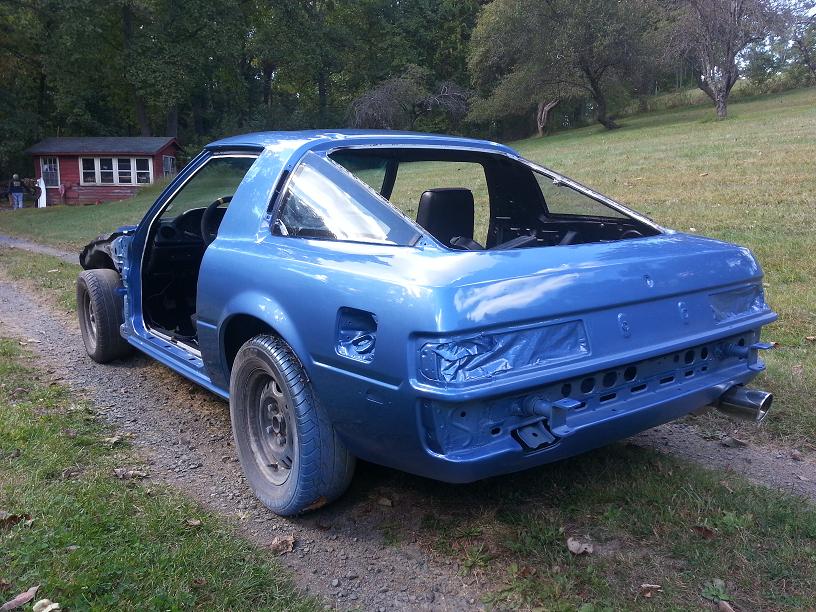
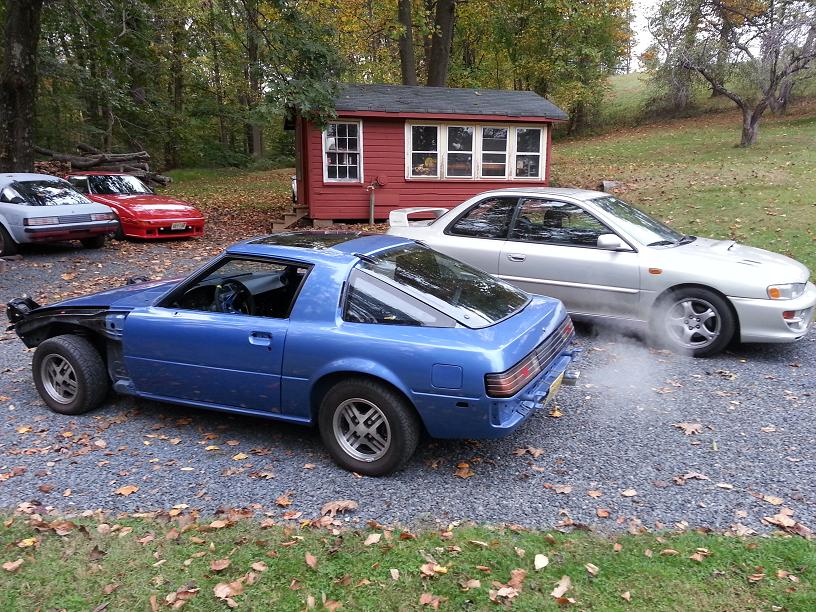
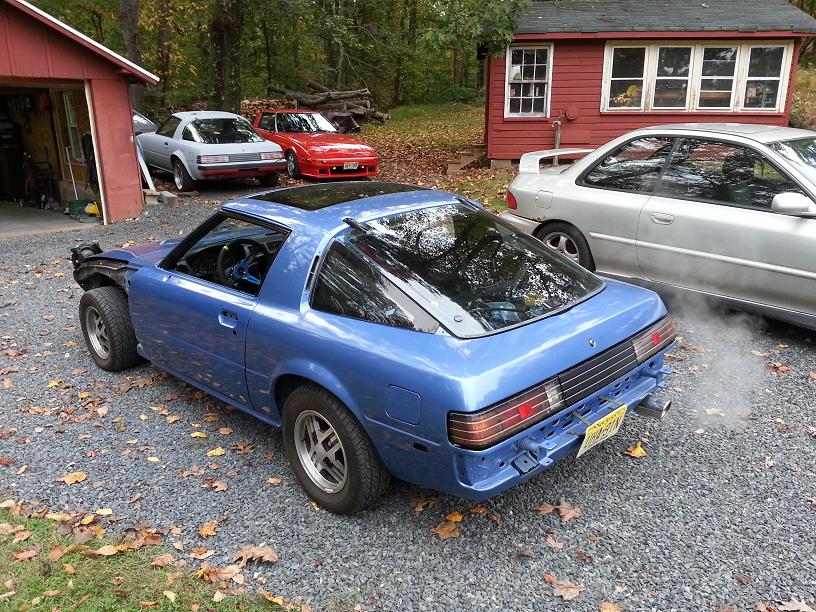
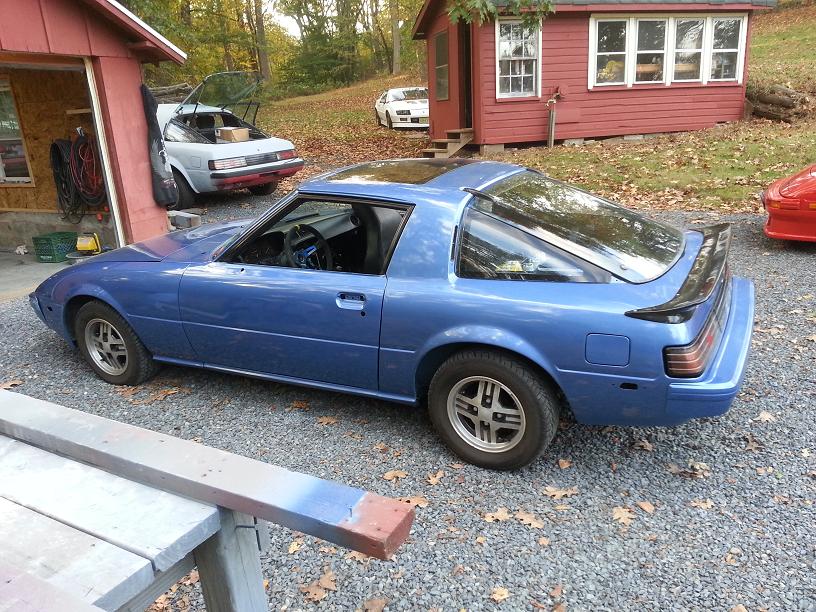
Here's two shots I took of the car yesterday after moving it out of the shop to work on those fenders. I am waiting on new window channels and window seals so theres no glass in the doors, but it's starting to look like a car again at least.
You can also see the 85 S I recently picked up which has metal flares on it. Previous owner got it 75% ready for paint and ran out of time/moved so thankfully it won't be nearly as much body work as I'm used to lol. Been sitting in a garage in NY since 97 so not much rust on it either... Anyway, I digress
You can also see the 85 S I recently picked up which has metal flares on it. Previous owner got it 75% ready for paint and ran out of time/moved so thankfully it won't be nearly as much body work as I'm used to lol. Been sitting in a garage in NY since 97 so not much rust on it either... Anyway, I digress
Thread Starter
Joined: Feb 2002
Posts: 8,389
Likes: 120
From: North Jersey
Haha, I guess. Thanks for the compliment. Looking like we might be a break in the weather tomorrow. Keeping my fingers crossed I can get the fenders and bumpers painted...
Looking like we might be a break in the weather tomorrow. Keeping my fingers crossed I can get the fenders and bumpers painted...

Sean that thing gorgeous! Your sheet metal patches makee me wanna go out and slap my welder (what was that you were saying about a craftsman blaming his tools lol) Really nice car!
Thread Starter
Joined: Feb 2002
Posts: 8,389
Likes: 120
From: North Jersey
You guys are making me blush Thanks for the compliments, it really means a lot! I've still got a long way though, One of these days I want to get an English wheel and be able to make more complex parts from scratch.
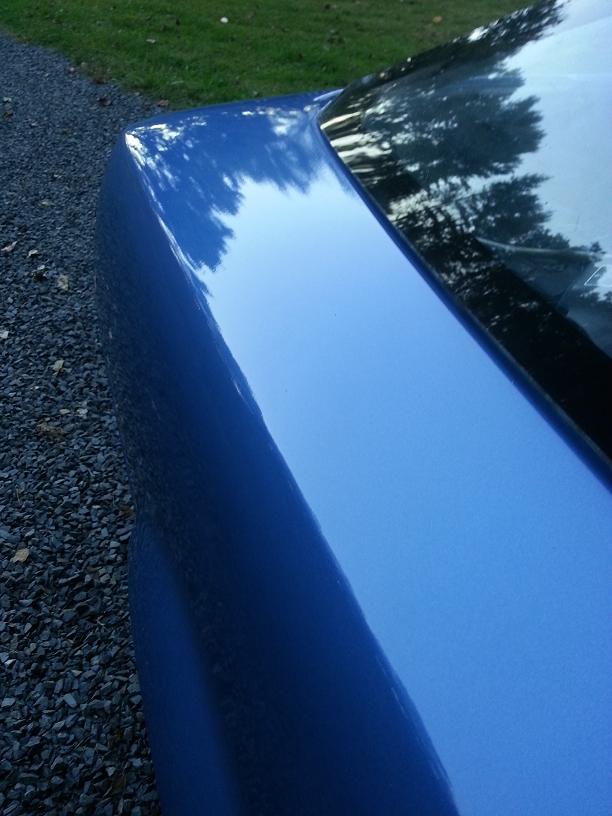
Really lucked out this weekend and the temp got up to around 70 on Saturday. It was nice and dry but really windy. I spent the morning finishing the prep work on the fenders and bumpers and then figured what the hell and painted them later in the afternoon. As you'll see I setup the fenders on my work bench, then painted them right in front of my shop, as soon as the last coat was done we moved the bench inside so keep the wind from blowing crap all over them. I'll consider myself incredibly lucky since I got no leaves/bugs/dust/crap in the paint - got an incredibly smooth finish too, very little orange peel or anything.
Too many pics for one post, but the second post will show what I did Sunday, spent the better part of the day reassembling the front end and got my spoiler on. Overall going quite well, since many of these panels aren't original to this car (or even original to my first build) there's been quite a bit of fiddling to get them all to fit correctly and look good. For how much welding and patching I had to do I'm very pleased with the panel gaps - I certainly am not shooting for factory perfect, that would be too much work
For those who want to do their own body work I would highly recommend the paint I'm using. It's a single stage urethane. You mix in reducer and hardener 4:1:1 so you get a gallon and a half of sprayable paint out of a gallon. For this project I initially bought a pint to try, and then bought another half gallon so I used 5 pints almost exactly since I have very little left:

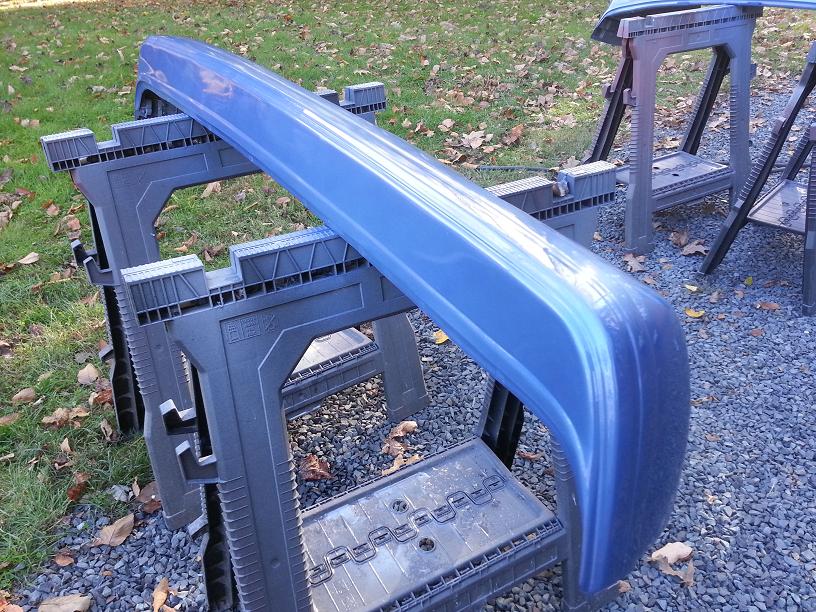
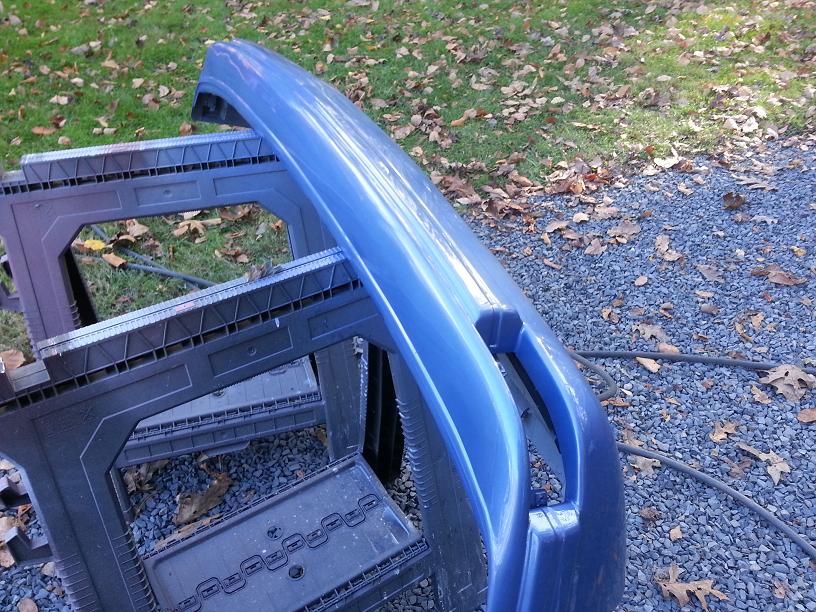
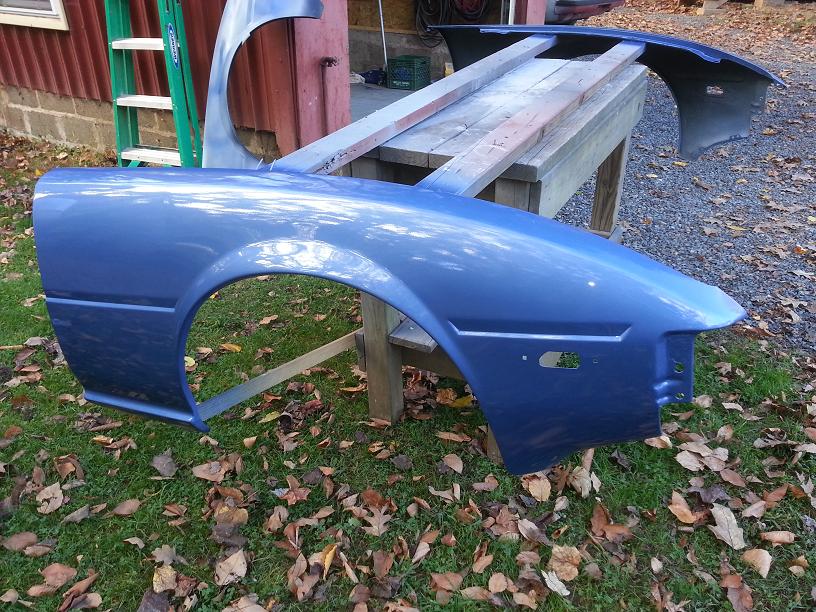
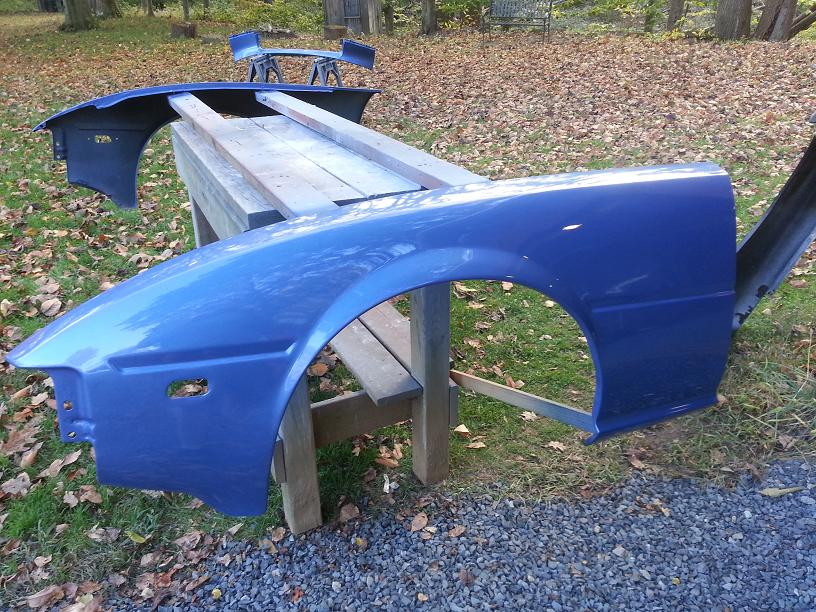
Thanks for the compliments, it really means a lot! I've still got a long way though, One of these days I want to get an English wheel and be able to make more complex parts from scratch.Really lucked out this weekend and the temp got up to around 70 on Saturday. It was nice and dry but really windy. I spent the morning finishing the prep work on the fenders and bumpers and then figured what the hell and painted them later in the afternoon. As you'll see I setup the fenders on my work bench, then painted them right in front of my shop, as soon as the last coat was done we moved the bench inside so keep the wind from blowing crap all over them. I'll consider myself incredibly lucky since I got no leaves/bugs/dust/crap in the paint - got an incredibly smooth finish too, very little orange peel or anything.
Too many pics for one post, but the second post will show what I did Sunday, spent the better part of the day reassembling the front end and got my spoiler on. Overall going quite well, since many of these panels aren't original to this car (or even original to my first build) there's been quite a bit of fiddling to get them all to fit correctly and look good. For how much welding and patching I had to do I'm very pleased with the panel gaps - I certainly am not shooting for factory perfect, that would be too much work
For those who want to do their own body work I would highly recommend the paint I'm using. It's a single stage urethane. You mix in reducer and hardener 4:1:1 so you get a gallon and a half of sprayable paint out of a gallon. For this project I initially bought a pint to try, and then bought another half gallon so I used 5 pints almost exactly since I have very little left:
Thread Starter
Joined: Feb 2002
Posts: 8,389
Likes: 120
From: North Jersey
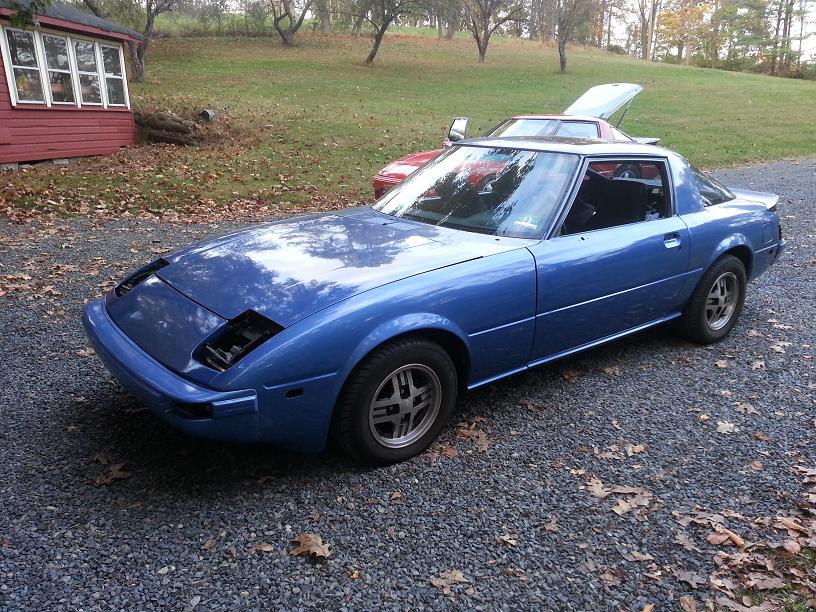
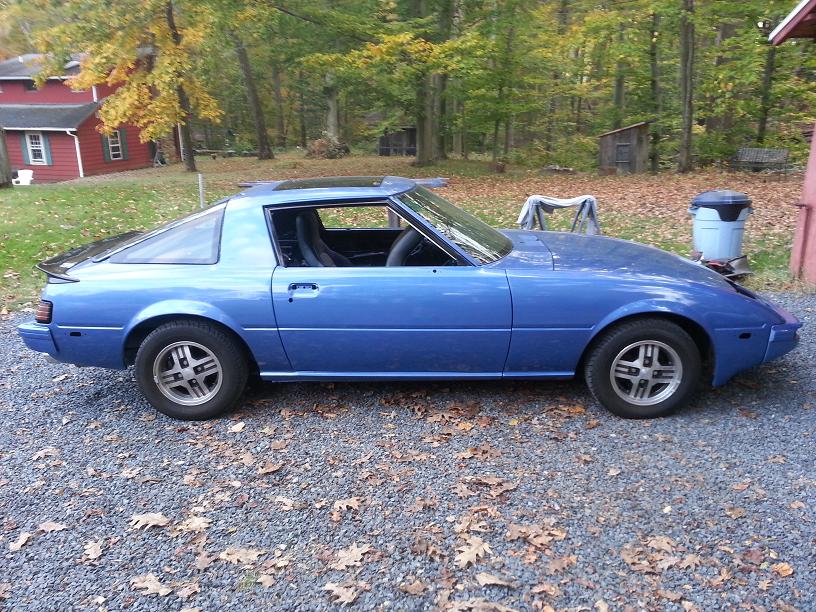
Starting to look like a car again! Other than the front plate, turn signals/ side markers and the plastic "grill" the front end is all done. I still have a few heat shields to put around the gas tank, but the rear is basically done as well. Still a bunch of stuff to reassemble in the doors but I'm waiting on new window channels and some other stuff.
The light lids are painted, but I haven't finished hooking up the headlights since most of the plastic clips for that extension of the wiring are broken. Need to spend a few minutes looking through spare parts to see if I have anymore, if not then off to Lowes to find something similar. Also, you can't see it well in the pics (and I've purposely not shown it since it's an embarrassing oversight on my part) but the hood came out pretty crappy. There's a large flatspot that I missed when body working it, and the paint came out very uneven - tiger stripes in the metallic and generally crappy looking - So I'll be redoing that at some point, and I purposely ignored the metal sunroof since I almost never use it. When I redo the hood I will paint it though so it's available if I need it.
Also ran into a problem with the seat belts. Because of rust I had to cut out the lower mounting point (in front of the bins) and replace it with one that came on my quarter panel patches (they cut off almost the whole back of the car lol) But either it got warped from welding or there is a burr in there I can't see and I stripped the bolt on the passenger side, and the driver side gave me a very uneasy feeling while I tightened it. If my measurements are correct they are 11x1.25mm bolts, a very odd size, but some research shows that some Porsche's use the same. Thankfully Amazon has a listing for both a tap/die and a helicoil kit so i'll be buying those and repairing the threads. If none of that works then a bunch of interior I just installed has to come back out so I can weld something new in there... Always the simple things that take the longest.
Anyway, again I appreciate the compliments, updates might slow down a bit over the next few weeks since my wedding is 3 weeks away and I should probably start getting ready for that lol. I'll be getting my 83 S (the red one) ready for the journey to Rhode Island (we can pretend to be rich for a day out on the cliffs, or I can jump off when we're done, whatever works) So not much time for this one I'm afraid.
Last edited by 82transam; Oct 14, 2013 at 08:31 AM.
