
daily driver/ weekend warrior

Thread Starter
Full Member
Joined: Feb 2014
Posts: 50
Likes: 0
From: Australia
Weekend update
Hey everybody just a quick update not thing really done thats picture worthy so no pictures today.
First off on Friday night i got Dad's RX3 guards down so that i can make moulds off them and even sell some flares. This meant a spent a couple of hours cleaning them off paint off with some P80 grit sand paper and then used a block and P120 which was worn out to give them a nice smooth finish. They are now back to the jell-coat but there will need to be some repair work done to them before i make moulds because dad never had mudflaps on the car so the front half of the rear ones are pretty worn away. I hope to keep the original shape of the guards and i will respray them the original colour so that they can be hung up in the bar (one day).
Also i have ordered a Group C front lip/bumper as the apron and bumper on the car now are pretty rough and the lip will go with the theme of the build.
Now i am in the process of finishing the engine bay which has required me to make new mounts for the radiator (So i can V mount it and put a bigger oil cooler in as well as moving the mount to the left of the car so i can fit my pod filter in a airbox between the head light motor and the radiator. There isnt a lot of room but i will make it work
Cheers
Thread Starter
Full Member
Joined: Feb 2014
Posts: 50
Likes: 0
From: Australia
Engine bay
Hey guys,
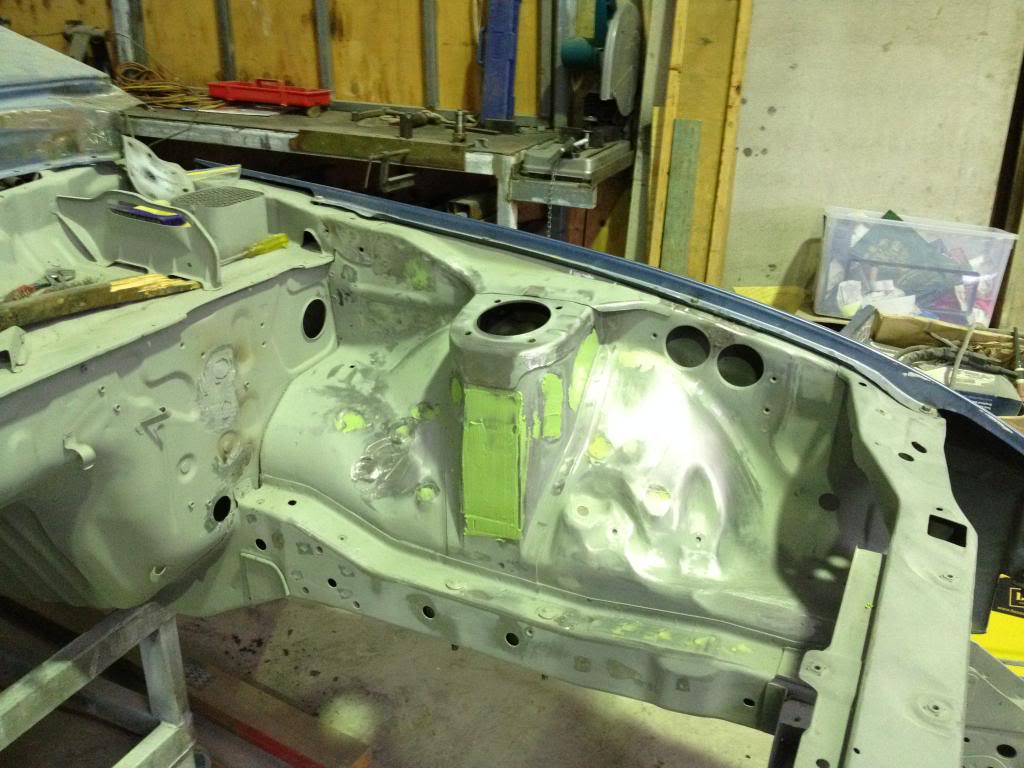
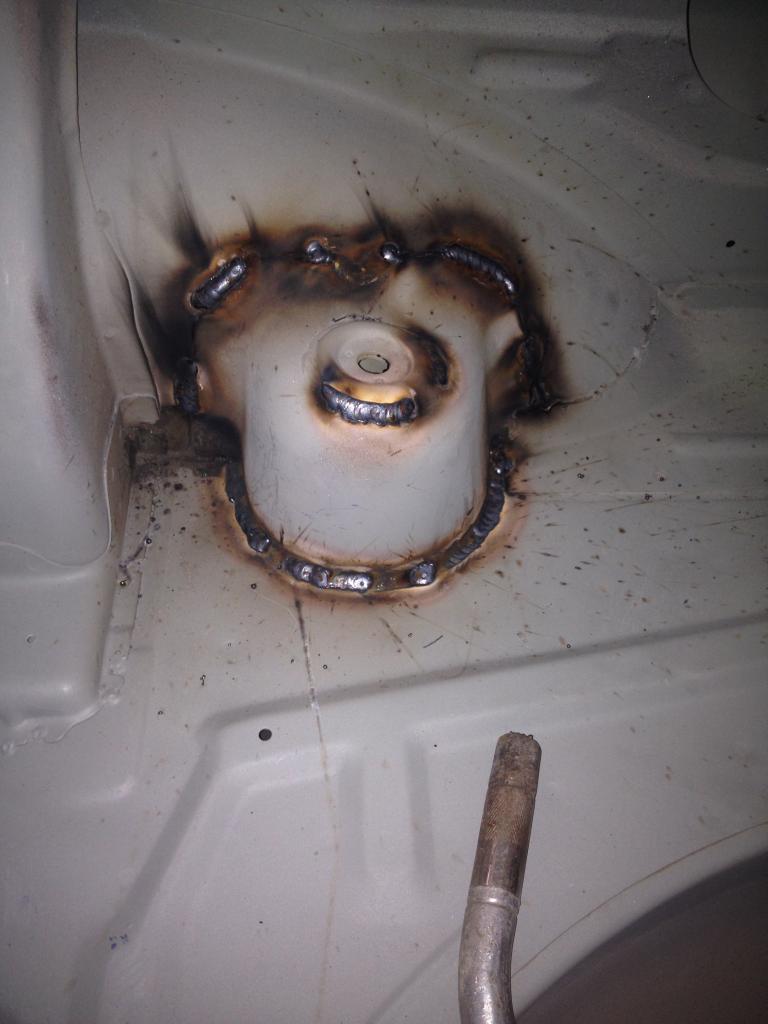
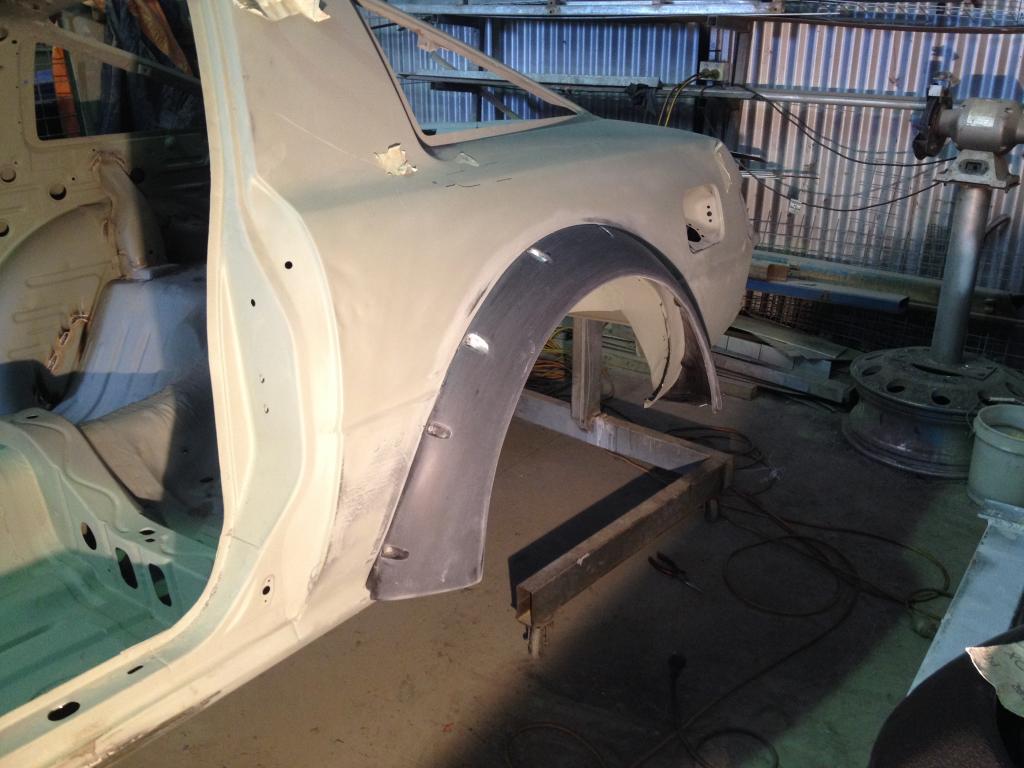
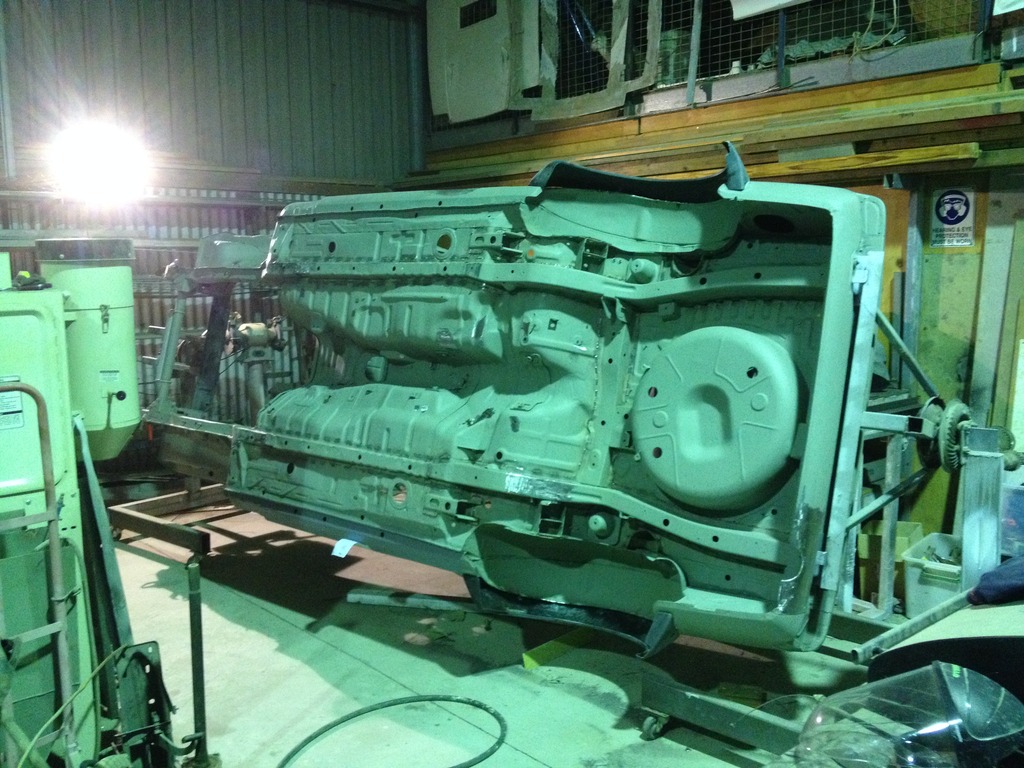
A couple of weeks back i said i planned to have the whole engine bay smoothed and in primer within a couple of hours. Well how wrong could i have been? I would have spent a total of about 15 maybe even 20 hours over 4 days working on the engine and i still only seem to be half way there. The quickest part was welding them holes up, which literally takes 5 minutes, but cutting flat plates or plugs to weld into the holes takes hours to get them cut perfectly to size and then hold them in place. Then i have had the joyous task of grinding the high points of the welds off so any body that looks under the bonnet would never know there was a hole there. Finally once all the grinding is done its onto bogging. Which is very time consuming because you apply it, wait for it to harden, sand it, apply some more, sand it again and repeat until its 100% level. One thing that i found is that the engine, due to the the humps and bumps in the inner guard panels is very difficult to sand with a sanding block and most has to be sanded with your finger tips (very hard to get an even flat surface).
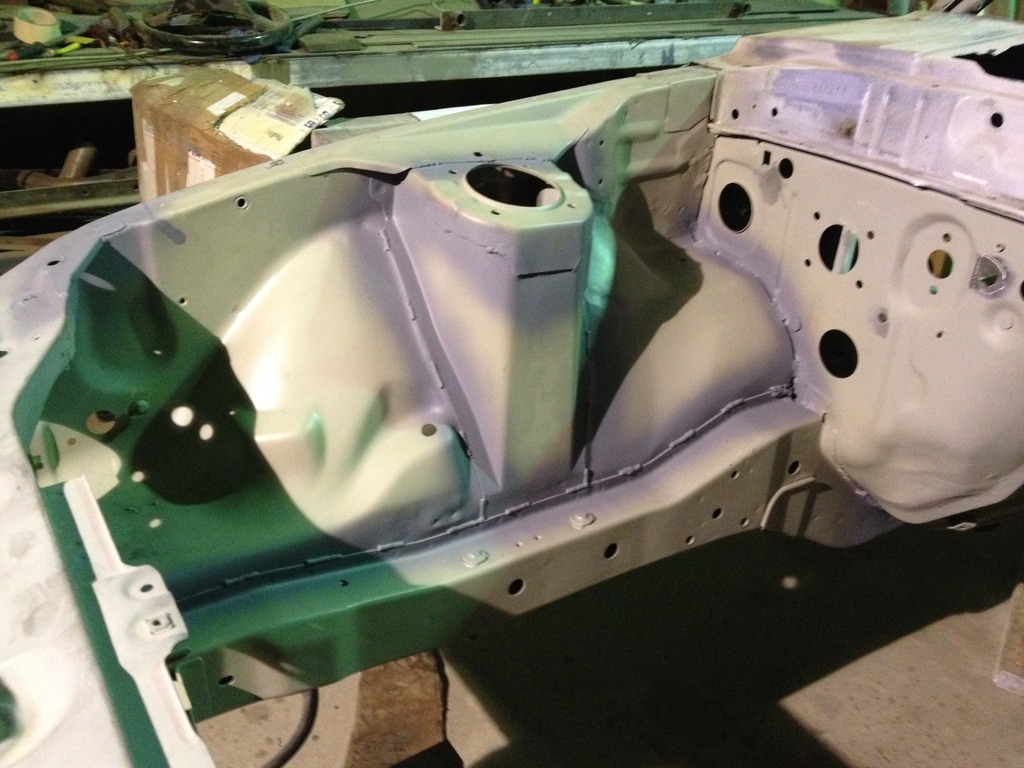
I didnt get any pictures of the passengers side finished but here is a shot of that side when i applied the bog. I made sure i put more then enough on the strut tower so i could sand most of it off.
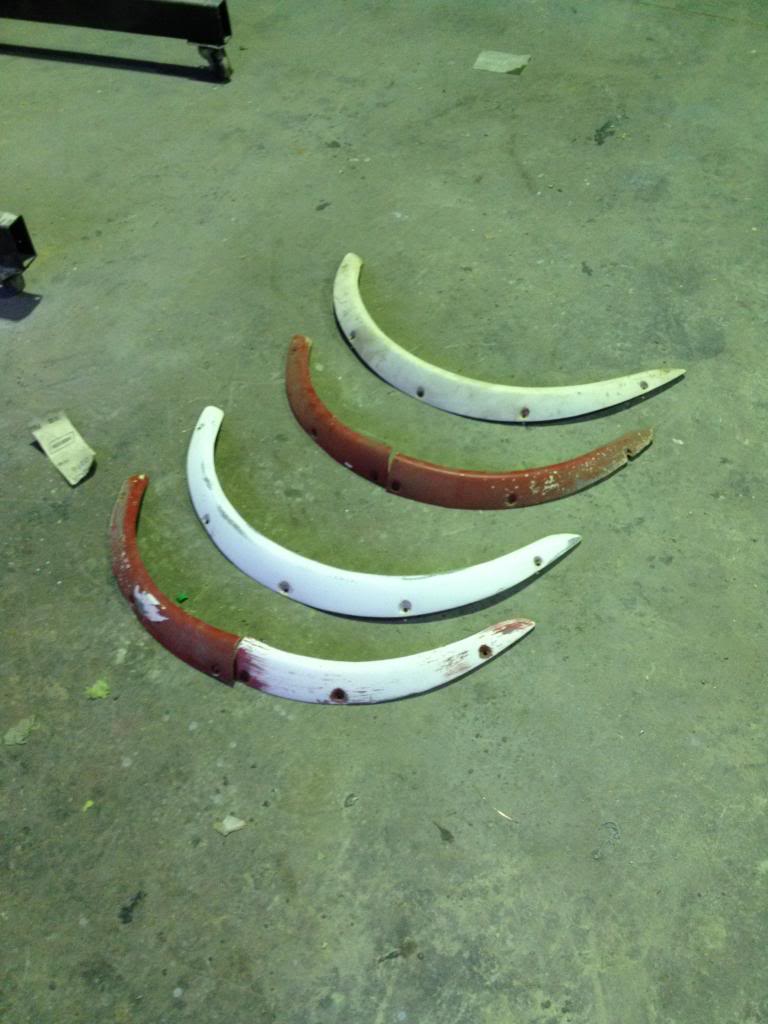
While i was waiting for the bog to dry i got started on the flares off the Rx3. When i pulled them down from up stairs i could see that they had certainly been knocked around in their life time. According to dad they were on a Rx3 rally car before i purchased them in the mid 80s and then they went on his rx3, which was rallied for a few years and then the guards were pulled off and sat in the shed since then. Which makes them at least 30 years old.
The two front guards were in the best shape with just a couple of chips on them but the front half of the rear guards where looking pretty bad and will require a bit of work.
I started with a paint scrapper chipping all the loose paint on top off, and then used some rough sand paper to clean the rest off. It was then down to some fine paper on a sanding black to completely smooth off the surround.
I have to admit they came up better then i expected but they still do need some work.
Here is some before and after pictures
The top white guard hasn't been touched yet and neither has then red guard. The white guard in the middle has been sanded back but not 100% finished and the bottom red guard has had some of the paint removed.
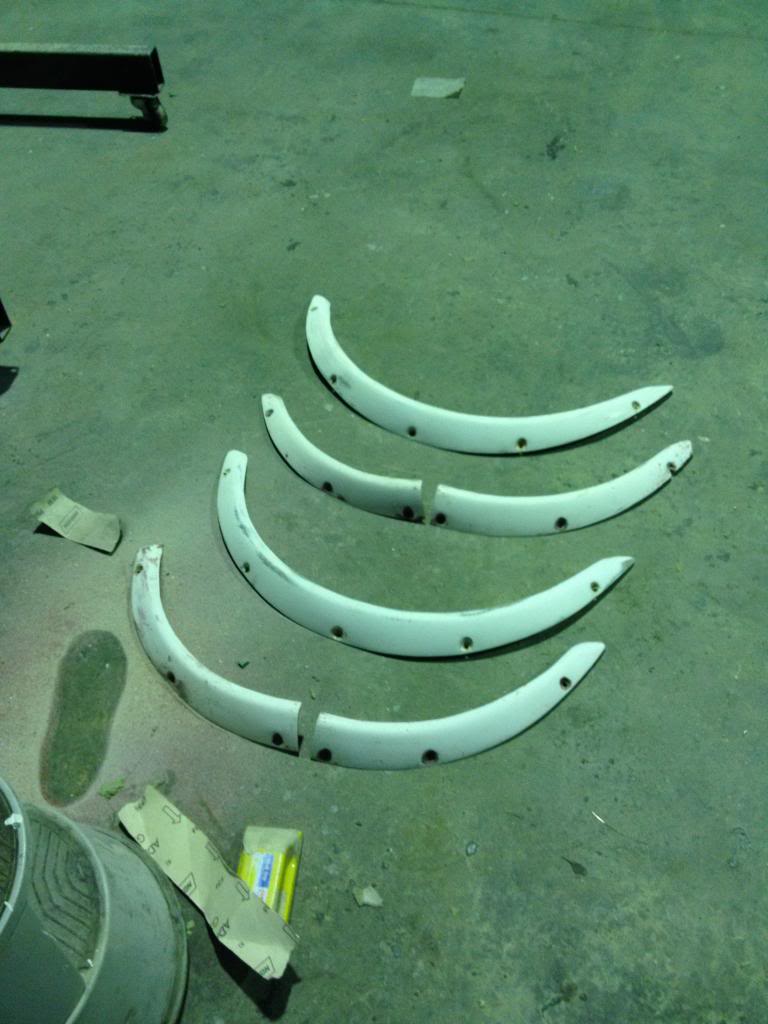
All the paint removed but still needing to be sanded back
All finished off except for in the holes where the bolts go
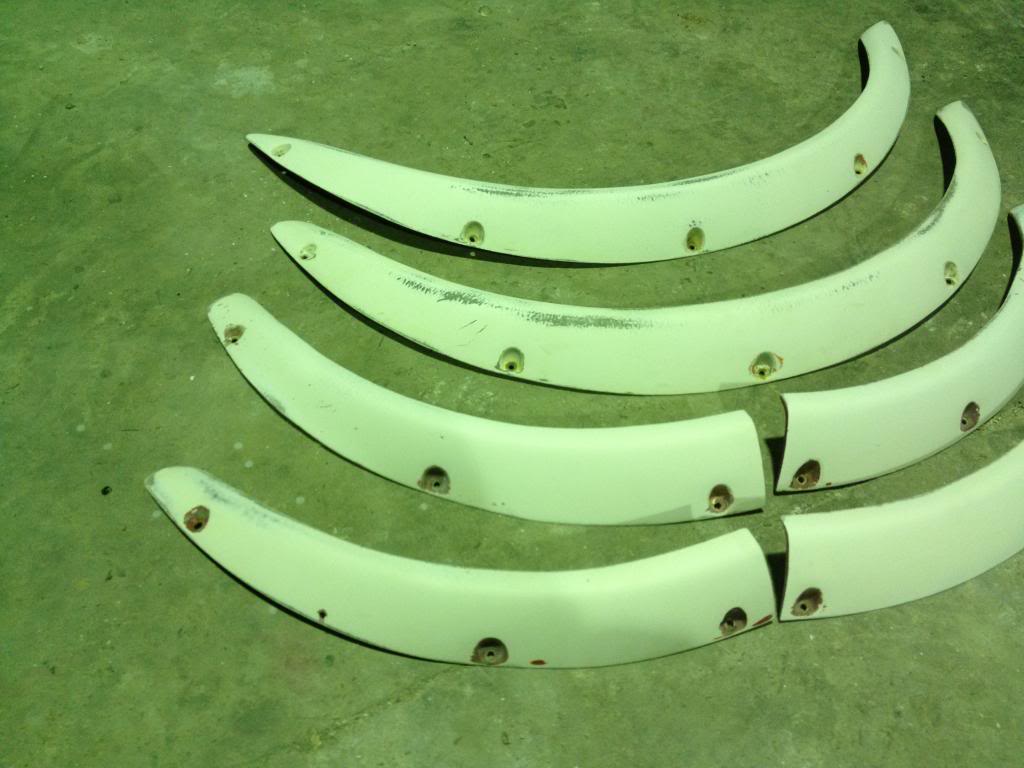
Some of the damages which was caused by the rocks flicking up and hitting the guards. Fibreglass will have to be added to the bottom and bog will be used to fill in the holes

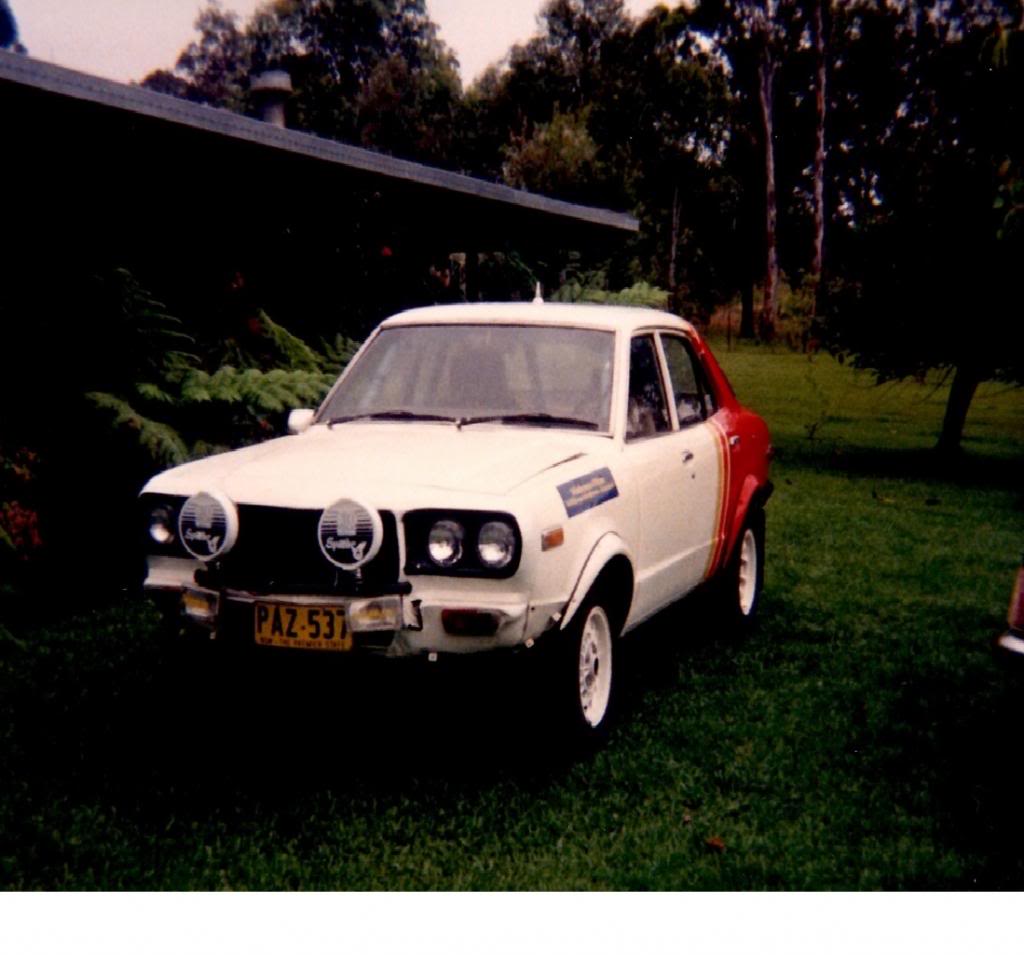
Here is a picture of Dads rally car back just after is was painted out the front of my grandparents house. We still have the rear bumper, the tail lights, the dash, the center console, the mirror, the grill, the right head light surround, the spot lights, the struts, cross member, side markers and the cowl cover below the window. Sadly dad crashed the car in a really muddy rally so it sat in the paddock until one of his mates brought the car, car the roof off it for his rally car which he rolled and took the rest to the scrap. Sad that the car isnt still around but maybe one day i will have a replica of this car.
A couple of weeks back i said i planned to have the whole engine bay smoothed and in primer within a couple of hours. Well how wrong could i have been? I would have spent a total of about 15 maybe even 20 hours over 4 days working on the engine and i still only seem to be half way there. The quickest part was welding them holes up, which literally takes 5 minutes, but cutting flat plates or plugs to weld into the holes takes hours to get them cut perfectly to size and then hold them in place. Then i have had the joyous task of grinding the high points of the welds off so any body that looks under the bonnet would never know there was a hole there. Finally once all the grinding is done its onto bogging. Which is very time consuming because you apply it, wait for it to harden, sand it, apply some more, sand it again and repeat until its 100% level. One thing that i found is that the engine, due to the the humps and bumps in the inner guard panels is very difficult to sand with a sanding block and most has to be sanded with your finger tips (very hard to get an even flat surface).
I didnt get any pictures of the passengers side finished but here is a shot of that side when i applied the bog. I made sure i put more then enough on the strut tower so i could sand most of it off.

While i was waiting for the bog to dry i got started on the flares off the Rx3. When i pulled them down from up stairs i could see that they had certainly been knocked around in their life time. According to dad they were on a Rx3 rally car before i purchased them in the mid 80s and then they went on his rx3, which was rallied for a few years and then the guards were pulled off and sat in the shed since then. Which makes them at least 30 years old.
The two front guards were in the best shape with just a couple of chips on them but the front half of the rear guards where looking pretty bad and will require a bit of work.
I started with a paint scrapper chipping all the loose paint on top off, and then used some rough sand paper to clean the rest off. It was then down to some fine paper on a sanding black to completely smooth off the surround.
I have to admit they came up better then i expected but they still do need some work.
Here is some before and after pictures
The top white guard hasn't been touched yet and neither has then red guard. The white guard in the middle has been sanded back but not 100% finished and the bottom red guard has had some of the paint removed.

All the paint removed but still needing to be sanded back

All finished off except for in the holes where the bolts go

Some of the damages which was caused by the rocks flicking up and hitting the guards. Fibreglass will have to be added to the bottom and bog will be used to fill in the holes

Here is a picture of Dads rally car back just after is was painted out the front of my grandparents house. We still have the rear bumper, the tail lights, the dash, the center console, the mirror, the grill, the right head light surround, the spot lights, the struts, cross member, side markers and the cowl cover below the window. Sadly dad crashed the car in a really muddy rally so it sat in the paddock until one of his mates brought the car, car the roof off it for his rally car which he rolled and took the rest to the scrap. Sad that the car isnt still around but maybe one day i will have a replica of this car.


Thread Starter
Full Member
Joined: Feb 2014
Posts: 50
Likes: 0
From: Australia
Group C front spoiler arrived
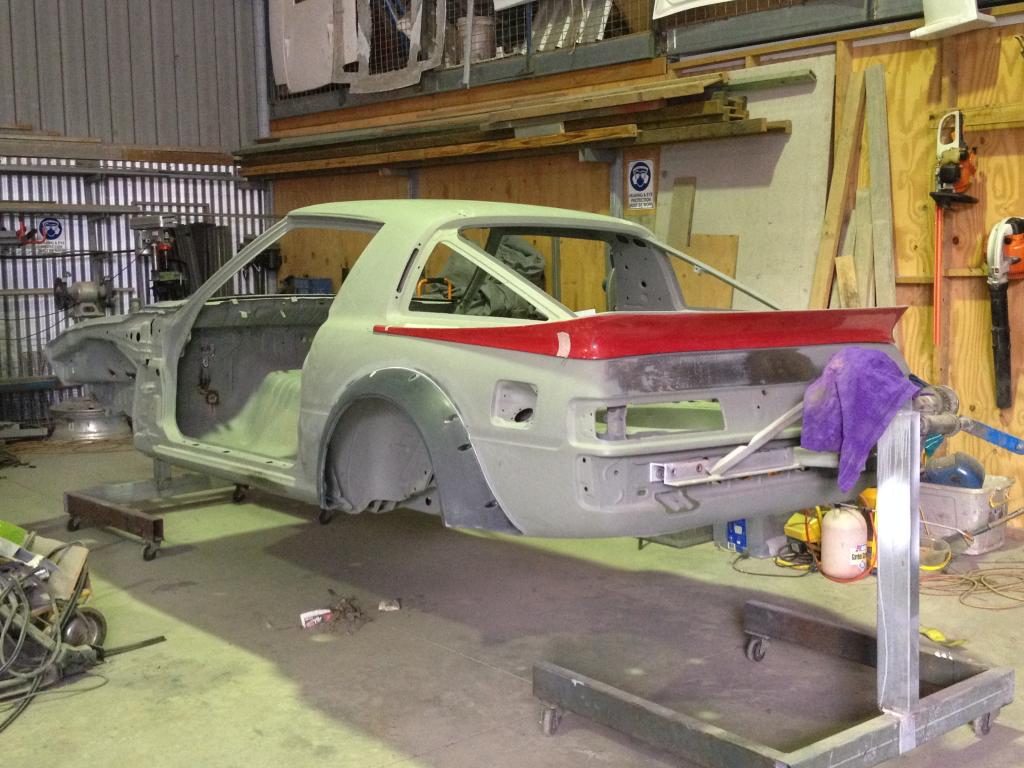
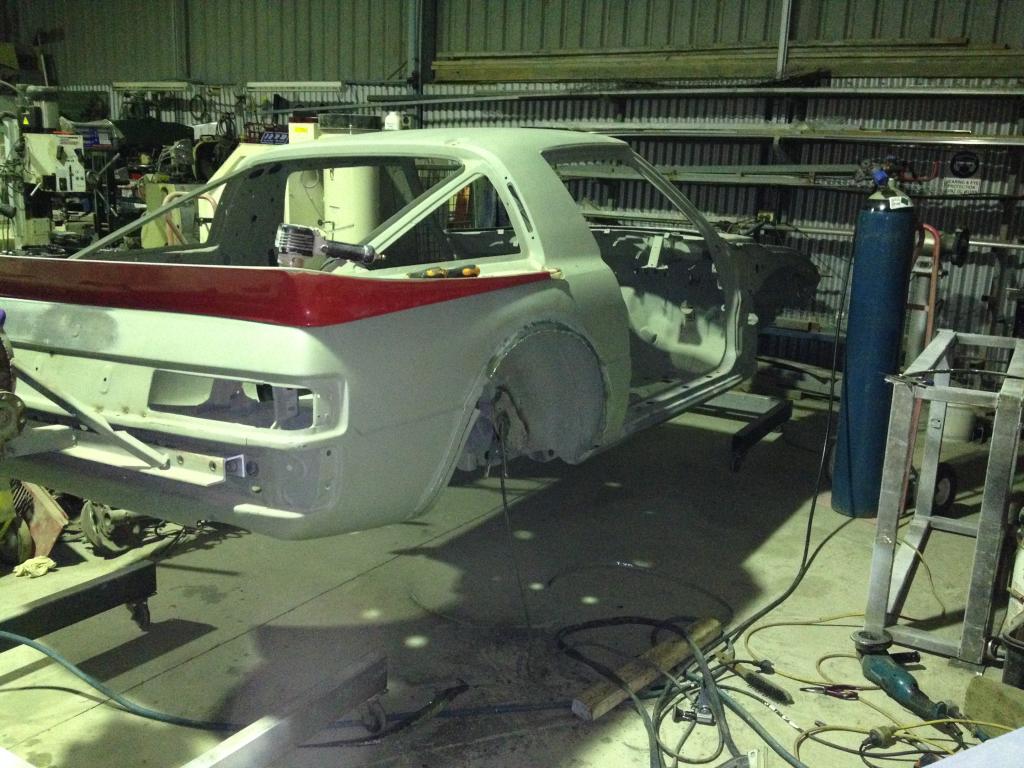
So now im on Easter break from school i have been able to get a couple more days of work done on my Rx7. Mainly it has been sanding, grinding and welding in the engine bay of my car so that all the holes are filled. I did plan to have the engine bay in high fill primer almost a month ago now but that certainly doesnt look like it will happen soon. I just have to keep chipping away at the work until its done.
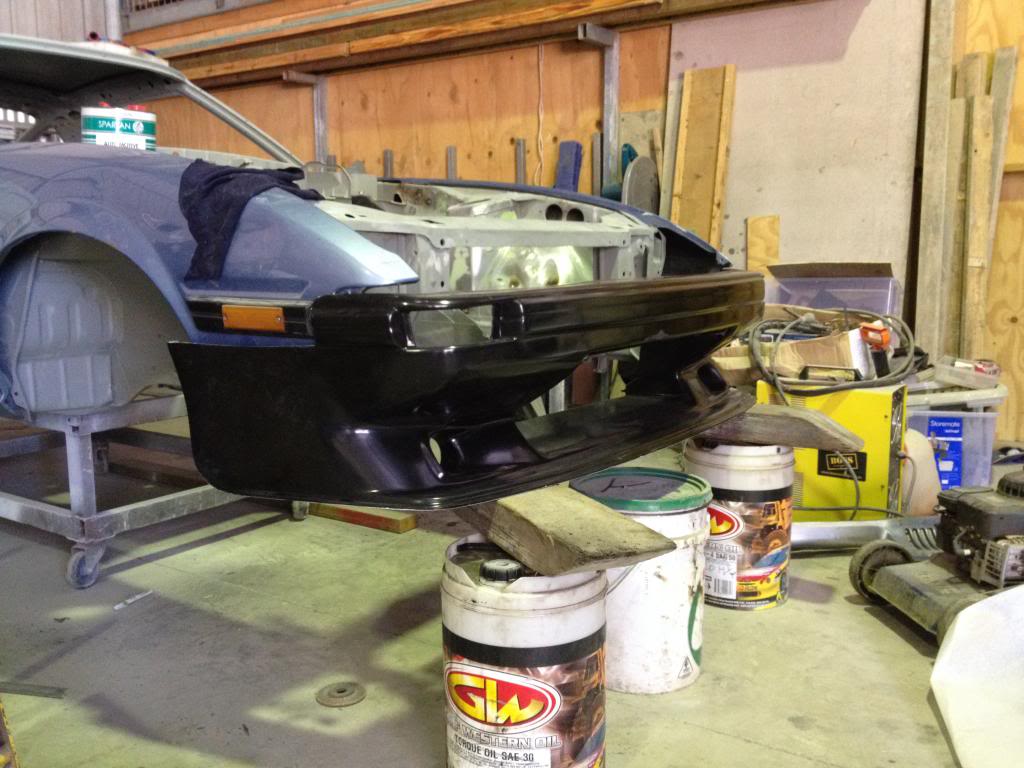
Also a couple of days ago i picked up a Group C front spoiler/lip for the front of my car. So i will be making mounts out of the old steel bumper part and fitting it to the car so i can work out where and how my guards will fit. The overall finish of the bar is very good, and it wasnt that expensive either. Only $400 AUS, but there will be a bit of work to mount it

At the moment im thinking about buying a roll cage and just turning this car into a track only car because i can see thats where it will end up. The splitter, flares and rear lip plus some camber on the front and fixed back seats should give it a fairly big race car feel. which may cause some unwanted attention from the police...
Cheers
Also a couple of days ago i picked up a Group C front spoiler/lip for the front of my car. So i will be making mounts out of the old steel bumper part and fitting it to the car so i can work out where and how my guards will fit. The overall finish of the bar is very good, and it wasnt that expensive either. Only $400 AUS, but there will be a bit of work to mount it


At the moment im thinking about buying a roll cage and just turning this car into a track only car because i can see thats where it will end up. The splitter, flares and rear lip plus some camber on the front and fixed back seats should give it a fairly big race car feel. which may cause some unwanted attention from the police...
Cheers
Thread Starter
Full Member
Joined: Feb 2014
Posts: 50
Likes: 0
From: Australia
Hey everybody,
The work on the Mazda has been all but stopped since i got the front lip from Sydney. I would love to spend more time on the car but due to my HSC at school i am unable to work on it as there is very little free time.
However a couple of weeks ago i did spend the weekend away at a rally sprint a few hours north of me.
Of the 28 cars that started only 24 finished and i finished 22nd so i would say that it was a pretty successful weekend being only the second time i have driven the car or been in a rally.
On the first run there was a couple of big offs which caused a delay of 40 minutes and forced the cancellation of the 3rd run due to time constrains. When i did actually start the first stage it was like driving on ice. The road was covered in marble size rocks and stone and was very hard packed underneath so i just slid every where in search of traction.
The second run the roads were swept and i has so much more fun. i could slide the car more and i knew that it wasnt going to bite or get loose. on that run i improved 11 seconds on my first run over the 8km.
Then there was a change of direction and things when down hill from there. The roads turned to powder and bull dust which was up to 100mm thick in some sections. It was impossible to keep the car on the road and drive fast at the same time. So i took it steady and brought the car home without a mark and as a finisher
That was the last event for the year and possibly until i finish university in 5 years.
This photo was taken on the second run at the hairpin. As you can see, the road was already starting to break up pretty bad but i still managed to get around the corner in a smooth motion.
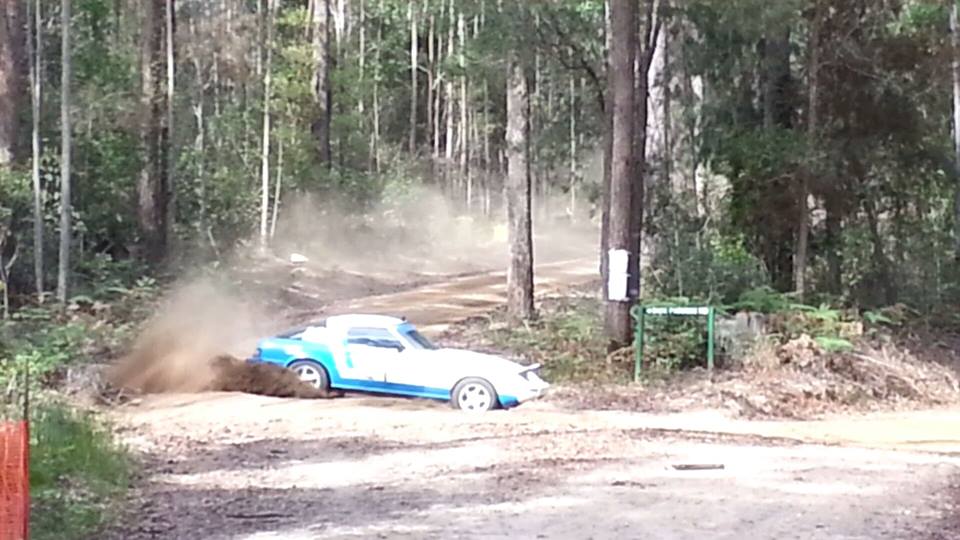
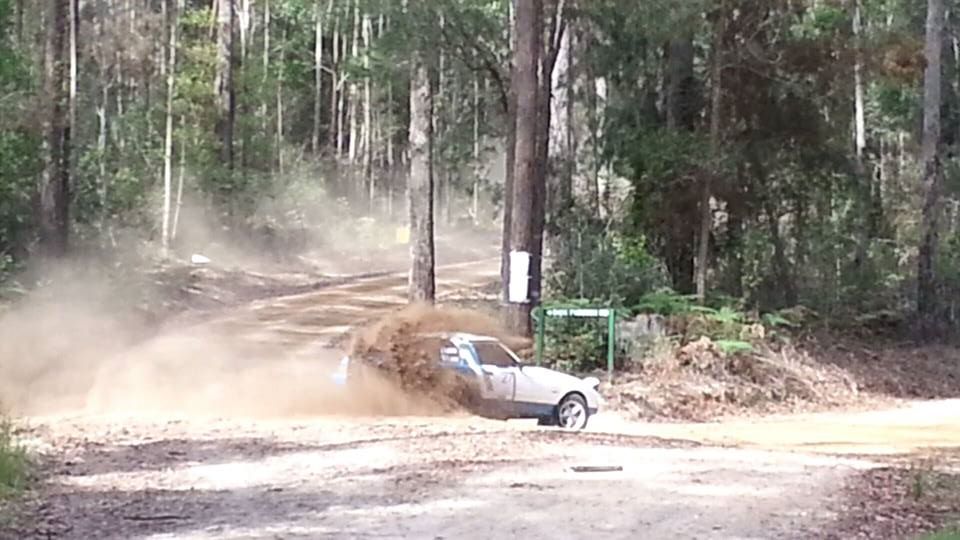
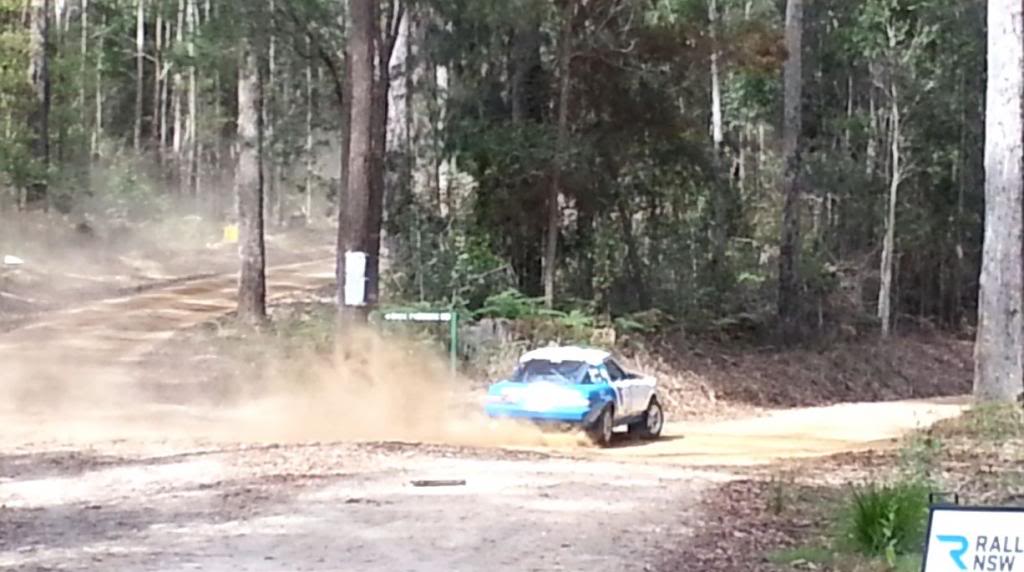
Sorry for the low quality shots.
The work on the Mazda has been all but stopped since i got the front lip from Sydney. I would love to spend more time on the car but due to my HSC at school i am unable to work on it as there is very little free time.
However a couple of weeks ago i did spend the weekend away at a rally sprint a few hours north of me.
Of the 28 cars that started only 24 finished and i finished 22nd so i would say that it was a pretty successful weekend being only the second time i have driven the car or been in a rally.
On the first run there was a couple of big offs which caused a delay of 40 minutes and forced the cancellation of the 3rd run due to time constrains. When i did actually start the first stage it was like driving on ice. The road was covered in marble size rocks and stone and was very hard packed underneath so i just slid every where in search of traction.
The second run the roads were swept and i has so much more fun. i could slide the car more and i knew that it wasnt going to bite or get loose. on that run i improved 11 seconds on my first run over the 8km.
Then there was a change of direction and things when down hill from there. The roads turned to powder and bull dust which was up to 100mm thick in some sections. It was impossible to keep the car on the road and drive fast at the same time. So i took it steady and brought the car home without a mark and as a finisher
That was the last event for the year and possibly until i finish university in 5 years.
This photo was taken on the second run at the hairpin. As you can see, the road was already starting to break up pretty bad but i still managed to get around the corner in a smooth motion.


Sorry for the low quality shots.
Thread Starter
Full Member
Joined: Feb 2014
Posts: 50
Likes: 0
From: Australia
Build up date 17/06/2014
So its been exactly 2 months sadly since the last update. With my final exams looming closer and closer, the times between visits to the shed to work on the Mazda are getting further and further apart.
However over the weekend i did manage to squeeze in a few hours on the old girl.
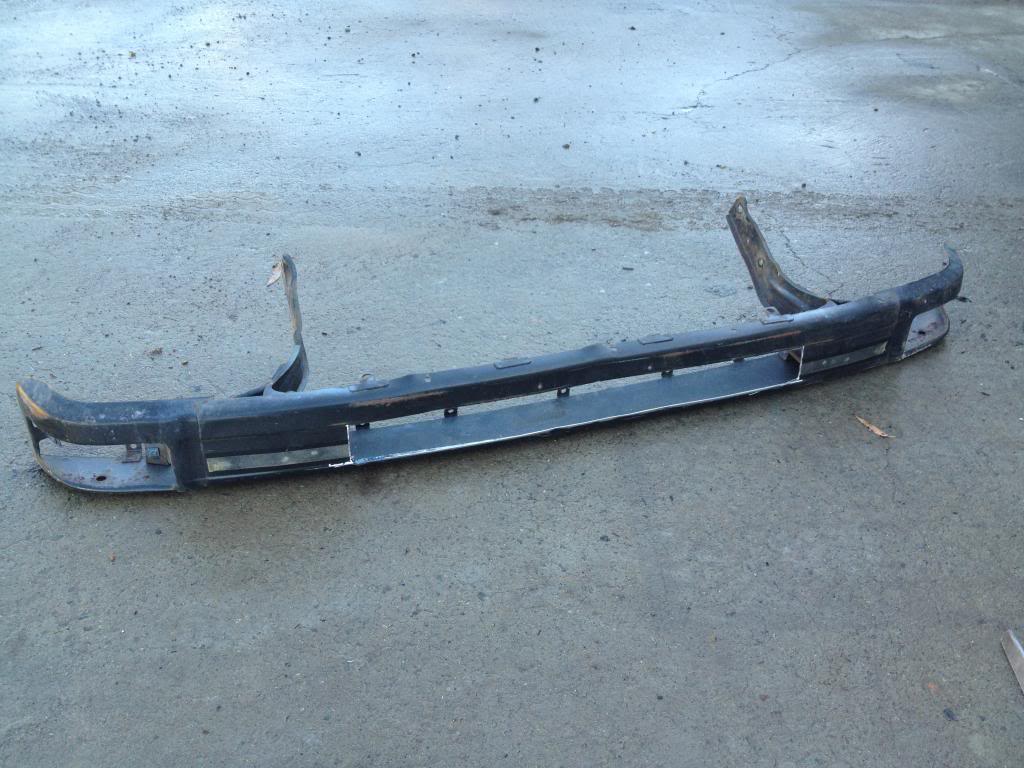
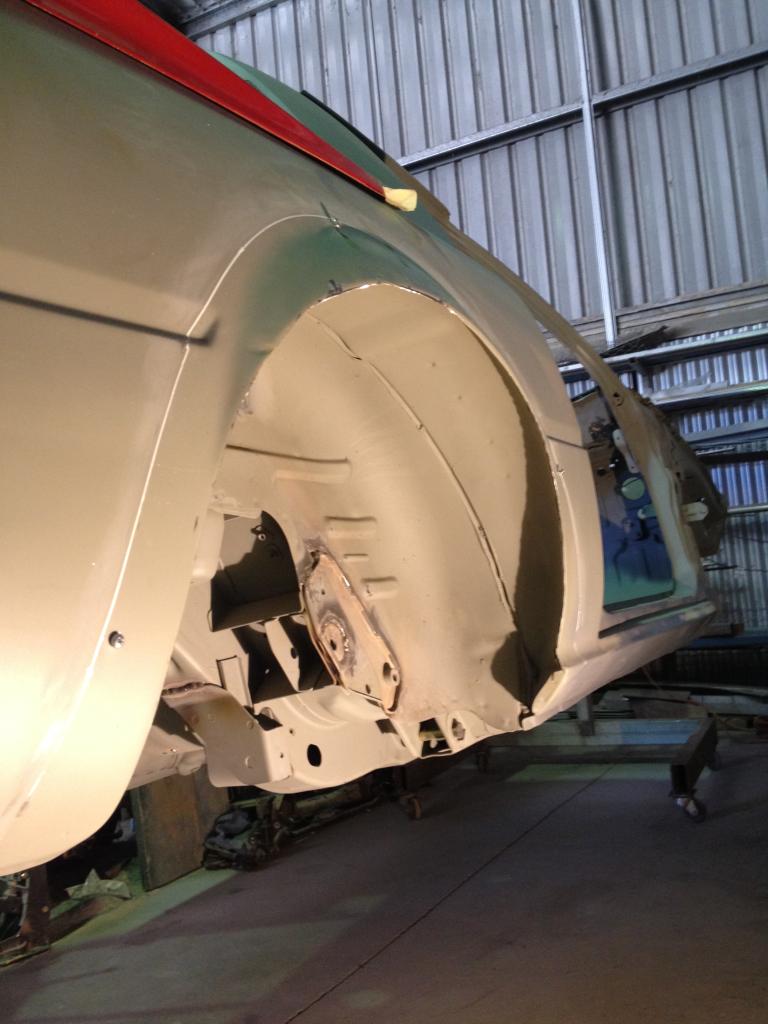
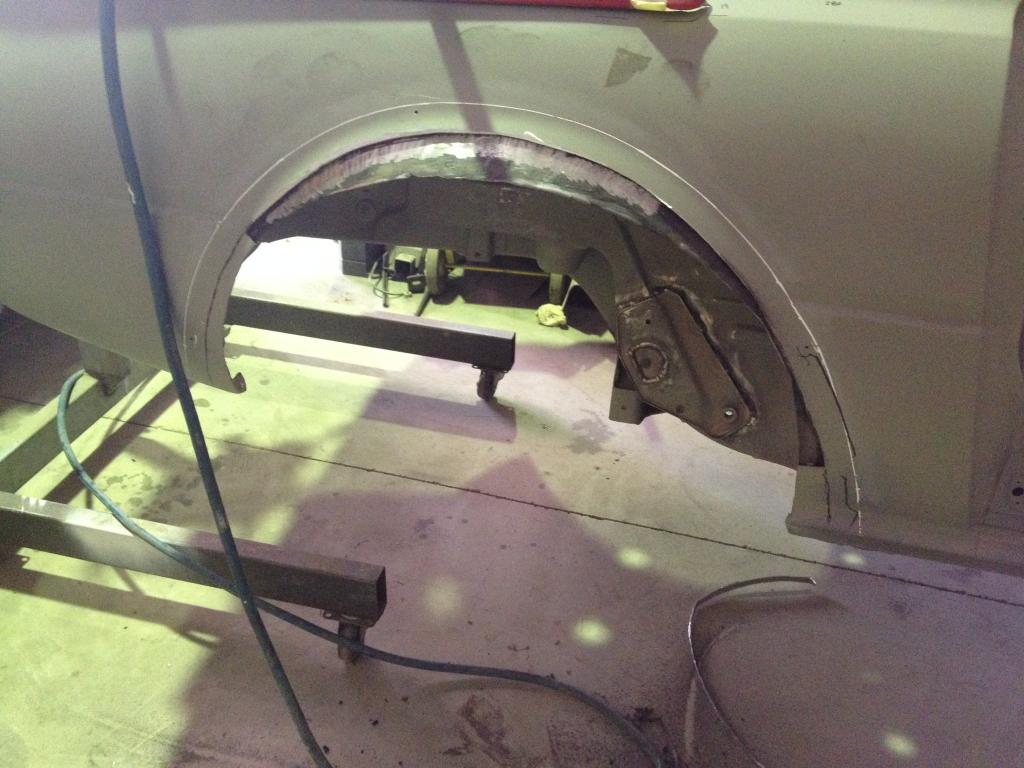
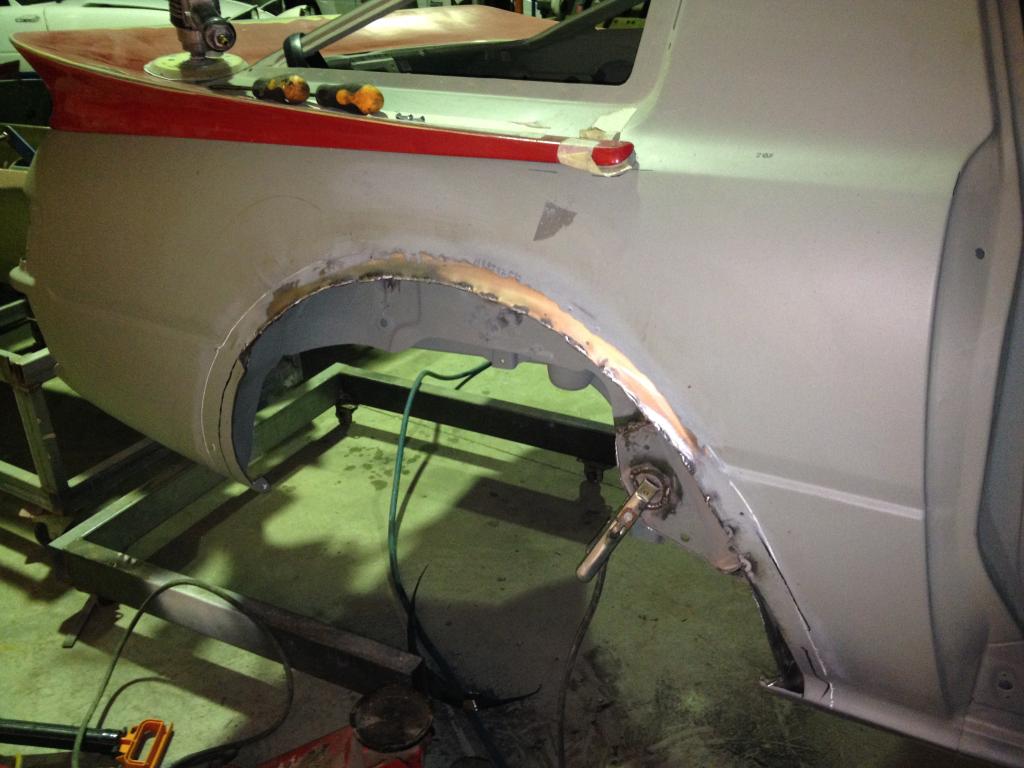
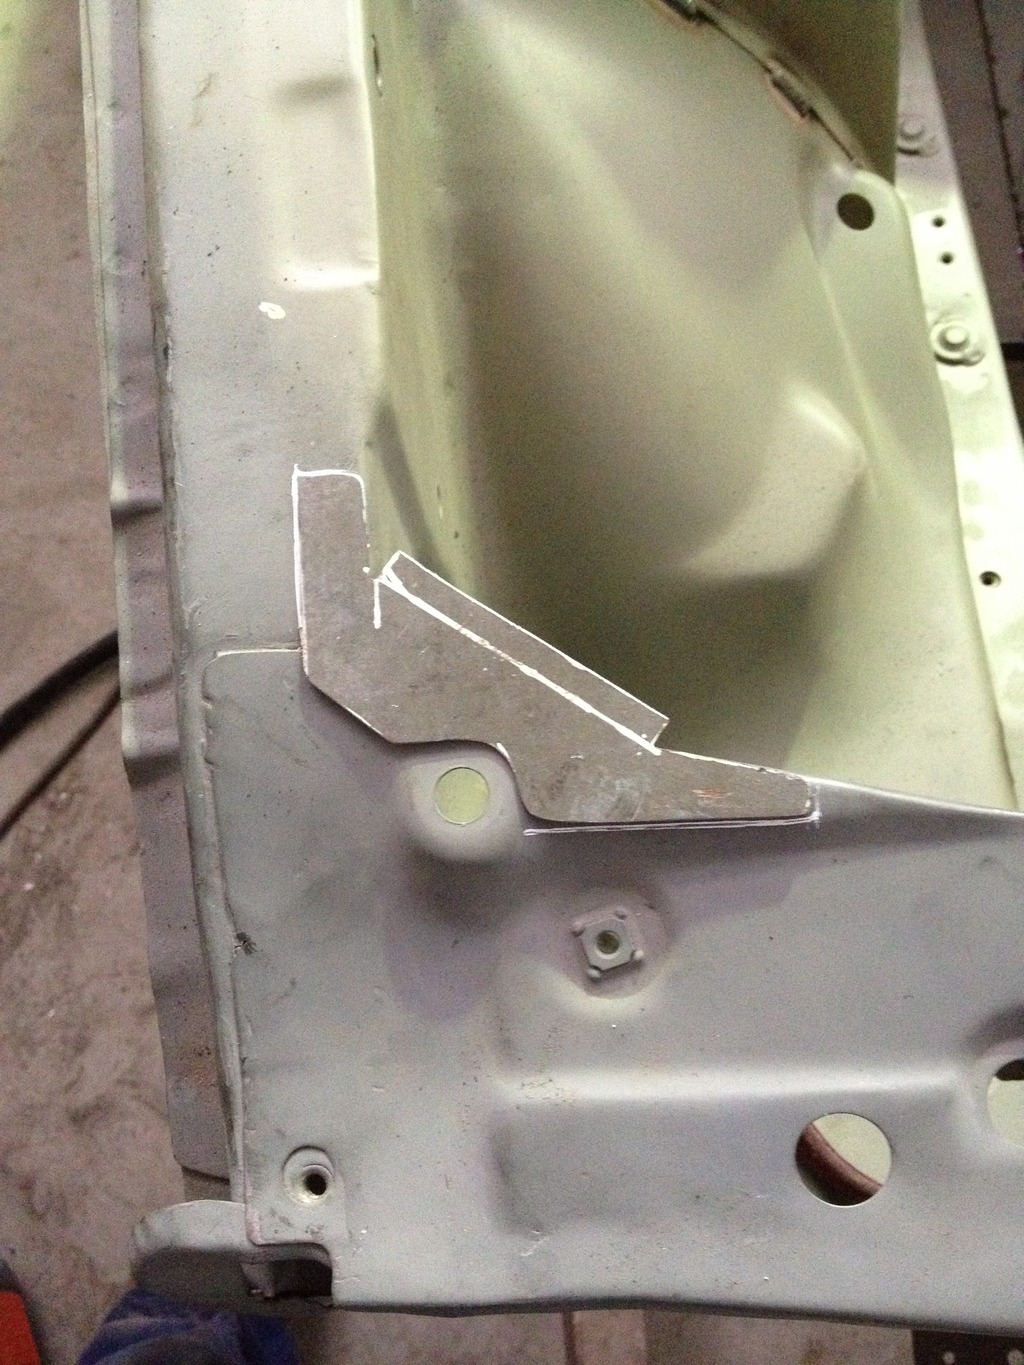
The first thing i did was cut the ends off the front lip so it could be sat on the car properly without them forcing the lip in another direction. Then i started planning to cut up the steel factory bumper to save a bit of weight (all of about 500 grams at best). I had to leave both the top and bottom sections on the bar right the way across as well as a small section that was bent up to help prevent/ limit the twisting motion in the steel piece. I also had to leave the ends as i wanted to use the factory mounting system and i needed the steel brackets to mount the blinkers/ parkers. As shown in the picture, i cut out the section outlined by the white line on the bumper. I could have cut more away, but it really doesnt save me that much weight and its a street car not a race car anyway.
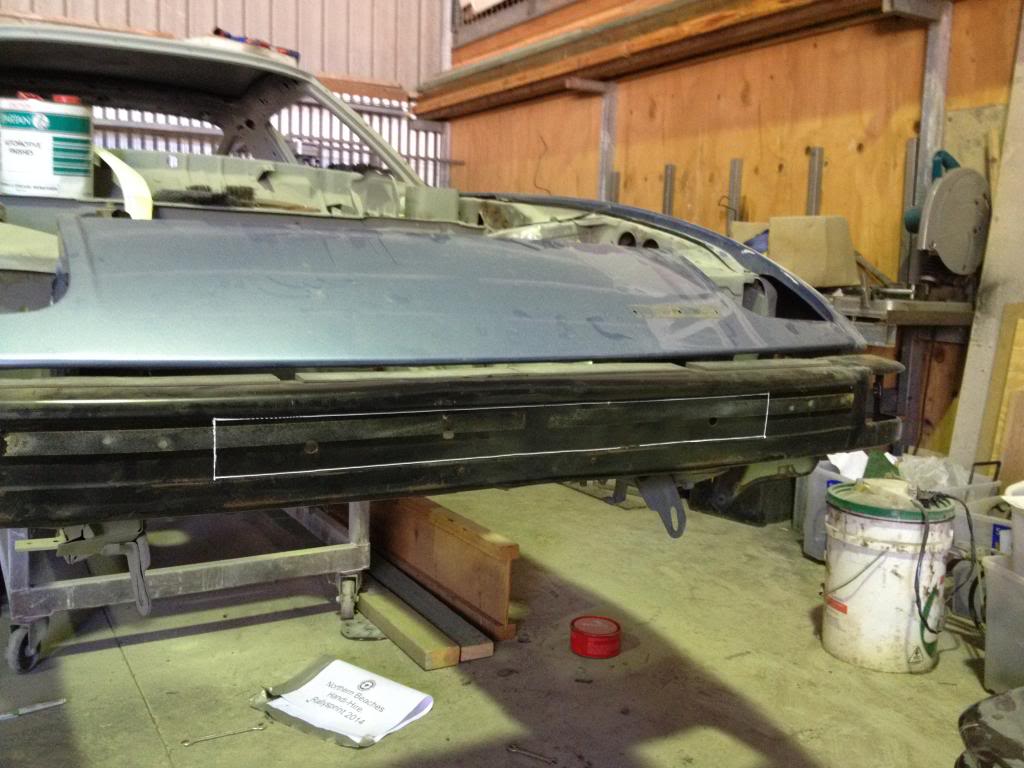
Once it was cut out it was just a matter of filing all the burred edges up and i then sandblasted the whole bumper. I only did this because there was surface rust founding on the edges where the plastic bumper previously ran. This was important for my to do now because once the fiberglass lip is fiberglassed to the steel bumper, i will not be able to get rust kill or any other form of paint in there.
You can also see in the picture that the bumper has been involved in a small hit, so that was hammered and dollyed out and back into shape. The steel bumper isnt in perfect shape, but you will never see it and i felt i would be wasting time on parts that will have no overall impact on the final product.
This is the bumper hanging after it has been painted in a thick rust kill primer. This stuff works great on raw metal and will protect it for years. I had to sandblast the bumper to remove all the rust, but this stuff will prevent anything that i have missed from spreading. (BTW that is a Group B rx7 forming in the back ground!! Getting closer)
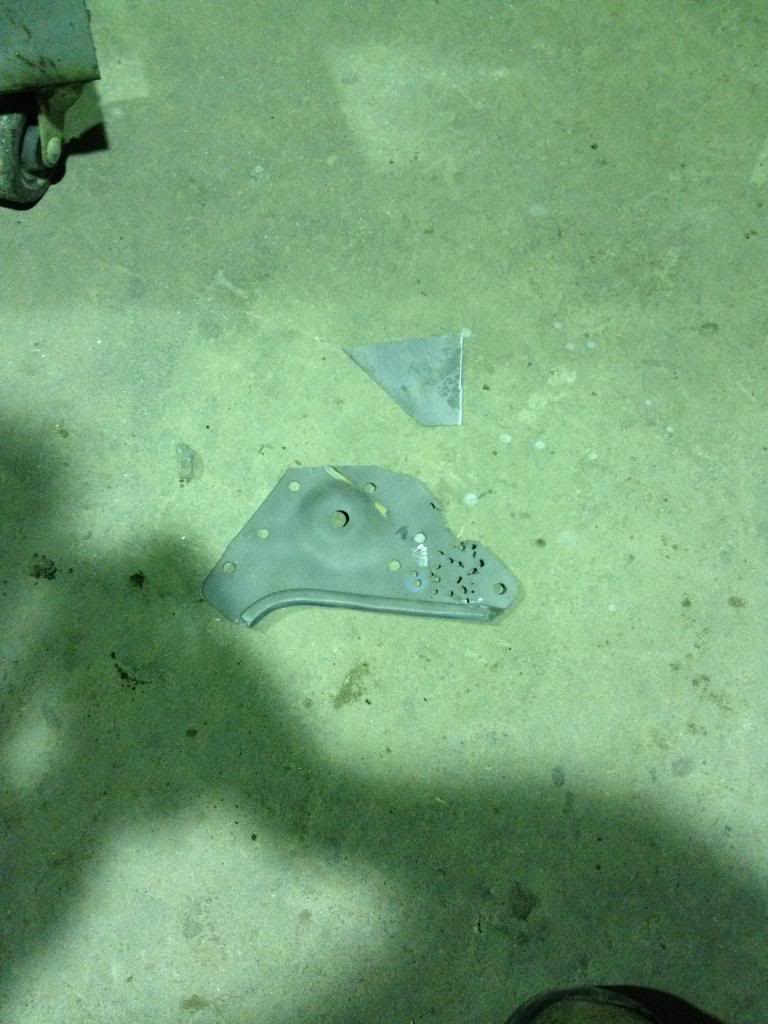
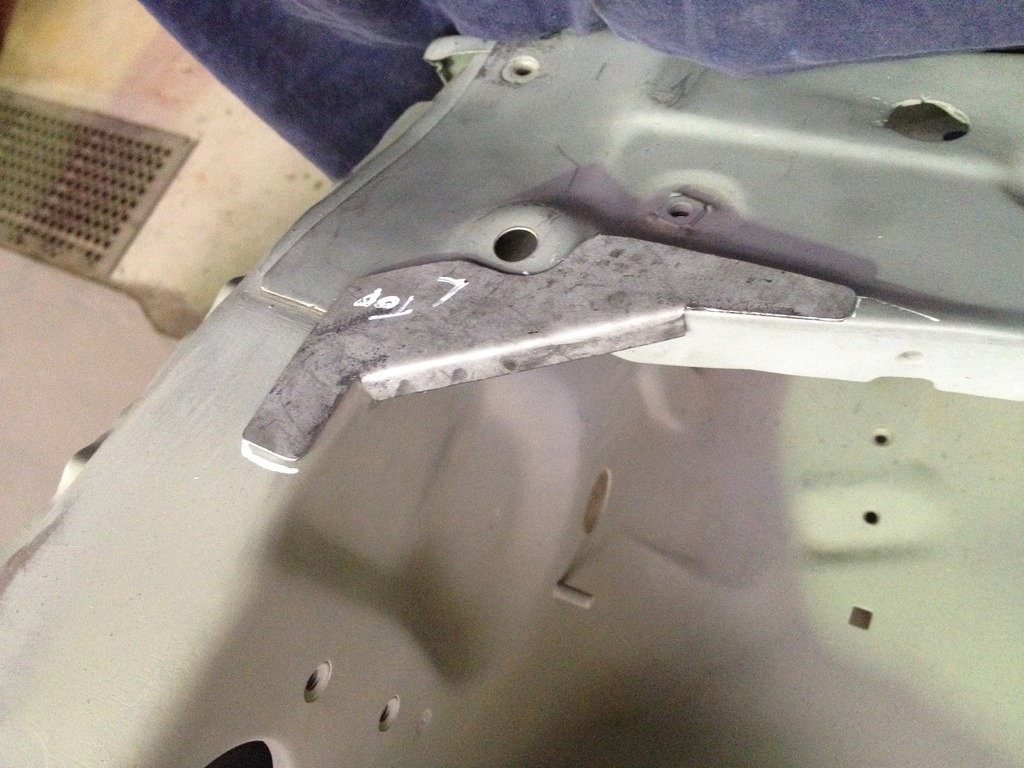
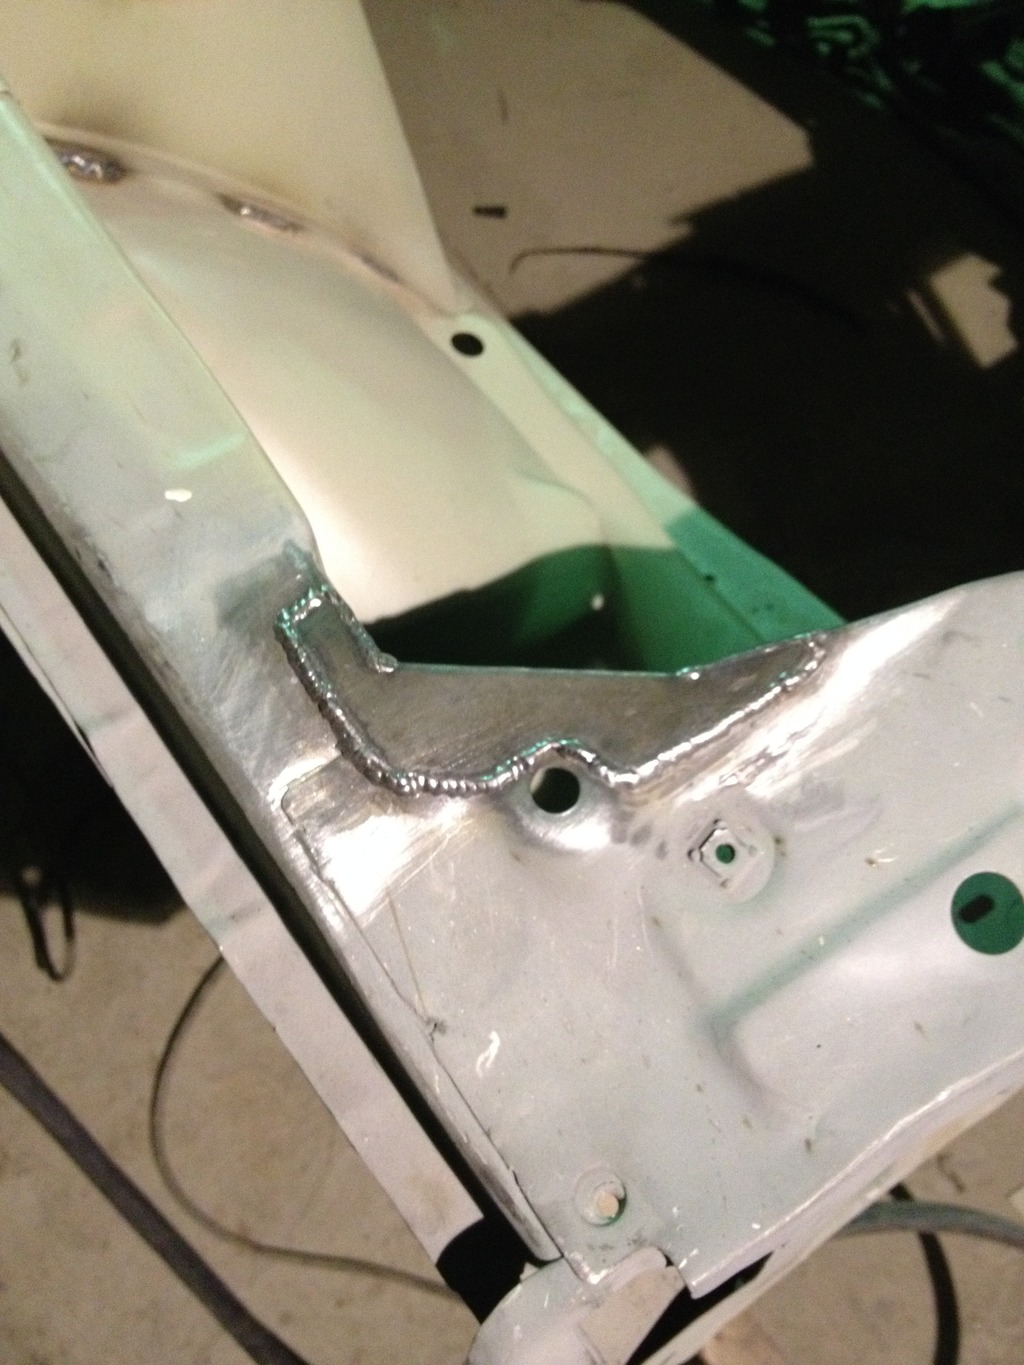
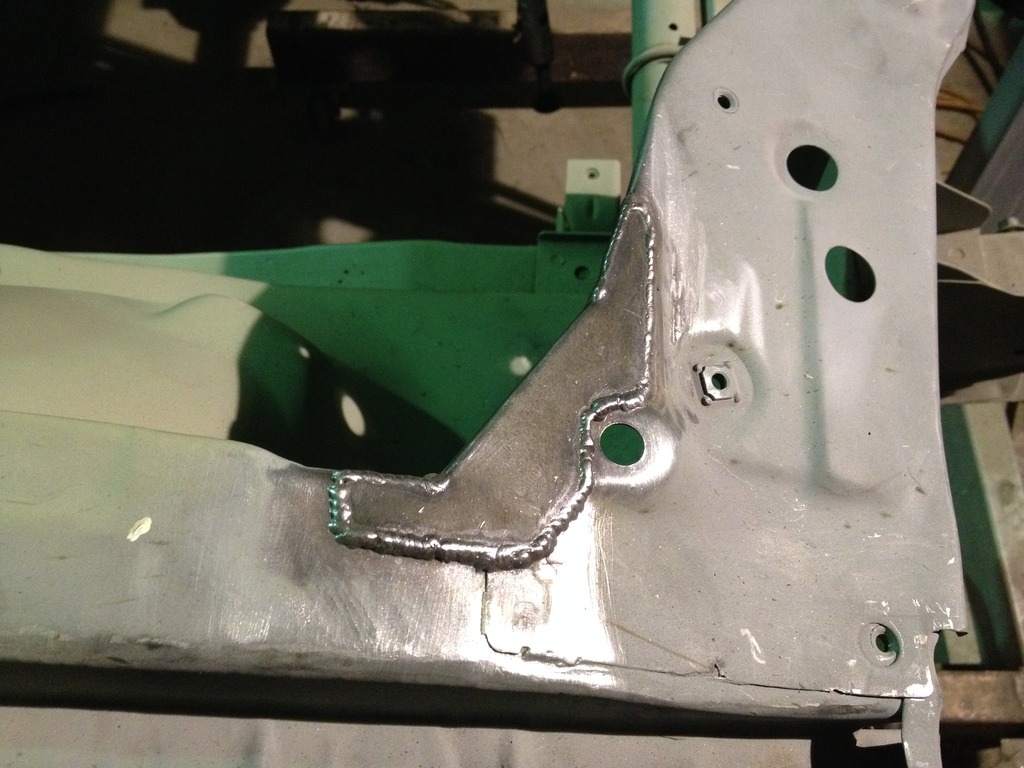
After that there wasnt much that i could do on the bumper until the primer dried so i started doing some rust repairs on the corner gussets of the engine bay. This one is off another car that we got for free. I thought when i drilled them off that they just had surface rust on them but once i flipped it over it was much worse than i thought. (Just to point out the ones that were on my car were completely stuffed, that's why it made sense to repair these rather then make new ones from scratch) I had taken these off some time ago and sandblasted them, but when i saw all the holes appear i was a bit put off fixing them. But with nothing to do and limited time to get this car finished i just went and got stuck into it.
The original sandblasted piece with the new piece ready to be welded in.
The new piece half welded in. Half of it you wont see but i still wanted it to look decent
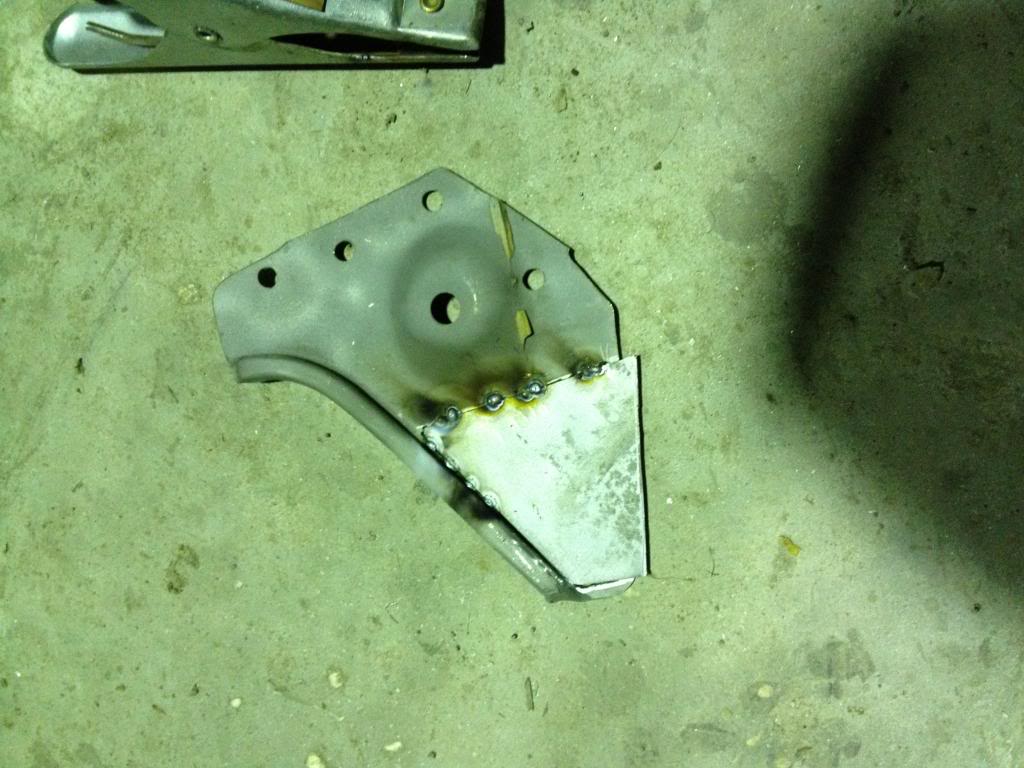
And finally finished welding it in
The whole process from cutting the material, to cutting it out, welding and grinding only took 30 minutes at most.
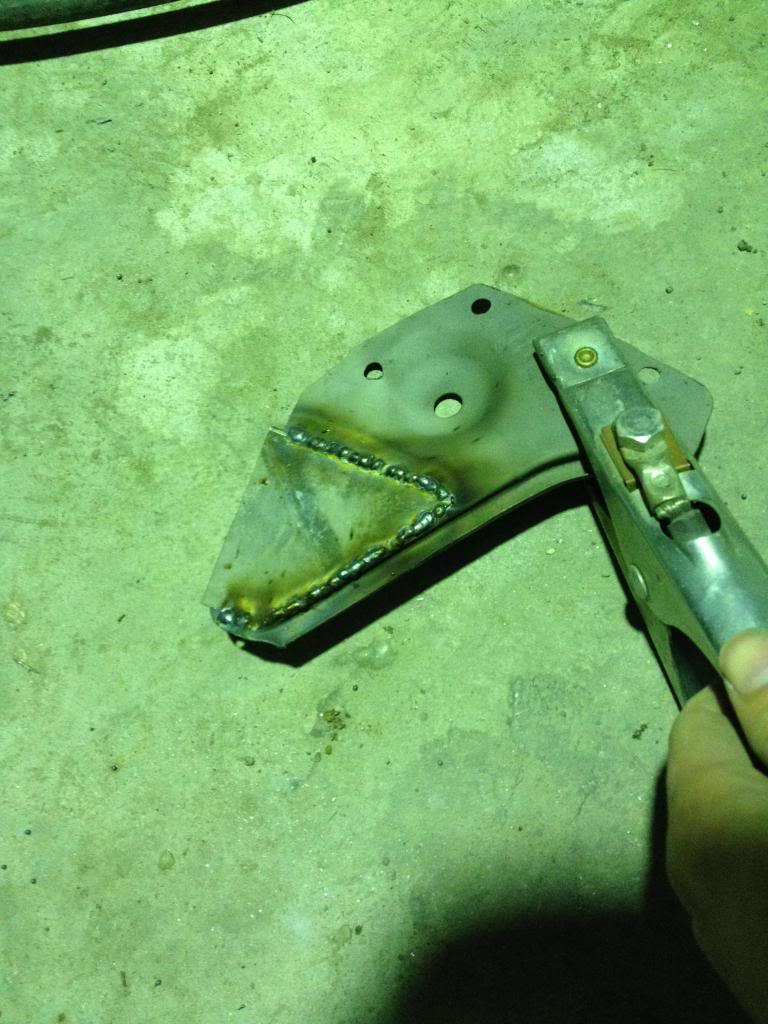
After i finished welding i ground the welds back so that its flat and smooth, which leaves me a job of drilling some holes in it for the new spot welds to go, I also have to trim up the side to make it one smooth line.
Hopefully i can find some more down time and get back to working on it. But if not i will just have to keep doing what i can when i can.
Oh and one other project that i have been working on is some adjustable strut tops. I have all the tools at home (both lathe and mill) which are capable of making these parts. I know most people will say just go buy some off the shelf, but where is the fun and hard work in that?? haha
Cheers guys, Josh
However over the weekend i did manage to squeeze in a few hours on the old girl.
The first thing i did was cut the ends off the front lip so it could be sat on the car properly without them forcing the lip in another direction. Then i started planning to cut up the steel factory bumper to save a bit of weight (all of about 500 grams at best). I had to leave both the top and bottom sections on the bar right the way across as well as a small section that was bent up to help prevent/ limit the twisting motion in the steel piece. I also had to leave the ends as i wanted to use the factory mounting system and i needed the steel brackets to mount the blinkers/ parkers. As shown in the picture, i cut out the section outlined by the white line on the bumper. I could have cut more away, but it really doesnt save me that much weight and its a street car not a race car anyway.

Once it was cut out it was just a matter of filing all the burred edges up and i then sandblasted the whole bumper. I only did this because there was surface rust founding on the edges where the plastic bumper previously ran. This was important for my to do now because once the fiberglass lip is fiberglassed to the steel bumper, i will not be able to get rust kill or any other form of paint in there.
You can also see in the picture that the bumper has been involved in a small hit, so that was hammered and dollyed out and back into shape. The steel bumper isnt in perfect shape, but you will never see it and i felt i would be wasting time on parts that will have no overall impact on the final product.

This is the bumper hanging after it has been painted in a thick rust kill primer. This stuff works great on raw metal and will protect it for years. I had to sandblast the bumper to remove all the rust, but this stuff will prevent anything that i have missed from spreading. (BTW that is a Group B rx7 forming in the back ground!! Getting closer)

After that there wasnt much that i could do on the bumper until the primer dried so i started doing some rust repairs on the corner gussets of the engine bay. This one is off another car that we got for free. I thought when i drilled them off that they just had surface rust on them but once i flipped it over it was much worse than i thought. (Just to point out the ones that were on my car were completely stuffed, that's why it made sense to repair these rather then make new ones from scratch) I had taken these off some time ago and sandblasted them, but when i saw all the holes appear i was a bit put off fixing them. But with nothing to do and limited time to get this car finished i just went and got stuck into it.
The original sandblasted piece with the new piece ready to be welded in.

The new piece half welded in. Half of it you wont see but i still wanted it to look decent

And finally finished welding it in

The whole process from cutting the material, to cutting it out, welding and grinding only took 30 minutes at most.
After i finished welding i ground the welds back so that its flat and smooth, which leaves me a job of drilling some holes in it for the new spot welds to go, I also have to trim up the side to make it one smooth line.
Hopefully i can find some more down time and get back to working on it. But if not i will just have to keep doing what i can when i can.
Oh and one other project that i have been working on is some adjustable strut tops. I have all the tools at home (both lathe and mill) which are capable of making these parts. I know most people will say just go buy some off the shelf, but where is the fun and hard work in that?? haha
Cheers guys, Josh


Thread Starter
Full Member
Joined: Feb 2014
Posts: 50
Likes: 0
From: Australia
Thanks mate, it is sad and disappointing that it has taken 3 years to get the car to the stage it is at now, but hopefully when i do finish the car i will be glad that i didnt rush and cut corners which means the car will be a pleasure to drive and take to shows (that is if i finish the car before i get so old i can't drive it).
Thread Starter
Full Member
Joined: Feb 2014
Posts: 50
Likes: 0
From: Australia
Front Lip Update
Hey everybody,
The car is starting to be pieced back together very slowly. Over Friday night and during some spare time on the weekend i managed to get the front fibreglass lip fixed to the car. I mounted up the steel bumper first and got to even on both sides of the car, so it was level with the guards and the nose cone. I then pushed the fibreglass lip on so again it was even on both sides. It was then just a matter of clamping it down and remeasuring and then remeasuring again it get it in the center of the car. once it was on the steel i then drilled two small holes in the bar into the bumper and used two self tappers to hold the bar in place. These will come out and be bogged over as i dont want to see them in the finished product. I then mixed up some resin and laid carbon fibre matting behind the fibreglass to hold it to the steel.


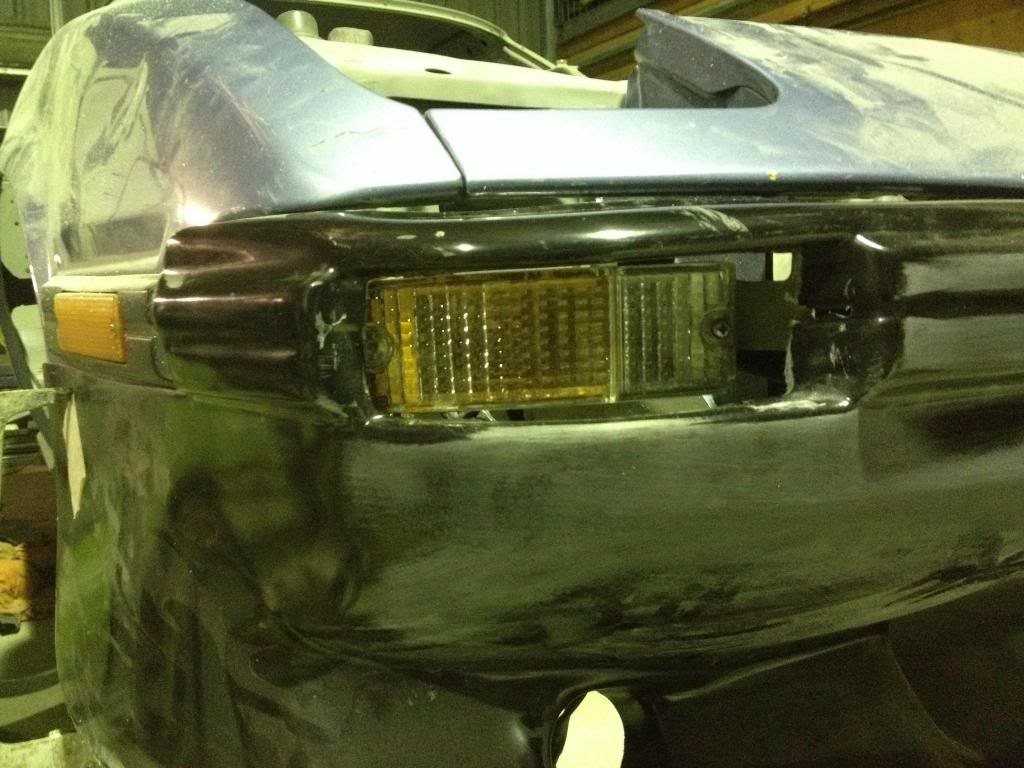
I also mounted the blinkers/park lights to the steel bumper. But this required me to cut the overhanging fibreglass away. I will now have to fibreglass straight back to the lights to make it look factory.
You can also see in the picture that the bar dips down under the headlights on both sides. I will have to reglass this part to make it smooth right the way across. Slowly but surely its coming together.
Cheers
The car is starting to be pieced back together very slowly. Over Friday night and during some spare time on the weekend i managed to get the front fibreglass lip fixed to the car. I mounted up the steel bumper first and got to even on both sides of the car, so it was level with the guards and the nose cone. I then pushed the fibreglass lip on so again it was even on both sides. It was then just a matter of clamping it down and remeasuring and then remeasuring again it get it in the center of the car. once it was on the steel i then drilled two small holes in the bar into the bumper and used two self tappers to hold the bar in place. These will come out and be bogged over as i dont want to see them in the finished product. I then mixed up some resin and laid carbon fibre matting behind the fibreglass to hold it to the steel.


I also mounted the blinkers/park lights to the steel bumper. But this required me to cut the overhanging fibreglass away. I will now have to fibreglass straight back to the lights to make it look factory.
You can also see in the picture that the bar dips down under the headlights on both sides. I will have to reglass this part to make it smooth right the way across. Slowly but surely its coming together.

Cheers
Thread Starter
Full Member
Joined: Feb 2014
Posts: 50
Likes: 0
From: Australia
All the 1st gens that dad and i have, do have rear seats. Well you can fit a small child at best in the rear seats. I have a mate with a couple of FCs and they both have rear seats. But the only FDs that i have been in were in the US so i cant clarify for the FD. They really aren't much of a seat, but they were added to the car because it was cheaper tax wise to bring them into the country from Japan.
This car will have some when it gets put back together but i doubt they will be used often or at all. They will simply be there to 'fill the hole'
Cheers

Full Member
Joined: Jan 2014
Posts: 196
Likes: 0
From: Georgetown Texas
I ot a set for mine and it didnt come with any of the mounting hardware and I can't find any pics of the bracket that holds the backrest up and bolts to the body under the seats and pics would be greatly appreciated
Thread Starter
Full Member
Joined: Feb 2014
Posts: 50
Likes: 0
From: Australia
Just thinking that it was so long ago that i pulled the car apart, that now its going to be so hard to put the car back together again..
Thread Starter
Full Member
Joined: Feb 2014
Posts: 50
Likes: 0
From: Australia
Wow guys it has been over 6 months since I made any updates to this build thread but fear not the car has had progress made on it during that time.
First of all I did finish high school and I am now studying mechanical engineering at University so hopefully in a few years I will be building race car parts for a living, but i still have four years to go.
As for the car, I thought the Rx3 flares were too small so i now have IP spec flares. They are a similar shape but approximately 65mm wider then the standard flares. It was really hard working out how to neatly cut and join the factory steal guards, but most people keep telling me that i am spending too much time trying to get it neat as it will never be seen once the guard is bolted on. These flares should enable 9inch rear slicks with comfort and possibly pushing it to 10inch. But as the car is being built to IP (improved production) specs, i legally cant run any bigger then 15x7.
This probably brings me to the biggest change to the car. After many long hard periods of time thinking about what i wanted to do with the car, i decided it was best to build the car as a dedicated race car.
I was going to have street rego but with the flares, wings and stripped interior it will look to much like a race car, and if it looks like a race car the police will treat it like a race car. So it will have rally rego which allows me to drive it to get it tuned and to shows and stuff as well as being $100 a year compared to $700 for full rego.
So as its now a dedicated race car, it will also be getting a cage, which hasnt been purchased yet as i still have many other things to finish before i start on the cage.
I have also started seam welding the rear suspension points, and am slowly working my way to the front of the car. This will should reduce the chance of the body tearing under the stresses of racing as well as stiffen the chassis.
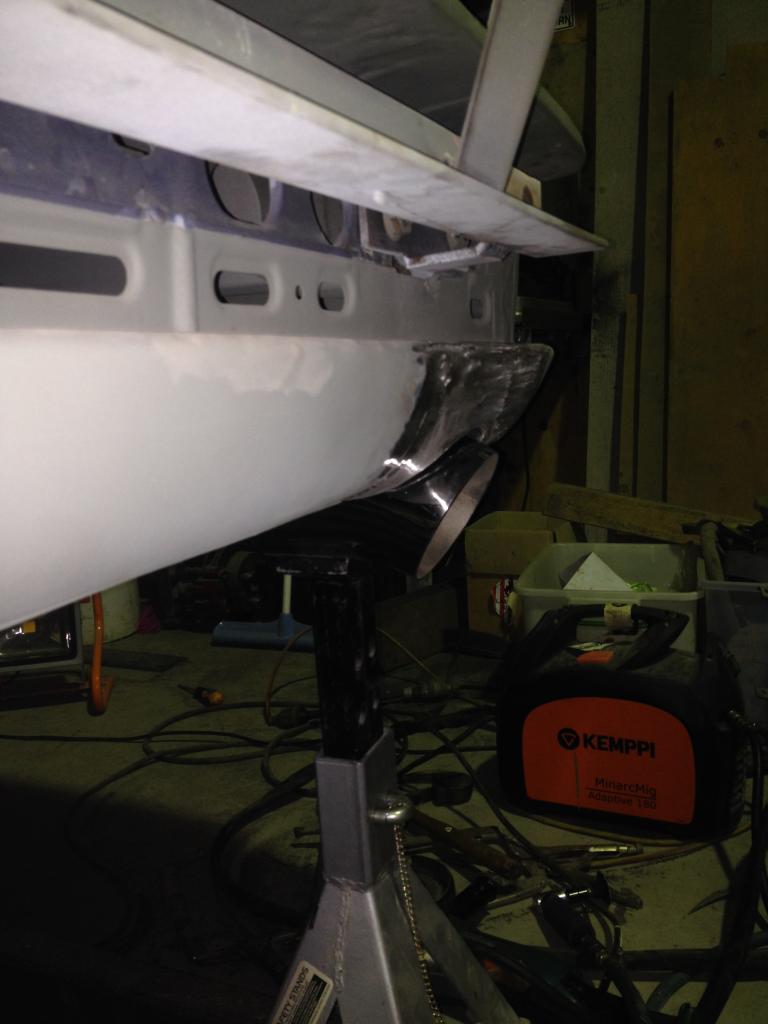
Finally i have made a new piece in the rear beaver panel that goes around the exhaust tip. The new piece was made from a single flat bit of steel and worked by hand using a hammer and dolly. The piece i thought came up pretty well considering i have about zero experience working with body metal. The hole is now round and is about 4.5inches in diameter which means i can fit a 4inch tip in there neatly
I dont have any photos on me to upload but keep posted as there will be some in the coming days
Cheers, Josh
First of all I did finish high school and I am now studying mechanical engineering at University so hopefully in a few years I will be building race car parts for a living, but i still have four years to go.
As for the car, I thought the Rx3 flares were too small so i now have IP spec flares. They are a similar shape but approximately 65mm wider then the standard flares. It was really hard working out how to neatly cut and join the factory steal guards, but most people keep telling me that i am spending too much time trying to get it neat as it will never be seen once the guard is bolted on. These flares should enable 9inch rear slicks with comfort and possibly pushing it to 10inch. But as the car is being built to IP (improved production) specs, i legally cant run any bigger then 15x7.
This probably brings me to the biggest change to the car. After many long hard periods of time thinking about what i wanted to do with the car, i decided it was best to build the car as a dedicated race car.
I was going to have street rego but with the flares, wings and stripped interior it will look to much like a race car, and if it looks like a race car the police will treat it like a race car. So it will have rally rego which allows me to drive it to get it tuned and to shows and stuff as well as being $100 a year compared to $700 for full rego.
So as its now a dedicated race car, it will also be getting a cage, which hasnt been purchased yet as i still have many other things to finish before i start on the cage.
I have also started seam welding the rear suspension points, and am slowly working my way to the front of the car. This will should reduce the chance of the body tearing under the stresses of racing as well as stiffen the chassis.
Finally i have made a new piece in the rear beaver panel that goes around the exhaust tip. The new piece was made from a single flat bit of steel and worked by hand using a hammer and dolly. The piece i thought came up pretty well considering i have about zero experience working with body metal. The hole is now round and is about 4.5inches in diameter which means i can fit a 4inch tip in there neatly
I dont have any photos on me to upload but keep posted as there will be some in the coming days
Cheers, Josh
Thread Starter
Full Member
Joined: Feb 2014
Posts: 50
Likes: 0
From: Australia
Picture update
So here is the pictures of the work that i have during the time that 6 months that i missed from this thread.
I will start with the rear suspension points which have been welded up. I Know the shock tower doesnt have much load on it, but i still thought it was best to weld it up in case one day i put coilovers such as the T3 ones in the rear.
I just used a MIG because i am yet to learn how to operate the TIG properly. I was pretty happy with the welds overall as i didn't even have to get the finishing pad out to buff the tops off the welds.
When i start the cage i will weld a triangle brace between the support tower which sits above the coil to stiffen up the rear end more.
Next i moved to the upper rear control arm mounts. If i do end up running IP chances are these points will have zero load on them, as the bushes in the top arm are removed and the arm just floats there. Then a second top control arm is added in the inner wheel well which is the same length as the bottom arm. The rules state that both factory arms must remain, but the bushes are free. So thats what every body else does, meaning i will problem do the same.
Now i will move to the flares. As the picture shows these flares are much wider then the white ones.
They were first taped in place and i made sure that both sides were in the exact same spot on the body. I know you will not be able to see both sides at the one time, but i still want it to look neat even being a race car.
This gives you an indication of actually how wide the flares are.

It is really starting to look Phat!!
Once the flares were in place with a few self tappers (the car now has riv-nuts and allen head bolts in the body) i worked out where i had to cut the metal arch.
For anybody that has cut up a clean body they will understand how scary this part is. Not for the faint of heart or those still unsure if they want flares as once you cut it is very very hard to reverse your mistake.

The Inner lip was the first piece to go, then both layers were separated. The Top layer was marked and cut first.
I only did little bits at a time just because i wasnt that confident
And then it was just a matter of stitch welding around the edge of the two layers while holding them together
I really didnt cut much off, only probably 50mm at the most, but still too far to return back to standard.
I will start with the rear suspension points which have been welded up. I Know the shock tower doesnt have much load on it, but i still thought it was best to weld it up in case one day i put coilovers such as the T3 ones in the rear.

I just used a MIG because i am yet to learn how to operate the TIG properly. I was pretty happy with the welds overall as i didn't even have to get the finishing pad out to buff the tops off the welds.


When i start the cage i will weld a triangle brace between the support tower which sits above the coil to stiffen up the rear end more.
Next i moved to the upper rear control arm mounts. If i do end up running IP chances are these points will have zero load on them, as the bushes in the top arm are removed and the arm just floats there. Then a second top control arm is added in the inner wheel well which is the same length as the bottom arm. The rules state that both factory arms must remain, but the bushes are free. So thats what every body else does, meaning i will problem do the same.

Now i will move to the flares. As the picture shows these flares are much wider then the white ones.

They were first taped in place and i made sure that both sides were in the exact same spot on the body. I know you will not be able to see both sides at the one time, but i still want it to look neat even being a race car.
This gives you an indication of actually how wide the flares are.


It is really starting to look Phat!!
Once the flares were in place with a few self tappers (the car now has riv-nuts and allen head bolts in the body) i worked out where i had to cut the metal arch.
For anybody that has cut up a clean body they will understand how scary this part is. Not for the faint of heart or those still unsure if they want flares as once you cut it is very very hard to reverse your mistake.


The Inner lip was the first piece to go, then both layers were separated. The Top layer was marked and cut first.

I only did little bits at a time just because i wasnt that confident

And then it was just a matter of stitch welding around the edge of the two layers while holding them together

I really didnt cut much off, only probably 50mm at the most, but still too far to return back to standard.
Thread Starter
Full Member
Joined: Feb 2014
Posts: 50
Likes: 0
From: Australia
Finally i made a section which goes around the exhaust tip. This was a piece of 0.9mm sheet, so yes it was a bit thick but that was the thinnest stuff we had at the time. I used a hand dolly and hammer to shape and roll the metal
I was very happy with how the tip came out. I never got a chance to finish it off before i moved 3 hours from the car so it will be one of the first things that gets done when i come home from my uni holidays


In other news, dad is very close to finishing the Group B rx7. We took it to the WRC at Coffs towards the end of last year but he has since had a massive health scare so the car has been put on the back burner for now.
Here is some shots from Coffs this year
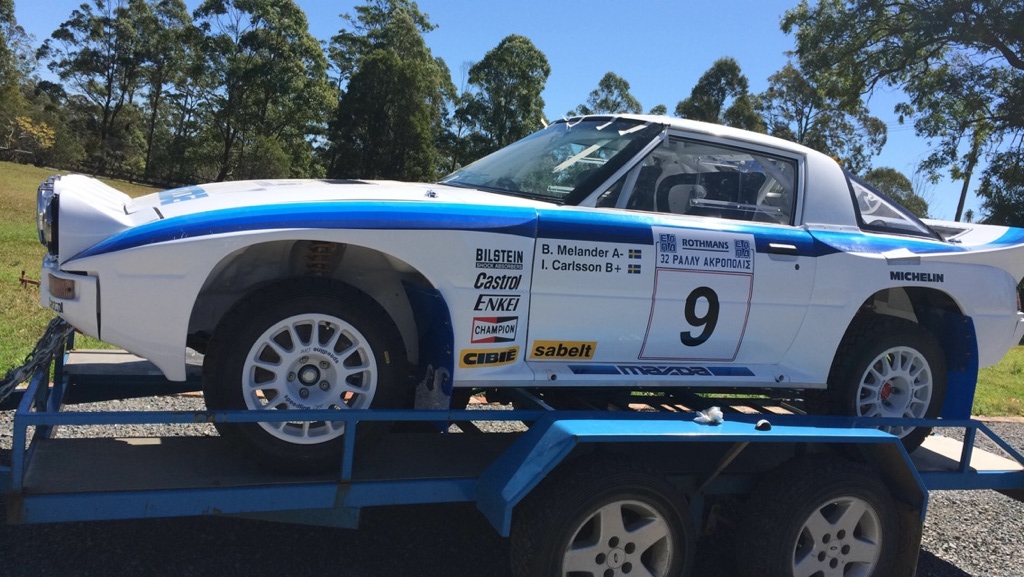

The photos really dont do the car justice. It truly does look awesome
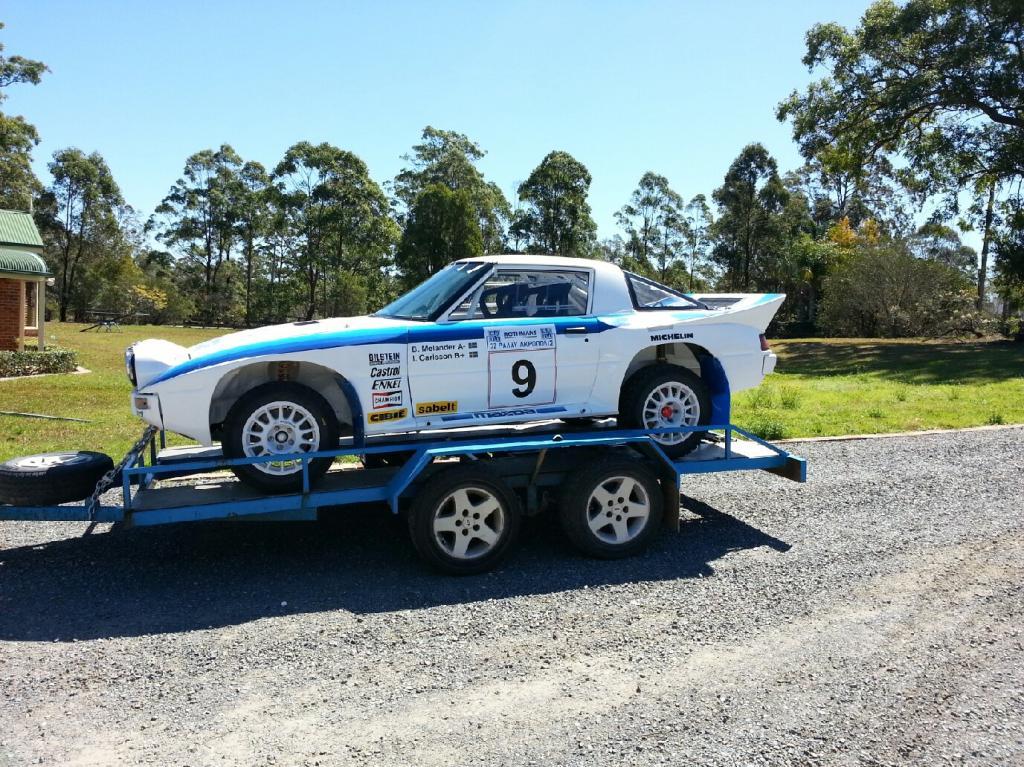
Also i drive my rally car to my High School formal. Went past a Police Officer on the side of the road which scared the **** out of me because i shouldnt have been driving it, even though he followed me into town he didnt pull me over so i counted myself lucky.
Every intersection i come too, the PP sat there barking and for the first time in my life i wish the car was quieter! Every take off was rev to 3,000rpm change, 3,000rpm change. The clutch was slipped quite a bit just to get it off the line at such low revs but that is life and the car made it there without problems
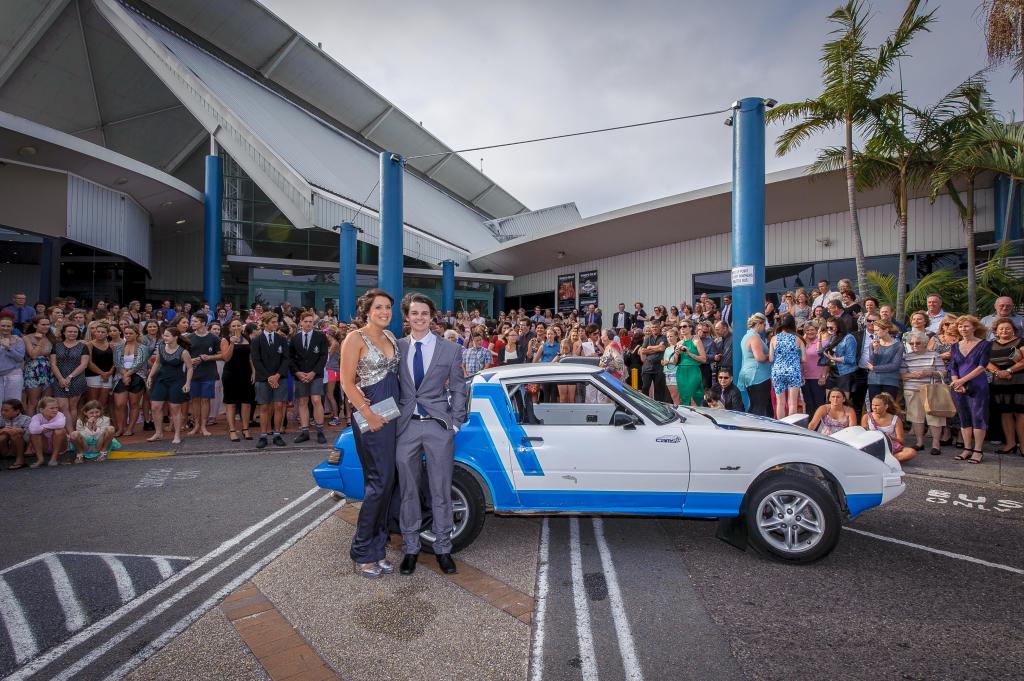
PS not many people standing their enjoyed being covered in the sweet smell of castor oil. Clearly they dont know what is up...
I was very happy with how the tip came out. I never got a chance to finish it off before i moved 3 hours from the car so it will be one of the first things that gets done when i come home from my uni holidays


In other news, dad is very close to finishing the Group B rx7. We took it to the WRC at Coffs towards the end of last year but he has since had a massive health scare so the car has been put on the back burner for now.
Here is some shots from Coffs this year


The photos really dont do the car justice. It truly does look awesome
Also i drive my rally car to my High School formal. Went past a Police Officer on the side of the road which scared the **** out of me because i shouldnt have been driving it, even though he followed me into town he didnt pull me over so i counted myself lucky.
Every intersection i come too, the PP sat there barking and for the first time in my life i wish the car was quieter! Every take off was rev to 3,000rpm change, 3,000rpm change. The clutch was slipped quite a bit just to get it off the line at such low revs but that is life and the car made it there without problems

PS not many people standing their enjoyed being covered in the sweet smell of castor oil. Clearly they dont know what is up...

Hey man, this is really coming along, jealous of your welding skills! So cool to see the RX7 rotary love being passed down in the family. Certainly this will be a car people stop and look at, keep up the awesome work!
Thread Starter
Full Member
Joined: Feb 2014
Posts: 50
Likes: 0
From: Australia
Cheers mate. I really hope that people will walk past the car and have to double back to take a second look. That would make all the time and effort that have gone into the car worth while.
Thread Starter
Full Member
Joined: Feb 2014
Posts: 50
Likes: 0
From: Australia
Update 15/06/2015
Well its been another 4 months and not much as has happened. This joys of living 3 hours away from the car and studying full time at University...
During the last visit to the car i did however manage to get some work done on it.
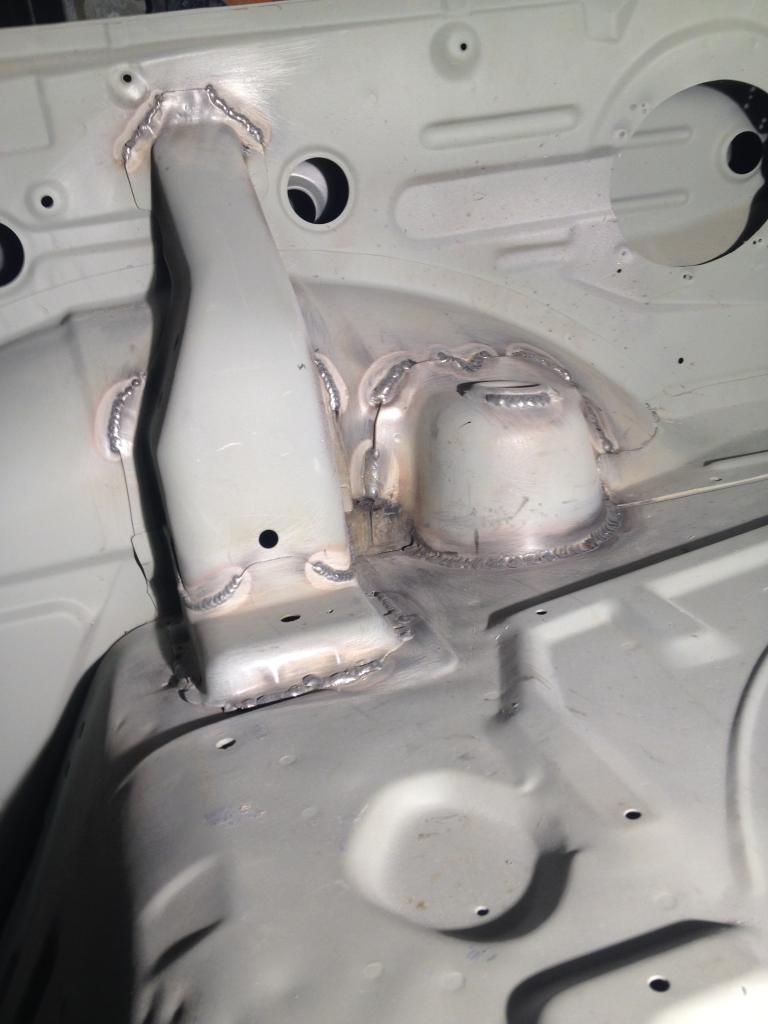
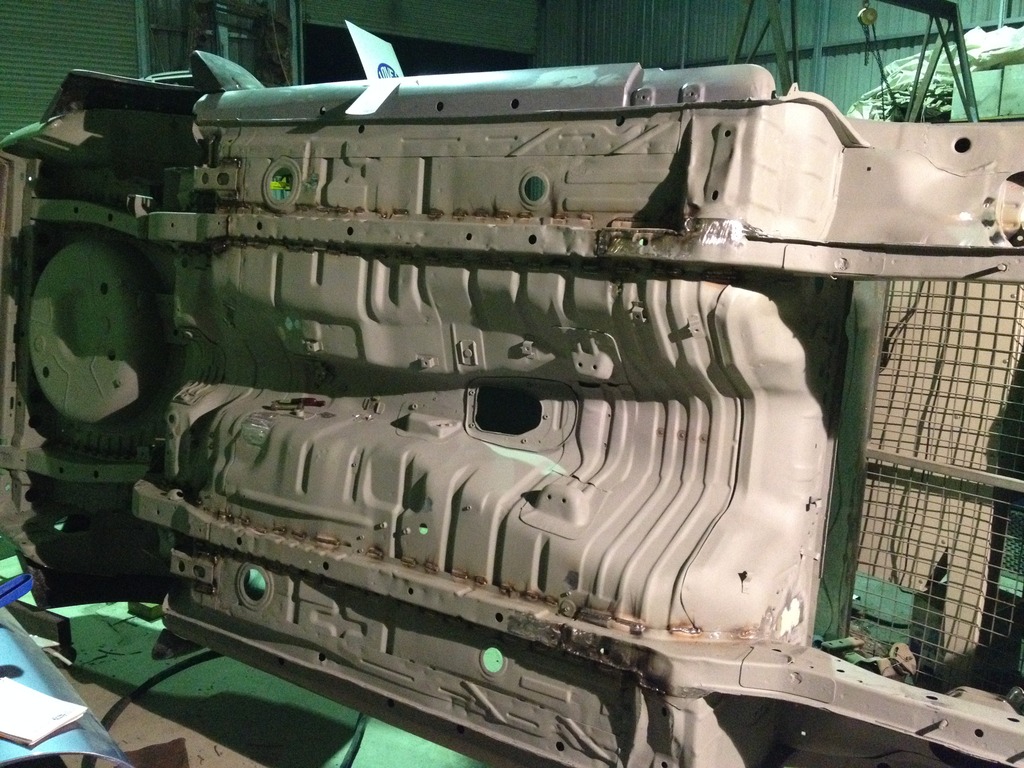
This included seam welding the engine bay including the strut tops to the strut tower as well as between the fire wall and the inner guard. I also flipped the car onto its side and welded along both chassis rails as well as all of the crossmembers in the rear half of the car. The rules for the improved production class state that there isn't allowed to be any body metal added except for a rollcage and seam welding. So i am going crazy with the seam welding to get the body as stiff as possible.
Here is where i started on the engine bay on the driver's side tower and inner guard.

Its a bit hard to tell in the photos but the car is now stitched together front to back.
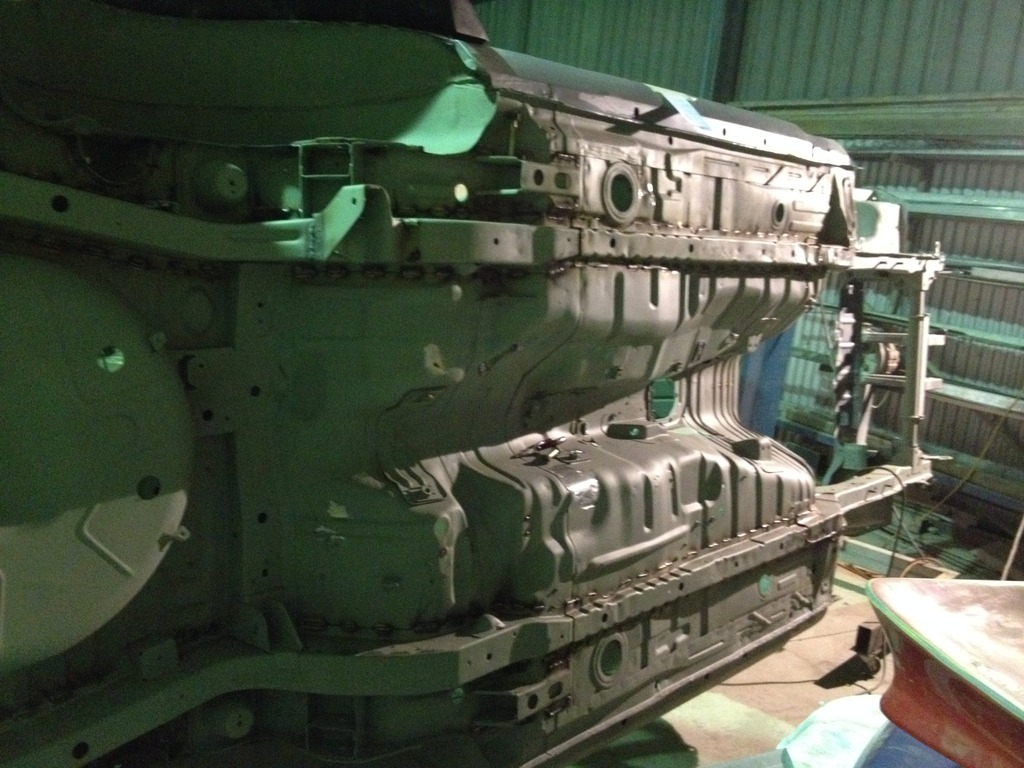
Engine Bay finished and primed
During the last visit to the car i did however manage to get some work done on it.
This included seam welding the engine bay including the strut tops to the strut tower as well as between the fire wall and the inner guard. I also flipped the car onto its side and welded along both chassis rails as well as all of the crossmembers in the rear half of the car. The rules for the improved production class state that there isn't allowed to be any body metal added except for a rollcage and seam welding. So i am going crazy with the seam welding to get the body as stiff as possible.
Here is where i started on the engine bay on the driver's side tower and inner guard.

Its a bit hard to tell in the photos but the car is now stitched together front to back.


Engine Bay finished and primed

Thread Starter
Full Member
Joined: Feb 2014
Posts: 50
Likes: 0
From: Australia
Update continued
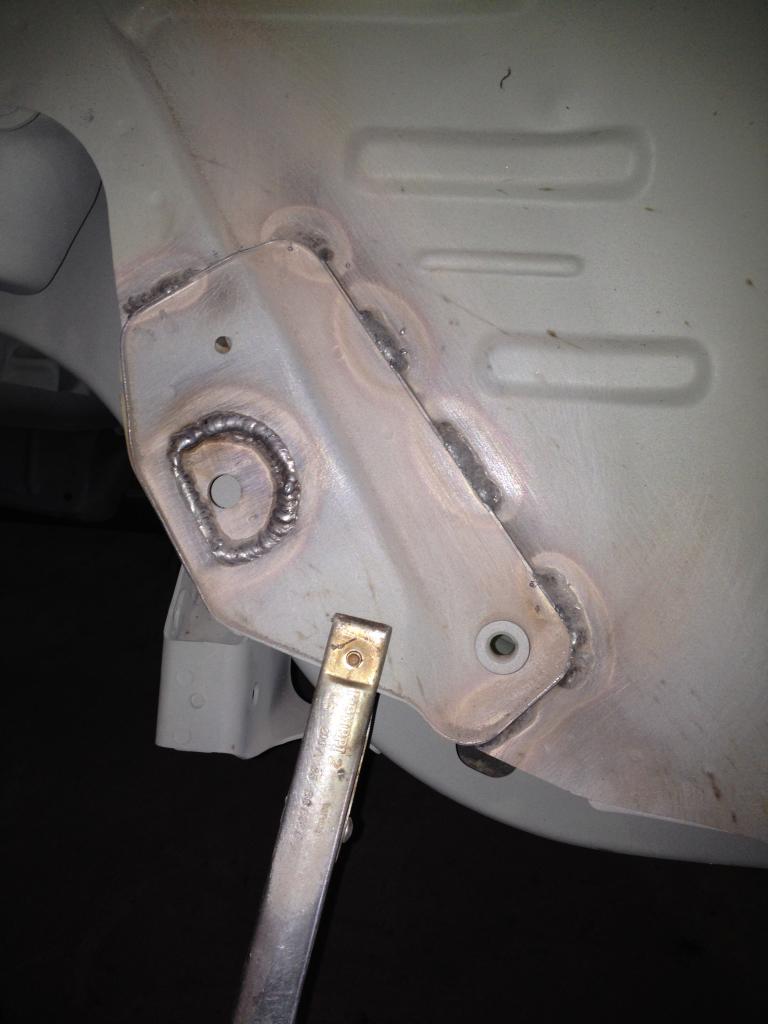
Following on from the seam welding under the car I made up some plates for the front radiator support panel. On the rally car both sides around the rubber stop for the bonnet have crack due to the flex in the front of the car. To prevent this on Dad's new rally car a beefy plate has been welded in to try and prevent the piece cracking. I wanted to do the same, however as the rules for improved production prevent materials being added to the body i was a bit stuck on what to do.
I did end up putting the plate there after talking with some IP racers but the plate itself is much smaller then the one on Dad's car.

I will have to use the flat cutter stone on the die grinder to buff the weld back around the hole so the rubber can fit in, other then that i am very happy with how they turned out. Hopefully they prevent the panel cracking. Once the guard and headlight is on they really arent that noticeable so im sure i will get away with it.
Next mod will be finishing the rear guards, including creating a flared lip with the steel section of guard to prevent it from digging into the tyres on full up travel as well as fixing up the fiberglass flares.
After that i will do the remaining body work and try and have the car in high fill primer on the outside.
Depending on my time in my uni break i may even head to Sydney to purchase a cage to weld in. Only time will tell... or the bank account
Cheers guys
I did end up putting the plate there after talking with some IP racers but the plate itself is much smaller then the one on Dad's car.


I will have to use the flat cutter stone on the die grinder to buff the weld back around the hole so the rubber can fit in, other then that i am very happy with how they turned out. Hopefully they prevent the panel cracking. Once the guard and headlight is on they really arent that noticeable so im sure i will get away with it.
Next mod will be finishing the rear guards, including creating a flared lip with the steel section of guard to prevent it from digging into the tyres on full up travel as well as fixing up the fiberglass flares.
After that i will do the remaining body work and try and have the car in high fill primer on the outside.
Depending on my time in my uni break i may even head to Sydney to purchase a cage to weld in. Only time will tell... or the bank account
Cheers guys
Thread Starter
Full Member
Joined: Feb 2014
Posts: 50
Likes: 0
From: Australia
Update 7/09/2015
After another 3 months away from the forums due to a lack of new stuff to post i am finally back.
Since my last post i did order some parts for my mazda. These included a new Race Products adjustable watts linkage. This system goes on the back of the diff to replace the standard off center one from factory. This system allows me to adjust the roll center of the car simply by opening the boot hatch and screwing the handle. It was a bit more then the non screw adjustable one, but that one had limited adjustability and required you to get under the car to adjust it.
Here is a picture Dad sent me when the box turned up at home.
[URL=http://s1288.photobucket.com/user/Josh_272/media/_20150806_1126391_zpskz8pgdl1.jpg.html]
It was the worst feeling knowing that race car parts were at home waiting for me yet i was unable to get up there due to uni
And here is a picture of the main part of the Watts linkage. i still have to cut down the cromoly arms to the correct length to fit my diff so they arent in the picture
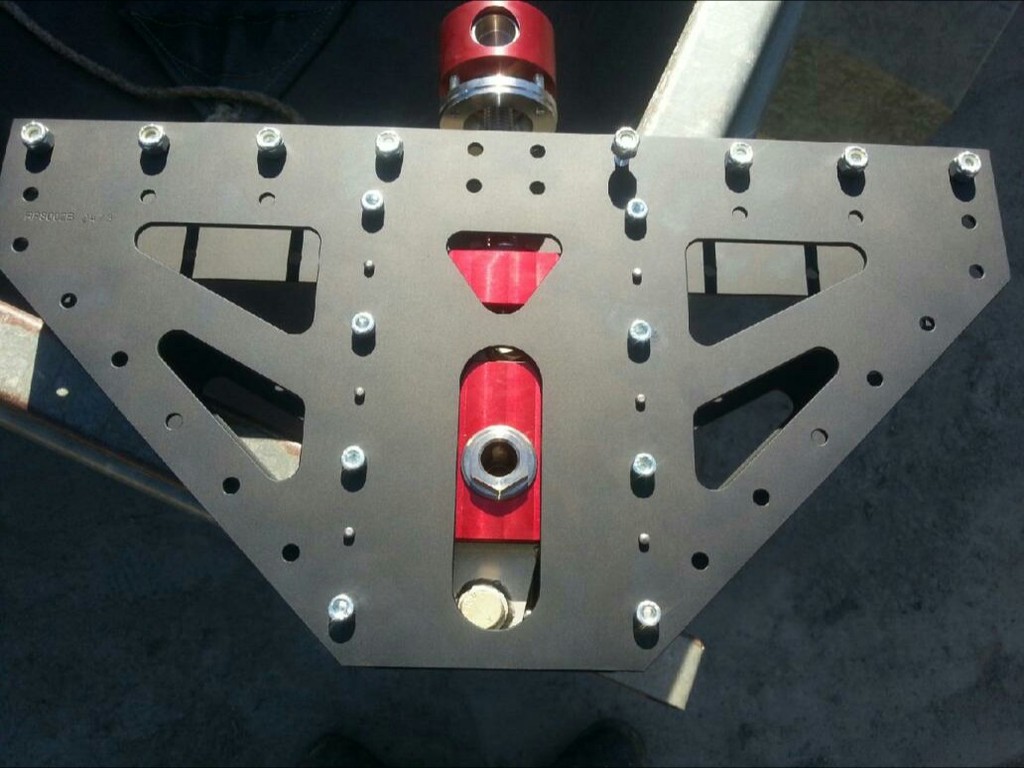
I have already drawn up some 3D models of what the mount will look like, however i just havent had time to actually get the materials.
In other news Dads Group B rx7 is heading down to Sydney tonight to get a final tune ready to head to the WRC on Wednesday afternoon. Sadly due to Dad's health we cant compete this year, so the car will only be driven for some minor displays. However we are entered to compete in the Alpine classic rally this year in November. This event is invite only with a normal field of 100 classic cars, however this year due to high demand the field has been extended to 120 cars.
Once the WRC is over we will be right into testing and not as stressed about finishing the build. hopefully that means i can spend more time at home working on my car rather then dads
For further updates please check out the Love Motorsport facebook page
Cheers Josh

Thread
Thread Starter
Forum
Replies
Last Post
ls1swap
3rd Generation Specific (1993-2002)
17
Jun 3, 2024 03:25 PM
NickNac113
1st Generation Specific (1979-1985)
13
Oct 1, 2015 09:25 PM