
daily driver/ weekend warrior

Thread Starter
Full Member
Joined: Feb 2014
Posts: 50
Likes: 0
From: Australia
daily driver/ weekend warrior
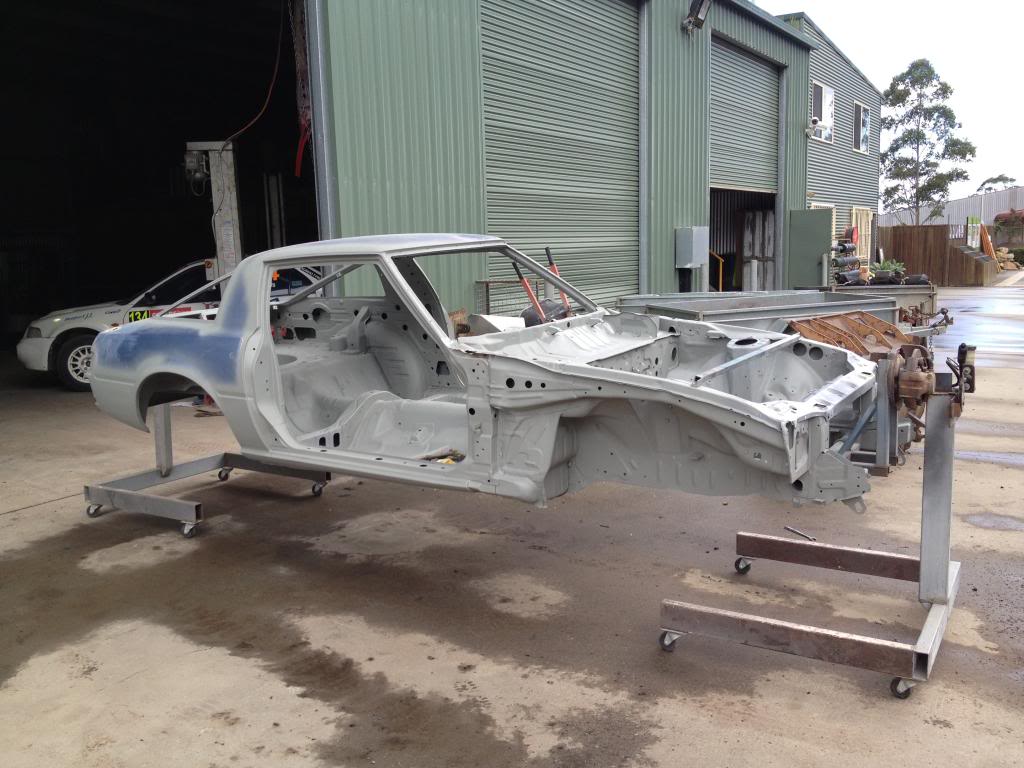
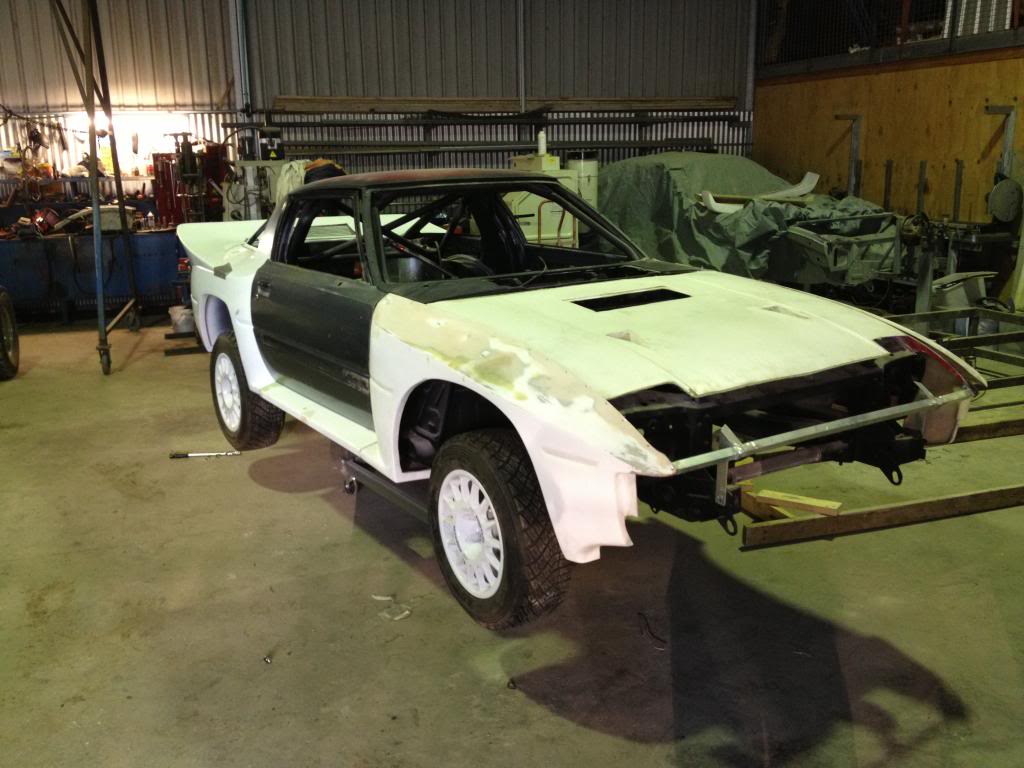
The base for my project was a 1983 model series 3 rx7. The car was picked up locally as a rolling shell, with everything but a motor and gearbox, for the price of $800 AUD. The shell had just had a fresh coat of the factory blue paint and had very minimal rust around the back window but only being 15 i still had a few years before any insurance company would even want to insurance me as a driver so i thought it would be a good time to pull the car right apart and see whats what.
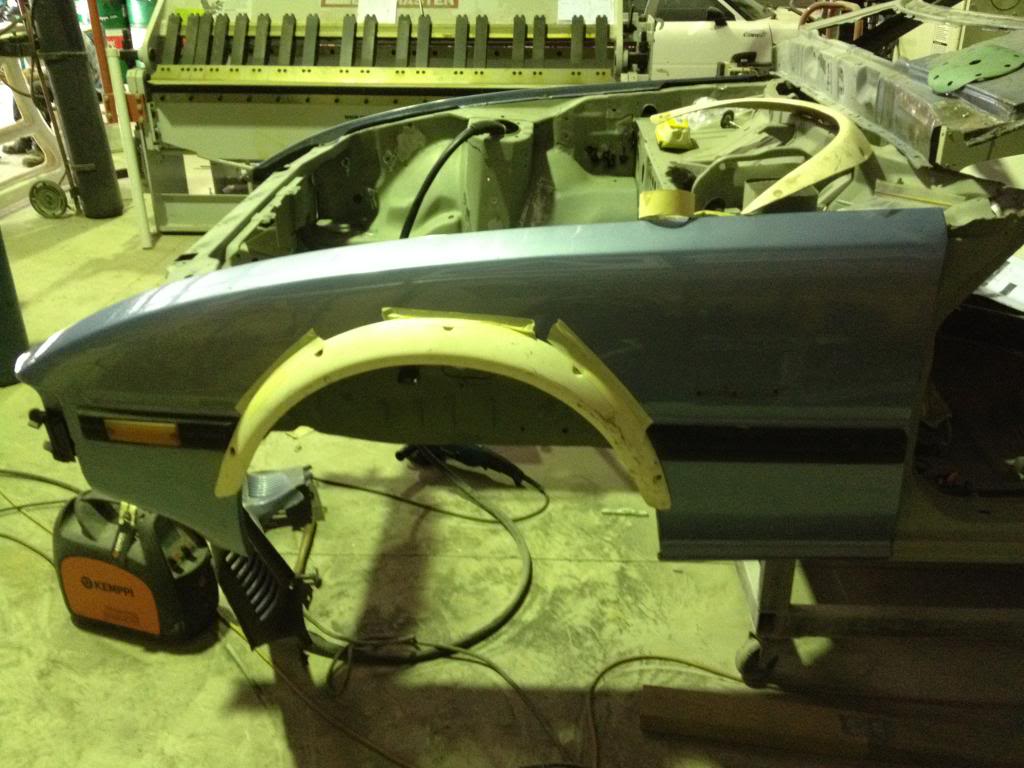
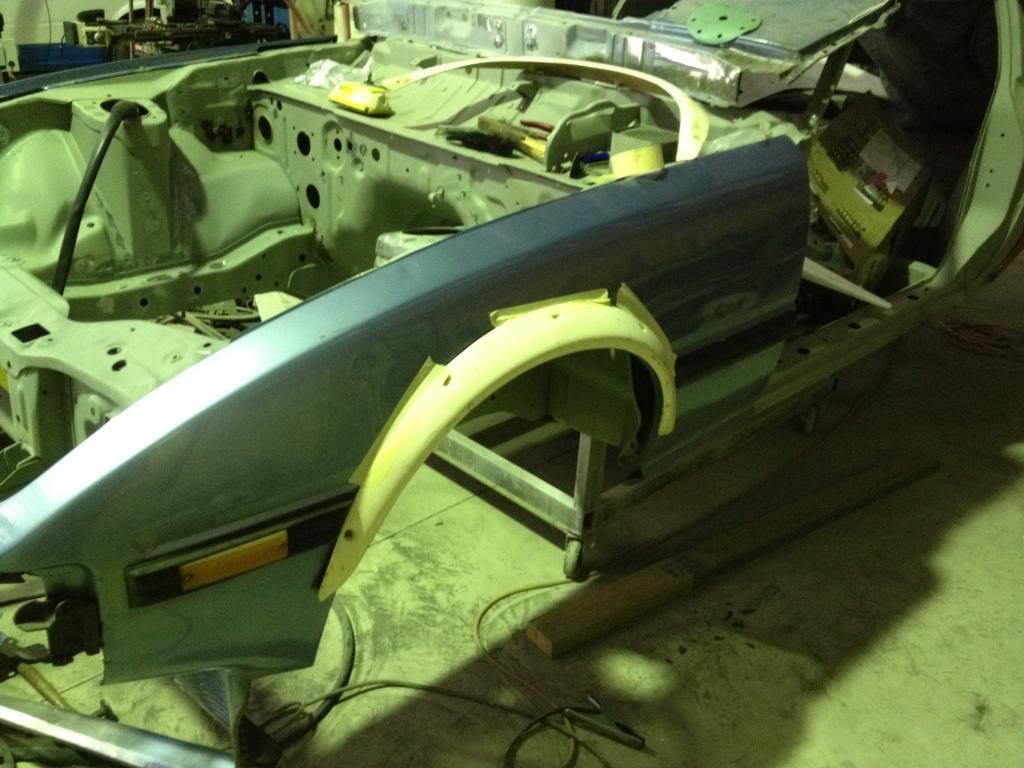
i didn't even get time to take a photo of the car when it first turned up in the driveway before i started pulling it apart so the first photos i have are of the car missing the front guards, bonnet, bumpers as well as the badges.
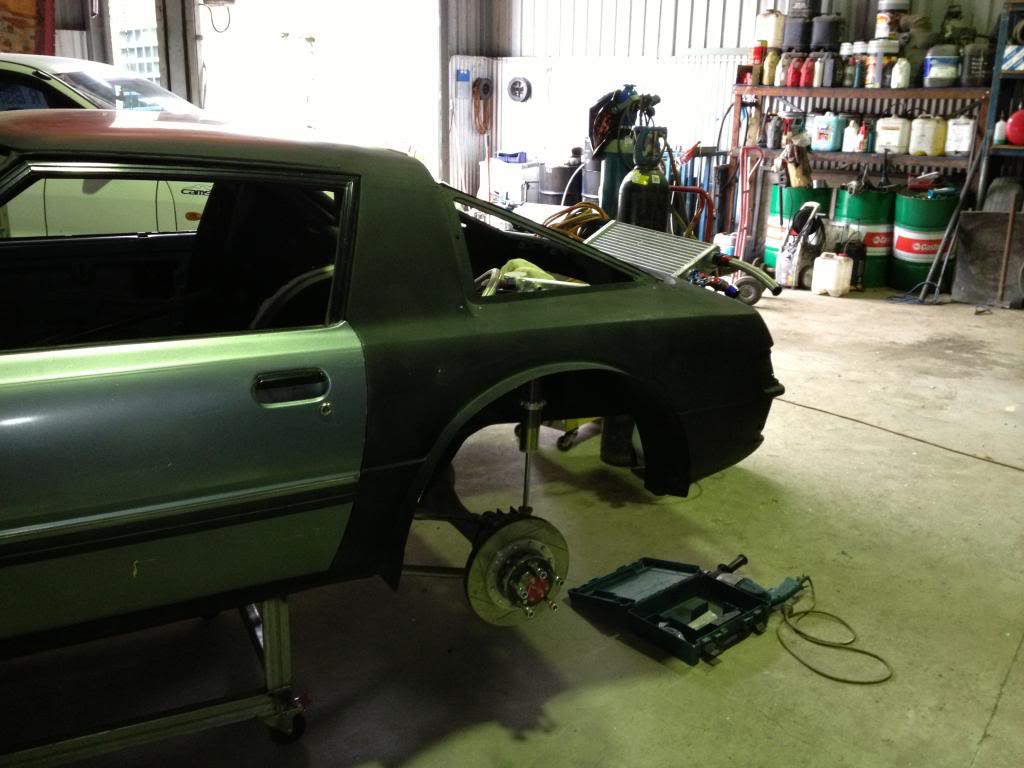
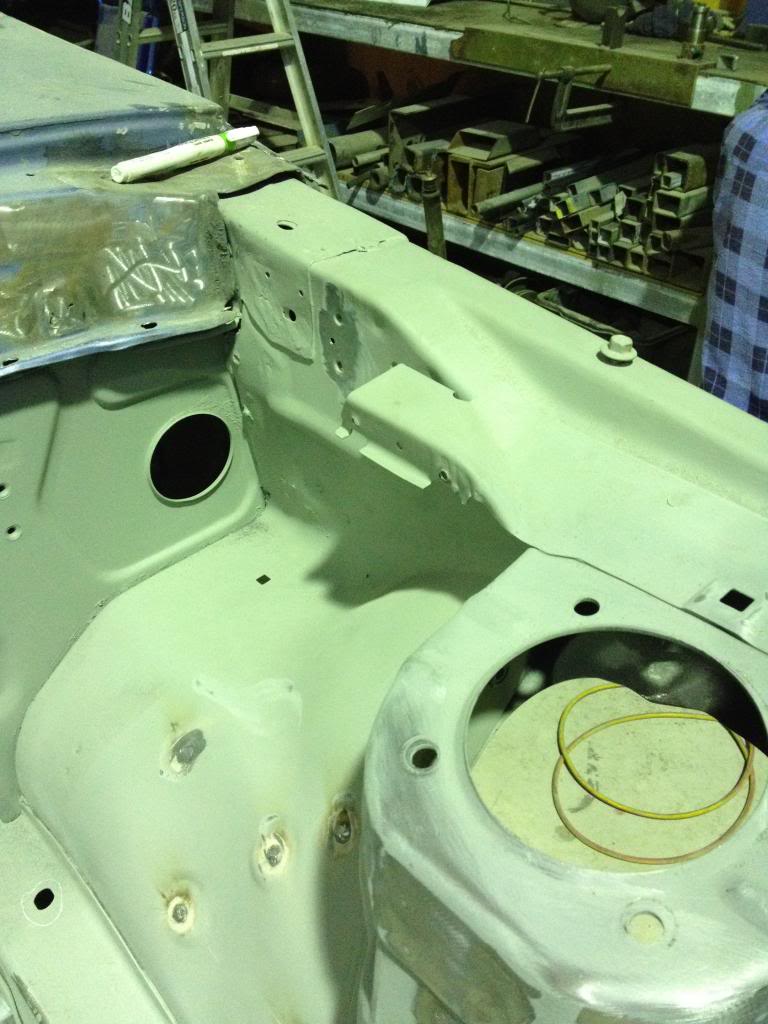
i have now owned the car for close to 2 and a half years, and during that time i have stripped every last nut and bolt out of the car (labeling or bagging them as i go so the process of putting the car back together is much more simple). i have put the car on a rotisserie so that everything underneath could be sandblasted, and cleaned before it is repainted. Actually the underside of the car, the interior of the car, the engine bay, the door jams, around the windows and the inner guards were all sandblasted to leave fresh metal to work with.
The only down side to having a car sandblasted is getting the glass back out from the car. But after a few hours and spinning the car upside down many times resulted in no more glass being left in the car.
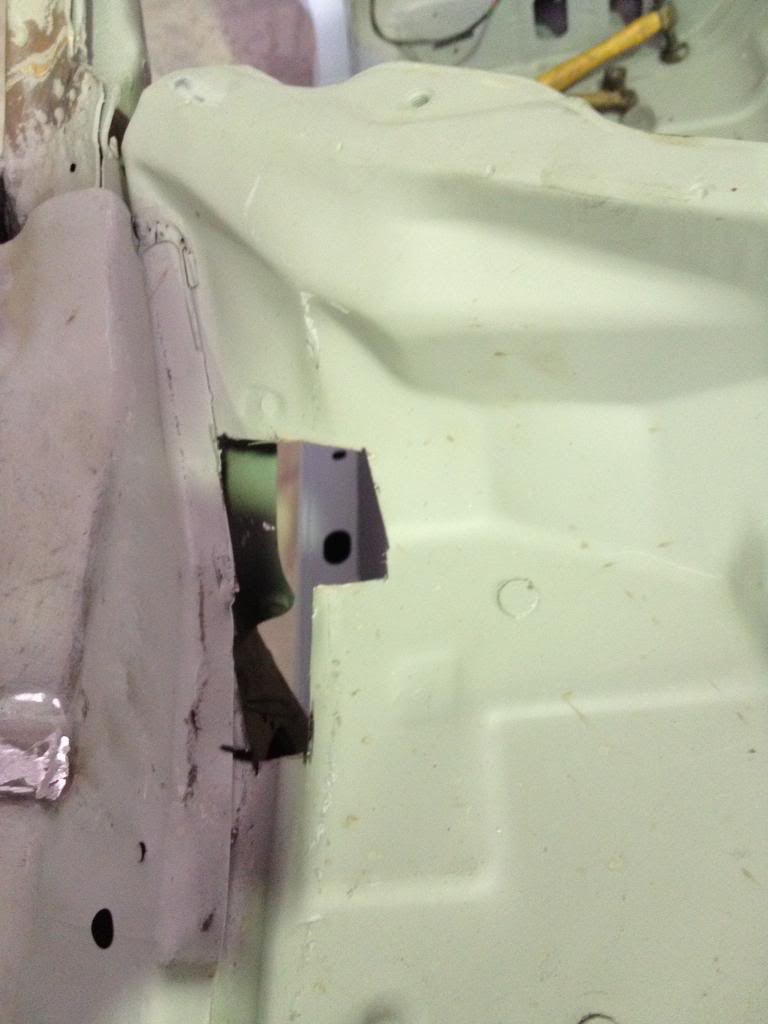
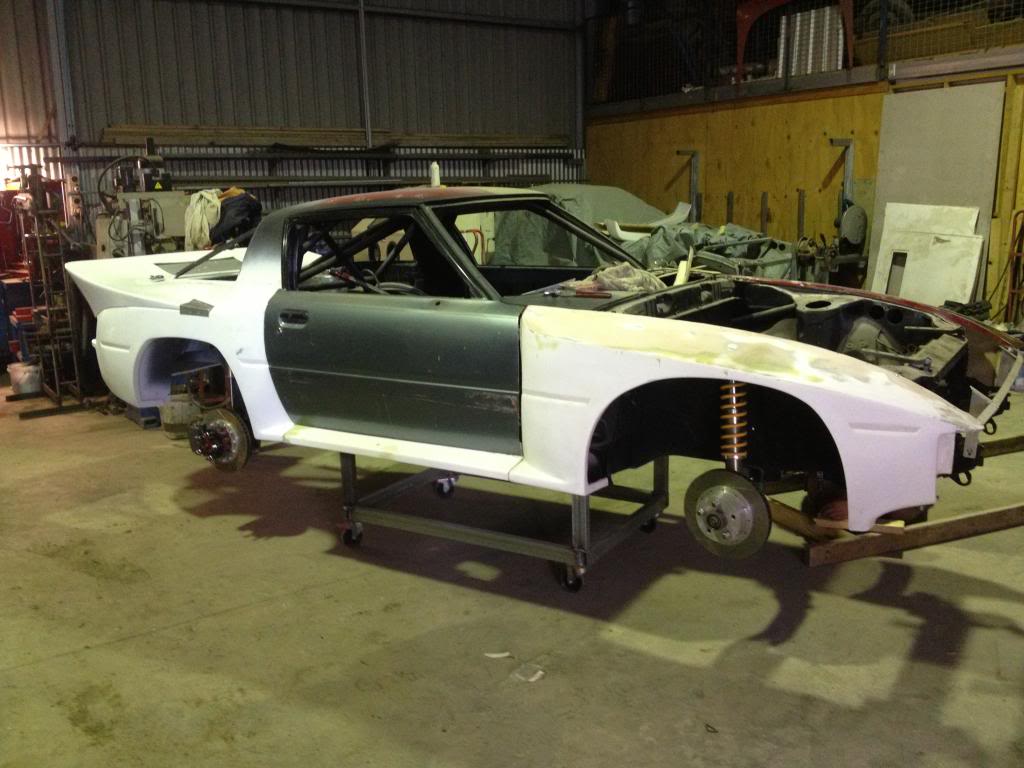
While i was taking the dash out i found a small section of rust in the cowling panel in front of the windscreen. To enable a proper rust repair, i drilled out all the spot welds for that panel and removed it. I also removed all the sound deadener which is now the 3rd RX7 which i have done and i am not willing to do it again.
The rear quarters and roof were stripped with paint stripper and i found on average about 7 layers of paint and primer so there has been a few resprays over the years. Overall the shell is very tidy, one of the best we have (between dad and i we have 7 1st gen rx7s) and it will make a very good base for my first major project.
Although im 18 in a few months and it seems to only be going backwards and getting further away from being finished.
So far the rust under the dash has been cut out and a new piece welded in. I just need to paint inside that area as once the cowling panel is back on i will not be able to get paint in there. Then i will have to paint the rest of the car. I have already shaved the rear aerial, badges, side moldings, and boot lock.
Before i paint the car though i want to put some ZG Datsun flares on the car to make it a bit fatter
Im having trouble up loading photos but when i work it out i will post some up
Plans for the car
- shave all badges, remove rear locker, rear wiper, aerial, side moldings and front quarter blinkers
- add ZG Datsun flares
- either 12a or 13b bridgeport with 48ida weber (depends what i can get my hands on)
- Hilux 8inch diff with LSD
- white paint, with black flares and little wing
- carbon fiber door cards
- fix back bucket seats
- nice sounding exhaust (not over the top loud but still loud enough)
- in general i want a really car tidy looking car that i drive most days and have fun at the track on the weekend
i didn't even get time to take a photo of the car when it first turned up in the driveway before i started pulling it apart so the first photos i have are of the car missing the front guards, bonnet, bumpers as well as the badges.
i have now owned the car for close to 2 and a half years, and during that time i have stripped every last nut and bolt out of the car (labeling or bagging them as i go so the process of putting the car back together is much more simple). i have put the car on a rotisserie so that everything underneath could be sandblasted, and cleaned before it is repainted. Actually the underside of the car, the interior of the car, the engine bay, the door jams, around the windows and the inner guards were all sandblasted to leave fresh metal to work with.
The only down side to having a car sandblasted is getting the glass back out from the car. But after a few hours and spinning the car upside down many times resulted in no more glass being left in the car.
While i was taking the dash out i found a small section of rust in the cowling panel in front of the windscreen. To enable a proper rust repair, i drilled out all the spot welds for that panel and removed it. I also removed all the sound deadener which is now the 3rd RX7 which i have done and i am not willing to do it again.
The rear quarters and roof were stripped with paint stripper and i found on average about 7 layers of paint and primer so there has been a few resprays over the years. Overall the shell is very tidy, one of the best we have (between dad and i we have 7 1st gen rx7s) and it will make a very good base for my first major project.
Although im 18 in a few months and it seems to only be going backwards and getting further away from being finished.
So far the rust under the dash has been cut out and a new piece welded in. I just need to paint inside that area as once the cowling panel is back on i will not be able to get paint in there. Then i will have to paint the rest of the car. I have already shaved the rear aerial, badges, side moldings, and boot lock.
Before i paint the car though i want to put some ZG Datsun flares on the car to make it a bit fatter
Im having trouble up loading photos but when i work it out i will post some up
Plans for the car
- shave all badges, remove rear locker, rear wiper, aerial, side moldings and front quarter blinkers
- add ZG Datsun flares
- either 12a or 13b bridgeport with 48ida weber (depends what i can get my hands on)
- Hilux 8inch diff with LSD
- white paint, with black flares and little wing
- carbon fiber door cards
- fix back bucket seats
- nice sounding exhaust (not over the top loud but still loud enough)
- in general i want a really car tidy looking car that i drive most days and have fun at the track on the weekend
Thread Starter
Full Member
Joined: Feb 2014
Posts: 50
Likes: 0
From: Australia
Okay i think i have worked it all out
From now on i will add the pictures in with the texts rather then attachments but for anybody that is interested in the photos that i have so far of my rx7 build here is a link to my Photobucket album
1983 Mazda Rx7 Build Photos by Josh_272 | Photobucket
Cheers
From now on i will add the pictures in with the texts rather then attachments but for anybody that is interested in the photos that i have so far of my rx7 build here is a link to my Photobucket album
1983 Mazda Rx7 Build Photos by Josh_272 | Photobucket
Cheers

Thread Starter
Full Member
Joined: Feb 2014
Posts: 50
Likes: 0
From: Australia
Thanks guys.
It has been a huge learning curve in terms of doing the body work and even just learning things mechanically as i pull the car apart.
I am very keen to get the car finished but i have no intention of rushing the car as i take a large amount of pride in the work that i do.
After reading up on the FC front sub frame swap, that may be the next take that i will preform to the shell. In doing that i get power steering, larger brakes and the 5 stud pattern that will be run on the rear. Plus if i do it well enough it will all look factory and hopefully keep the highway patrol away!! haha
Thread Starter
Full Member
Joined: Feb 2014
Posts: 50
Likes: 0
From: Australia
Hey guys quick update.
I got in contact with a guy who crashed his FC on the way home from the tuners in the wet and i brought the front struts, hubs and brakes for $100. Over here in Australia most people want at least $250 just for the calipers so i thought i got a pretty good deal.
I didnt have the tools to remove the cross member and steering rack but that is something i will be going back for.
My biggest concern with the subframe swap is the steering column. i want to make it look as factory as possible
If anybody is able to post some photos of where they cut the two columns and how is looks in the car. I hope to use as much FC column as i possibly can so that no highway officer can pick that its not factory.
Thread Starter
Full Member
Joined: Feb 2014
Posts: 50
Likes: 0
From: Australia
Hey guys
So i have decided on doing the FC sub frame swap due to the bigger brakes, powers steering and it enables me to use the factory mounts on the Fc motor. I have also decide on doing the ZG flares but dad has previously purchased some for his car and he received two right hand front one and two right hand rear ones. After ringing the bloke to tell him what he had received the bloke told his dont worry about it because you can only see one side of the car at a time. But the indents for the bolts were in different spots when the guards were reversed and one side didn't sit on the car right, so they were on sold for cost. I am now concerned about whether the guards i will purchase and whether i will have to modify them.
Has anybody purchased a set for their car and how did they come? Im only looking for 2inch front and maybe 2.5inch rear
Also i am ordering an ecu soon so that i can start making brackets and wiring the car before it goes to paint
Has anybody had any dramas with the haltech Sprint RE unit
http://www.himni-racing.com/images/h..._sprint_re.jpg
I can pick it up for $1090 AUD which i dont think is bad
Cheers
Trending Topics
Thread Starter
Full Member
Joined: Feb 2014
Posts: 50
Likes: 0
From: Australia
Bit of a back story to the work so far
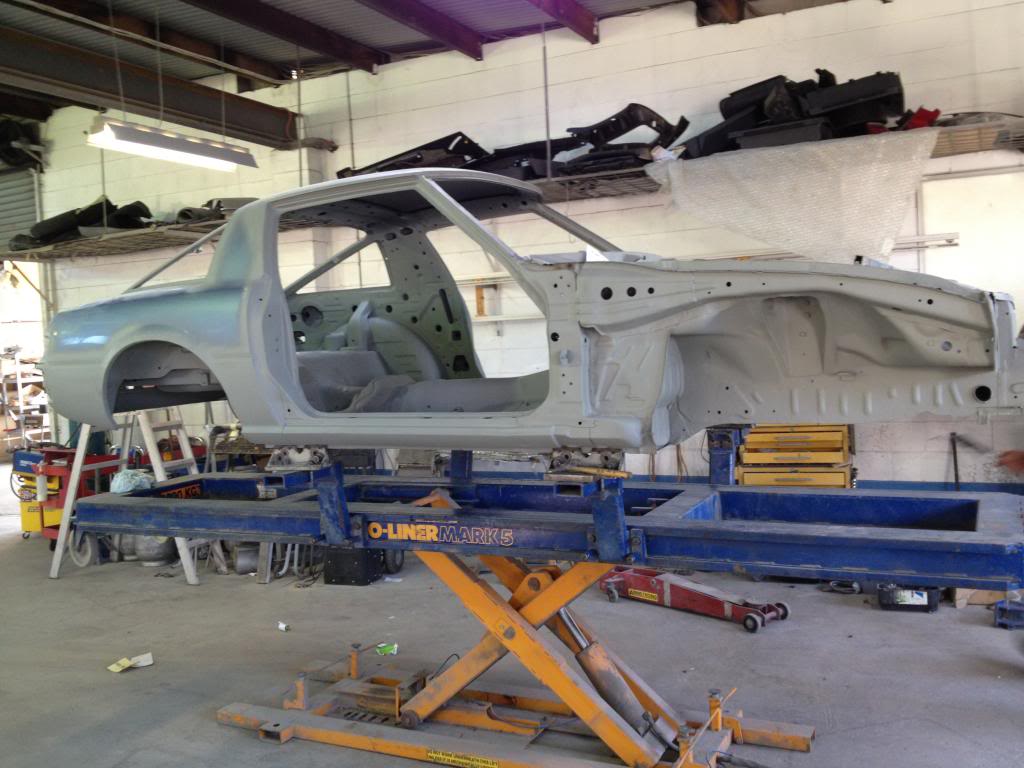
This is the car sitting in primer waiting to go to the local auto repair shop. The car is 30 years old and i felt that it was important to get it checked that it is square so that i dont have problems with alinements later down the track.
The car sitting on the lazer aligning tool. Lucky that after a day at the shop they were happy to tell me that the car was all within factory tolerances. Great news and it meant i could progress on the build
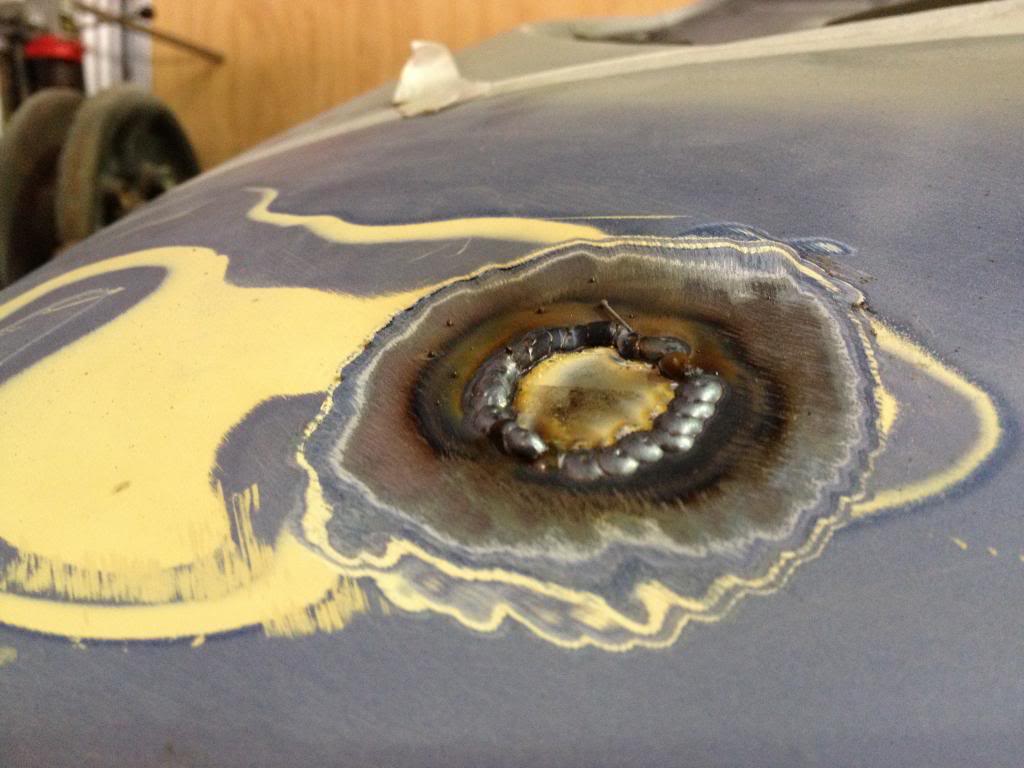
To give the car a clean look i decided that fill the aerial hole in the rear quarter. i gave the hole a bit of a clean, then i made a plug that fits the hole and then used the MIG to weld it up. Before i welded the hole up i pushed the edges down so that there was enough weld there that it wouldnt crack and fall out. So yes i will have to use a skim of body filler over the top to get it smooth it off.
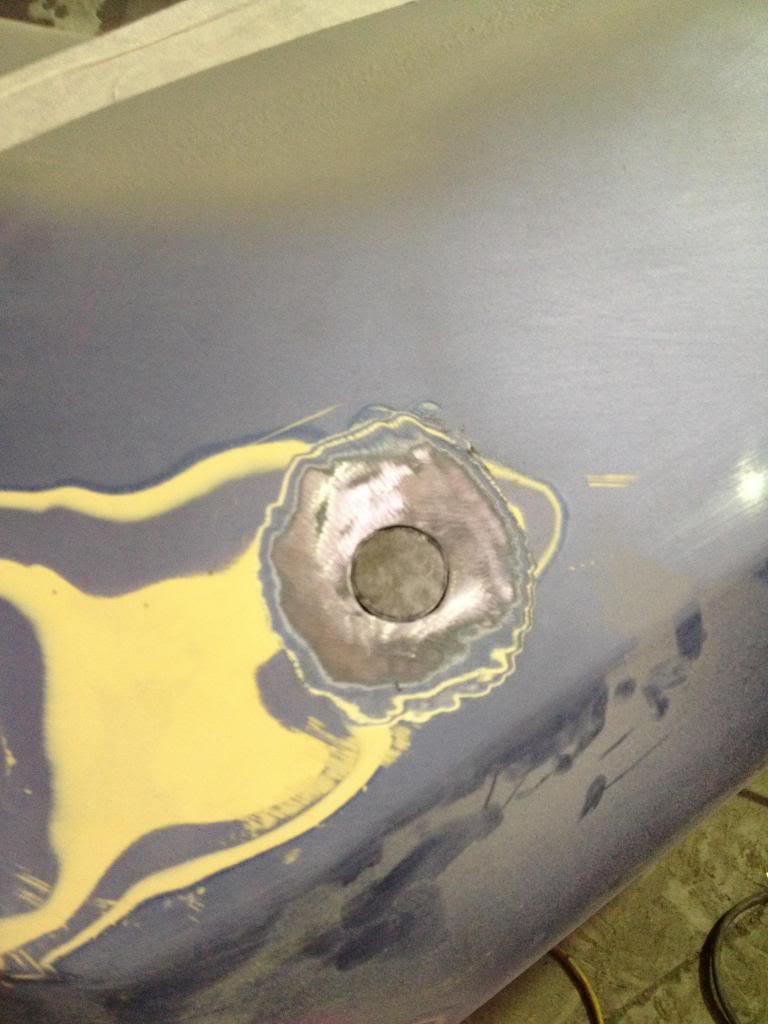
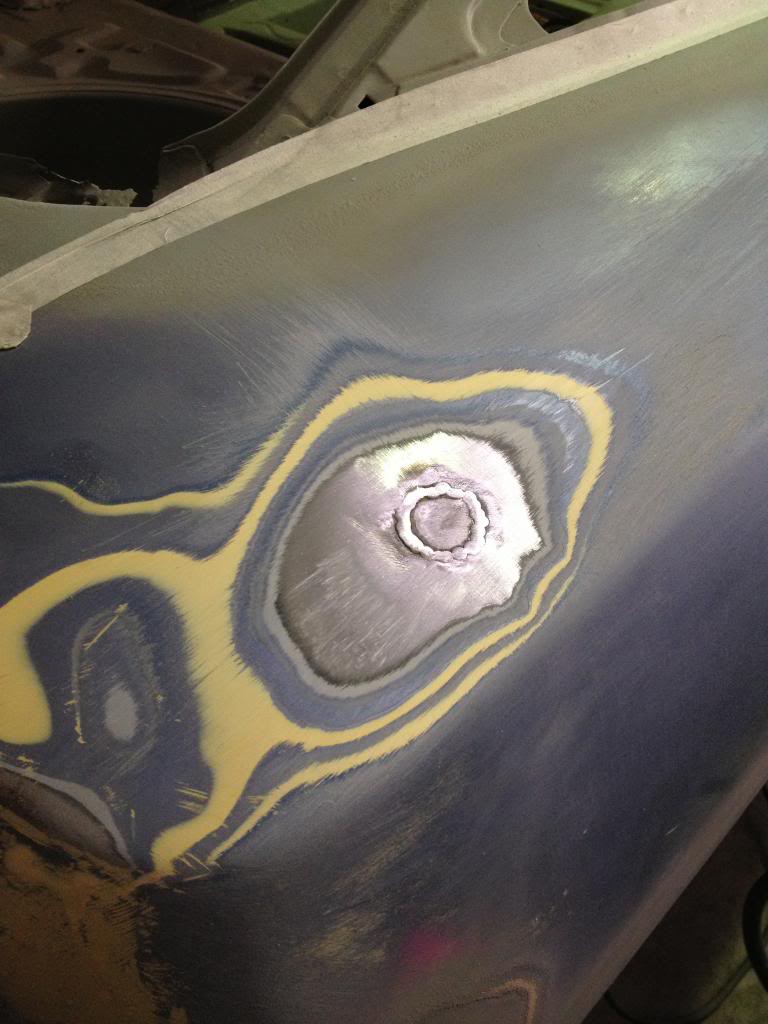
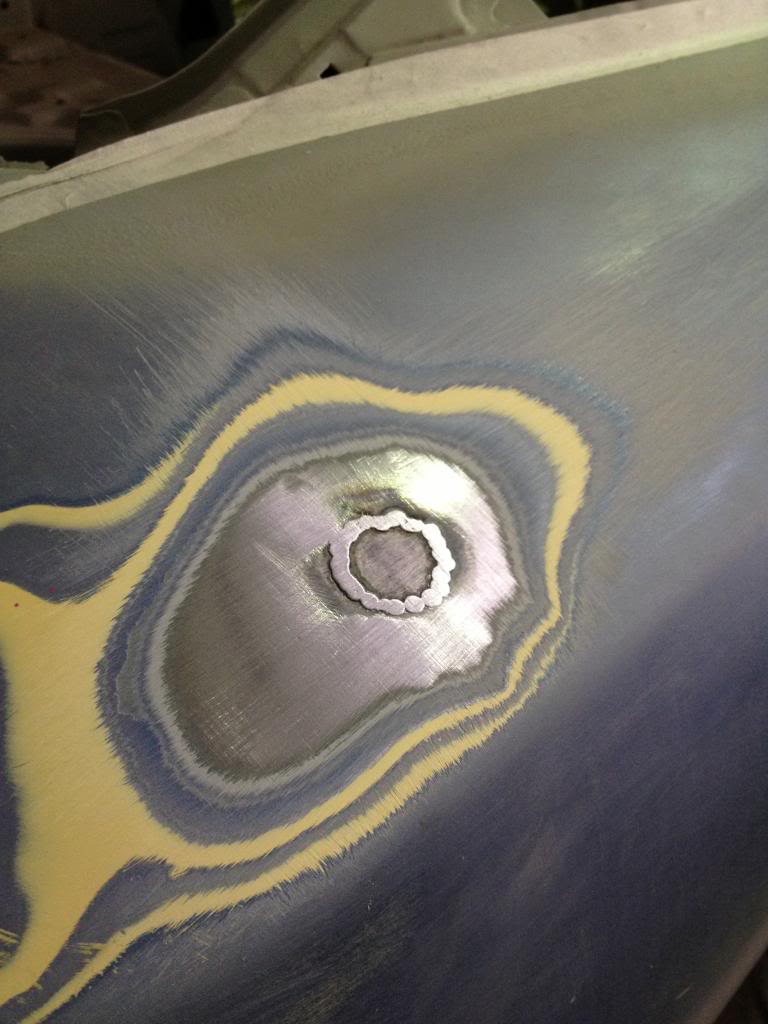
Once that was cleaned up and i was happy with the end results i then stripped all the paint off the rear quarters with panel stripper. That is a very long process but it is something that had to be done before i could paint the car and it is a lot easier then repairing panels after they have been heated and warped with the sandblaster.
As i just primed over the top of the plug that i welded in the aerial hole i will need to clean it back to bare metal behind i use bog to smooth the surface off. This means going around the edges of the weld with a die-grinder with a tip just rough enough to clean the black areas which is the gas shielding from the welder and the small pieces of metal which have been filed back (yes the area was cleaned before it was painted but you just can't get it all off) so that the bog has a clean surface to bond to. My grandfather has worked in the panel beating industry since the age of 12 when he left school until the day he retired at 65 so he has been assisting me with advice on what to do
Cheers
The car sitting on the lazer aligning tool. Lucky that after a day at the shop they were happy to tell me that the car was all within factory tolerances. Great news and it meant i could progress on the build
To give the car a clean look i decided that fill the aerial hole in the rear quarter. i gave the hole a bit of a clean, then i made a plug that fits the hole and then used the MIG to weld it up. Before i welded the hole up i pushed the edges down so that there was enough weld there that it wouldnt crack and fall out. So yes i will have to use a skim of body filler over the top to get it smooth it off.


Once that was cleaned up and i was happy with the end results i then stripped all the paint off the rear quarters with panel stripper. That is a very long process but it is something that had to be done before i could paint the car and it is a lot easier then repairing panels after they have been heated and warped with the sandblaster.
As i just primed over the top of the plug that i welded in the aerial hole i will need to clean it back to bare metal behind i use bog to smooth the surface off. This means going around the edges of the weld with a die-grinder with a tip just rough enough to clean the black areas which is the gas shielding from the welder and the small pieces of metal which have been filed back (yes the area was cleaned before it was painted but you just can't get it all off) so that the bog has a clean surface to bond to. My grandfather has worked in the panel beating industry since the age of 12 when he left school until the day he retired at 65 so he has been assisting me with advice on what to do
Cheers
Thread Starter
Full Member
Joined: Feb 2014
Posts: 50
Likes: 0
From: Australia
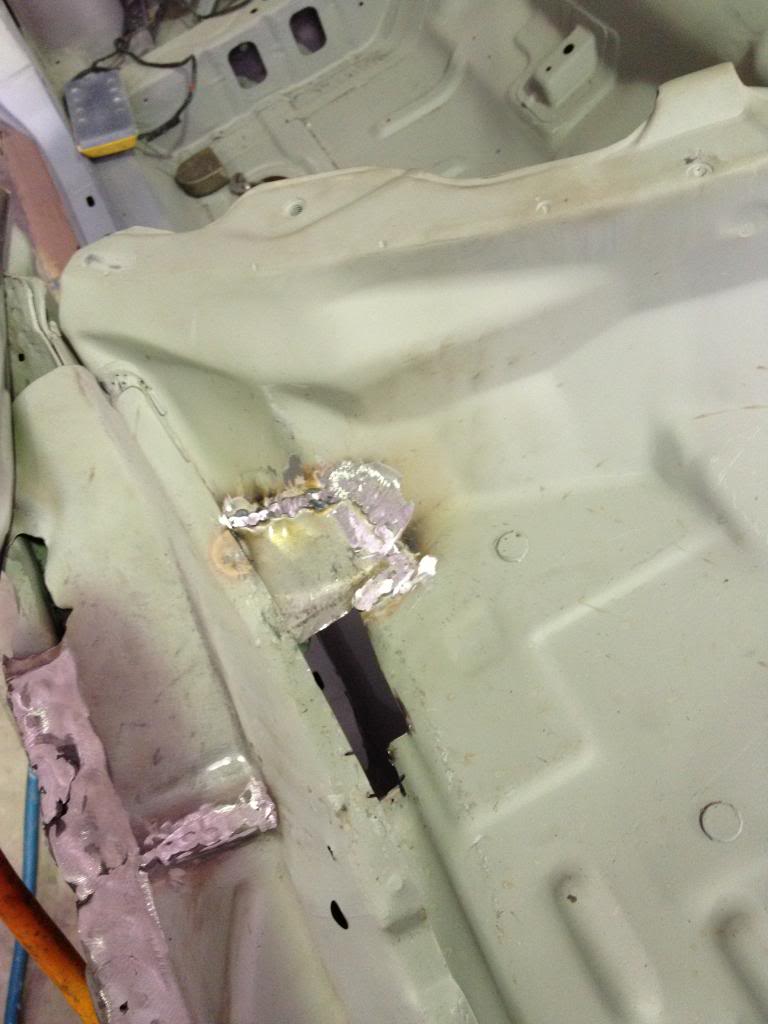
The next job was to cut the rust out from under the dash. The cut job i did was pretty rough but it was very very hard to get in there and not hack up the surrounding panels.
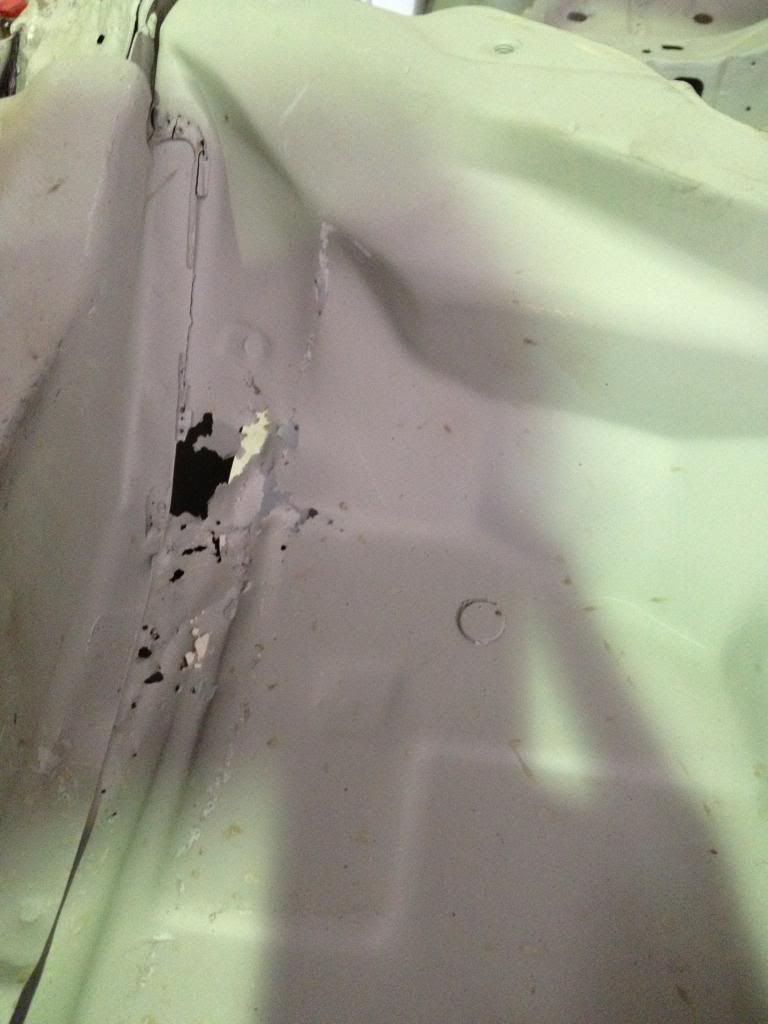
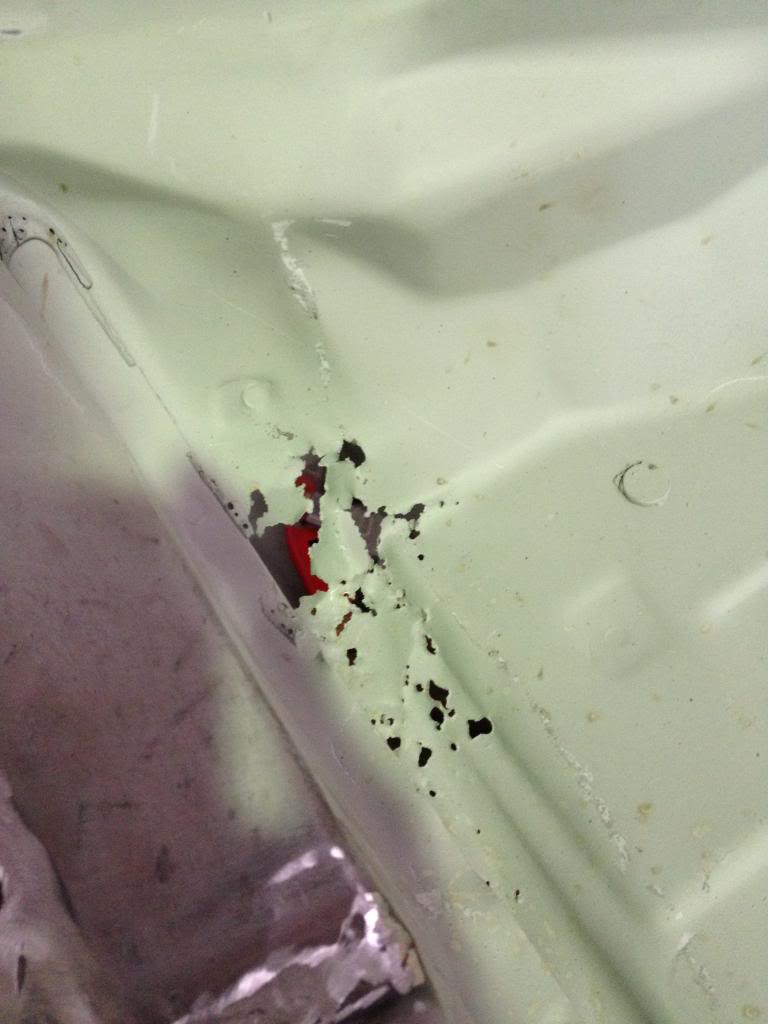
Dont worry this is only a quick job to take the tops off the welds. i will clean it all up properly when the rest of the pieces are welded in. I decided to make the piece in three parts because it is far to difficult to do in one piece.
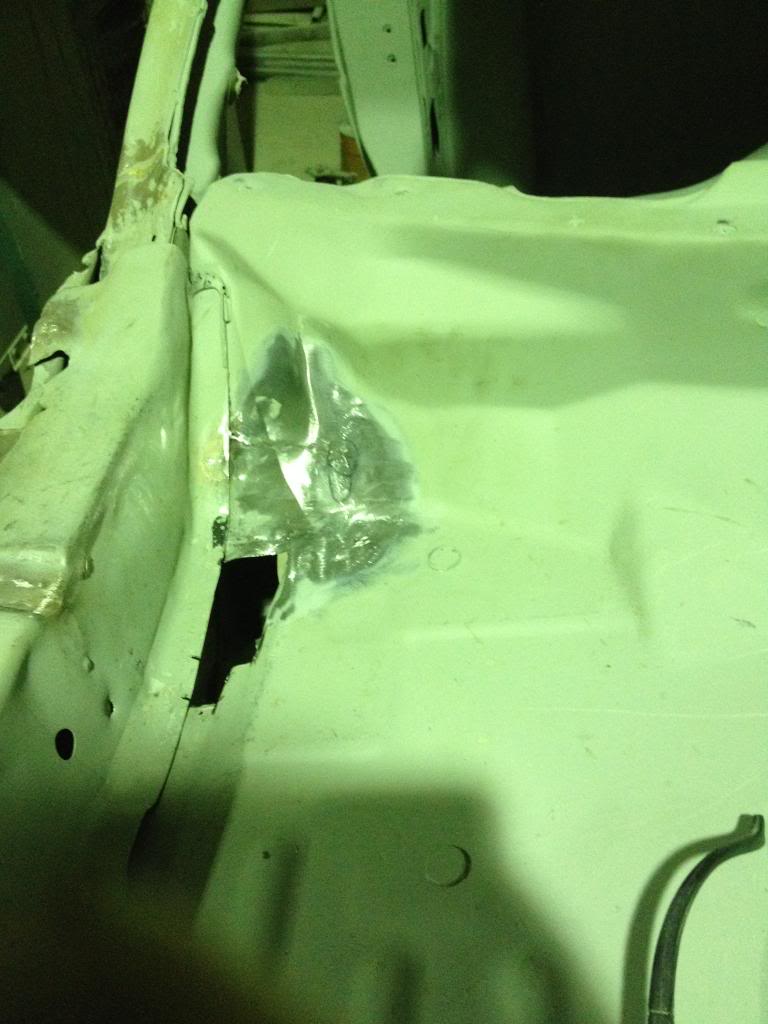
Currently i dont have any photos of the new pieces welded into place but they will be coming very soon. Hopefully i can have it resprayed in there within the next few weeks but i will see how i goo because i have some pretty important exams coming up soon. And sadly i need an education so that i can spend more money on cars


Dont worry this is only a quick job to take the tops off the welds. i will clean it all up properly when the rest of the pieces are welded in. I decided to make the piece in three parts because it is far to difficult to do in one piece.


Currently i dont have any photos of the new pieces welded into place but they will be coming very soon. Hopefully i can have it resprayed in there within the next few weeks but i will see how i goo because i have some pretty important exams coming up soon. And sadly i need an education so that i can spend more money on cars

Thread Starter
Full Member
Joined: Feb 2014
Posts: 50
Likes: 0
From: Australia
Thread Starter
Full Member
Joined: Feb 2014
Posts: 50
Likes: 0
From: Australia
It is things like this which require more work, which in turn adds more time that it takes to get it to the painting stage.
Thanks for the positive feedback, i will certainly keep you posted
Thread Starter
Full Member
Joined: Feb 2014
Posts: 50
Likes: 0
From: Australia
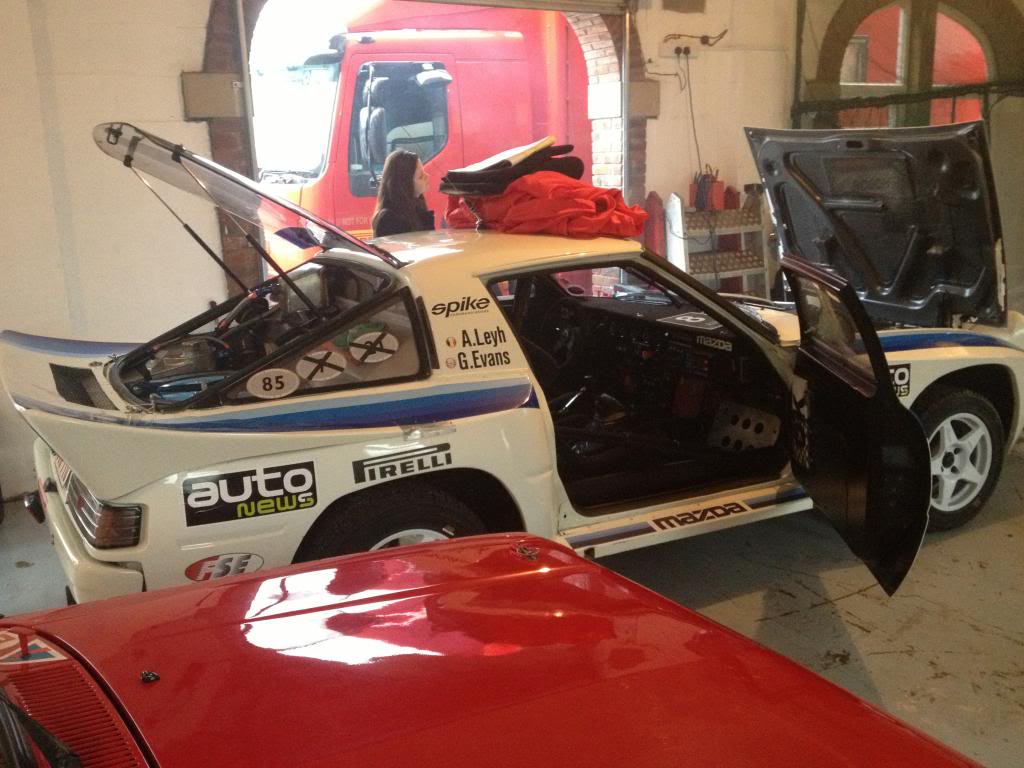
FB rally car
So i have another Rx7 project floating around the shed that i thought you guys might be interested in. The car itself has been a PRC (production rally car) for the last 7 years. Dad brought the car off a young girl in town and her and her boyfriend had absolutely no idea what a rotary was. They were that little experienced that with Mazdas that her boyfriend told dad that it needed a new head gasket and thats why the engine was running rough. However dad worked at Mazda during the 80's during the time of first rx7s and has also rallied an rx3 sedan with a 13b BP engine, as well as an off road buggy with the same engine so he informed the guy how the car in fact had no head gasket. So they ended up selling the car to dad for $500. Over a short period of time the car got stripped to a bare shell, a cage added, the same 13b BP engine out of his rx3 (yes that engine was purchased in pieces in the mid 80's and used in race cars ever since, and i lost count of how many times it was blown up. Until the day it died it still had great compression and the housings were like new, because dad only used carbon seals, but during that time it did have two different sets of rotors in it and a few different intermediate plates. sorry getting off topic). Behind the motor was a series 5 turbo box with a Albins 1:1 close ratio gear set. A custom H/D tail shaft was made to suit the Hilux 8 inch diff. The car ran Bilsteins all round at first but then dad upgraded to MCA custom coilovers in the front. They were a million times better.
The car does have a few good bits in it now like the suspension and the turbo brakes but the best part is the series 5 turbo PP engine. Due to the production class rules, the car isnt allowed a turbo, but dad built a brand new engine for it with all parts straight from Mazda. The engine has rx8 crank, and stationary gears, and series 5 NA rotors which had been lighten, and a huge PP intake done by extreme rotaries.
well a few weeks ago dad handed me the keys to the car. He is building a new bigger and better car and this old girl is pretty tired so before it gets parked for good it was my turn to give it a spin.
The instructions from dad have been that i can race it as much as i like, but i have to find the money, and i cant crash it. so there is a bit of pressure not to go stupid but i still did my first event with him sitting by my side.
I certainly didnt break any speed records or set fastest stage times but i finished my first event without marking the car so i was happy.
Here is some pictures from the weekend.
Its about this time of the night before that dad started to wonder if he had made a mistake letting me drive his car
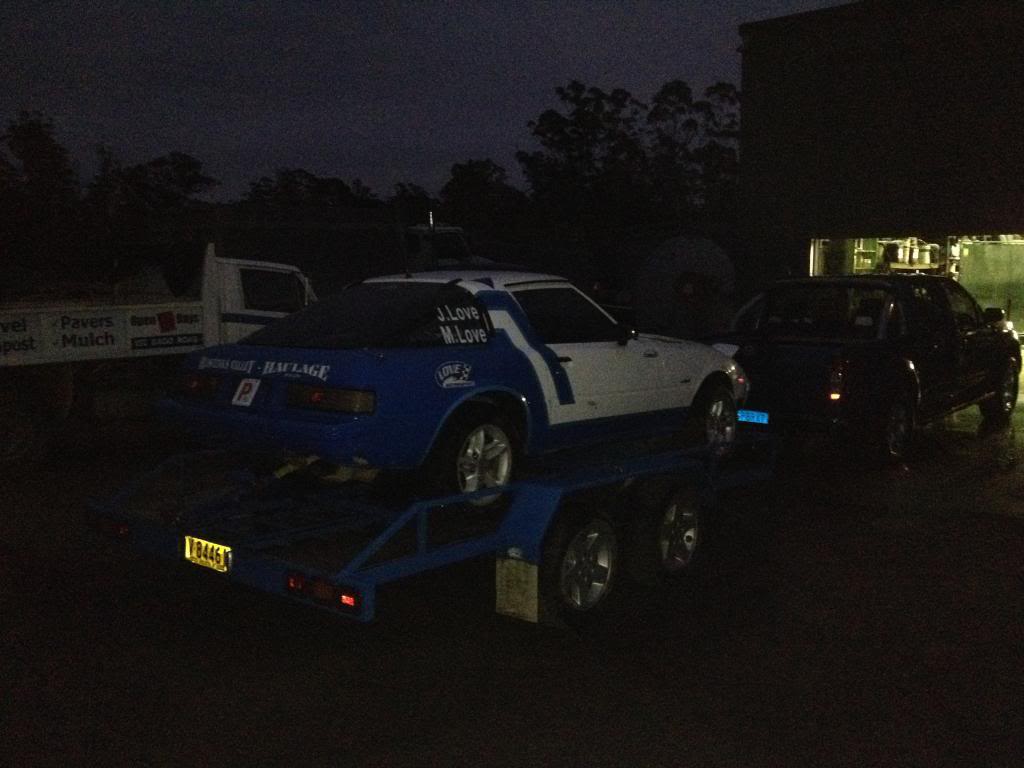
Waiting in service park ready to hit the rally stage for the first time

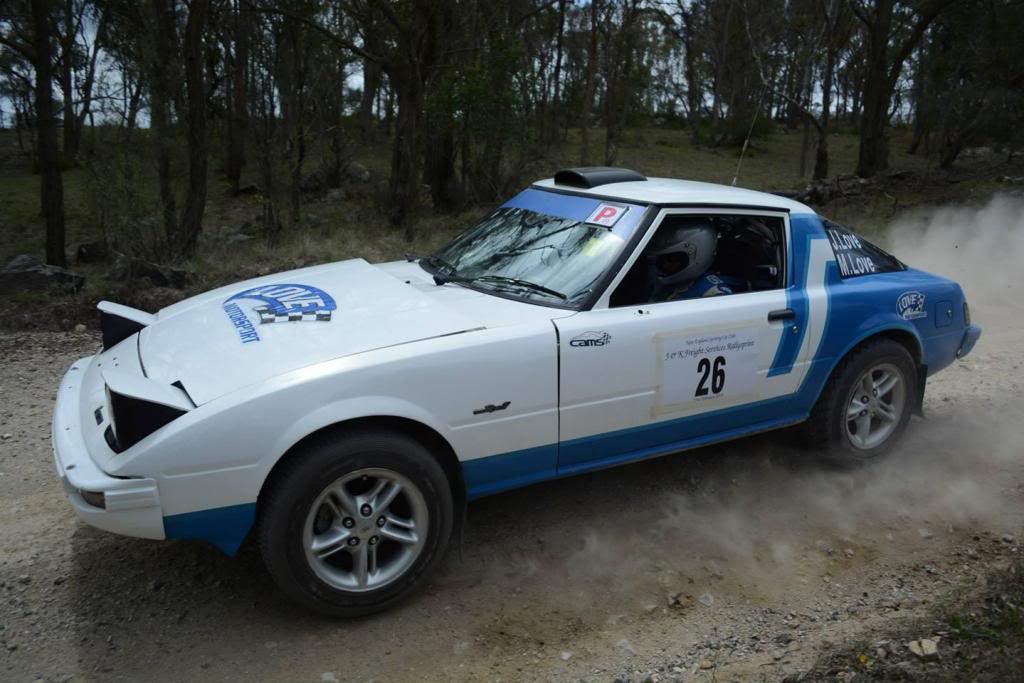
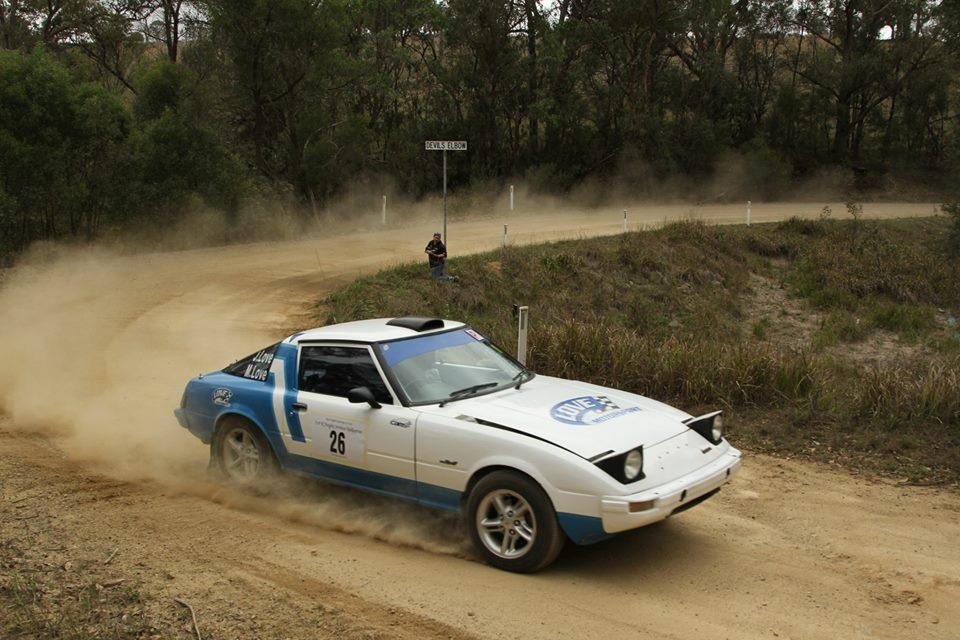
And back on the trailer without a single new scratch

Cant wait till the next event in less then two months. Im certainly hooked
The car does have a few good bits in it now like the suspension and the turbo brakes but the best part is the series 5 turbo PP engine. Due to the production class rules, the car isnt allowed a turbo, but dad built a brand new engine for it with all parts straight from Mazda. The engine has rx8 crank, and stationary gears, and series 5 NA rotors which had been lighten, and a huge PP intake done by extreme rotaries.
well a few weeks ago dad handed me the keys to the car. He is building a new bigger and better car and this old girl is pretty tired so before it gets parked for good it was my turn to give it a spin.
The instructions from dad have been that i can race it as much as i like, but i have to find the money, and i cant crash it. so there is a bit of pressure not to go stupid but i still did my first event with him sitting by my side.
I certainly didnt break any speed records or set fastest stage times but i finished my first event without marking the car so i was happy.
Here is some pictures from the weekend.
Its about this time of the night before that dad started to wonder if he had made a mistake letting me drive his car

Waiting in service park ready to hit the rally stage for the first time


And back on the trailer without a single new scratch

Cant wait till the next event in less then two months. Im certainly hooked
Thread Starter
Full Member
Joined: Feb 2014
Posts: 50
Likes: 0
From: Australia
Group B rx7
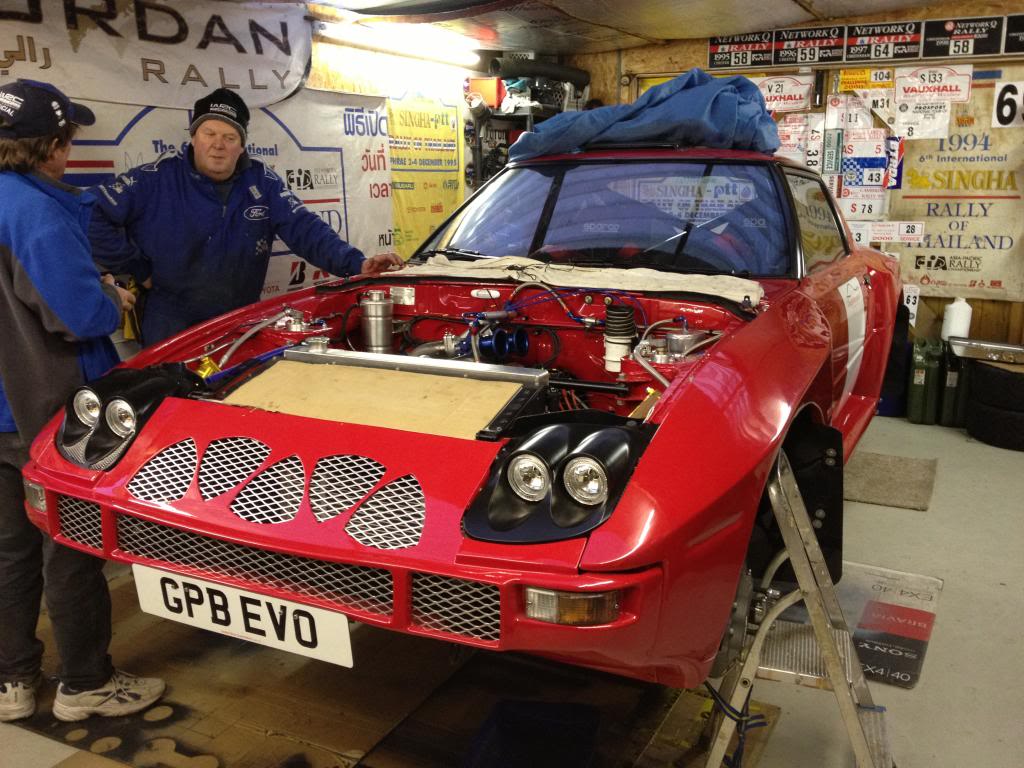
Hey guys after some interest in my father's Group B rally car build i thought i would post some photos up for people to have a look at. I didnt feel like starting another thread so i will just add a few here
The first photo in the in the which houses the number 1 genuine Group B rx7. This car however is now in the number 20 shell after one too many crashes. Dad was even lucky enough to get to sit in the car. Also on our private tour, Pete the mechanic, started the car up and the premix fumes filled the air and it was that heavy that i couldnt breathe and my eyes were watering. I swear it was just from the premix!!

This red rx7 is also a genuine Group B Mazda. This car is number 10 and has never been raced so now Pete, who is standing there talking to dad, is building this car into a tarmac racer. The workmanship on the car was amazing! And judging by the engine and brake package it will go very fast and brake bloody hard!!

Now to dads car.
The car is a 1980 model series 2 rx7 brought about 6 years ago as a shell. The plan was to turn it into a PRC (production rally car) with small ZG flares. the car was a bit rusty but it was still pretty good. Dad then welded in lots of braces and chopped the rear section of floor out so he could run longer control arms and coil over rear suspension. After 12 months dad lost interest and put the car back up stairs (in the loft). About 4 years ago dad pulled the car back down from up stairs and begun work again. This time he cut more of the rear floor out, and started work on the rear suspension. The car has also been tubbed to enable the wheels to tuck further up in the guards. Dad build the rear suspension towers which tie into the chassis and roll cage. The coilovers all round are custom items from Murray Coote Australia with remote canisters. The control arms are all chromoly and run from the back of the front seat to the diff (approximately 515mm long). The car features AP four piston calipers all round which dad got AP to redo as they are the same calipers that were on the car in the 80s. The diff is a 8 inch hilux unit with Race Product full floating hubs. The engine is a series 5 turbo block with series 5 NA rotors which are lightened and balanced as well as rx8 crank and stationary gears. Extreme Rotaries did the PP porting and made the manifold. The car has twin 55mm EFI hardware throttle bodies running 4 1000cc injectors. The car is dry sumped with a Mazda Factory Race unit and the oil cooler is in the rear wing like the factory cars.
All the plumbing is done through Speedflow braided hoses and couplings.
We arent sure when the car will be finished but all the fibreglass panels are done, which dad and i have put over 1500 hours into sanding and bogging to make correct fitting molds.
I cant wait to see the car in the bush.

Sorry i dont have any more photos. The last ones are about 12 months old so i will have to help dad push it outside and get some more shoots. You may need to now wipe the key board to catch that drool HAHA!!
If you want to see more Hit up Love Motorsport - Home of rotary parts and accessories
cheers guys
The first photo in the in the which houses the number 1 genuine Group B rx7. This car however is now in the number 20 shell after one too many crashes. Dad was even lucky enough to get to sit in the car. Also on our private tour, Pete the mechanic, started the car up and the premix fumes filled the air and it was that heavy that i couldnt breathe and my eyes were watering. I swear it was just from the premix!!

This red rx7 is also a genuine Group B Mazda. This car is number 10 and has never been raced so now Pete, who is standing there talking to dad, is building this car into a tarmac racer. The workmanship on the car was amazing! And judging by the engine and brake package it will go very fast and brake bloody hard!!

Now to dads car.
The car is a 1980 model series 2 rx7 brought about 6 years ago as a shell. The plan was to turn it into a PRC (production rally car) with small ZG flares. the car was a bit rusty but it was still pretty good. Dad then welded in lots of braces and chopped the rear section of floor out so he could run longer control arms and coil over rear suspension. After 12 months dad lost interest and put the car back up stairs (in the loft). About 4 years ago dad pulled the car back down from up stairs and begun work again. This time he cut more of the rear floor out, and started work on the rear suspension. The car has also been tubbed to enable the wheels to tuck further up in the guards. Dad build the rear suspension towers which tie into the chassis and roll cage. The coilovers all round are custom items from Murray Coote Australia with remote canisters. The control arms are all chromoly and run from the back of the front seat to the diff (approximately 515mm long). The car features AP four piston calipers all round which dad got AP to redo as they are the same calipers that were on the car in the 80s. The diff is a 8 inch hilux unit with Race Product full floating hubs. The engine is a series 5 turbo block with series 5 NA rotors which are lightened and balanced as well as rx8 crank and stationary gears. Extreme Rotaries did the PP porting and made the manifold. The car has twin 55mm EFI hardware throttle bodies running 4 1000cc injectors. The car is dry sumped with a Mazda Factory Race unit and the oil cooler is in the rear wing like the factory cars.
All the plumbing is done through Speedflow braided hoses and couplings.
We arent sure when the car will be finished but all the fibreglass panels are done, which dad and i have put over 1500 hours into sanding and bogging to make correct fitting molds.
I cant wait to see the car in the bush.


Sorry i dont have any more photos. The last ones are about 12 months old so i will have to help dad push it outside and get some more shoots. You may need to now wipe the key board to catch that drool HAHA!!
If you want to see more Hit up Love Motorsport - Home of rotary parts and accessories
cheers guys
Thread Starter
Full Member
Joined: Feb 2014
Posts: 50
Likes: 0
From: Australia
Group B rx7
Hey guys after some interest in my father's Group B rally car build i thought i would post some photos up for people to have a look at. I didnt feel like starting another thread so i will just add a few here
The first photo in the in the which houses the number 1 genuine Group B rx7. This car however is now in the number 20 shell after one too many crashes. Dad was even lucky enough to get to sit in the car. Also on our private tour, Pete the mechanic, started the car up and the premix fumes filled the air and it was that heavy that i couldnt breathe and my eyes were watering. I swear it was just from the premix!!
This red rx7 is also a genuine Group B Mazda. This car is number 10 and has never been raced so now Pete, who is standing there talking to dad, is building this car into a tarmac racer. The workmanship on the car was amazing! And judging by the engine and brake package it will go very fast and brake bloody hard!!
Now to dads car.
The car is a 1980 model series 2 rx7 brought about 6 years ago as a shell. The plan was to turn it into a PRC (production rally car) with small ZG flares. the car was a bit rusty but it was still pretty good. Dad then welded in lots of braces and chopped the rear section of floor out so he could run longer control arms and coil over rear suspension. After 12 months dad lost interest and put the car back up stairs (in the loft). About 4 years ago dad pulled the car back down from up stairs and begun work again. This time he cut more of the rear floor out, and started work on the rear suspension. The car has also been tubbed to enable the wheels to tuck further up in the guards. Dad build the rear suspension towers which tie into the chassis and roll cage. The coilovers all round are custom items from Murray Coote Australia with remote canisters. The control arms are all chromoly and run from the back of the front seat to the diff (approximately 515mm long). The car features AP four piston calipers all round which dad got AP to redo as they are the same calipers that were on the car in the 80s. The diff is a 8 inch hilux unit with Race Product full floating hubs. The engine is a series 5 turbo block with series 5 NA rotors which are lightened and balanced as well as rx8 crank and stationary gears. Extreme Rotaries did the PP porting and made the manifold. The car has twin 55mm EFI hardware throttle bodies running 4 1000cc injectors. The car is dry sumped with a Mazda Factory Race unit and the oil cooler is in the rear wing like the factory cars.
All the plumbing is done through Speedflow braided hoses and couplings.
We arent sure when the car will be finished but all the fibreglass panels are done, which dad and i have put over 1500 hours into sanding and bogging to make correct fitting molds.
I cant wait to see the car in the bush.


Sorry i dont have any more photos. The last ones are about 12 months old so i will have to help dad push it outside and get some more shoots. You may need to now wipe the key board to catch that drool HAHA!!
The first photo in the in the which houses the number 1 genuine Group B rx7. This car however is now in the number 20 shell after one too many crashes. Dad was even lucky enough to get to sit in the car. Also on our private tour, Pete the mechanic, started the car up and the premix fumes filled the air and it was that heavy that i couldnt breathe and my eyes were watering. I swear it was just from the premix!!
This red rx7 is also a genuine Group B Mazda. This car is number 10 and has never been raced so now Pete, who is standing there talking to dad, is building this car into a tarmac racer. The workmanship on the car was amazing! And judging by the engine and brake package it will go very fast and brake bloody hard!!
Now to dads car.
The car is a 1980 model series 2 rx7 brought about 6 years ago as a shell. The plan was to turn it into a PRC (production rally car) with small ZG flares. the car was a bit rusty but it was still pretty good. Dad then welded in lots of braces and chopped the rear section of floor out so he could run longer control arms and coil over rear suspension. After 12 months dad lost interest and put the car back up stairs (in the loft). About 4 years ago dad pulled the car back down from up stairs and begun work again. This time he cut more of the rear floor out, and started work on the rear suspension. The car has also been tubbed to enable the wheels to tuck further up in the guards. Dad build the rear suspension towers which tie into the chassis and roll cage. The coilovers all round are custom items from Murray Coote Australia with remote canisters. The control arms are all chromoly and run from the back of the front seat to the diff (approximately 515mm long). The car features AP four piston calipers all round which dad got AP to redo as they are the same calipers that were on the car in the 80s. The diff is a 8 inch hilux unit with Race Product full floating hubs. The engine is a series 5 turbo block with series 5 NA rotors which are lightened and balanced as well as rx8 crank and stationary gears. Extreme Rotaries did the PP porting and made the manifold. The car has twin 55mm EFI hardware throttle bodies running 4 1000cc injectors. The car is dry sumped with a Mazda Factory Race unit and the oil cooler is in the rear wing like the factory cars.
All the plumbing is done through Speedflow braided hoses and couplings.
We arent sure when the car will be finished but all the fibreglass panels are done, which dad and i have put over 1500 hours into sanding and bogging to make correct fitting molds.
I cant wait to see the car in the bush.
Sorry i dont have any more photos. The last ones are about 12 months old so i will have to help dad push it outside and get some more shoots. You may need to now wipe the key board to catch that drool HAHA!!
Thread Starter
Full Member
Joined: Feb 2014
Posts: 50
Likes: 0
From: Australia
Cheers mate
Dad's Rally car
Dad had been working very late nights to get the rally car finished, just found some extra motivation, so the cage is 100% finished, the master cylinders have been mounted up under the dash, the floor on the drivers side (right hand drive) has been cut and lowered to fit the bucket seats in and fitting dads head under the roll bar, the sill stands have been put in the car and tied to the cage, he has stitched welded from front to back along the chassis and towers, and he has started on the steering column which is out of a toyota corolla, and had a KE72 (for memory off the top of my head) manual rack. Under the dash the car has a electric power steering box out of a suzuki i think which has a control box so when the car is traveling at high speeds the wheel turns less, like all modern cars.
And all the work has just been done after work during the last week
My car
Not much happened since the last update.
i did spend last weekend grinding and filling lots of the holes in the engine bay but due to school exams i havent been able to spend a whole lot of time on the car, probably only a couple of 2 hours at best over the last month.
This friday though i have set some time aside after school so i can finish the engine bay.
I hope to have everything forward of the firewall in high fill primer by friday night.
I will post pictures when im done
Also i have picked the final paint colour, I was planning to go white but now im sold on metallic blue. The colour is a House of Kolour item called Majik Blue.
I will use a white base coat and then the blue, before i clear. This blue may have a bit too much purple in it for my liking, just depends what light it is in so i will test a panel and see if its the colour i will go with.
Cheers
Thread Starter
Full Member
Joined: Feb 2014
Posts: 50
Likes: 0
From: Australia
Hey guys i spent a couple of hours last night on photoshop mucking around with designs for my Mazda.
The picture is a bit rough bit it gives you a general idea of how the car is going to turn out.
The colour is the HOK metallic paint, the wheels are Rota Wheels (yes i have heard they will break and all that other bull, but when they are only $800 for a set i really cant argue with that) which will probably be in a 15x8 size, maybe even 15x9 on the rear and i really want to add the white Mazda strip like the rx4 and REUP utes had.
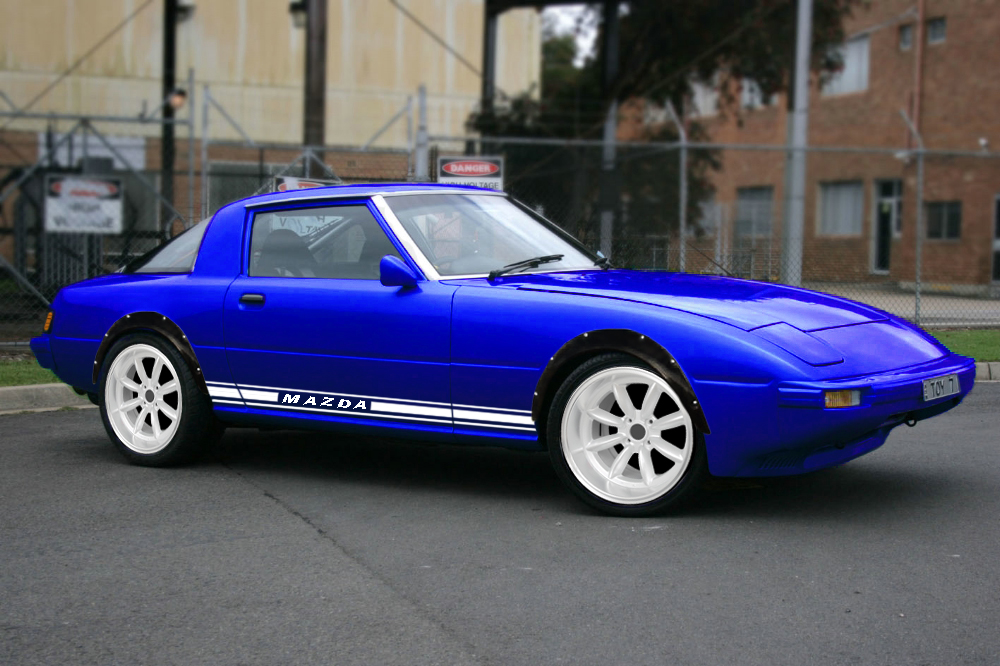
One thing i didnt do on this rendering is the black rear wing. Im sure i have posted it in other pictures (currently red) and that will be added to the car.
Cheers i hope you guys like the car
Thread Starter
Full Member
Joined: Feb 2014
Posts: 50
Likes: 0
From: Australia
I dont want elastic bands either because i want to be able to drive the car on the street, (well in our area they arent really what you would call a sealed surface and certainly not after rain) so i will probably go with a 50 series tyre just so it has a fair amount of sidewall
Thread Starter
Full Member
Joined: Feb 2014
Posts: 50
Likes: 0
From: Australia
Update
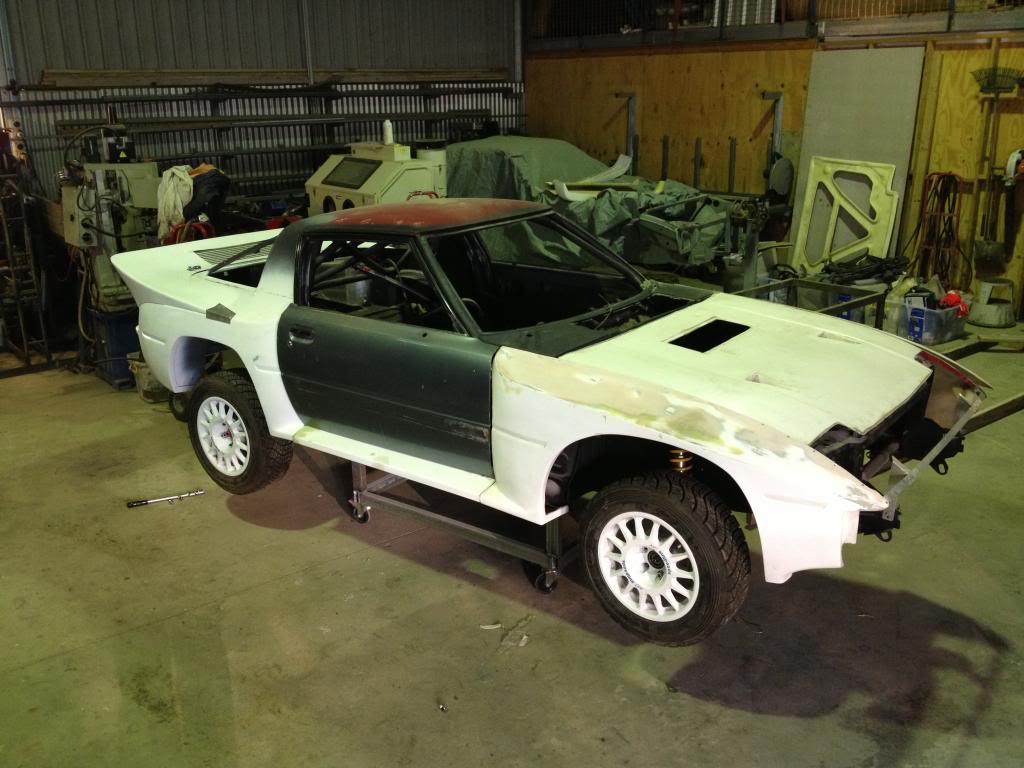
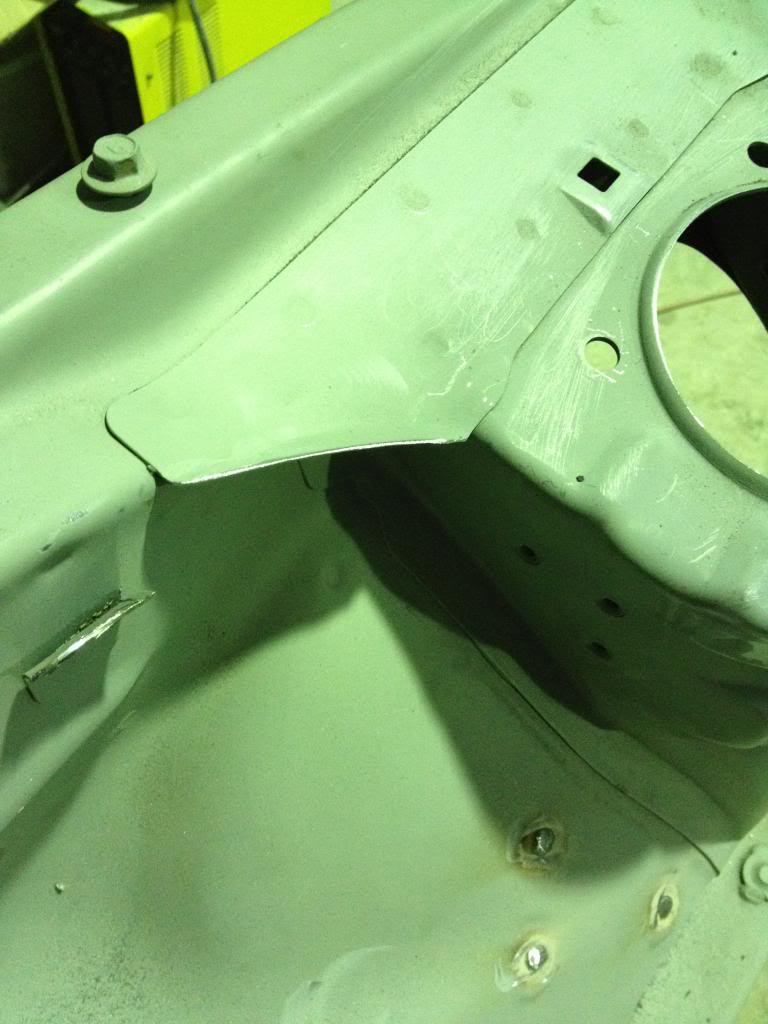
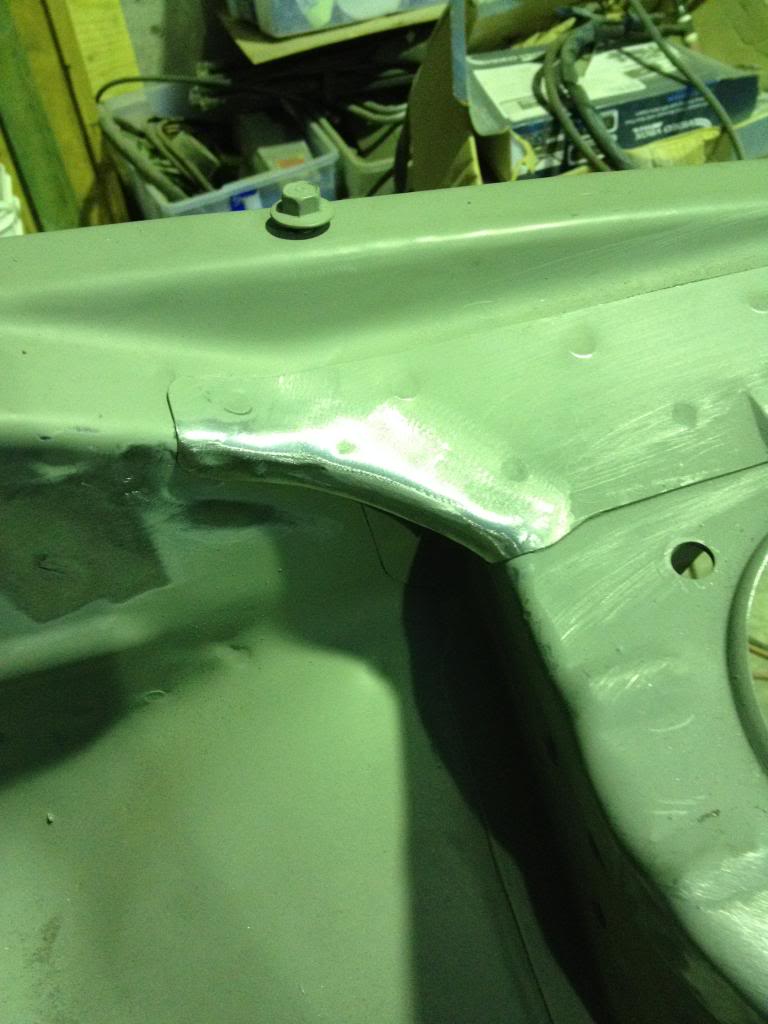
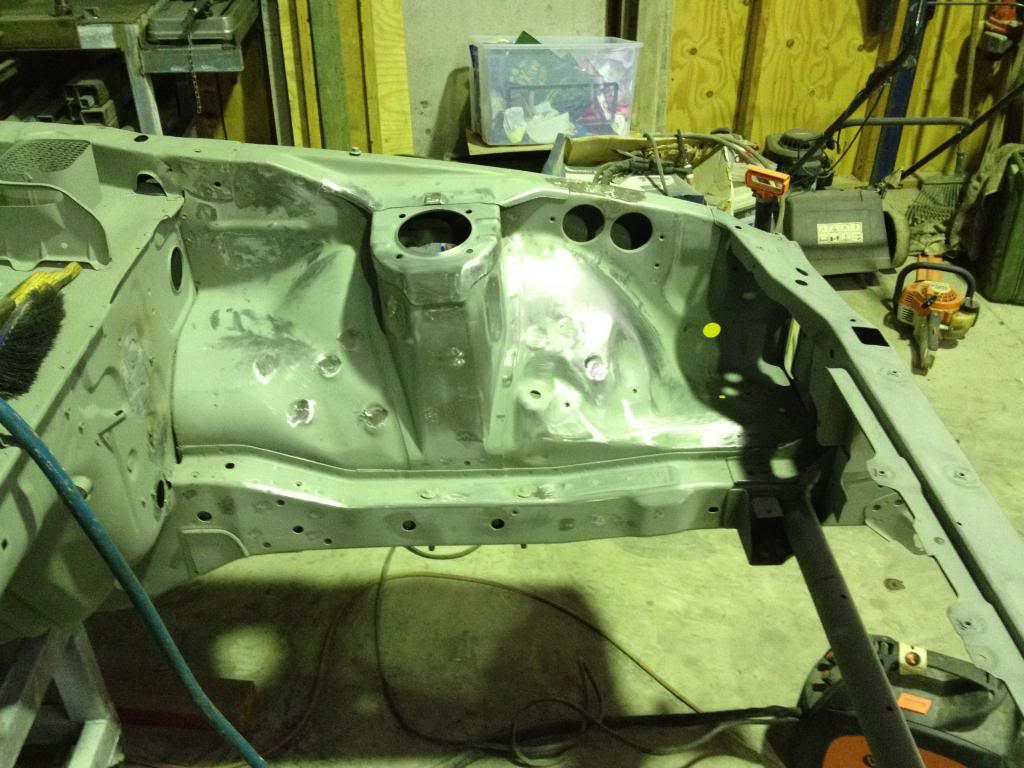
Okay guys over the weekend i did get a fair bit of work done on the Mazda. I raced home after school and got straight into finishing welding up the holes in the engine bay. So now most of the threaded holes are gone (for things like the cruise control and pollution gear) and all the holes which are in the fender wells are gone too (the harness will be be above the inner guard) plus the air con holes in the firewall are gone too. After everything was ground back first with a 5in grinder and then with a air die grinder, the surfaces were sanded with P80 sandpaper so that it was rough enough for the bog to stick. I dont want to have much bog in the bay because i dont want it to crack but i still need a little just to smooth things off. After rubbing everything back in what felt like 500 degrees i got ready to bog but it was getting to late in the night and i didn't want to rush anything so i left the car under the car cover in the shed. This means that i will have to re-rub the bay down but that shouldn't take that long. On sunday i spent a couple more hours on it but i mainly focused on putting the flares on the car. A little while ago we found some flares dad had on his rx3 rally car and yes they are a bit small and done quite fit right but they were free so thats what im using. First thing will be to clean them up and repaint them, so i can make moulds and maybe sell some flares to fit the rx3. This will enable me to make a set for myself which i will then cut up and mould to fit to the rx7. The guards will add about 45mm to the body which will enable me to get a bit more dish on my wheels. i know this is a lot of work as you can go and but ZG datsun flares, but i want the flares to tapper to nothing right at the bottom of the guard and fit to the Mazda lines so i will make my own
Oh and i also did a little modification to the bracket that holds some pollution sh#t on. i didnt like the look of it so i cut and bent it so it looks factory. i did get one small dent in it but i can wipe a skim of bog in it and nobody will ever know
Cheers Guys
BTW this is the finished left hand fender well.
The car is getting closer and closer to being finished. certainly getting keen


Oh and i also did a little modification to the bracket that holds some pollution sh#t on. i didnt like the look of it so i cut and bent it so it looks factory. i did get one small dent in it but i can wipe a skim of bog in it and nobody will ever know


Cheers Guys
BTW this is the finished left hand fender well.

The car is getting closer and closer to being finished. certainly getting keen

Thread Starter
Full Member
Joined: Feb 2014
Posts: 50
Likes: 0
From: Australia
So for those reading this thread i hope you are enjoying the build and i will keep you posted as much as possible as the car unfolds and transforms.
Cheers