
craaaazzy's Widebody REW project

Thanks. That pic is of Matt's car...something I may do to fit the vmount but not fully committed to that yet as I have another idea in mind but need to swap motors first to see how much room I have to play with.
just picked up my bosch injectors from having them cleaned and flow tested to make sure they were good. happy to say they match and should have no issues. now to put them onto the rail and install them on the engine.
next, have to get some help in removing the GSL-SE motor out.
next, have to get some help in removing the GSL-SE motor out.
only took me 2 months to install the FFE step up kit. hopefully nothing leaks.
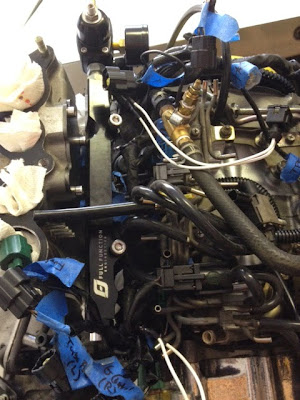
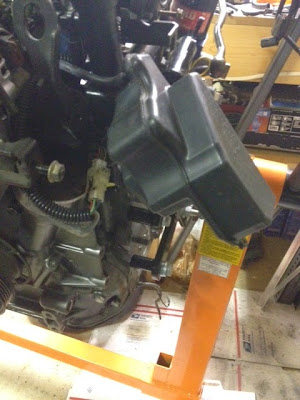
because of the 60mm injectors i chose to run, it ended up creating some clearance issues w/ some things. first, one of the metal vacuum line hit the rail so i had to cut that one piece out and not affect the other metal lines. luckily i had another set of these metal lines which i could again cut the necessary piece to use. it's the one w/ the 2 black silicone lines attached and zip tied:

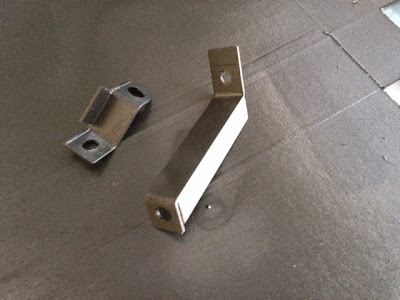
second, the turbo and wastegate solenoid valves could not be installed in its stock location. ended up having to make some aluminum brackets to move them slightly up and out:
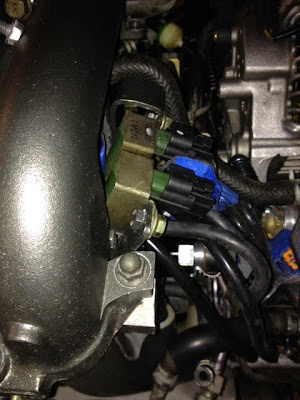
third, with the solenoids relocated a bit, that in turn created clearance issues w/ the pressure chamber which again, i had to make some more brackets for.
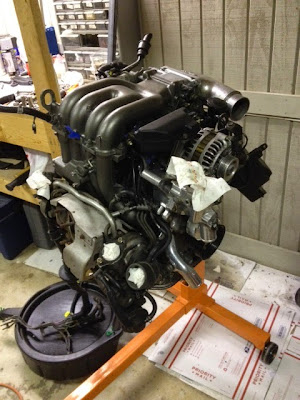
will also have to relocate the vacuum chamber because of the 12a front cover. not quite sure where to mount it...i may have to wait until the engine is in to see where it would fit best.
motor is pretty much complete now. just need to order a 2nd gen filler neck cap assembly so to eliminate the AST. if anyone has a good one for sale, let me know.
bad pics for now but i'll try to take some good ones tomorrow:

because of the 60mm injectors i chose to run, it ended up creating some clearance issues w/ some things. first, one of the metal vacuum line hit the rail so i had to cut that one piece out and not affect the other metal lines. luckily i had another set of these metal lines which i could again cut the necessary piece to use. it's the one w/ the 2 black silicone lines attached and zip tied:
second, the turbo and wastegate solenoid valves could not be installed in its stock location. ended up having to make some aluminum brackets to move them slightly up and out:
third, with the solenoids relocated a bit, that in turn created clearance issues w/ the pressure chamber which again, i had to make some more brackets for.
will also have to relocate the vacuum chamber because of the 12a front cover. not quite sure where to mount it...i may have to wait until the engine is in to see where it would fit best.
motor is pretty much complete now. just need to order a 2nd gen filler neck cap assembly so to eliminate the AST. if anyone has a good one for sale, let me know.
bad pics for now but i'll try to take some good ones tomorrow:
and the GSL-SE motor is finally out!!! removed the engine and tranny as a unit by myself...not quite as bad as i thought. luckily i had a leveler as i don't see how i could manage without it.
here's the stock motor w/ my spare REW:

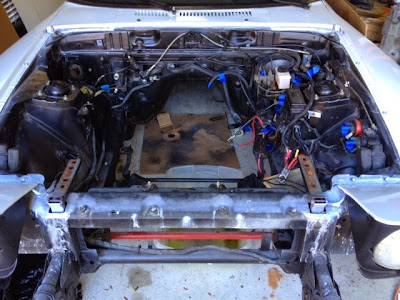
here's the garage space i have to work with. wife's car sits outside now until the REW motor is in.

need to figure out clearance issues w/ the motor mounts and the twin turbo's but will do so tomorrow as i did a quick sanding of the front plate and painted it. hoping for the best.
here's the stock motor w/ my spare REW:
here's the garage space i have to work with. wife's car sits outside now until the REW motor is in.
need to figure out clearance issues w/ the motor mounts and the twin turbo's but will do so tomorrow as i did a quick sanding of the front plate and painted it. hoping for the best.


Great progress Craaaaaazy, looks good! My garage looked like that at one time but now it looks like a junkyard bomb went off in there, scattering parts everywhere! 
You're doing great work - keep it up!
You're doing great work - keep it up!
thanks woodmv. that pic was after me cleaning up, i had boxes and parts everywhere.
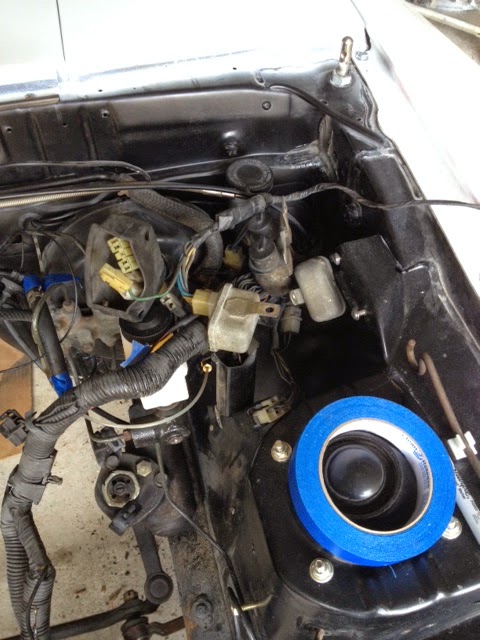
started wiping down the engine bay. am wanting to paint it but the wiring on the driver's side looks to be a pain. passenger side is ready for some quick sanding though.
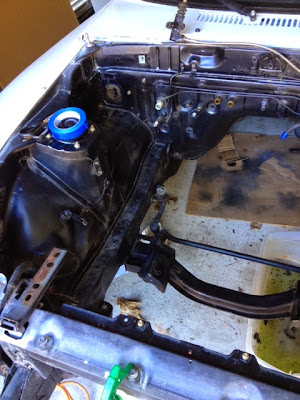

wish i was better with wiring as i would love to eliminate every wire i don't need. anyone know what this is? the two items with the **** looking things on top and the two silver items to the right of them. what are they (am wanting to know if i can remove them).

started wiping down the engine bay. am wanting to paint it but the wiring on the driver's side looks to be a pain. passenger side is ready for some quick sanding though.
wish i was better with wiring as i would love to eliminate every wire i don't need. anyone know what this is? the two items with the **** looking things on top and the two silver items to the right of them. what are they (am wanting to know if i can remove them).
good news is that the front plate does indeed fit. i did have to bend the metal lines to the actuator a little though but should not be a problem. can't use the competition motor mounts i have as the tops are too wide and would touch the actuator hose. planning on using hokey pucks now as they are smaller in diameter.


ok, a quick look at the 85 wiring diagram...are the items i asked earlier close to the brake booster w/ the **** looking tops and the silver things behind them, are they the main relays? if so, it means i should not remove them.
spent the day trying to remove the wiring harness on the driver's side. plan was to totally remove it from the chassis but when i climbed inside to see where the connectors were, it was totally behind the dash so scratched that idea. i did get the harness undone from the engine bay so i can move it while painting. i just hope i can figure out how it all goes back together. sorry for the crappy pic.

this is going to be the hardest part to paint as there is little room w/ the harness there. at least i can move it some.
i don't have a spray gun but may pick up a cheapo from harbor freight and use it to spray a single stage paint...depending on price. if that is expensive, i'll just have to research on spray can paint. if anyone has suggestions, please let me know.
I just checked the place that I bought my original color from that I painted my engine bay with and they have a really cool spray adapter for rattle cans. Check this out:
Touch Up Paint and Accessories | AutomotiveTouchup
I may have missed it but are you going original body color in the engine bay? If so I was real happy with the color they sent me. They have all the paint codes for just about any old car. I ordered two rattle cans and used 1 and a half to spray my entire engine bay (minus the hood), then covered it in clear.
thanks for the info. original color was tornado but PO already painted it black so am sticking w/ that color. saw an adapter like that at home depot today when i was picking up paint for my daughter's room.
right, 15x8 w/ 2in backspace in the front. if u go w/ 15x10 w/ 1n backspace, outer edge would sit the same as our current wheels but would have an additional inch inside (thinking about it in my head but i could be wrong w/o drawing it out). makes sense. can't imagine how hard it would to steer though.
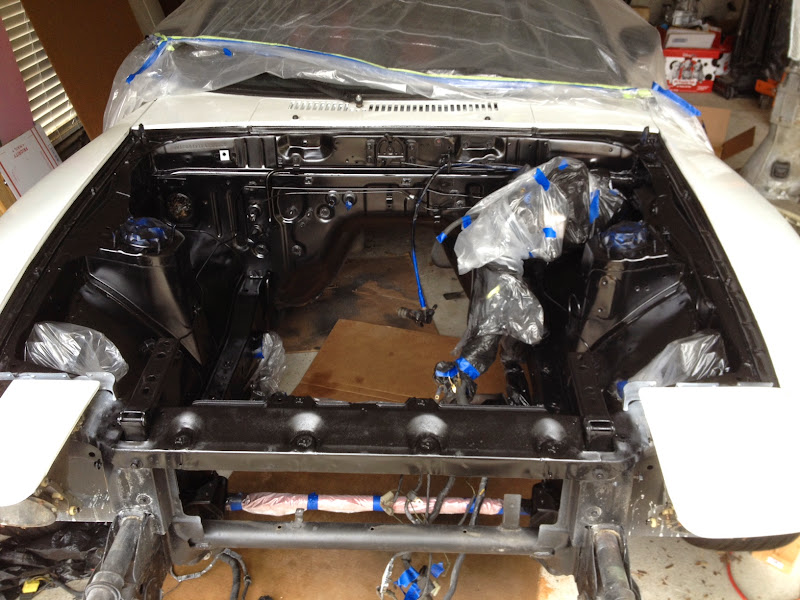
painted the engine bay today. ended up using rustoleum bbq semi-gloss spray paint. this is high temp paint and says primer is not recommended. hopefully it lasts. this is with 2 coats...came out pretty good i must say.
on a different note, i got to drive this little baby yesterday, v10 version.

on a different note, i got to drive this little baby yesterday, v10 version.
oh, forgot to say that i almost started cutting some flat stock for the hockey puck mounts but thought i'd verify the competition mounts again. they do fit! when i first tried them, i had them 180 degrees off so i just had to rotate it and the plate does not hit the actuator hose. i may try to install the engine tomorrow or wait until i can get some help another day as i don't want to scratch the engine bay...we'll see how patient i can be.
Joined: Jun 2006
Posts: 4,815
Likes: 24
From: Columbia, Tennessee
I painted a s4 13b I swapped with Rustoleum high temp (not for engines) about 8 years ago. Could have been BBQ, dont remember. Basically one of the primary injector grommets was bad and sprayed gasoline all over the engine. The paint came off as if I sprayed it with aircraft stripper. I actually just stripped the rest of with air craft stripper matter of fact, lol.
While your bay is empty Id recommend truck bed coating... It dries pretty hard and has a nice subtle texture to it and covers imperfections.
While your bay is empty Id recommend truck bed coating... It dries pretty hard and has a nice subtle texture to it and covers imperfections.