
1984 5-letter / S5 "Selene"

Thread Starter
Joined: Jul 2002
Posts: 3,219
Likes: 8
From: Washington State
Ya man - i've gone back and forth a lot on this issue - but when it comes down to it the indentation and the spacing actually perfectly matches all other body panel / glass joints that have a gutter - and this perfectly matches that flow!
Thread Starter
Joined: Jul 2002
Posts: 3,219
Likes: 8
From: Washington State
Incredible thanks to my bro Chris (metallic_rock) for his amazing work! WOW!
Here's what he did:
- flattened out the under side of the throttle plate spindle
- cut off the bottom of the throttle plate screws, flattened the tops (be sure to hammer/ tap the edge of the bottoms after to lock them in)
- cut away divider between chambers
- knife-edged the divider
- smoothed all edges inside the TB
Throttle body before and after:
Thread Starter
Joined: Jul 2002
Posts: 3,219
Likes: 8
From: Washington State
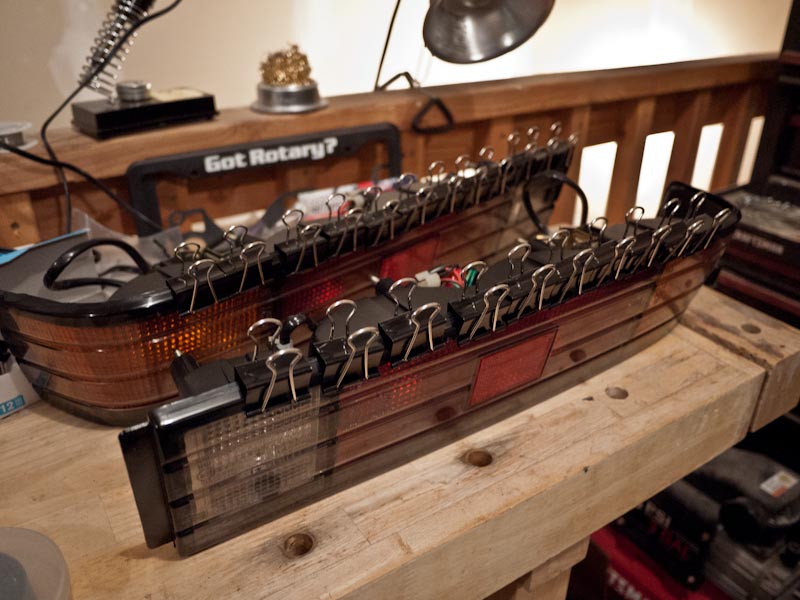
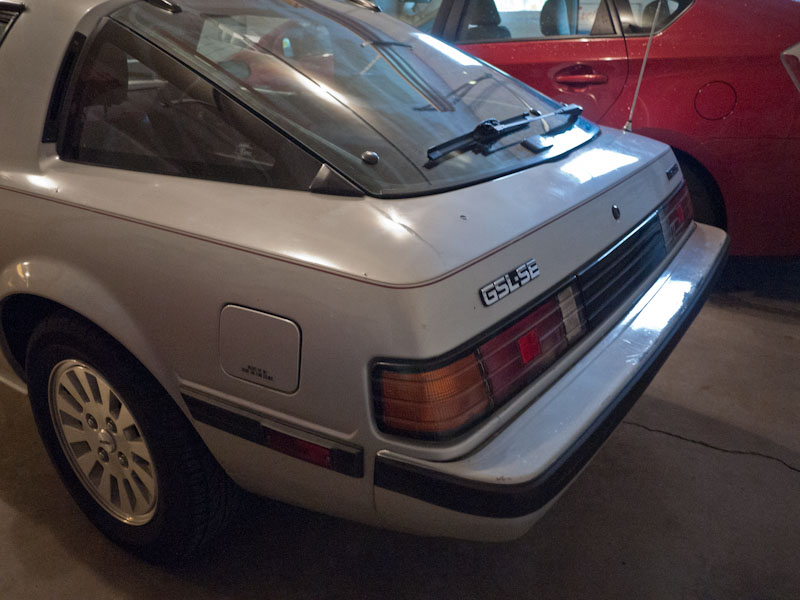
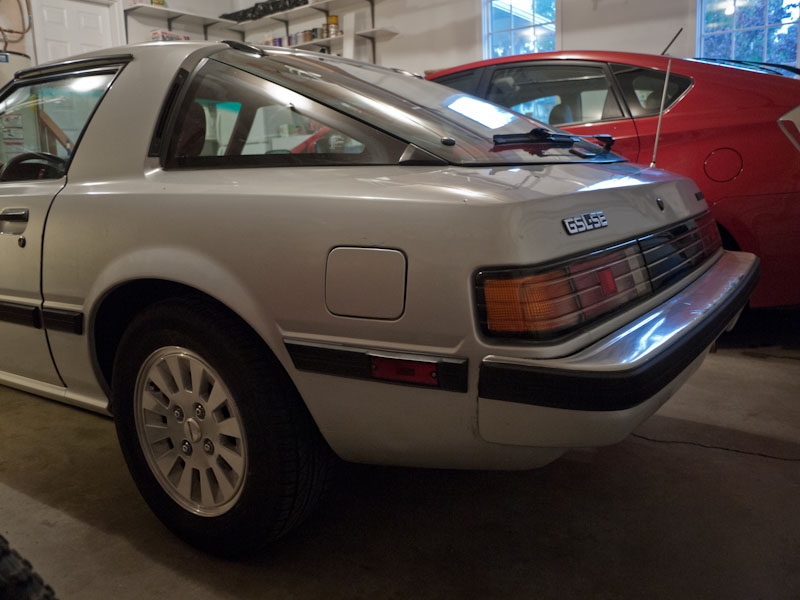
 clean up some garage space.
I had to take extreme measures to finish up those tails - the bottoms were the most bowed out, and took some extra persuasion to seal up. Ended up having to let them dry for about 3-4 days.
STAY!
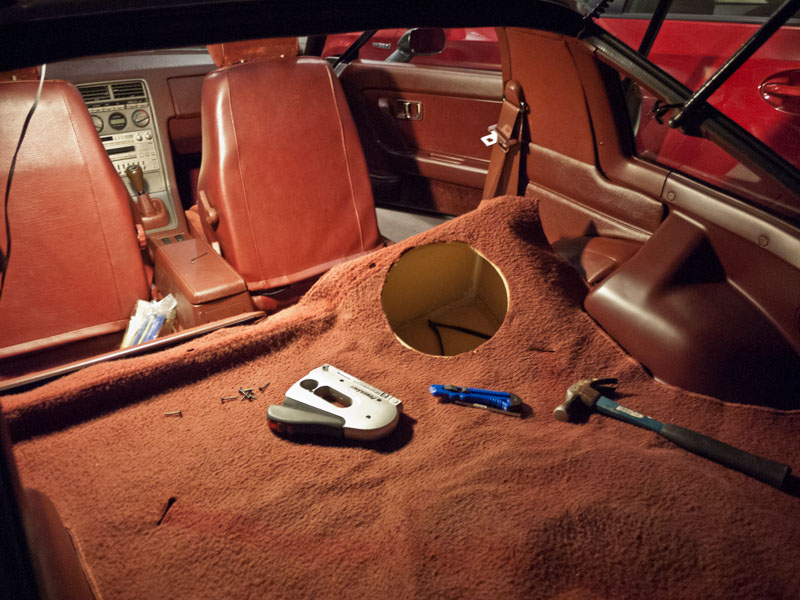
So far this weekend: SUBWOOFER install.
I'm finally getting my lazy *** around to it. No longer will my rear hatch be a mess of carpet, wires, and a pre-fab sub box just flapping around like a limp.... noodle.
Experimenting around with the pre-fab, I found that for the TIGHTEST bass response for the DRIVER ONLY, place the subwoofer behind the passenger seat firing directly rearwards, about 90* from the back wall of the storage bin area. This however leaves the bass tone in the passenger seat very boomy, and not tight at ALL. I will say though that the driver's side lacks that boom - however is VERY clean.
A little bit of boom is good, though, so experiment #2 - rotate the sub so its firing at the same angle in relation to the back of the car, but firing towards the driver's side. This really balanced out the tone - still VERY tight, but not just for the driver now. Both driver and passenger have equal tightness of bass, and BOTH have a nice subtle "boom" to them. This can all be tuned out through the graphic EQ, as well.
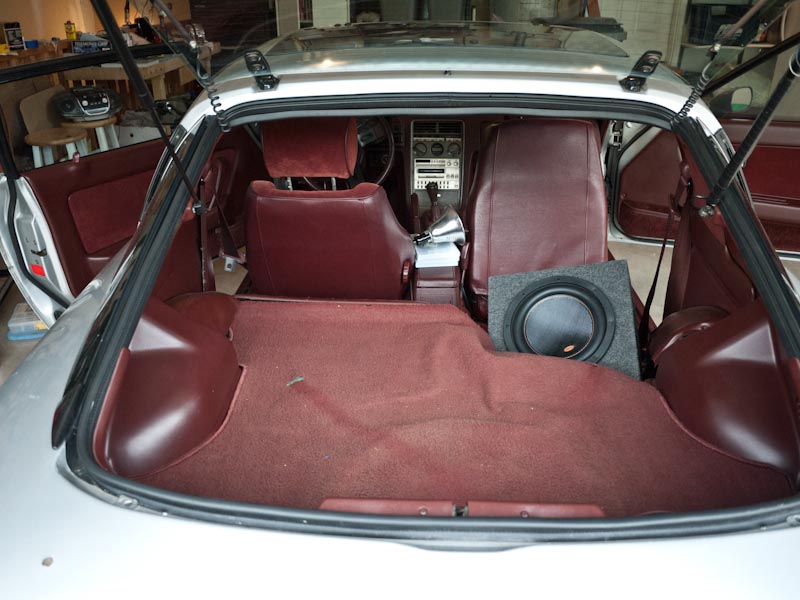
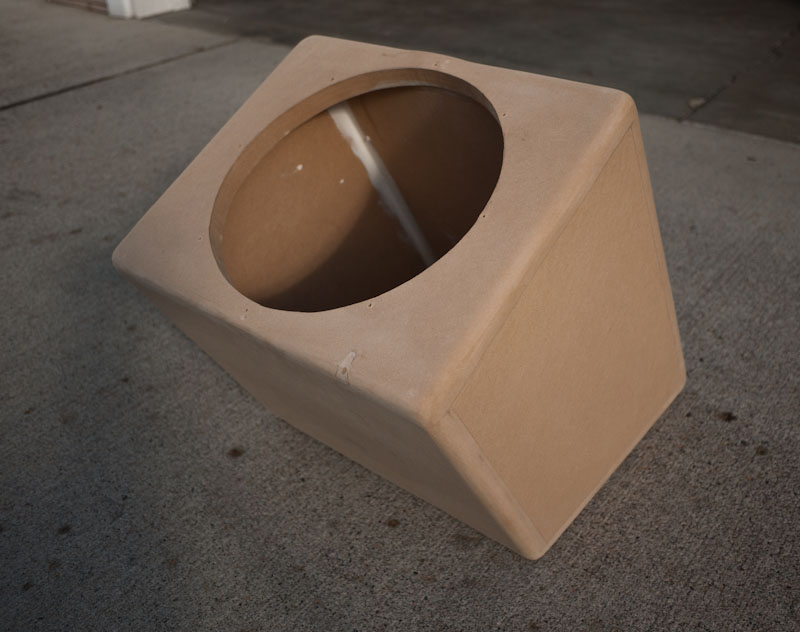
The pre-fab box was roughly the right cubic volume, however does not fit this space with any degree of finesse. So, custom enclosure time! I made the enclosure as narrow as I dared, as the M5 sub magnet basically drops directly down from the mounting ring. The thing is HUGE!
I struggled for quite some time trying to figure out how to build a box with a fancy angled top to get it firing backwards and inwards. Several cardboard mockups later, I said fuggit and decided to just build a box firing directly rearwards. It will sound great for driver, not as much for passenger, but look clean and be WAY easier to build. So I did:
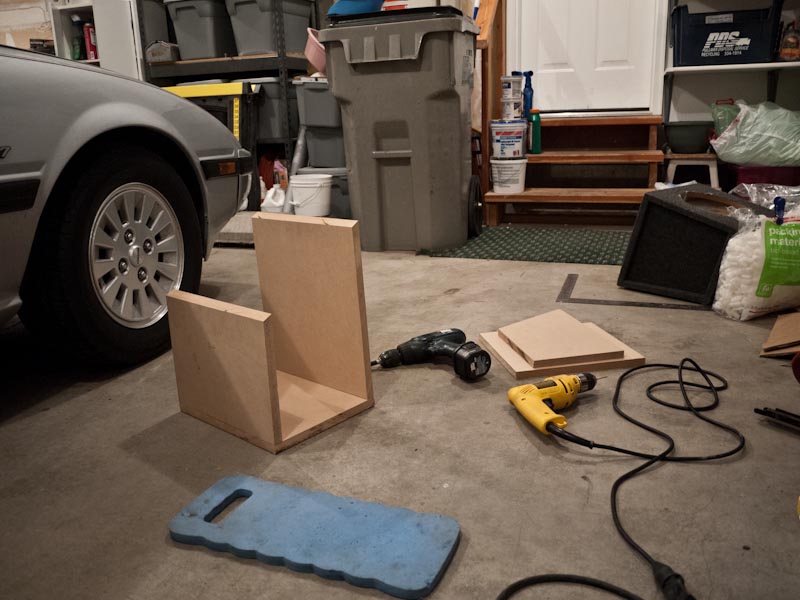
I have glued the sides, and will be cutting the speaker ring and gluing the top / bottom here in about 10 minutes.
After clamping it down (before gluing it) I dropped it in for a test fit. And Lo! And Behold! I can take this enclosure, and rotate it inwards, and it still fits just as dandy!!! Woohoo best of both! To get it to stay I will get 3 or 4 "L" brackets and solidly affix this to the car.
Then for the amp mount

Stay tuned!
Thread Starter
Joined: Jul 2002
Posts: 3,219
Likes: 8
From: Washington State
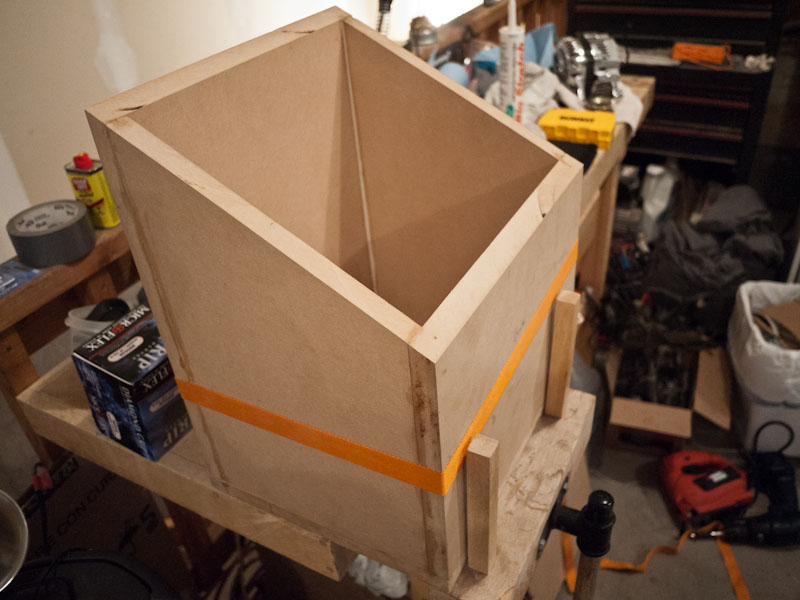
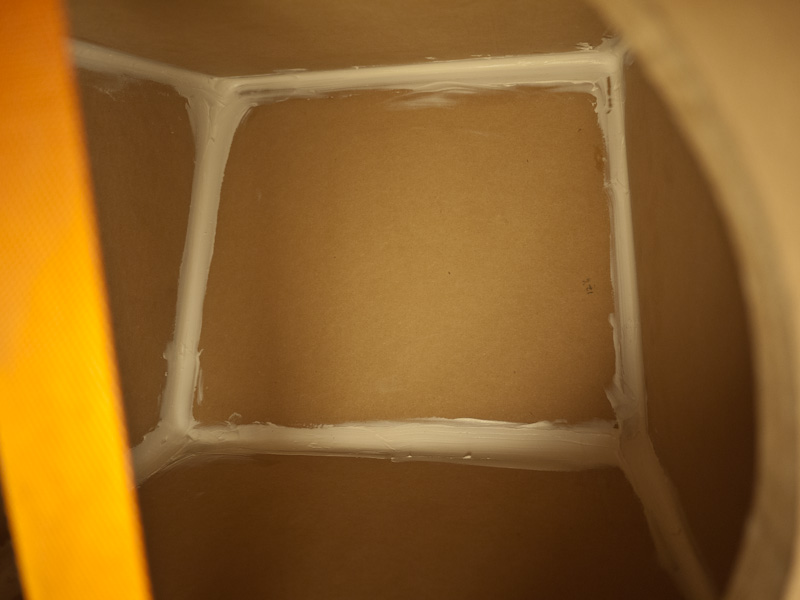
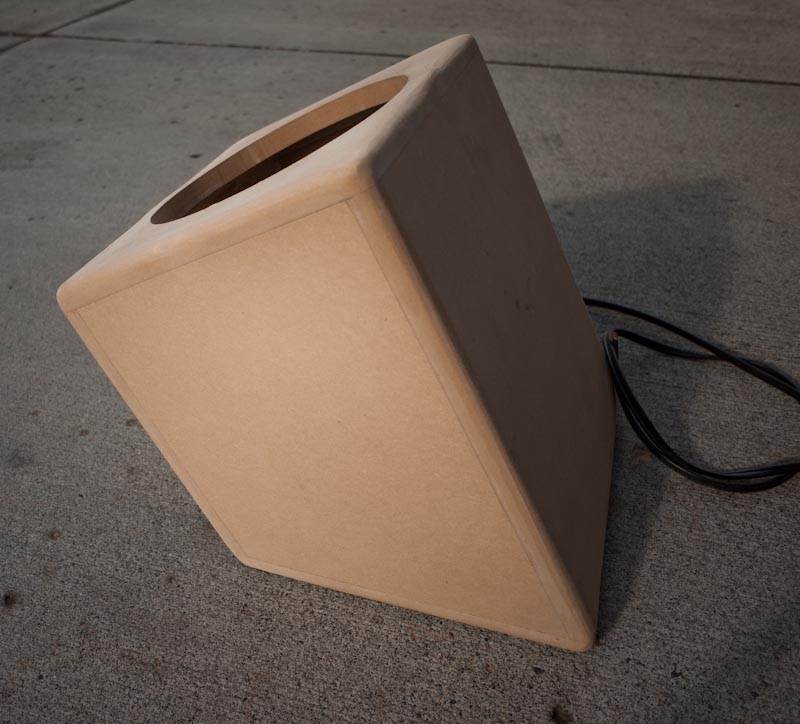
Assembled and sealed.
Wood glued, clamped together, seams all lined up and nice and tight. Inside is sealed with copious amounts of "Big Stretch" caulk. I'm going to let this whole thing cure in the garage for 24 hours - so Tuesday after work it should be ready to start mounting.
A key to getting a tight seal is once you've applied the wood glue to the 3/4 edge, wet your finger (or examination glove) and spread the glue across the entire width, so it coats 100% of the seam. This will maximize the surface area of adhesion. The glue will dry stronger than the MDF.
Do the top first, so you can easily caulk the underside. The mount panel is the most important to have solid.
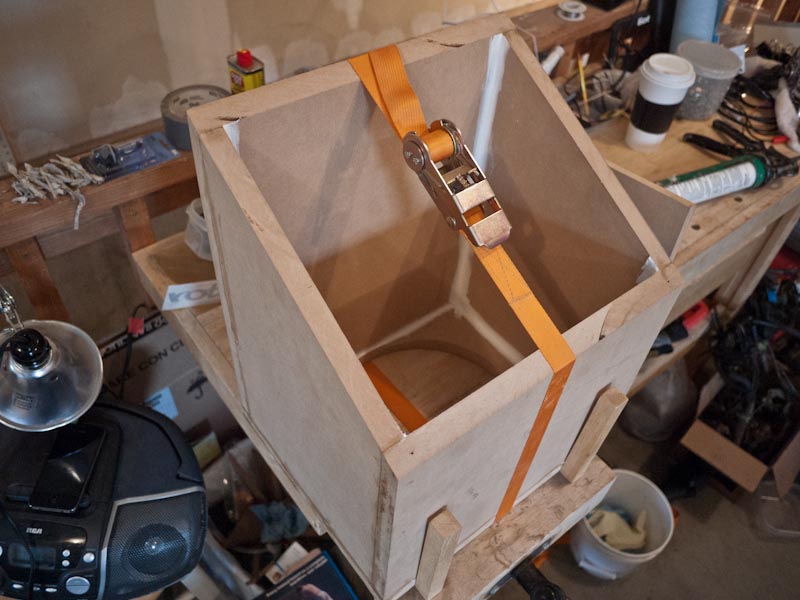
Once the top is sealed, attach the bottom plate and caulk through the hole in the top.
I will be running the wire directly to the subs, no extra wiring for a sub-box terminal. Will cut a hole in the side of the box, pull the 12ga wire through, then seal it with more caulk.
After this whole setup dries I will smooth out all the edges, fill the screw holes (used for clamping the mount down with screws while drying only, will be taken out after), and take a router to all the outside sharp edges for a bit of acoustic treatment.
A key to getting a tight seal is once you've applied the wood glue to the 3/4 edge, wet your finger (or examination glove) and spread the glue across the entire width, so it coats 100% of the seam. This will maximize the surface area of adhesion. The glue will dry stronger than the MDF.
Do the top first, so you can easily caulk the underside. The mount panel is the most important to have solid.
Once the top is sealed, attach the bottom plate and caulk through the hole in the top.
I will be running the wire directly to the subs, no extra wiring for a sub-box terminal. Will cut a hole in the side of the box, pull the 12ga wire through, then seal it with more caulk.
After this whole setup dries I will smooth out all the edges, fill the screw holes (used for clamping the mount down with screws while drying only, will be taken out after), and take a router to all the outside sharp edges for a bit of acoustic treatment.
Thread Starter
Joined: Jul 2002
Posts: 3,219
Likes: 8
From: Washington State
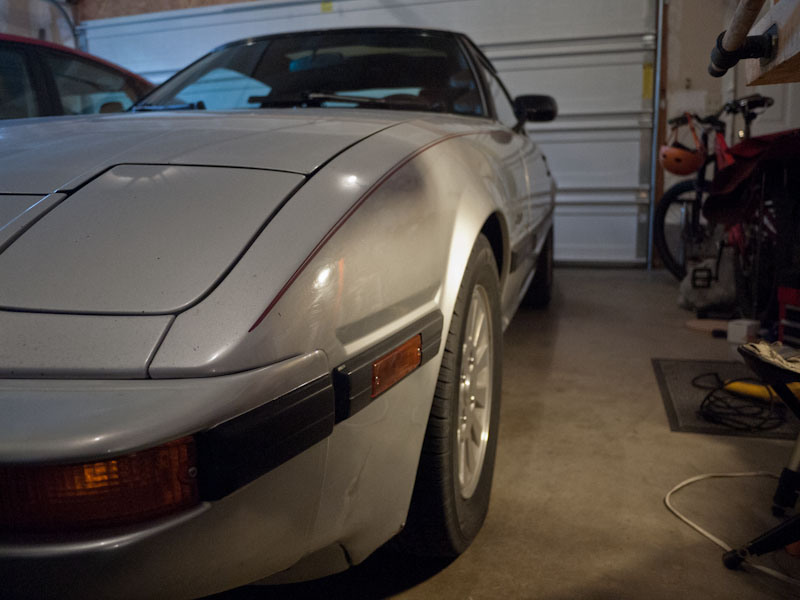
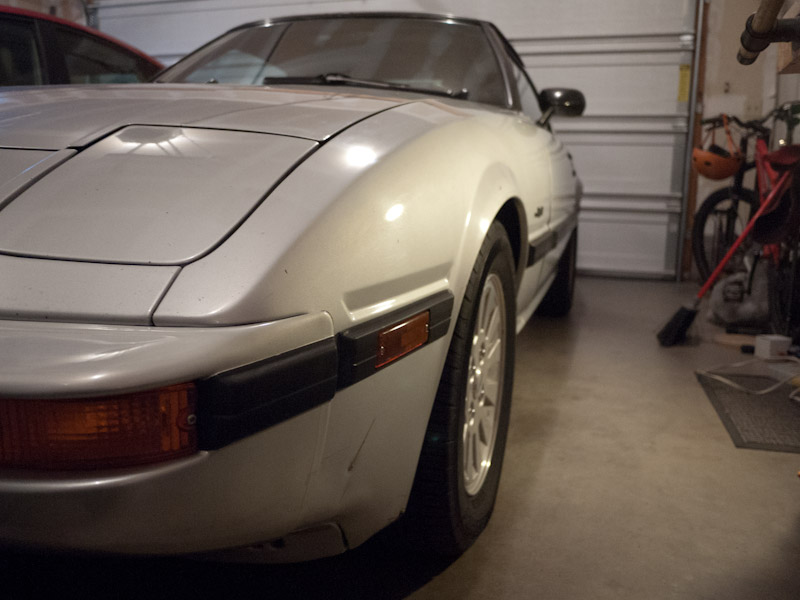
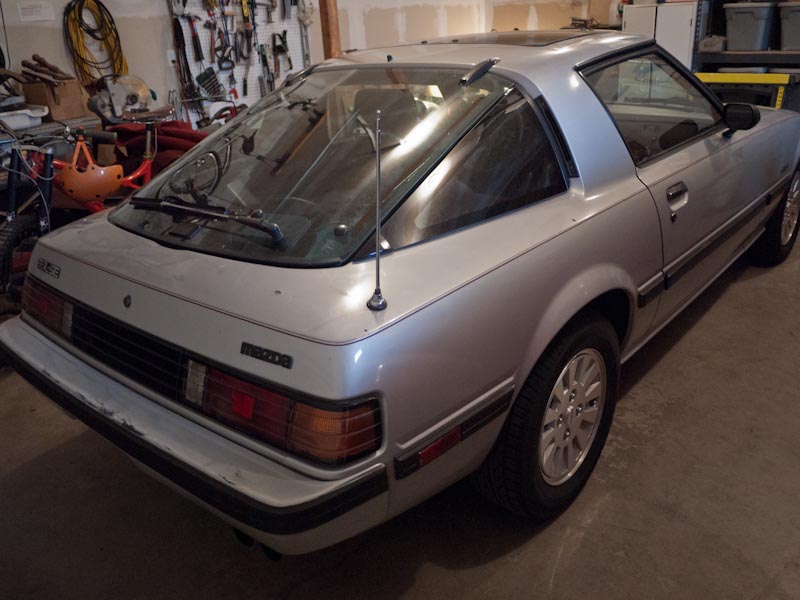
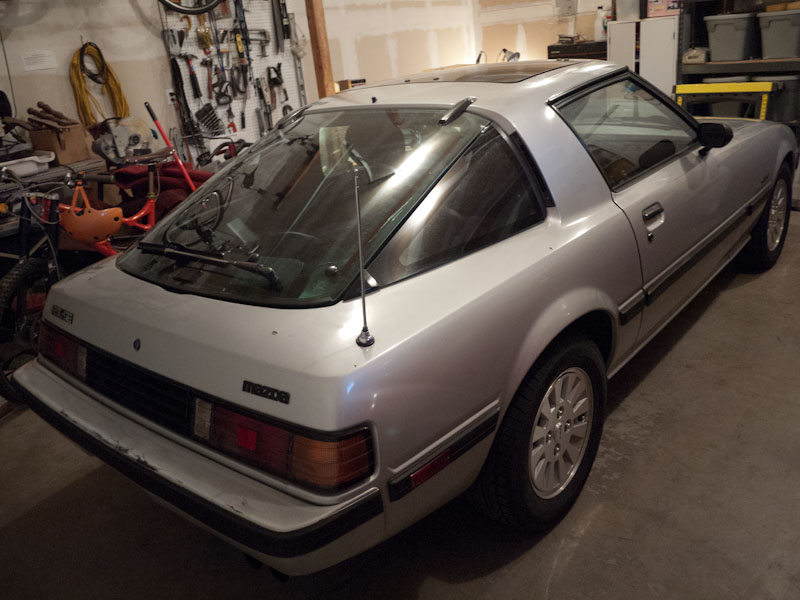
Pinstripes = gone
Fungus_Mungus inspired me to finally remove the fading/chipping pinstriping. I've never been the biggest fan of it, in my opinion the lines of the car speak for themselves, the stripe just sort of shoves it in your face.
But then there's the side of me that loves the 80's pinstriping. Well, honestly if I do a pinstripe it will probably be a dark grey wide band with smaller line to accent, which would all go below the black side bumpers. That's for another day.
For today, pinstripe is gone. The obligatory before and afters:
---
You can see I also removed the "Unleaded Fuel Only, Seulement Essence Sans Plombe". sad to see it go, but it was so faded and cracked it looked bad
---
Thread Starter
Joined: Jul 2002
Posts: 3,219
Likes: 8
From: Washington State
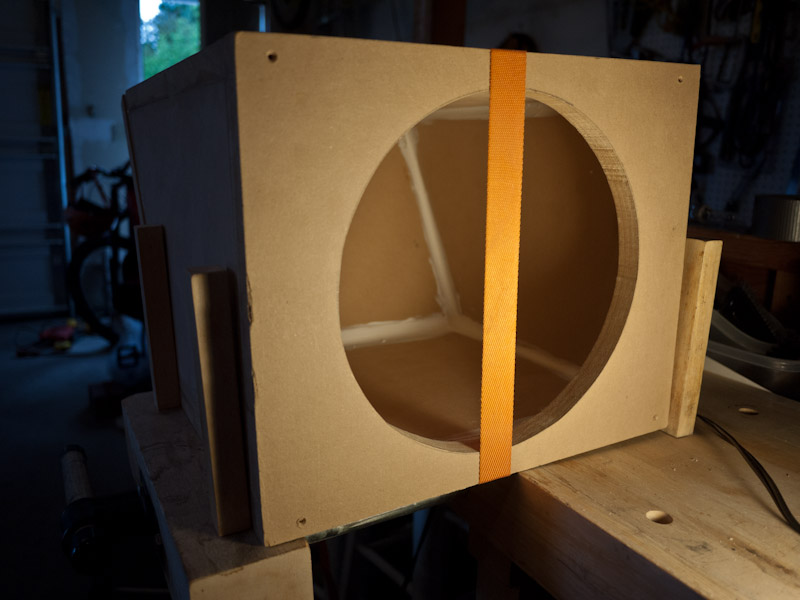
Subwoofer enclosure ready to install
So i spent an extra day on the sub box - i wasn't totally happy with the fitment of the filler panel i put on the inside (to reduce inner box volume to exact sub spec), so I filled in the gaps with wood glue. Will let it set another day before dropping the sub in and bolting the box to the frame of the car and carpeting it. It will be going at an angle where the passenger storage bin was.
Sanded down all seams, took the router to the edges, and then smoothed that out with the sander again. I did the routing / sanding late at night in the dark with a spotlight. I got distracted (mosquito perhaps? dont recall) and let the router sit for a second and made a boo-boo on the face plate. No worries it'll be carpeted. But i filled the gouge and the holding-screw holes for a nice clean finish.
I was on a roll so I decided to take apart the stereo and try to find what was up with my wiring - see if I had some wires crossed or something. I quadruple checked all my wiring and as far as i can tell i'm spot on. I have no idea why i'm getting progressively worse line noise and my tape deck now acts as a microphone. Enough for today. I'm tired. Calling it!

You weren't kidding when you said you found a gem to start your project with. I wish mine was more of a jem and less of a save from the grave sometimes. At least I am getting a lot of hands on experience.
Thread Starter
Joined: Jul 2002
Posts: 3,219
Likes: 8
From: Washington State
Best laid plans...
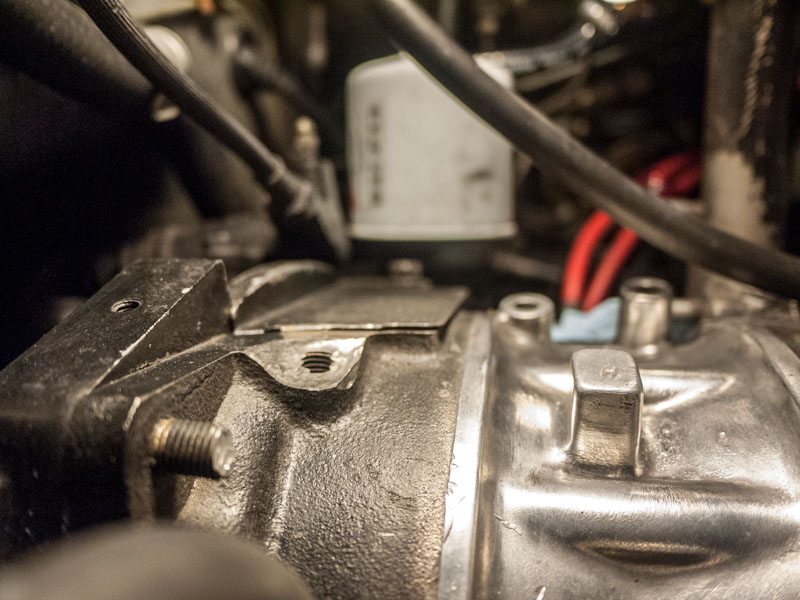
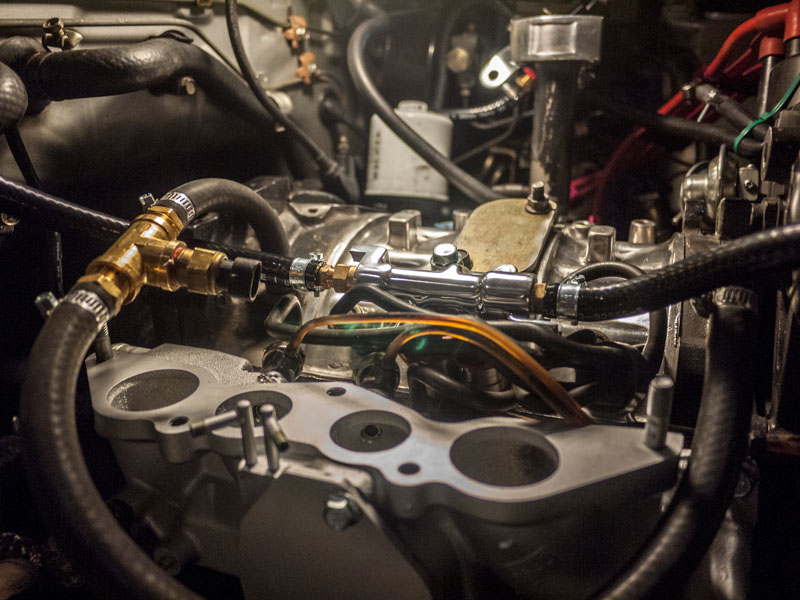
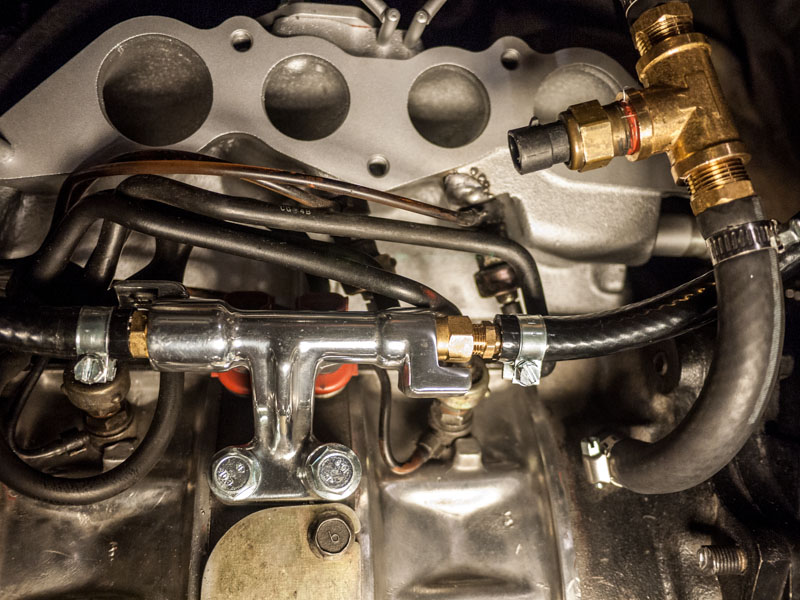
So I had been planning on installing the EFI system before Old School Reunion on Sunday June 9th. Welp - it literally came down to a round injector plug not fitting a square harness plug. EVERYTHING else is done.
I had the GSL-SE fuel pump installed, so I had to swap out the non-return Mallory FPR for the Aeromotive return-style unit. It works GREAT! Super precise. And the GSL-SE fuel pump is WAAAAY quieter. I didnt think it was running at first.

MECHANIC'S NOTE: Check, double check, and TRIPLE CHECK your fuel line connections before calling it good. Also - check this with the pump running and NOT THE ENGINE.
I had to tighten down the fitting on the high pressure side of the fuel pump @ the filter - was a slow leak but caught it right away. All other fittings were good. Took her out for a spin and gaddam she pulls hard. Harder than usual actually.
The obnoxious rattle in my exhaust seems to have taken the day off - she even SOUNDED better than usual!
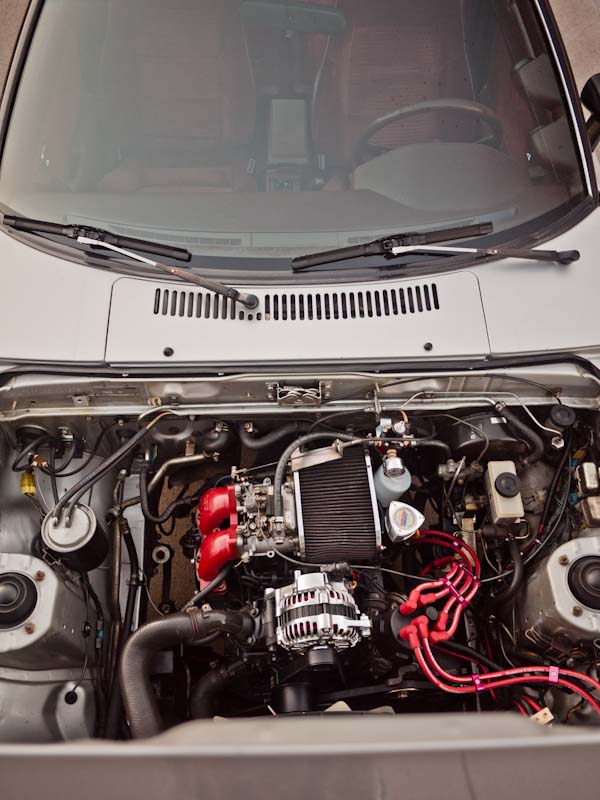
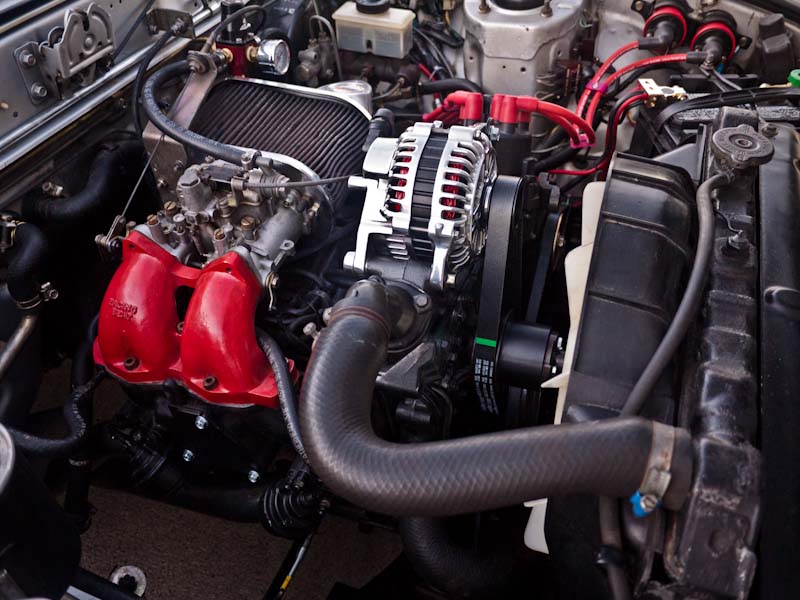
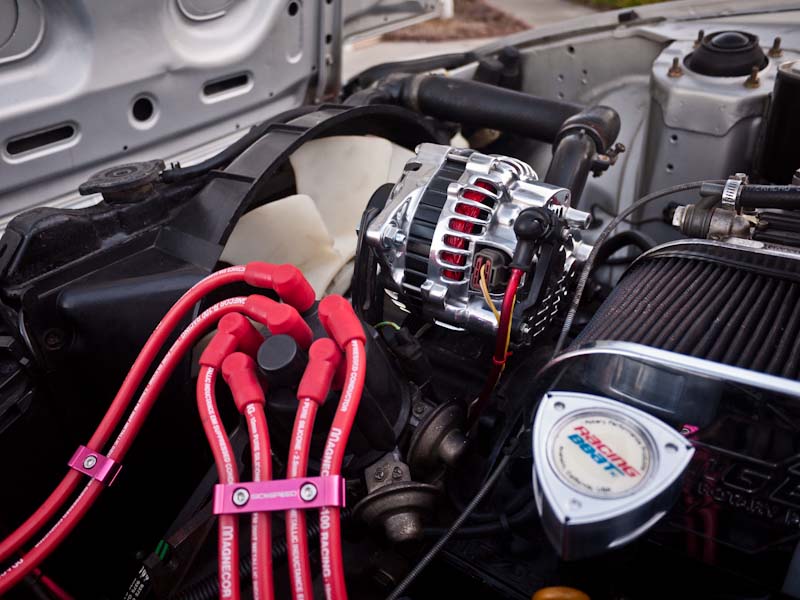
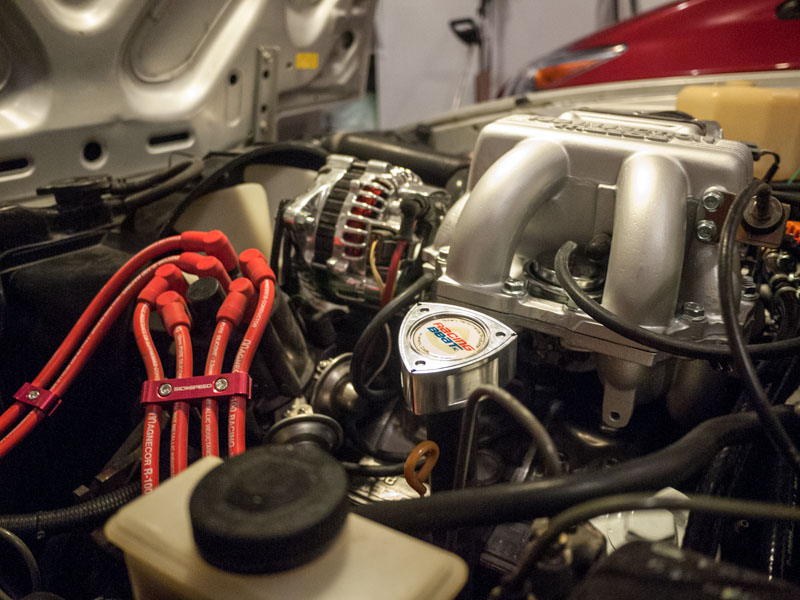
I figured, shoot, while i'm on a roll, why lose momentum? Mounted the polished FD alternator:
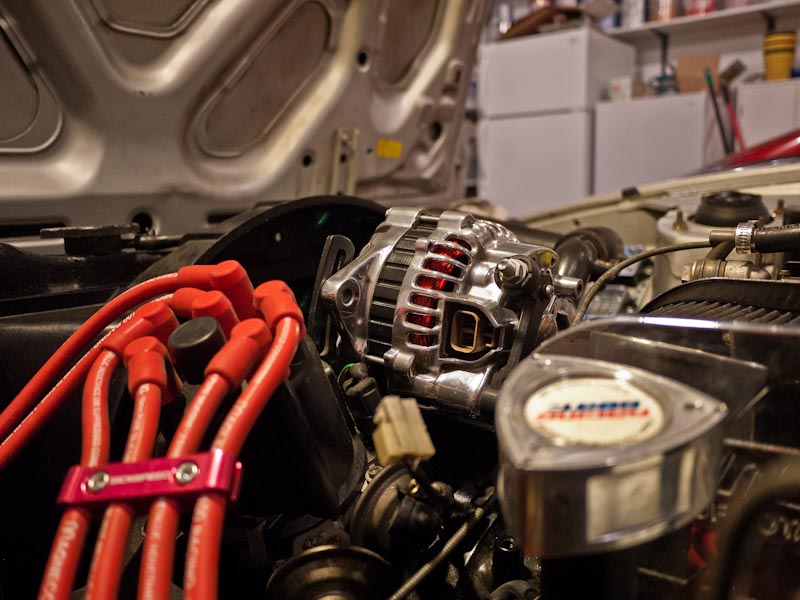
And the Atkins 6-rib pulley kit (non-underdrive):
The belt they sent is about an inch, inch and a half too short. Will have to see about swapping it for a longer one - the FD alt is bottoming out on the water pump neck just below the alternator mount.
A note - the FD alt is almost a direct bolt on to the S5 water pump mount. I had a GSL-SE alt on there before, and this dropped right on.
Thats all for tonight. Lots to do before the show on Sunday!
I had the GSL-SE fuel pump installed, so I had to swap out the non-return Mallory FPR for the Aeromotive return-style unit. It works GREAT! Super precise. And the GSL-SE fuel pump is WAAAAY quieter. I didnt think it was running at first.
MECHANIC'S NOTE: Check, double check, and TRIPLE CHECK your fuel line connections before calling it good. Also - check this with the pump running and NOT THE ENGINE.
I had to tighten down the fitting on the high pressure side of the fuel pump @ the filter - was a slow leak but caught it right away. All other fittings were good. Took her out for a spin and gaddam she pulls hard. Harder than usual actually.
The obnoxious rattle in my exhaust seems to have taken the day off - she even SOUNDED better than usual!
I figured, shoot, while i'm on a roll, why lose momentum? Mounted the polished FD alternator:
And the Atkins 6-rib pulley kit (non-underdrive):
The belt they sent is about an inch, inch and a half too short. Will have to see about swapping it for a longer one - the FD alt is bottoming out on the water pump neck just below the alternator mount.
A note - the FD alt is almost a direct bolt on to the S5 water pump mount. I had a GSL-SE alt on there before, and this dropped right on.
Thats all for tonight. Lots to do before the show on Sunday!
Senior Member
Joined: Aug 2001
Posts: 724
Likes: 1
From: Fort McMurray, Alberta
Cool build so far man. I saw your name on the thread and figured it was an old one of your blue car, it's funny how many people keep coming back to these cars (myself included lol). Keep up the good work, loving the pictures.
George
George


Thread Starter
Joined: Jul 2002
Posts: 3,219
Likes: 8
From: Washington State
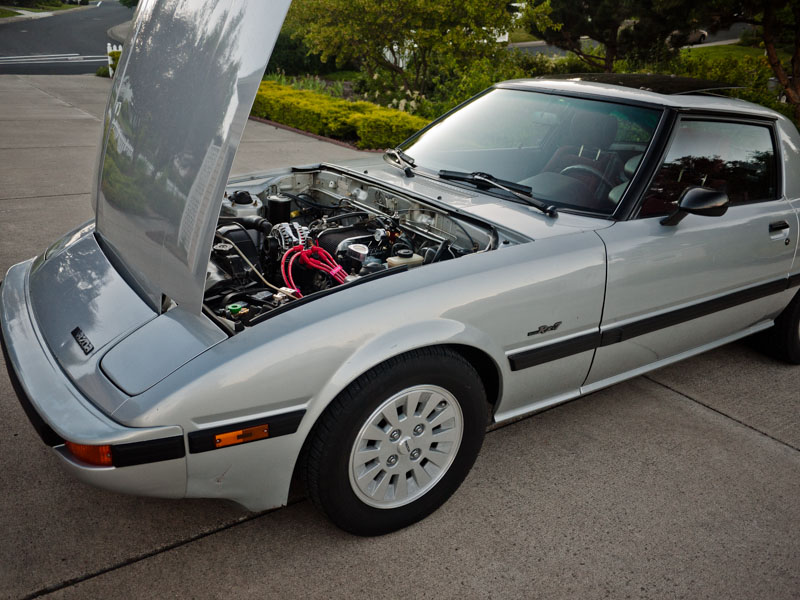
5/31/2013
Been a long time since i've updated. So we'll go chronologically.
Standalone CO2 6-port / VDI system
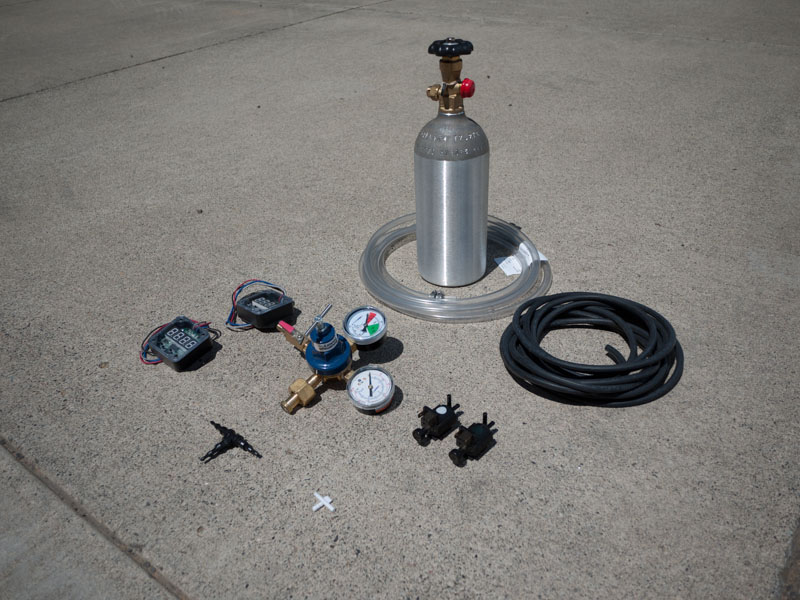
Mounted the RPM switches here for now. I'm thinking of making a little cover for them and painting it body color.
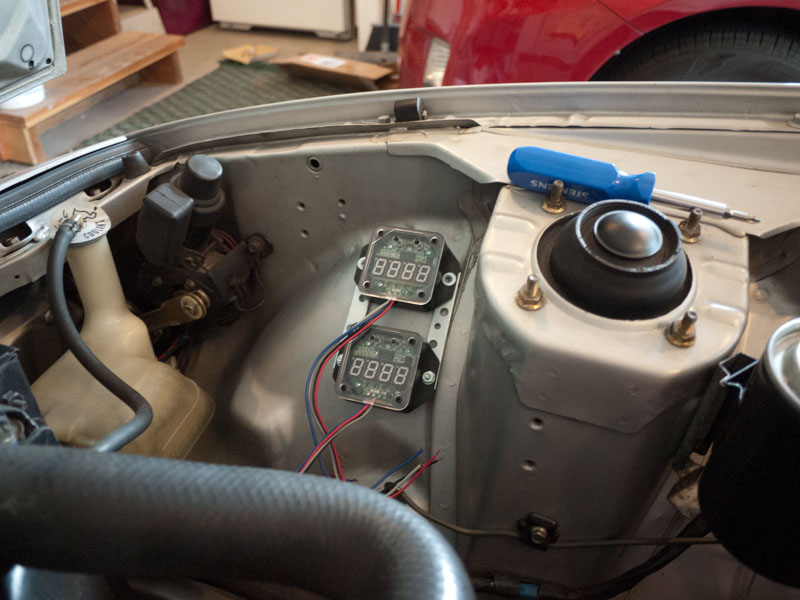
How does it work? Supposing your 6 port hardlines don't have a leak in them - it works amazing!
Standalone CO2 6-port / VDI system
- 2.5lb CO2 tank
- Digital RPM switches (Jegs)
- OEM vacuum solenoids
- Vacuum line
- Splitter (plastic shown - ended up going brass as they broke easily)
Mounted the RPM switches here for now. I'm thinking of making a little cover for them and painting it body color.
How does it work? Supposing your 6 port hardlines don't have a leak in them - it works amazing!
Thread Starter
Joined: Jul 2002
Posts: 3,219
Likes: 8
From: Washington State
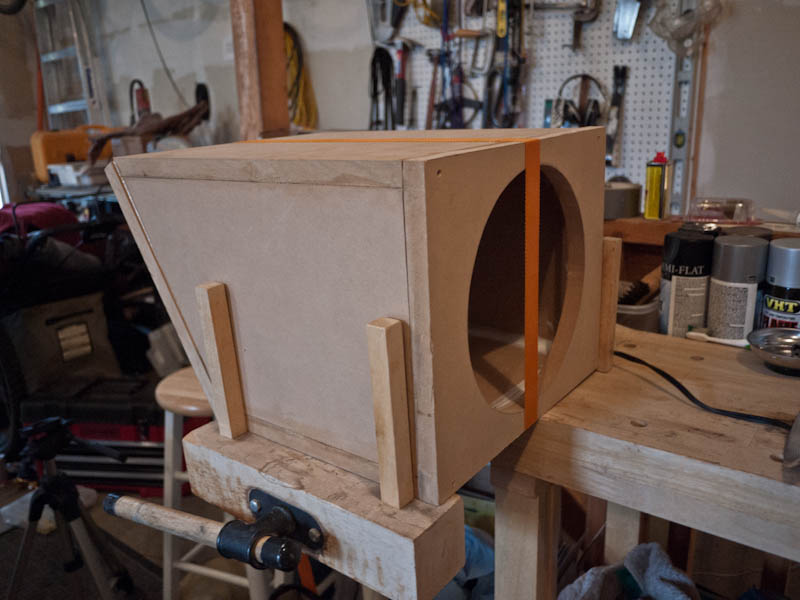
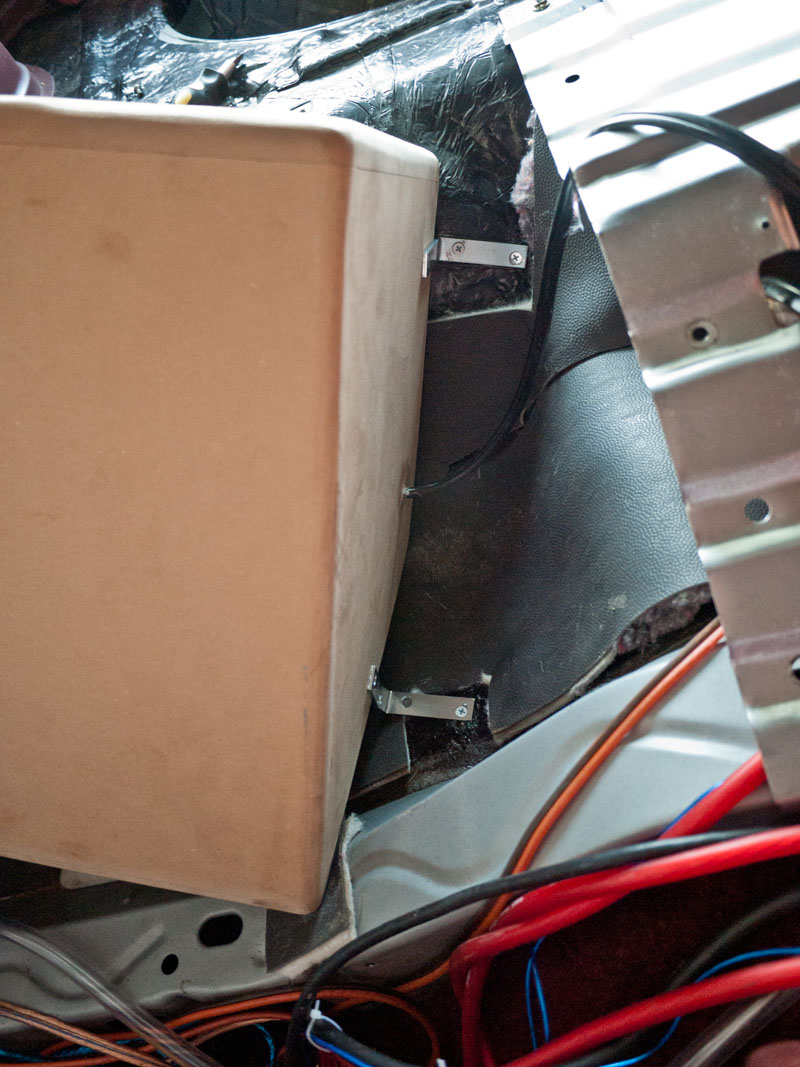
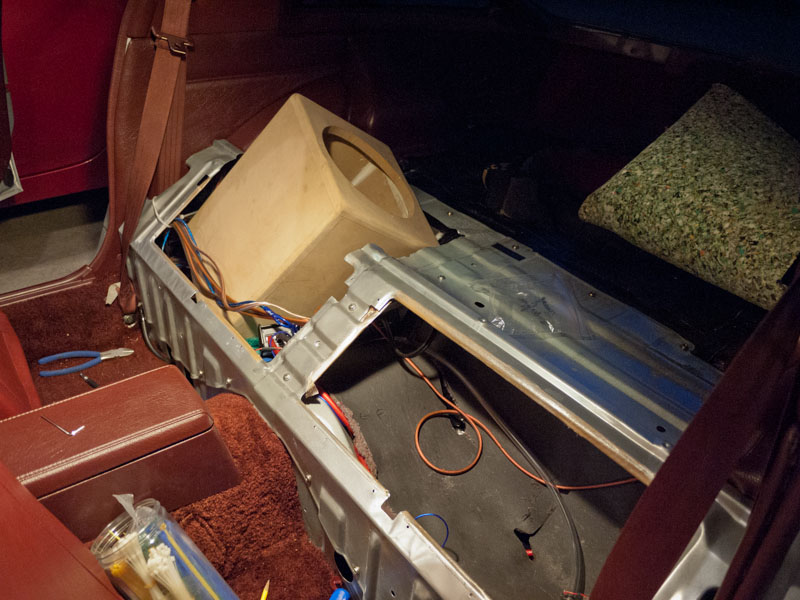
6/7/2013 - Subwoofer install
I wanted as clean of an install as possible, sunk into the rear deck. I was trying to come up with super fancy angled cut boxes, then realized i could just make one to fit straight, then tilt it 
Through experimentation i found that the cleanest bass note is firing the woofer directly back behind the passenger seat - however this sound is biased to the driver. to get the most even tone and volume for both seats, i found angling it inwards really balanced things out.
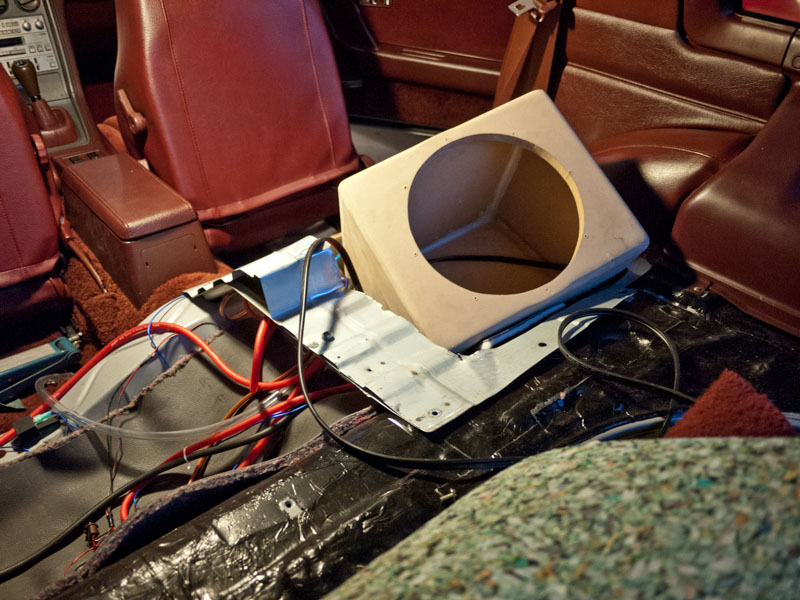
The box is screwed into the frame of the car in 3 places. You can rock the car back and forth by grabbing the sub box. This creates the strongest bass tone possible from a box, as it now has the strength of the chassis to move the woofer against.
Tin snips to trim out the upper portion of the storage bin frame
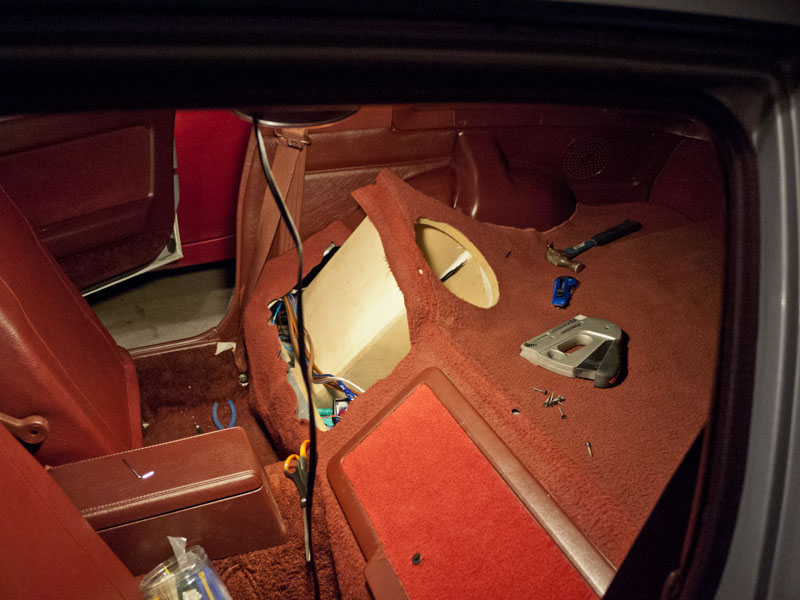
Through experimentation i found that the cleanest bass note is firing the woofer directly back behind the passenger seat - however this sound is biased to the driver. to get the most even tone and volume for both seats, i found angling it inwards really balanced things out.
The box is screwed into the frame of the car in 3 places. You can rock the car back and forth by grabbing the sub box. This creates the strongest bass tone possible from a box, as it now has the strength of the chassis to move the woofer against.
Tin snips to trim out the upper portion of the storage bin frame
Thread Starter
Joined: Jul 2002
Posts: 3,219
Likes: 8
From: Washington State
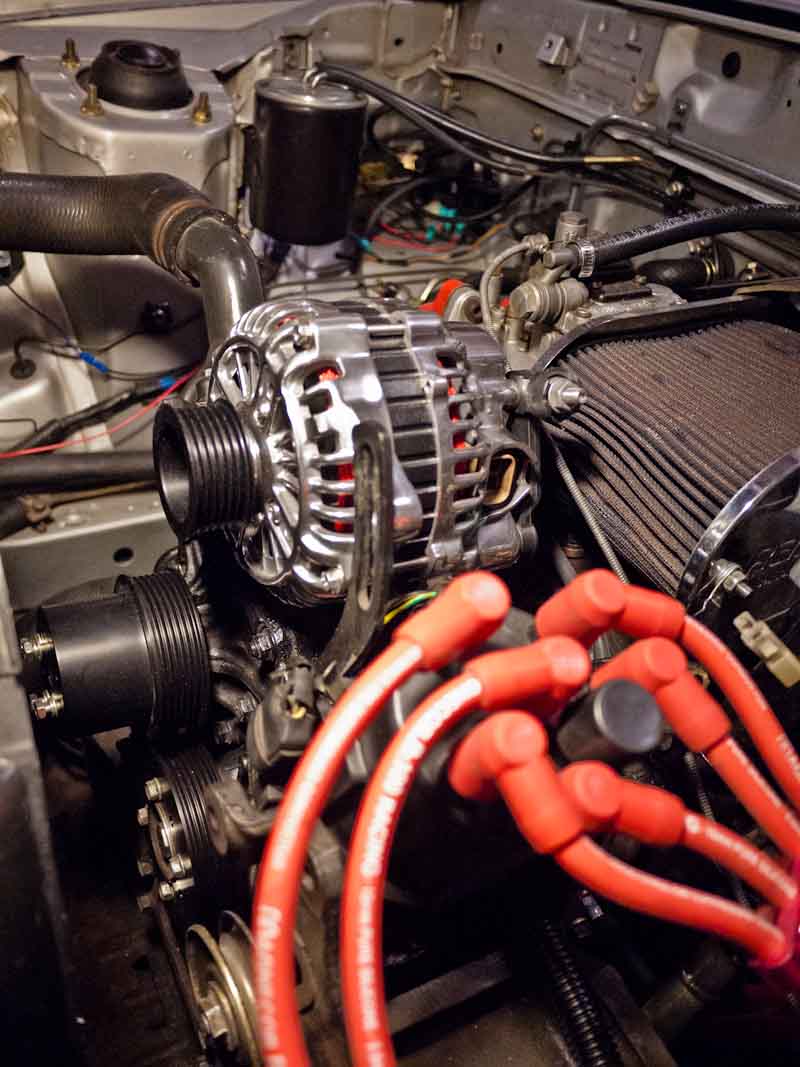
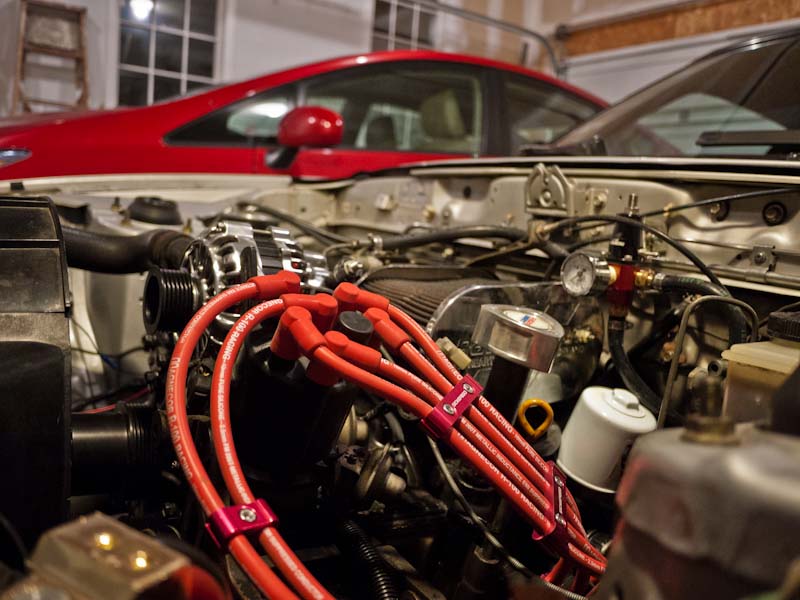
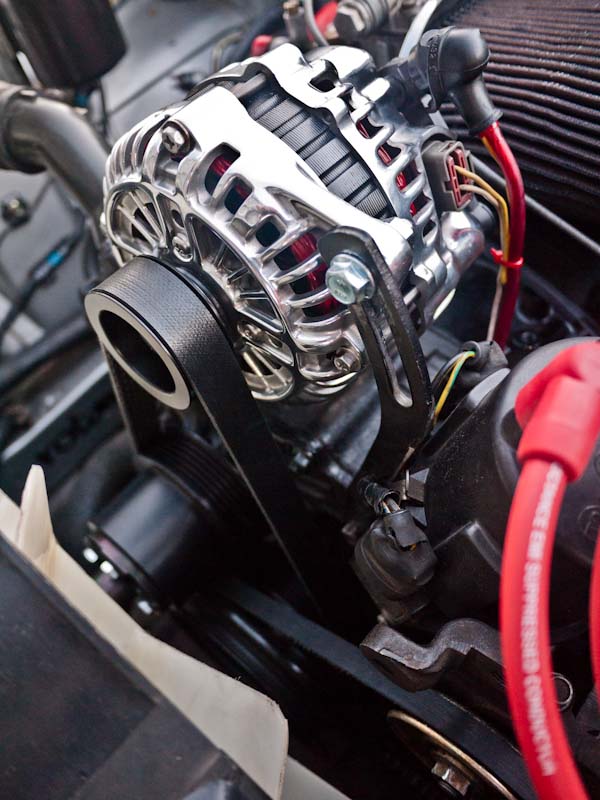
6/29/2013 - S6 alternator and 6-rib serpentine pulley kit
Installed the FD alternator, which ended up requiring a custom pulley kit. I didnt want to go underdriven, so I got the Atkins 6-rib serpentine belt pulley kit. It came with a 30.5" belt, which I had to swap for a 31.5" belt as the FD alternator was bottoming out on the S4/S5 (not sure which) water pump neck. 31.5" belts are very hard to find. Had to order it online.
Thread Starter
Joined: Jul 2002
Posts: 3,219
Likes: 8
From: Washington State
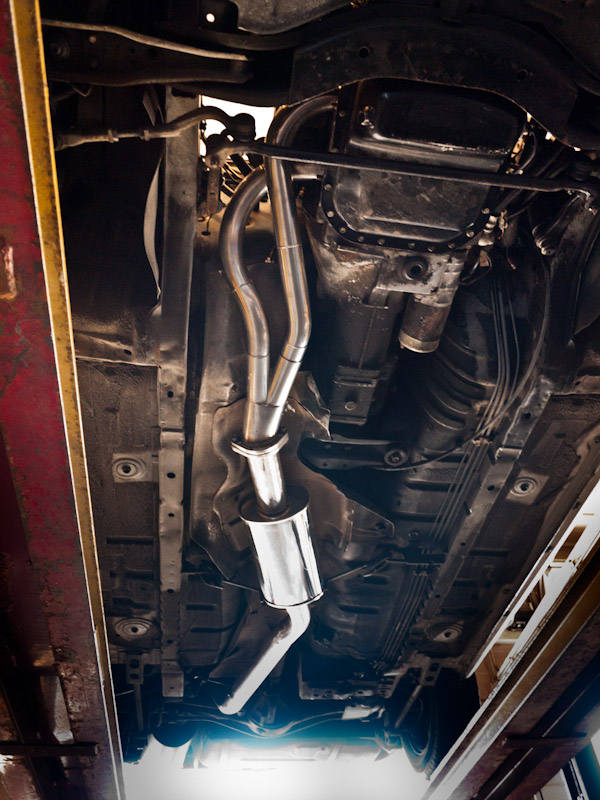
7/3/2013 - Exhaust
I FINALLY fixed my exhaust rattle!
As it turns out, all it was is my shitty old exhaust system!
So we swapped that out, and she sounds SO much nicer. I have fallen in love with my car all over again.
Old system:
Racing Beat RestrictaFlow collected 2" (OD)* header (1.75" ID)*
Rusting Beat PrimaRattle resonator (1.75" ID)
Rusting Beat PrimaRattle muffler (melted)
Stock tubes (1.75")
*ID = inner diameter
*OD = outer diameter
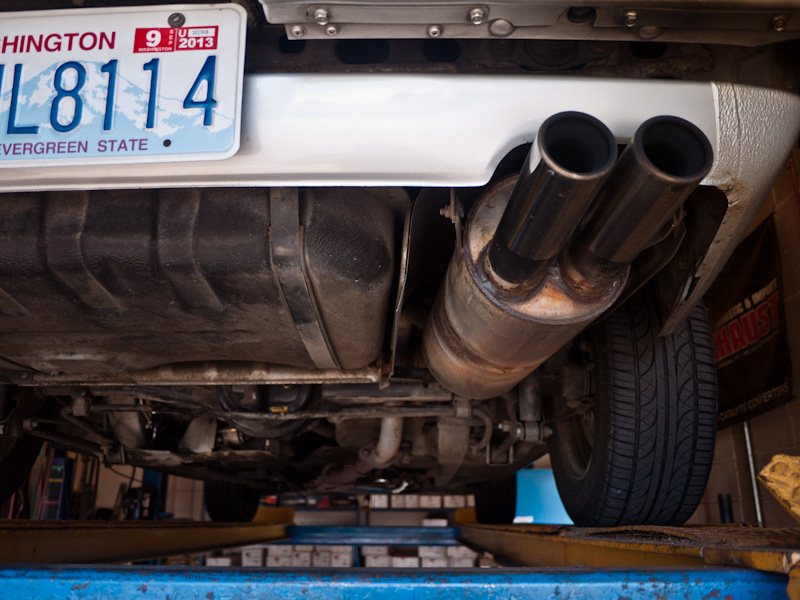
New system:
Rotary Shack Maxpower collected 3" header (OD)
Racing Beat universal 3" resonator (OD)
Racing Beat PR Extreme 2.75" muffler (ID?? not sure on that one)
3" tubes (2.75" ID)
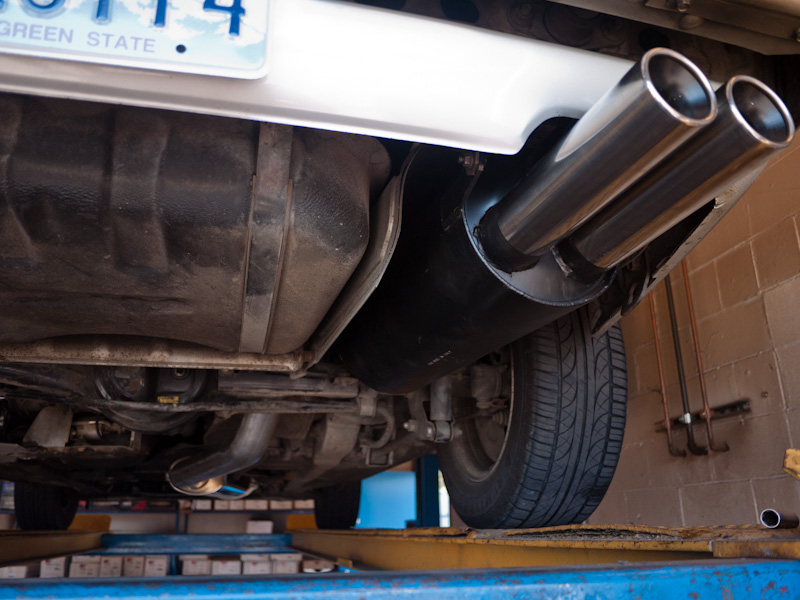
I had the work done by Pat Dotson @ Mach 1 Mufflers of Spokane, WA.
Mufflers Spokane, WA - Mach 1 Muffler
If you live within 100 miles of Spokane, this is THE shop to hit up. AMAZING work - like watching a master artist at work. I was quoted higher by other shops whos quality, knowing from past experience, was significantly lower.
I hung around the shop, helped out here and there, and chatted with some of Pat's buddies. This is an old school racing crew, going generations back. Naturally they were totally stoked on the wankel, and had lots of stories of buddies who raced them back in the day.
Here's how she sounds:
As it turns out, all it was is my shitty old exhaust system!
So we swapped that out, and she sounds SO much nicer. I have fallen in love with my car all over again.
Old system:
Racing Beat RestrictaFlow collected 2" (OD)* header (1.75" ID)*
Rusting Beat PrimaRattle resonator (1.75" ID)
Rusting Beat PrimaRattle muffler (melted)
Stock tubes (1.75")
*ID = inner diameter
*OD = outer diameter
New system:
Rotary Shack Maxpower collected 3" header (OD)
Racing Beat universal 3" resonator (OD)
Racing Beat PR Extreme 2.75" muffler (ID?? not sure on that one)
3" tubes (2.75" ID)
I had the work done by Pat Dotson @ Mach 1 Mufflers of Spokane, WA.
Mufflers Spokane, WA - Mach 1 Muffler
If you live within 100 miles of Spokane, this is THE shop to hit up. AMAZING work - like watching a master artist at work. I was quoted higher by other shops whos quality, knowing from past experience, was significantly lower.
I hung around the shop, helped out here and there, and chatted with some of Pat's buddies. This is an old school racing crew, going generations back. Naturally they were totally stoked on the wankel, and had lots of stories of buddies who raced them back in the day.
Here's how she sounds:
Thread Starter
Joined: Jul 2002
Posts: 3,219
Likes: 8
From: Washington State
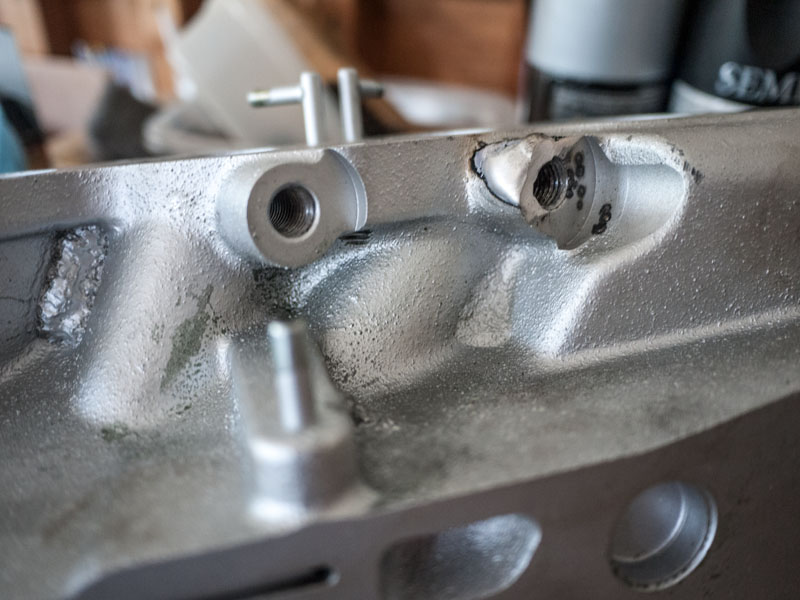
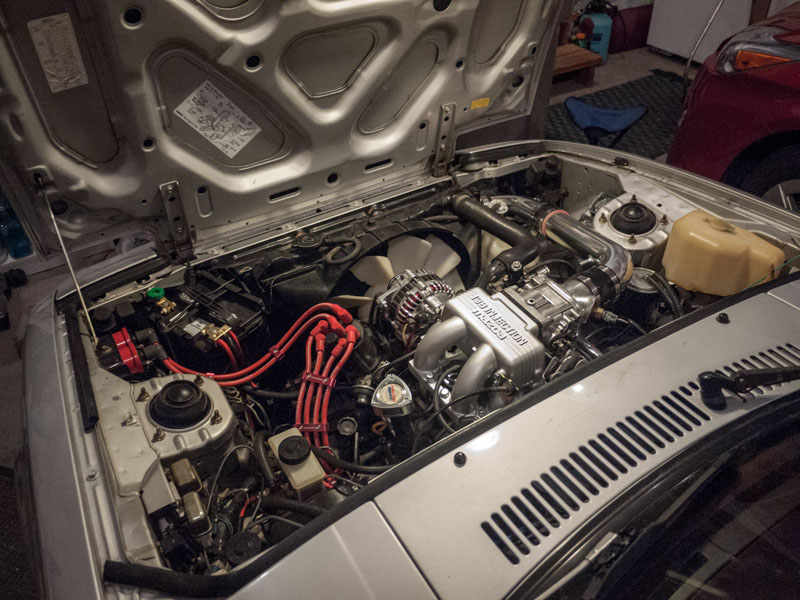
8/2/2013 - EFI install pt 1
I had put it off long enough, so time it was to install EFI. While installing the very first piece, tragedy strikes:
Turns out it was in fact the ceramic coating that was clogging the oil injector threads.
I had honestly given up on life at this point. There was no purpose - there was no order.
I walked around empty - unable to feel or relate to anything. But i kept going, one step at a time...
... to the fabrication shop. Where they did an amazing piece of work

I breathe in and feel the joy and exuberance of life.
 [/QUOTE]
Turns out it was in fact the ceramic coating that was clogging the oil injector threads.
I had honestly given up on life at this point. There was no purpose - there was no order.
I walked around empty - unable to feel or relate to anything. But i kept going, one step at a time...
... to the fabrication shop. Where they did an amazing piece of work
I breathe in and feel the joy and exuberance of life.
[/QUOTE]
Thread Starter
Joined: Jul 2002
Posts: 3,219
Likes: 8
From: Washington State
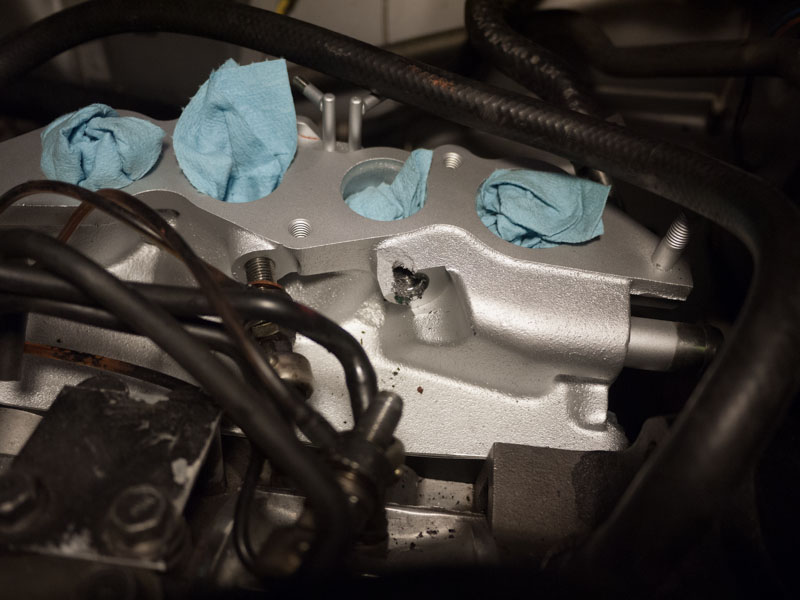
8/5/2013 - EFI pt 2
Here's the spot I had to grind down to get the S5 VDI intake to sit properly on the LIM:
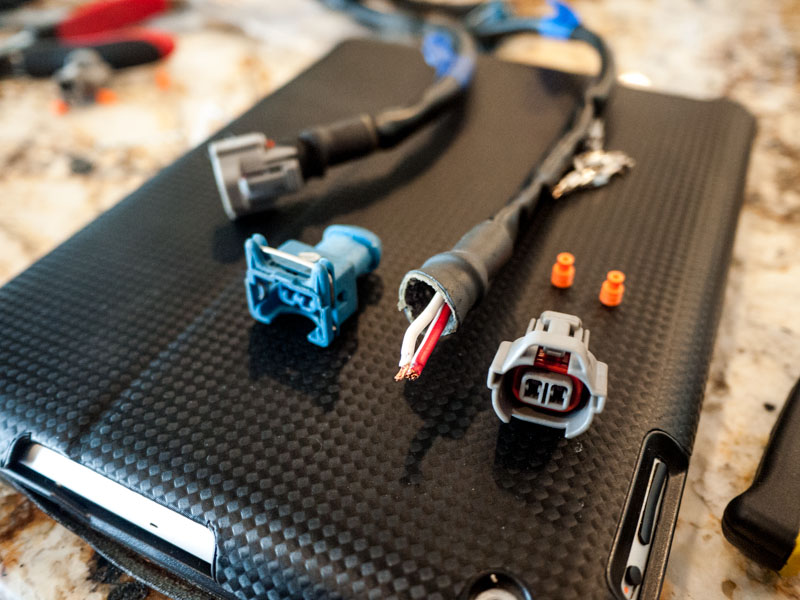
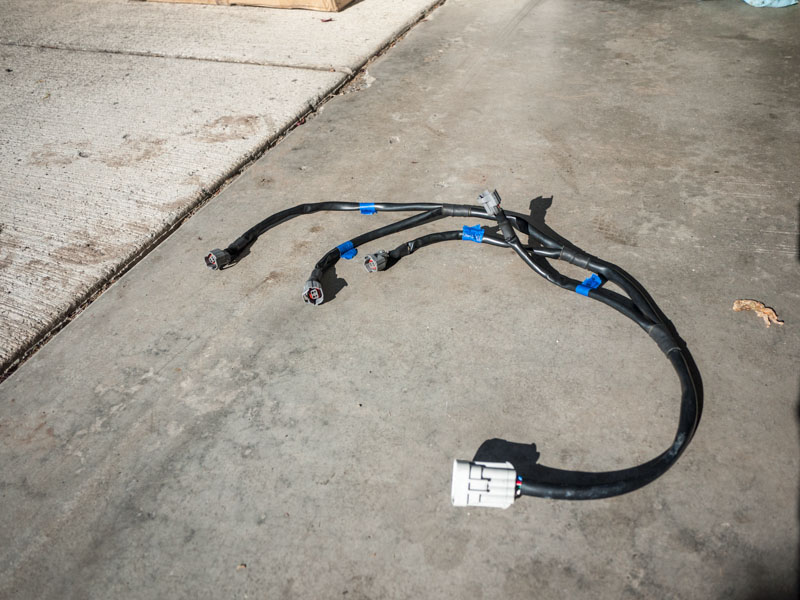
Re-pinned the Haltech injector harness to plug into OEM S5 injectors.
Haltech plugs are blue, Mazda plugs are Grey
The engine block was spray painted black by a previous owner. While installing EFI goodies, some of it started flaking off, so i decided to keep at it. 3/4 of it flaked right off. That last 1/4 was FUSED to the metal. It took me 5 days (2 hrs a day) to get the block cleaned down to bare. SO worth it.
Thread Starter
Joined: Jul 2002
Posts: 3,219
Likes: 8
From: Washington State
8/11/2013 - EFI pt 3
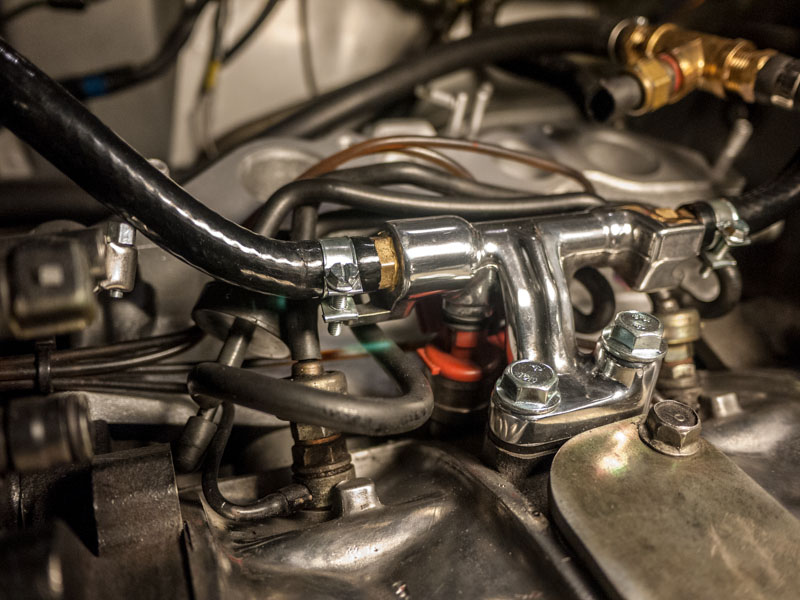
Cut the cold air induction pipes and fitted them up.
I also replaced the headlight lifter rods. wow ridiculously easy, i'm embarrassed i put it off that long.
This CAI mounts a cone filter in front of the radiator, where the AC condenser lives. I had to remove that, which i'm not entirely keen on, but will see if i can find a smaller condenser down the road.

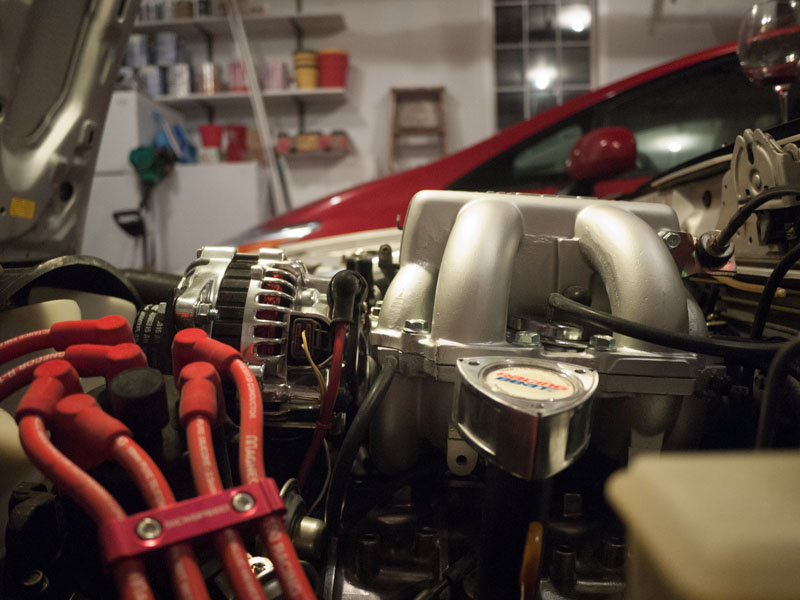
Series 5 VDI intake manifold
I also replaced the headlight lifter rods. wow ridiculously easy, i'm embarrassed i put it off that long.
This CAI mounts a cone filter in front of the radiator, where the AC condenser lives. I had to remove that, which i'm not entirely keen on, but will see if i can find a smaller condenser down the road.
Series 5 VDI intake manifold

 heheh
heheh
GSL-EV
Joined: Jun 2012
Posts: 450
Likes: 8
From: Rapid City, SD
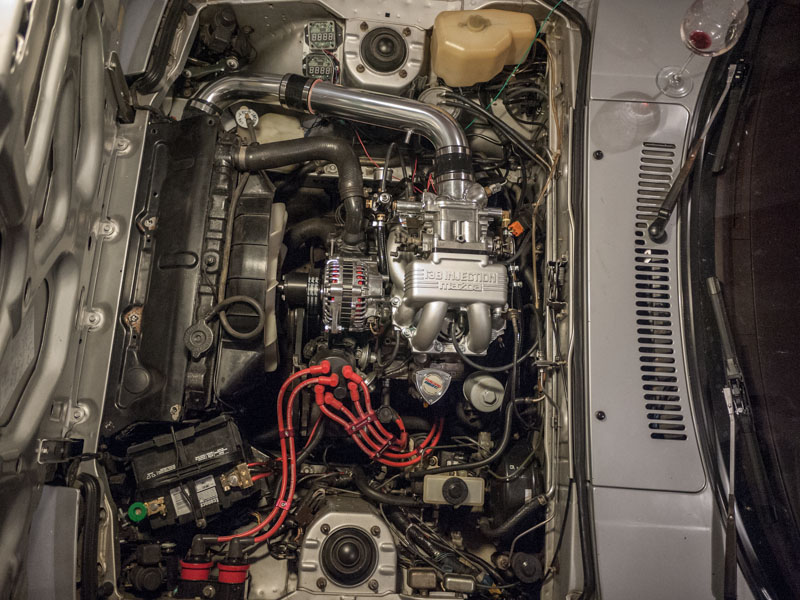
You really should put a coaster under that wine glass so as not to mar the paint <grin>. Does red wine stain the finish on a silver car?
Everything looks great under the hood except for that terribly yellowed washer fluid reservoir. (But then you knew that and are now terribly upset that I had the temerity to mention it.)
Looking Great!
Doug
Everything looks great under the hood except for that terribly yellowed washer fluid reservoir. (But then you knew that and are now terribly upset that I had the temerity to mention it.)
Looking Great!
Doug
Thread Starter
Joined: Jul 2002
Posts: 3,219
Likes: 8
From: Washington State
You really should put a coaster under that wine glass so as not to mar the paint <grin>. Does red wine stain the finish on a silver car?
Everything looks great under the hood except for that terribly yellowed washer fluid reservoir. (But then you knew that and are now terribly upset that I had the temerity to mention it.)
Looking Great!
Doug
Everything looks great under the hood except for that terribly yellowed washer fluid reservoir. (But then you knew that and are now terribly upset that I had the temerity to mention it.)
Looking Great!
Doug
Hahah she needs a wash and wax anyhow
cabernet sauvignon comes right off of clear coat - no problems.The washer fluid reservoir.... yeah i know. I was about to buy a replacement from Mazdatrix for $40 or whatever they are, then noticed it DOESNT come with the motor and sensor. My sensor is out, so the "WASHER" dummy light is on all the time if i plug it in.
Will be getting a new reservoir anyways, but need to get a working sensor off someone.
Thread Starter
Joined: Jul 2002
Posts: 3,219
Likes: 8
From: Washington State
OK So I have a few fuel maps that I'm going to try starting with, and adjust the fuel maps by the % difference in size of the injectors that the map came off of.
The car wasn't starting because I had the injectors harness plugged in the way that looked nice. Turns out you can't re-assign the injector banks via ECU which I was hoping / counting on, so off the intake manifold comes. pulled it off just enough to get to the plugs (pressurized fuel hose still attached - i DONT want to deal with that **** again!!) and LO! and Behold!
The oil injector bung repair is not holding the injector tight. Even without successfully starting the engine yet, I've got a pool of oil on the lower intake manifold. That thing is cranked down as hard as I can without knowingly damaging something, so, off it comes, at least back it out an inch, and going to try putting gas-rated thread tape on there and mash it back in. hope hope hope it holds.
Then, plug the injectors in the right firing order, and see what happens