1984 5-letter / S5 "Selene"
 05-09-13, 11:48 AM
#76
Power Window relays and Fender Trim shave
Wow been a month since updates - too long.
So, between there and here:
On the subwoofer box, I'm still determining best angle/position. If i put the sub behind the passenger, angled slightly upwards and backwards, it creates an AMAZING resonance in the driver's seat, however the passenger seat is super boomy. If i take that same position and angle it inwards so its cross-firing (about 45*), its better for the passenger and slightly less good for the driver. I'm thinking that dead center angled back might be the optimum, but still playing around with options.
I took some photos of the power window relay install, i'm re-doing the write-up which is a) no longer online and b) rambled on and on about totally irrelevant things, and didnt actually explain what the circuit was doing.
The photos:


So, between there and here:
- messed with timing
- soldered / redrilled dellorto jets to lean it out a bit. better but still not there.
- new windshield installed
- AEM Wideband O2 sensor, EGT, dual gauge pod installed
- introduced new stereo whine by installing said gauges.
- still haven't built my subwoofer box.
On the subwoofer box, I'm still determining best angle/position. If i put the sub behind the passenger, angled slightly upwards and backwards, it creates an AMAZING resonance in the driver's seat, however the passenger seat is super boomy. If i take that same position and angle it inwards so its cross-firing (about 45*), its better for the passenger and slightly less good for the driver. I'm thinking that dead center angled back might be the optimum, but still playing around with options.
I took some photos of the power window relay install, i'm re-doing the write-up which is a) no longer online and b) rambled on and on about totally irrelevant things, and didnt actually explain what the circuit was doing.
The photos:


 05-10-13, 12:47 AM
#83
As far as EFI goes - waiting on some custom fuel rails for the S5 intake and then its game on.
I ordered some polished S4 rails so that I could eliminate the pulsation dampener. Well even though the injectors are in the exact same spot, the secondary fuel rail mounts are much shorter.
Shazbot!
So, I would run stock S5 rails (with new Pulsation Dampners) but you can no longer get them. Alas, custom fuel rails it is. Should be done from the fab shop this week. All other components are in, haltech f9 & harness, cleaned and balanced fuel injectors, high pressure fuel pump & fuel pressure regulator, ceramic S5 intake manifold and gaskets, polished 3" throttle body inlet & cold air intake system.
I ordered a generic Acura Integra cold air intake kit. It's not a direct fit, but comes with enough 3" tubing and decent bends I should be able to make a nice clean route from the manifold to the Re-Speed radiator support CAI.
Still need to order a decent cone filter as the kit came with a junker.
I want to powdercoat the engine pulleys - so I called up Auto Zone to ask about a DIY powdercoat system and they had never heard of such a thing. I see. I wondered then if the guy on the phone even knew what powdercoating is. I thanked him for checking and politely hung up the phone.
---
---
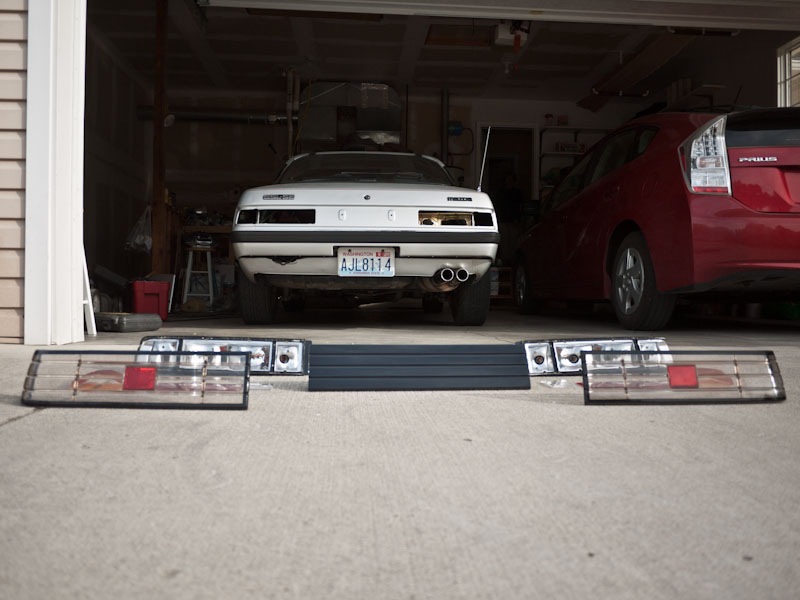
Tonight's progress, phase 2 of tail light cleanup. Hair dryer to melt the glue that was still stuck, and ever so gently pulled off the lenses.

And this is as far as I got, masking off the outer lenses for a fresh blast of black.

I'll probably throw on the polished S5 alternator here this weekend, and start cleaning up the driver's side engine bay to get ready for the power steering pump to go back on. As much of a pain in the *** it is, I want to put the cooling line in. I might have to remove a bunch of stuff - it wraps around everything. I may look into an aftermarket PS cooler...
05-12-13, 05:37 PM
#87
While I have the rails apart I was playing with some ideas I came up with a few years ago. 2.5" rounds nested inside, replacing lenses and bulbs.
I love the round look but have never liked the painted stock lenses.
I think I will get a 2nd set of tails and build some of these:
I love the round look but have never liked the painted stock lenses.
I think I will get a 2nd set of tails and build some of these:
 05-13-13, 11:10 AM
#89
So i had huge plans to get 15 projects done, only made progress on one 
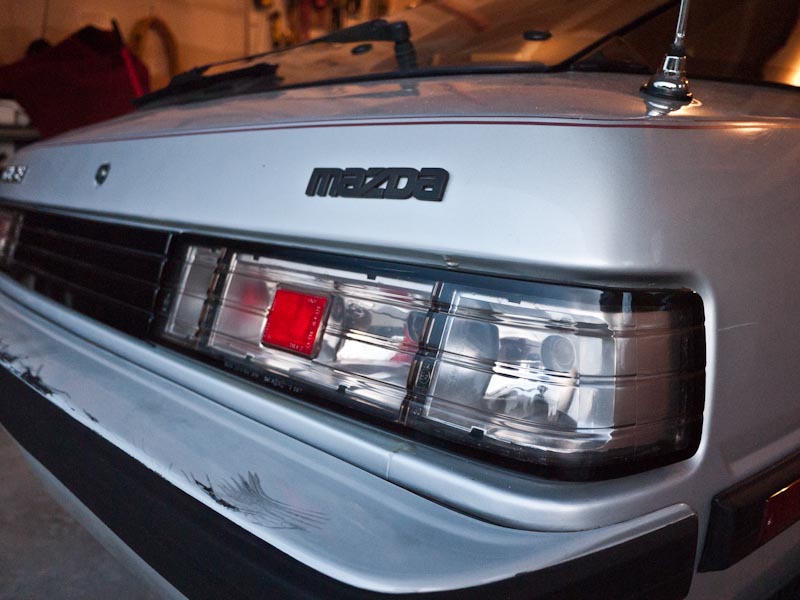
Started with the Mother's headlight polish kit - came with polish, polishing ball, and terry cloth for shining. WOW amazing results. You barely tell from this photo, but here's before:

And after:

If your tail lights and center trim are scratched, faded, generally looking drab, go get this stuff!!! It's $23 or something, and makes your tails and center lens look NEW.
Got the rest of the tail light assembly cleaned and painted. The silver liner paint will make the oem lenses really pop. Normally, with black plastic behind them, they look dull and muddy. white or silver both helps the actual bulb's light as well as external light reflect through the lenses.


I'm letting that cure and then will seal them back up with black silicone caulk and binder clips.
Started with the Mother's headlight polish kit - came with polish, polishing ball, and terry cloth for shining. WOW amazing results. You barely tell from this photo, but here's before:
And after:
If your tail lights and center trim are scratched, faded, generally looking drab, go get this stuff!!! It's $23 or something, and makes your tails and center lens look NEW.
Got the rest of the tail light assembly cleaned and painted. The silver liner paint will make the oem lenses really pop. Normally, with black plastic behind them, they look dull and muddy. white or silver both helps the actual bulb's light as well as external light reflect through the lenses.
I'm letting that cure and then will seal them back up with black silicone caulk and binder clips.


 05-13-13, 10:15 PM
#91
Caulked and clamped!
And done! The caulk claims 2-4 hour curing period before painting.... not sure if that means thats how long it takes to fully cure or just "to handle", but seeing as the caulk is structural and will be holding on the outer lens, i'll err on the side of caution and leave it overnight.

05-15-13, 01:22 AM
#92
Tails are done. I used so much silicone I dont think its dry yet. I probably should have left the clips on another day. but they're still sealed and within mm of factory fit (if not better, they were bowed out a bit before now flat).
As the silicone is drying its leaving a little bit of condensation in there. I'm not pleased about that. hopefully it will evaporate out as the units cannot be completely sealed due to the holes where the lenses snap in as well as two holes on each vertical cross beam between the sections. fingers crossed.
There was one spot that spooged out over night and got on the lens. not bad enough to pull apart but I will definitely notice
Overall - SUPER stoked
Before:

After:


As the silicone is drying its leaving a little bit of condensation in there. I'm not pleased about that. hopefully it will evaporate out as the units cannot be completely sealed due to the holes where the lenses snap in as well as two holes on each vertical cross beam between the sections. fingers crossed.
There was one spot that spooged out over night and got on the lens. not bad enough to pull apart but I will definitely notice
Overall - SUPER stoked
Before:
After:
05-15-13, 02:19 PM
#93
Damn you! I was not unhappy with my lights and now I am starting to be.
I agree with you on the "Euro" lights, not my preference. Now smoke the outer lens and it might be ok. I may have to see what it looks like in person on the EV with the LED bulbs. (The LED's have the correct colors so clear lens works.)
I am not 100% certain but it looks like in the before you had the black rubber seal around the assembly but in the after you dont. Is there a chance of water getting inside the car through that missing seal? Am I all wet?
05-16-13, 10:09 AM
#95
If the trim or seal is just appearance you could just paint the place where the trim would be flat black and it will all disappear.
05-16-13, 01:04 PM
#97
Moderator
iTrader: (3)
Join Date: Mar 2001
Location: https://www2.mazda.com/en/100th/
Posts: 30,841
Received 2,604 Likes
on
1,847 Posts
the taillights look great dood!
05-16-13, 01:15 PM
#98
Thanks for the compliments! I'm really pleased with how these turned out.
After a day the caulk was still soft and pulling just a little bit across the bottom, so off they came and i put a whole line of clamps to hold it down. will probably put them back on Friday (thats 3-4 days total dry time so far). Less caulk obviously would dry faster.
The last 3-4 set of tail lights i've refurbed I've left the outer trim off. As 82ta mentioned the seal is the foam squishy thing. I usually will get the foam adhesive trim at O'Reiley's and put a fresh seal around there to replace the factory squishy.
I will however give them a thorough soak and peek inside to see if i'm getting any leaks, report back with results.
