
1984 5-letter / S5 "Selene"

GSL-EV
Joined: Jun 2012
Posts: 450
Likes: 8
From: Rapid City, SD
Doug - the nail polish was for the "Mazda" logo, which tends to fade and turn white-ish and hazy. Nail polish restores them to factory finish. Apply thick. And several coats. The thicker it is, the more you get the gel finish. Thinner coats give a slightly bumpy matte finish, which still looks good.
Best part is if you mess up, just do another coat! its clear!!!
The vinyl horn button itself has been prepped with SEM vinyl prep, Bulldog adhesion promoter, and SEM Burgundy spray dye/paint.
Best part is if you mess up, just do another coat! its clear!!!
The vinyl horn button itself has been prepped with SEM vinyl prep, Bulldog adhesion promoter, and SEM Burgundy spray dye/paint.
I must say the SEM paint intrigues me and I know I will be doing this after I get some other things done. I worked on my center console this weekend and found a paint that is a fair match for the metal finish. It is a little brighter but that was less important since I am repainting all of it. Details later on the what did I do thread.
Stilettoman - Atkins has the clear lenses.
79-85 Rx7 Clear Side Marker Lens Set...
and
79-85 Rx7 Clear Side Marker Lens Set...
I have a set on my GSL-SE, don't recall them being quite that expensive when they first came out, but maybe they were. My car part pricing memory can be selective..
79-85 Rx7 Clear Side Marker Lens Set...
and
79-85 Rx7 Clear Side Marker Lens Set...
I have a set on my GSL-SE, don't recall them being quite that expensive when they first came out, but maybe they were. My car part pricing memory can be selective..
Thread Starter
Joined: Jul 2002
Posts: 3,219
Likes: 8
From: Washington State
I must say the SEM paint intrigues me and I know I will be doing this after I get some other things done. I worked on my center console this weekend and found a paint that is a fair match for the metal finish. It is a little brighter but that was less important since I am repainting all of it. Details later on the what did I do thread.
Would love to see the paint you found for it - mine definitely needs a resto. That will be the final piece for the interior (apart from the rear deck carpeting).
Stilettoman - Atkins has the clear lenses.
79-85 Rx7 Clear Side Marker Lens Set...
and
79-85 Rx7 Clear Side Marker Lens Set...
I have a set on my GSL-SE, don't recall them being quite that expensive when they first came out, but maybe they were. My car part pricing memory can be selective..
79-85 Rx7 Clear Side Marker Lens Set...
and
79-85 Rx7 Clear Side Marker Lens Set...
I have a set on my GSL-SE, don't recall them being quite that expensive when they first came out, but maybe they were. My car part pricing memory can be selective..
These days I prefer the stock colors, which I swapped out right after I took that first picture.
GSL-EV
Joined: Jun 2012
Posts: 450
Likes: 8
From: Rapid City, SD
Details! I bought a new shift boot and surround, and it looks gorgeous! Now the rest of the center console looks like ***. I would have paid the $280 for the whole bit - except you can't buy the ash tray any more! Would suck to have spent so much money and still have it look like ***.
Would love to see the paint you found for it - mine definitely needs a resto. That will be the final piece for the interior (apart from the rear deck carpeting).
Would love to see the paint you found for it - mine definitely needs a resto. That will be the final piece for the interior (apart from the rear deck carpeting).
Thread Starter
Joined: Jul 2002
Posts: 3,219
Likes: 8
From: Washington State
Radiator dry - yikes!!! That shouldn't happen. You running a mixture of coolant and water or just water? I don't know a whole lot about cooling systems but I've never had that happen even after months of garage or outdoor sitting.
Ready or not...
Joined: Dec 2009
Posts: 261
Likes: 0
From: Taos, NM
New Mexico is DRY DRY DRY. From what the Previous Owner said, Smooth had been out in someone's back yard for years (at least part of the time without any hood). No grass, no rust/rot. No moisture and every seal, hose, belt, boot... gone to crap. It will be a tedious recovery, and she's got a beautiful body. I will put a diaper on her radiator next (the reservoir proved leak free last night). I will chase this leak and the others, and the ones yet to come....... Interesting, not what I anticipated.
Thread Starter
Joined: Jul 2002
Posts: 3,219
Likes: 8
From: Washington State
New Mexico is DRY DRY DRY. From what the Previous Owner said, Smooth had been out in someone's back yard for years (at least part of the time without any hood). No grass, no rust/rot. No moisture and every seal, hose, belt, boot... gone to crap. It will be a tedious recovery, and she's got a beautiful body. I will put a diaper on her radiator next (the reservoir proved leak free last night). I will chase this leak and the others, and the ones yet to come....... Interesting, not what I anticipated.
 Well, for me anyways. 82transam sure seems to be rocking with the body work. not for me thanks! lol! by the time you're done your engine bay will look SUPA fresh!
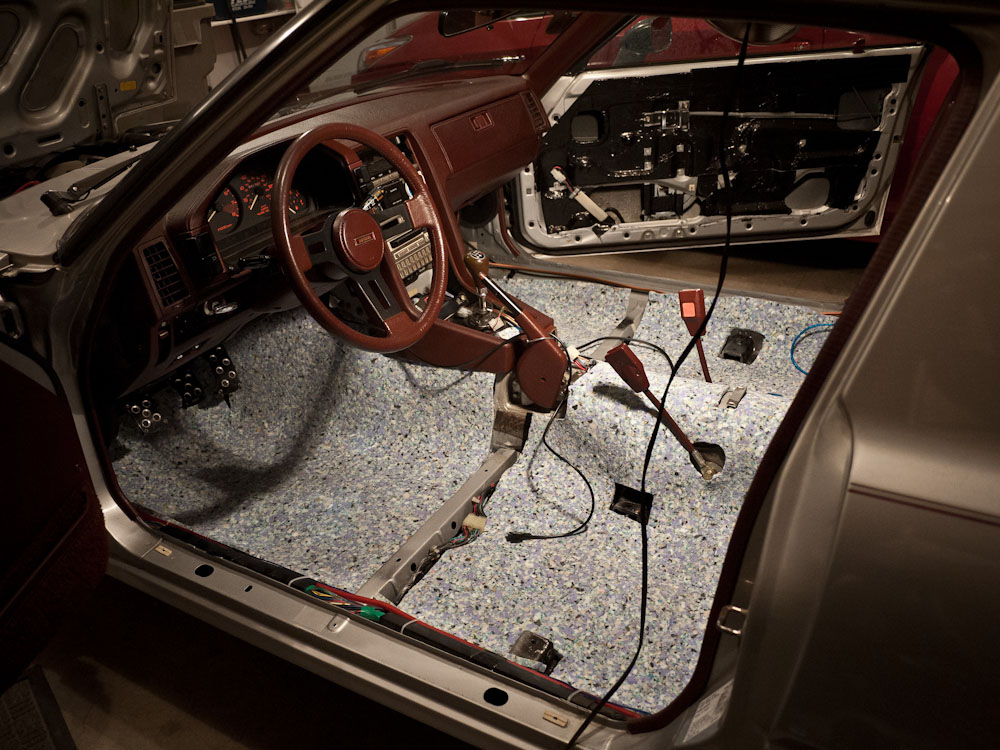
Here are some more pics of the interior restoration:
---
Door cards before resto - and back-side of rear wheel cover to compare to stock color:

Here they are, restored

For comparison - the indentation part with the holes is the factory OEM color - i did not paint this part - only the visible parts surrounding it. if you look reaaaaly close under juuust the right light you can see that the factory color is a slight red-shift hue

Now that everything else is done - I can come up with no further excuses and its now time to cut fresh carpet liner and re-install carpets:


Thread Starter
Joined: Jul 2002
Posts: 3,219
Likes: 8
From: Washington State
Waiting on a high pressure fuel pump, 3" throttle body inlet, polished fuel rails & 6port /vdi pots. just got my re-speed CAI radiator support and 3" chrome intake tubing (from an integra CAI kit). so close!
Before I get the EFI system in, however, I'm going to build a standalone 6port / vdi actuation system, as the air pump and smog have been removed. Stay tuned for that little gem! I've been scheming


Joined: Aug 2011
Posts: 3,078
Likes: 42
From: Cambridge, Minnesota
Alright, I'll post again - love the progress so far!
I gotta ask, what are you using to mount the gauges on the A-Pillar? I have 3 gauges for under my single-DIN Kenwood stereo and two more that need to go on the pillar and I can't for the life of me find what people use to mount them. I have a spare aftermarket SN95 dual gauge pod for the Mustang that I might test fit but doubt it will work. Just curious!
Dang, you Sean and I haven't been posting nearly as much as we were for a while there. Must mean all 3 of us are either getting stuff done to our cars right??
Thread Starter
Joined: Jul 2002
Posts: 3,219
Likes: 8
From: Washington State
Alright, I'll post again - love the progress so far!
I gotta ask, what are you using to mount the gauges on the A-Pillar? I have 3 gauges for under my single-DIN Kenwood stereo and two more that need to go on the pillar and I can't for the life of me find what people use to mount them. I have a spare aftermarket SN95 dual gauge pod for the Mustang that I might test fit but doubt it will work. Just curious!
Dang, you Sean and I haven't been posting nearly as much as we were for a while there. Must mean all 3 of us are either getting stuff done to our cars right??
I gotta ask, what are you using to mount the gauges on the A-Pillar? I have 3 gauges for under my single-DIN Kenwood stereo and two more that need to go on the pillar and I can't for the life of me find what people use to mount them. I have a spare aftermarket SN95 dual gauge pod for the Mustang that I might test fit but doubt it will work. Just curious!
Dang, you Sean and I haven't been posting nearly as much as we were for a while there. Must mean all 3 of us are either getting stuff done to our cars right??
 Yeah, I've made a bunch or progress, but its wash car / picture time, and I havent had the time yet. This weekend The car is back together and running quite nicely. The interior is crazy fresh. I've been scheming on a subwoofer box, which is the weekend's major project.
For a-pillar pods, check out Mazdatrix. They have one that looks OEM. Like, unreal match. I just painted it burgundy in the interior refresh and can't wait to put it in! It looks so slick.
Gauges & Gauge Pods
Joined: Aug 2011
Posts: 3,078
Likes: 42
From: Cambridge, Minnesota
Thanks man Yeah, I've made a bunch or progress, but its wash car / picture time, and I havent had the time yet. This weekend The car is back together and running quite nicely. The interior is crazy fresh. I've been scheming on a subwoofer box, which is the weekend's major project.
Yeah, I've made a bunch or progress, but its wash car / picture time, and I havent had the time yet. This weekend The car is back together and running quite nicely. The interior is crazy fresh. I've been scheming on a subwoofer box, which is the weekend's major project.Make sure to post some pics of what you come up with for a subwoofer box, I know people use the area between the tail lights for small 8" woofers and I've seen some other crazy setups as well - I'll send you the links to em.
For a-pillar pods, check out Mazdatrix. They have one that looks OEM. Like, unreal match. I just painted it burgundy in the interior refresh and can't wait to put it in! It looks so slick.
Gauges & Gauge Pods
Gauges & Gauge Pods
Anyways, thanks for the help and I look forward to what you come up with next - always fun to check in and see what you're working on!

Thread Starter
Joined: Jul 2002
Posts: 3,219
Likes: 8
From: Washington State
13B Injection Mazda
now that the interior is mostly back together and nearing its completion, i finally have space on the floor to begin scheming the next phase.
This week I should be getting the final pieces to the 13B Injection system from the S5. This will have 4 fuel injectors controlled with a Haltech F9 fuel computer. The ignition will be left stock for now, direct fire or such down the road.


Meanwhile I think my muffler's shot so it sounds pretty lame. Will be trying to source a tie-me-over until I can redo the whole thing down the road. I definitely want to throw at least one catalytic converter in there. call me a hippy - but i dig the smell of exhaust only so much.
Will take some pics of how the interior turned out after I get the subwoofer box built and installed.
This week I should be getting the final pieces to the 13B Injection system from the S5. This will have 4 fuel injectors controlled with a Haltech F9 fuel computer. The ignition will be left stock for now, direct fire or such down the road.
Meanwhile I think my muffler's shot so it sounds pretty lame. Will be trying to source a tie-me-over until I can redo the whole thing down the road. I definitely want to throw at least one catalytic converter in there. call me a hippy - but i dig the smell of exhaust only so much.
Will take some pics of how the interior turned out after I get the subwoofer box built and installed.
Thread Starter
Joined: Jul 2002
Posts: 3,219
Likes: 8
From: Washington State
spring cleaning
Had big intentions of building a sub box this past week but the weather was so nice, I had to wash her up, make sure all the new weatherstripping was holding, and take her for a cruise.
Saw this classic Southern Pacific streamliner diesel electric so had to duck in and grab a shot.


Found a gorgeous S5 vert - Had to snap a pic

Saw this classic Southern Pacific streamliner diesel electric so had to duck in and grab a shot.
Found a gorgeous S5 vert - Had to snap a pic
GSL-EV
Joined: Jun 2012
Posts: 450
Likes: 8
From: Rapid City, SD
Good looking car. That is a different placement for the front license plate.
I drove my 85 GSL for 3 years without a front plate before I got stopped for not having a front plate. I got off with a warning because I had the plate in the car with the replacement bracket. I hated having to put it on the car.
I drove my 85 GSL for 3 years without a front plate before I got stopped for not having a front plate. I got off with a warning because I had the plate in the car with the replacement bracket. I hated having to put it on the car.
Thread Starter
Joined: Jul 2002
Posts: 3,219
Likes: 8
From: Washington State
I've been studying up on the Factory Training Manual on how to properly configure the vacumn advance system on the 'SE distributor. It turns out the factory system uses manifold pressure regulated via check valve, which actuates under certain conditions as received by various sensors. Throttle position, coolant temp, and the underlying manifold pressure behind it all.
Then i got curious about how streetable carb setups run with vacuum advance. After quite a long read through lengthy debates about manifold vs. ported pressure, the conclusion was to hook it up to what you've got and see what it does. Any better? good. worse? try the other one.
As i'm still growing accustomed to this Dellorto 48, i've only hooked the advance up to the manifold pressure, and so far so good! The exhaust tone is sounding much better and the lower rpm range is infinitely more drivable.
I may not need a new muffler after all - the setup may just be that out of whack. I know she's way rich right now - she was tuned for sea level, and I'm at 2500-4500 ft in my area. Re-jetting with my buddy and a wideband should do us right.
Here are the threads that led me through lengthy debate and contradiction, starting with the most helpful posts:
https://www.rx7club.com/1st-generati...0/#post7530539
https://www.rx7club.com/1st-generati...0/#post7512505
https://www.rx7club.com/1st-generati...0/#post7513150
More interesting info here, some graphs on the electronic controlled ignitions:
https://www.rx7club.com/1st-generati...2/#post9987018


