
Heaven or Hell: A Decade Long Time Attack Build

Thread Starter
Joined: Mar 2003
Posts: 390
Likes: 13
From: Anaheim
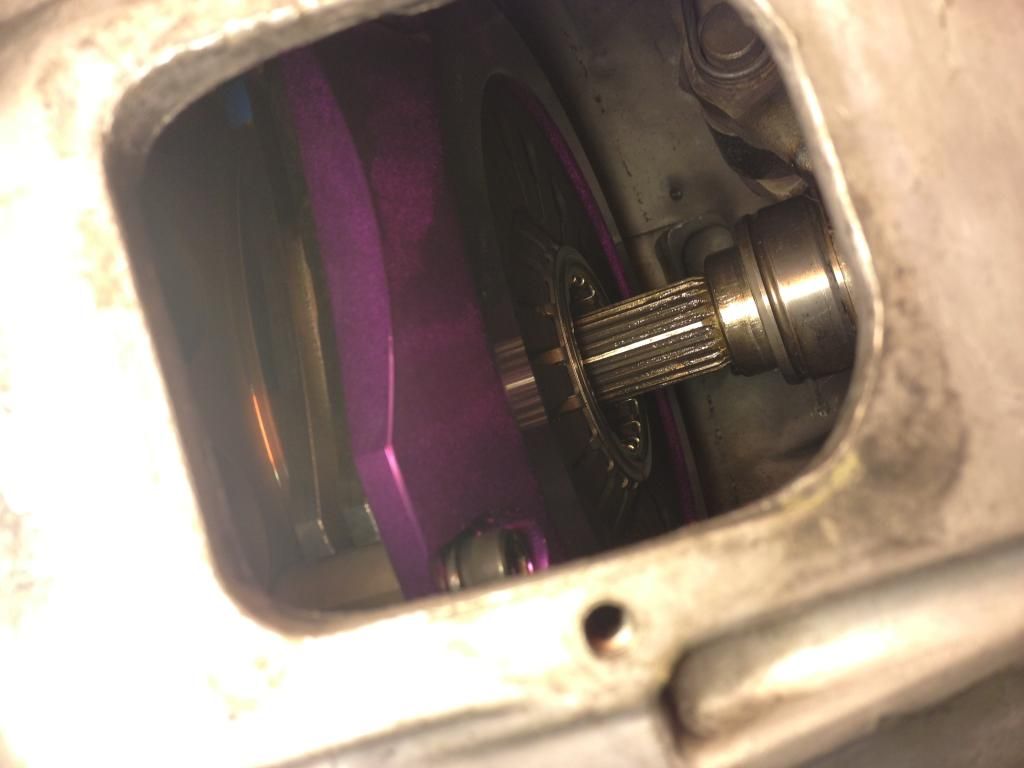
PPG straight cut dog engagement box installed into FD housing ready to go. I was so lucky to get my hands on this. My friend and official "Team FD Time Attack Ba-tu-ru (battle)" fabricator Peter had this on his 9 sec drag FD back in the day and was willing to part with it.
I can't wait to try this thing out. Rally car sound effects incoming!
Ive solo'd FD trans jobs before...but never on the ground with jack stands. Ive done a clutch job on my M3 like this, but the BMW tranny is literally half the size of the FDs massive chunk of awkwardness.
At this point I was really beginning to miss working at a shop with a lift and transmission jack. You have to jack the car high enough to get the trans under, yet at that height the floor jack maxes out before you can get the damn thing mated to the engine...this was some lame *** ****.
So I built myself a platform and somehow managed to lift the jack/trans assembly onto it. At this angle, laying under the car and lifting that thing 4 inches onto the platform was pretty challenging to solo. There was much profanity and many drawn out "ohhh my godddddd" moments. Have you ever just collapsed your body and laid your head down on the floor like you're going to sleep under the car? If so...you "know dat feel".
Now lots of shaking, jiggling, and small adjustments - along with more profanity.
Finally home.
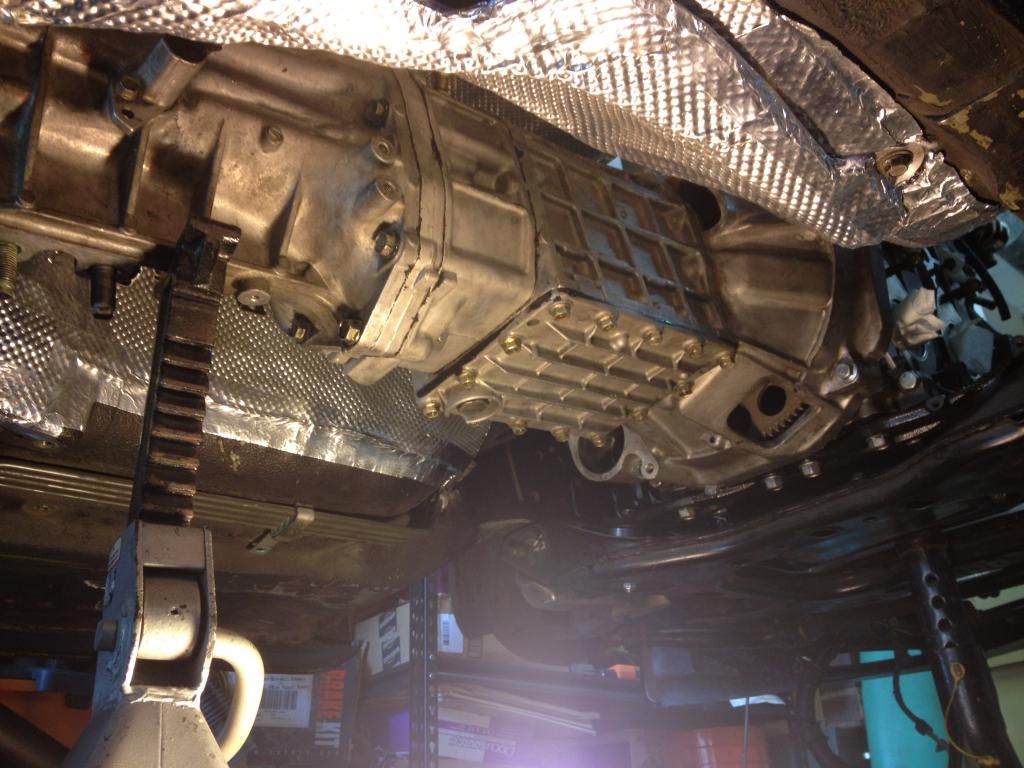
I learned an important lesson that day - A transmission jack is worth its weight in gold. Next time I will be armed with a Harbor Freight floor trans jack.
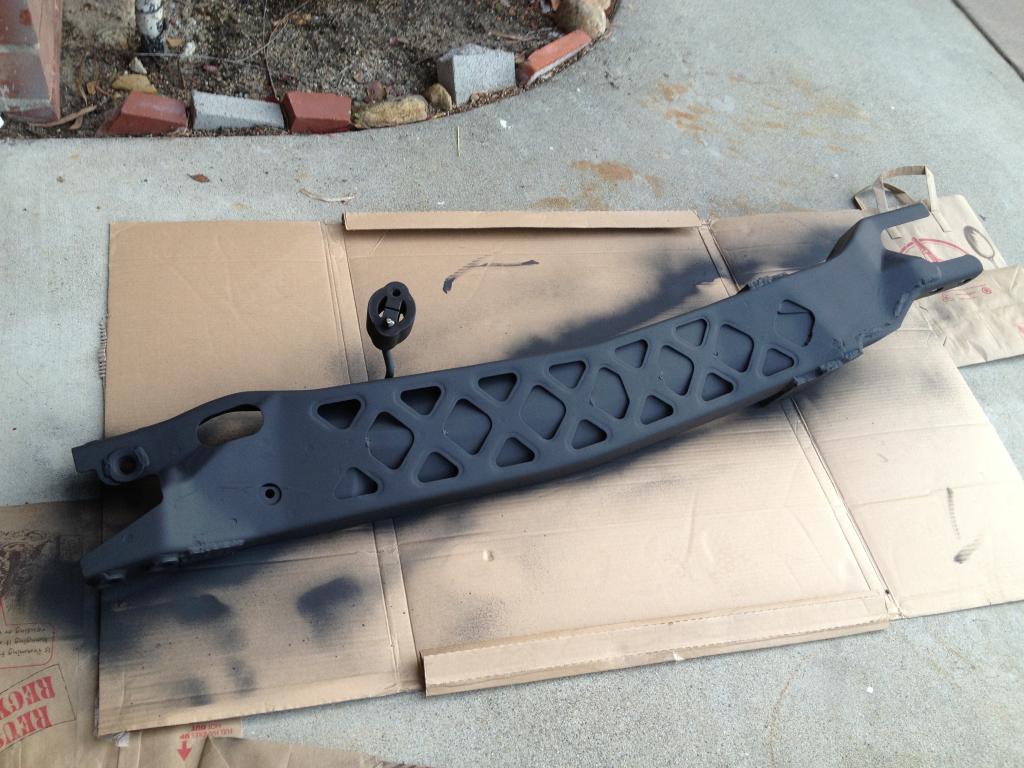
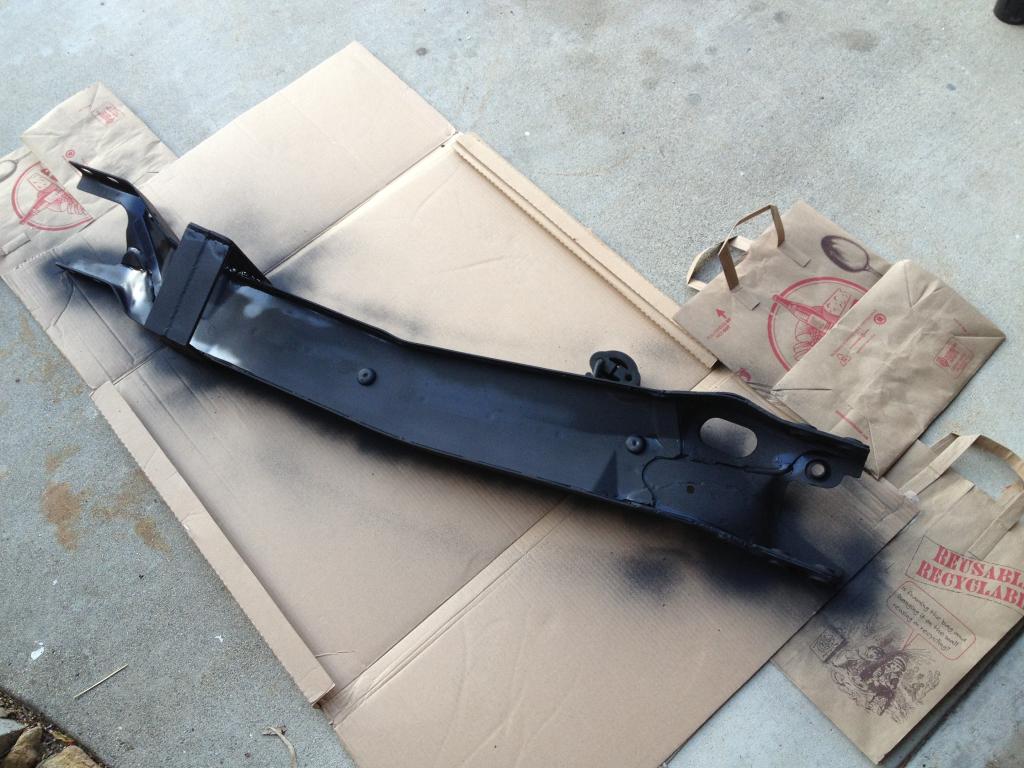
I buttoned it up with a welded and reinforced PPF also from Petes FD. Hit it with some high temp before installation.
I can't wait to try this thing out. Rally car sound effects incoming!

Ive solo'd FD trans jobs before...but never on the ground with jack stands. Ive done a clutch job on my M3 like this, but the BMW tranny is literally half the size of the FDs massive chunk of awkwardness.

At this point I was really beginning to miss working at a shop with a lift and transmission jack. You have to jack the car high enough to get the trans under, yet at that height the floor jack maxes out before you can get the damn thing mated to the engine...this was some lame *** ****.

So I built myself a platform and somehow managed to lift the jack/trans assembly onto it. At this angle, laying under the car and lifting that thing 4 inches onto the platform was pretty challenging to solo. There was much profanity and many drawn out "ohhh my godddddd" moments. Have you ever just collapsed your body and laid your head down on the floor like you're going to sleep under the car? If so...you "know dat feel".

Now lots of shaking, jiggling, and small adjustments - along with more profanity.

Finally home.

I learned an important lesson that day - A transmission jack is worth its weight in gold. Next time I will be armed with a Harbor Freight floor trans jack.
I buttoned it up with a welded and reinforced PPF also from Petes FD. Hit it with some high temp before installation.


oh yeah, ATV jack from autozone.
LIFESAVER.
i now have multiple friends with lifts, but a few years ago that ATV jack saved my life (and my back and triceps).
i am extremely jealous of that transmission. i want the exact same thing but with the stock helical gears, as i don't want to listen to the rallycar whine while driving it 4+ hours to a track event!
very nice update
this thing looks like it's about ready to start, no?
Thread Starter
Joined: Mar 2003
Posts: 390
Likes: 13
From: Anaheim
Thank you sir.
Its so close, yet so far away...
We have the car at my buddies shop now (Design Craft Fabrication [DCF] - Making Performance Cars Perform Better). Pete and I have been working on it a few times a week as our schedules permit. We had a long list of tasks to complete, but were making some decent progress. All the fuel lines had to be made/plumbed, the v-mount setup fab, lots of bracket making/mounting accessory parts like FPR/coils/fuel filter/boost solenoid, oil cooler fab, plumbing oil for the turbo/water for the wastegates, and a good amount of wiring work. Its a ton of stuff really, but thats to be expected on a car that has had literally every stock part removed, changed or modified in some way.
A good amount of time was consumed with mapping out and ordering hoses and fittings for all these things that need plumbing. Finding out exactly where we want the lines to run, what angle fittings go where, how many, how much line, what type of line, what adapters are needed, etc etc. Fittings and hoses had me pulling my hair out.
The cool part is, everything is being done the right way without cutting corners. Pete is doing some awesome fab work that I am really impressed with. We could just zip tie **** to the car where we want and call it good, but every component has a custom fabled aluminum bracket. Pete could have just made a 90 degree bend right out of the turbo to the IC, but instead he spent 6 hours chopping u-bends and welding together slices of pie. Im glad to take a bit longer and spend more money in order to respect details.
I haven't caught up on the updates, but Im always taking pics...so all this stuff should be up pretty soon.
Thread Starter
Joined: Mar 2003
Posts: 390
Likes: 13
From: Anaheim
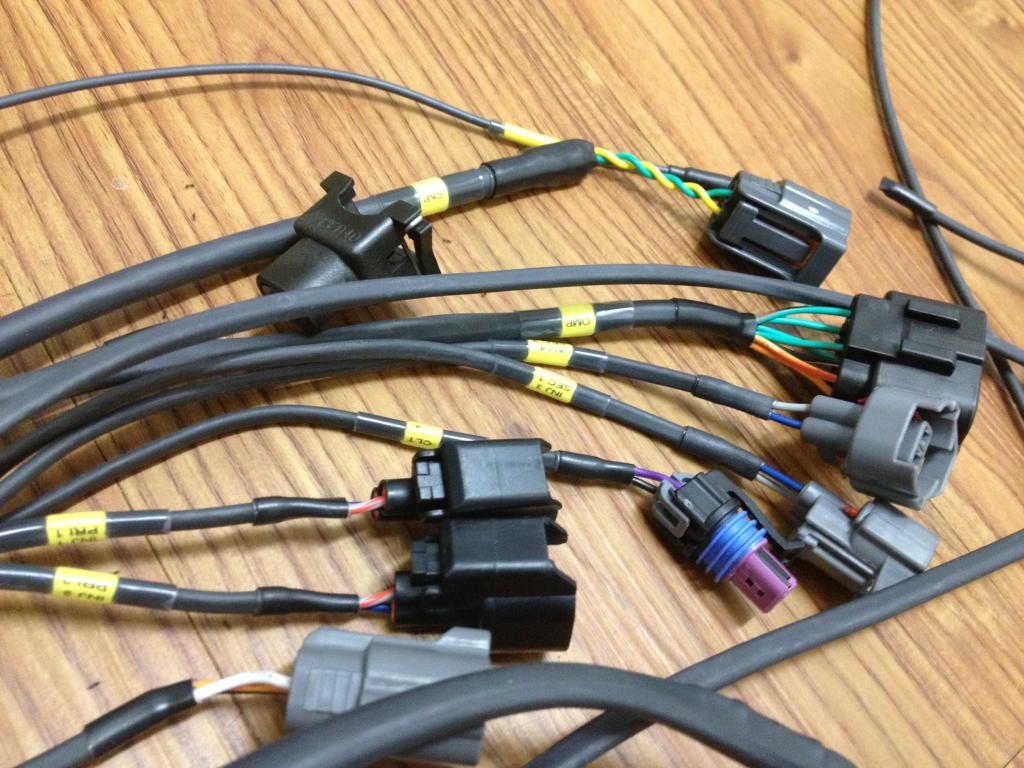
For the harness I enlisted the services of the famous C. Ludwig (lms-efi.com).
Chris did a great job and his prices are friendly. We had a few issues -- secondary injector clips were incorrect, coolant temp sensor was not included in the shipment, and prior to building the harness I was told they use Raychem DR-25 shrink however upon arrival the shrink is generic. I understand the generic stuff has the same diesel resistance mil specification as DR-25. Call me a name brand *****, but its just nice to see Raychem -- esp if you're expecting it. Functionally there should not be a difference, however my elitist jerk friends at the shop looooove to come up to me randomly with harnesses they're working with on other cars and say **** like, "Hey, can you help me figure out what all this yellow stuff is?". ******** hahaha.
Chris was/is a great guy to work with and I highly recommend his services (look up "C. Ludwig" here on the forum if you need work done). He is very knowledgeable and his customer support is excellent. He always replies to emails promptly and is fairly accessible via phone.
I am satisfied with the quality of the work. It is definitely a nice product for the price. When it comes to motorsports wiring the pricing scale can get so outrageous in a hurry. We are lucky to have guys like Chris to fill this niche and provide a cost effective yet good quality alternative to professional competition style harnesses. I asked a friend who used to work at MoTEC and now does wiring for professional motorsports teams (forgot the company he's at now) what it would cost to do a "basic" harness for an FD. He said it would start somewhere around $3000 but likely end up around $4000...this is for just an engine harness.
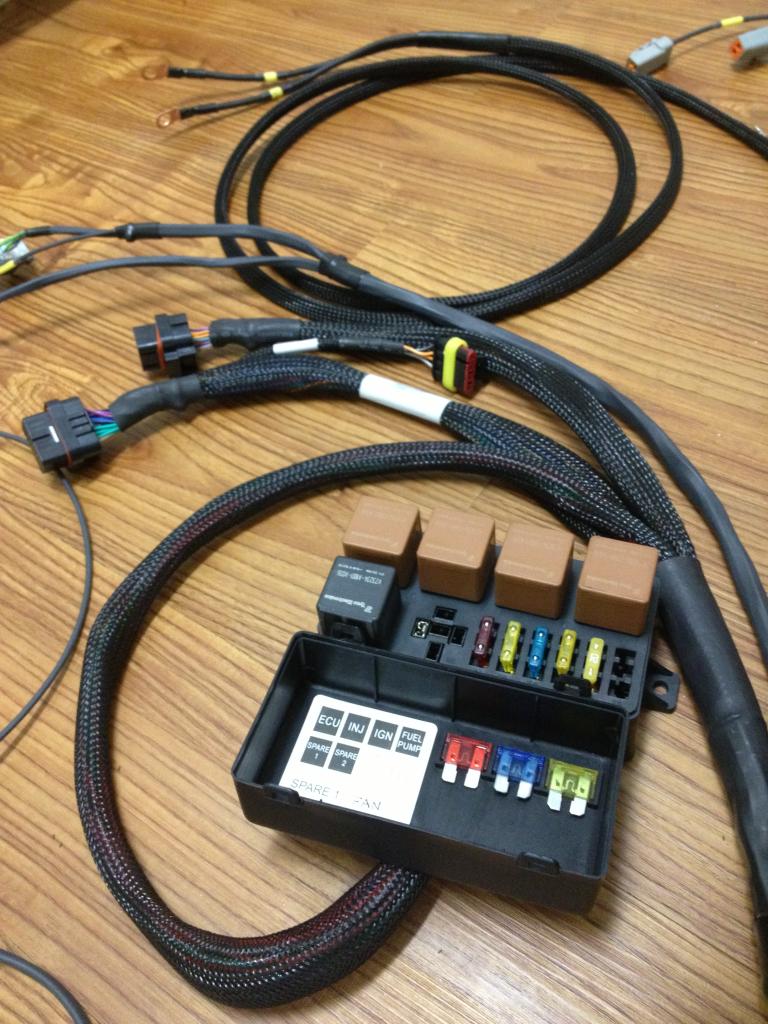
Harness construction looks to be quality and everything is labeled for easy installation. The ignition leads are wired using a break-out harness to allow for future modifications without having redo the main harness.
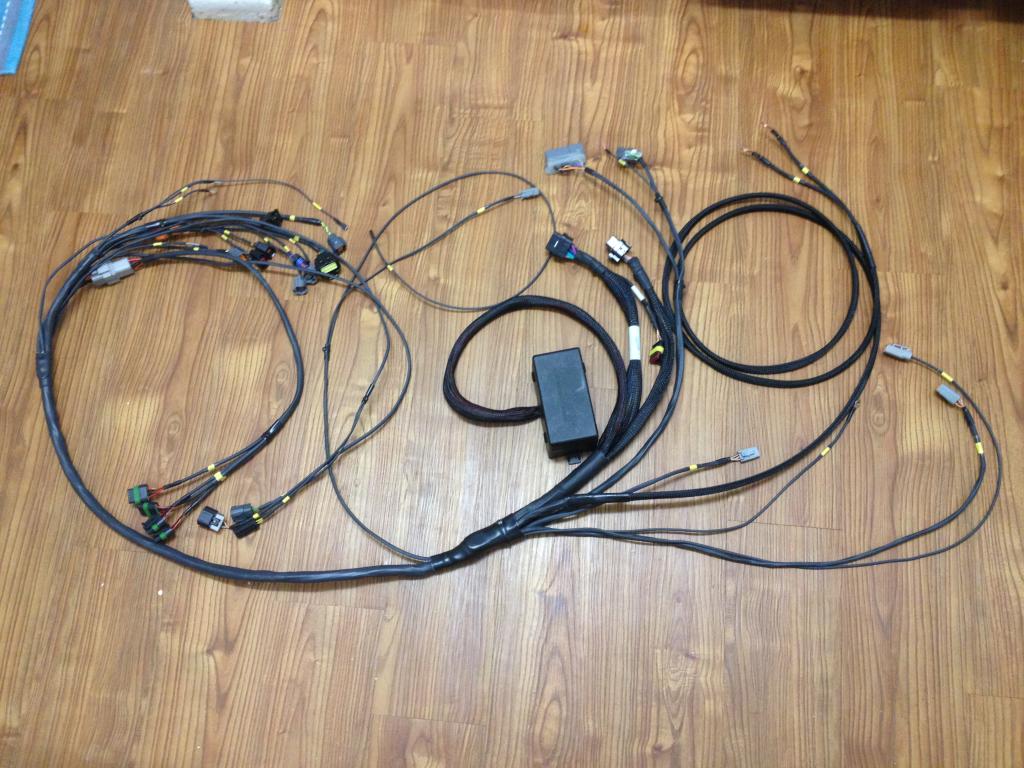
I like how the new Haltech flying leads incorporate the fuse box.
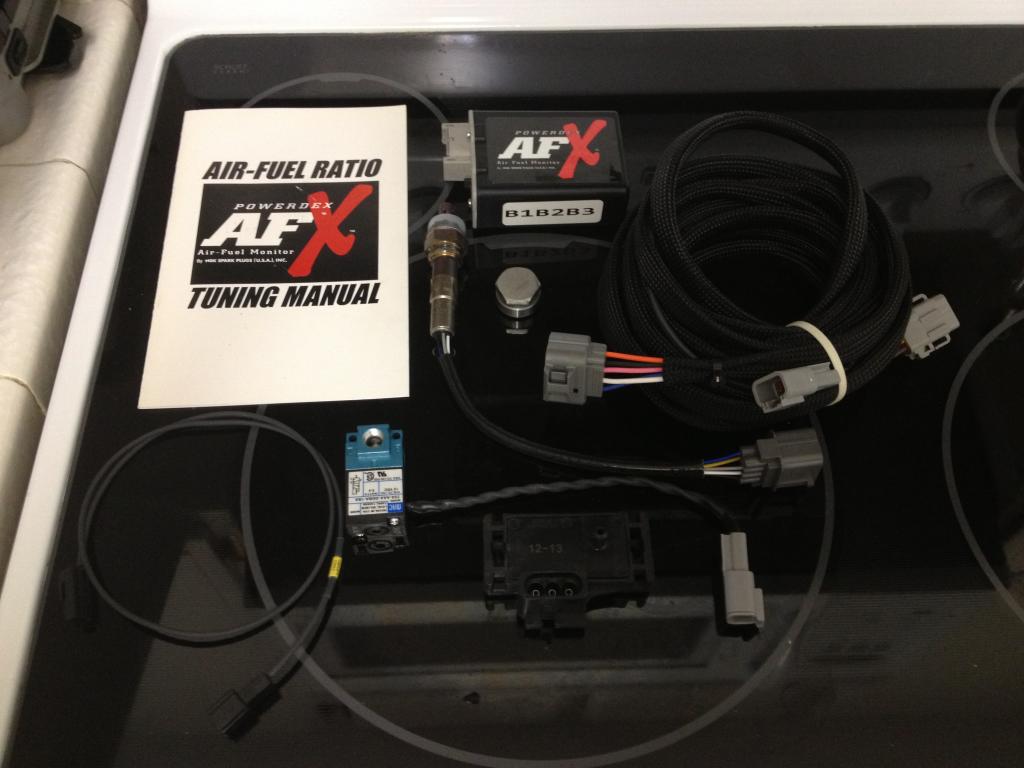
I also got a NGK AFX wideband from Chris, as well as a MAC solenoid valve for boost control, and a GM 4 bar MAP sensor.
Chris did a great job and his prices are friendly. We had a few issues -- secondary injector clips were incorrect, coolant temp sensor was not included in the shipment, and prior to building the harness I was told they use Raychem DR-25 shrink however upon arrival the shrink is generic. I understand the generic stuff has the same diesel resistance mil specification as DR-25. Call me a name brand *****, but its just nice to see Raychem -- esp if you're expecting it. Functionally there should not be a difference, however my elitist jerk friends at the shop looooove to come up to me randomly with harnesses they're working with on other cars and say **** like, "Hey, can you help me figure out what all this yellow stuff is?". ******** hahaha.
Chris was/is a great guy to work with and I highly recommend his services (look up "C. Ludwig" here on the forum if you need work done). He is very knowledgeable and his customer support is excellent. He always replies to emails promptly and is fairly accessible via phone.
I am satisfied with the quality of the work. It is definitely a nice product for the price. When it comes to motorsports wiring the pricing scale can get so outrageous in a hurry. We are lucky to have guys like Chris to fill this niche and provide a cost effective yet good quality alternative to professional competition style harnesses. I asked a friend who used to work at MoTEC and now does wiring for professional motorsports teams (forgot the company he's at now) what it would cost to do a "basic" harness for an FD. He said it would start somewhere around $3000 but likely end up around $4000...this is for just an engine harness.
Harness construction looks to be quality and everything is labeled for easy installation. The ignition leads are wired using a break-out harness to allow for future modifications without having redo the main harness.


I like how the new Haltech flying leads incorporate the fuse box.

I also got a NGK AFX wideband from Chris, as well as a MAC solenoid valve for boost control, and a GM 4 bar MAP sensor.

Thread Starter
Joined: Mar 2003
Posts: 390
Likes: 13
From: Anaheim
Thanks for the kind feedback.
Small transmission update:
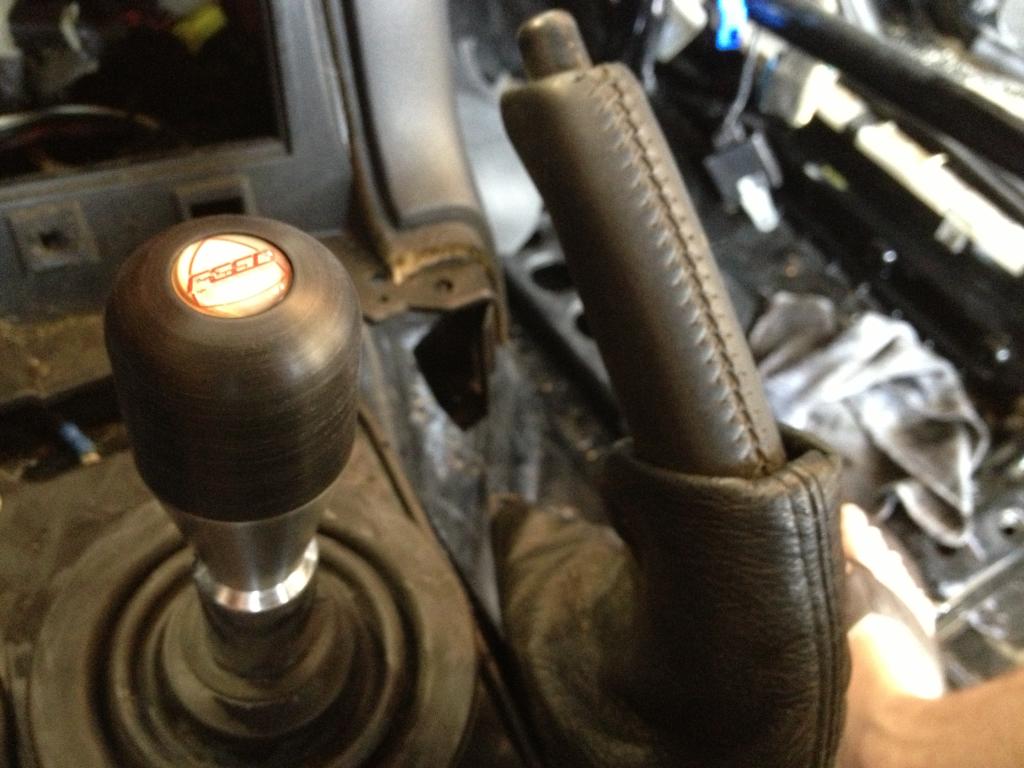
The elusive C's short shift
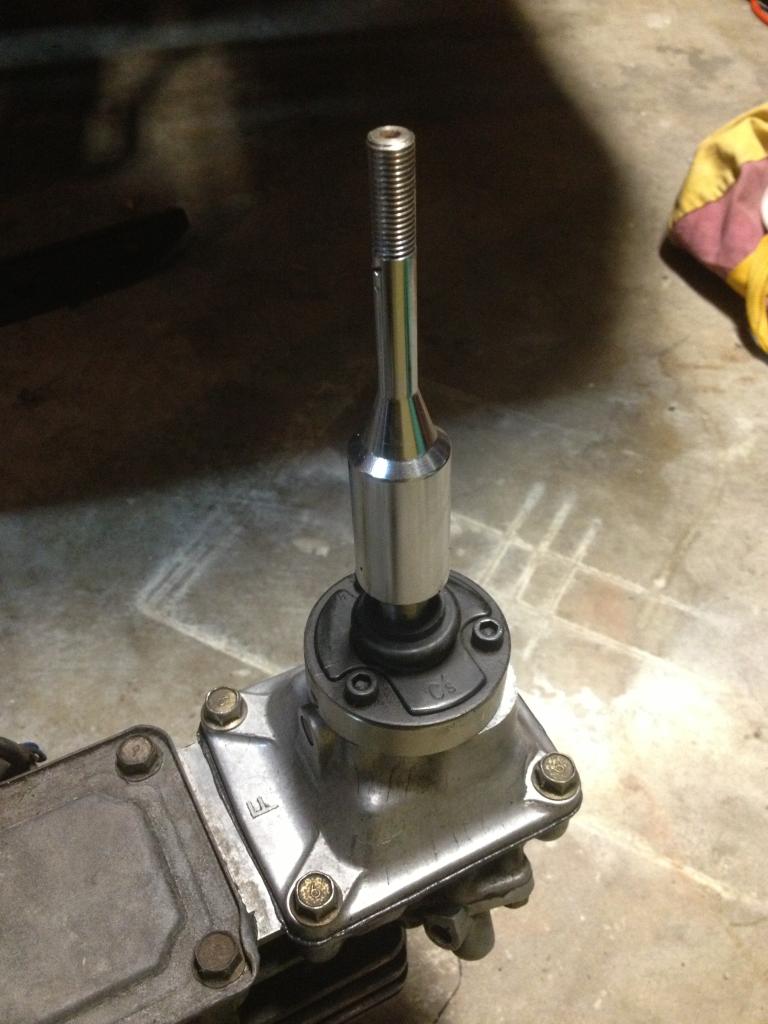
Installed with new shifter boot and FEED combination heavy weight ****
Also fitted my A'PEXi GT wing (actually its called the "Extreme Wing" lol). Most ppl prob don't know that this product ever existed. As far as I can recall, total sales in the US were like under 5 pieces. Its a nice wing...quality is fantastic and the wing stays are pretty cool with their adjustable rake mechanism. Unfortunately, with my car being widebody now and my focus completely on time attack -- this wing is a bit too small. I think it would be perfect for non-widebody FD.
You'll see this one in the classified section shortly.

Shown here mounted to some custom aluminum risers we made that increase height by about 5".
Small transmission update:
The elusive C's short shift

Installed with new shifter boot and FEED combination heavy weight ****

Also fitted my A'PEXi GT wing (actually its called the "Extreme Wing" lol). Most ppl prob don't know that this product ever existed. As far as I can recall, total sales in the US were like under 5 pieces. Its a nice wing...quality is fantastic and the wing stays are pretty cool with their adjustable rake mechanism. Unfortunately, with my car being widebody now and my focus completely on time attack -- this wing is a bit too small. I think it would be perfect for non-widebody FD.
You'll see this one in the classified section shortly.

Shown here mounted to some custom aluminum risers we made that increase height by about 5".
Thread Starter
Joined: Mar 2003
Posts: 390
Likes: 13
From: Anaheim
Haven't updated in a while. Life has been busy but Ive been trying my best to make it to the shop and get things done on the car whenever possible.
I think the thread is pretty much caught up to the point where I recently took the car to Design Craft.
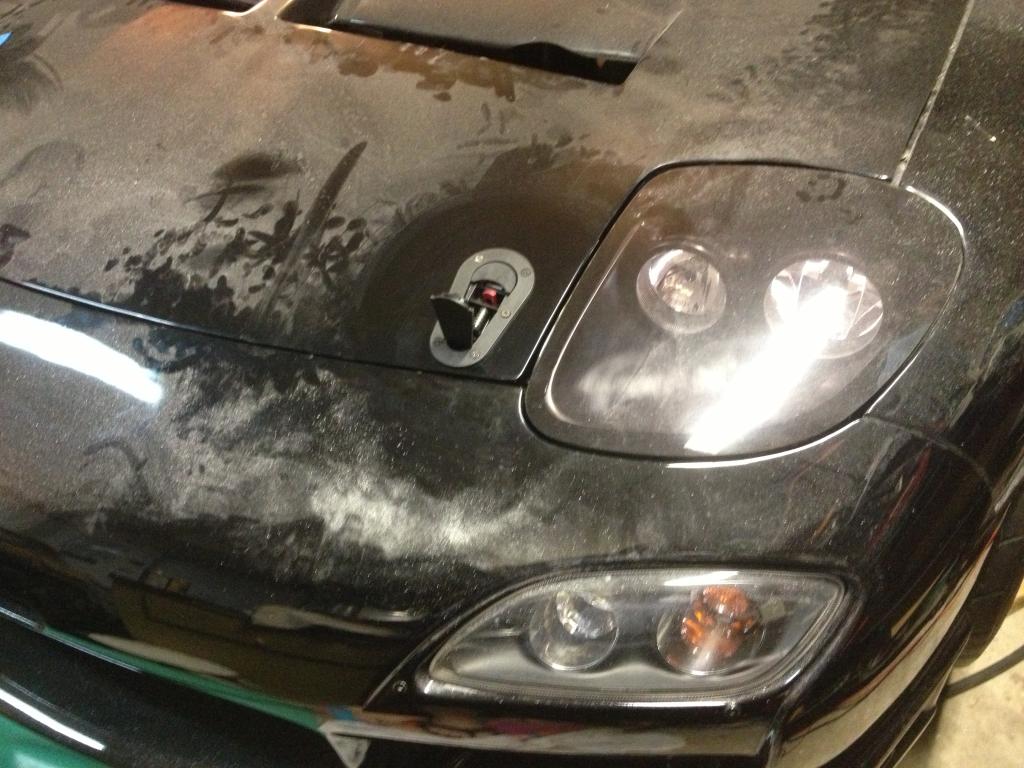
Here is the last thing I did at my home garage before towing to the shop. Installed some Aerocatchers -- the cutting was really straight forward and easy, but installing and tightening the damn nuts on the underside was a total pain. I have an old version that requites nuts and bolts. I had to preload a nut and washer into the end of a long 6mm socket and try to get them threaded on the underside. The washer doesn't fit into the socket so you need to balance it on the end...while mating it up to the bolts...at an angle. There were many small washers dropped onto the floor and into the engine bay, leading to many obscenities spewed while crawling around looking to retrieve them.
It would have been 100x easier to take off the hood and do it on the ground.
I believe the newer versions no longer use nuts and bolts, I think the housing is threaded. I could have also cut out more skeleton from the hood, but I wanted to keep it as clean as possible.
In the end I like how they came out and they're strong.

...a little dusty?
I wore a mask but will probably still get mesothelioma from this.
I think the thread is pretty much caught up to the point where I recently took the car to Design Craft.
Here is the last thing I did at my home garage before towing to the shop. Installed some Aerocatchers -- the cutting was really straight forward and easy, but installing and tightening the damn nuts on the underside was a total pain. I have an old version that requites nuts and bolts. I had to preload a nut and washer into the end of a long 6mm socket and try to get them threaded on the underside. The washer doesn't fit into the socket so you need to balance it on the end...while mating it up to the bolts...at an angle. There were many small washers dropped onto the floor and into the engine bay, leading to many obscenities spewed while crawling around looking to retrieve them.
It would have been 100x easier to take off the hood and do it on the ground.
I believe the newer versions no longer use nuts and bolts, I think the housing is threaded. I could have also cut out more skeleton from the hood, but I wanted to keep it as clean as possible.
In the end I like how they came out and they're strong.


...a little dusty?
I wore a mask but will probably still get mesothelioma from this.
Thread Starter
Joined: Mar 2003
Posts: 390
Likes: 13
From: Anaheim
Threw on some spare cheapo FN01s from my S13, pushed her out and gave her a quick wash. Prob the first wash in 8-9 years - aside from power washing prior to paint. It was a hot *** day so of course I was left with water spots everywhere...
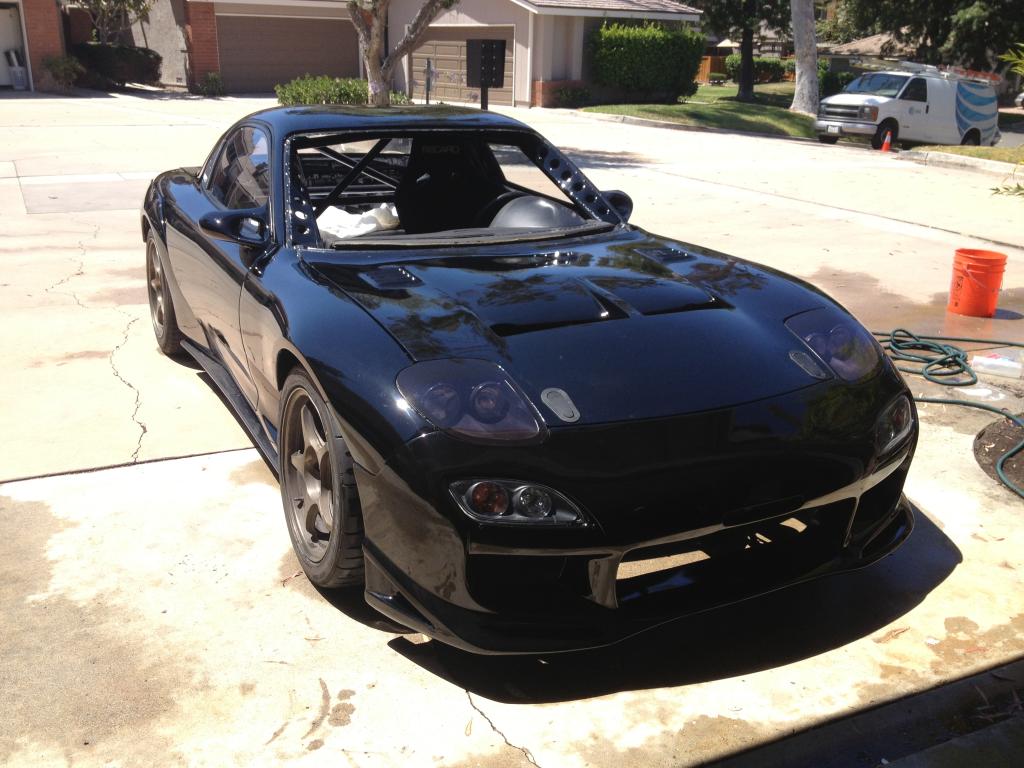
Then off to breathe some life into this bitch!

Then off to breathe some life into this bitch!

Thread Starter
Joined: Mar 2003
Posts: 390
Likes: 13
From: Anaheim
I started the process of tearing down the factory harnesses, labeling everything, tracing back the connections and eliminating everything not needed (90% of the chassis harness is not needed). I haven't brought out the scale yet, but Im betting all the chassis harnesses combined will total around 30lbs. This is not including all the unneeded things they interface with.
Talking to Chris Ludwig, we needed to keep a few connections going to the cluster (if cluster function was to be retained), and a couple connections from the dash harness (clutch pedal for 2 step launch on the ECU comes to mind -- not really needed, but sounds like fun). Then there is the battery relocation to deal with, so some wires in the charge harness and front harness would need to be retained - such as the ignition switch, starter relay, starter solenoid. Then there are things like headlights, tail lights, and turn signals to worry about. Of course, these accessories could be wired separately using a switch panel - but if I was already ripping open the factory loom Id like to figure out which wires I could retain to accomplish the same thing.
This kind of stuff got old quick.
The more I played with it, the louder the little voice in my head got telling me how ghetto fabulous this approach is.
It eventually got loud enough to get me to admit to myself that this is not the way I want my build to be and the money I was trying to get away with not spending on wiring would actually be a wise investment.
So Ive decided to bite the bullet, be a little more legit, and spend the money for a Racepak Smartwire. There are definitely cheaper alternatives available that would get the job done and still allow me to trash the factory harnesses (I would probably get a Leash Electronics distribution block if I wasn't trying to go all out on this car), but the Smartwire PDM functionality looks pretty awesome, especially when used in conjunction with a Haltech ECU with CAN.
So if anyone reading this has a Smartwire laying around they want to unload or know of anyone who does...please shoot me a PM. Im also in the market for a Racepak/Haltech IQ3 logger dash BTW, so you will see my excellent condition Mazdaspeed gauge cluster up for sale soon. Im kinda bummed I won't be using it, I really like that cluster and was looking forward to watching the needle rip through some RPM.
Talking to Chris Ludwig, we needed to keep a few connections going to the cluster (if cluster function was to be retained), and a couple connections from the dash harness (clutch pedal for 2 step launch on the ECU comes to mind -- not really needed, but sounds like fun). Then there is the battery relocation to deal with, so some wires in the charge harness and front harness would need to be retained - such as the ignition switch, starter relay, starter solenoid. Then there are things like headlights, tail lights, and turn signals to worry about. Of course, these accessories could be wired separately using a switch panel - but if I was already ripping open the factory loom Id like to figure out which wires I could retain to accomplish the same thing.
This kind of stuff got old quick.

The more I played with it, the louder the little voice in my head got telling me how ghetto fabulous this approach is.
It eventually got loud enough to get me to admit to myself that this is not the way I want my build to be and the money I was trying to get away with not spending on wiring would actually be a wise investment.
So Ive decided to bite the bullet, be a little more legit, and spend the money for a Racepak Smartwire. There are definitely cheaper alternatives available that would get the job done and still allow me to trash the factory harnesses (I would probably get a Leash Electronics distribution block if I wasn't trying to go all out on this car), but the Smartwire PDM functionality looks pretty awesome, especially when used in conjunction with a Haltech ECU with CAN.
So if anyone reading this has a Smartwire laying around they want to unload or know of anyone who does...please shoot me a PM. Im also in the market for a Racepak/Haltech IQ3 logger dash BTW, so you will see my excellent condition Mazdaspeed gauge cluster up for sale soon. Im kinda bummed I won't be using it, I really like that cluster and was looking forward to watching the needle rip through some RPM.
Thread Starter
Joined: Mar 2003
Posts: 390
Likes: 13
From: Anaheim
Chop chop.
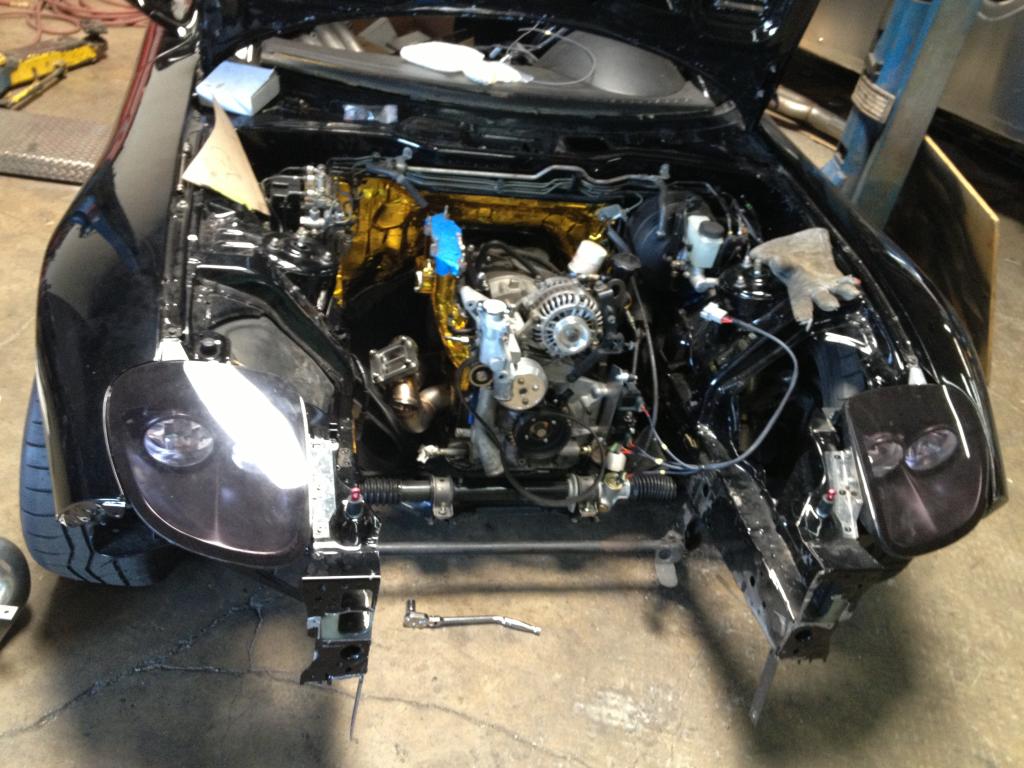
One of the first things we did at the shop was do away with the radiator support.
Look at all that room...
Im at the point with this car now that chopping off large pieces of metal doesn't phase me a bit. This makes for a ton more room for the v-mount while simultaneously making the engine much easier to work on. I have to say, being able to literally pull up a chair and sit down INSIDE the engine bay with the motor pretty much in your lap is a beautiful thing when running wiring and hoses. I was joking with the guys that after experiencing how awesome it is, the first mod on any car I get from now on will be to chop off the core support.
What are the odds? We threw in the the Greddy core for mock up and it fit perfectly.
One of the first things we did at the shop was do away with the radiator support.

Look at all that room...
Im at the point with this car now that chopping off large pieces of metal doesn't phase me a bit. This makes for a ton more room for the v-mount while simultaneously making the engine much easier to work on. I have to say, being able to literally pull up a chair and sit down INSIDE the engine bay with the motor pretty much in your lap is a beautiful thing when running wiring and hoses. I was joking with the guys that after experiencing how awesome it is, the first mod on any car I get from now on will be to chop off the core support.
What are the odds? We threw in the the Greddy core for mock up and it fit perfectly.


Thread Starter
Joined: Mar 2003
Posts: 390
Likes: 13
From: Anaheim
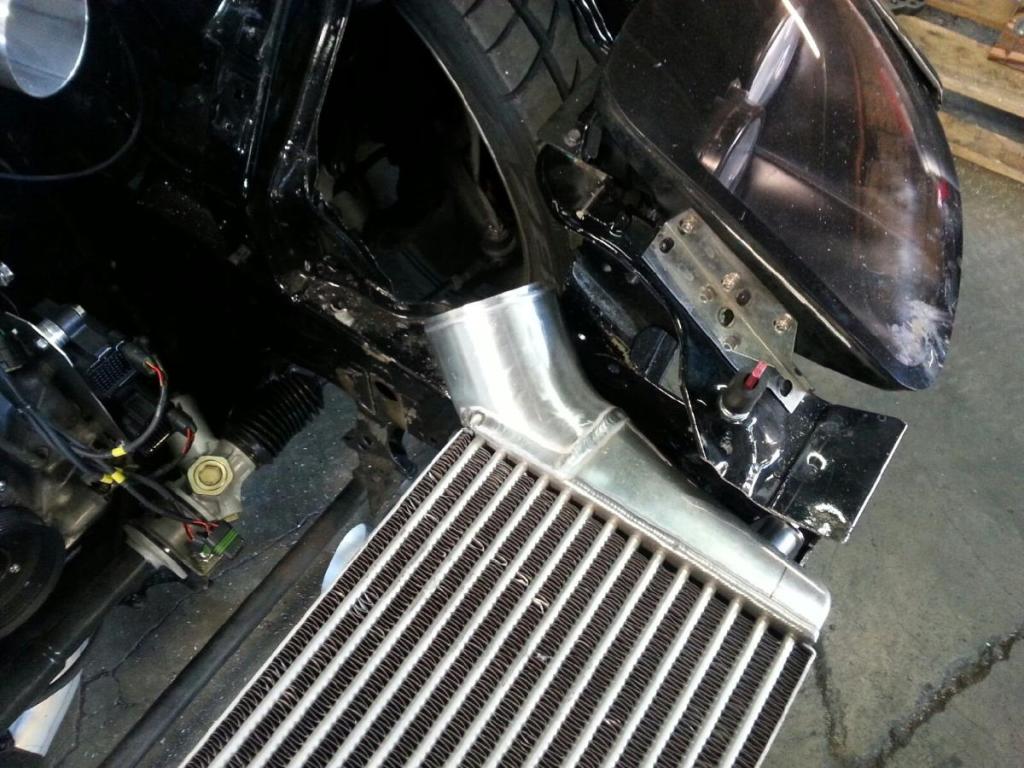
Then chop chop on the Greddy elbow.
Peter was intent on making a 4" charge pipe. When I told him its overkill he agreed. When I suggested it may cause some loss of low end response while not gaining anything on top he told me theres no way Ill notice any loss. Then he told me to stop being a bitch (lol) and agreed that if there is any abnormal dip in the curve on the dyno we will make a 3.5" version and see the difference. If the man wants to make a 4" pipe, god dammit let him make a 4" pipe. In the end the data will decide. Ill admit it came out pretty mean looking once we finished (pics to come).


Peter was intent on making a 4" charge pipe. When I told him its overkill he agreed. When I suggested it may cause some loss of low end response while not gaining anything on top he told me theres no way Ill notice any loss. Then he told me to stop being a bitch (lol) and agreed that if there is any abnormal dip in the curve on the dyno we will make a 3.5" version and see the difference. If the man wants to make a 4" pipe, god dammit let him make a 4" pipe. In the end the data will decide. Ill admit it came out pretty mean looking once we finished (pics to come).
Thread Starter
Joined: Mar 2003
Posts: 390
Likes: 13
From: Anaheim
Next we had to go through the entire fuel system, boot to bonnet (and back). The factory hard lines are a thing of the past so every connection, hose, and fitting had to be mapped out. We are running a -8 feed to the filter (I sold my SARD filter in favor of an E85 compatible Fuel Lab 828 6 micron fiberglass element filter), then to a Y fitting that splits the -8 into a -8 and a -6. From there the -6 feeds the primary while the -8 feeds the secondary. Both the rails are -6 back to the Fuel Lab 528 pressure regulator. From the regulator a single -6 goes in and out of the flex fuel sensor before returning to the tank.
It took several days of research for me to decide on which brand hose and fittings to use. I knew I wanted PTFE (teflon), but there are so many options and price ranges. I ended up finding a wholesale site that sells the baller Goodridge PTFE hoses and fittings for pretty reasonable prices. The only drawback is from the time you place your order it takes about 1.5-2 weeks to receive your goods. It was worth the wait, I probably would have spent $300 more for the same product buying from the next cheapest vendor.
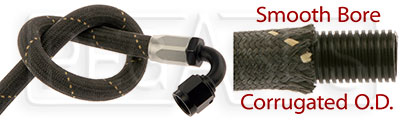
I ended up going with the Goodridge 910 series smooth bore PTFE with aramid kevlar braid. The PTFE is carbon impregnated to prevent any buildup of static electricity caused by moving fluid (not necessary for our automotive flow rates, but cool nonetheless). The outer part of the extruded PTFE is convoluted (ribbed), while the inner bore is smooth. This allows for the flexibility of a convoluted hose with the superior flow of a smooth bore (the bend radius is impressive). The aramid kevlar cover is flame retardant and self extinguishing. Not to mention light as a feather. Goodridge claims this is the lightest, highest flowing, and most flexible hose in the world.
Plus it looks pretty awesome.
I ended up getting 10' of -8 and 16' of -6. I originally ordered 10 and 10, which would have been perfect had we not decided to mount the FPR over by the brake booster instead of on top of the motor by the UIM. We figured a little extra effort avoiding heat soak may help later on down the road. This did delay things as I had to wait 2 weeks for the additional -6 to arrive.
Now that its on the car, Im very happy with my decision. We plan to pressure test the system this weekend.
It took several days of research for me to decide on which brand hose and fittings to use. I knew I wanted PTFE (teflon), but there are so many options and price ranges. I ended up finding a wholesale site that sells the baller Goodridge PTFE hoses and fittings for pretty reasonable prices. The only drawback is from the time you place your order it takes about 1.5-2 weeks to receive your goods. It was worth the wait, I probably would have spent $300 more for the same product buying from the next cheapest vendor.
I ended up going with the Goodridge 910 series smooth bore PTFE with aramid kevlar braid. The PTFE is carbon impregnated to prevent any buildup of static electricity caused by moving fluid (not necessary for our automotive flow rates, but cool nonetheless). The outer part of the extruded PTFE is convoluted (ribbed), while the inner bore is smooth. This allows for the flexibility of a convoluted hose with the superior flow of a smooth bore (the bend radius is impressive). The aramid kevlar cover is flame retardant and self extinguishing. Not to mention light as a feather. Goodridge claims this is the lightest, highest flowing, and most flexible hose in the world.
Plus it looks pretty awesome.
I ended up getting 10' of -8 and 16' of -6. I originally ordered 10 and 10, which would have been perfect had we not decided to mount the FPR over by the brake booster instead of on top of the motor by the UIM. We figured a little extra effort avoiding heat soak may help later on down the road. This did delay things as I had to wait 2 weeks for the additional -6 to arrive.
Now that its on the car, Im very happy with my decision. We plan to pressure test the system this weekend.


Thread Starter
Joined: Mar 2003
Posts: 390
Likes: 13
From: Anaheim
I have to say, it was cool getting to work on my car along side a legit time attack machine. So many talented people put in tons of hard work on that car in order to make the World Time Attack deadline this year. It was pretty humbling -- looking over in that direction instantly makes me realize how much further I have to go.
Heres some more Vmount mock up with the baller *** A'PEX radiator. Thing is beautiful. This one is for an R32 GTR application that we are cutting up and making our own mounts and end tanks.


Japanese heat exchangers are so pretty.
Started on the IGN-1A coil mount.

*** I am so happy to say that after 10.5 years of silence the FD finally came out of hibernation last night. Everything went quite smooth...I still can't really process it. Still lots to do (we have a lot of temp ghetto rigged things going on just so we could see if the engine would fire up). I have a decent amount of pics from along the way that I will catch up with. =))
has a Full Member
Joined: Jan 2008
Posts: 94
Likes: 7
From: Southern California
Jealous you get to work over at Design Craft next to the Team America GTR and Eric Hsu. That guy knows his ****, seems to be a cool guy too. Read all his stuff on MotoIQ, everything he writes is gold.
Thread Starter
Joined: Mar 2003
Posts: 390
Likes: 13
From: Anaheim
Check out post #61.
About $3-5 cheaper per foot on the hose than the next best pricing I could find and about $6-10 cheaper per fitting.
I have a lot of respect for the guys behind that build. They are all OG guys who have been building awesome cars since the early days of the Import scene in the US. Ive known Eric since he was the engineering manager at A'PEX over 10 years ago. He already knew his **** back then...since moving on to work at Cosworth and now factory Honda race teams he's really broadened his experience beyond the amateur racing world. A bit of a cocky ******* at times - which he will openly admit to haha. I feel very fortunate to have grown up around these old ***** and learn so many lessons from them about the sport I love.
For anyone wondering, Design Craft isn't solely focused on race team support or building huge budget race cars. They also do street car builds and other customer cars, pretty much anything you can think of. Anyone in SoCal looking for an experienced shop to undertake a build feel free to PM me and I can put you in contact.
About $3-5 cheaper per foot on the hose than the next best pricing I could find and about $6-10 cheaper per fitting.
Originally Posted by ThunderSprinter
Jealous you get to work over at Design Craft next to the Team America GTR and Eric Hsu. That guy knows his ****, seems to be a cool guy too. Read all his stuff on MotoIQ, everything he writes is gold.
For anyone wondering, Design Craft isn't solely focused on race team support or building huge budget race cars. They also do street car builds and other customer cars, pretty much anything you can think of. Anyone in SoCal looking for an experienced shop to undertake a build feel free to PM me and I can put you in contact.
Thread Starter
Joined: Mar 2003
Posts: 390
Likes: 13
From: Anaheim
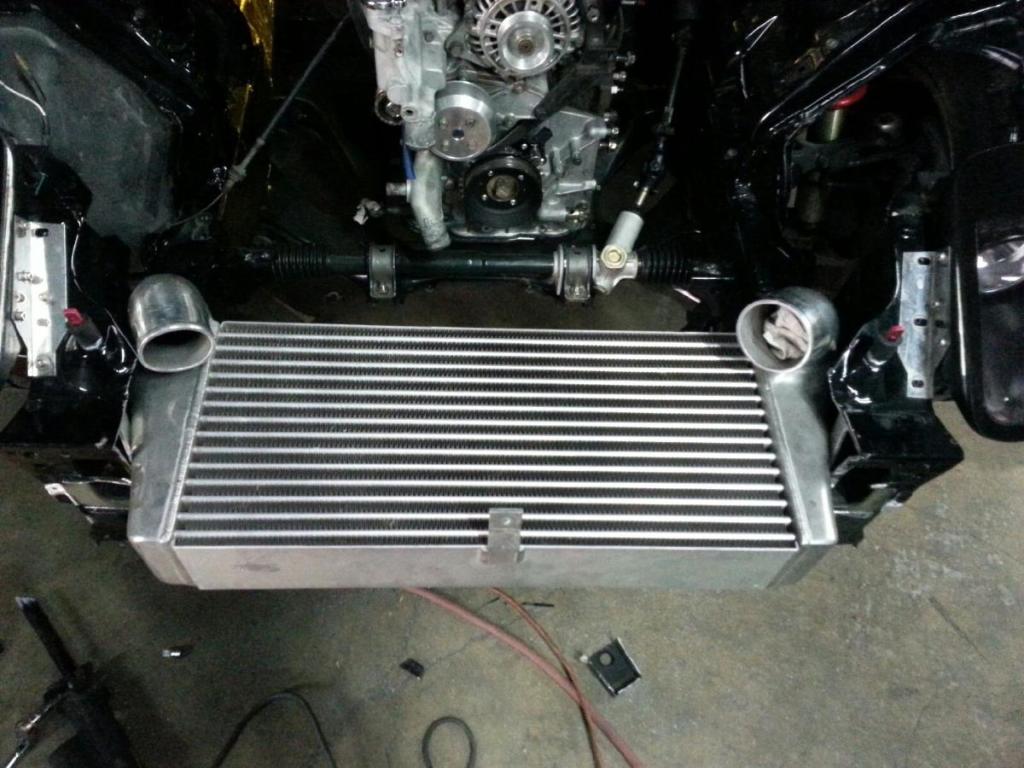
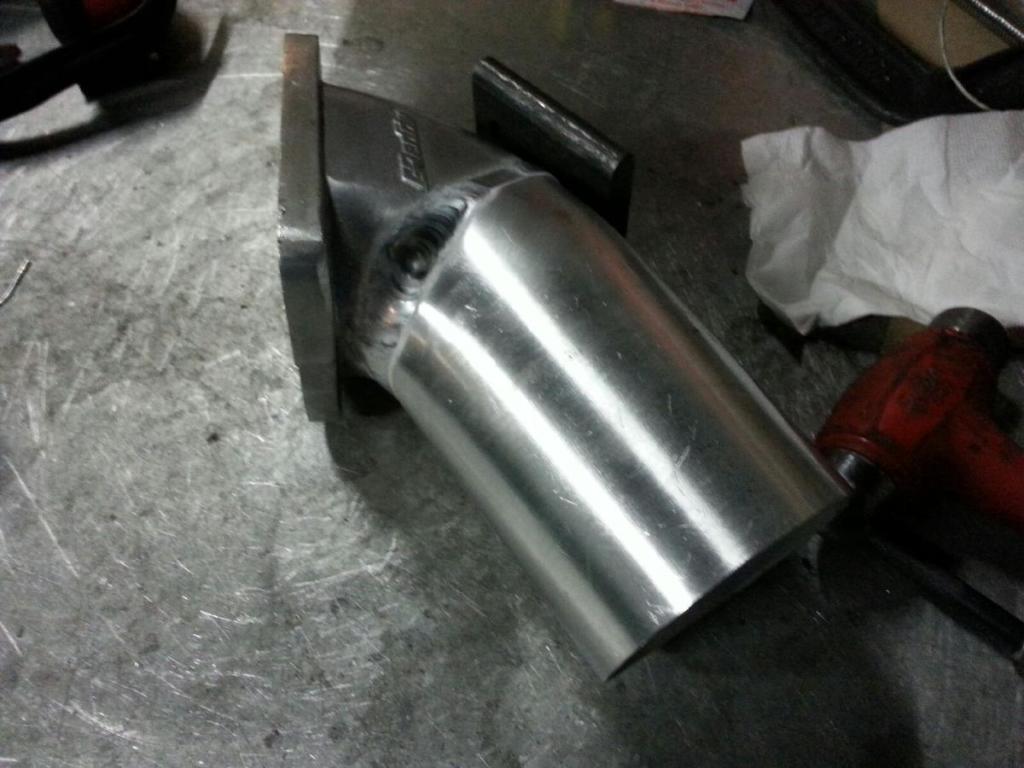
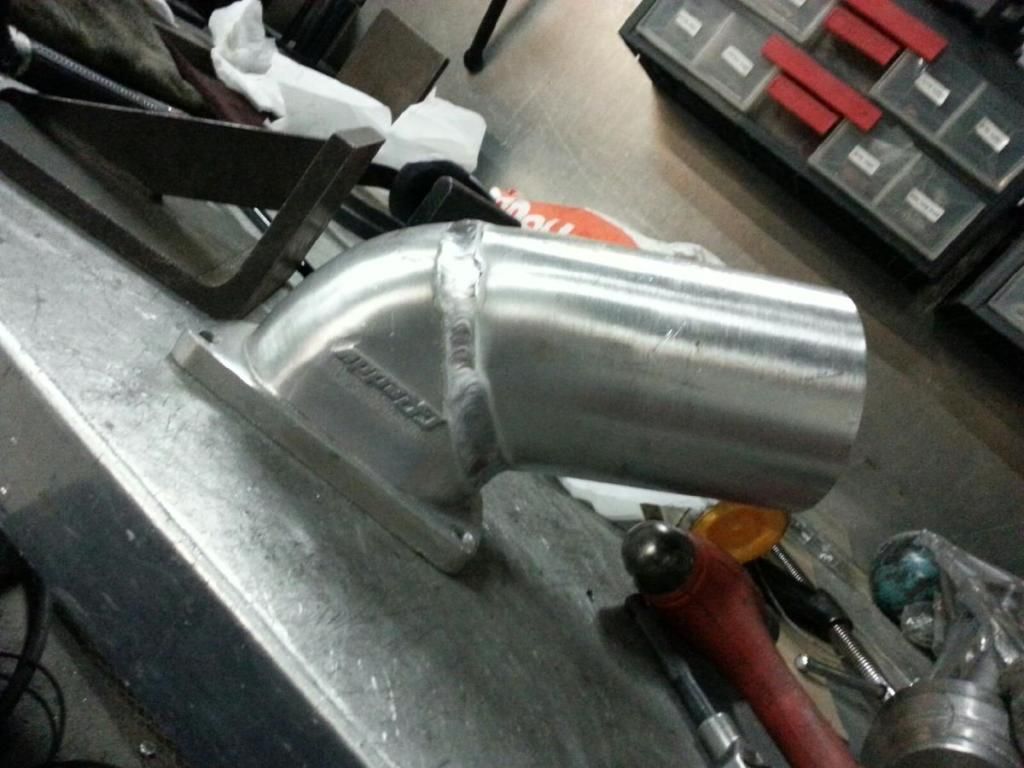
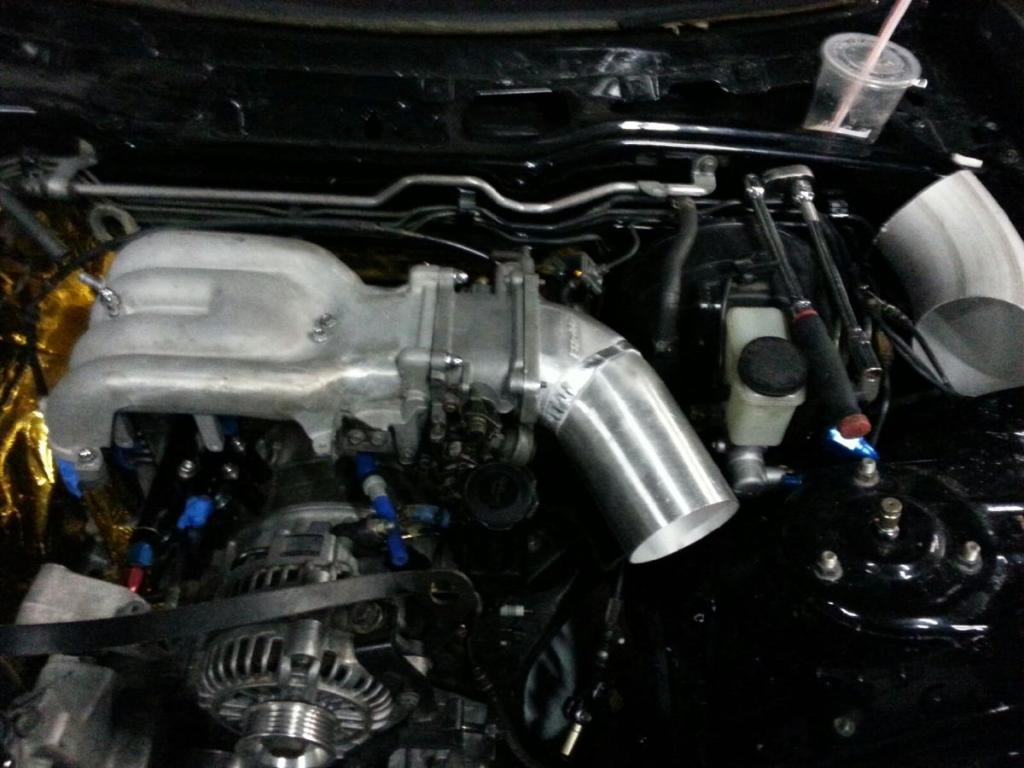
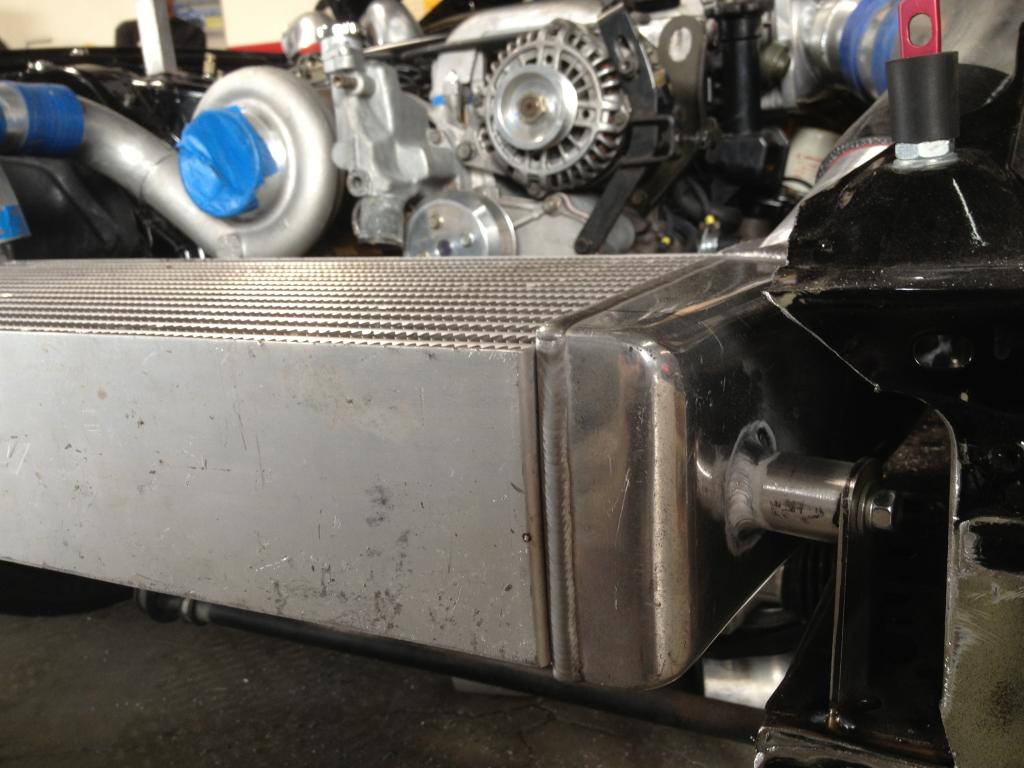
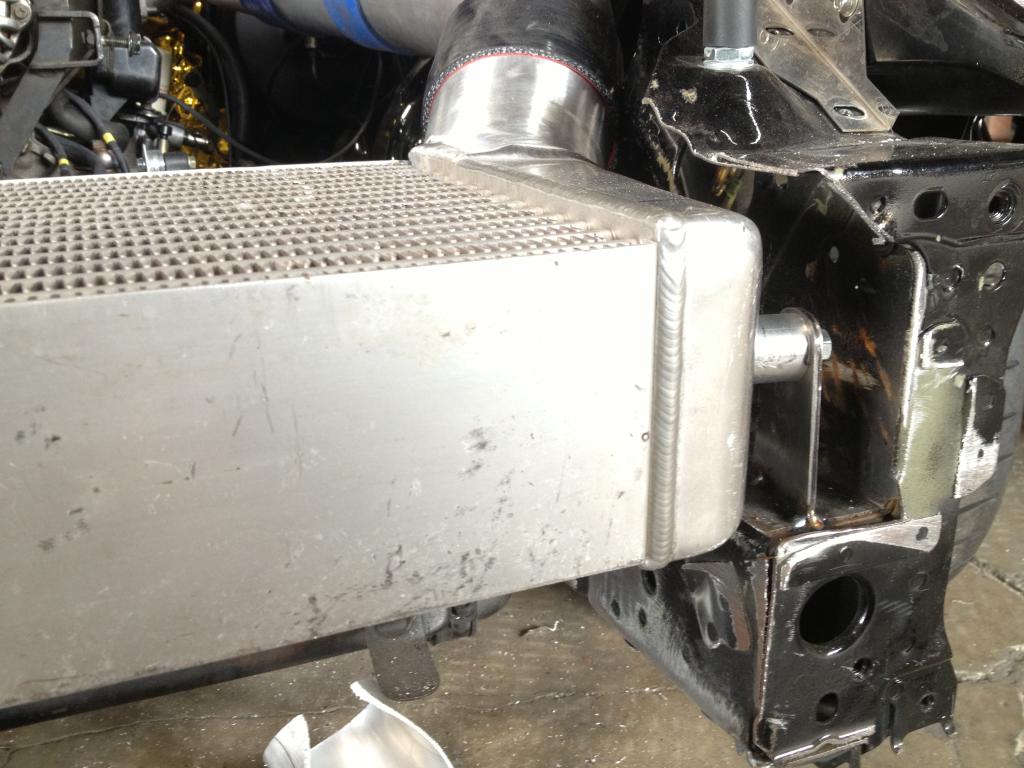
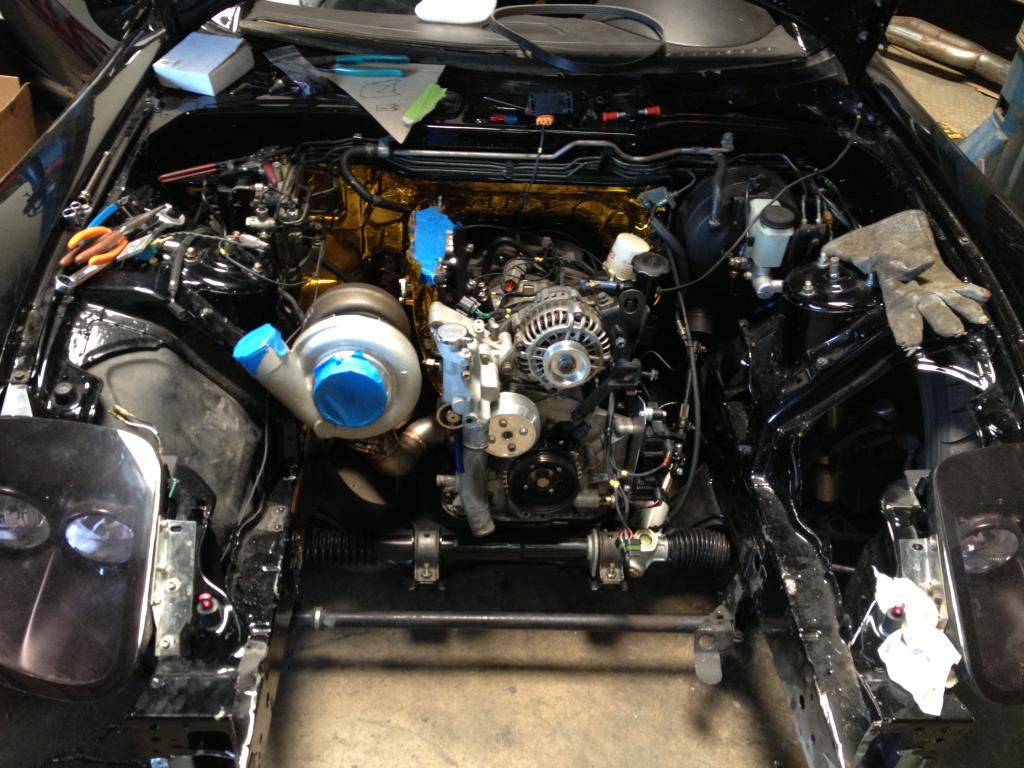
Pete chopped the outlets on the Greddy IC and started making his own. He did an awesome job splitting the pipe and welding in several sections to get a good fit and clean flow. I love it.

Doing away with the core support allowed us to bring the IC as far forward as possible. Maybe not ideal for weight distribution if we nit pick, but it makes working on the car easier, allows for more room to add things like air separator tanks and oil catch cans in the engine bay, and cuts down on heat soak from the engine.
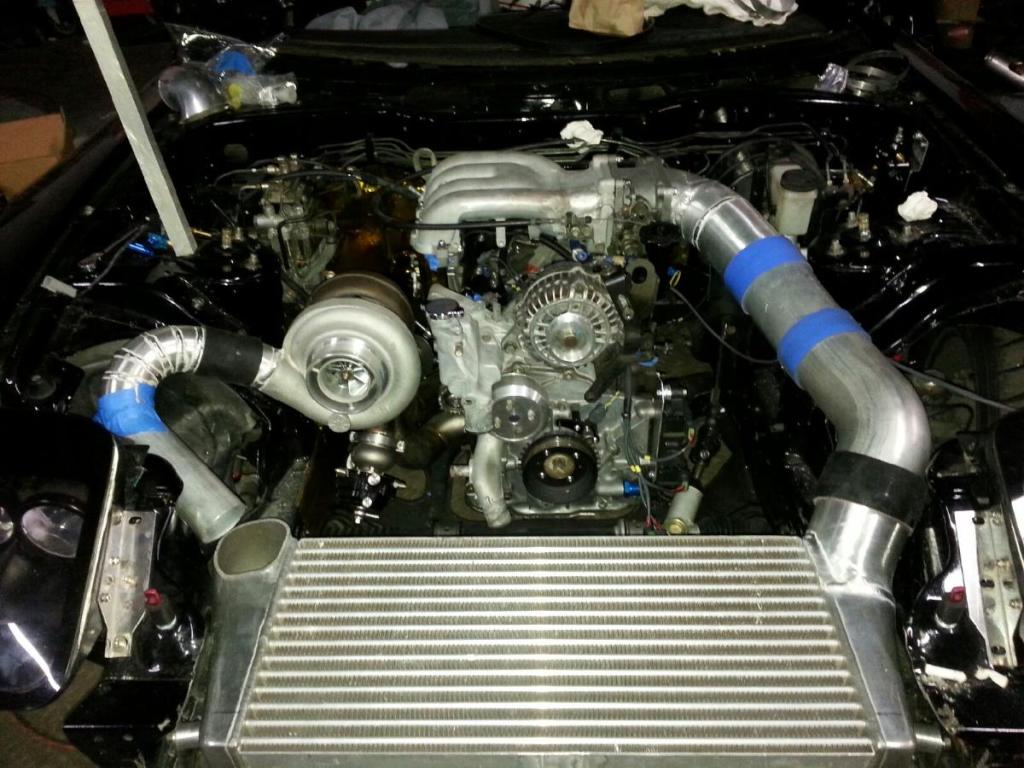

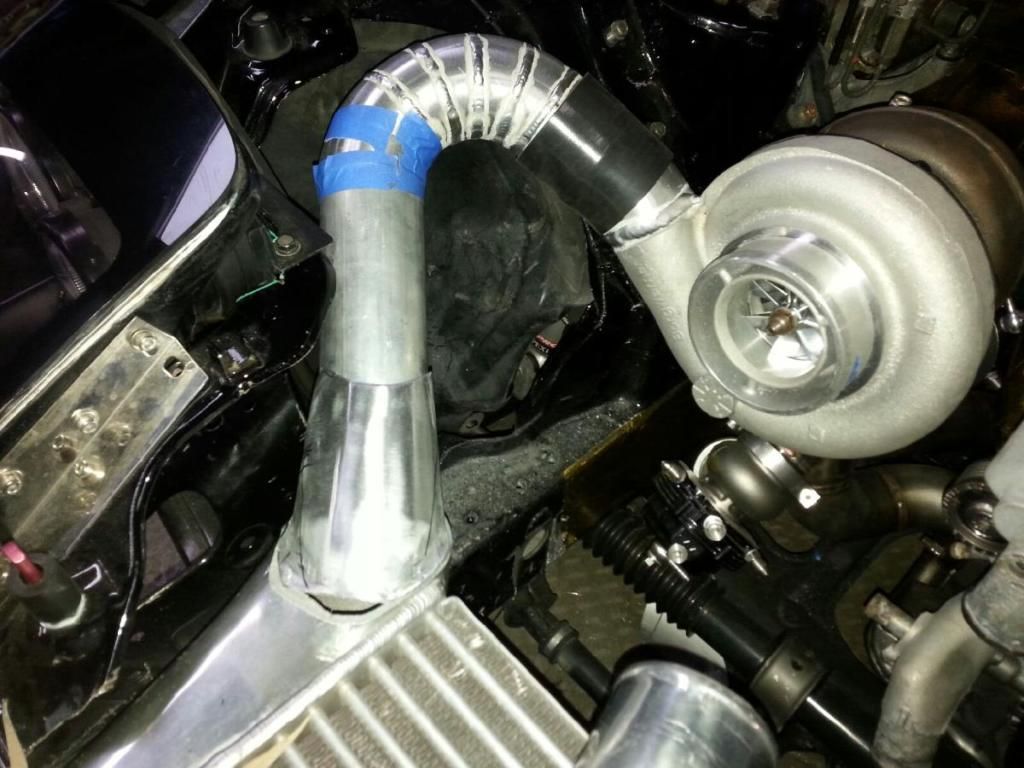
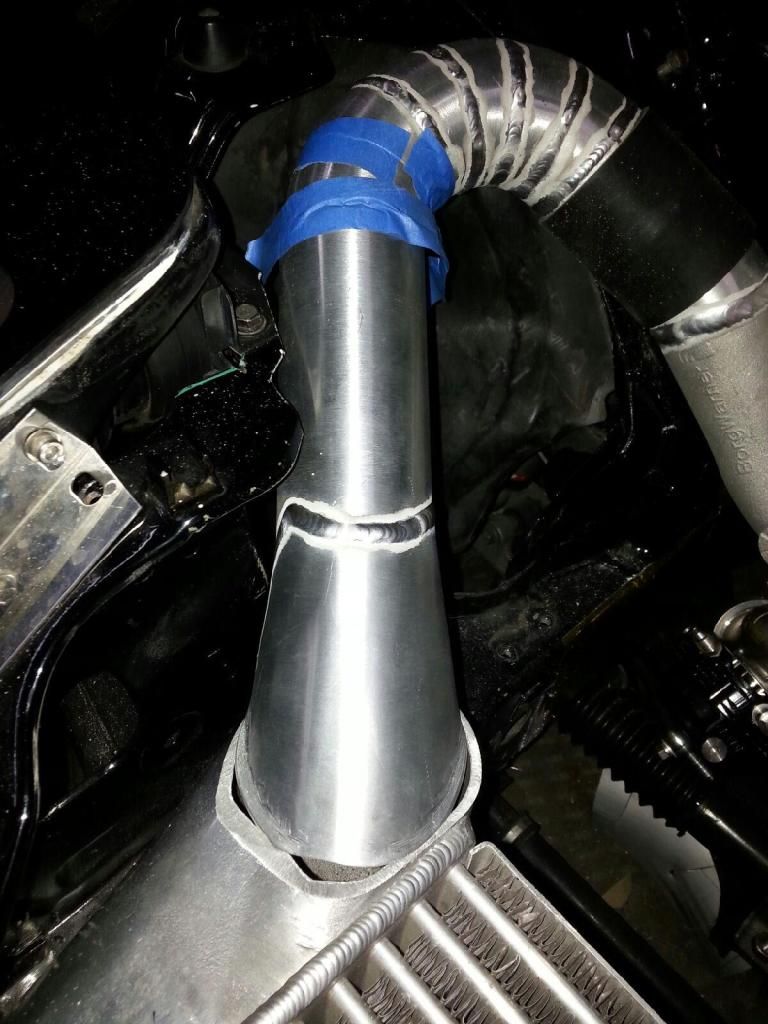


Doing away with the core support allowed us to bring the IC as far forward as possible. Maybe not ideal for weight distribution if we nit pick, but it makes working on the car easier, allows for more room to add things like air separator tanks and oil catch cans in the engine bay, and cuts down on heat soak from the engine.


Thread Starter
Joined: Mar 2003
Posts: 390
Likes: 13
From: Anaheim
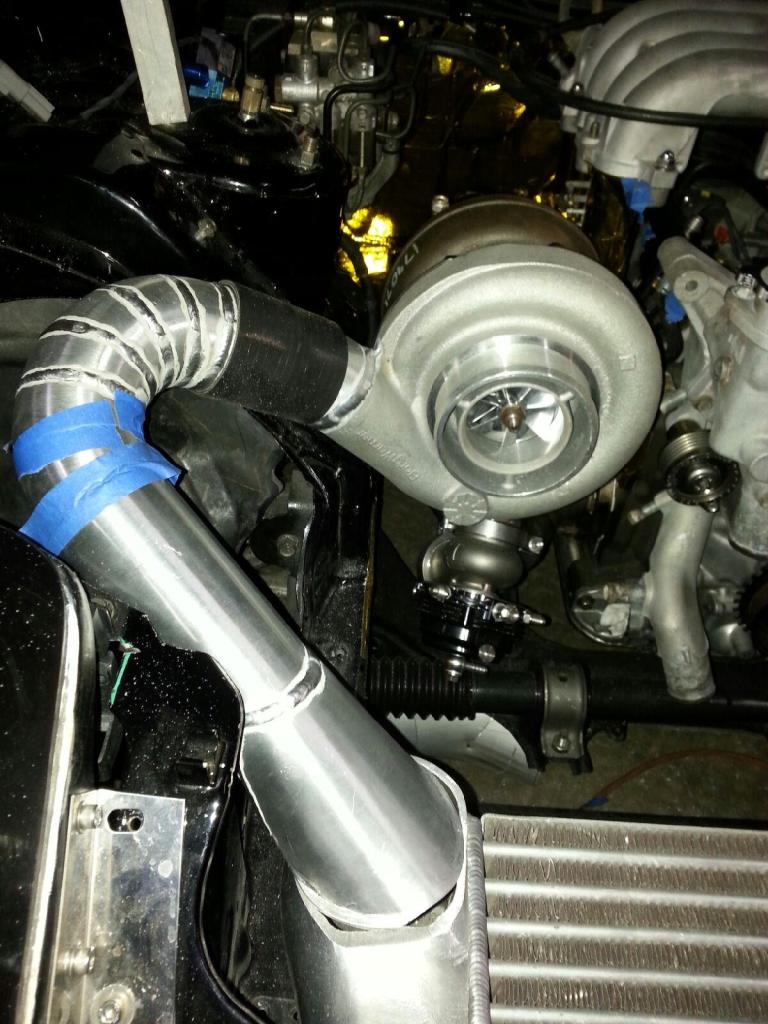
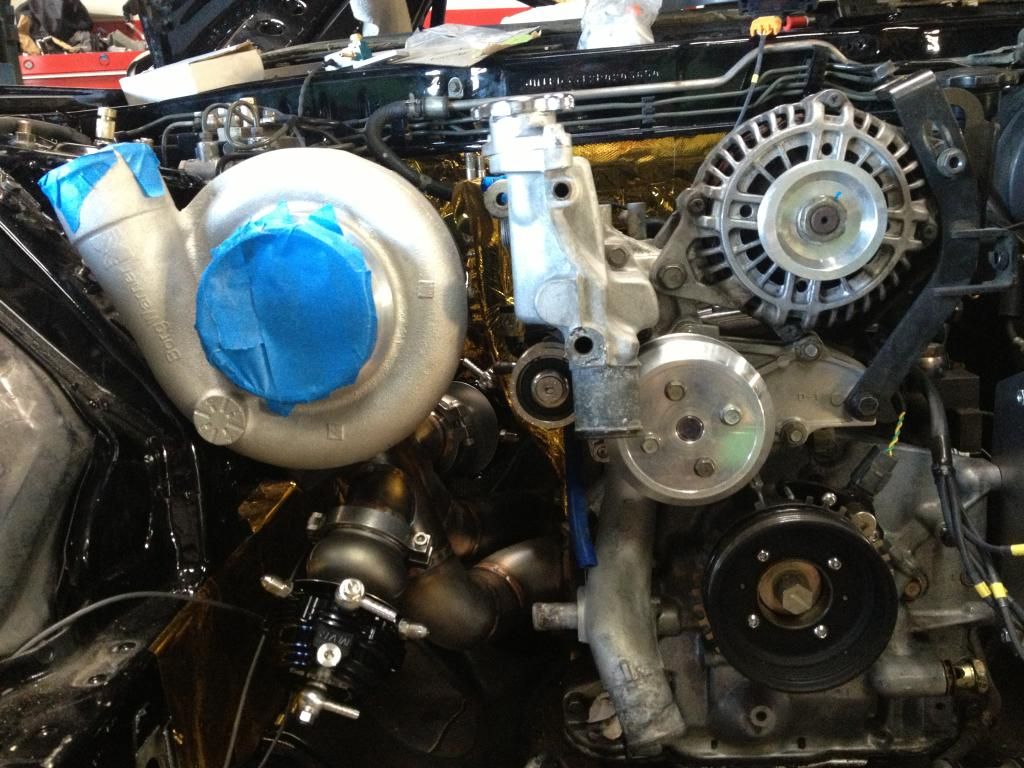
I was looking into changing my turbo setup to something a bit more contemporary. The "old school" T04X squared performed amazingly well in its time, and is still a solid no frills turbo that will out flow most of its rivals. The high flow at low boost characteristics is what I liked about the T04X^2. Since I was planning on running pump gas or 104, I was looking to keep boost at a modest level. Now with E85, I can boost 2 bar without worry, so I began looking at more turbo options.
After about a decade since we last corresponded, I ended up reconnecting with Geoff at Full Race. I helped Geoff out with his AWD RB26 powered S14 back when he first started his business. I since haven't kept tabs on much industry related stuff so I was very happy to see how far Geoff and Full Race have come. What a great job he has done! In a time where so many shops have been forced to close doors, Geoff has managed to expand and flourish. Major props to him and his crew.
After catching up a bit and picking his brain about a new turbo setup Geoff was willing to show me some support through Full Race. With a 500whp goal and maximum transient response in mind, we settled on a Borg Warner S362 FMW with a cupped turbine wheel and 0.91a/r hot side. To be totally honest, my initial thought was that the 362 would be too small. I was also concerned about the .91 housing on a rotary. However, Geoff whole heartedly recommended this setup, he works with BW turbos on a daily basis, and I trust him. At the end of the day, the 362 is just a transitional turbo. Once the car is sorted and proven to be track worthy we will upgrade to an EFR.
I am very proud to have the support of Full Race and I can't thank Geoff enough for his kindness.
BW S362 and Sham Wow
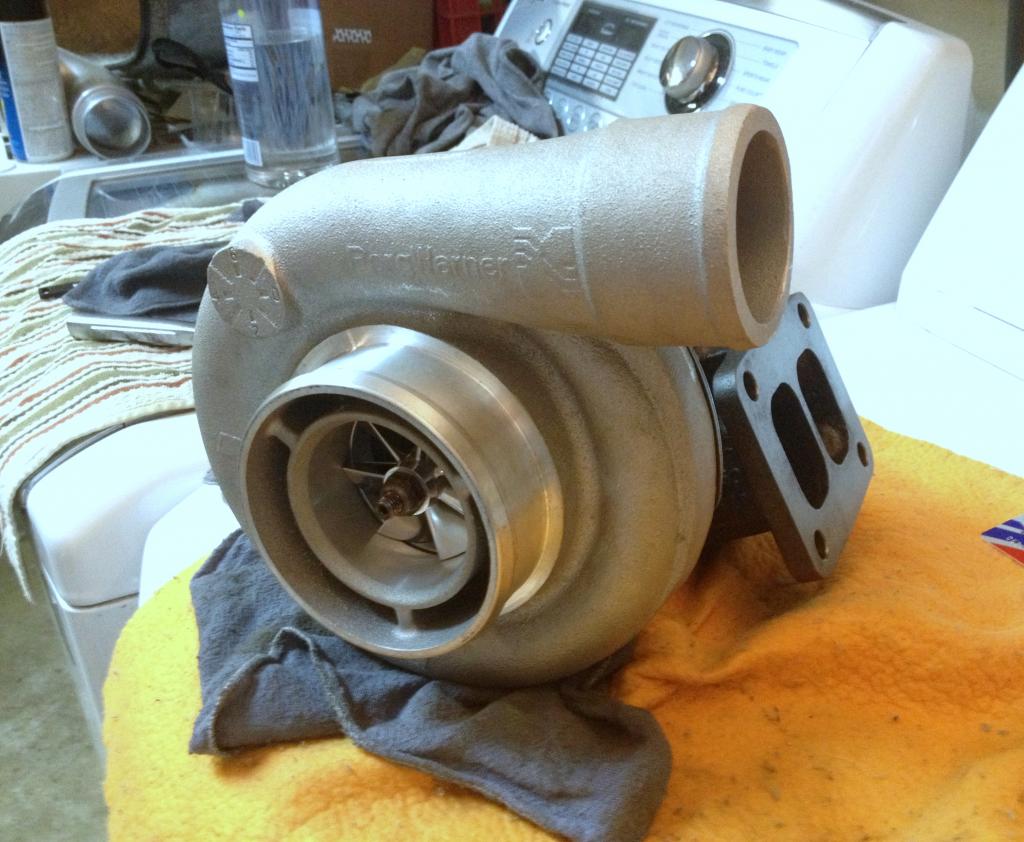
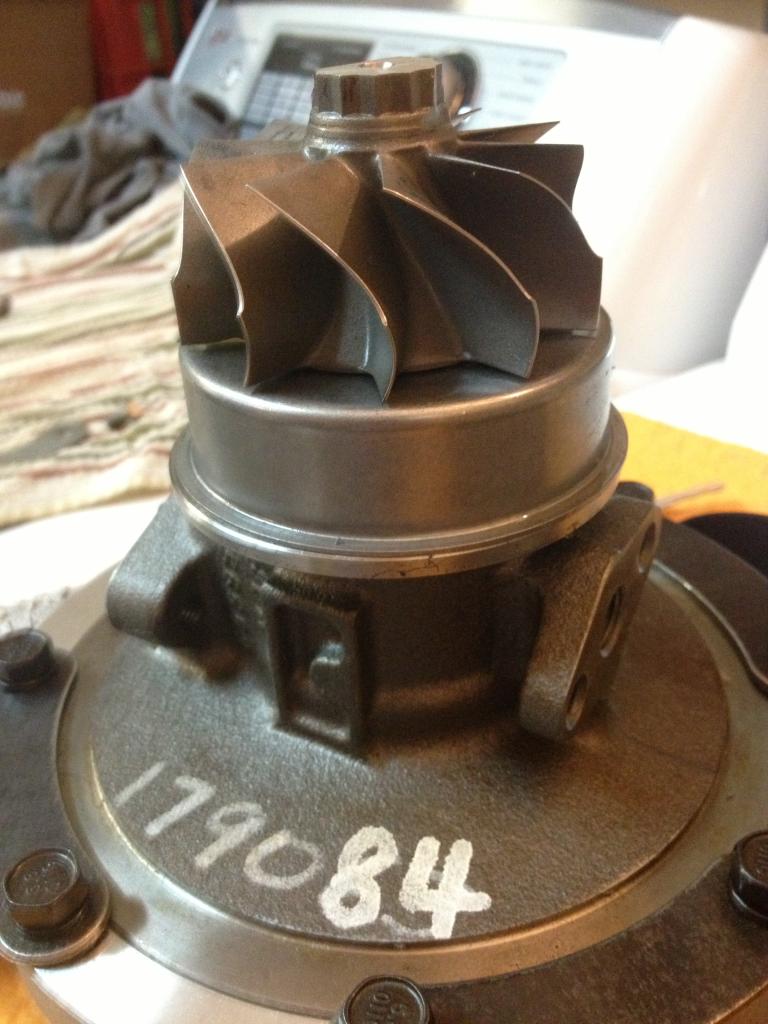
Forged milled compressor wheel
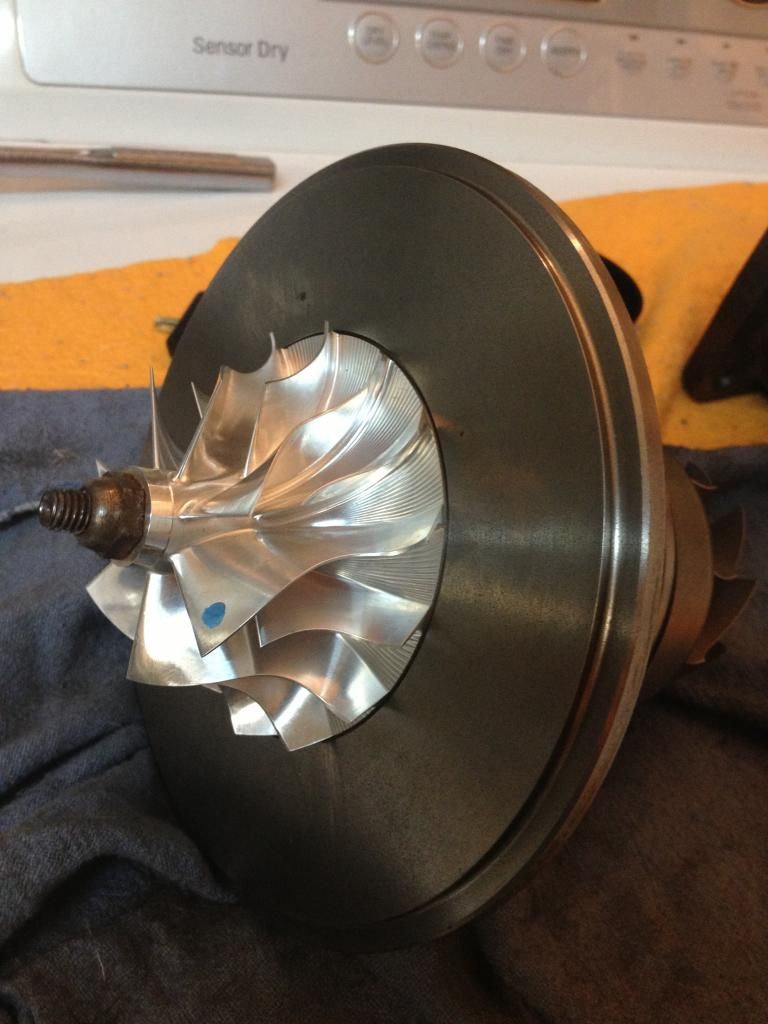
Cupped turbine wheel with extended tip
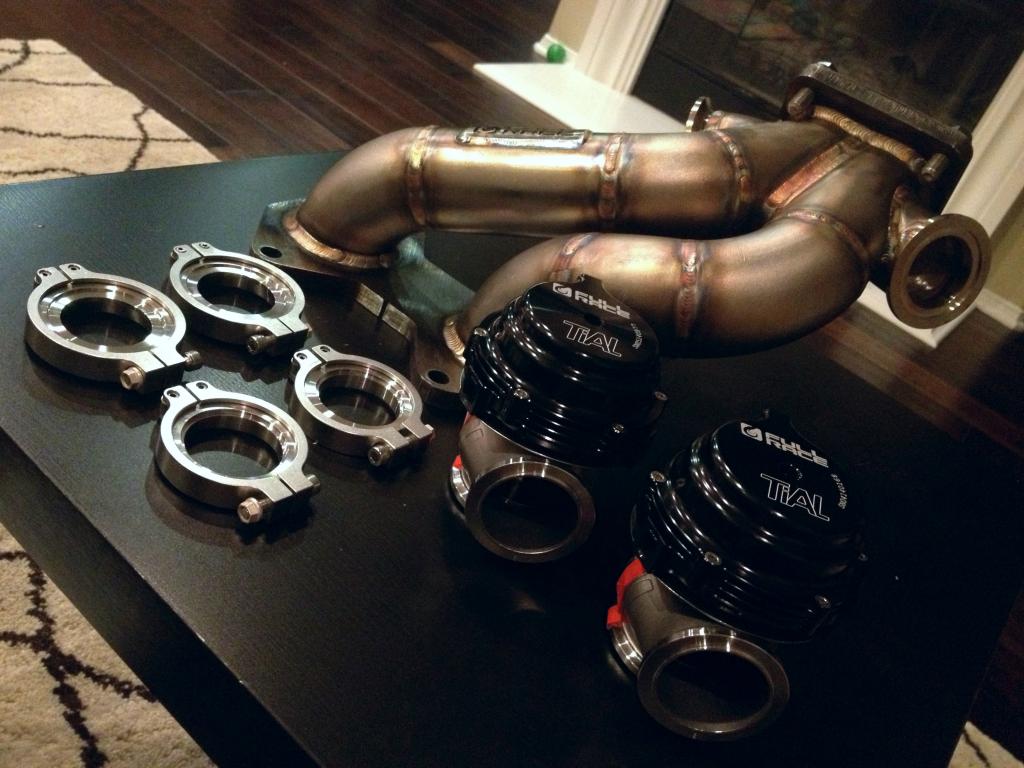
Beautiful Full Race twin scroll tubular manifold. Quality and craftsmanship are top notch -- its almost too pretty to install. My crappy cell phone pics and horrible lighting do not do it justice.

Dual Tial MV-R 44mm gates. If I decide to use a 4 port solenoid and boost by gear in the future these guys will help regulate boost to a more traction-friendly level in lower gears.
On the car
After about a decade since we last corresponded, I ended up reconnecting with Geoff at Full Race. I helped Geoff out with his AWD RB26 powered S14 back when he first started his business. I since haven't kept tabs on much industry related stuff so I was very happy to see how far Geoff and Full Race have come. What a great job he has done! In a time where so many shops have been forced to close doors, Geoff has managed to expand and flourish. Major props to him and his crew.
After catching up a bit and picking his brain about a new turbo setup Geoff was willing to show me some support through Full Race. With a 500whp goal and maximum transient response in mind, we settled on a Borg Warner S362 FMW with a cupped turbine wheel and 0.91a/r hot side. To be totally honest, my initial thought was that the 362 would be too small. I was also concerned about the .91 housing on a rotary. However, Geoff whole heartedly recommended this setup, he works with BW turbos on a daily basis, and I trust him. At the end of the day, the 362 is just a transitional turbo. Once the car is sorted and proven to be track worthy we will upgrade to an EFR.
I am very proud to have the support of Full Race and I can't thank Geoff enough for his kindness.
BW S362 and Sham Wow

Forged milled compressor wheel

Cupped turbine wheel with extended tip

Beautiful Full Race twin scroll tubular manifold. Quality and craftsmanship are top notch -- its almost too pretty to install. My crappy cell phone pics and horrible lighting do not do it justice.

Dual Tial MV-R 44mm gates. If I decide to use a 4 port solenoid and boost by gear in the future these guys will help regulate boost to a more traction-friendly level in lower gears.

On the car


has a Full Member
Joined: Jan 2008
Posts: 94
Likes: 7
From: Southern California
Interesting wastegate position on the full race manifold. Sort of the opposite from where you'd think the gas would flow, but at the same time being close to the turbine I could see back pressure causing them to operate efficiently.

Thread Starter
Joined: Mar 2003
Posts: 390
Likes: 13
From: Anaheim
Thanks guys =))
Yes. It seems every company has their own idea of what location is best. Ive seen plenty like the Turblown manifold that place the WG runners near the engine side flange. Also, the angle of the WG runners on the Full Race manifold doesn't seem to be ideal either...according to diagrams like this:
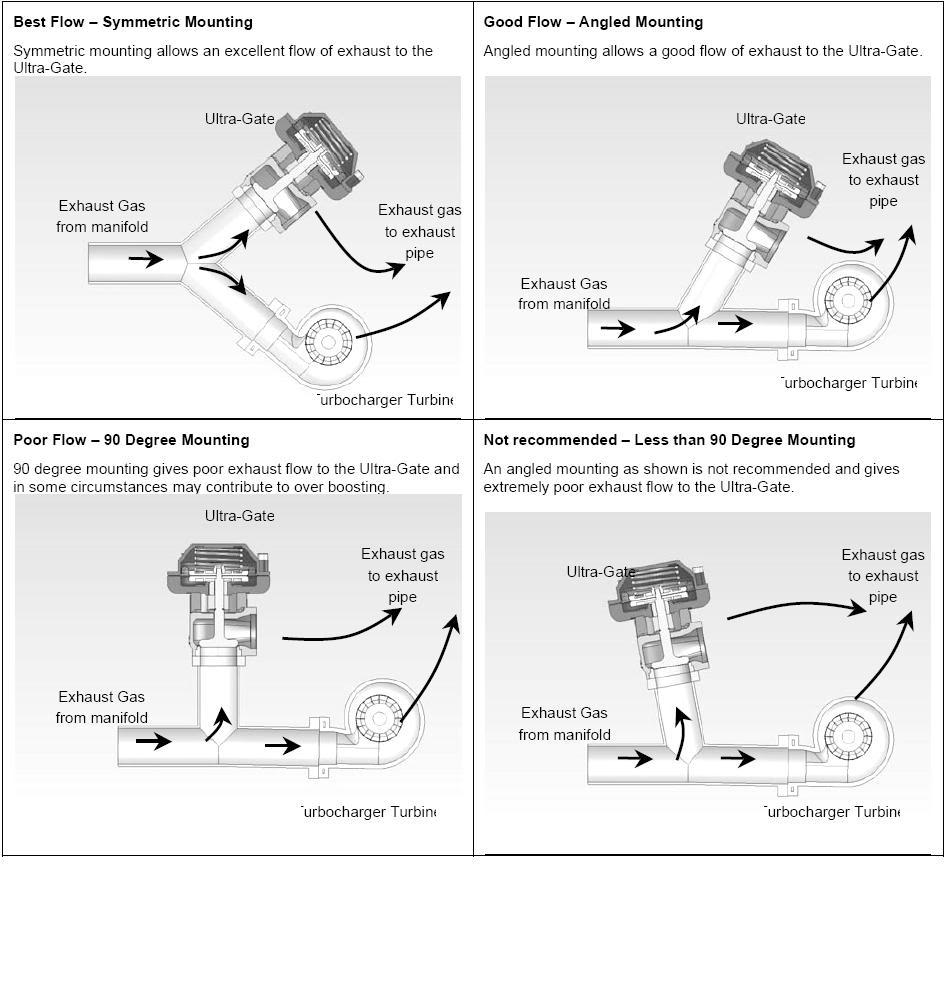
Whether or not this actually translates into any noticeable real world performance loss is probably debatable. I am not an engineer nor do I have any extensive knowledge in fluid dynamics, but Im thinking the positioning and angle, while maybe not optimal, probably will not produce an effect significant enough to really worry about. What would be the anticipated result? With dual 44mm outlets, I really doubt over boosting will be an issue (esp at the boost pressures I plan on running).
Whether or not this actually translates into any noticeable real world performance loss is probably debatable. I am not an engineer nor do I have any extensive knowledge in fluid dynamics, but Im thinking the positioning and angle, while maybe not optimal, probably will not produce an effect significant enough to really worry about. What would be the anticipated result? With dual 44mm outlets, I really doubt over boosting will be an issue (esp at the boost pressures I plan on running).
Joined: Jun 2008
Posts: 1,065
Likes: 1
From: B̷͈͇̠̗͔̼̝̓̎͛͂A̧̡̠̩̭̹̼̭͔̎̃̈́̍͂ͬͬ̚Y̯̜ͨ̒̾̽͊͘ ͈͙̰
When I asked Geoff about the placement of the wastegate runners, he noted that they were purposely placed indirect of the exhaust flow for turbine priority and to maximize response. When using dual wastegates, especially 44mms, there should be ample surface area where boost control should not be an issue, as you noted. Let us know how it goes
Thread Starter
Joined: Mar 2003
Posts: 390
Likes: 13
From: Anaheim
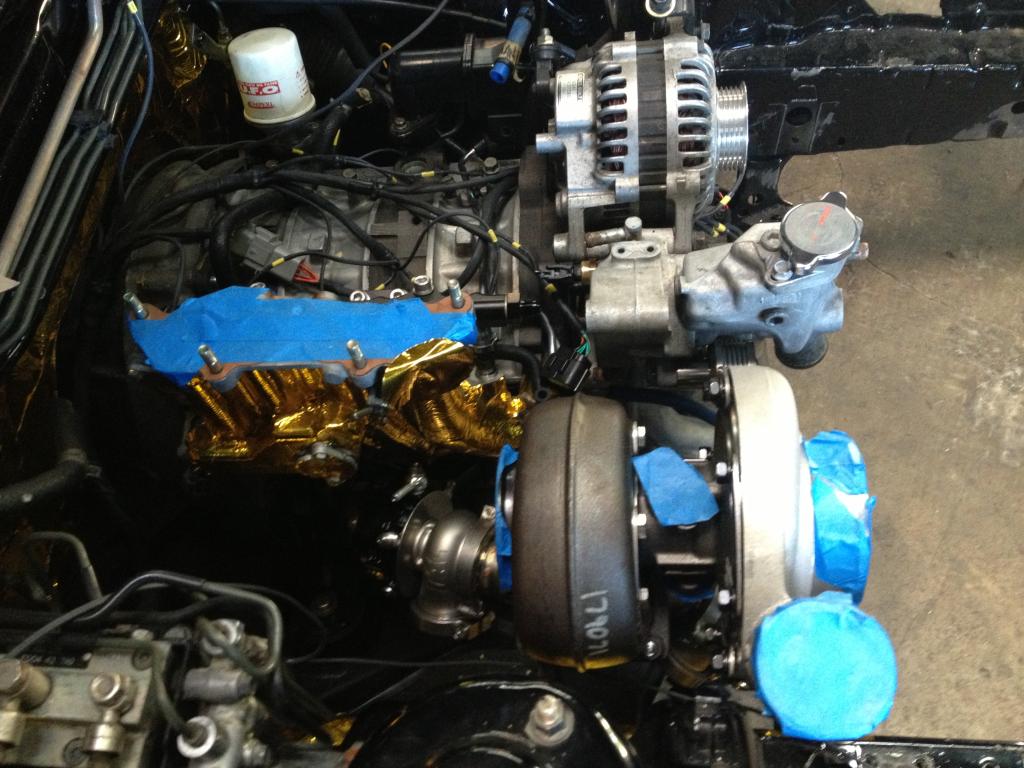
Speaking of wastegates. Having a hydraulic press handy made installing the springs a lot easier.
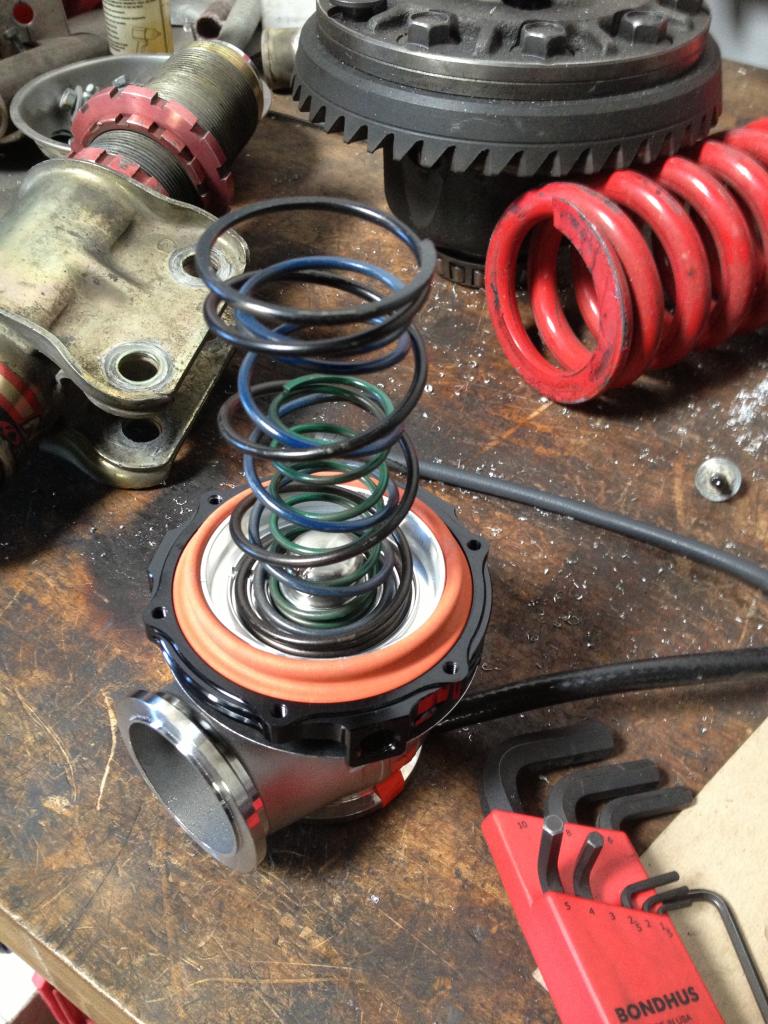
Pete was impressed with the internal design of the newer style Tial gates. He's old school and was telling me stories of how all the Japanese gates used to have a nut securing the shaft that would always come lose and become a major pita.
I got to work on mounting the Walbro E85 450L fuel pump inside the internal surge tank. Pete welded up a mounting bracket that we attached to the pump with hose clamps. Bolting it to the rubber surge tank resulted in it being too flimsy, so I made a backing plate. Its nice and solid now. This is the only pic I took and its pretty crappy. Ill upload a better one once I start digging into the car again. The return line dumps directly into the surge, which is held in place by the fuel cell foam.
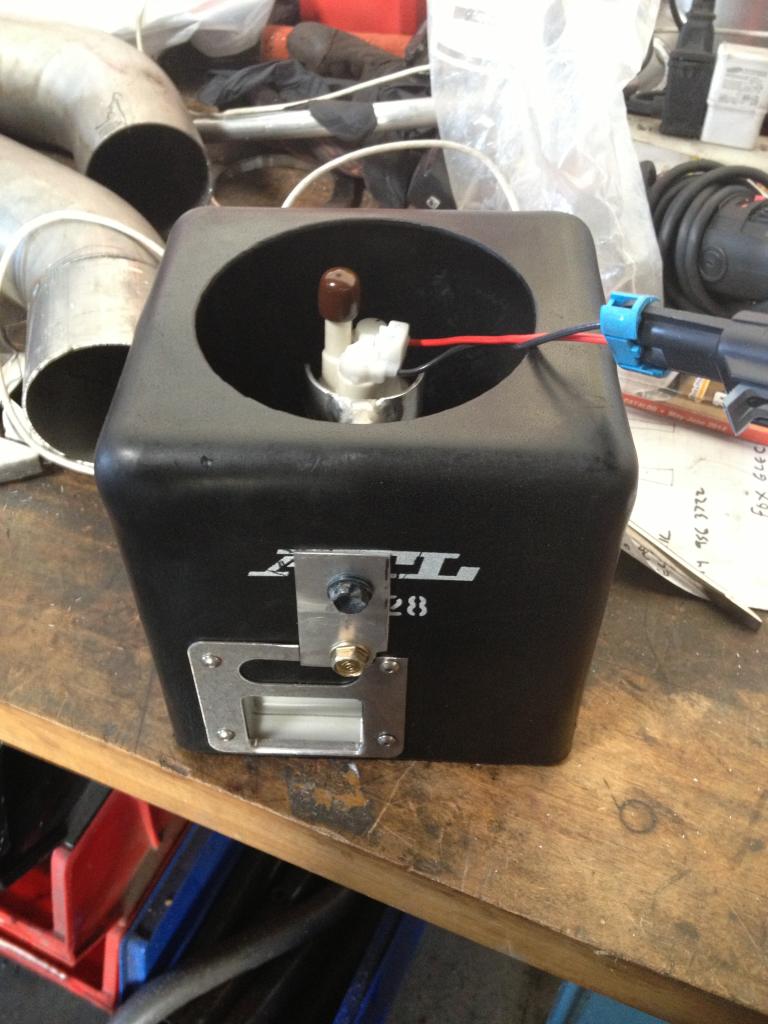
The sock that came with the pump was too big to allow all 3 trap doors to operate properly. No matter where we placed the pump, one door's travel would be obstructed. So we decided to just run with no sock. Its a bit scary, but I am running a large 6 micron fuel filter and all the fuel system components are brand new so they are clean and free of any varnish. The Team America GTR does not run a sock on its pumps either. I will be logging fuel pressure and plan to program an ecu fail safe for any drop.
(Before installation, I replaced the bolts with stainless steel pieces. I am paranoid of the E85 cleaning off any paint or coatings from things and gunking up my fuel system)