Heaven or Hell: A Decade Long Time Attack Build
 11-09-14, 02:46 AM
#126
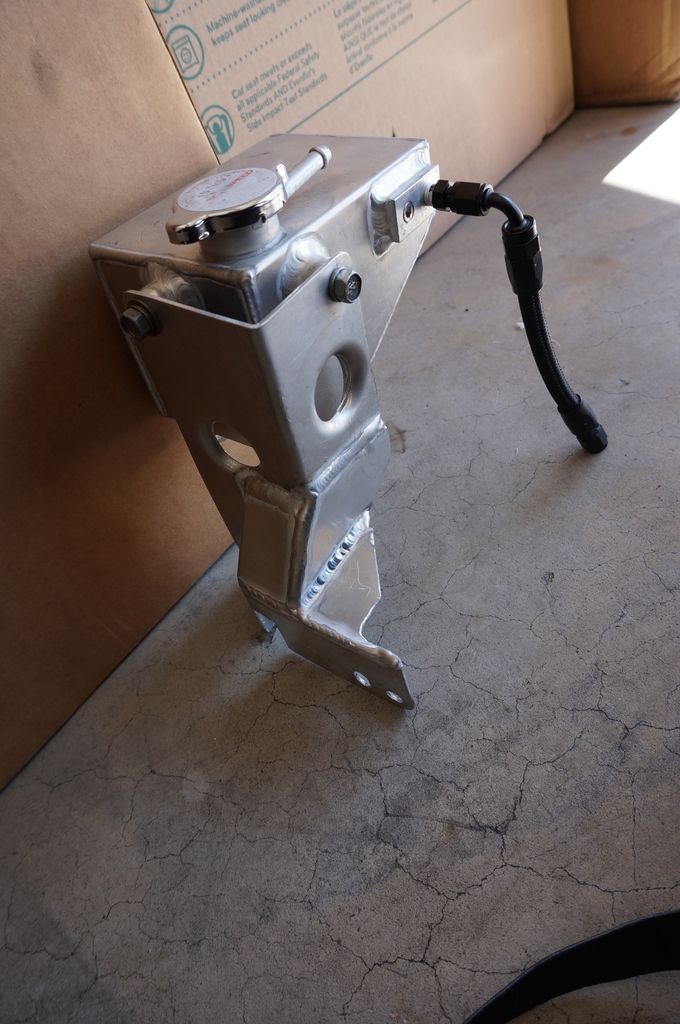
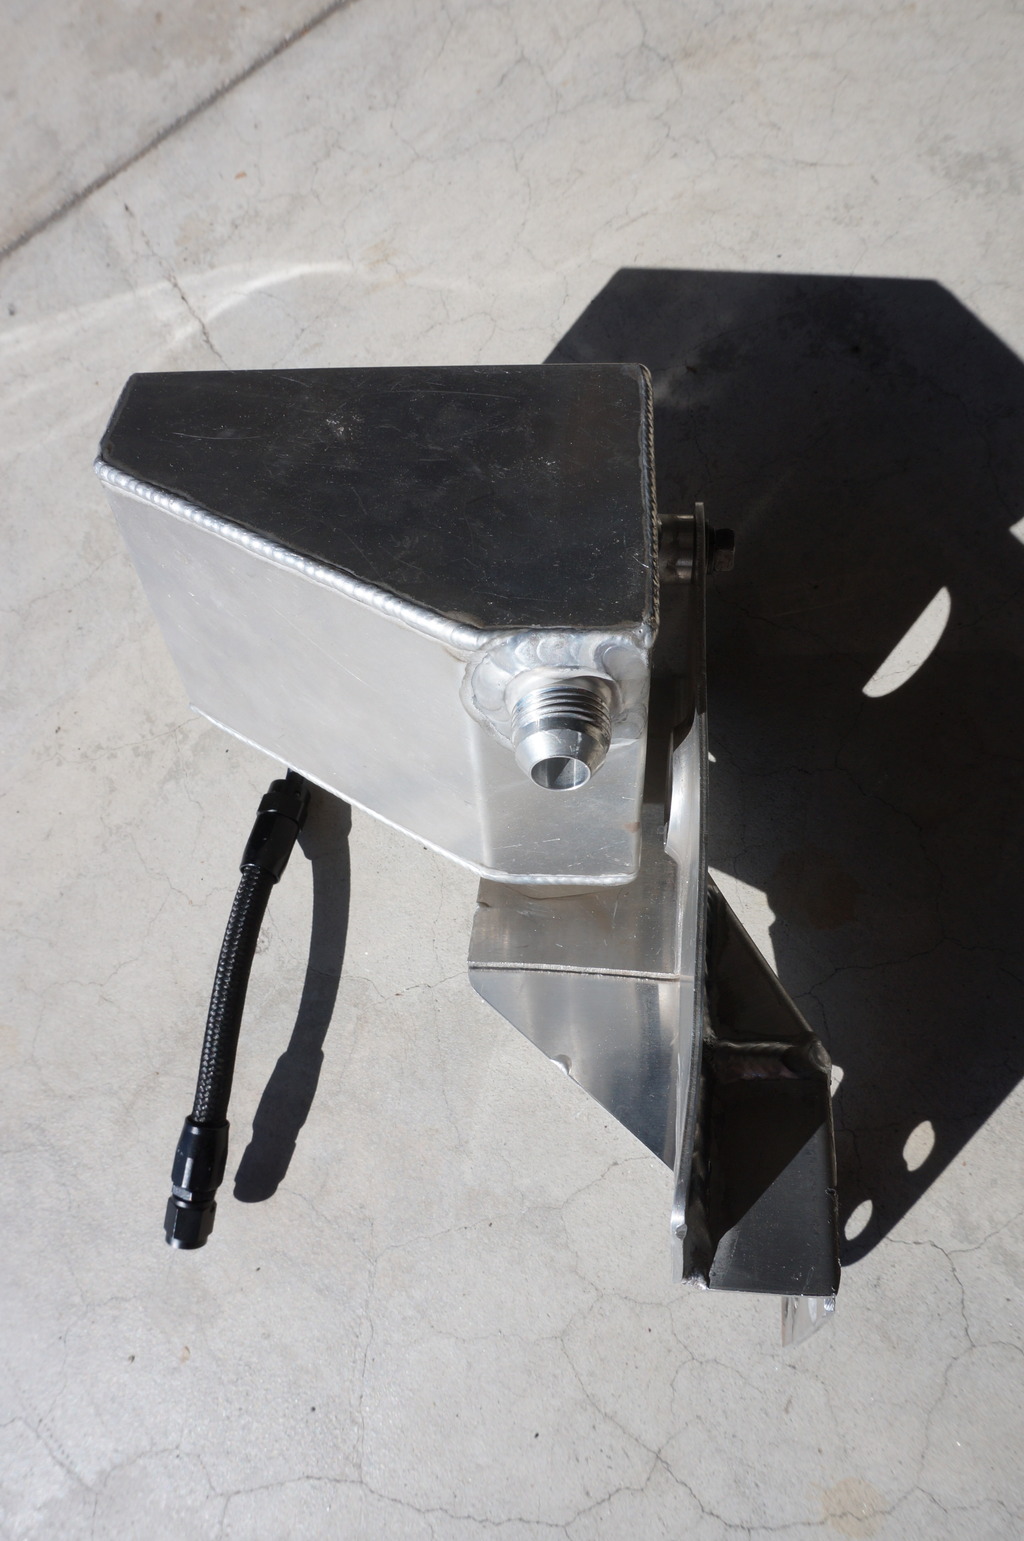
For the oil cooler(s)...
We wanted to simplify the system and go with one large cooler instead of a dual setup. Pete, as always, wanted to go "really ****** big". So I started linking him these giant *** NASCAR oil coolers found on ebay. In case you've never checked it out, there are several sellers on ebay who auction off authentic used NASCAR parts. Everything from electronics to carbon ducting, to engine parts. A lot of the pieces are really nice, hand fabricated items and the pricing is very reasonable. It seems there are some people with NASCAR team connections who come up on used parts during the season for pennies on the dollar and have made a nice business selling them on ebay. Anyways...I was proud of myself that I was actually able to find an oil cooler that was "too ****** big man" for Pete lol.
I was about to order this Fluidyne cooler: http://www.summitracing.com/parts/fld-db-30618
Then Pete suggested looking into the stock FC oil cooler. Ive never worked on an FC so I didn't know anything about the oil cooler, but after looking into it a bit it looks like a nice size. Roughly the same dimensions as the $380 Fluidyne cooler I was about to buy. You can't argue with the price...I picked one up off the forum for $70 shipped.
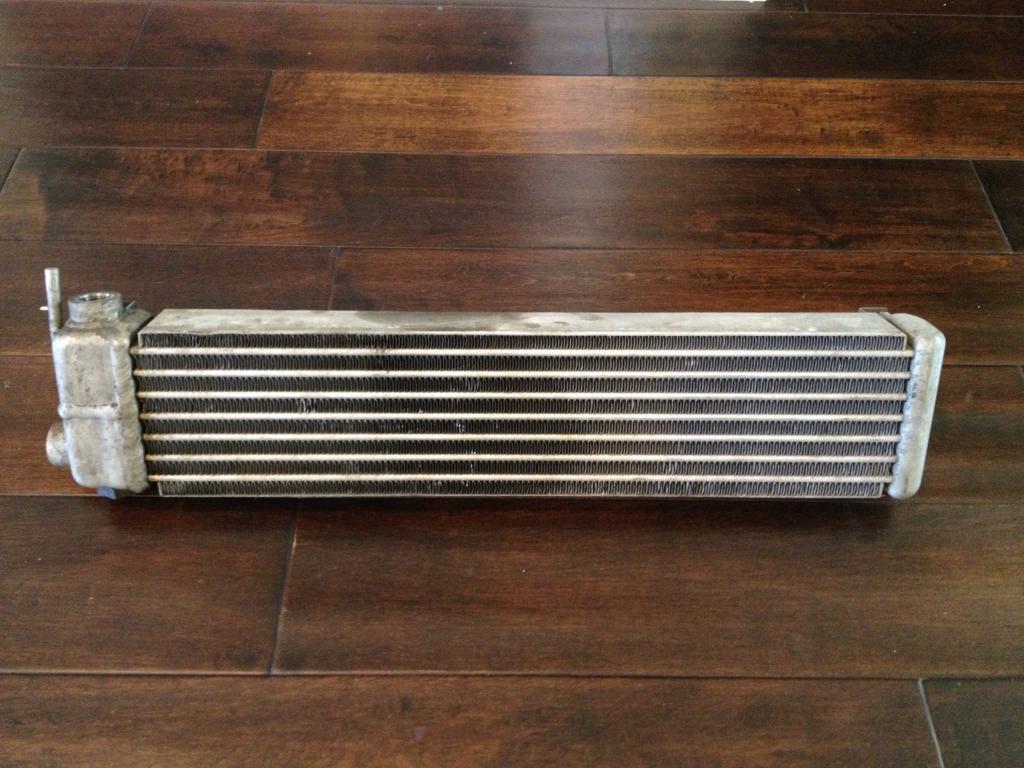
I like the fact that it is made to OE quality standards, manufactured in Japan by Calsonic. I guess you could say I "cheaped out" here and I can argue that. However, The way i see it is this is all R&D that we are learning as we go. The car will let us know what works and does not as soon as we get out for shake down. For $70, I don't mind replacing it if it isn't up to the task. As with the radiator, I think tight shrouding will be key.
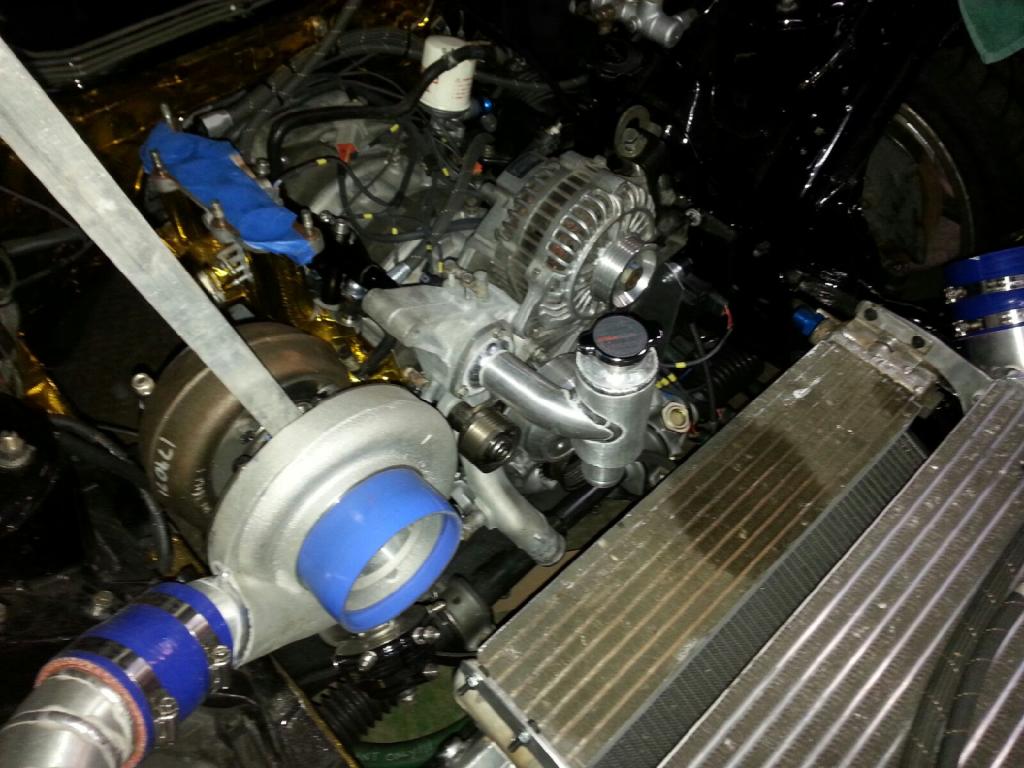
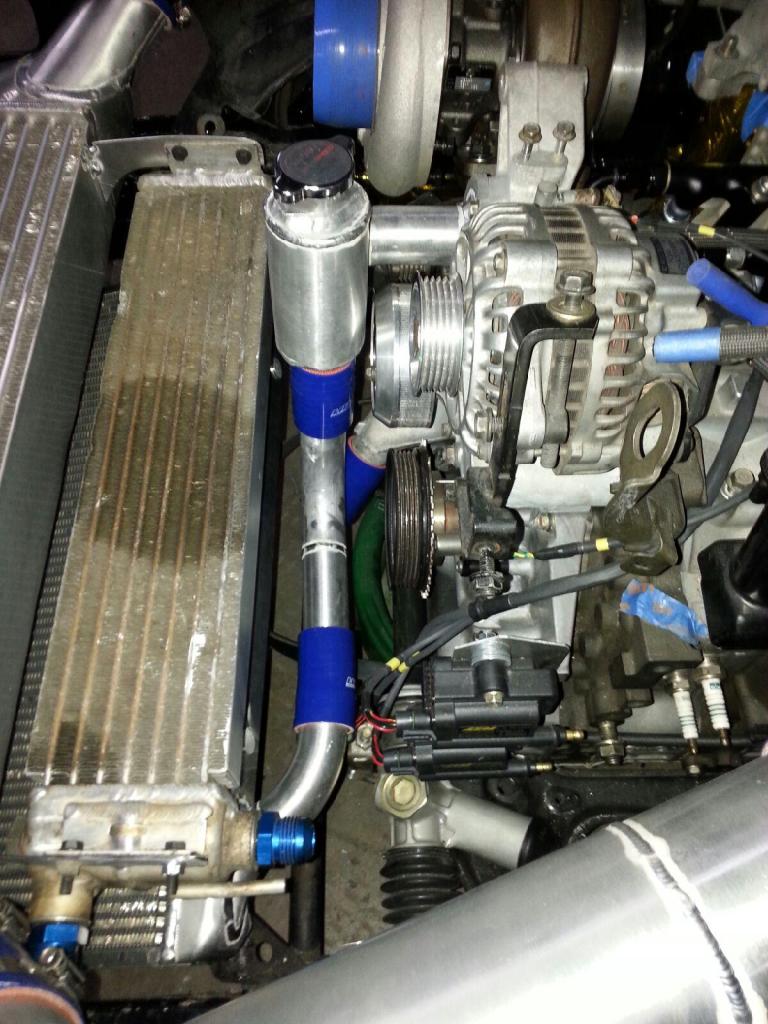
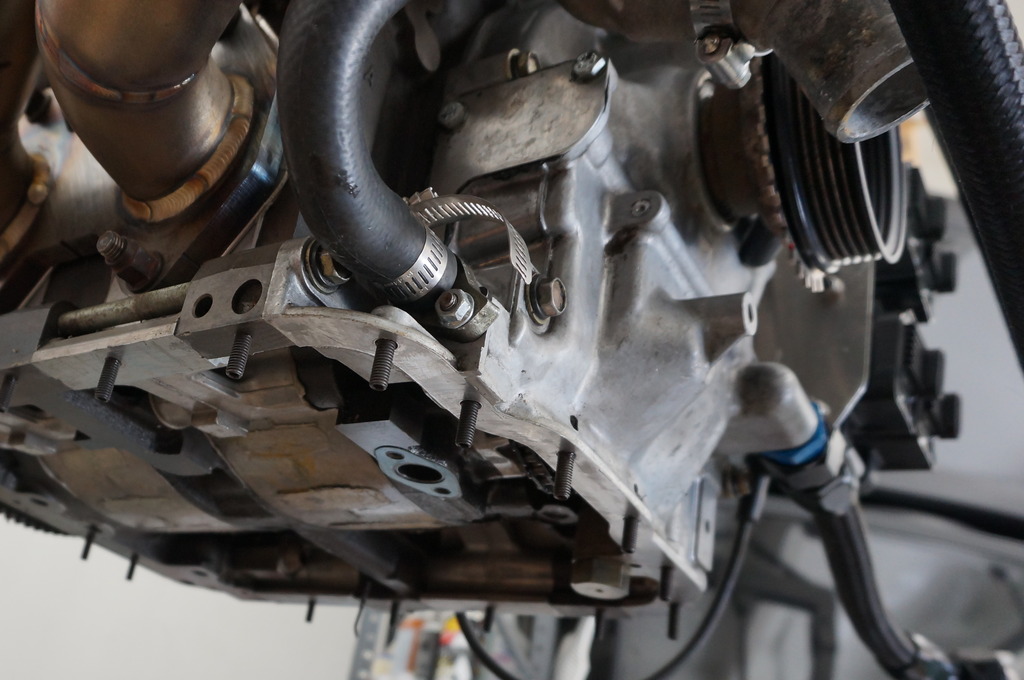
We mounted it in the same plane as the IC.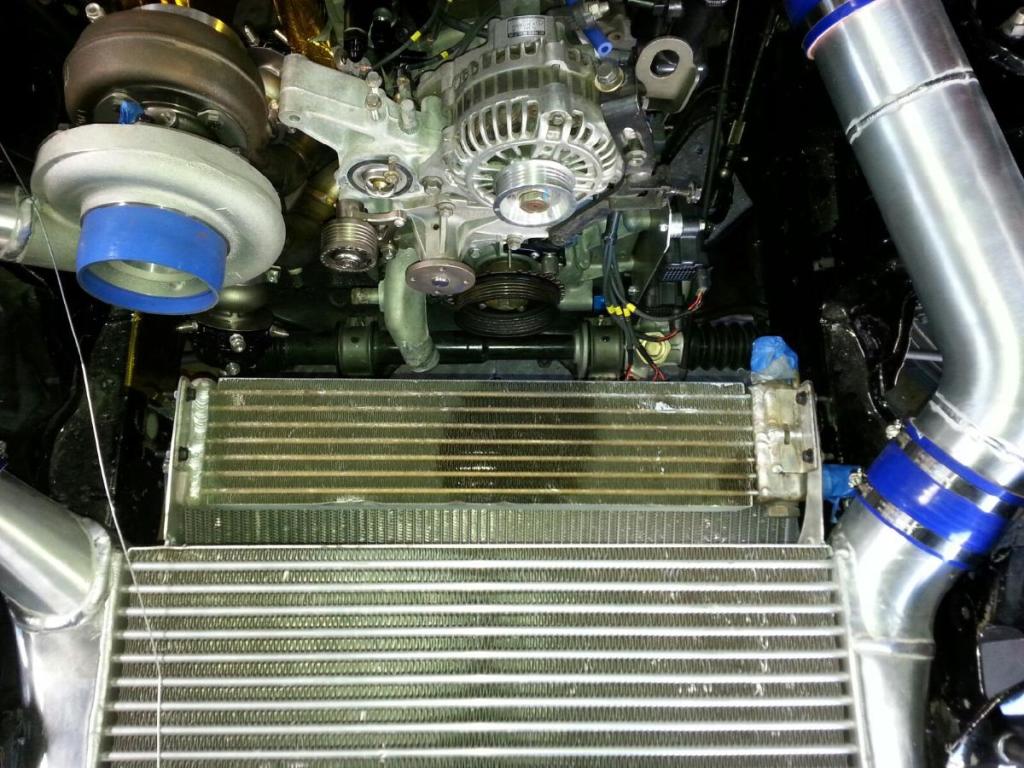
I need to clean it up a bit. The previous owner laid an oily hose on it.
We wanted to simplify the system and go with one large cooler instead of a dual setup. Pete, as always, wanted to go "really ****** big". So I started linking him these giant *** NASCAR oil coolers found on ebay. In case you've never checked it out, there are several sellers on ebay who auction off authentic used NASCAR parts. Everything from electronics to carbon ducting, to engine parts. A lot of the pieces are really nice, hand fabricated items and the pricing is very reasonable. It seems there are some people with NASCAR team connections who come up on used parts during the season for pennies on the dollar and have made a nice business selling them on ebay. Anyways...I was proud of myself that I was actually able to find an oil cooler that was "too ****** big man" for Pete lol.
I was about to order this Fluidyne cooler: http://www.summitracing.com/parts/fld-db-30618
Then Pete suggested looking into the stock FC oil cooler. Ive never worked on an FC so I didn't know anything about the oil cooler, but after looking into it a bit it looks like a nice size. Roughly the same dimensions as the $380 Fluidyne cooler I was about to buy. You can't argue with the price...I picked one up off the forum for $70 shipped.

I like the fact that it is made to OE quality standards, manufactured in Japan by Calsonic. I guess you could say I "cheaped out" here and I can argue that. However, The way i see it is this is all R&D that we are learning as we go. The car will let us know what works and does not as soon as we get out for shake down. For $70, I don't mind replacing it if it isn't up to the task. As with the radiator, I think tight shrouding will be key.
We mounted it in the same plane as the IC.

I need to clean it up a bit. The previous owner laid an oily hose on it.

 11-11-14, 06:32 AM
#127
With the ITS NA cars, one FC cooler isn't enough to keep them cool. It's popular to run two of those coolers in parallel. That's at only ~185 whp. With the power you'll make you'll have a hard time keeping things cool for extended track sessions with a single cooler.
I have had good luck with the Fluidyne DB-30617 as a single cooler solution on those ITS cars.
I have had good luck with the Fluidyne DB-30617 as a single cooler solution on those ITS cars.
11-19-14, 12:38 AM
#128
With the ITS NA cars, one FC cooler isn't enough to keep them cool. It's popular to run two of those coolers in parallel. That's at only ~185 whp. With the power you'll make you'll have a hard time keeping things cool for extended track sessions with a single cooler.
I have had good luck with the Fluidyne DB-30617 as a single cooler solution on those ITS cars.
I have had good luck with the Fluidyne DB-30617 as a single cooler solution on those ITS cars.
I will likely go ahead and repurpose this FC cooler for use on my S13. Given it only makes 385whp...it still amazes me how without an oil cooler I can abuse that car on the track for pretty much endless lapping, and the temps stay in check. Of course there is a noticeable decrease in power.
11-19-14, 01:34 AM
#129
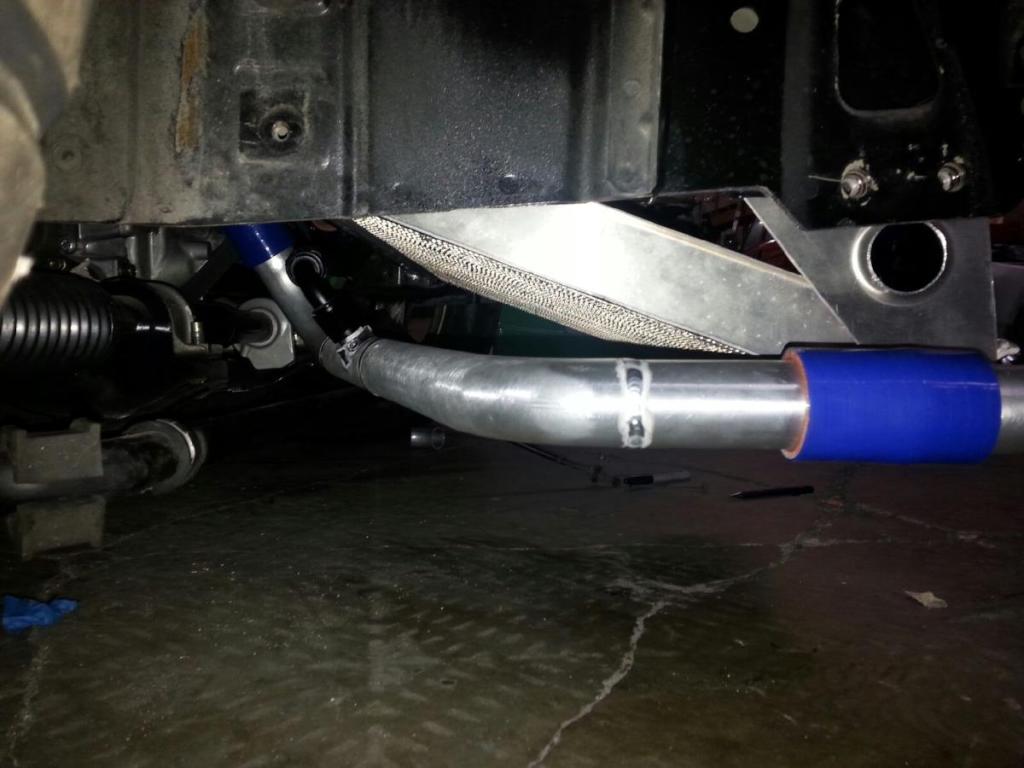
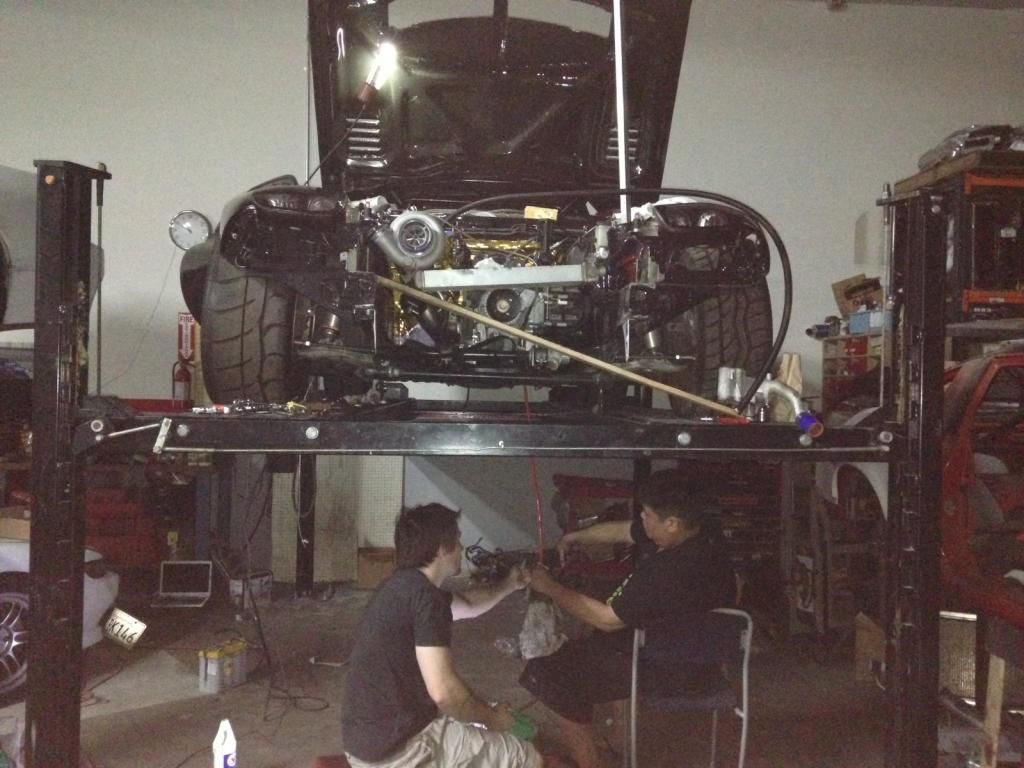
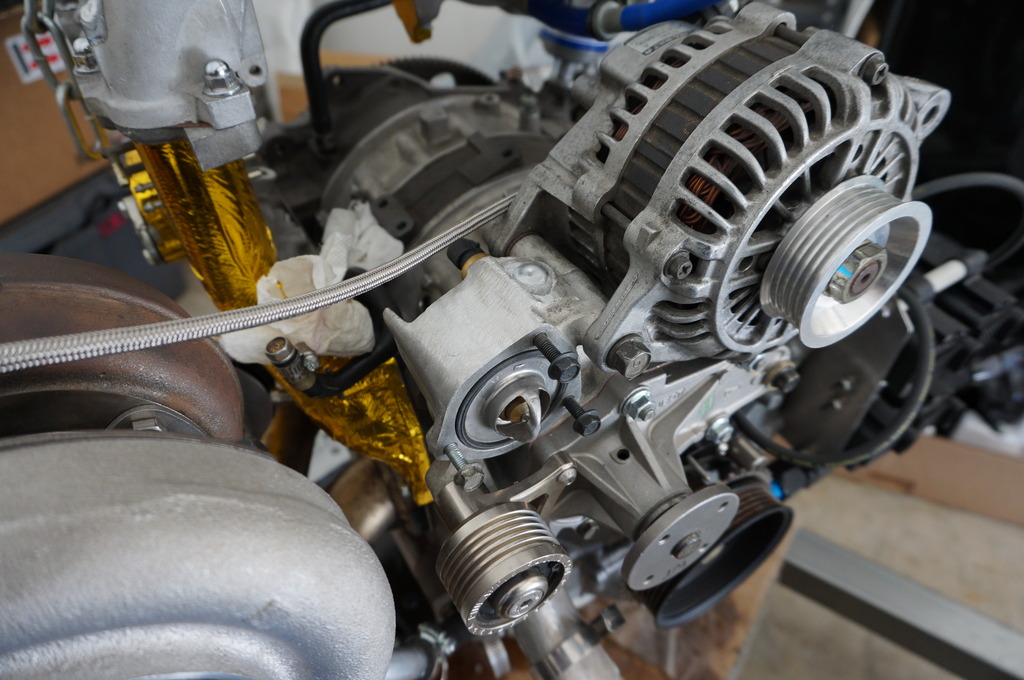
Finishing up the cooling system with the rest of the 1.5" aluminum pipe.
Here you can see the -10 bleeder that goes to the bottom of the A'pexi reservoir.
And the nearly-completed engine bay...
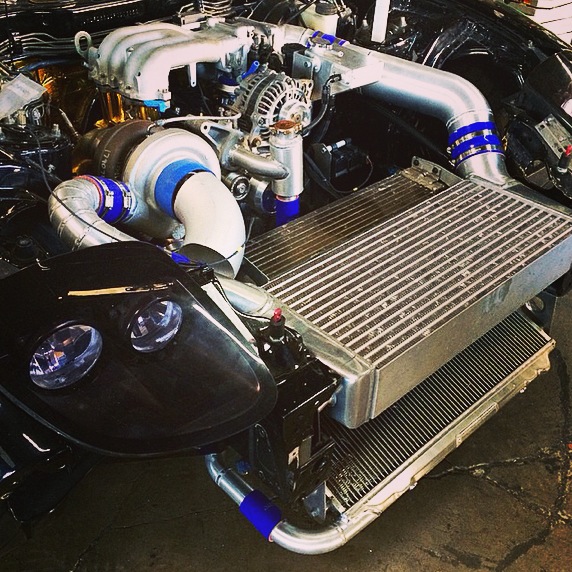
Still need to finish the intake, water overflow, and oil catch can - among other things. More detailed pics to follow once I have some time.
Theres plenty of things here that I just didnt have time to photograph. I was on somewhat of a time limit at the shop and had to bust *** to get as much done as possible.
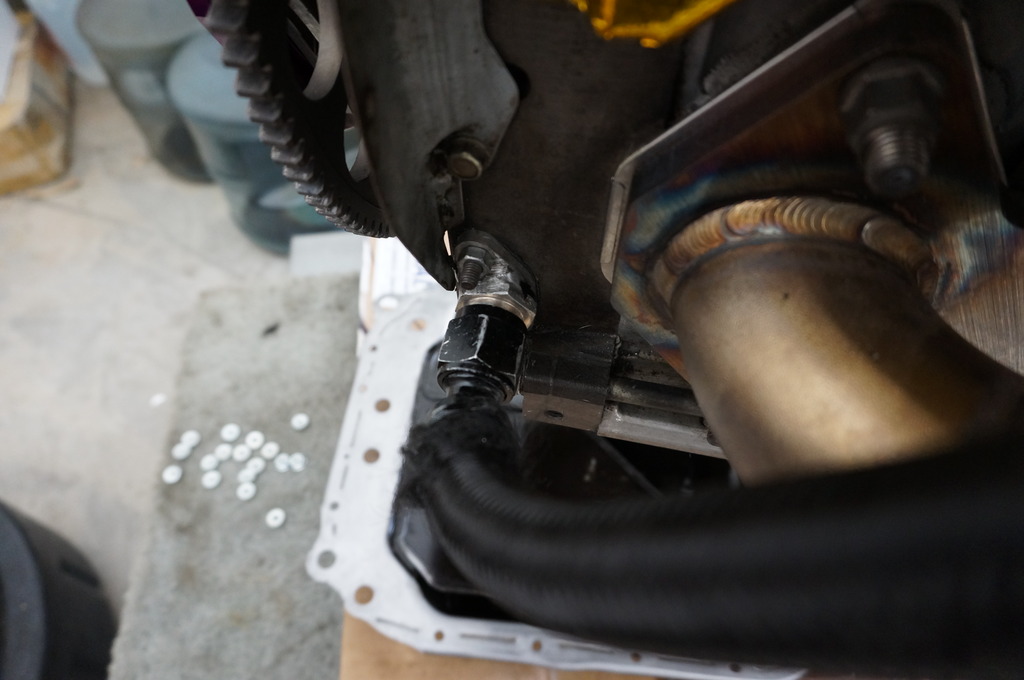
The oil cooler was plumbed with -12 nylon branded hose (Vibrant).
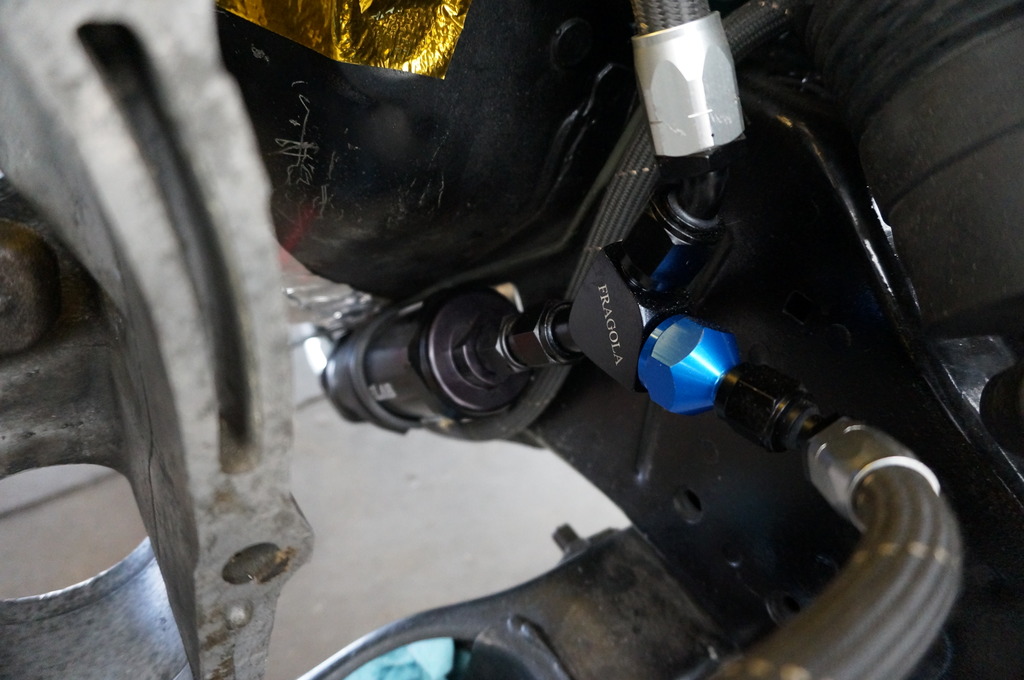
The turbo oil feed is -3 PTFE stainless braid. The fitting on the block was a bitch to find. Apparently 14mm to -3 fittings do exist, but are nearly impossible to order in the US. I tried several large AN plumbing shops and they couldn't seem to find a way to get one in stock. I ended up being a little more creative and using a 14mm to -4 fitting (which is easily sourced) with a hose end that has a -4 female end that steps down to a -3 hose. Sweet.
Side note: Some of the most challenging work was figuring out what fittings/hose ends to get, how many, and what combination is needed to accomplish what we want to do. There are so many little parts to source...down to what type of washer to use for X component (teflon? copper? aluminum? bonded viton?) or what type of connector to use on Y electrical connection. Ordering the correct parts without wasting money on **** you don't need/can't use is half the battle.
Here you can see the -10 bleeder that goes to the bottom of the A'pexi reservoir.


And the nearly-completed engine bay...

Still need to finish the intake, water overflow, and oil catch can - among other things. More detailed pics to follow once I have some time.
Theres plenty of things here that I just didnt have time to photograph. I was on somewhat of a time limit at the shop and had to bust *** to get as much done as possible.
The oil cooler was plumbed with -12 nylon branded hose (Vibrant).
The turbo oil feed is -3 PTFE stainless braid. The fitting on the block was a bitch to find. Apparently 14mm to -3 fittings do exist, but are nearly impossible to order in the US. I tried several large AN plumbing shops and they couldn't seem to find a way to get one in stock. I ended up being a little more creative and using a 14mm to -4 fitting (which is easily sourced) with a hose end that has a -4 female end that steps down to a -3 hose. Sweet.
Side note: Some of the most challenging work was figuring out what fittings/hose ends to get, how many, and what combination is needed to accomplish what we want to do. There are so many little parts to source...down to what type of washer to use for X component (teflon? copper? aluminum? bonded viton?) or what type of connector to use on Y electrical connection. Ordering the correct parts without wasting money on **** you don't need/can't use is half the battle.
12-04-14, 02:55 AM
#131
^^^ Thanks Chris!
Im starting to run out of photos now (plenty of stuff not included here that I just didnt have time to document). Ill take some more soon...things have been crazy with the new baby, plus we are moving in two weeks.
Here is some exhaust work that Pete got started on next.
Geoff had the S362 turbine housing fitted with a 3" vband outlet. Pete began the downpipe with a conical transition from 3" to 3.5".
We talked about going 4" but both Pete and Geoff agreed there would be no real benefit over 3.5", with the downside being 4" is bulky as hell. Not a good thing if you want to run flat bottom aero package.
Some initial downpipe construction.

You'll notice the ABS is still there...before hastily ripping it out I wanted to give it a try on the track. ABS can be a hit or miss depending on the system. Too much engagement and you're leaving time on the table. I don't know much about the FD ABS, but from what I can read online it seems like it is setup pretty aggressively in terms of allowing the driver to push right up to the threshold. How it will react to r-compounds or racing slicks, I have no idea. There is also the safety aspect relating to off track excursions. Some systems go into ice mode, inhibiting your ability to come to a stop in reasonable distance. I haven't read about any ice mode horror stories concerning the FD, so Im willing to give it a shot.
There is no ABS on my S13 and I have become very comfortable with anticipating tire adhesion by feel, but Im sure a proper ABS system will yield more effective braking. Without the ability to tune the stock system, it may be a lost cause - in which case I will remove it. If I was able to print my own money a Bosch motorsport ABS would be on the car.
Anyone with ABS experience on the track using decent tires feel free to post your thoughts.
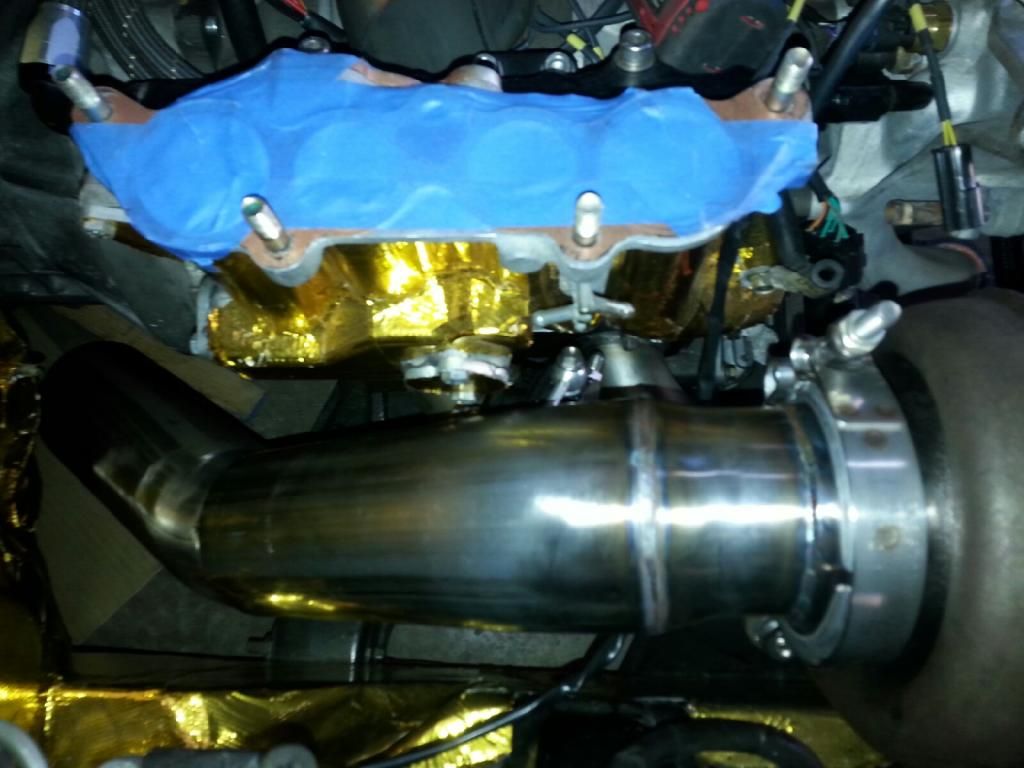
The angle ended up hugging the trans housing a bit too close, so we will most likely cut and modify it. This is as far as we got with the exhaust on this round of fab. We still haven't decided if it will be a side exit or a traditional setup. An 02 bung will be welded on later to fit the NGK wideband I got from Mr. Ludwig.
Im starting to run out of photos now (plenty of stuff not included here that I just didnt have time to document). Ill take some more soon...things have been crazy with the new baby, plus we are moving in two weeks.
Here is some exhaust work that Pete got started on next.
Geoff had the S362 turbine housing fitted with a 3" vband outlet. Pete began the downpipe with a conical transition from 3" to 3.5".

We talked about going 4" but both Pete and Geoff agreed there would be no real benefit over 3.5", with the downside being 4" is bulky as hell. Not a good thing if you want to run flat bottom aero package.
Some initial downpipe construction.

You'll notice the ABS is still there...before hastily ripping it out I wanted to give it a try on the track. ABS can be a hit or miss depending on the system. Too much engagement and you're leaving time on the table. I don't know much about the FD ABS, but from what I can read online it seems like it is setup pretty aggressively in terms of allowing the driver to push right up to the threshold. How it will react to r-compounds or racing slicks, I have no idea. There is also the safety aspect relating to off track excursions. Some systems go into ice mode, inhibiting your ability to come to a stop in reasonable distance. I haven't read about any ice mode horror stories concerning the FD, so Im willing to give it a shot.
There is no ABS on my S13 and I have become very comfortable with anticipating tire adhesion by feel, but Im sure a proper ABS system will yield more effective braking. Without the ability to tune the stock system, it may be a lost cause - in which case I will remove it. If I was able to print my own money a Bosch motorsport ABS would be on the car.
Anyone with ABS experience on the track using decent tires feel free to post your thoughts.

The angle ended up hugging the trans housing a bit too close, so we will most likely cut and modify it. This is as far as we got with the exhaust on this round of fab. We still haven't decided if it will be a side exit or a traditional setup. An 02 bung will be welded on later to fit the NGK wideband I got from Mr. Ludwig.
12-19-14, 01:24 AM
#134
Originally Posted by ivegonemad
amazing build bro! love the wing.
Hit me up if you want to make it yours.
12-19-14, 03:22 AM
#135
With the goal of driving the car out of the shop under it's own power, I needed to fill all the fluids and and bleed the clutch/brakes. I had day dreamed hundreds of times about the trip to Autozone to buy oil for the FD like a 12 year old imagining the day they get their first car. Loading up a trunk full of various lubricants in the parking lot was a very surreal feeling. A big part of me still was not convinced that the car would fire up. I knew the chances of some sort of unforeseen bs throwing a wrench in our plans was dangerously high with a project that has been torn apart for this long.
I got back to the shop late and started filling the trans with 85W140. Pete told me to get the thickest **** they had and this stuff was like honey.
What ensued was a classic scenario of my experiences working at Gary's...
The shop is really setup well for fabrication of anything imaginable. Theres loads of interesting metal shaping tools, all your typical industrial cutting/drilling/sanding equipment, table mounted plasma cutter, lathe, bead roller, etc etc...theres even a giant hole punch machine that easily punches various size holes in plates of metal up to like 1/8" steel...however, some of the most simple things - such as a funnel - are strangely absent lol. In this case, we couldn't find the awesome pneumatic fluid transfer pump that was buried in the corner of the shop somewhere...so we had to use a dinky hand operated plastic pump connected to 1/2" tubing. The little pump was no match for the weight of the thick oil as I immediately noticed it required an unusually high amount of effort to move the fluid. I checked with Pete if he had used this pump recently, he insured me it was fine, "c'mon man...just don't be a *****" - sitting there 5 feet in front of me getting a kick out of my struggle. The next couple of pumps got even stiffer before all the sudden the end of the tubing blasted off the pump outlet like a rocket - followed by perfect tail of thick stinky 85W140 foot juice.
Pretty much this:

Picture a big Chinese dude with a goofy looking smile on his face sitting right in the line of fire.
Any of the stress from working on the car was instantly relieved. Seeing that goo spread shot across his face had me on the floor laughing.
Reminded me of this:
So back to the trans...which is still not filled after 30min. Without another pump to use, Pete came up with some Bill Nye inspired solution of using the air gun to compress the fluid inside the bottle and force it though the tube. We drilled a hole in the cap of the oil bottle, and another one on the side to fit the nozzle of the air gun. Careful control of the air flow was key...you could feel the bottle expand like crazy so if you get too cocky with the trigger you'll likely have a gear oil bomb go off in your hand. Most of the dialogue as I recall it was along the lines of, "SLOW DUDE!! SLOW!!.....****, I really don't want to loose my fingers to some stupid *** tranny fluid bomb...". Lol.
Here we are wasting all kinds of time trying to engineer a tighter seal. This was before I started using the drill to make perfectly sized holes...Pete pretty much just dropped the end of the tube in there and was trying to seal the end using rags lol. As you might imagine, more gear oil wound up on his knee than in the trans.
After drilling the holes and making the thing air tight, the method worked surprisingly well. Scary, but it worked. Of course, we learned the hard way that if you don't hold onto the hose tightly it will just blow out of the bottle and blast oil everywhere. Keep in mind this was like 11pm and after working on the car all day neither of us were thinking very clearly.
In the end, it took two 'supposedly' proficient mechanics, with like 30 years of combined experience in the racing industry, over an hour to fill a transmission - all while thoroughly covering ourselves and everything in our vicinity in thick smelly oil.
It wasn't our finest moment under a car...but it was one of the most memorable!
I got back to the shop late and started filling the trans with 85W140. Pete told me to get the thickest **** they had and this stuff was like honey.
What ensued was a classic scenario of my experiences working at Gary's...
The shop is really setup well for fabrication of anything imaginable. Theres loads of interesting metal shaping tools, all your typical industrial cutting/drilling/sanding equipment, table mounted plasma cutter, lathe, bead roller, etc etc...theres even a giant hole punch machine that easily punches various size holes in plates of metal up to like 1/8" steel...however, some of the most simple things - such as a funnel - are strangely absent lol. In this case, we couldn't find the awesome pneumatic fluid transfer pump that was buried in the corner of the shop somewhere...so we had to use a dinky hand operated plastic pump connected to 1/2" tubing. The little pump was no match for the weight of the thick oil as I immediately noticed it required an unusually high amount of effort to move the fluid. I checked with Pete if he had used this pump recently, he insured me it was fine, "c'mon man...just don't be a *****" - sitting there 5 feet in front of me getting a kick out of my struggle. The next couple of pumps got even stiffer before all the sudden the end of the tubing blasted off the pump outlet like a rocket - followed by perfect tail of thick stinky 85W140 foot juice.
Pretty much this:
Picture a big Chinese dude with a goofy looking smile on his face sitting right in the line of fire.
Any of the stress from working on the car was instantly relieved. Seeing that goo spread shot across his face had me on the floor laughing.
Reminded me of this:
So back to the trans...which is still not filled after 30min. Without another pump to use, Pete came up with some Bill Nye inspired solution of using the air gun to compress the fluid inside the bottle and force it though the tube. We drilled a hole in the cap of the oil bottle, and another one on the side to fit the nozzle of the air gun. Careful control of the air flow was key...you could feel the bottle expand like crazy so if you get too cocky with the trigger you'll likely have a gear oil bomb go off in your hand. Most of the dialogue as I recall it was along the lines of, "SLOW DUDE!! SLOW!!.....****, I really don't want to loose my fingers to some stupid *** tranny fluid bomb...". Lol.
Here we are wasting all kinds of time trying to engineer a tighter seal. This was before I started using the drill to make perfectly sized holes...Pete pretty much just dropped the end of the tube in there and was trying to seal the end using rags lol. As you might imagine, more gear oil wound up on his knee than in the trans.

After drilling the holes and making the thing air tight, the method worked surprisingly well. Scary, but it worked. Of course, we learned the hard way that if you don't hold onto the hose tightly it will just blow out of the bottle and blast oil everywhere. Keep in mind this was like 11pm and after working on the car all day neither of us were thinking very clearly.
In the end, it took two 'supposedly' proficient mechanics, with like 30 years of combined experience in the racing industry, over an hour to fill a transmission - all while thoroughly covering ourselves and everything in our vicinity in thick smelly oil.
It wasn't our finest moment under a car...but it was one of the most memorable!

 01-12-15, 01:31 AM
#139

curious to see what your results with the FC oil cooler are.. I ran my stock FD oil cooler in series with the FC oil cooler behind the nose of my bumper and ducted it. I cant remember exact numbers but the temperatures were very cool after hitting the Dragon @ DGRR a few years back..
02-27-15, 12:37 AM
#141
Been a while...
Not much to update as far as build progress goes. Been zero free time to work on the car with the new baby and all. We also moved in Jan to add to the chaos. The FD and most of my tools are now finally moved into the new place, so at least I have access now. A good amount of parts stock piling has been going on, so the potential for progress is there once things relax a bit. Still a few things left from when the car was at Design Craft that I haven't had the time to post as well.
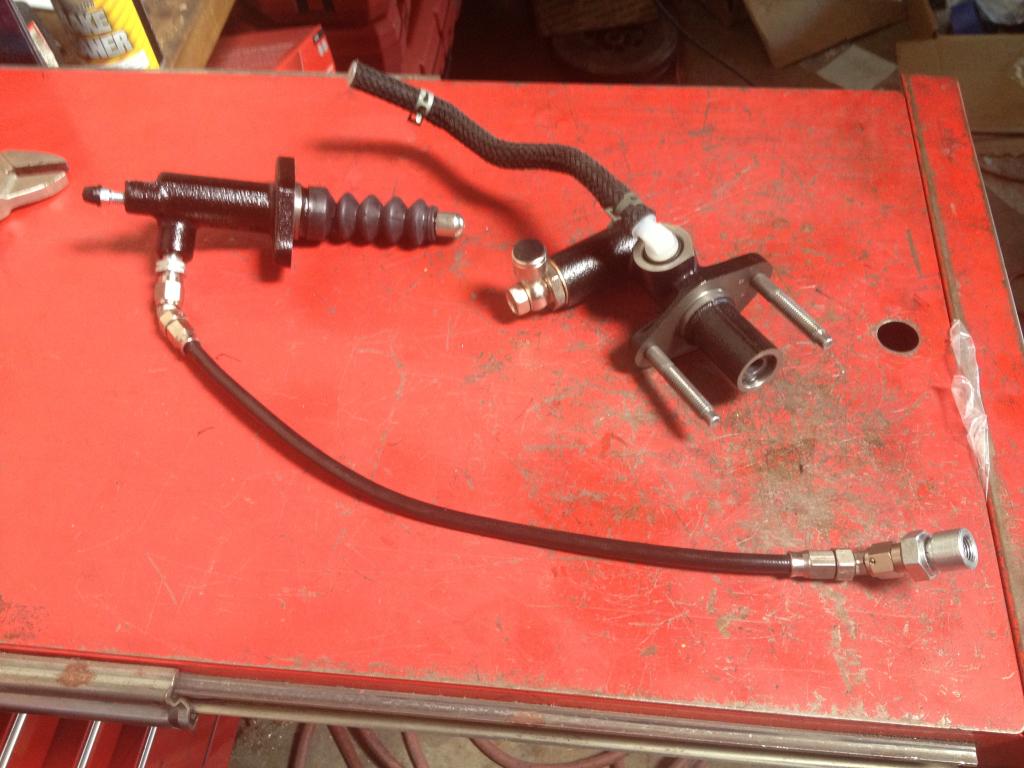
Heres a small one...when filling the clutch master cyl with fluid and attempting to bleed the system for the first time in 10 years things did not go well lol. I totally overlooked that I still had the old master and slave in there. Pumping the clutch to get the fluid moving resulted in a busted master cyl with the piston frozen.
A visit to my buddy at Mazdatrix and the problem was solved with new master and slave that I plumbed with some Earls fittings and -3 PTFE lines.
Not much to update as far as build progress goes. Been zero free time to work on the car with the new baby and all. We also moved in Jan to add to the chaos. The FD and most of my tools are now finally moved into the new place, so at least I have access now. A good amount of parts stock piling has been going on, so the potential for progress is there once things relax a bit. Still a few things left from when the car was at Design Craft that I haven't had the time to post as well.
Heres a small one...when filling the clutch master cyl with fluid and attempting to bleed the system for the first time in 10 years things did not go well lol. I totally overlooked that I still had the old master and slave in there. Pumping the clutch to get the fluid moving resulted in a busted master cyl with the piston frozen.
A visit to my buddy at Mazdatrix and the problem was solved with new master and slave that I plumbed with some Earls fittings and -3 PTFE lines.
 02-27-15, 12:54 AM
#142
Originally Posted by Bubble Tech
curious to see what your results with the FC oil cooler are.. I ran my stock FD oil cooler in series with the FC oil cooler behind the nose of my bumper and ducted it. I cant remember exact numbers but the temperatures were very cool after hitting the Dragon @ DGRR a few years back..
Originally Posted by jacobcartmill
AX, do you have any pics of how you have your haltech mounted?
03-22-15, 03:11 AM
#143
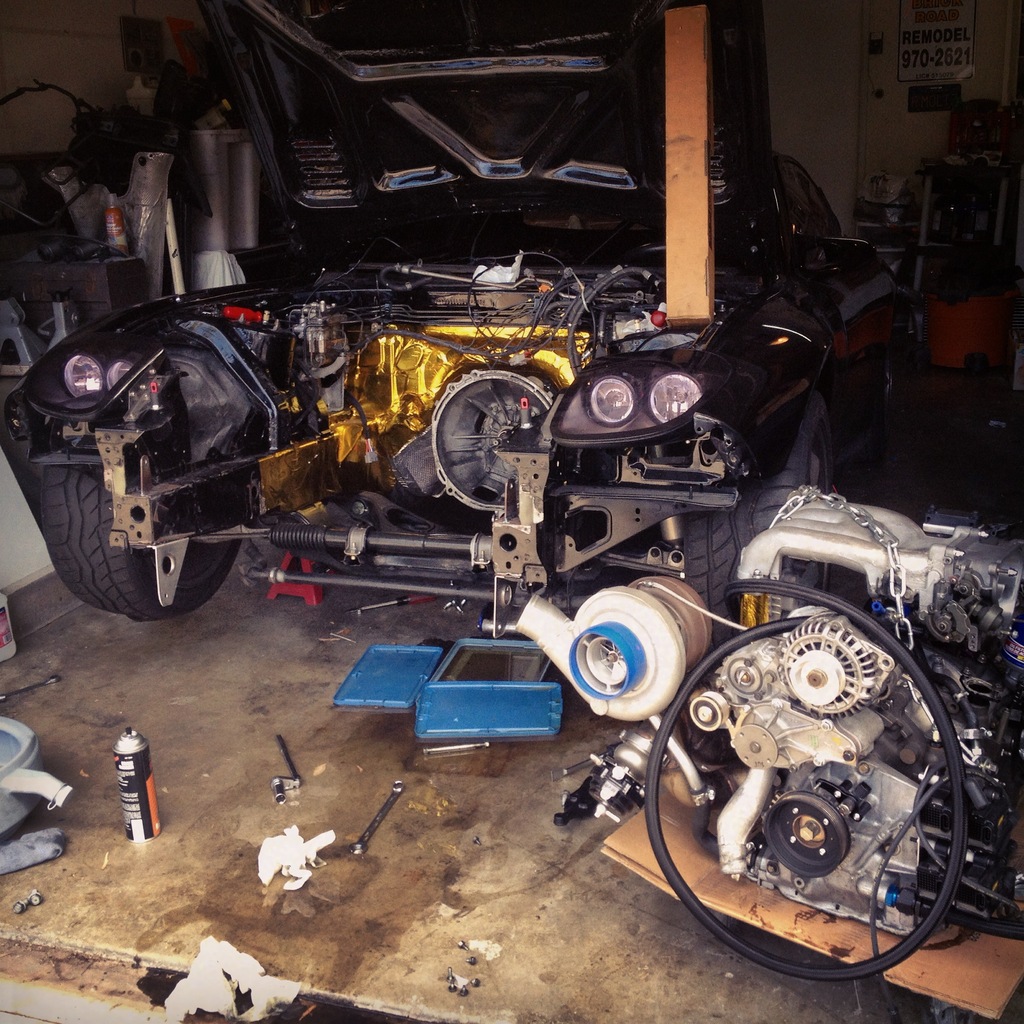
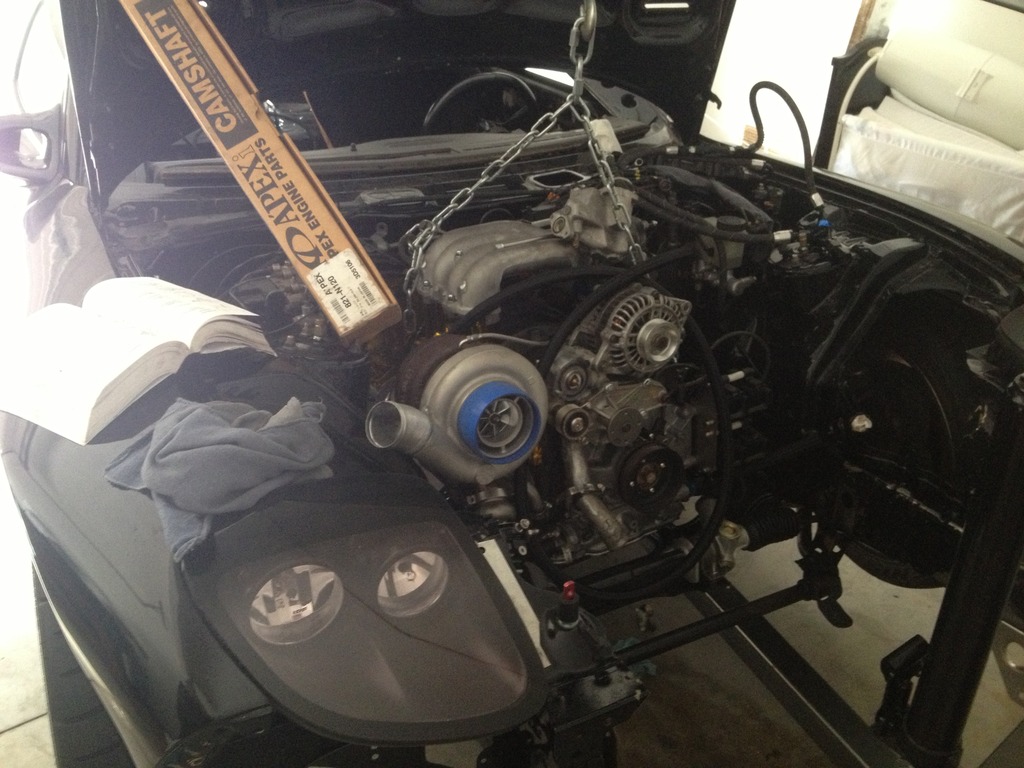
Knowing that the motor was running with no oil leaks in its past life, I decided to leave the pan alone and install it as is. Being an idiot, I didnt consider the fact that the last time it ran was over 5 years ago (I have very realistic expectations for this motor. I have no idea how far it will go, but for the price I paid for it I think its worth rolling the dice. Ill consider it a great victory if it makes it past the dyno.). Upon filling the engine with oil we immediately noticed oil dripping from the pan where the motor mount bolts are. Pete enjoyed ragging on me for the next hour or so while I accepted the fact that Id have to pull the motor for my laziness.
So once we kinda/sorta got the car running at the shop (I have a vid I need to upload) I brought it home and promptly put it into pieces again. Back to its natural state I suppose lol.
I really love how simple and easy the car is to work on now. I can have the engine out by myself in about 2hrs. This was just before my second daughter was born so things sat like this for about 3 months. However, I did continue the parts stockpiling. Updates will come soon.
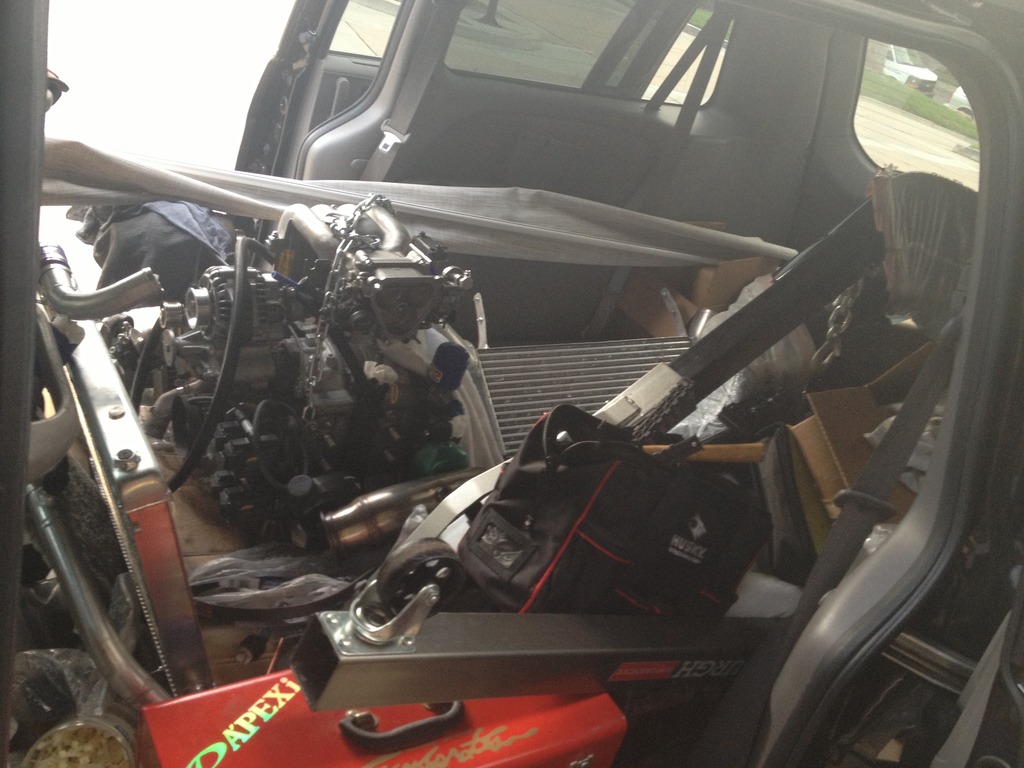
We also moved during this time. Moving the car and all the parts/tools was a huge pain in the ***...
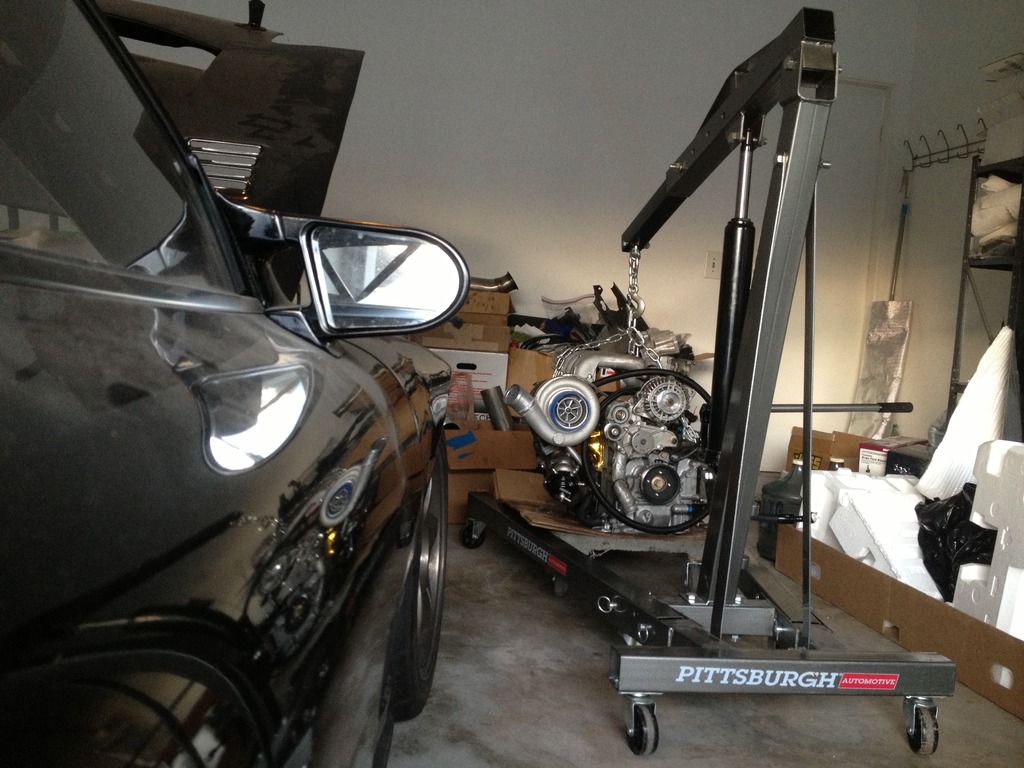
Heres what an Odyssey looks like with like half of an FD in it, along with some tools and an engine hoist:
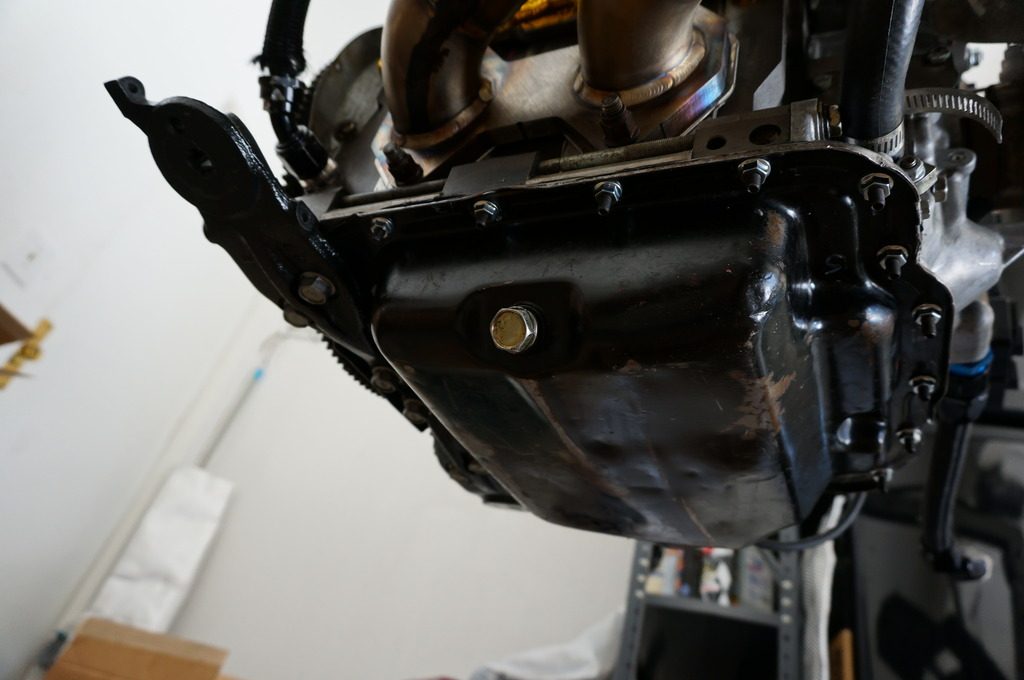
Finally in its new cave. Oil pan has been removed, cleaned, and resealed. I opted to replace the factory m6 blots with studs and nuts so I don't have to worry about stripping the soft aluminum mating surface.
Aaaaand motor back in. Only took 3 months! =/
So once we kinda/sorta got the car running at the shop (I have a vid I need to upload) I brought it home and promptly put it into pieces again. Back to its natural state I suppose lol.

I really love how simple and easy the car is to work on now. I can have the engine out by myself in about 2hrs. This was just before my second daughter was born so things sat like this for about 3 months. However, I did continue the parts stockpiling. Updates will come soon.
We also moved during this time. Moving the car and all the parts/tools was a huge pain in the ***...
Heres what an Odyssey looks like with like half of an FD in it, along with some tools and an engine hoist:

Finally in its new cave. Oil pan has been removed, cleaned, and resealed. I opted to replace the factory m6 blots with studs and nuts so I don't have to worry about stripping the soft aluminum mating surface.

Aaaaand motor back in. Only took 3 months! =/
 04-13-15, 02:51 AM
#144
As promised...better picture update.
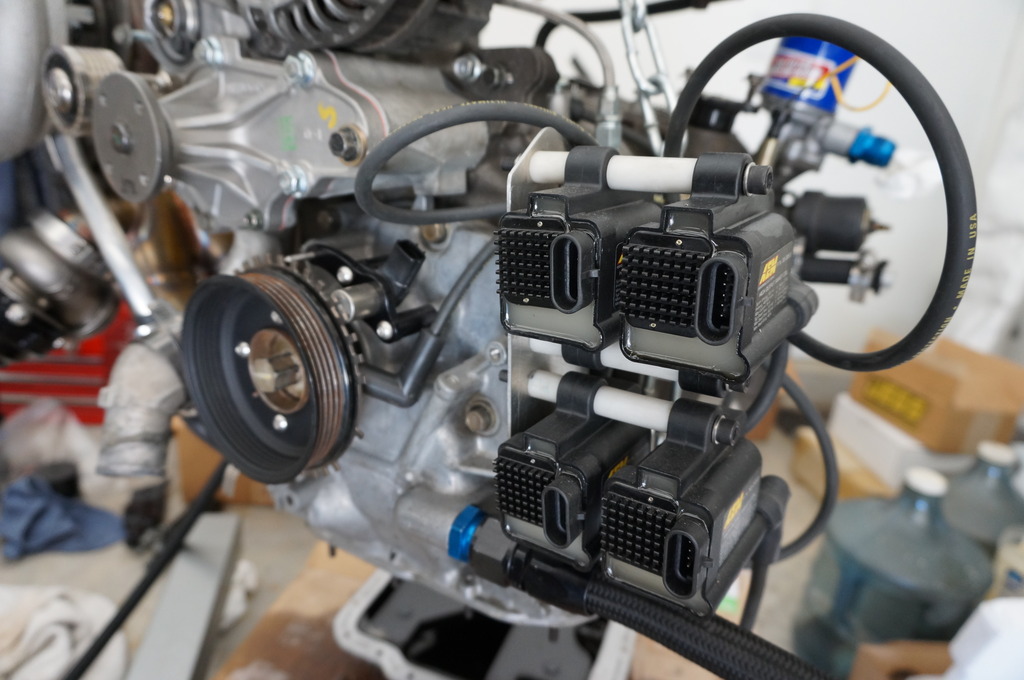
Coil mount. (these are temp auto zone wires)
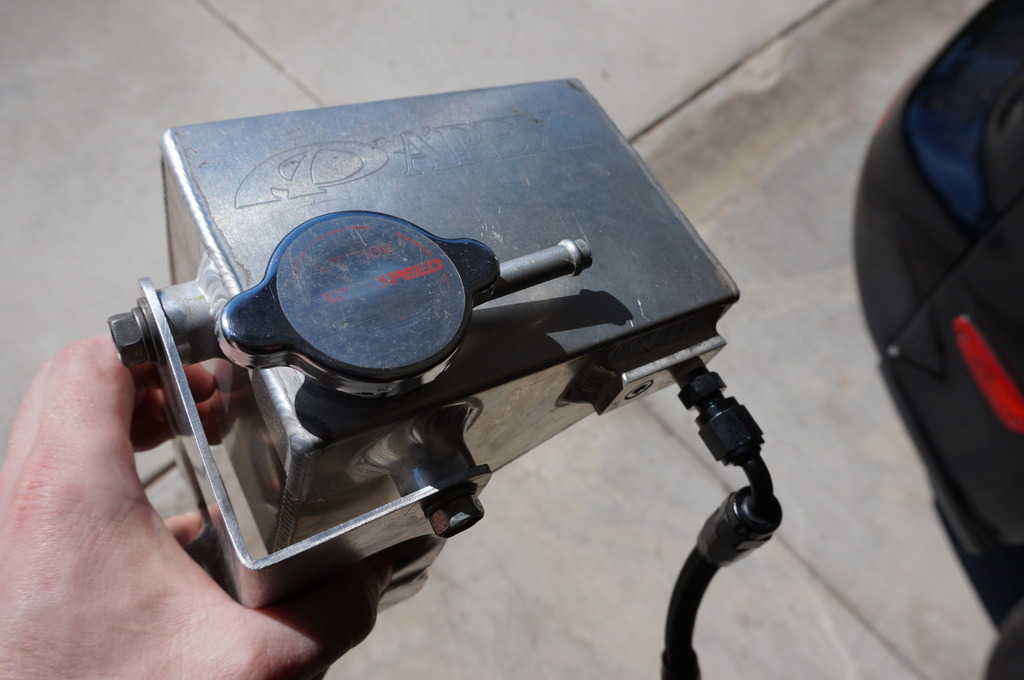
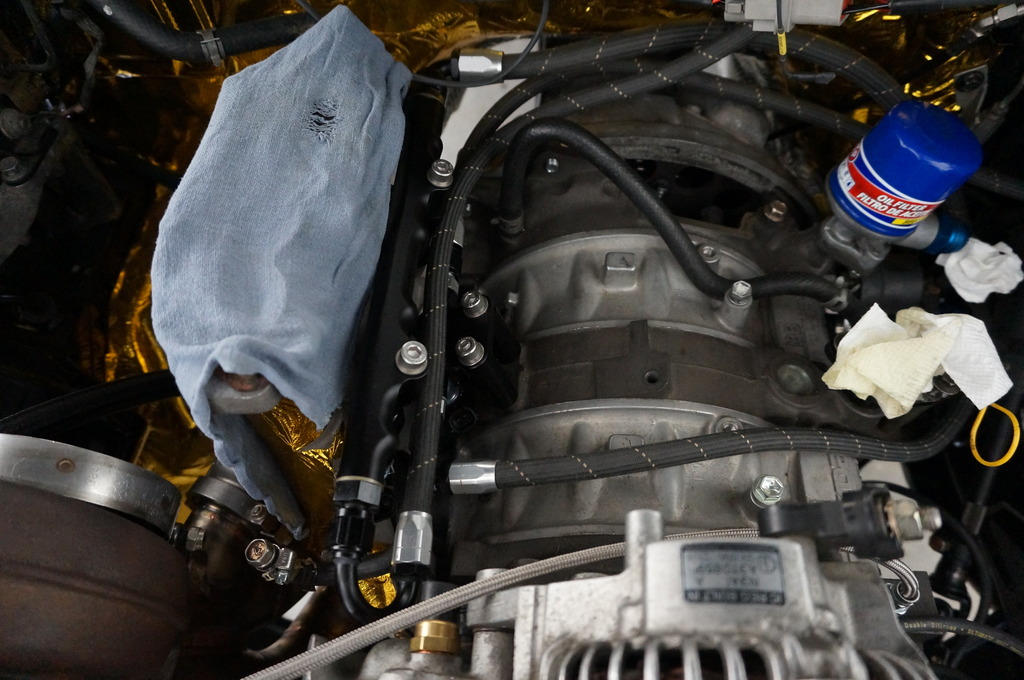
A'pexi reservoir tank ala Pete w/ highly worn "rare jdm yO!" Mazdaspeed cap.
Rear drain used for ventilation.
Finally shaved off that air pump mount.
Oil pan bolts replaced with studs.
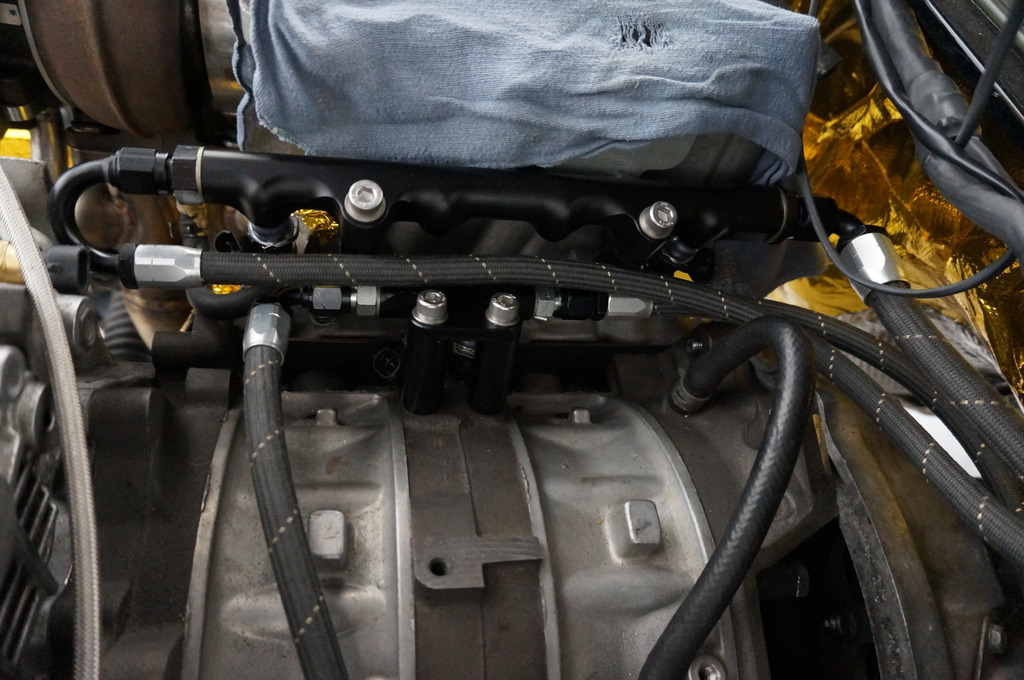
Fuel filter with Y fitting -8 to -8 and -6 feeds.
Rails and lines.
Coil mount. (these are temp auto zone wires)

A'pexi reservoir tank ala Pete w/ highly worn "rare jdm yO!" Mazdaspeed cap.


Rear drain used for ventilation.

Finally shaved off that air pump mount.

Oil pan bolts replaced with studs.


Fuel filter with Y fitting -8 to -8 and -6 feeds.

Rails and lines.


 04-14-15, 03:09 AM
#147
The can isn't mounted yet but it will go somewhere on the right side of the engine bay, far away from any glowing metal. I bought the Jegs baffled can with dual -10 inlets and a filtered breather, but we're thinking of making our own. Real estate in the engine bay is getting scarce so making a can that is shaped to fit our needs provides a little more freedom. Venting will come from the rear turbo drain and oil fill neck.
The A'pexi tank actually isn't an overflow. Its an air separation tank. The -10 on the bottom goes to the upper radiator hard pipe, the -4 on the side goes to the swirl pot and we will be adding a couple other -4 bleeder lines from various points in the cooling system. The goal is that any air in the system will travel to the reserve tank since it is the highest point. The cap on the swirl pot is not sprung, the pressurized cap is on the reserve tank. Once 1.3 bar is exceeded in the A'pex tank, water will pass to a separate overflow tank which we haven't mounted yet (heres that space issue again).
BTW -- After my little E85 injector rust scare I drained the cell and filled up some good ole primo CA 91. I used your PS1000 map with my setup settings and the car fired up and ran beautifully =) Thank you!
05-05-15, 03:01 AM
#149
Right now Im working on making sure the car runs without leaking and everything is prepped and ready to undergo another round of fab work. Another obstacle is finishing up the wiring. I purchased a Racepak Smartwire PDM, which I was planning on installing myself, but after further consideration I decided to look into doing a chassis harness with Ludwig. The plan was to do a chassis harness as well as another engine harness (sans fuse box) so we can use the PDM to control power to IG/fuel/ecu as intended. I eventually decided that if we were going to be making a new engine harness I might as well upgrade to the Elite while were at it. - Let the snowball roll! -
When I initially approached Ludwig he said he'd love to do it but it would be a couple months before we could start. That was fine by me, but now that a couple months have past he has apparently taken on more work and informed me that it would be more like July/August before we could even think about it. If I wasn't trying to push for some track time by the end of the year Id probably just keep waiting, because honestly I like working with Chris and Im a fan of his harnesses, but I need to keep the ball rolling. So Ive disappointingly wasted a couple months waiting for plans that didnt pan out and now Im on to finding another solution. Rywire is probably the most convenient and non-NASA budget friendly option. Ryan does harnesses on a lot of the builds that come through Design Craft, so having him local and the car accessible would be a plus. I have a couple friends of friends who do legit harnesses for professional motorsports (one works at MoTEC), but even with a "hook up" Im sure the price would be prohibitively high for an amateur competitor like myself with a mortal wallet.
Other than wiring and fab, I have a list of about 30 things I need to take care of while the car is still in the home garage, and of course a few thousand dollars worth of parts that need to be bought. Hopefully things start coming together shortly.
05-29-15, 09:34 PM
#150
Slowly making progress. I have some updates that Ill post as time permits. Between work/wife/kids it is a huge feat if I am able to spend a few hours a week in the garage or online researching/ordering parts.
Finally got my blank carbon panels in from Marc at Carbon Miata. Waited about 3 months for these. I can do a more in depth review if anyone is interested but for now I'll just say that upon initial test fitment I was prepared to contact Marc about a refund. The cluster panel and gauge hood were significantly off when trying to mate them together. I decided to just start playing with it, forcing **** together without really caring - with plans of raising hell with Marc if anything ends up breaking or simply not fitting acceptably.
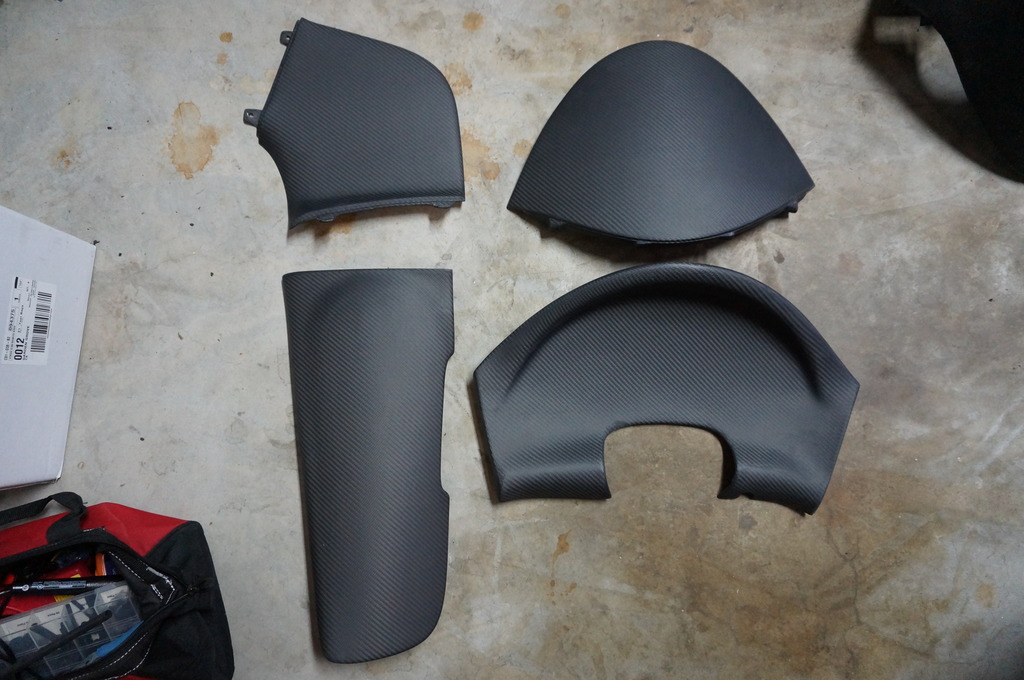
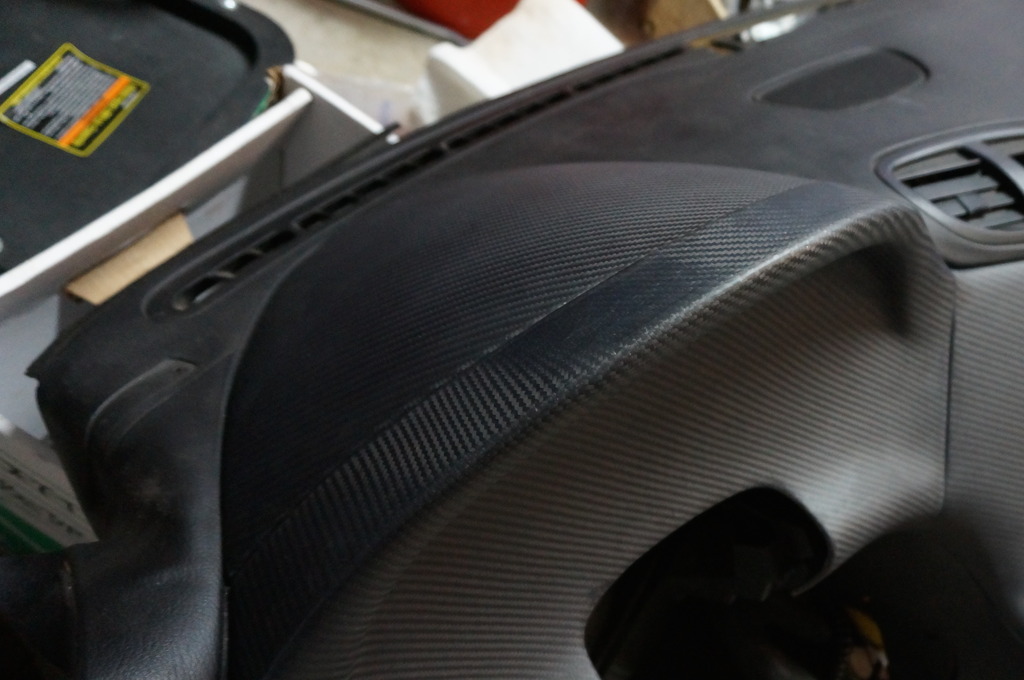
I started with the HVAC panel. Dimensions and shape were ok but I think the angle of the mounting tabs are a bit off as seen here.
This causes unnecessary tension on the panel when fully bolted down. As long as nothing breaks I don't care.
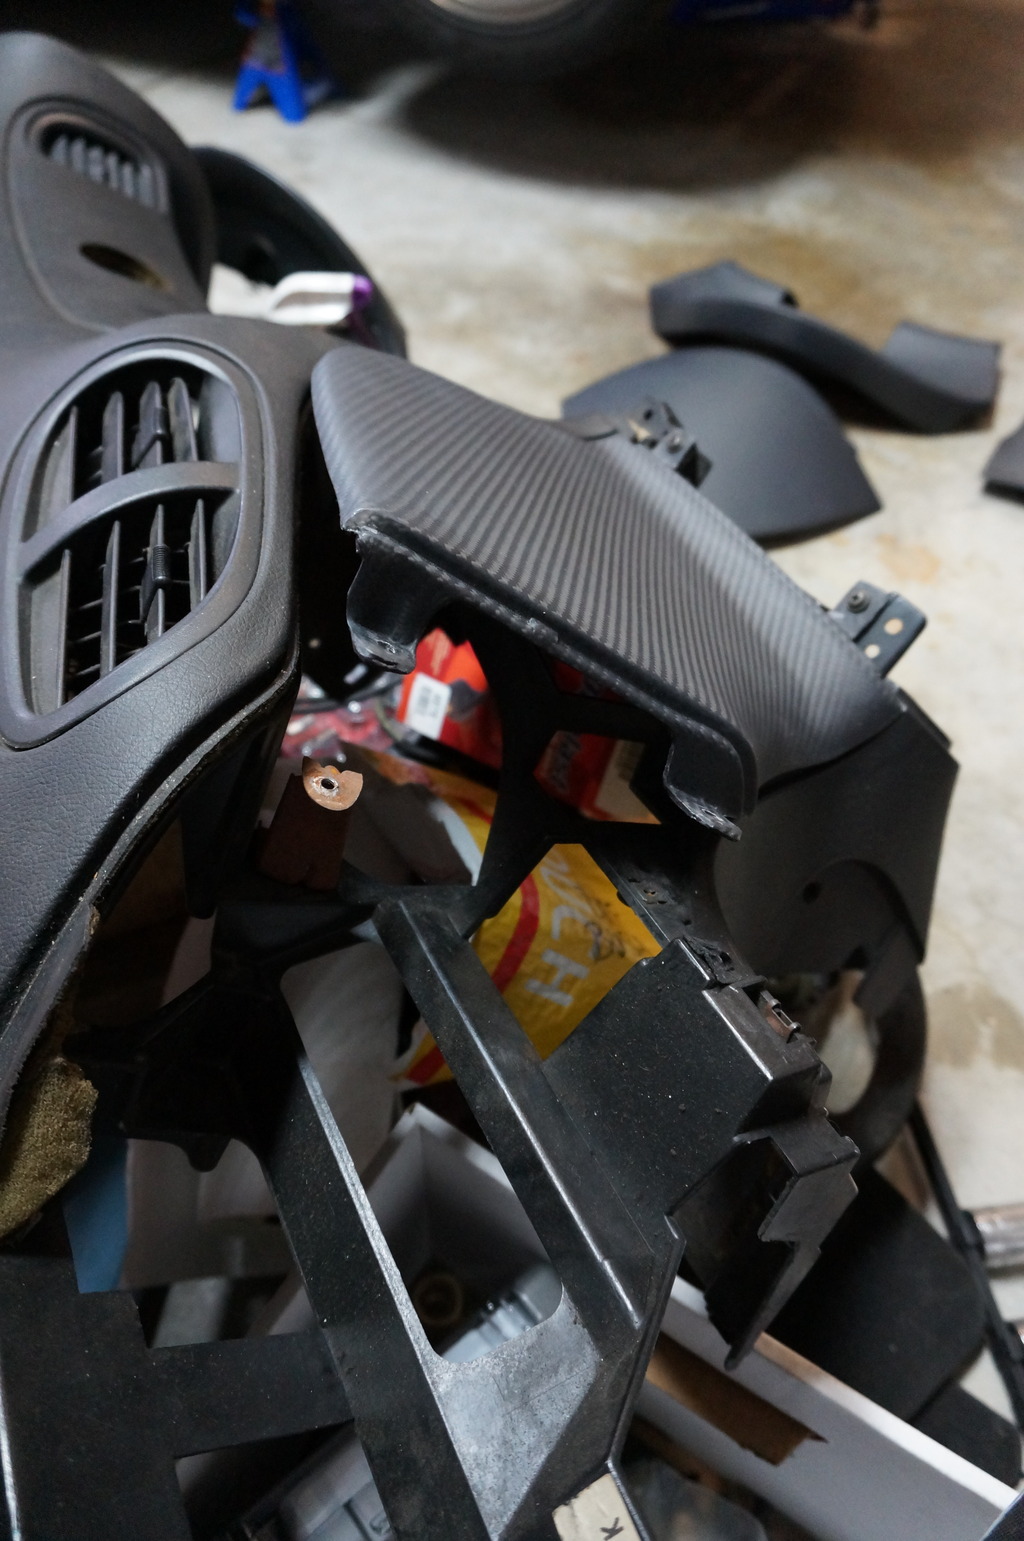
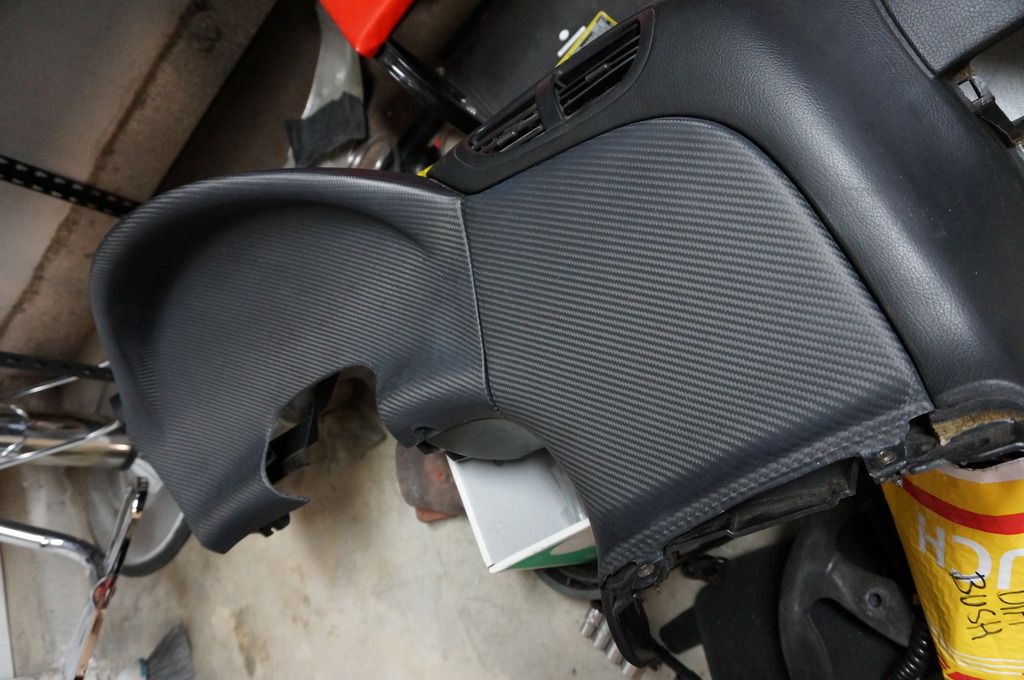
After messing around with the cluster panel and hood for an hour I was able to force it into a reasonable fit. There was definitely Dremel work needed. Its not perfect, but the end result came out ok.
One thing that actually impressed me is that the weave pattern matches pretty nicely between the separate panels. I was kind of expecting the angle of the weave to be noticeably off when the panels are abutted.
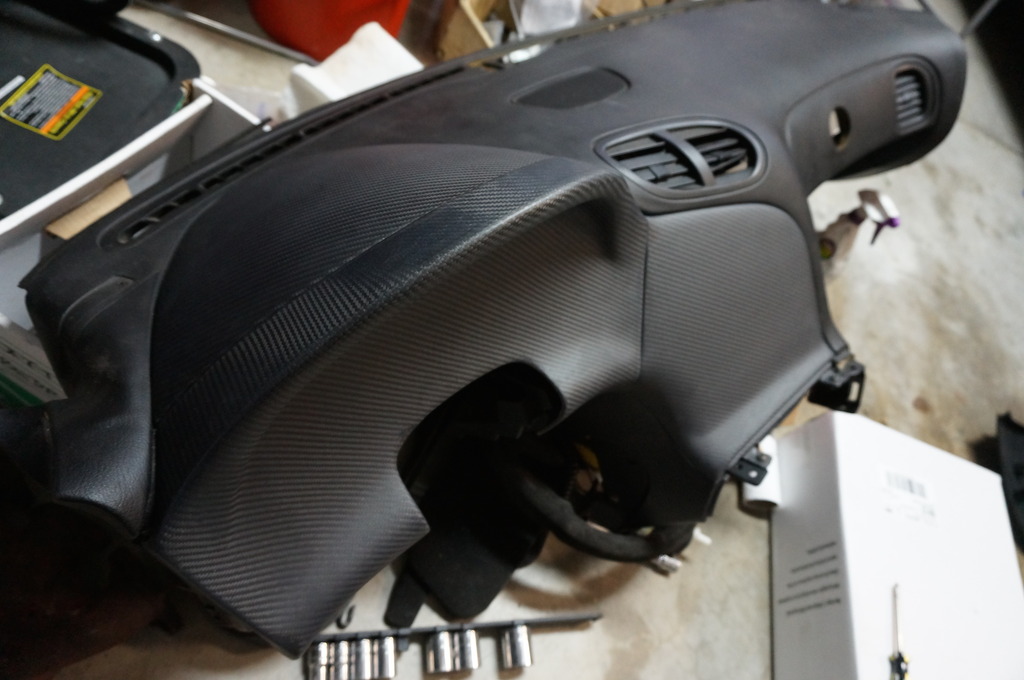
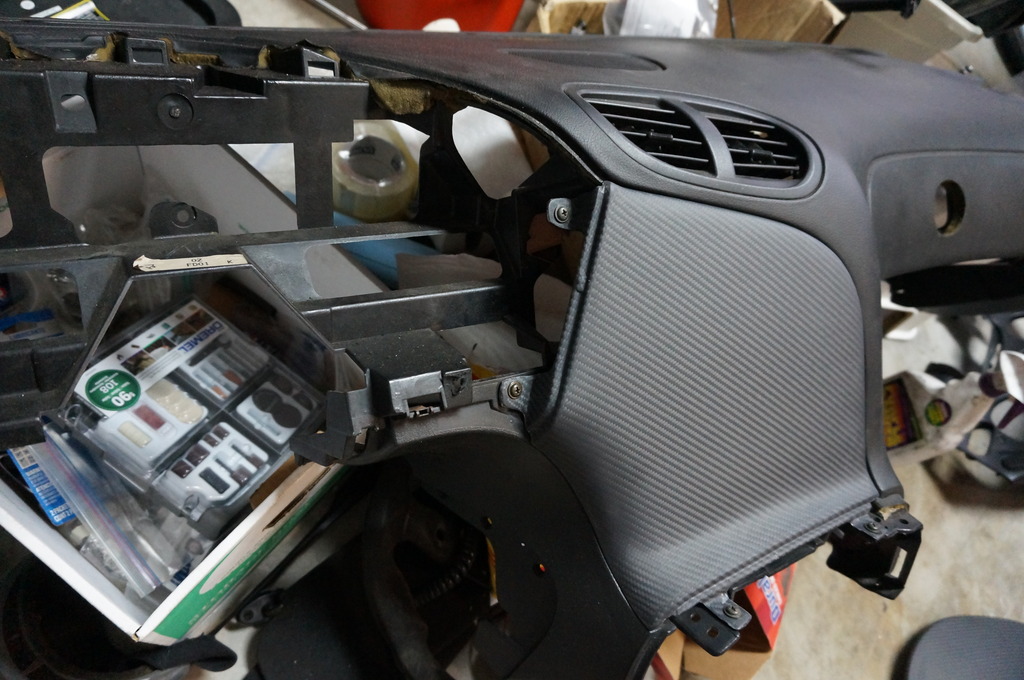
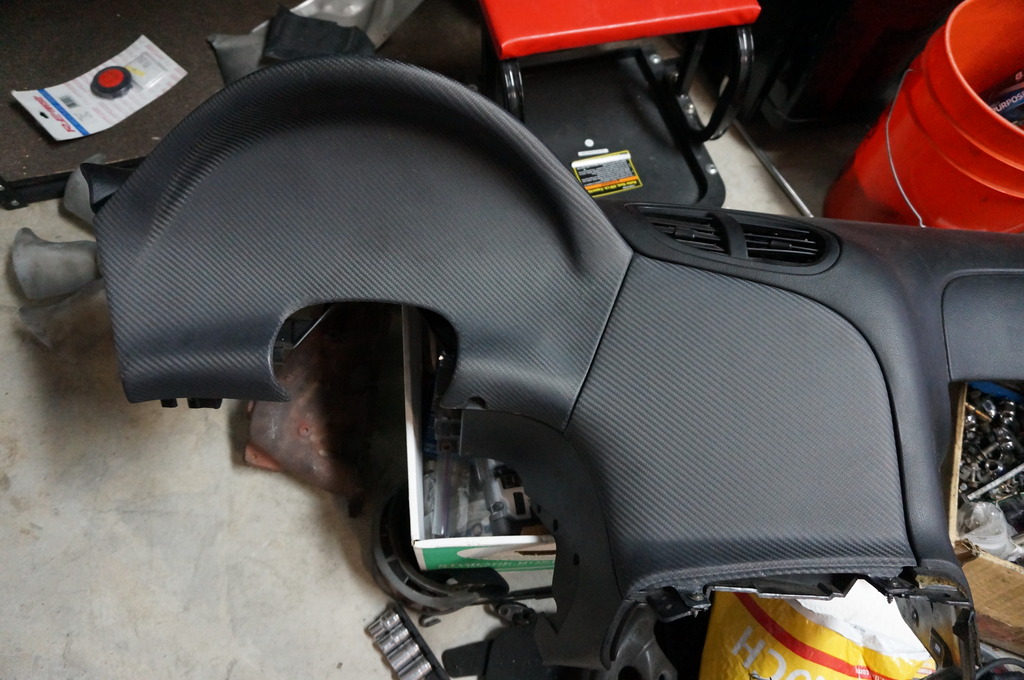
See that sweet hole cut into the passenger side dash? Yeah that was courtesy of the previous owner and his talented boost gauge installation. When I get around to it, I need to fab something to fill the void and cover the panel with some DiNoc carbon vinyl. Looking at that hole has been pissing me off for over 10 years lol.
I will say, the experience really made me appreciate the precision fit of the OEM pieces. The stock cluster panel and hood fit together like a work of art and even have little dowel tabs that integrate into each other perfectly.
I also took the time to gut the back of the dash. Getting rid of the heavy steel mounting bar will save some good weight. The dash will be mounted directly to the cage. We will also have to fab a mount for the steering shaft, but the effort will be worth it. Making the car as light as possible is high priority and something I am very willing to go the extra mile for.
Finally got my blank carbon panels in from Marc at Carbon Miata. Waited about 3 months for these. I can do a more in depth review if anyone is interested but for now I'll just say that upon initial test fitment I was prepared to contact Marc about a refund. The cluster panel and gauge hood were significantly off when trying to mate them together. I decided to just start playing with it, forcing **** together without really caring - with plans of raising hell with Marc if anything ends up breaking or simply not fitting acceptably.

I started with the HVAC panel. Dimensions and shape were ok but I think the angle of the mounting tabs are a bit off as seen here.

This causes unnecessary tension on the panel when fully bolted down. As long as nothing breaks I don't care.

After messing around with the cluster panel and hood for an hour I was able to force it into a reasonable fit. There was definitely Dremel work needed. Its not perfect, but the end result came out ok.


One thing that actually impressed me is that the weave pattern matches pretty nicely between the separate panels. I was kind of expecting the angle of the weave to be noticeably off when the panels are abutted.


See that sweet hole cut into the passenger side dash? Yeah that was courtesy of the previous owner and his talented boost gauge installation. When I get around to it, I need to fab something to fill the void and cover the panel with some DiNoc carbon vinyl. Looking at that hole has been pissing me off for over 10 years lol.
I will say, the experience really made me appreciate the precision fit of the OEM pieces. The stock cluster panel and hood fit together like a work of art and even have little dowel tabs that integrate into each other perfectly.
I also took the time to gut the back of the dash. Getting rid of the heavy steel mounting bar will save some good weight. The dash will be mounted directly to the cage. We will also have to fab a mount for the steering shaft, but the effort will be worth it. Making the car as light as possible is high priority and something I am very willing to go the extra mile for.
Last edited by AX75F92; 05-29-15 at 09:44 PM.