When you click on links to various merchants on this site and make a purchase, this can result in this site earning a commission. Affiliate programs and affiliations include, but are not limited to, the eBay Partner Network.
So I finally did it. I've wanted an FD as long as I can remember, and while the one I now own isn't quite what I had in my head - it'll get there sooner or later. I've owned RX8s for about 7 years now, and feeling comfortable enough with rotaries and my own mechanical knowledge at this point, it felt like the right time to dive in, so here we go!
According to the previous owner, the car has no compression on Rotor 1 after it overheated - more on that below. I bought it without performing a compression test on it knowing at worst it would need a new engine anyways, and at best I could luck out.
First the info - 1993 Brilliant Black RX-7 FD Touring. ~75,000 miles on the chassis, ~11,000 on a "RP street ported and pinned" engine that previously made 397whp at 14psi. I'm now the 4th owner. Mod list (that I've discovered so far) below - most of this is based on the previous for sale post that the guy before me bought it from.
Engine/Drivetrain:
RX7Store Garrett GT35R Single Turbo kit
Rotary Extreme V-Mount kit
HKS SSQ (maybe knockoff - there's no HKS branding that I can see)
Unknown down pipe and exhaust - 3" it seems all the way.
ACT 6 Puck Clutch
Stock 5 speed transmission - 5th gear synchro may need rebuild
Stock differential
Fuel:
550/1600cc injectors
Stock fuel pump assembly - as far as I know.
ECU:
Microtech LT8
Suspension:
White Tokico adjustables - need to be replaced soon.
Eibach lowering springs
Unknown blue rear sway bar
Pettit trailing arms and toe links
Body:
99 Spec wing
Knightsports (or replica) rear bumper - cracked and will need replacing, probably with stock for now.
SSR Integral A2 - 17x8 in front with 225/40/17 and 17x9 in rear with 265/40/17 Kumho Ecsta Supra's that will need to be replace from dryrot and age
RE-Amemiya or replica sleek headlights - need to remove and verify if authentic as well as replace the eyelids. Would like to go back to stock popups for appearance's sake.
Car history: I bought this from a local in Charlotte who had the car for a couple years, about 1.5 of which it hasn't been running due to overheating and he had it taken to a friend's shop where it has been sitting until now. He said when it overheated started seeing temps creep up fast, 92...94...96..102 and at that point he heard a *pop* and coolant and steam went everywhere, he pulled off and shut the car off. I was under the impression that the overflow tank burst, but upon looking at that, there wasn't even a radiator hose going to it, so it must have been somewhere else. Unfortunately the car has been at his friend's shop for at least a year, so I have no idea what attempts to repair they made over that time frame, and what is no longer left the way it was when it last ran. The car needs some serious cleaning and alot of love, both of which I can give and will be hopefully making progress on that along with a potential engine rebuild very soon in the future.
Since you might have ignored all that anyways - here are some pics of the car while it was still in the shop where I bought it.
As you can see I've got my work cut out for me. Here's a couple more once it got to my house and in the light before we pushed it into the garage. Front with RE-Amemiya style lights missing lenses. Rear cracked bumper with 99 spec wing
I really wanted to get it washed before I pushed it into the garage out back - but the rains were coming quick and I didn't want any of the exposed electrical stuff to get wet - so that will have to wait until the weather gets better and my yard dries up (we had to push it through a winter-mud-puddle).
More to come later of the progress from yesterday!
Ok - so this is a log from a couple days ago but I finally got a chance to start digging into stuff and cleaning up the car a little. Basically just working on anything I felt like at the time, and ADD was kicking into overload.
I started out by putting it on jackstands and trying to take the wheels off, but discovered that they had a custom lug nuts and as far as I knew, there was no key to found. I texted the previous owner and he never took the wheels off and didn't know either(if that reflects how long it's been since this car got some TLC). After searching around online I tested out the tried and true method of hammering on a closely fitting socket - which actually turned out to be a 16mm in this case and this method worked out great. About 30 minutes later all the lug nuts were off and replaced with some temporary blue lug nuts that matched the pitch and thread 12mm x 1.5 in this case. These have just been lying around in my garage for years and I always felt like they would com in handy - today they did!
Before trying out the lugnut removal method, I started hunting through the interior which was filthy at this point, so that spurred a cleaning that ended up with most of the interior pieces being disconnected and cleaned on the spot.
Before - driver side:
After quick cleaning and vacuuming driver side - feels so good to get the mess out:
After that I started hunting down all the issues with the interior I could find and will be cleaning everything while it's out before putting it back in. Once the interior is all re-assembled I'll have a photo for that one, but here's another from the driver side after all kinds of tinkering and panel cleaning - the carpet is getting dirty again from everything I'm doing but take a look at the difference in the interior panels now!
I deviated to pulling things out of the engine after cleaning up the interior and concluding that the lug nut key was nowhere to be found - first the intake and intercooler piping - and hey - the turbo looks great too! Very little compressor play and it spins smoothly, so that's a huge plus since I had no idea on the condition of the turbo when I bought the car. V-Mount IC removed
Next I moved on to pulling the spark plugs and checking on them - they were in a backwards order - , the 7L plugs on the top and the 9T plugs on the bottom. Despite that, they're all basically new, so this may have been done recently as a troubleshooting step to revive the engine by the previous owner. After removing them, I squirted some(maybe an ounce or so) Marvel Mystery Oil in through the trailing(top) plug holes with a dental syringe that I widened out to get better flow. I spun the engine manually with a 19mm socket on the eshaft bolt (clockwise), and at first there was some resistance from how long the engine had been sitting but after getting it moving with the MMO, stopping to inject a bit more on each side of the rotor faces, it started moving much more easily.
Satisfied that the engine was sufficiently lubricated to try a compression test for the first time. A friend lent me a tester from rotarycompressiontester.com, so I did the following:
1.) Hooked up a charged battery to the car
2.) Unplugged the EGI fuse
3.) Disconnected the fuel pump
4.) Hooked up the tester on R2's Trailing plug hole(top)
5.) Held the clutch pedal down
6.) Held the throttle down
7.) And turned the key
For the first time since seeing the car, I was hearing its starter and something of an exhaust pulse, however... the tester did not even detect a pulse on R2. Thinking I did something wrong, I checked everything again, and switched the tester plug into R1's trailing plug hole - and it got results! Unfortunately not very good results at all, failed by any means - 63, 72, and 54 psi normalized to 250rpm. Starter was running about 180rpm with the battery I was using and a new starter(unsure how many kW). After that relative success, at least in getting the compression tester to detect a pulse, I switched it back over to R2's trailing plug and tried again - same result. Absolutely no compression on R2. Engine rebuild time it is!
That was the end of that day - I'll update you guys more next time on where we're at so far. Thanks for reading!
I noticed the front relay block was hanging upside-down in the front of the car. It's VERY possible that some or all of those relays are rusted out at this point, if that box hangs upside down it will collect water that will get into and rust out the relays.
Hope the engine has plenty of useable parts in it! If it blew an apex seal you are going to want to check the turbine wheel of the turbo, the edges of the wheel will get chewed up when a piece of apex seal heads out. Good thing is that typically isn't too pricey to have fixed compared to a new turbo.
Dale
That's great info, I'll have to check those relays out... at this point I'm still unsure if parts on the car are in the state they are because of troubleshooting steps for the bad compression or if the previous owner was just driving around with them like that. I'm inclined to think the latter, but it's possible that those relays were only upside down while it was stored in the shop while they were tinkering with it. Should probably go about replacing all of those anyways - old car parts and what not.
I'm still unsure on the apex seals as the engine hasn't yet been pulled, but the back of the turbo seems to be ok, I'll know more when I get it all apart.
More updates coming as soon as I get a chance for the write-up. Have been steadily continuing the tear-down and should be finally getting the engine+trans out within the next couple days.
Looks like that patmac guy's car. I talked to him about this car when he had it for sale 2 yrs ago. Price was way off, and I don't think at the time he knew or realized the engine was blown. Looks like it's in good hands now and will be built up properly. Wish I'd ended up with this one, though, my current FD project has really been a challenge. I'll be starting a build thread soon. Good luck. Subscribed.
Looks like that patmac guy's car. I talked to him about this car when he had it for sale 2 yrs ago. Price was way off, and I don't think at the time he knew or realized the engine was blown. Looks like it's in good hands now and will be built up properly. Wish I'd ended up with this one, though, my current FD project has really been a challenge. I'll be starting a build thread soon. Good luck. Subscribed.
Yep this is the same one! It had been up at SMG Racing in RI before he owned it. He's a great guy but his rotary knowledge has some room to grow which may have lead to where the car is now, but all that should be rectified in time!
Not sure if anyone else can chime in on this, but I was talking with a JDM importer about all kinds of stuff and the topic of ECUs came up and he said that he didn't believe the Microtech LT8s had support for the OMP, so if that hasn't been pumping correctly this whole time, and I know the previous owner wasn't premixing, that might be a direct reason for the engine failure. Time will tell, but I'm going to have to do some more research on the OMP situation to see if there's any proof to that information. At this point I'm pretty committed to hunting down a PowerFC + Commander, and will likely need a replacement dash harness to go with it since the current one was completely butchered to fuel the microtech and whatever else this car may have had modified throughout its lifetime.
Update time - after I found out the compression was low I pretty much instantly set off to tearing down the car and unbolting/cleaning things as I went to prepare the engine for pulling. I've been following the Rotary Resurrection teardown and it's been getting me pretty much there except for some of the mods I had already pulled out like the V Mount setup. At this point all that's left is the electrical connector behind the ABS(not sure if this needs to be disconnected?), disconnecting the fuel lines, and unbolting the transmission from the PPF since I'll be pulling the engine out with the trans attached.
The state of the car right now is an ADD dream - if I get distracted doing one thing there's always something else to work on no matter where I look, which is fun, but also quite daunting once I get to the point where the part costs start piling up. I'm trying to sell my 40th Anniversary RX8 before I can fund the engine rebuild, so as soon as that goes this is going to speed up a lot.
At this point I have a list of things(in no particular order) I know I want done before any kind of maiden voyage is taken once the engine is rebuilt:
Remove, clean, and evaluate brake and clutch master cylinders, as well as check out clutch slave cylinder. The clutch pedal sticks to the floor when I press it all the way, might just be lack of use, might be a failed slave/master.
Replace all brake pads, clean/refurbish calipers, and a full system bleed. I don't play games with brakes.
Get rid of the Microtech LT8, and purchase/install a Power FC + Commander. If anyone has one for sale in good working order let me know!
Replace coolant hoses(all of them). If the previous owner said the car overheated while driving in traffic at average speed, I need to get to the bottom of why. Might have been compression/water seals, might be something completely different.
Figure out why fans are always on with ignition. Might be fixed by #3.
Fuel filter and potential line replacements. Crazy story on this further down.
Replace transmission cover plate (the little one that lets you see through to the clutch and flywheel)
Install stock-style popup headlights. Working on a deal with a guy in Columbia, SC for some with an HID kit installed.
Dash harness. Either re-wiring the whole thing myself or replacing. The existing wiring has been pretty badly butchered to accommodate the early 2000's and the Microtech. Not even sure it would work correctly with a PowerFC.
Replace tires(and possibly wheels). It's been sitting a while and there's probably a bit of dry-rot to deal with at this point. Current setup SSR Integral A2s in 17x8 front and 17x9 rear wrapped in 225/45/17 and 265/40/17 Kumho Ecsta Supra tires, seems a little thin for the grip and handling levels I want.
Evaluate or replace the wastegate spring. I have no idea how this car is currently managing boost levels except through fuel cut or something along those lines from the Microtech. There isn't a boost controller as far as I can tell.
That's pretty much it for the necessities in my eyes before I even try pulling away from my garage. All the other things like suspension refresh, interior perfecting, etc can happen after I know what the car feels like while rolling. I'll have more of an idea on timeline hopefully once the 8 sells, but I would love to have this thing rolling by May... famous last words.
As mentioned before about the fuel stuff - when I was talking to the previous owner before buying the car he kept commenting on how it shot flames all the time and how it always smelled like so much gas when he was driving that he had to keep the windows down to breathe. He did mention that he replaced the fuel pump with some buddies so I figured "ok, the cars just running rich and maybe there's a bad seal to the fuel pump area". When the tow truck dropped the car off in my driveway the first thing I wanted to do was get the driver window up that had been down all the time the car had been sitting in that shop in case it rained before we could push the car into the garage. Unfortunately the battery had been relocated to behind the driver seat and the wiring connector that attaches to the positive post came apart; so the only way I could get power to the car was to climb into the rear hatch area and hold the positive lead to the battery post while a good buddy(also owns an FD) who came over to check out the car turned the ignition to the 'ON' position and rolled the window up. Once the window was (finally) up, I had him go over the dash lights with me and tell me if he saw anything else standing out of the ordinary while we had a battery connected. All the while I kept hearing a faint hum and really quickly began to smell gas - at this point I had him turn off the ignition and take the key out ASAP while I disconnected the battery and scrambled out of the back to see if there was fuel dumping on the ground anywhere. Seemed like the pump couldn't build enough pressure to prime or something... We got to looking around, didn't really see anything dripping but when we went to look at the fuel pump - the cover was never put back on, so you could see the top of the fuel pump assembly and all the hoses going into it and.... the hose clamps to the fuel lines weren't tightened over the seal at all. This dude had been driving around gradually spitting fuel out around the edges of the lines for who knows how long! No wonder it smelled like gas... It looks like most of the screws to the fuel pump assembly got stripped as well so I'm going to need to remove and replace those with something close to OEM - so that will definitely need to be done before the car is running.
I had hoped to post some pictures but for some reason it's not letting me add any with the built-in picture tool so I'll have to figure that out tomorrow. Might switch to off-site hosted pics next.
Thanks for reading along!
Last edited by Darkning; Feb 22, 2018 at 12:05 AM.
Sounds like you are headed in the right direction!
The fans might be direct wired to a switch. A couple of the local FDs circumvented the relays and wired them directly to a toggle switch.
Definitely lock down what ECU you want to run before getting too far along with the wiring.
Good luck!
You may want to add to your list getting the injectors serviced and fabricating side panels to the v-mount (unless i'm not seeing them), otherwise all the forced air goes out the sides. Also assume you are going to have the engine rebuilt.
Keep pinging away and eventually you'll be driving it.
You may want to add to your list getting the injectors serviced and fabricating side panels to the v-mount (unless i'm not seeing them), otherwise all the forced air goes out the sides. Also assume you are going to have the engine rebuilt.
Keep pinging away and eventually you'll be driving it.
Thanks for the reminder! I had thought about the injector servicing but forgot to write that down. I believe the car has 550 primaries and 1600 secondaries... I don't know much about fuel injectors yet but 550 seems low with such a drastic contrast for the secondaries. Might be a good time to evaluate upgrading them if necessary. I don't foresee ever wanting more than 450 whp on this car MAX(even that may be high) - my driving preference is to maintain a car that will be predictable on twisty roads with the power available that may be needed everywhere else.
As for the V-mount ducting, there definitely is none at the moment. This could also be part of the previous engine overheated since ducting isn't concentrated or focused at all. The undertray is missing as well - considering picking up one of the aluminum ones from LRB Speed. I'm playing with the idea of getting some aluminum and figuring the V ducting out on my own. Should make for a fun project! May work on extending the intake duct closer to the front as well, so I'll need to figure that out before fabbing up the ducting.
You really don't need an undertray with a v-mount, at least for cooling. They do protect the radiator from road debris though. If you install one, you need to allow air to exhaust from the radiator. I believe the LRB v-mount trays have a bunch of rotor shaped openings. I would cover those with screening. The most important thing is to block the sides between the intercooler and the radiator so your airflow doesn't escape before going through the IC and radiator.
Haven't made too much progress lately. Engine and trans are still in the car - although I'm really hoping to have some friends on deck tomorrow to finally get them lifted out. Spent most of the weekend so far working on the RX8 with little odds and ends to get it cleaned up and more desirable for any potential buyers.
Pic of the 8:
Back to photos of the 7 and where it stands currently:
Took the wheels off and cleaned them, if only for my sanity.
Very glad I don't have to sort this mess out now. I ordered a replacement dash harness from a user on the forums here - it's coming from an R1 so we'll have to see how much effort is required to make up the difference - I don't care about the Bose stereo since mine has no speakers anyways, so I'm guessing the only odd-end will be the sun/moon(whichever one isn't glass) roof controls.
Found out my BOV is almost surely a knock off, so that may get replaced before the car begins moving after the engine replacement, we'll see.
I spent this afternoon trying to make heads or tails out of the fuel system and how it's run with added/replaced lines. There's a "spare" hose in the fuel pump area that wasn't connected anything, and it turns out that they left the old fuel filter location and its hoses intact, and ran a new line with a new fuel filter down lower - I'll have a pic of this one tomorrow. Not sure if I want to retain the OEM location and just replace the filter, or keep the relocate although it may need some kind of shielding as I don't like how exposed it is to road debris.
Thanks for the input so far! Getting some great advice.
I spent this afternoon trying to make heads or tails out of the fuel system and how it's run with added/replaced lines. There's a "spare" hose in the fuel pump area that wasn't connected anything, and it turns out that they left the old fuel filter location and its hoses intact, and ran a new line with a new fuel filter down lower - I'll have a pic of this one tomorrow. Not sure if I want to retain the OEM location and just replace the filter, or keep the relocate although it may need some kind of shielding as I don't like how exposed it is to road debris.
The benefit of relocating the fuel filter is ease of future maintenance. You can also upgrade to a better aftermarket filter which may be necessary if you are pushing more air and fuel through your engine. If it's mounted above the lowest part of the differential, subframe, or fuel tank, it should be safe, but adding shielding is a good measure.
As for the hoses, refer to the FSM for the proper routing. My guess is the "spare" hose may be for the charcoal canister. Check to see if that's still there
I'm all about ease of future maintenance, and will probably the fuel filter relocated from the factory location, but definitely don't need the stock filter and it's hanging hoses still there, so that will be removed soon. I did some more digging + disconnecting last night and I think I've finally made some sense out of the setup. There are two lines going to the engine - the feed and return line. The feed line is connected to the additional (only) filter and is routed through a rubber/stainless steel braided hose The charcoal canister does not appear to be in the loop and the 3rd fuel line is capped near the oil filter up front. Not sure why this wasn't totally removed but I appreciate having some additional hard lines in case they prove necessary. The PO said the car always smelled like crazy amounts of gas while driving(which I think I mentioned previously that the fuel clamps weren't on tight at all), but I wonder if not running the charcoal canister aided in the smell being so strong. Here's a few pics of the system:
Relocated fuel filter - you can faintly see the charcoal canister and it's bottom breather tube still present and the "cut" line that came from the original fuel filter location near the top right of the photo.
This is where my feed line is run now - the stainless steel braided hose connecting to a a hard line that then connects to a rubber hose that is attached to the "relocated" fuel filter.
Engine bay TB + UIM removed and fuel lines disconnected.
I don't like where the FPR is located since you can't get to it at all with the UIM installed - I'm thinking of relocating it to either the front of the UIM behind the alternator area, or possibly even over near the clutch master cylinder - depending on whether or not my ignition coils end up there since currently only the leading "coil" is there - it seems that there was a Turbo II coil/ignition swap done on this car, although I can't tell yet if the trailing coils were from the FD or if they were swapped as well.
Also figured out that the manifold currently installed on the car is an XS Power - which is I know is usually quite cheap but at least as far as I can tell until I get it completely off the car, it doesn't seem like there are any cracks or welds. The wastegate setup is an unknown currently, so that needs to get addressed as well. So many questions, but one day I will gladly be at the bottom of them.
Unknown wastegate with atmosphere dump - would be nice to have the WG replumbed one day. The UIM had lots of busted vacuum caps, not sure if this is just from the car sitting or were all part of how the car was running previously.
Photo quality is probably way overkill for some janky caps.
I'm beginning to understand why folks buy stock and upgrade later... even though I'm saving lots of money by already having some things - trying to wrap my head around someone else's conversion process is tough work.
That's all for now! As you can see the engine is still in the car but at this point the PPF bolts to the trans are the only things keeping it there. Just waiting on some extra hands.
Wow what a project. I never thought a car could be so neglected. Looks like its in good hands now. Am really interested to watching the progress on this. Very satisfying to see.
First off there are two books that are your bible. The first is the '93 Service Highlights which explains how systems work and then there's the Factory Service Manual (at least there's a separate service manual for the '94. If there's not one for the '93, get the '94 Workshop Manual (even if your's is '93) because it provides different and useful info from the Service Highlights manual). Parts diagrams are also a useful reference. These can be found on Mazda parts vendor sites such as Jim Ellis Mazda Parts.
The charcoal canister is part of the Evaporation Emission Control System which is controlled by a Purge Control Solenoid. I assume the PO removed the solenoid valve which means the entire evaporative emission control system should be deleted. Since my FD still has the stock fuel and emissions system i am not quite sure what is involved in deleting that, but it may not be as simple as just removing and capping. From the Service Highlights manual "While the engine is stopped, the evaporative emission control system temporarily stores evaporated gasoline fumes from the fuel tank in the canister. The stored gas is then pulled into the air intake system for combustion when the engine is running. This operation prevents gasoline fumes from flowing out to the atmosphere." This could explain the fuel smell, but it could also be attributed to the non-factory hoses/clamps used, which gets to number two.
Second. Always use fuel injection hose for fuel lines where you need to use hose. Also, SAE is a little larger than the hardline fuel tubes which leads to...
Third. Use fuel injector clamps. These are smooth with chamfered edges so they don't tear the fuel hose. I use two clamps to ensure a leak free fit
Fourth. Flare the fuel lines that connect to fuel hose. I use a bubble flare
Finally, there's a lot of good info out there on the subject. Here's some
Here's good reference for all the vacuum hose and what you what you'd want to cap and what you wouldn't. And don't use rubber caps, they rot (as evidenced). Use a fuel safe material such as Buna N (Nitrile)
Everything youre running into is eerily similar to the state of my car when I first bought it. Went through a lot of the same issues. Hard to tell if it's previous owners' lack of knowledge or simply taking no pride in their work.
It's been a crazy week and I haven't had much time to really work on the car, but I finally had some downtime this afternoon and the weather was great so I finally got the engine pulled!
For the past week or so it's been sitting ready except the PPF/Trans bolts were still attached and the motor mount nuts weren't off. That all came loose with no issue - although I'm glad i invested in an air compressor and impact tools before I got the car because the PPF/Trans bolts were putting up a fight and my confidence in my 5 year old Autozone breaker bar is beginning to wane. The impact wrench made quick work of them and shortly after taking all that loose and supporting the trans with a jack, the engine was beginning to lift out of the car! I got my wife to help out with the navigation, and in about 30 minutes the engine was out without issue. Not having and AC compressor, PS cooler, radiator, or intercooler in the way really helped. You can kind of see the to-do list on the windshield in the background... I saw that on another user's build thread here and can't remember who it was to give credit for the awesome idea.
It's finally out! Feeling pretty good about it as this is the first engine I've been involved in a pull of from start to finish. I'm sure this won't be the last time in my life I yank a motor out of an FD, but hopefully the last for a while!
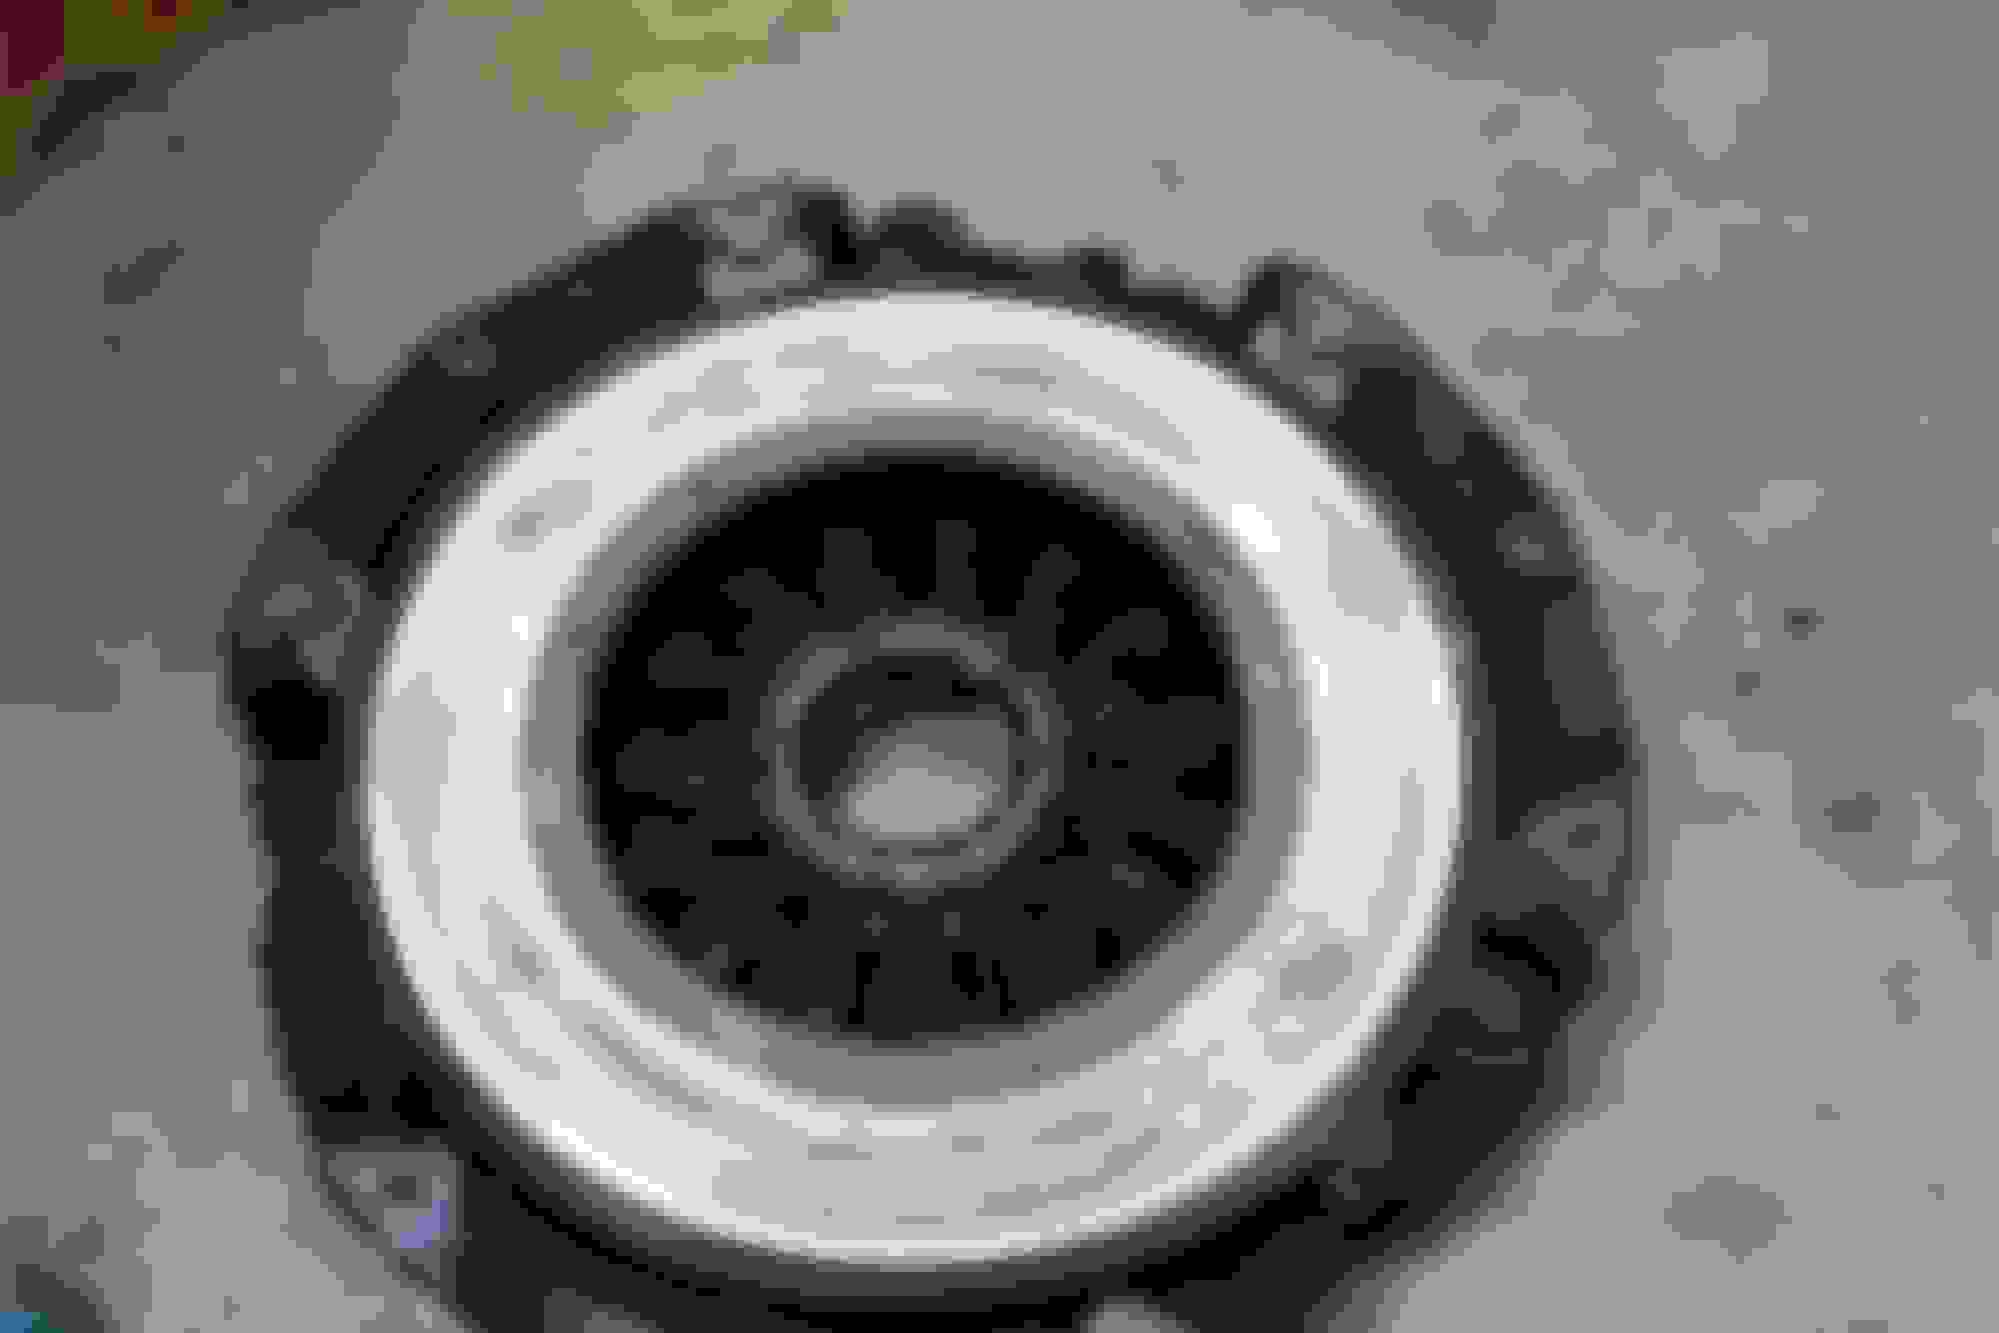
Got the trans separated and begin working on getting the clutch loose.... I was told and saw from the previous FS threads that the car had a 6 puck ACT clutch and was a pain to drive... well - the pain to drive part may have been true but quickly found out this one was a 4-puck and a pretty worn out one at that too.
Hotspots ahoy! I'm not sure yet if I want to pursue a replacement flywheel or just have this one resurfaced. Coming from the RX8 world a lightweight flywheel was always desirable if you felt good enough about rev-matching and your shifting talents, not sure how that kind of thing holds up to the higher torque and hp of a boosted car and if it's worth the difference.
Also got to work on pulling things off the engine, including the exhaust manifold/turbo/wastegate. Broke the oil drain line (was super hard rubber) when removing it from the engine side, although that's definitely something I would be replacing anyways. I don't trust a single hose on this car right now.
Also - think there are enough adapter fittings here? Turbo oil feed line(I assume anyways - its the top one).
I still need to remove the manifold heat wrap and see how the XS Power header is doing, and still am not 100% sure on the WG setup, although I believe it's an XS Power kit as well. Figuring out the spring is next on the list regarding that setup.
Wastegate UIM hose snapped when I was moving it out of the way... getting replaced anyways.
After getting the clutch and exhaust manifold off - I started messing around with the flywheel while watching the rotors go around inside the chamber, and on the bright side it seems like all of the apex seals are still there for R2/R1 - although R2 definitely doesn't have any compression and I see alot of oil moving around in there. The oil is mostly the MMO I put in when I first did the compression check, but it's black and nasty and there was oil in the intake manifold as well. I'm very anxious to crack the engine open and see what things really look like. Wish I had good photos but I couldn't get enough light in there to see what was going on for real.
I'm not sure if I've mentioned this yet but take a look at this janky clutch line job... Just one more thing that looks like someone literally just threw parts in the car they had lying around.
And lastly the empty engine bay - I get to start cleaning now (that's free!) and will hopefully be re-aligning the car in the garage for a while so I can pull the RX8 in to revert it back to stock in hopes of getting more sale attention.
Just a thought - the "feed" line that I removed (the rubber/stainless steel braided one I mentioned previously) could probably be substituted for the currently capped emissions line that goes back to the charcoal canister. I assume it's probably just a factory hardline but I don't know why I couldn't use that unless it's too small or wasn't built to sustain the fuel pressure needed to operate as a feed line. If anyone has any insight on this I'd appreciate it! Thanks for following along!
That plastic 90 in the oil drain line from the turbo made me cry.
It still amazes me that people can look at a gorgeous car like an FD and proceed to do hack work on it. Just a damn shame.
Good thing is most of the car looks there and sound. Just break it down piece by piece and work on things.
For the fuel system, stock there are 2 larger diameter hard lines (feed and return) and one slightly smaller diameter vent line for the charcoal canister. Some people have used that hardline as a second feed so it is possible. But it depends on how much power you're planning to make, I would read up and see where the limitations are.
Also, a 4-puck unsprung clutch is a BITCH to drive smoothly. I'd re-think that setup. Flywheel isn't terrible, they all get spots and streaks. A light flywheel does well, I have one and love it.
Dale
Last edited by DaleClark; Mar 5, 2018 at 11:30 AM.
That plastic 90 in the oil drain line from the turbo made me cry.
It still amazes me that people can look at a gorgeous car like an FD and proceed to do hack work on it. Just a damn shame.
Good thing is most of the car looks there and sound. Just break it down piece by piece and work on things.
For the fuel system, stock there are 2 larger diameter hard lines (feed and return) and one slightly smaller diameter vent line for the charcoal canister. Some people have used that hardline as a second feed so it is possible. But it depends on how much power you're planning to make, I would read up and see where the limitations are.
Also, a 4-puck unsprung clutch is a BITCH to drive smoothly. I'd re-think that setup. Flywheel isn't terrible, they all get spots and streaks. A light flywheel does well, I have one and love it.
Dale
Great info. For the fuel line I guess I was thinking as using it as the only feed line (i.e. primary) but not having the original on the car to compare it to I didn't know that this emissions line was smaller than the primary - so I will be replacing the current feed line later with proper hosing and not hack-jobbing the existing emissions line that is currently capped off. I may leave that until I get the car running. Since I'm starting from non-clean state, I don't have any of the original emissions equipment either to compare to - so I'm unsure if that 3rd fuel line has any business remaining on the car at all if there's nothing left to connect it to, so I will probably eliminate that for cleanliness and space savings.
Good info about the lightweight flywheel too - we'll see where the $$$ numbers are. Depending on what the engine looks like on the inside I may buy a complete shortblock and rebuild the existing engine as a spare for (hopefully very far) down the road - and that may come with a new/resurfaced flywheel already.
As for the clutch I am definitely replacing it - and since I have no desire to drag the car or dump the clutch at high RPMs - and live in the city and unfortunately that's probably going to be where alot of my driving happens with the car. I've heard great things about both the ACT Street/Strip and Centerforce Dual Friction clutches and will be doing a bit more research on other options as well. One of the perks of living in Charlotte is that twisty mountains are only 2-4 hours away depending on where I want to go and that environment is what my goals for the car's handling and power are going to be built to as a standard. 400ish whp would be awesome but anything more than that is going to border on useless and require too much turbo to spool predictably while cornering. Track time one day would be awesome as well but for now the closest I get is the twisties.
ACT makes good clutches. Centerforce clutches IMHO are a lot of marketing and not a lot of clamping power. Their FD clutch is overpriced and not great.
Exedy makes a great lineup of clutches, I would look at them in depth. OEM quality too. I have their street performance clutch and love it. But, it comes down to how much power you plan to make. If you're going north of 400hp you may need to get a little more creative.
With the charcoal canister stuff, the stock canister is back by the gas tank. Fumes from the tank vent into the canister and the engine pulls those fumes in at certain times to burn. You can vent it but I don't know if you'll get a gas smell or anything not great like that. I typically leave that whole system as-is, it does just fine and isn't in the way or obnoxious.
If you haven't been to Deal's Gap Rotary Rally, do so! It's at the end of April every year. Even if you come up in a daily driver it's worth it to meet everyone, see other FD's, get ideas for your projects, and learn a ton.
I've heard too light of a flywheel can cause driveability problems (like 8 lbs or less). I have a 12 lb flywheel and find it's the ideal compromise. Stock is like 23