
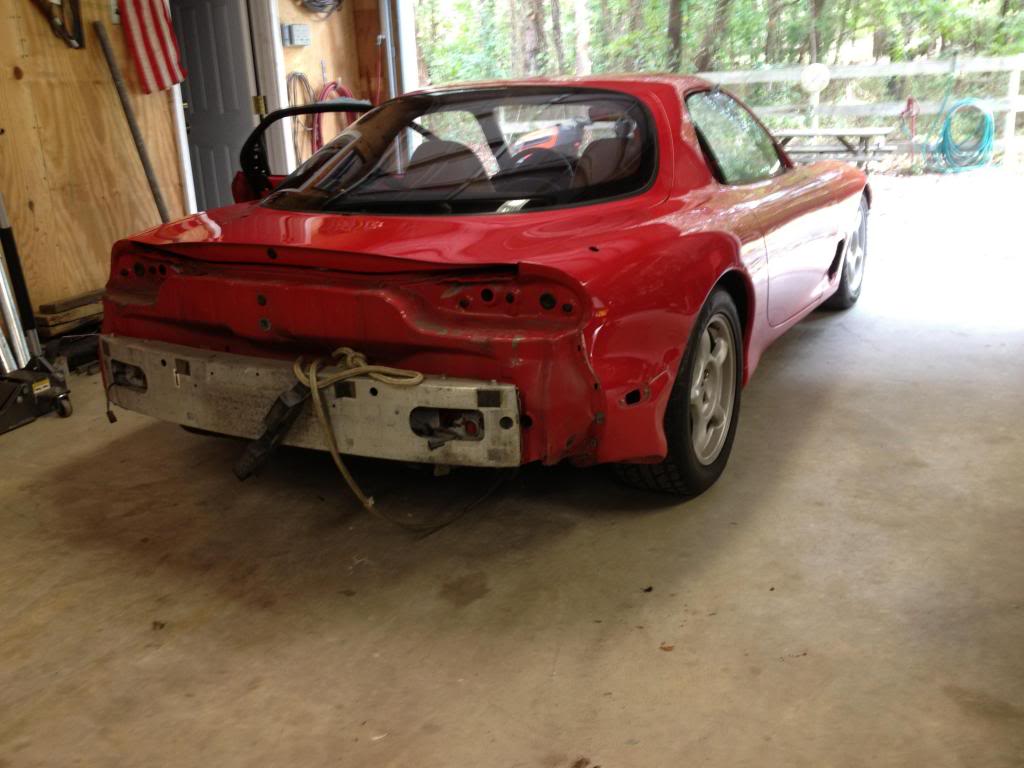
93 VR parking lot find....

Thread Starter
Joined: Apr 2011
Posts: 806
Likes: 288
From: Millersville Md
Thread Starter
Joined: Apr 2011
Posts: 806
Likes: 288
From: Millersville Md
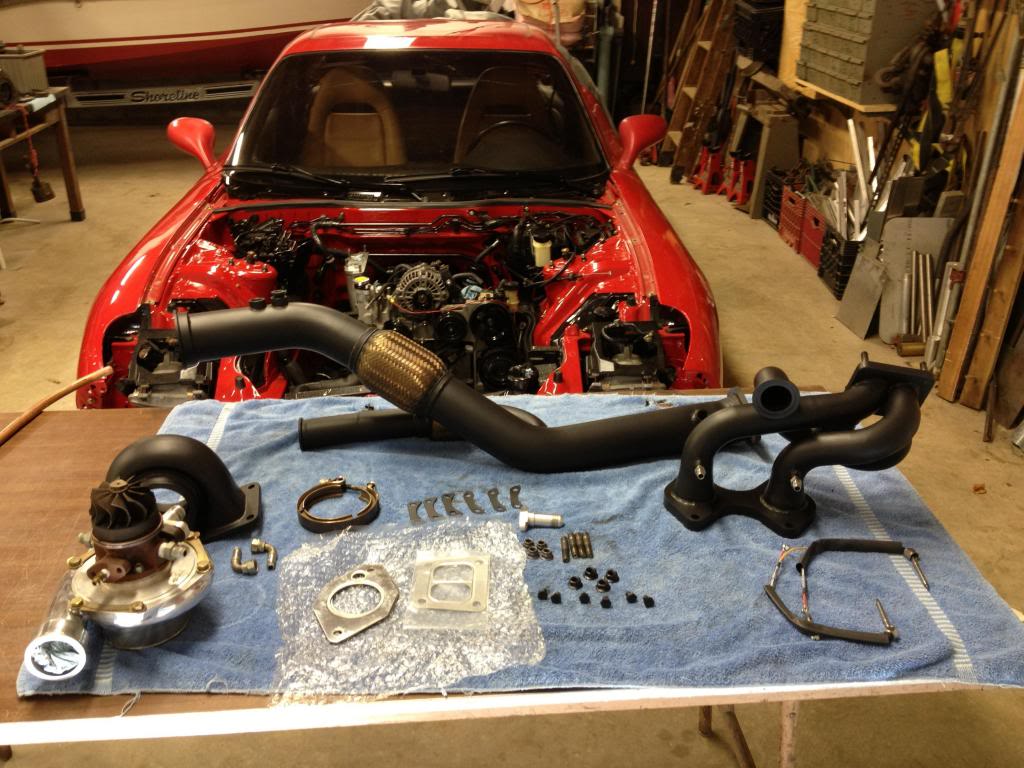
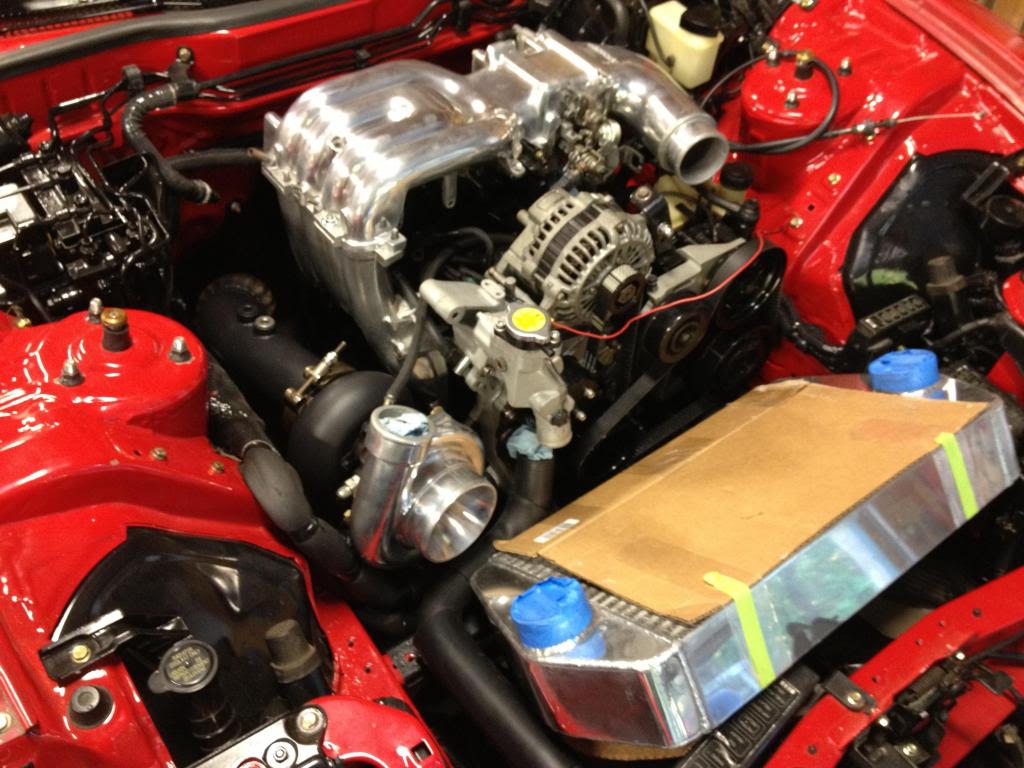
Progress. I received my turbo setup back from the coating shop. Went with the 3500 degree satin black and i must say it turned out great. If you are interested in getting anything done i went thru IRP, check with them for a quote. Before i sent the stuff out to be coated i test fit it. As with all long tube headers i had a few issues. First being the heater core hose that needed to be reworked, second since I'm attempting to use a RA omp adapter with a 99 spec omp the front tube comes very close to it and heat may be an issue, third with my adapter the oil return will have to be extended and fourth ..... air filter location. I also turned on my battery. Surprisingly everything worked as it should expect that when i removed the key from the ignition the buzzer bell kept ringing.
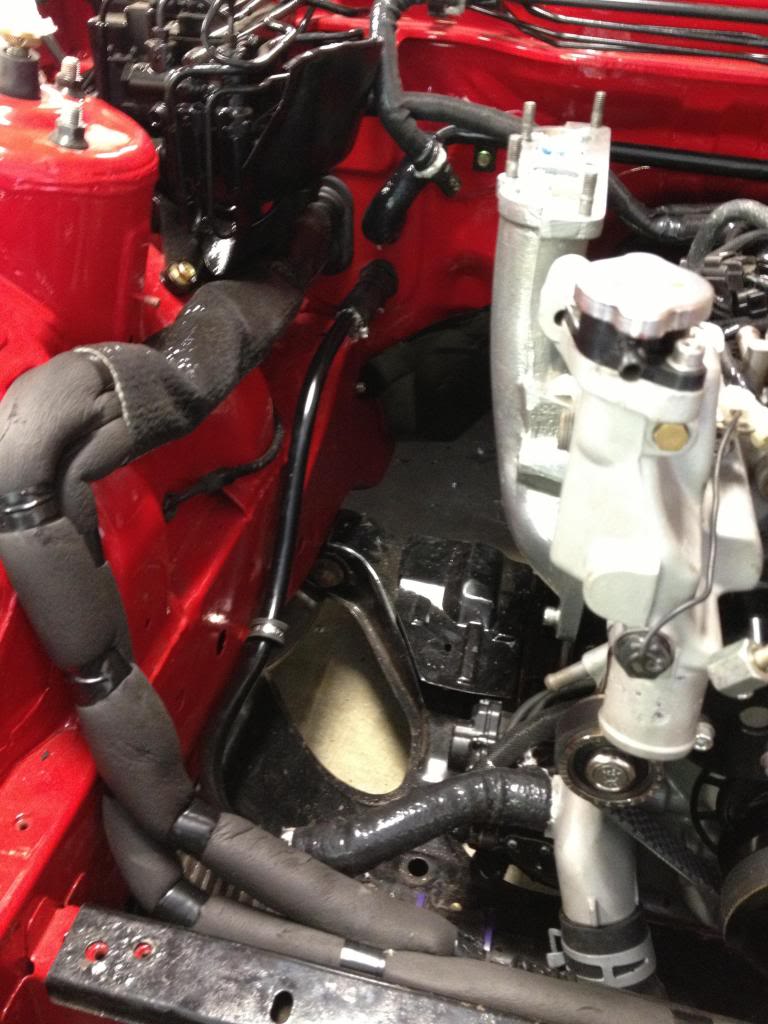
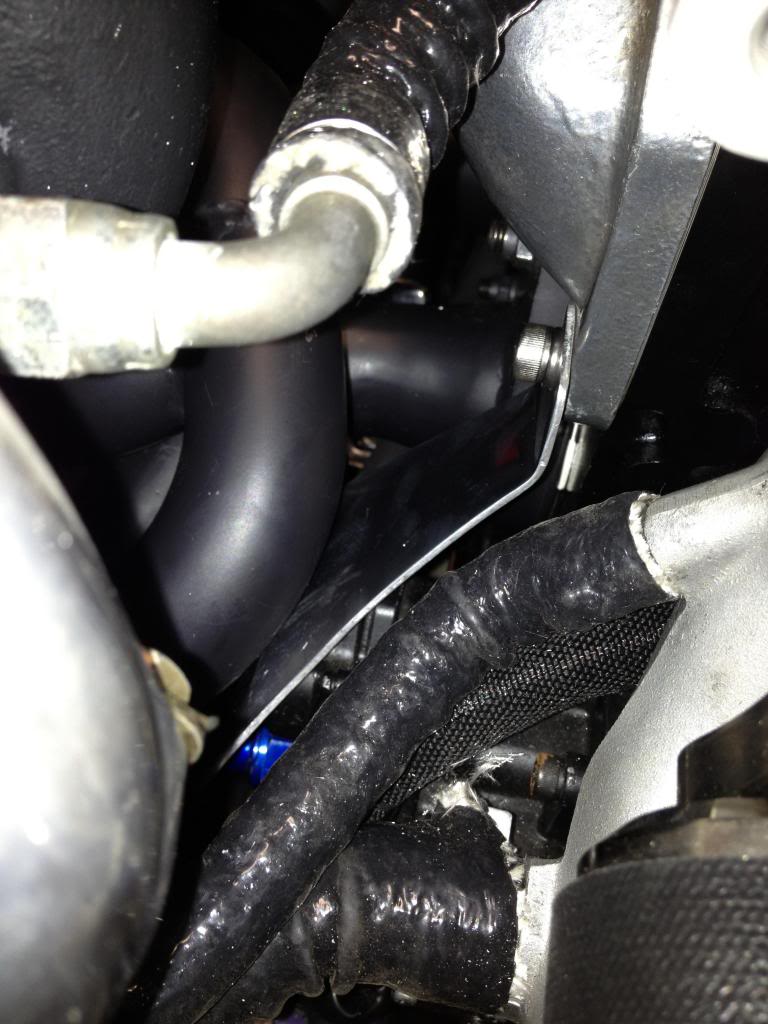
After looking at a few heater hose reworks i wasn't really thrilled with the "loop it over the turbo and back to the water pump housing outlet". I fabed up a hard pipe out of 5/8 soft copper tubing that kicked down and then 90ed close to the water outlet nipple. Flared both ends and used oem clamps ( I am not a fan of hose clamps, the oem ones are constant pressure that you cant over tighten ). Using short pieces of 5/8 silicone hose to make up the connections. I also covered the short hoses with some heat wrap just for extra protection.
You heard about that game call operation right? I haven't installed a turbo in a long time. The last one i did was on a friends vw a few years back. Laying everything out, it went together pretty smoothly. On a side note running a tap thru to clean up the threads where some of the coating got on them makes installing the egt probes and turbo studs a breeze.
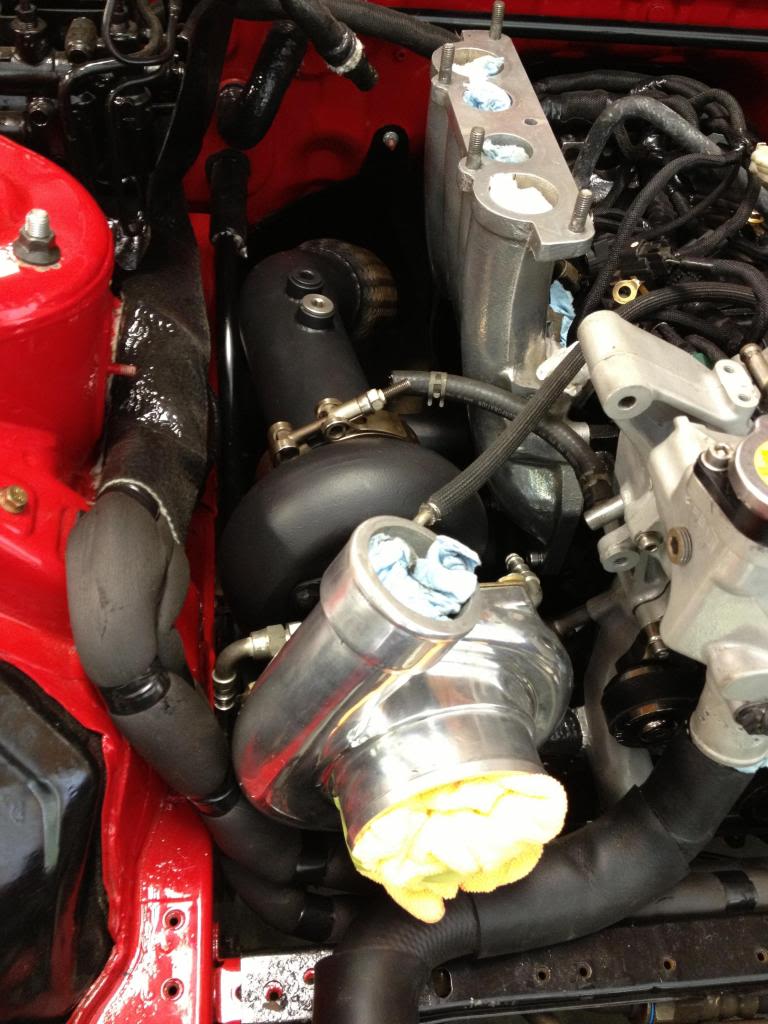
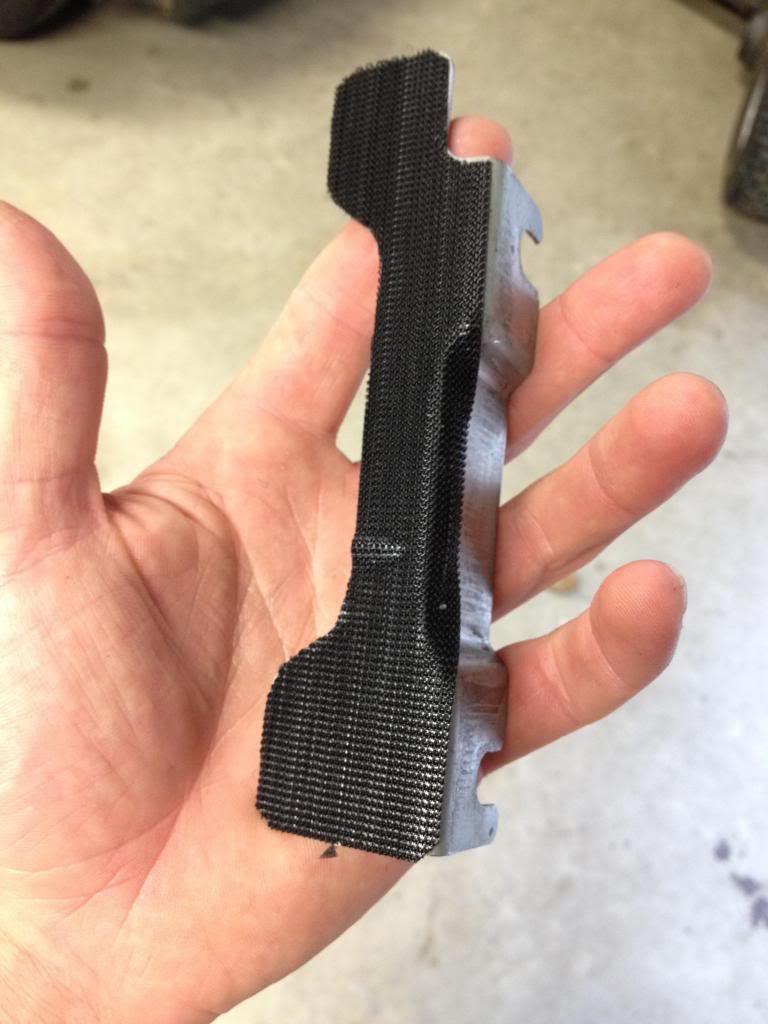
With the omp so close to the header i knew i would have to do something. Thought about sticking some flexible heat tape on it but figured it would not hold up and just peel off. Still may but not sure. The omp was painted with 2000 deg. black and I made a heat shield out of aluminium to shield the direct heat. Its mounted off one of the Lim bolt and snakes its way around in front of the omp. This I "think" should dissipate the heat.
The duct for my stock mount should be here in a week or two. Then i will be able to make the piping up and sort out the filter location. Maybe start on my water tank as well.
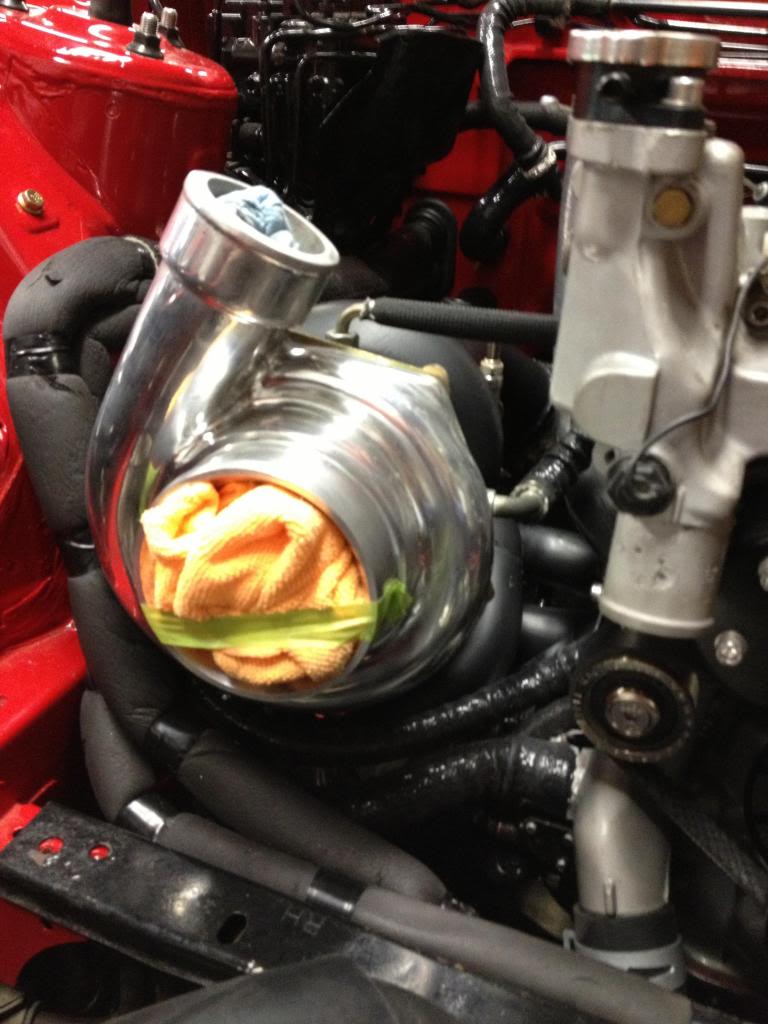

I did cover any hose that is on the turbo side for extra protection. As to date I'm still waiting on the last few pieces of dei to cover the engine harness where it loops over the down pipe and the turbo oil return line. After i make double sure i don't have any leaks my plan is to use dei fire tape for all the ends to give it a more presentable look.
Remember i mentioned the bell still dinging with the key out of the ignition. After a couple hours of tracing it down i found the problem. Turns out i made a goof, when i removed my dash to install the carpet i popped the cover off the ignition switch. Turns out there is a spring under it to push the key switch back in after you remove the key. I used a spring from a ball point pen cut it down and stretched it out to match the stock one. (easier said then done believe me) now its all fixed up and i wont have that annoying beeping any longer. In the mess i forgot to take a picture thou.
A while back i traded some electrical work with a friend who is a body man by trade and painter to have all the body and paint work done on my car. I got the word yesterday to bring it down the first part of October. That's two weeks from now and a little bit sooner then i wanted but you don't argue when all you have to do is pay for materials. They will just have to push it around the shop.
After looking at a few heater hose reworks i wasn't really thrilled with the "loop it over the turbo and back to the water pump housing outlet". I fabed up a hard pipe out of 5/8 soft copper tubing that kicked down and then 90ed close to the water outlet nipple. Flared both ends and used oem clamps ( I am not a fan of hose clamps, the oem ones are constant pressure that you cant over tighten ). Using short pieces of 5/8 silicone hose to make up the connections. I also covered the short hoses with some heat wrap just for extra protection.

You heard about that game call operation right? I haven't installed a turbo in a long time. The last one i did was on a friends vw a few years back. Laying everything out, it went together pretty smoothly. On a side note running a tap thru to clean up the threads where some of the coating got on them makes installing the egt probes and turbo studs a breeze.


With the omp so close to the header i knew i would have to do something. Thought about sticking some flexible heat tape on it but figured it would not hold up and just peel off. Still may but not sure. The omp was painted with 2000 deg. black and I made a heat shield out of aluminium to shield the direct heat. Its mounted off one of the Lim bolt and snakes its way around in front of the omp. This I "think" should dissipate the heat.


The duct for my stock mount should be here in a week or two. Then i will be able to make the piping up and sort out the filter location. Maybe start on my water tank as well.


I did cover any hose that is on the turbo side for extra protection. As to date I'm still waiting on the last few pieces of dei to cover the engine harness where it loops over the down pipe and the turbo oil return line. After i make double sure i don't have any leaks my plan is to use dei fire tape for all the ends to give it a more presentable look.
Remember i mentioned the bell still dinging with the key out of the ignition. After a couple hours of tracing it down i found the problem. Turns out i made a goof, when i removed my dash to install the carpet i popped the cover off the ignition switch. Turns out there is a spring under it to push the key switch back in after you remove the key. I used a spring from a ball point pen cut it down and stretched it out to match the stock one. (easier said then done believe me) now its all fixed up and i wont have that annoying beeping any longer. In the mess i forgot to take a picture thou.
A while back i traded some electrical work with a friend who is a body man by trade and painter to have all the body and paint work done on my car. I got the word yesterday to bring it down the first part of October. That's two weeks from now and a little bit sooner then i wanted but you don't argue when all you have to do is pay for materials. They will just have to push it around the shop.
Thread Starter
Joined: Apr 2011
Posts: 806
Likes: 288
From: Millersville Md
Thread Starter
Joined: Apr 2011
Posts: 806
Likes: 288
From: Millersville Md
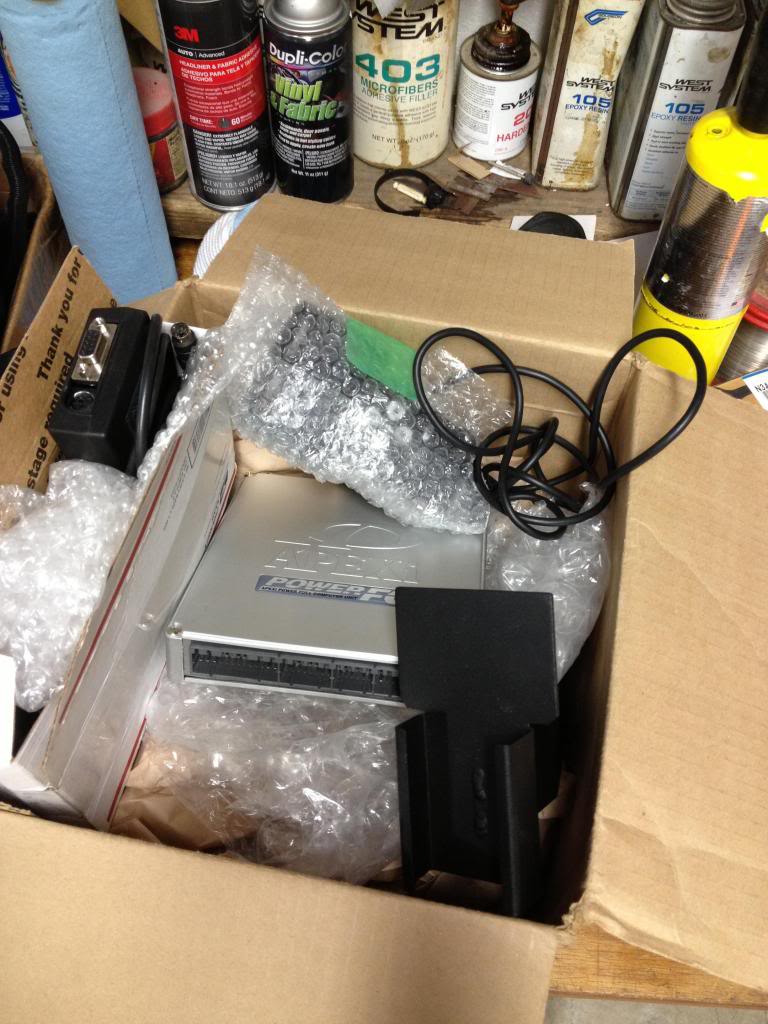
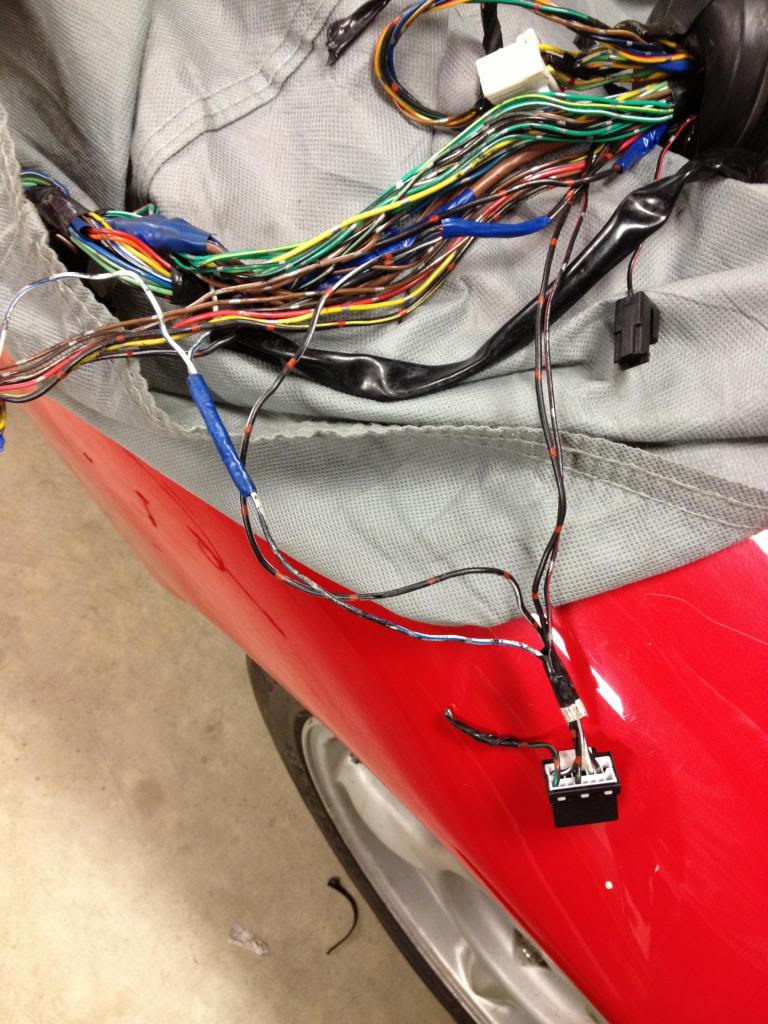
Couple of random things i did not add to my last post. The buzzing was not from the low coolant switch, since i jumpered that out while i am working on it. I went with a PFC for engine management. Yes i know its not "new age" but to be honest i still think the pfc is a great standalone that's stood the test of time to date. With tons of information available and i do like the monitoring window right on the commander giving me less gauges to mess with. I may one day change to another ems once i've out grown it but at this point I'm happy with my choice. I did use dale clarks thread on the pfc and check engine light. With one of the extra pins i had left over from my single turbo engine harness rework i hooded it up and now i have a working light. This should help me pass the visual inspection at the emissions station. To mount the pfc i took the old mounting bracket off the stock computer to support where it sits in the factory location. I also mounted my data log behind it as well. While i was under the dash i found out my car had the fan recall done but it did not have the small harness extensions. (it did however have them between the fan relays under the hood ) It was built into the engine harness, since i don't agree with the reasons why they chose to do it i removed it. During my reading one of arghx "why is this so dam complicated part 3 cooling fans" threads i also tied fan relays one and three together which bacisally jumps the fan speed up from starting on level one to level two. Not really concerned with fan "noise" while the ac is on, i would rather trade off increased fan noise to have the most cooling possible.

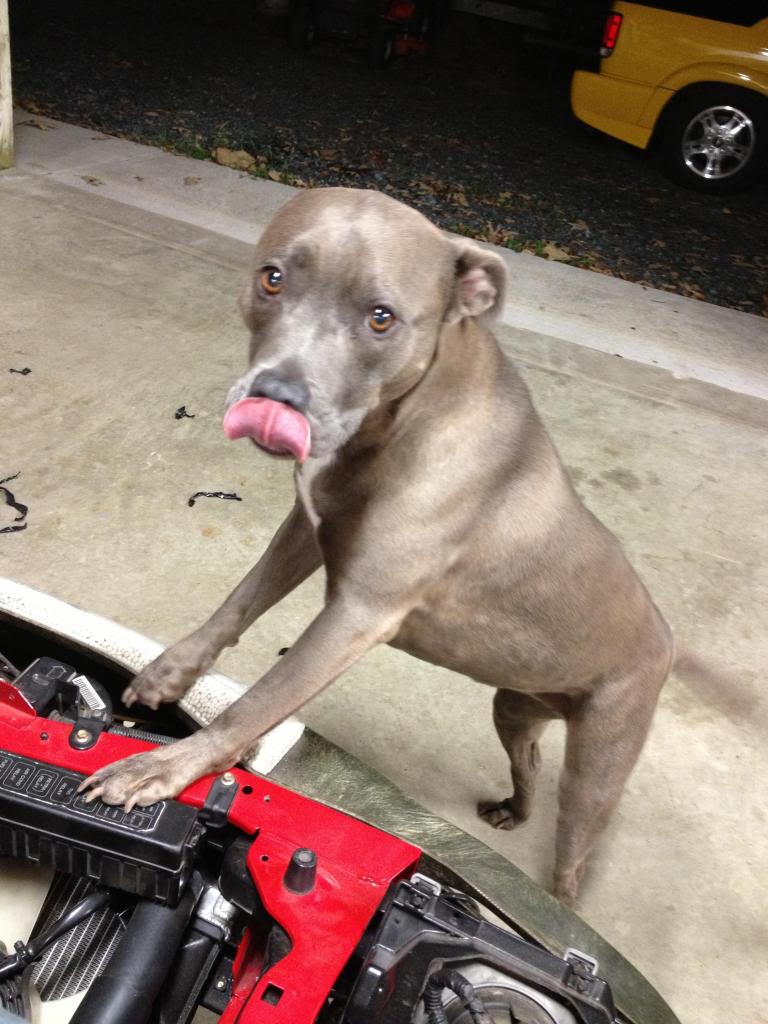
One of my helpers showed up to work!!!


One of my helpers showed up to work!!!
gdub, i recommend making a simple shield for the LIM to protect it from the inferno the turbo/manifold/dp will create (yours may be a little more difficult due to your fancy LIM):

also, i voice my love of Haltech on here all the time (and granted, it's a much better EMS, and much easier to use), but that Commander hand controller will always hold a special place in my heart. that little thing is so damn handy.
at one point i owned a S14 with a RB25DET and gt3076R in it (long story, and i'll never own another POS 240sx) that had a powerFC with datalogit and Commander. the car had a hiflow cat on it, but i failed my emissions test (nashville has sniffer test for pre-OBD2 cars). so i pulled back around to the entrance of the emissions testing, retarded the timing (coarse adjustment) with the Commander, re-tested, and passed with flying colors. then i turned the timing back to normal with the commander and drove home. i love that commander.
at one point i owned a S14 with a RB25DET and gt3076R in it (long story, and i'll never own another POS 240sx) that had a powerFC with datalogit and Commander. the car had a hiflow cat on it, but i failed my emissions test (nashville has sniffer test for pre-OBD2 cars). so i pulled back around to the entrance of the emissions testing, retarded the timing (coarse adjustment) with the Commander, re-tested, and passed with flying colors. then i turned the timing back to normal with the commander and drove home. i love that commander.
Thread Starter
Joined: Apr 2011
Posts: 806
Likes: 288
From: Millersville Md
Jacob
I did notice the heat shield you fabed up, which I like. Simple and effective. I was thinking about making one up that mounted off the bottom lim studs. Like you said tho my fancy lim (haha) makes it a lil more involved. To be honest I'm considering a lim blanket.
While I'm being so honest, I seriously considered haltech. After I noticed renesisfd incorporated the racepak in place of the stock gauge location it was the only other option I would take. Interior Real estate is important to me. I'm not one to have 8 gauges in my cabin. But like stated the hand controller is just one sweet piece of hardware. Md has sniffers too but my 93 is old enough for historic tags. I may take that option which means no more emissions. I have to research it a bit more first. I appreciate the comments/info
Recovering Milkaholic
iTrader: (7)
Joined: Jan 2002
Posts: 8,206
Likes: 0
From: Budds Creek, Maryland
I have historic tags on my jeep and for my Fd in Maryland. I used to have to tag my car in Saint Mary's county Maryland which did not require emissions testing. Anyway in regards to historic tag. Any twenty year old qualifies, no safety inspection or emissions tests will be required. It's really pretty sweet. Just pay tax, tags and title and you'll have tags the same day.
Thread Starter
Joined: Apr 2011
Posts: 806
Likes: 288
From: Millersville Md
Last couple nights have been tear down nights. Removed my door handles, window molding, seals, mirrors, and just about anything that would interfere with the body and paint work. I got the word last week that the first part of oct is when they are expecting me to drop her off. I bought all new windshield molding for the front and rear glass ( gets a new front windshield) and door trim, seals, new gas door, new headlight covers, and a few other odds and ends.
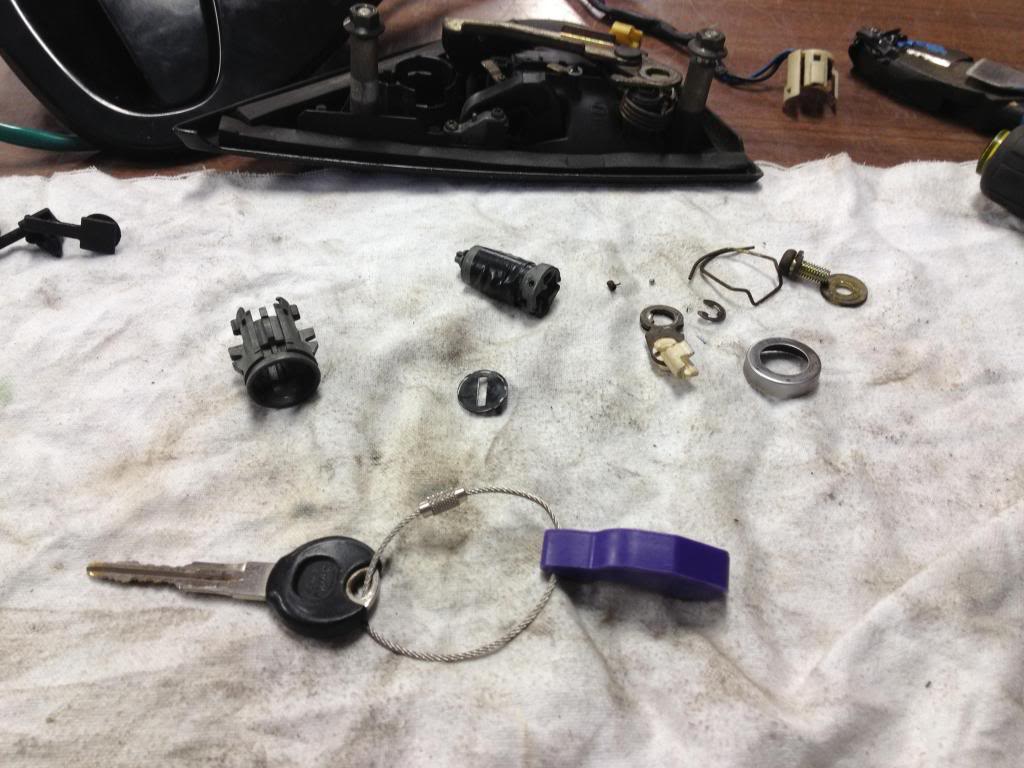
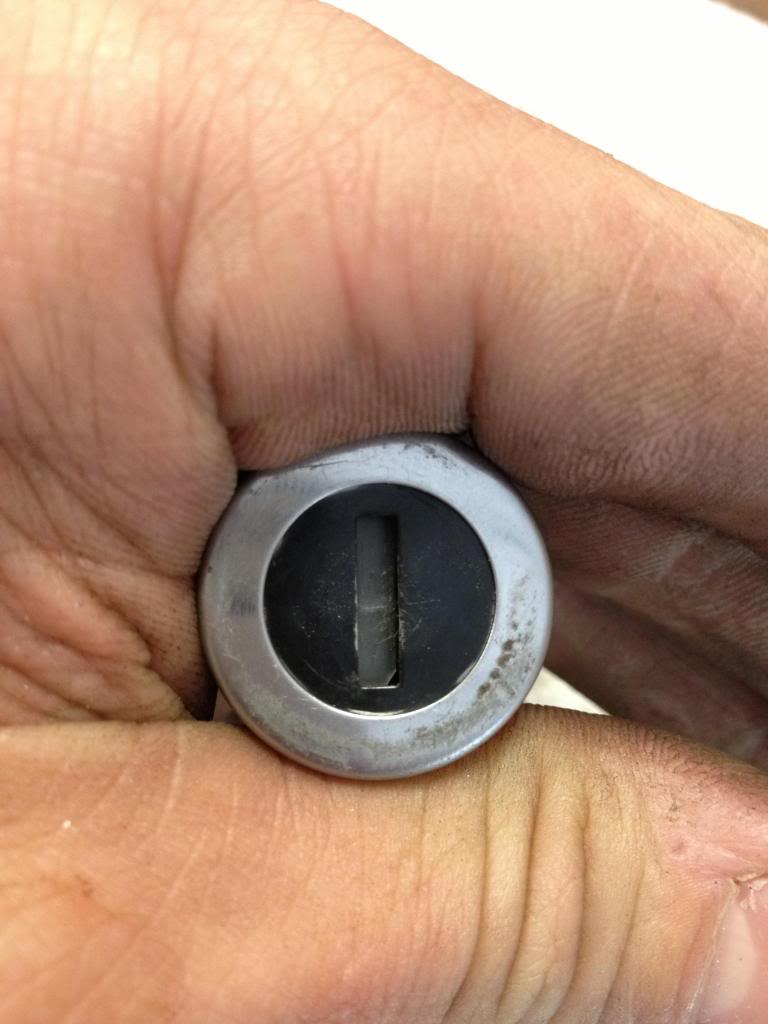
When i was taking my door handles out i noticed the little plastic door that covers the key hole was missing on the pass. side handle. I got ballsy and dissembled the key lock to see if i could repair it.
~ in the first picture you can see the lock assembly taken apart. The Phillips screw and washer are what hold the pull lever to the assembly. You remove them only to get the complete key cylinder and wires out. I later found that you can skip this step. The wires clip on the back of the cylinder and do not need to be removed.
The wire next to the screw is what retains the cylinder into the handle, simply remove it and pull the cylinder out.
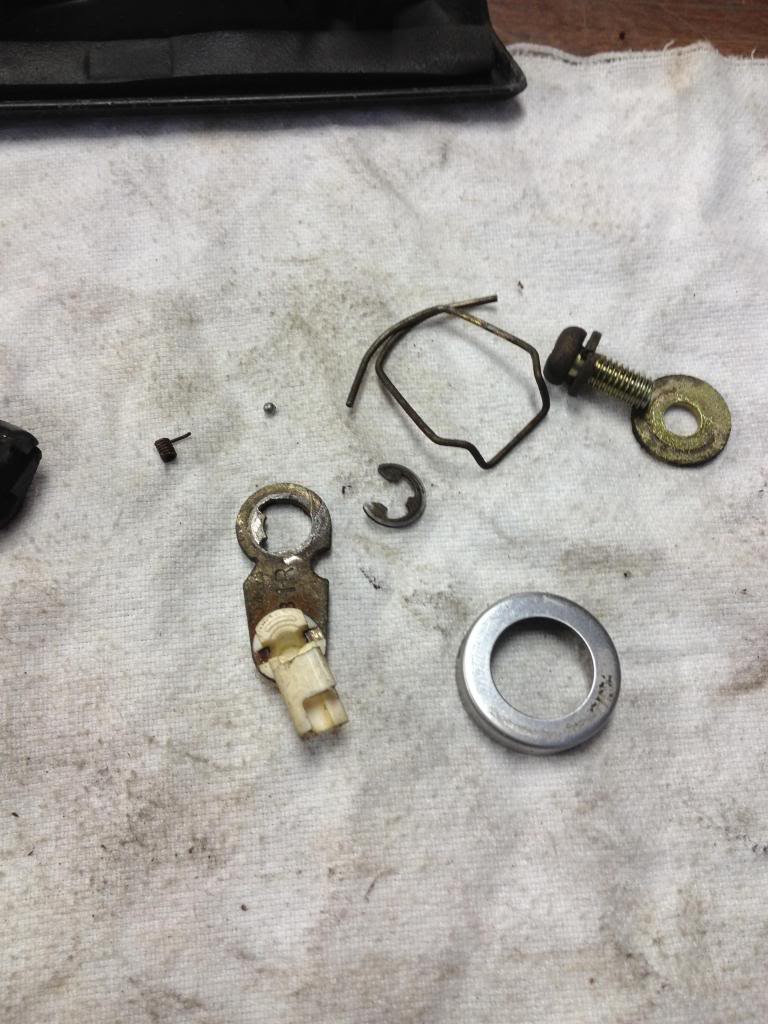
Now, i dissembled the lock lever arm by removing the c-clip on the back side. This is not necessary to fix the door tho.
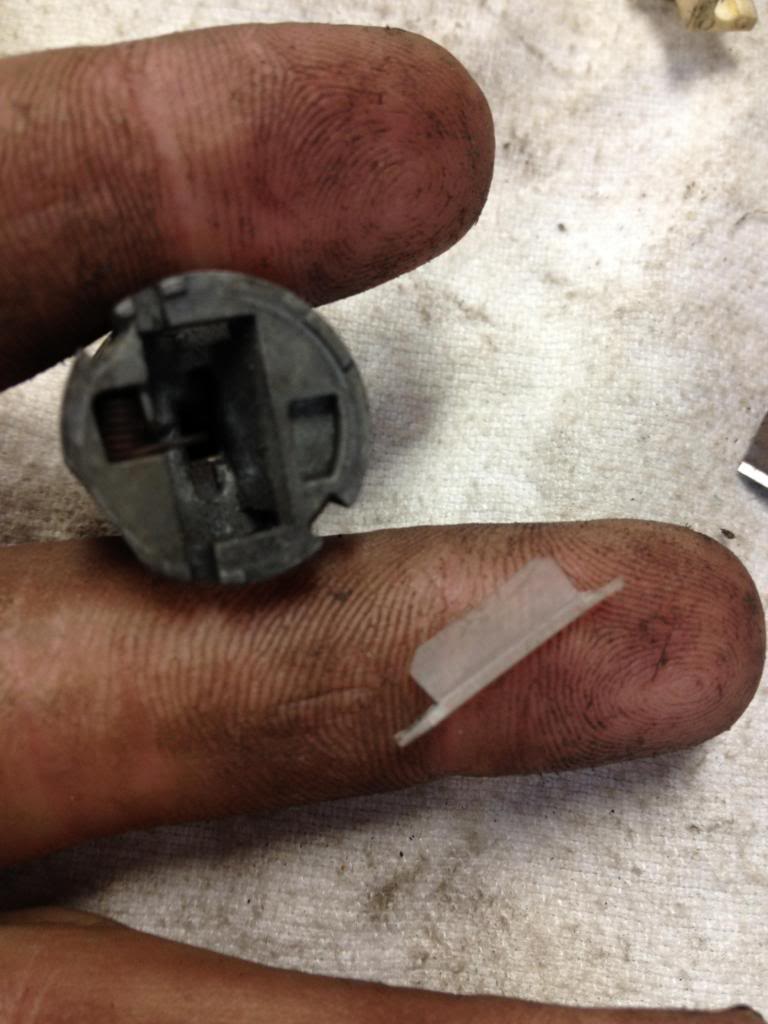
Before you remove the cylinder from the outer shell, insert your key fully so the tumblers do not fly out on you. After its removed put a pass of tape around it to hold them in place. OH AND AS YOU REMOVE THE INTER KEY CYLINDER FROM THE OUTER. DO NOT LOOSE THE LITTLE BALL BEARING AND SPRING THAT HOLD IT IN. See my picture for how small it is. The little ball bearing has a slot which will make more sense after you see it up close.
Remove the silver retaining ring and black key slot top. You will see how it works. A little spring (one next to the small ball bearing) pushes the door closed. My plastic slot cover was missing completely.
I made a new cover from the top of a plastic coffee can lid. Its a trial and error type thing here. But i did take a picture of how it looks.
After a few trims it fit well and operated as should.
Here is a shot of what it looks like after. Excuse the cut corner this was one of the first ones i made. Like is said its a trial and error deal. I made three before i had one that fit and worked correctly. I also re-painted the black key top but for some reason didn't take a completed shot
Hopefully this helps anyone out that is looking to fix theirs. I was hesitant at first but it turns out it was for nothing.
This sounds familiar


When i was taking my door handles out i noticed the little plastic door that covers the key hole was missing on the pass. side handle. I got ballsy and dissembled the key lock to see if i could repair it.
~ in the first picture you can see the lock assembly taken apart. The Phillips screw and washer are what hold the pull lever to the assembly. You remove them only to get the complete key cylinder and wires out. I later found that you can skip this step. The wires clip on the back of the cylinder and do not need to be removed.
The wire next to the screw is what retains the cylinder into the handle, simply remove it and pull the cylinder out.
Now, i dissembled the lock lever arm by removing the c-clip on the back side. This is not necessary to fix the door tho.
Before you remove the cylinder from the outer shell, insert your key fully so the tumblers do not fly out on you. After its removed put a pass of tape around it to hold them in place. OH AND AS YOU REMOVE THE INTER KEY CYLINDER FROM THE OUTER. DO NOT LOOSE THE LITTLE BALL BEARING AND SPRING THAT HOLD IT IN. See my picture for how small it is. The little ball bearing has a slot which will make more sense after you see it up close.
Remove the silver retaining ring and black key slot top. You will see how it works. A little spring (one next to the small ball bearing) pushes the door closed. My plastic slot cover was missing completely.
I made a new cover from the top of a plastic coffee can lid. Its a trial and error type thing here. But i did take a picture of how it looks.
After a few trims it fit well and operated as should.


Here is a shot of what it looks like after. Excuse the cut corner this was one of the first ones i made. Like is said its a trial and error deal. I made three before i had one that fit and worked correctly. I also re-painted the black key top but for some reason didn't take a completed shot
Hopefully this helps anyone out that is looking to fix theirs. I was hesitant at first but it turns out it was for nothing.

This sounds familiar

Thread Starter
Joined: Apr 2011
Posts: 806
Likes: 288
From: Millersville Md
Thanks man, I'm sticking with the vr. I originally was going to paint it white but after painting the engine bay I'm glad I chose the red. My painter is planning to use high reflective clear so it should have that "still wet" look when it's done.
Thank you
Thank you
Recovering Milkaholic
iTrader: (7)
Joined: Jan 2002
Posts: 8,206
Likes: 0
From: Budds Creek, Maryland
High reflective clear?
I've been in and around body shops most of my life and that's first time I've ever heard of that. I'm sure it will look awesome with the regular clear that your going to end up with.
I've been in and around body shops most of my life and that's first time I've ever heard of that. I'm sure it will look awesome with the regular clear that your going to end up with.
Thread Starter
Joined: Apr 2011
Posts: 806
Likes: 288
From: Millersville Md
Haha that's just his term for reducing the clear down on the final coat so it lays out. But I know what you mean. On a side note I used house of colors clear on a truck frame I did a few years back and it came out a lot better then some standard stuff Ive used in the past.
Recovering Milkaholic
iTrader: (7)
Joined: Jan 2002
Posts: 8,206
Likes: 0
From: Budds Creek, Maryland
Haha that's just his term for reducing the clear down on the final coat so it lays out. But I know what you mean. On a side note I used house of colors clear on a truck frame I did a few years back and it came out a lot better then some standard stuff Ive used in the past.
As you said though he is just using the terms. I just making sure you don't fall for the old board stretcher trick. Charging you for high reflective clear. It's all reflective.
Thread Starter
Joined: Apr 2011
Posts: 806
Likes: 288
From: Millersville Md
Well yea I agree with using better paint leaving better results , definitely going to be a difference in Nasom or HOK. I just sprayed my fd in HOK. Going more than 2-1 on the clear though isn't going to make it any more reflective. You still have to wet sand and buff so what's the difference if you reduce it down on the final coat?
As you said though he is just using the terms. I just making sure you don't fall for the old board stretcher trick. Charging you for high reflective clear. It's all reflective.
As you said though he is just using the terms. I just making sure you don't fall for the old board stretcher trick. Charging you for high reflective clear. It's all reflective.

Recovering Milkaholic
iTrader: (7)
Joined: Jan 2002
Posts: 8,206
Likes: 0
From: Budds Creek, Maryland
Thread Starter
Joined: Apr 2011
Posts: 806
Likes: 288
From: Millersville Md
Thread Starter
Joined: Apr 2011
Posts: 806
Likes: 288
From: Millersville Md
So its been a year since I went M.I.A. I'm not dead and you are probably wondering where I have been and what I have been up to. Its been an interesting year to say the least. With way to much to cover and to be honest re-live. But I will give you the short story. I moved a couple times, left my job and started working for myself, suffered a tragic loss of a dear friend and the old lady and I called it quits. Life has changed quite drastically for me. So I took some time to focus on myself. An the only thing that I can tell you I've learned about life is, it goes on.
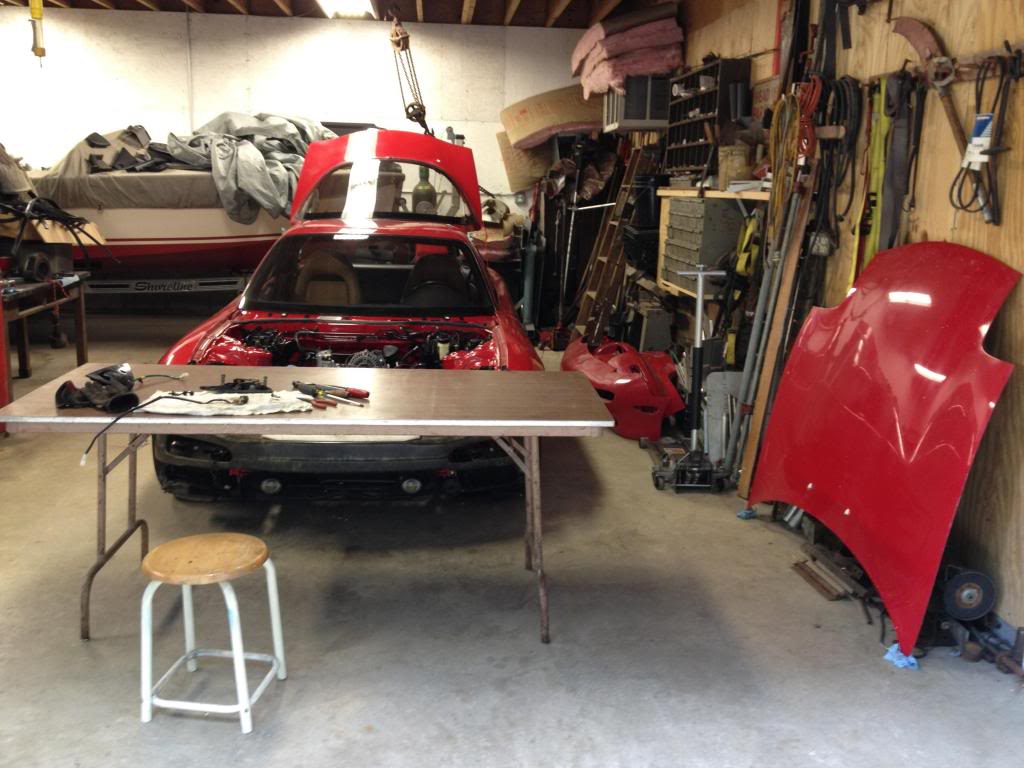
The car is making progress despite the setback of late. A friend that I raced with helped me get the metal work on the damaged quarter all straightened out and patched in along with the rusted out lower section on the other side. I took some time to roll all the fenders and quarters lips for future, removed the rock guard all the way around the car. I then welded up the rear wiper, rear window spray nozzle, and power antenna hole. Removed all the factory emblems and badges then filled the holes left behind. I started doing all the body work from that point, despite the fact that I loath doing body work in general. Fixed every ding, dent, scratch, chip, you name it I fixed it. I could go into hours of detail about the sanding, blocking, priming, blocking, priming, blocking, priming, blocking ~ now your getting the idea~ but I will spare you. I cant tell you how many times I've blocked this car because to be honest, I didn't keep track. But what I can tell you is this car is as straight and true as the day it came off the factory floor. Hell, probably better. I did stop and grab pictures of the process up to date. So with out further adieu.....
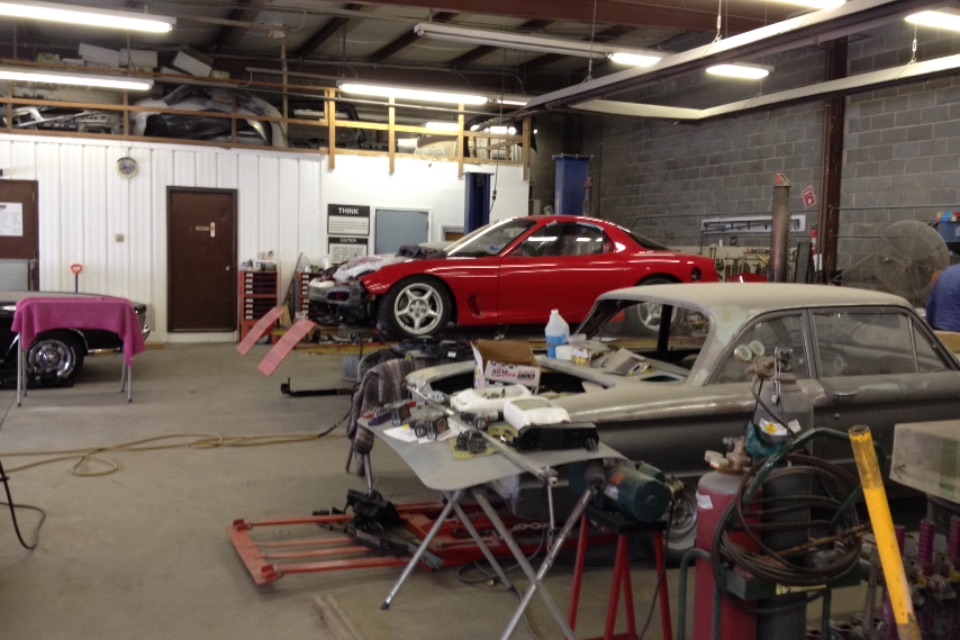
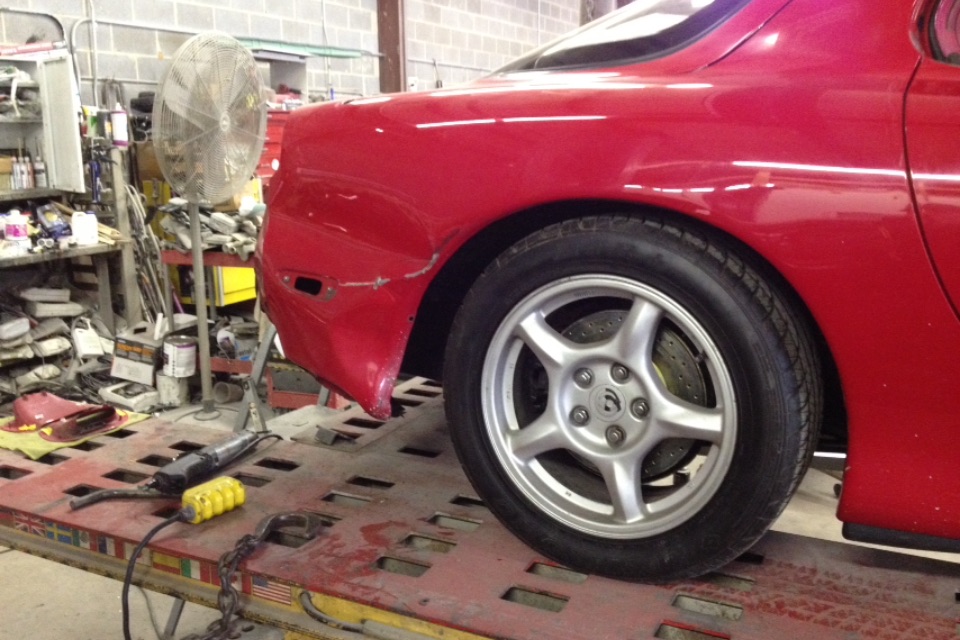
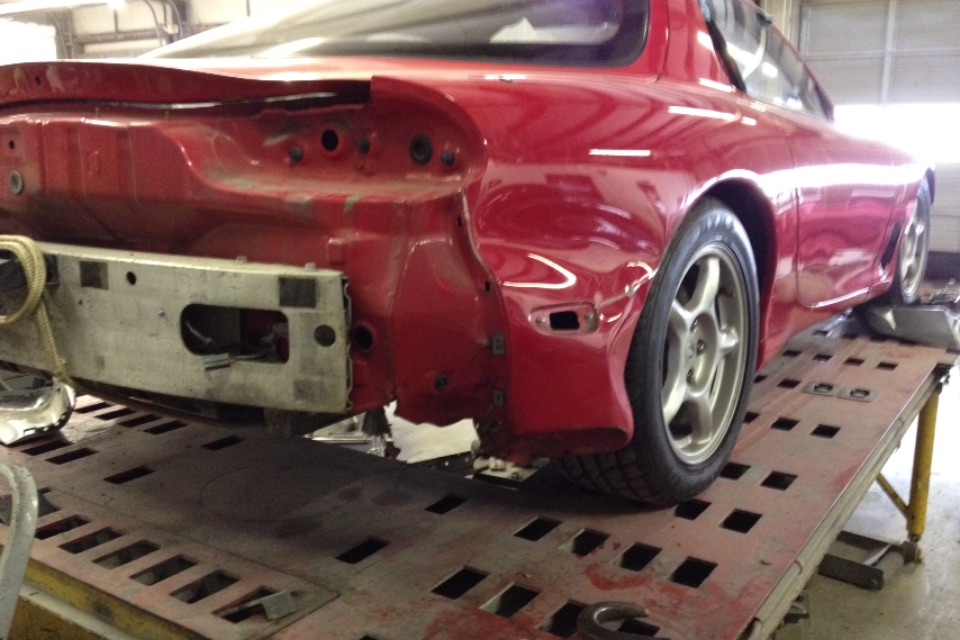
The car is making progress despite the setback of late. A friend that I raced with helped me get the metal work on the damaged quarter all straightened out and patched in along with the rusted out lower section on the other side. I took some time to roll all the fenders and quarters lips for future, removed the rock guard all the way around the car. I then welded up the rear wiper, rear window spray nozzle, and power antenna hole. Removed all the factory emblems and badges then filled the holes left behind. I started doing all the body work from that point, despite the fact that I loath doing body work in general. Fixed every ding, dent, scratch, chip, you name it I fixed it. I could go into hours of detail about the sanding, blocking, priming, blocking, priming, blocking, priming, blocking ~ now your getting the idea~ but I will spare you. I cant tell you how many times I've blocked this car because to be honest, I didn't keep track. But what I can tell you is this car is as straight and true as the day it came off the factory floor. Hell, probably better. I did stop and grab pictures of the process up to date. So with out further adieu.....


