
WRITEUP: D-gauge backlight to white color

Thread Starter
Vagina Junction
Joined: Mar 2001
Posts: 1,838
Likes: 0
From: Seattle, WA
WRITEUP: D-gauge backlight to white color
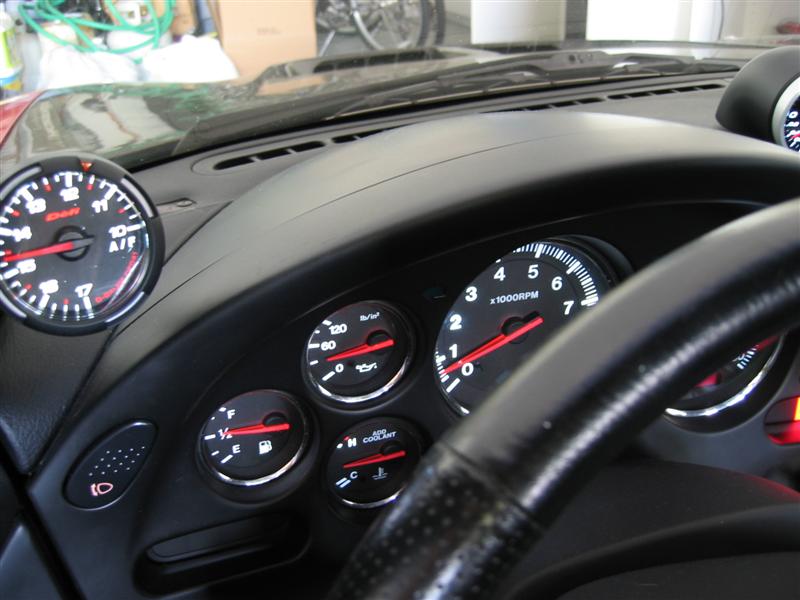
My goal when picking out gauges for my car was always to have a uniform coloration. When I chose the Defi BF gauges for their accuracy and beauty, it also left me to change the color of the other gauges I would use (Stock cluster and any other colored backlight gauges). I also demanded a series with an Air Fuel gauge, which Defi BF did not have in its lineup. Defi D-series, however, did have an A/F with a red backlight (similar to stock). This is the writeup to convert a Defi D-series gauge from the amber color to a white color similar to the BF series.
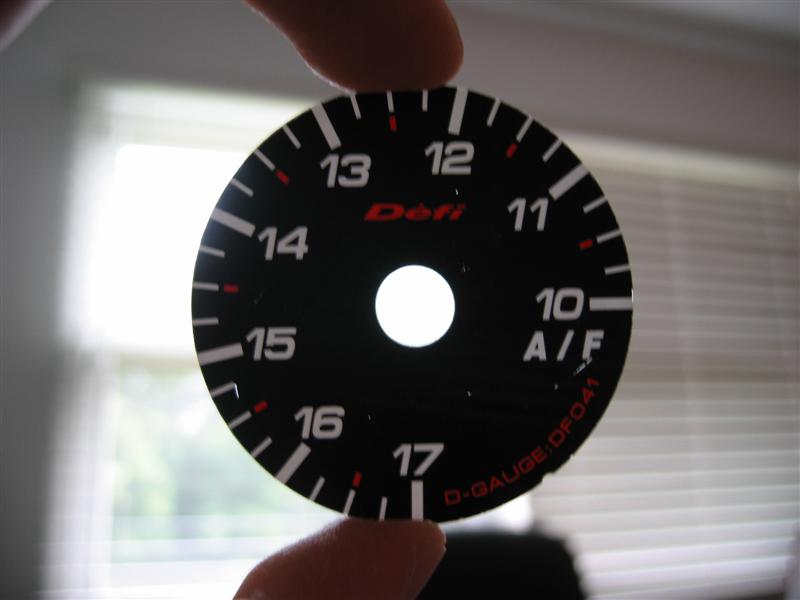
The gauge with the black bezel removed:

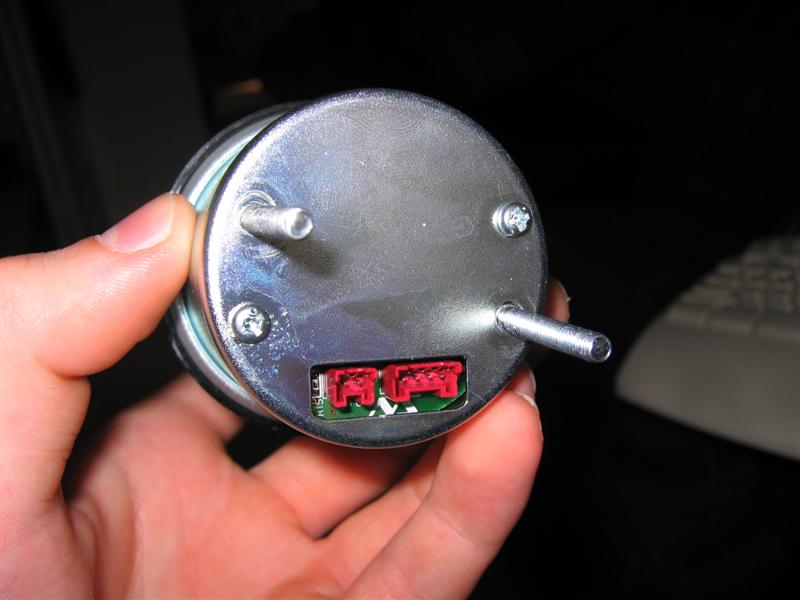
Rear of gauge
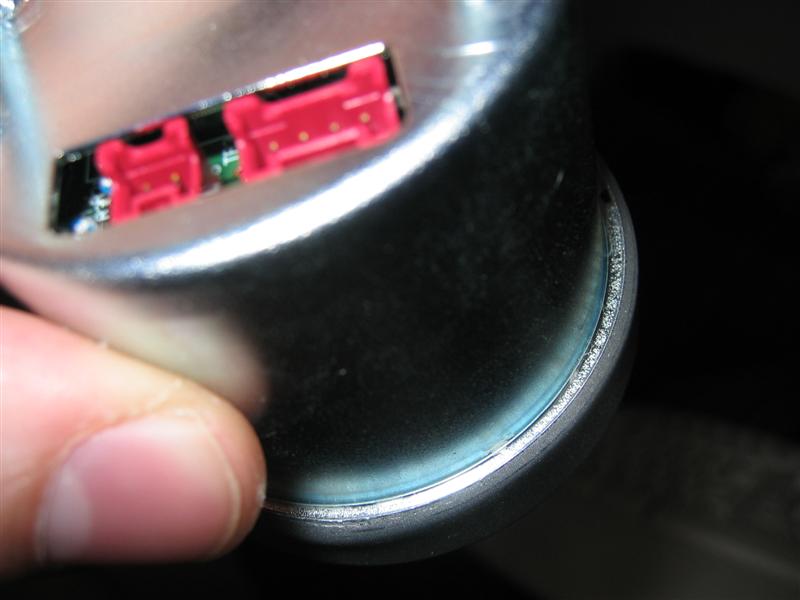
The metal surround is held onto the body by a beveled edge:
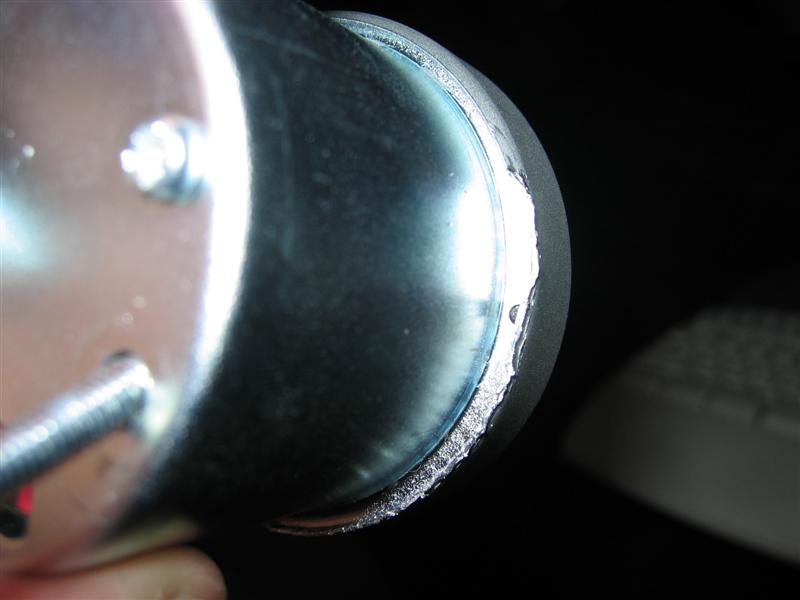
Simply bend this back all the way around the gauge (i used pliers)
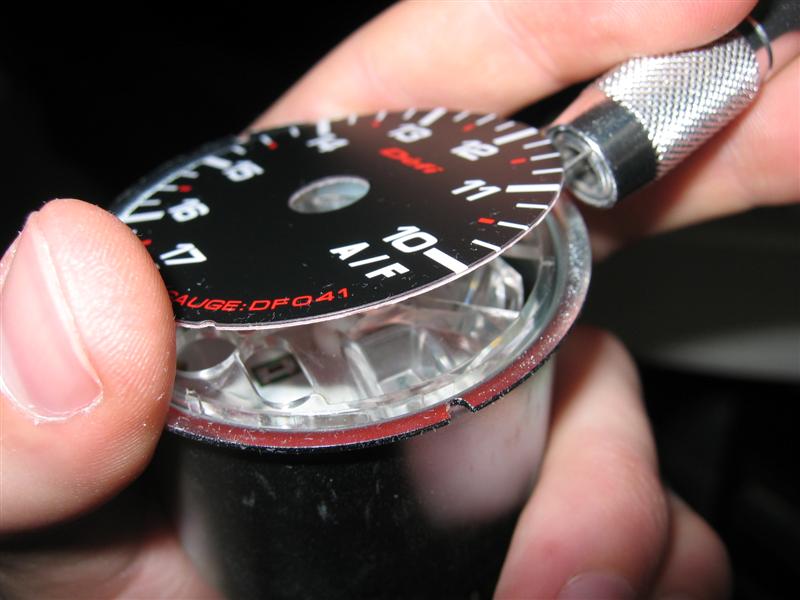
And gently remove the surround to reveal the unprotected face

The gauge with the black bezel removed:
Rear of gauge
The metal surround is held onto the body by a beveled edge:
Simply bend this back all the way around the gauge (i used pliers)
And gently remove the surround to reveal the unprotected face
Thread Starter
Vagina Junction
Joined: Mar 2001
Posts: 1,838
Likes: 0
From: Seattle, WA
Remove the needle. I found it was easiest to rotate it past the maximum to break the seal on the needle pin while gently pulling upwards away from the face.

Pry the face away from the unit. Better make a mark to remember the orientation for reinstallation.
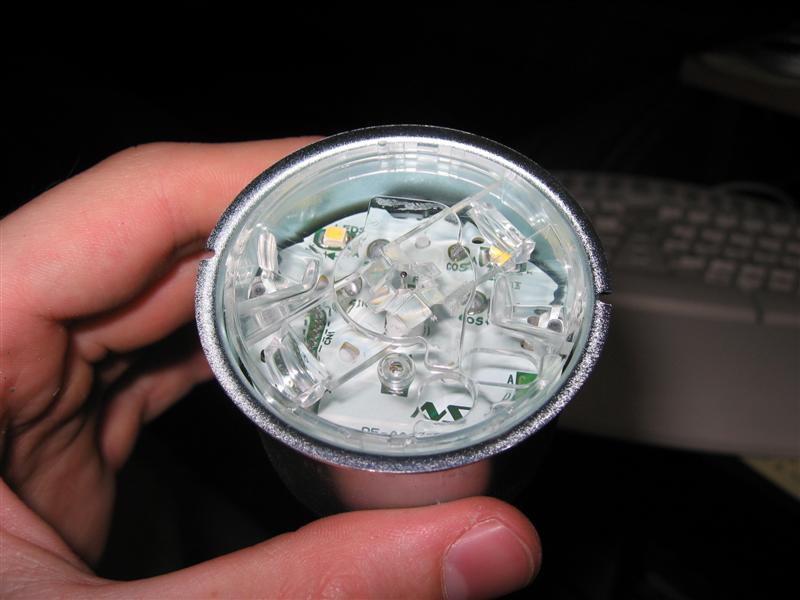
The light system (two LEDS (yellow bodied) at the 11 and 1 oclock positions of this picture)
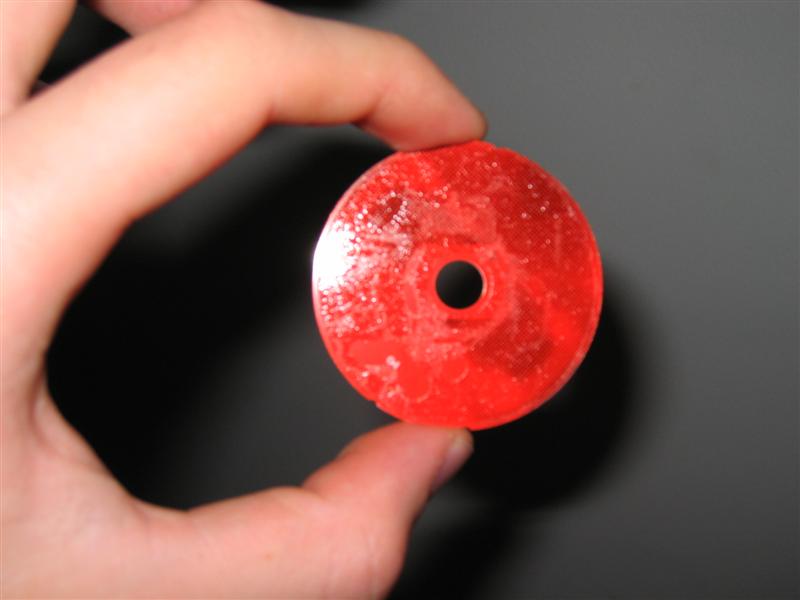
The rear of the gauge face. Red plastic film.
The workstation. I used 200 and 800 grit sandpaper to remove the film

Pry the face away from the unit. Better make a mark to remember the orientation for reinstallation.
The light system (two LEDS (yellow bodied) at the 11 and 1 oclock positions of this picture)
The rear of the gauge face. Red plastic film.
The workstation. I used 200 and 800 grit sandpaper to remove the film
Thread Starter
Vagina Junction
Joined: Mar 2001
Posts: 1,838
Likes: 0
From: Seattle, WA
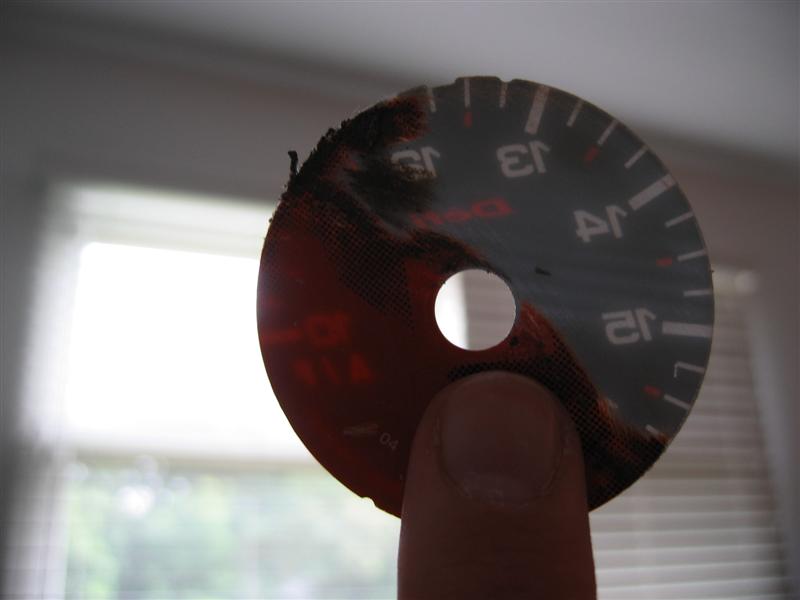
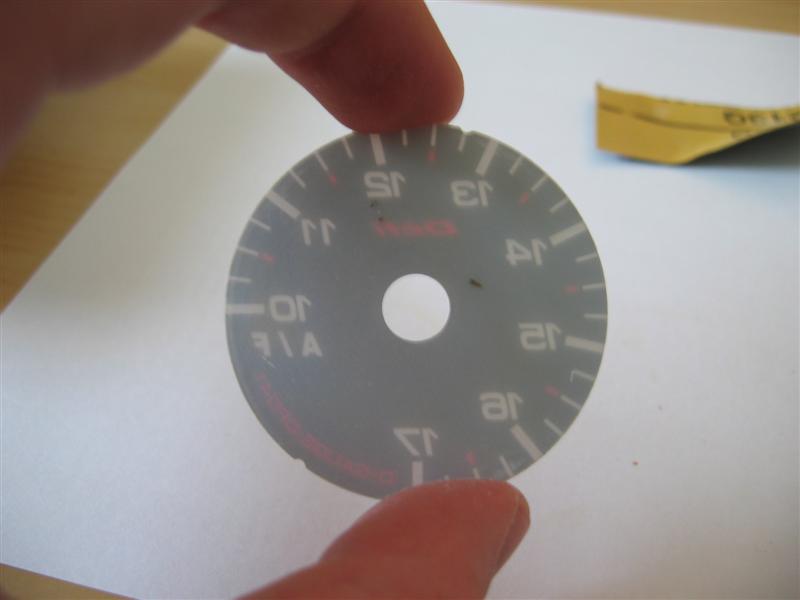
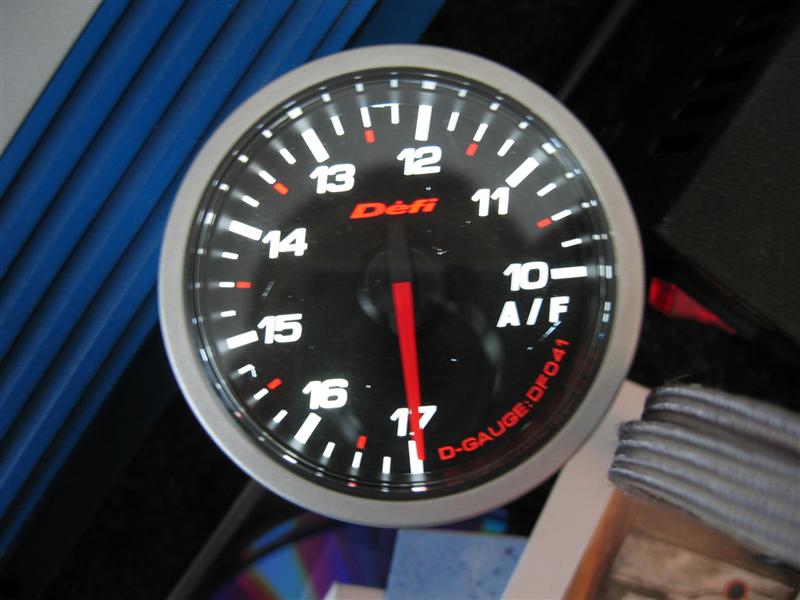
Halfway done, you can see the glue is turning black with rubbing. Make sure to rub AWAY from the areas clear of film, or sle the glue becomes a real bitch to remove.

The lighting differences
DONE!
All that is left is to reattach the face to the plastic light grid (i used clear double sided tape after the glue gun didn't work so well...cooled too quickly), then put the metal surround back on and bend the surround back around the lip. Here it is lit up!
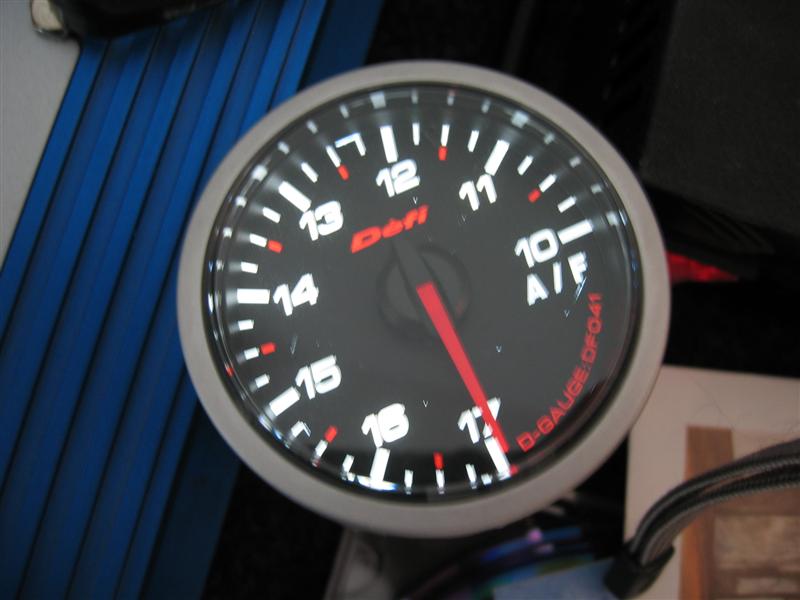
The lighting differences
DONE!
All that is left is to reattach the face to the plastic light grid (i used clear double sided tape after the glue gun didn't work so well...cooled too quickly), then put the metal surround back on and bend the surround back around the lip. Here it is lit up!
Thread Starter
Vagina Junction
Joined: Mar 2001
Posts: 1,838
Likes: 0
From: Seattle, WA
You can see some areas where I scratched the black part of the face. This is easilly rectified by using a black sharpie marker on the back so that light will not bleed through. I didn't do it, just because I was working quickly and didn't want to reassemble it again. Learn from my mistakes and check the lighting before you reinstall the metal hood.
I took a little bit of a risk by doing this to a brand new gauge, but...that's what i do
 I hope this helps those who want to make a conversaion, and the process is very similar to converting the stock cluster to white lights. I'll post a picture when I actually install it (could be a while). By the way, this WILL void your warrenty with Defi.

Thread Starter
Vagina Junction
Joined: Mar 2001
Posts: 1,838
Likes: 0
From: Seattle, WA
Originally Posted by eyecandy
Nice write up! I wonder if you could just respray the backing to change the color......
You can sand the film to white and use different colored LEDs, but that's about it (and that would require some de-soldering).

Trending Topics
Thread Starter
Vagina Junction
Joined: Mar 2001
Posts: 1,838
Likes: 0
From: Seattle, WA
Originally Posted by potatochobit
UHH
but the red matches the amber dash colors.......
but the red matches the amber dash colors.......


Rotary Enthusiast
Joined: Aug 2002
Posts: 1,050
Likes: 0
From: New York
This is by far the best guage setup. Black face, with white letters and red needles.
I envy you. Someday I'll have the vigor and means to convert all that is orange to pure white as well
Until then, Orange is fine :P
I envy you. Someday I'll have the vigor and means to convert all that is orange to pure white as well
Until then, Orange is fine :P
I'm doing the conversion to white faces on my cluster right now. Just a coincidence, but I took my Defi D white face boost gauge apart yesterday to see what I needed to change the color on it. From your pics, the black face has a much redder film than the white; the white is pure orange.
The problem with the white face gauges is that the backing film is kind of the base for the color of the letters/numbers on the face when the light is off (hard to explain). So if you got rid of the film on the back, then the letters/numbers on the face would be so light during the day that you would hardly be able t see them. I'm not sure it would work well at night either.
Nice write-up. I like the black face with the white backlighting.
BTW, I'll be posting my write-up on changing the stock gauges to white backlighting tonight when I get them installed and can get pics with the lights on.
Thread Starter
Vagina Junction
Joined: Mar 2001
Posts: 1,838
Likes: 0
From: Seattle, WA
Originally Posted by BOTTLEFED
Oh yeah, is that a wide-band a/f gauge?
I didn't think a narrow-band O2 sensor could read that high/low.
I didn't think a narrow-band O2 sensor could read that high/low.
Full Member
Joined: Sep 2004
Posts: 143
Likes: 0
From: Indianapolis, Indiana
That looks really nice. I love the look of the Defi D-gauges. I want to go for a Defi Boost, Oil Temp., and A/F with th AEM Uego. Does anyone know about the claims that the Mechanical Boost from Defi sucks? I know they aren't making it anymore. (Sorry about the change in subject)
Still on 1st engine
Joined: Jun 2003
Posts: 1,176
Likes: 1
From: SoCal
Way to go Hyperite!  I knew someone had to be crazy enough to rip apart a (rather expensive) Defi gauge.
How'd the metal bezel turn out after getting chewed up during disassembly? That was always my major concern...
I knew someone had to be crazy enough to rip apart a (rather expensive) Defi gauge. How'd the metal bezel turn out after getting chewed up during disassembly? That was always my major concern...
Thread Starter
Vagina Junction
Joined: Mar 2001
Posts: 1,838
Likes: 0
From: Seattle, WA
Originally Posted by InsaneGideon
Way to go Hyperite! I knew someone had to be crazy enough to rip apart a (rather expensive) Defi gauge.
How'd the metal bezel turn out after getting chewed up during disassembly? That was always my major concern...
I knew someone had to be crazy enough to rip apart a (rather expensive) Defi gauge. How'd the metal bezel turn out after getting chewed up during disassembly? That was always my major concern...
The bezel was indeed pretty chewed up, but as I ended up using the black bezel cover, it isn't visible at all since it is butted right up against the pod.
Driving at night for the first time tonight the D-series white has a definitely more "pure white" color than the other gauges which I'll consider "super white". Super white almost has a purpleish hue to it, while Pure white seems yellowish in comparison. BARELY distinguishable, but I can't help but stare at all my gauges

Dan Cernese
Joined: Aug 2001
Posts: 208
Likes: 0
From: Pepperell, MA
[revived thread]
The shop installing my Defi-Link Meter (not BF; needed 52mm) will be converting them from green to stock colors. They fabricated a tool to take the bezel off without chewing it up and used a solvent rather than sandpaper. I can't wait to see them.
Thanks for the write-up it continues to help!
The shop installing my Defi-Link Meter (not BF; needed 52mm) will be converting them from green to stock colors. They fabricated a tool to take the bezel off without chewing it up and used a solvent rather than sandpaper. I can't wait to see them.
Thanks for the write-up it continues to help!
Last edited by dhcernese; Nov 22, 2006 at 01:08 PM.

Archie is Gay
Joined: Feb 2006
Posts: 354
Likes: 1
From: San Diego
Originally Posted by dhcernese
[revived thread]
The shop installing my Defi-Link Meter (not BF; needed 52mm) will be converting them from green to stock colors. They fabricated a tool to take the bezel off without chewing it up and used a solvent rather than sandpaper. I can't wait to see them.
Thanks for the write-up it continues to help!
The shop installing my Defi-Link Meter (not BF; needed 52mm) will be converting them from green to stock colors. They fabricated a tool to take the bezel off without chewing it up and used a solvent rather than sandpaper. I can't wait to see them.
Thanks for the write-up it continues to help!
Oh yeah....you'll love the Link gauges. Had them on my last car and they were worth every penny.

Full Member
Joined: Mar 2005
Posts: 234
Likes: 0
From: Arroyo Grande, CA
I'm in the process of converting the backlight color on my Link Meter gauges right now. The backlighting on the Link gauges is quite a bit more complicated than the D series gauges. After trying several different ideas on a test gauge, I think I have it figured out.
I am using an auto gauge restoration shop to un-roll the bezel, and then crimp the bezel back in place once I am done. The Link gauge faces have a two color coating of green and then off-white. It appears to be put on with a printing process, and ethenol takes it right off. I am thinking on doing a write up when I'm all done.
By the way, the D gauge uses 3 white LED's, where the Link Meter uses 5 LED's. 3 green for the backlight, and two red that are directed through a prism to the pointer.
Rotary Freak
Joined: Dec 2001
Posts: 1,803
Likes: 0
From: Macungie, Pennsylvania
Originally Posted by Hyperite
No, since this is a red film, the only color you could respray it to would be black You can sand the film to white and use different colored LEDs, but that's about it (and that would require some de-soldering).
You can sand the film to white and use different colored LEDs, but that's about it (and that would require some de-soldering).Dan Cernese
Joined: Aug 2001
Posts: 208
Likes: 0
From: Pepperell, MA
Originally Posted by ReadyKW
I'm in the process of converting the backlight color on my Link Meter gauges right now. The backlighting on the Link gauges is quite a bit more complicated than the D series gauges. After trying several different ideas on a test gauge, I think I have it figured out.
I am using an auto gauge restoration shop to un-roll the bezel, and then crimp the bezel back in place once I am done. The Link gauge faces have a two color coating of green and then off-white. It appears to be put on with a printing process, and ethenol takes it right off. I am thinking on doing a write up when I'm all done.
By the way, the D gauge uses 3 white LED's, where the Link Meter uses 5 LED's. 3 green for the backlight, and two red that are directed through a prism to the pointer.
I am using an auto gauge restoration shop to un-roll the bezel, and then crimp the bezel back in place once I am done. The Link gauge faces have a two color coating of green and then off-white. It appears to be put on with a printing process, and ethenol takes it right off. I am thinking on doing a write up when I'm all done.
By the way, the D gauge uses 3 white LED's, where the Link Meter uses 5 LED's. 3 green for the backlight, and two red that are directed through a prism to the pointer.