When engines break (with pics)....
 07-30-05, 03:23 PM
#151
Thanks Tyler,
Ya, I expected a few problems. If everything went smooth then I would lose some respect for the real engine builders for who it all the time.
Order placed with Malloy Mazda this morning. Parts should be here Wednesday so I'll scrape out the Hylomar out of the seal grooves in a day or two and get ready to do it again.
 07-30-05, 10:55 PM
#153
Originally Posted by HDP
What is Hylomar? I searched and read that it's some sort of sealant, but what exactly is it?
Hylomar is impervious to oil, gasoline, glycol and other engine fluids. Hylomar is oxygen-sensor safe, seals gaps .01" or less, and performs at constant temperatures up to 600�F. With Hylomar, components are assembled, reused and reassembled with ease. Use Hylomar for thin gaps without a gasket or as a gasket dressing. It holds the gasket in place during assembly as well as giving a great seal.
Hope that helps.
08-07-05, 03:02 PM
#154

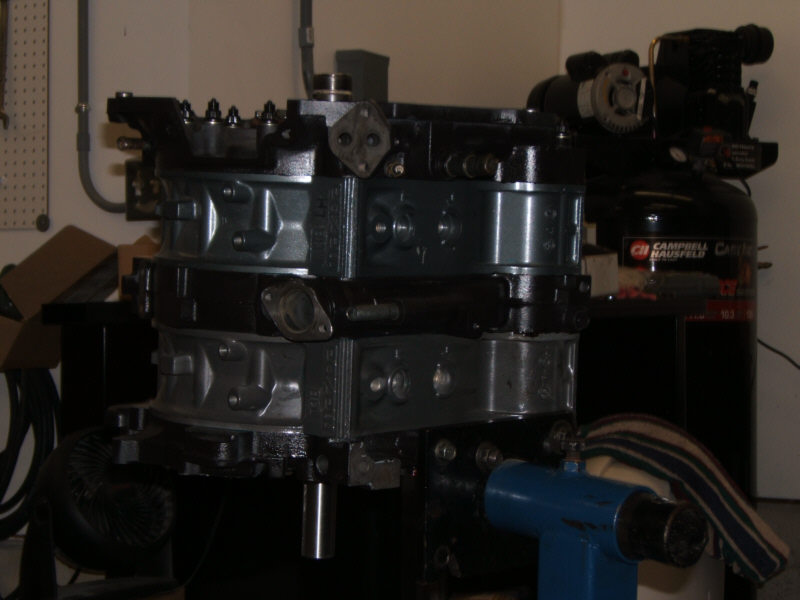
There we go, the assembled motor. Yes, the rotor housings are a different color.
I bought one used and didn't feel like repainting it. 
Above, the shot of the Racing Engine studs.
A note on the engine studs: They are designed to act like dowels so they should get screwed in before you start placing the housings on top of the front side housing. I didn't really look at them closely enough before hand, but we were able to screw them in with some Home Depot nuts and then get them torqued down.
The stock torque specs are around 28 ft/lbs for the engine studs. I used 45 ft/lbs for these.
The motor did make the "6 chugs" so it at least has some compression. Hopefully all will be well when it gets dropped back into the car. I'll post more pics as I get components stuck on but that's about all of my "allowed" garage time today.
I'd like to thank a few people who have helped get it this far:
Matt and Matt (two local mechanic guru's that always help get dirty)
RotaryResurrection (for answering n00b questions
)CrispyRX7 (always good to have input from people "in the know")
RTS3GEN (just "da man" when it comes to these cars)
Rynberg & AdamC & Damonb (for bugging me to get something done
 )
08-07-05, 03:34 PM
)
08-07-05, 03:34 PM
#155
Lives on the Forum
Join Date: Dec 2001
Location: San Lorenzo, California
Posts: 14,716
Likes: 0
Received 8 Likes
on
8 Posts
Haha, great to hear, Kyle! I really hope you don't have any more issues and everything goes smoothly....good luck.
BTW, your motor is further along than mine....
BTW, your motor is further along than mine....
08-07-05, 04:47 PM
#156
Obviously too late now, but for future reference, the teflon encapsulated o-rings from McMaster-Carr were very easy to work with.
http://fc3spro.com/TECH/MODS/ENGINE/...ING/tefsil.htm
FEP-Encapsulated Silicone O-Ring As568A Dash Number 175
Part # 9319K239
http://fc3spro.com/TECH/MODS/ENGINE/...ING/tefsil.htm
FEP-Encapsulated Silicone O-Ring As568A Dash Number 175
Part # 9319K239
08-07-05, 05:10 PM
#157
TRINGLS
Join Date: Apr 2004
Location: Clermont, FL
Posts: 1,053
Likes: 0
Received 0 Likes
on
0 Posts
Mahjik, What is the rear rotor housing coated in, spray on ceramic?
I'm thinking of coating my side/intermediate housings with ceramic as well as the exhaust header and exhaust side of the turbos... not sure if its worth it but it came out great on yours.
~Kris
I'm thinking of coating my side/intermediate housings with ceramic as well as the exhaust header and exhaust side of the turbos... not sure if its worth it but it came out great on yours.
~Kris
08-07-05, 06:11 PM
#158
Originally Posted by JaNusSolSumnus
Mahjik, What is the rear rotor housing coated in, spray on ceramic?
I'm thinking of coating my side/intermediate housings with ceramic as well as the exhaust header and exhaust side of the turbos... not sure if its worth it but it came out great on yours.
~Kris
I'm thinking of coating my side/intermediate housings with ceramic as well as the exhaust header and exhaust side of the turbos... not sure if its worth it but it came out great on yours.
~Kris
Honestly, I'm not sure what good it would do to coat them with anything. Coolant will be running through there all the time so it really shouldn't matter all that much.
08-07-05, 06:13 PM
#159
Originally Posted by rynberg
Haha, great to hear, Kyle! I really hope you don't have any more issues and everything goes smoothly....good luck.
Originally Posted by rynberg
BTW, your motor is further along than mine....
08-07-05, 06:15 PM
#160
Originally Posted by poss
Obviously too late now, but for future reference, the teflon encapsulated o-rings from McMaster-Carr were very easy to work with.
http://fc3spro.com/TECH/MODS/ENGINE/...ING/tefsil.htm
FEP-Encapsulated Silicone O-Ring As568A Dash Number 175
Part # 9319K239
http://fc3spro.com/TECH/MODS/ENGINE/...ING/tefsil.htm
FEP-Encapsulated Silicone O-Ring As568A Dash Number 175
Part # 9319K239
08-07-05, 10:17 PM
#161
The Man
Originally Posted by Mahjik
There we go, the assembled motor. Yes, the rotor housings are a different color.
I bought one used and didn't feel like repainting it. Above, the shot of the Racing Engine studs.
A note on the engine studs: They are designed to act like dowels so they should get screwed in before you start placing the housings on top of the front side housing. I didn't really look at them closely enough before hand, but we were able to screw them in with some Home Depot nuts and then get them torqued down.
The stock torque specs are around 28 ft/lbs for the engine studs. I used 45 ft/lbs for these.
The motor did make the "6 chugs" so it at least has some compression. Hopefully all will be well when it gets dropped back into the car. I'll post more pics as I get components stuck on but that's about all of my "allowed" garage time today.
I'd like to thank a few people who have helped get it this far:
Matt and Matt (two local mechanic guru's that always help get dirty)
RotaryResurrection (for answering n00b questions
)CrispyRX7 (always good to have input from people "in the know")
RTS3GEN (just "da man" when it comes to these cars)
Rynberg & AdamC & Damonb (for bugging me to get something done
)Wish I was closer so I could get dirty too! Like the idea for the racing studs. I'm going to talk with Cam this week about these. Wonder if you could replace the stockers while the motor is still together. BTW, like the torque specs!!!! Nice compromise. Cam is torquing his race engines to 50ft/lbs after I told him I torque my engine bolts to 58ft/lbs!
Art
08-08-05, 08:24 AM
#162
Originally Posted by RTS3GEN
Thanks Kyle,
Wish I was closer so I could get dirty too! Like the idea for the racing studs. I'm going to talk with Cam this week about these. Wonder if you could replace the stockers while the motor is still together. BTW, like the torque specs!!!! Nice compromise. Cam is torquing his race engines to 50ft/lbs after I told him I torque my engine bolts to 58ft/lbs!
Art
Thanks Art!
I was debating between 40 and 45ft/lbs and just figured what the heck.
As far as replacing your stock engine studs, I don't think that would be a good idea (I'm not sure releasing the torque on the plates would be a good thing if the engine isn't going to come apart). I'd just wait for your motor to "give up the ghost". You have a magic formula that has been working for years, so don't change it now!
08-08-05, 09:32 AM
#164
Lives on the Forum
Originally Posted by Mahjik
Rynberg & AdamC & Damonb (for bugging me to get something done )
)
08-20-05, 08:46 PM
#168
Originally Posted by HDP
No new/additional pics?
Once I get the front cover on, the oil pain sealed, etc... then I'll snap a few pics since those will at least show some decent progress over the last pics.
Originally Posted by rynberg
Good to hear. Good luck finishing her up.
 08-21-05, 05:46 AM
#169
TRINGLS
Join Date: Apr 2004
Location: Clermont, FL
Posts: 1,053
Likes: 0
Received 0 Likes
on
0 Posts
Better hurry with your buddy, I hear prices are on the rise.... I'm a sad panda still since I cant find a decent housing to save my life.... I feel like I'm never going to have a running car again.
Hopefully by this time next year I'll be able to do my own rebuilds (I plan on picking up a blown FC to play with) and wont have as much to worry about the next time the FD decides to get 'touchy'.
~Kris
Hopefully by this time next year I'll be able to do my own rebuilds (I plan on picking up a blown FC to play with) and wont have as much to worry about the next time the FD decides to get 'touchy'.
~Kris
08-21-05, 11:00 AM
#170
Originally Posted by JaNusSolSumnus
Better hurry with your buddy, I hear prices are on the rise....
Originally Posted by JaNusSolSumnus
I'm a sad panda still since I cant find a decent housing to save my life.... I feel like I'm never going to have a running car again.
09-01-05, 11:31 PM
#171
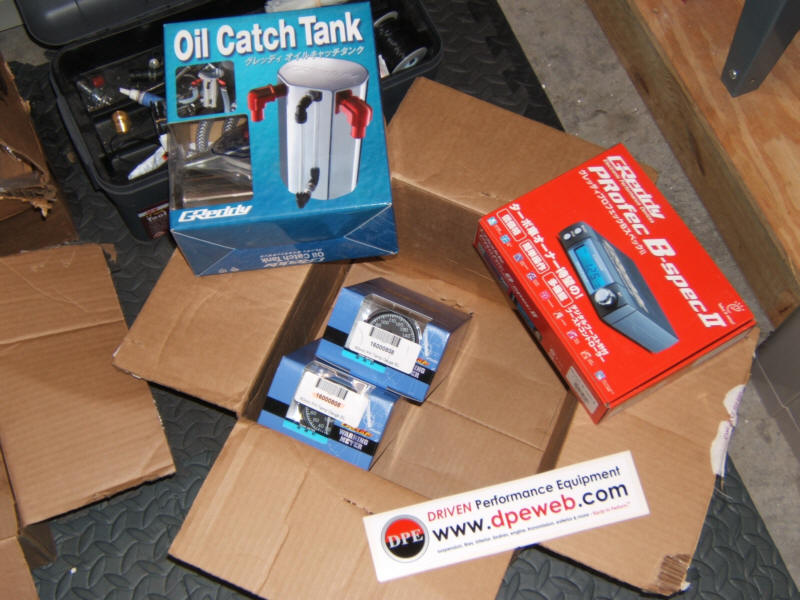
Thanks to the boys at http://www.dpeweb.com for hooking me up with the Greddy parts (catch can, 2 peak/hold temp gauges for water/oil, and the profec).
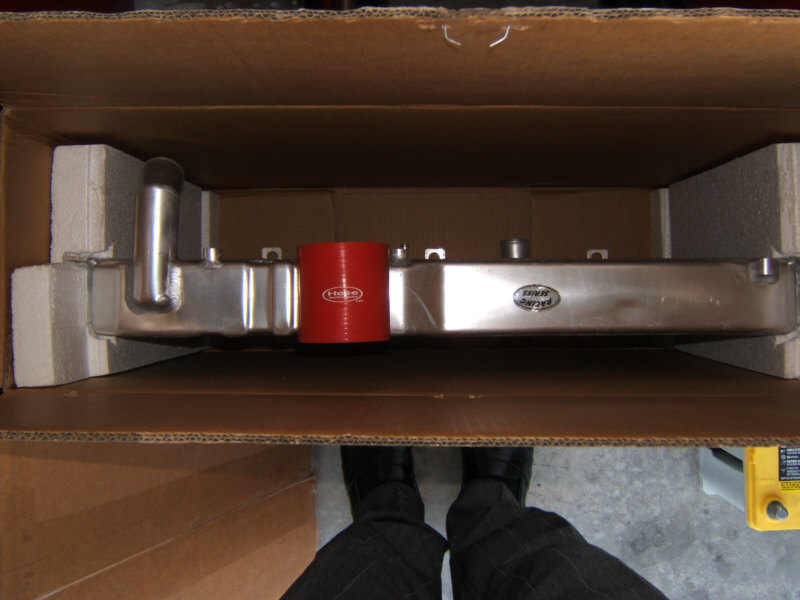
The race radiator from RadiatorWorld.com. Some people were interested in the size of it so I use a coupler to show the thickness.
 09-02-05, 10:23 PM
#173
3rd gen junkie
Join Date: May 2002
Location: san diego
Posts: 604
Likes: 0
Received 0 Likes
on
0 Posts
Mahjik, I'm really sorry, but I'm going to have to be another hater-- if you are truly serious about performance, the money for a real standalone (haltech, motec, etc) is well worth the investment.. you could find one for less than the cost of your chrome plating.
Maybe you think that your ECU wasn't the cause of the failure, but even so wouldn't you like better control of the tune of your engine? You have to have seen the condition your wiring harness was in-- i'm guessing it was bad? Haha.. mine was completely toast when I took it out. With a standalone, the car will simply run better than with the stock ECU and harness, from my experience anyway.
Good luck with everything and hope your car does what you want it to in the end.
Last edited by FCdemon; 09-02-05 at 10:40 PM.
09-03-05, 08:23 AM
#174
Originally Posted by FCdemon
Mahjik, I'm really sorry, but I'm going to have to be another hater-- if you are truly serious about performance, the money for a real standalone (haltech, motec, etc) is well worth the investment.. you could find one for less than the cost of your chrome plating.
Originally Posted by FCdemon
Maybe you think that your ECU wasn't the cause of the failure, but even so wouldn't you like better control of the tune of your engine?
I'm not saying I'll never have a programmable standalone ECU, it's just not in the scope/budget for this project. When/if I go with a programmable standalone, I'll just go with a small single turbo setup as well. However, I'll most likely sell the car and build a track-only NSX before I would go through that.
Originally Posted by FCdemon
You have to have seen the condition your wiring harness was in-- i'm guessing it was bad? Haha.. mine was completely toast when I took it out.