
Porting Waste Gate & Completing Non-Seq

Thread Starter
Eats, Sleeps, Dreams Rotary
Joined: May 2003
Posts: 3,639
Likes: 0
From: MIA
Porting Waste Gate & Completing Non-Seq
Finally got the turbo's off to fix the metal pipe with the coolant leak. While their off, I'd like to port the waste gate and remove the flappers from the "exhaust manifold?". Is it the exhaust manifold that has the flapper, and the flapper on the turbo's that has the wastegate? Anyone got pics would be greatly apprecieated.
Thread Starter
Eats, Sleeps, Dreams Rotary
Joined: May 2003
Posts: 3,639
Likes: 0
From: MIA
Originally Posted by 2a+RoN
I took out both the pre-control and TCA flappers and welded the holes shut. The wastegate is the one on the primary turbo hot side I believe and the TCA is on the manifold.
Trending Topics
Thread Starter
Eats, Sleeps, Dreams Rotary
Joined: May 2003
Posts: 3,639
Likes: 0
From: MIA
Im going to head over there now, pick up the turbo's and the exhaust manifold and take pics for you guys. I need this done by tonight if not im going to get charged for it having to stay another day.
Senior Member
Joined: May 2001
Posts: 583
Likes: 0
From: S.F. Bay Area, CA
the waste gate is not the easier one to get to. The port that is plainly visible is the TCA. To port the wastegate, you will need to remove the turbo with the wategate from the manifold. I did mine that way, but did not actually disassemble the actual turbo. Just make sure to tape up all the ports so that the metal filings do not damage your turbines when you start it up....


Senior Member
Joined: May 2001
Posts: 583
Likes: 0
From: S.F. Bay Area, CA
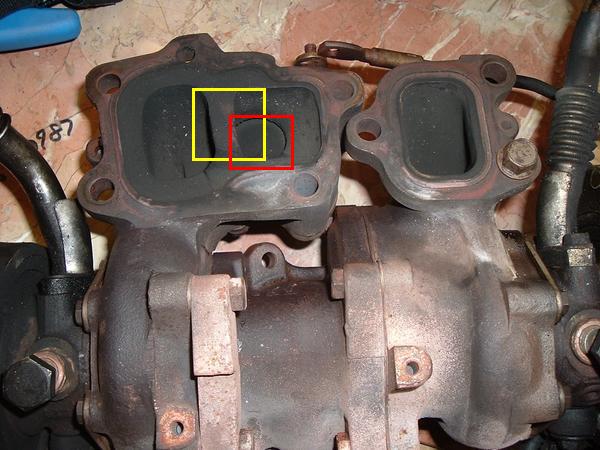
Originally Posted by Fatman0203
RedSquare: Is this the pre-control?
Yellow Square: Can I cut this piece out to stop the crack from spreading and probably provide better flow?
Yellow Square: Can I cut this piece out to stop the crack from spreading and probably provide better flow?
you should not cut out that flange that separates those two ports- it's not part of the wastegate anyway.
Last edited by overkill; Sep 22, 2004 at 07:43 PM.
I AM A THEIF - I also go by EVIL7
Joined: Sep 2004
Posts: 167
Likes: 0
From: tx
Originally Posted by Fatman0203
Anyone else know?
This is the way I did it. I did not remove the pre-control. I welded it 90% open.
I did remove the turbo control(the one in the exhaust manifold itself. I removed the primary turbo from the housing and I bored out the wastegate hole to 1.24"
This is the instructions that I followed. The second set is a little more specific than the first.
http://www.scuderiaciriani.com/rx7/non-sequential.html
36. Open the pre-control gate approx 90% and have welded in this position (you want the gate to be opened and be even with the turbine chamber flow path..IE less exhaust drag). The weld goes around the base of the lever that the pre-control actuator clipped to. DO not weld on the inside of the turbine housing in any way, shape or form, and do not simply tack this as it could come loose.
.
The Turbo Pre-control gate should be welded open. The weld goes at the
base of the outside control arm, and should be welded good, not just
tacked. (preferably TIG welded, but a good wire feed is acceptable for
this)
The turbo control gate in the manifold has got to be removed and the hole
tapped for pipe threads, and a cast iron pipe plug installed.
Thread Starter
Eats, Sleeps, Dreams Rotary
Joined: May 2003
Posts: 3,639
Likes: 0
From: MIA
Any idea why it shouldnt be removed? I dont really want to be a guinea pig, but I would like to know whats the big deal about just not getting rid of the flapper all together instead of 90% open deal.
I AM A THEIF - I also go by EVIL7
Joined: Sep 2004
Posts: 167
Likes: 0
From: tx
Originally Posted by Fatman0203
whats the big deal about just not getting rid of the flapper all together instead of 90% open deal.
(you want the gate to be opened and be even with the turbine chamber flow path..IE less exhaust drag).
READ READ READ!!!!! lol
If you look closely at the setup you will understand... If you take it out you will disrupt the exhaust flow
Thread Starter
Eats, Sleeps, Dreams Rotary
Joined: May 2003
Posts: 3,639
Likes: 0
From: MIA
Originally Posted by xb2002
(you want the gate to be opened and be even with the turbine chamber flow path..IE less exhaust drag).
READ READ READ!!!!! lol
If you look closely at the setup you will understand... If you take it out you will disrupt the exhaust flow
READ READ READ!!!!! lol
If you look closely at the setup you will understand... If you take it out you will disrupt the exhaust flow
Thread Starter
Eats, Sleeps, Dreams Rotary
Joined: May 2003
Posts: 3,639
Likes: 0
From: MIA
BTW, looks like I may not be able to take off the flapper thats on the exhaust manifold. Does it make a difference? I had it held open with wire, and it ran hard, does it make any difference at all?

I AM A THEIF - I also go by EVIL7
Joined: Sep 2004
Posts: 167
Likes: 0
From: tx
Originally Posted by Fatman0203
I guess =/, whats 90% btw? As open as I can get it with the rod in the back?
Originally Posted by Fatman0203
BTW, looks like I may not be able to take off the flapper thats on the exhaust manifold. Does it make a difference? I had it held open with wire, and it ran hard, does it make any difference at all?
Yes it does make a difference as it will restrict exhaust flow. Take a die grinder with a cut off wheel (or a hacksaw) and just cut the arm off by cutting the shaft itself above the arm (between manifold and the arm). Then the flapper will slide out of the manifold. You will need to tap the hole to a 3/8" pipe and install a cast iron plug to prevent cracking.... hope this helps
Thread Starter
Eats, Sleeps, Dreams Rotary
Joined: May 2003
Posts: 3,639
Likes: 0
From: MIA
Originally Posted by xb2002
take the rod off, and the actuator for the pre control... put the block off plate on the housing covering the pre control flapper. open the pre control flapper (by the arm) until it makes slight contact with the plate. Make a index mark and weld it in place (open).
Originally Posted by xb2002
Yes it does make a difference as it will restrict exhaust flow. Take a die grinder with a cut off wheel (or a hacksaw) and just cut the arm off by
cutting the shaft itself above the arm (between manifold and the arm). Then the flapper will slide out of the manifold. You will need to tap the hole to a 3/8" pipe and install a cast iron plug to prevent cracking.... hope this helps
cutting the shaft itself above the arm (between manifold and the arm). Then the flapper will slide out of the manifold. You will need to tap the hole to a 3/8" pipe and install a cast iron plug to prevent cracking.... hope this helps