
oil pan gasket or not?

With a brace grooved to match the protrusions from the bead, you are effectively increasing the thickness of the pan flange AND maintaining the same areas of pressure. These areas include around the bolt holes and either side of the beads. You could trace an unbroken line from a point all the way around the pan and back to it's origin where there is an even amount of presssure along that line.
With an ungrooved brace, if I'm understanding the design correctly (as a flat piece of metal), you are transferring pressure only to the raised bead. This sacrifices pressure between bolt holes where there is no bead. In addition, most of the pressure would be at the surface areas where the bead transitions to flat flange and not all the way across the width of the flange due to the metal deforming without any reinforcement.
I've made a simple graph to show what this means.
White spaces you see are where gaps are (pressed bead on the oil pan and space between flat brace and the oil pan).
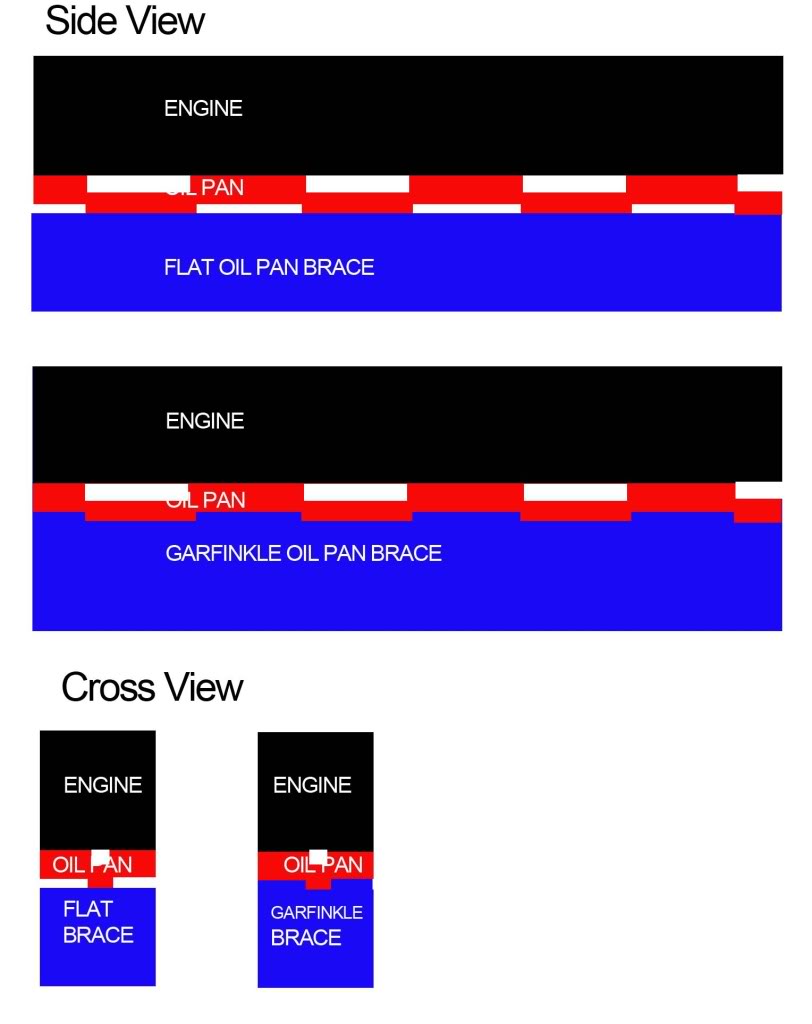
Let me also post what these grooves are on stock oil pan by showing Garfinkle oil pan brace. Here is one from one of the forsale post from a friend of mine 'caredden'.

As mentioned by alexdimen, when using flat brace, you are only putting pressure by the bead area. And if you compare the area of the beads vs. flat area of the oil pan, you see its drastic different.
Also, as I've mentioned earlier, oil pan beads must be flatten to truly have equal pressure around the pan. Not sure what kind of pressure is require to flatten.
If you also look at the motor mount area and the torque used on the oil pan area is far greater than the 10mm bolts surrounding the pan. My guess is that far greater pressure is put on by the motor mount bolts might flatten the oil pan beads more than other portions. This creating uneven spacing between the pan and the flat brace.
Where as Garfinkle brace will distribute this pressure evenly as flat surface of the oil pan is where flat surface of the brace will touch. Also, the grooves in the brace will actually help engine torque as grooves will help the metal to NOT bend certain direction.
Again, this is the reasoning why I bought Garfinkle oil pan brace vs other flat oil pan brace sold by various vendors. And I do not think this is inferior in any means. To me its FAR SUPERIOR than any oil pan braces out there.
Last edited by Herblenny; Feb 22, 2010 at 08:20 AM.
I can only explain this from a conceptual standpoint. I'm not using any brace at all. In my application it is not necessary with the right stuff sealant.
I did read the thread about the flat brace and how it's purpose is to put pressure directly on the beads. This is because they correspond to the mating points between irons/housings, which are prone to leaking. I will say that some people may have found this necessary; I don't know because I've never had a problem with leaks since I removed the gasket. However, when you are sealing a flange, you want each surface perfectly rigid, perfectly flat, and with equal pressure at every point on the flange surface.
Also, I was under the impression that oil pan leaks occurred mainly around the engine mounts when using a gasket because repeated compression of the gasket from arresting engine movement reduced it's thickness. I got this impression from my own experience and seeing what other's went through.
I have a couple questions...
What are the advantages of any pan brace when not using a gasket? Are there complications that arise from producing more horsepower and stress on the block, requiring more rigidity? Why are they leaking from where the irons meet the rotor housings?

Junior Member
Joined: Dec 2003
Posts: 47
Likes: 0
From: なごや
I used the listed mazda sealant, probably the most expensive sealant I have ever purchased. It works well, 2 years, no leaks, no brace.
Haha. What did I get myself into?
I can only explain this from a conceptual standpoint. I'm not using any brace at all. In my application it is not necessary with the right stuff sealant.
I did read the thread about the flat brace and how it's purpose is to put pressure directly on the beads. This is because they correspond to the mating points between irons/housings, which are prone to leaking. I will say that some people may have found this necessary; I don't know because I've never had a problem with leaks since I removed the gasket. However, when you are sealing a flange, you want each surface perfectly rigid, perfectly flat, and with equal pressure at every point on the flange surface.
Also, I was under the impression that oil pan leaks occurred mainly around the engine mounts when using a gasket because repeated compression of the gasket from arresting engine movement reduced it's thickness. I got this impression from my own experience and seeing what other's went through.

I read about Bonzai's explanation using UIM to LIM gasket. But that's because its completely surrounds the opening. If FD oil pan beads are continuous and completely surrounds the opening, I would agree, but it doesn't as pictures of grooves I posted using Garfinkle's pan brace.
I also agree that using good sealant and proper install will reduce oil leak. I never had issues with oil leak without the brace nor after using the brace. But I think for higher horse power, i think it gives bit more structural rigidity to the engine... And this becomes more important when the brace sit flush with the pan and not sit on the beads of the oil pan (see my diagram in previous post). In order to sit flush, it will require the grooves on the brace to do so. Also the grooves themselves will help with brace flexing certain direction. I believe these grooves are at point where irons and aluminum housings meet.
I have a couple questions...
What are the advantages of any pan brace when not using a gasket? Are there complications that arise from producing more horsepower and stress on the block, requiring more rigidity? Why are they leaking from where the irons meet the rotor housings?
What are the advantages of any pan brace when not using a gasket? Are there complications that arise from producing more horsepower and stress on the block, requiring more rigidity? Why are they leaking from where the irons meet the rotor housings?
irons and aluminum rotor housings will move because of torque produced by the engine. This is another reason why some people like to add additional dowel pins, thicker dowel pins, or tighter tolerance dowel pin to the housings.. This all to keep the motor in structural form when sees torque. I think when the irons and aluminum rotary housing move, seal gets broken by the oil pan (especially when gasket is old and cracks much easier). Hence oil leak. Sealant seems to be bit better as its more flexible and forms around these movements (in my opinion but I don't have facts). But thicker oil pan brace will help as it will reduce iron/housing movement. This is mainly why I want one of these for my 20B project. But thicker oil pan brace to hold the motor bit more stable during torque. I also believe that grooves will reduce bending when pan experiences pressure. Again, this is my thought process and if I'm wrong, please someone correct me.
Last edited by Herblenny; Feb 22, 2010 at 09:28 AM.
This has been bothering me so, I have to respond.
Again, I own this motor mounts and I personally think its better than most out there and its quite rude that you think its "worst design for motor mounts" for the FDs.
Here is my thoughts on the mounts and I quite think opposite to your opinion as its quite well thought of.
For instance.. look that the mounts you commonly see.. Most aftermarket ones are a cylinder cut, drilled and using stock mounts and put a bolt through it. When engine vibrates, the metal contact from the head of the bolt, thread of the bolt, transfers the vibration to the subframe. Look at Mazda OEM mounts.. no metal bolts are inserted in the middle but solid rubber glued in between.
Now Let's look at Garfinkle's mounts.
As you could see, the bolt is surrounded by the bushing.. hence no metal to metal contact to transfer the vibration as easily as ones with sandwich type aftermarket mounts. Also, Garfinkle cut these appropriate length to compensate the oil pan brace height and puts the motor stock height. Again, well thought of.
I am not backing Garfinkle because I know the guy, but because I spent my hard earned money buying things I believe to be good. I think anyone would be insulted if someone tells you you bought the "worst design for motor mounts", which pretty much tells you you wasted your hard earn money.... One thing coming from an individual, but coming from another vendor seems uncall for. At least post a reason why its the "worst design for motor mounts" for our cars...

guys,
i have problems with my engine mounts.
today i remove them to and one is completely broken rubber. what can i do?
are the aluminium and steel intercheangeble?
what options do i have?
for what i searhed so far i found:
1-make in a lathe pvc rings
2-those garfinkles look nice
thanks!!
i have problems with my engine mounts.
today i remove them to and one is completely broken rubber. what can i do?
are the aluminium and steel intercheangeble?
what options do i have?
for what i searhed so far i found:
1-make in a lathe pvc rings
2-those garfinkles look nice
thanks!!


Banzai also carries aftermarket mounts. -----> http://banzai-racing.com/store/FD_po...mounts.html#34
guys,
i have problems with my engine mounts.
today i remove them to and one is completely broken rubber. what can i do?
are the aluminium and steel intercheangeble?
what options do i have?
for what i searhed so far i found:
1-make in a lathe pvc rings
2-those garfinkles look nice
thanks!!
i have problems with my engine mounts.
today i remove them to and one is completely broken rubber. what can i do?
are the aluminium and steel intercheangeble?
what options do i have?
for what i searhed so far i found:
1-make in a lathe pvc rings
2-those garfinkles look nice
thanks!!
Other options are get the mounts from vendors. All the ones I've seen from other vendors are pretty much the same as the do it yourself type... except they might sell it in different materials or put a metal spacers in between the bushings. Even solid mounts are same principle as what I've mentioned above.. Just cut cylindrical block with a bolt through it.
OEM is another option but I think its the highest cost option new. Also, eventually you'll have the same issue with mounts separating or rubber splitting.
The last option and Only one that's different from aftermarket vendors are the ones David Garfinkle makes. I bought them (even though I made my own and have 3 other ones) because I like the design of it. He cuts the mounts to compensate the added oil pan brace and he machines the mounts so that the part of the bushing slides up the mount so NO metal to metal contact is made. This mount should in theory reduce the vibration more than the ones that makes direct contact of the bolt to the mounts to the sub frame (I think I stated this above.. sorry to re-state).
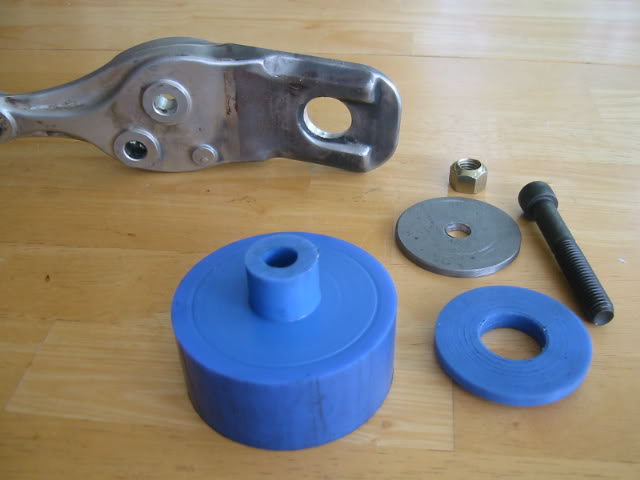
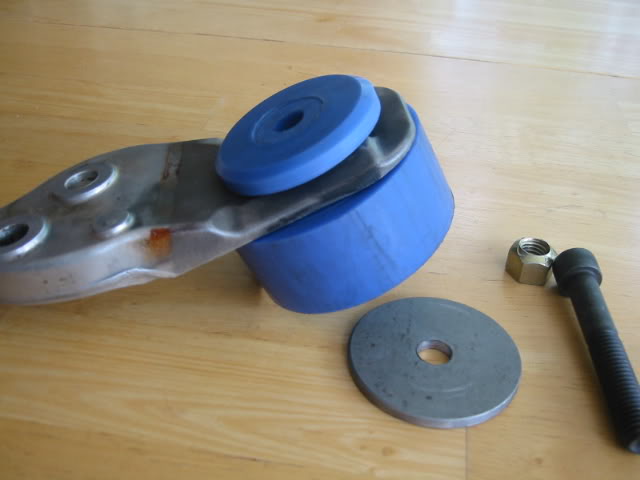
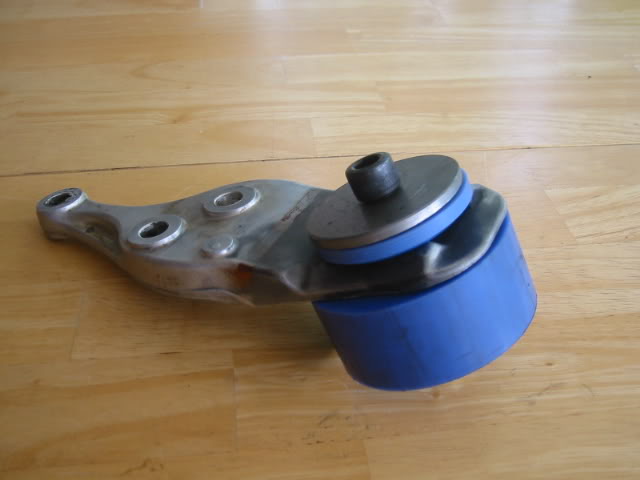
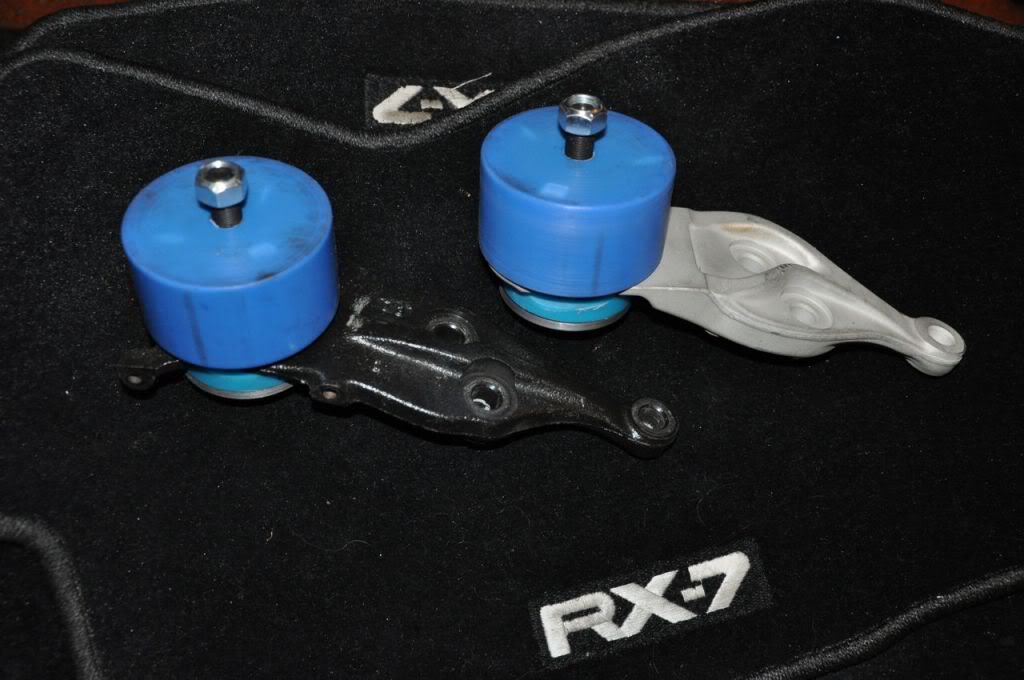
Here are some pics of Garfinkle's mounts so you could see what he did..
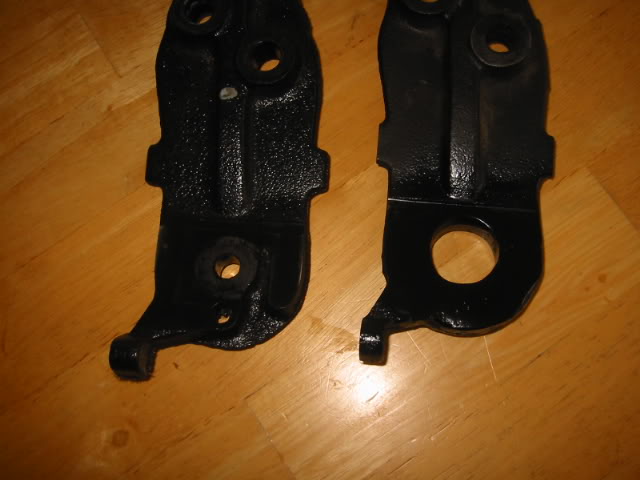
Comparison of stock steel to his steel mounts. The bushing mounting hole has been increased. Also Garfinkle welds the Steel mounts to strengthen certain section of the mount.
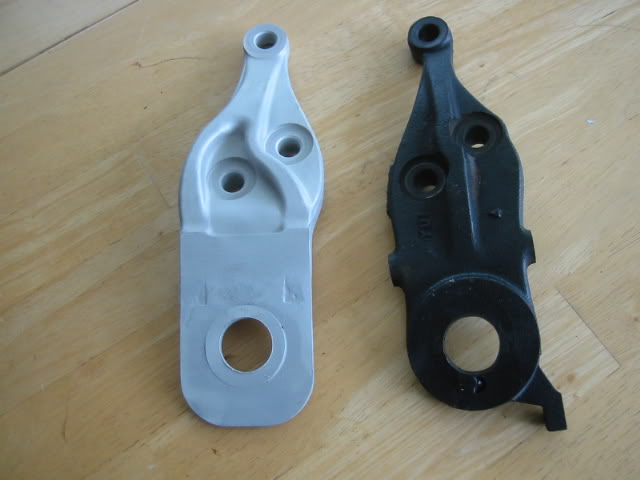
Enlarged holes and machined flattened and welded aluminum mount.
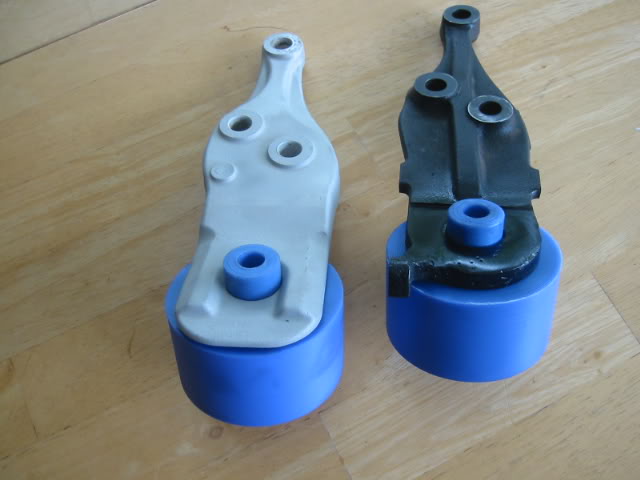
Nylon bushings and the mounts.. See how the top portion of the bushing slides up the enlarged hole. This requires more time to make each one of these mounts vs. simple cut ones others have.. Also, you could see the welded strengthen portion of the mount.
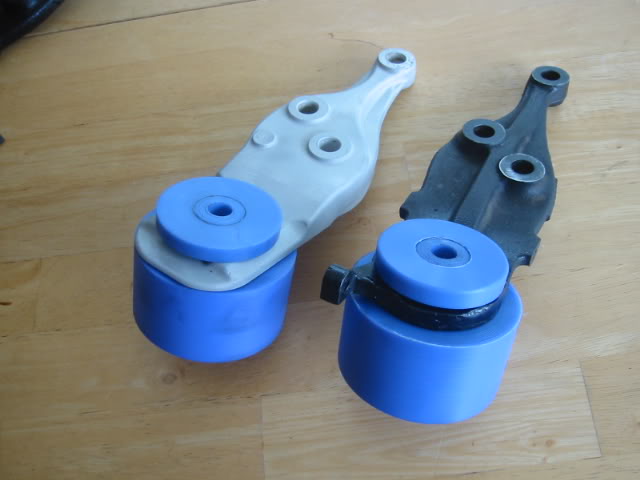
Machined added nylon that fits snug to the bottom machined bushing.
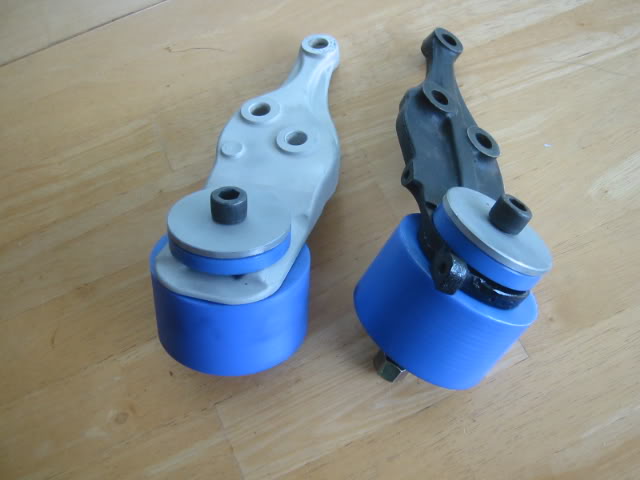
To hold things in place, a metal spacer on top to distribute the pressure evenly to the Nylon spacer, and heavy duty bolts that slide snug to the holes on the mounts.
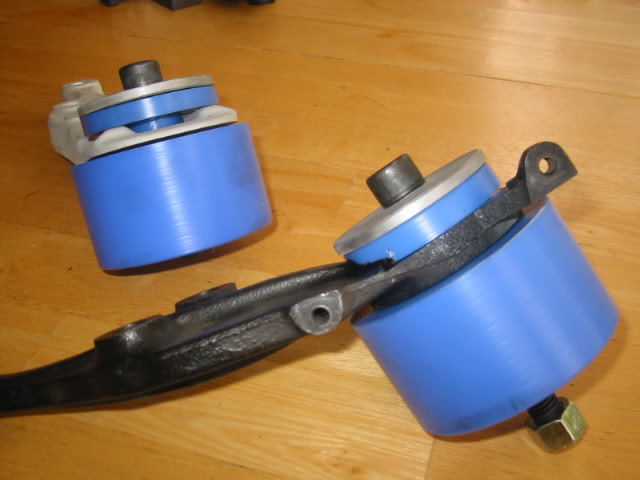
Finished product.
Last edited by Herblenny; Feb 24, 2010 at 08:06 AM.
hi,
thanks for the reply.
it looks like the garfinkles is the best solution. i emailed him with no answer. i searched today and found another passengers mount. so i have two steel ones.
i tried those and fit very nice. do you think that i can fit two stock steels with no problems?
the steel one os much beter and stifer desing than the aluminium. do you think it is a good option? thanks
Is your other steel one same side as the first one? Its been awhile but not sure if they are interchangeable or not. I'm trying to get in touch with Garkinkle via phone... I'll let you know about his email.
I really think his is the best mounts available vs. others out there. But decide based on reasoning I stated on here and your own research.
I really think his is the best mounts available vs. others out there. But decide based on reasoning I stated on here and your own research.
......Other options are get the mounts from vendors. All the ones I've seen from other vendors are pretty much the same as the do it yourself type... except they might sell it in different materials or put a metal spacers in between the bushings. Even solid mounts are same principle as what I've mentioned above.. Just cut cylindrical block with a bolt through it.......
Ahh... I forgot about the Nortecs. You are right, they are different and also no metal to metal contact... except full compression of the bushing.
I don't think any US vendors sell them and might be a special order from Australia. I also like that design.
Also, does it lower the engine with Garfinkle brace?? I'm just curious if its lower than stock or same height. I have a very little room between my tower brace and the IC pipings.
I don't think any US vendors sell them and might be a special order from Australia. I also like that design.
Also, does it lower the engine with Garfinkle brace?? I'm just curious if its lower than stock or same height. I have a very little room between my tower brace and the IC pipings.
Last edited by Herblenny; Feb 25, 2010 at 07:43 AM.
Personally I was a little iffy on removing the arms afterward.... I don't have any leaks and I didn't want to chance developing one by R & R'ing the arms. So as a semi-temp fix, I switched to a MazdaSpeed shock tower brace which seemed to have slightly more clearance and made a spacer for the driver's side of the tower brace bracket. No clearance issues now.
guys,
i just finished the pan fixing.
i want to thank you for all the info and help and to inform you some issues i had and how i fix them .
parhaps someone find it helpfull. :
first of all, i did not had time to order any poly mount and i found lockaly a second steel mount.so i had two right side mounts. i test fit them and they fit fine. i decide to use them. i read that there is an issue with some spacer needed underneath the drivers side motor mount if a steel one is used because the steel one does not press a specific point.
i was suprised but mazda had already put a taped hole in that place . all i had to do is to drill a coresponding hole on the pan and clear the sealand from that hole. then i used a bolt like the other ones and thats it!! this bolt is beneath the motor mount and has enouth clearense . i tithened this before i placed the motor mount.(the other passengers side mount also have a bolt beneath so it is the same situation).
now i want your opinion in two subjects:
1. do you think i will be ok with these two steel mounts?
2. when i placed the pan back in , i apply a bead of permatex ultra grey rtv on the pan and in about 15 min i screw all the bolts and the motor mounts. i tighten the pan bolts in three passes BUT: the permatex instructions say to " hand tighten the bolts until rtv squizes out, wait an hour and then final tighten the bolts" . i wish i had read that part before i try to put the pan back...
do you think that i will have ruined the rtv with that way?
thanks

almex wheels
Joined: Dec 2009
Posts: 59
Likes: 0
From: FL
To the guy who can't get the permatex right stuff. Go to your local Yamaha motorcycle dealer and ask for yamabond, they might have to order it ,but it is as good as it comes I've sealed 83 year old Indian motocycle cases with it
Racecar - Formula 2000
Joined: Sep 2002
Posts: 4,034
Likes: 370
From: Bath, OH
2. when i placed the pan back in , i apply a bead of permatex ultra grey rtv on the pan and in about 15 min i screw all the bolts and the motor mounts. i tighten the pan bolts in three passes BUT: the permatex instructions say to " hand tighten the bolts until rtv squizes out, wait an hour and then final tighten the bolts" . i wish i had read that part before i try to put the pan back...
do you think that i will have ruined the rtv with that way?
thanks
do you think that i will have ruined the rtv with that way?
thanks
Joined: Oct 2001
Posts: 4,772
Likes: 2
From: My 350Z Roadster kicks my RX7's butt
guys,
i have problems with my engine mounts.
today i remove them to and one is completely broken rubber. what can i do?
are the aluminium and steel intercheangeble?
what options do i have?
for what i searhed so far i found:
1-make in a lathe pvc rings
2-those garfinkles look nice
thanks!!
i have problems with my engine mounts.
today i remove them to and one is completely broken rubber. what can i do?
are the aluminium and steel intercheangeble?
what options do i have?
for what i searhed so far i found:
1-make in a lathe pvc rings
2-those garfinkles look nice
thanks!!
What are those shorter Garfinkle mounts made of? Does he have a web site? ...is Garfinkle = Bonzai Racing, cause I have their oil pan brace (& OMP BOP).
Xcessive Motorsports sells new pans that use an o-ring to seal them but if HC says it's fixable then give that a a try. Although with this thread being two months old, you probably already resolved it. If not, the fabricator I know swears by "ThreeBond" because it stays flexible. It says semi drying on the box. He doesn't do rotaries, so just throwing that out there.


Thread
Thread Starter
Forum
Replies
Last Post
troym55
3rd Generation Specific (1993-2002)
23
May 25, 2016 12:42 PM
tiger18
3rd Generation Specific (1993-2002)
9
Sep 3, 2015 08:27 PM