
KnightSports V-Mount kit install write up + pics


Thread Starter
Joined: Jun 2005
Posts: 1,489
Likes: 7
From: South Bay, North Cali.
KnightSports V-Mount kit install write up + pics
Dang.... if knightsports' v-mount kit is supposely the most install friendly,everyone on the forum with other vmount kits must went through hell. :P The install overall wasn't too bad, but other than the IC itself, every section has requires a bit of modification. KS makes their parts fit 'tight' yet perfectly. Leaving their marks of perfection on your arms and knockles.... lol. The kit arrived from FDNewbie a couple weeks ago, but I didn't put it on until last weekend. Thanks again Ramy for helping me reach my dream one step at a time, FDNewbie rock!
I've always wanted to do a write up, this would be my first one.. so plz crit or fill in anything. thx The thread posted by def3 help'd a lot. https://www.rx7club.com/3rd-generation-specific-1993-2002-16/picked-up-knight-sport-v-mount-kit-664974/ thanks Dave. i used a lot of those pics as some of my reference for radiator hoses and brackets, which was a bit trickier than it looks.
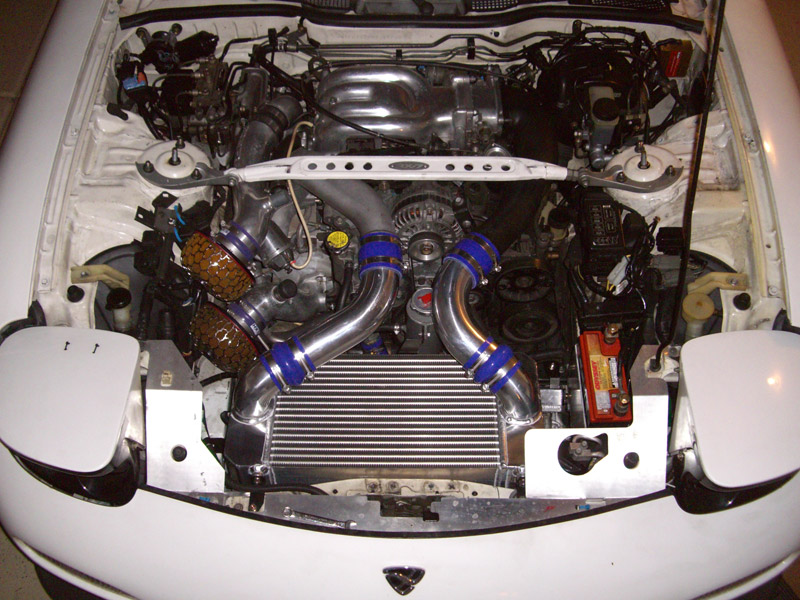
This is what I started with. The intake and rotary extreme battery pretty much cleaned out a lot of space already.

All the parts from the shipment spread out. (*note: missing one of the front bracket and japanese instructions in this pic)
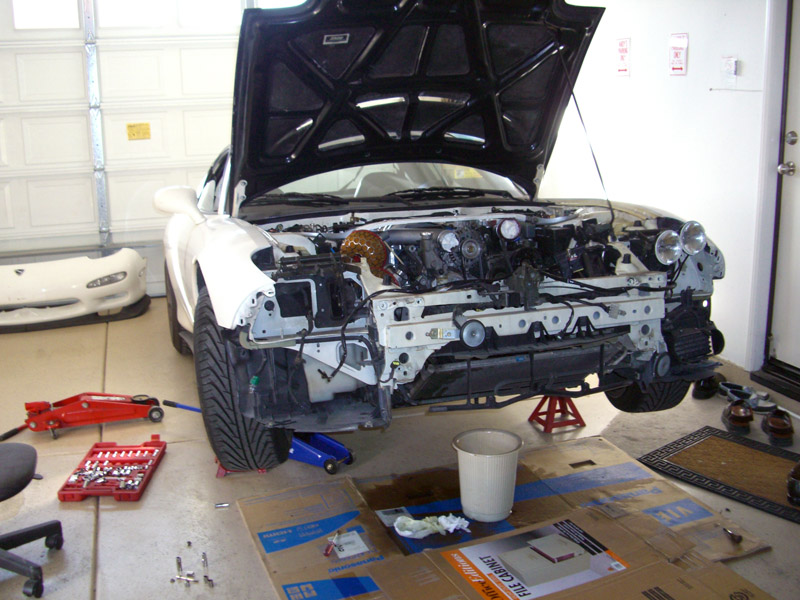
I started on saturday morning and was able to wrap up and finish by late sunday night. The intercooler, radiator, a/c condenser, all pretty much have to be taken out along w/ the brackets attached.
I've always wanted to do a write up, this would be my first one.. so plz crit or fill in anything. thx
The thread posted by def3 help'd a lot. https://www.rx7club.com/3rd-generation-specific-1993-2002-16/picked-up-knight-sport-v-mount-kit-664974/ thanks Dave. i used a lot of those pics as some of my reference for radiator hoses and brackets, which was a bit trickier than it looks. This is what I started with. The intake and rotary extreme battery pretty much cleaned out a lot of space already.
All the parts from the shipment spread out. (*note: missing one of the front bracket and japanese instructions in this pic)
I started on saturday morning and was able to wrap up and finish by late sunday night. The intercooler, radiator, a/c condenser, all pretty much have to be taken out along w/ the brackets attached.
Thread Starter
Joined: Jun 2005
Posts: 1,489
Likes: 7
From: South Bay, North Cali.
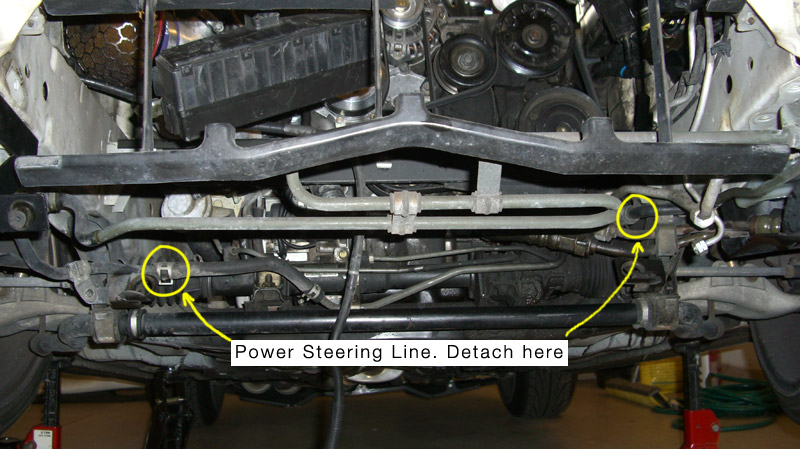
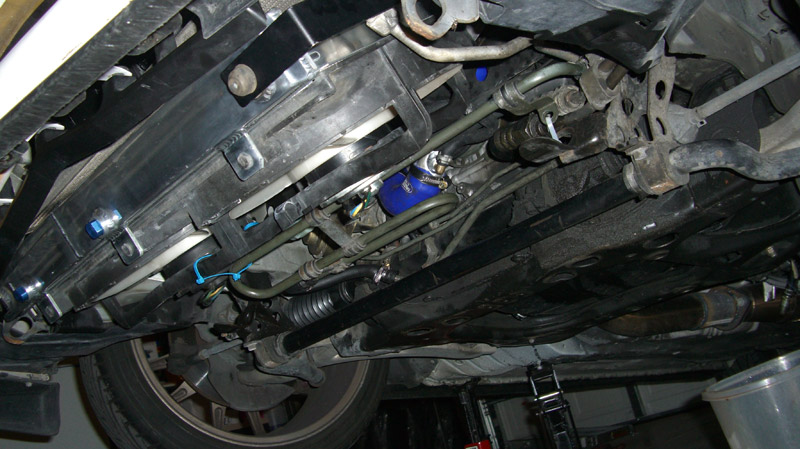
After all the big stuff are taken out, it was time to start doing some modification to stock parts. The power steering line will require removal and some cutting. I circled the clamps where they detach from the rubber hoses. This main section needs to be shorten and pushed back.
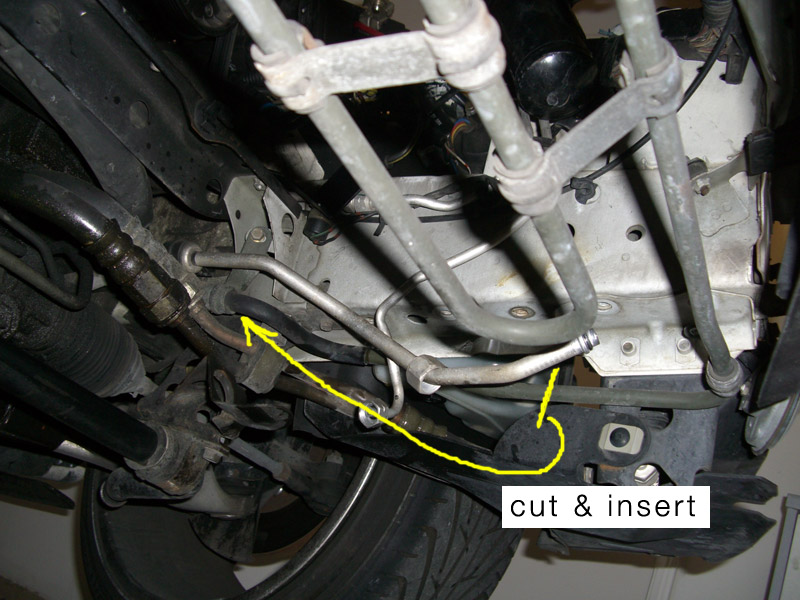
on the right side, leave roughly 7.5 inches (190mm), counting the pipe. It will require cutting and insert into the rubber hose. The bracket can be reused to help support.
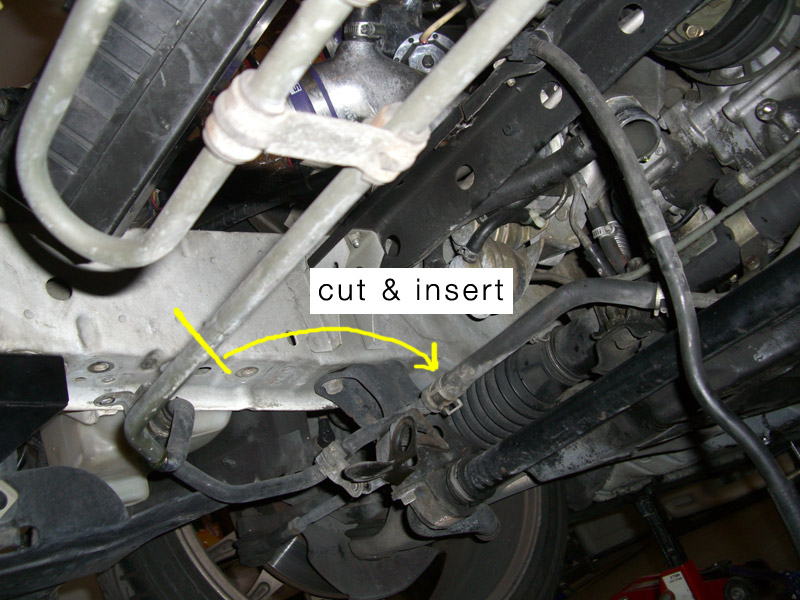
on the left side, there can be different ways to approach this. The instructions were a bit unclear where the illustration had a "U" pipe attached to where its suppose to cut, and down the main hose. There is no such "U" shape on the pipe to reuse, so instead of leaving it longer, i cut at the same distance as the top loop and using the rubber hose to bend the "U" shape for attachment..

on the right side, leave roughly 7.5 inches (190mm), counting the pipe. It will require cutting and insert into the rubber hose. The bracket can be reused to help support.
on the left side, there can be different ways to approach this. The instructions were a bit unclear where the illustration had a "U" pipe attached to where its suppose to cut, and down the main hose. There is no such "U" shape on the pipe to reuse, so instead of leaving it longer, i cut at the same distance as the top loop and using the rubber hose to bend the "U" shape for attachment..
Thread Starter
Joined: Jun 2005
Posts: 1,489
Likes: 7
From: South Bay, North Cali.
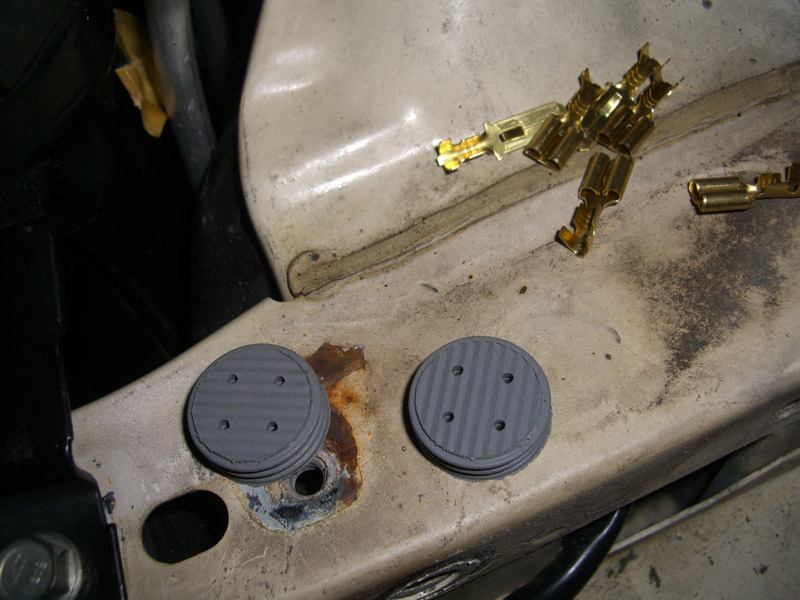
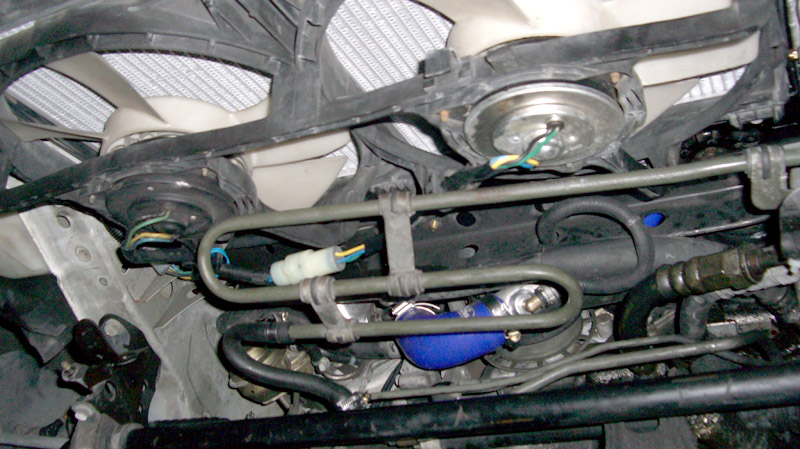
Next were the fan wiring extension. They were a bit of a pain, but after its done, the plugs are so much better quality than stock ones. These round cylindrical plugs come with rubber backings to make sure each wire is water proof.
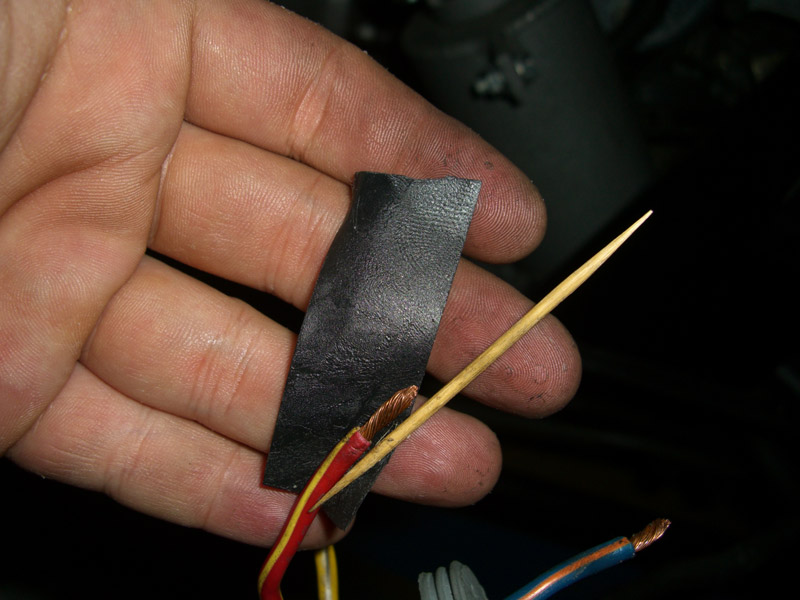
It was nearly impossible to put all four wires through each tiny hole by hand so i used the same technique to put wires through firewalls, using a toothpick attached to the wire with a piece of tape to help sliding it through.
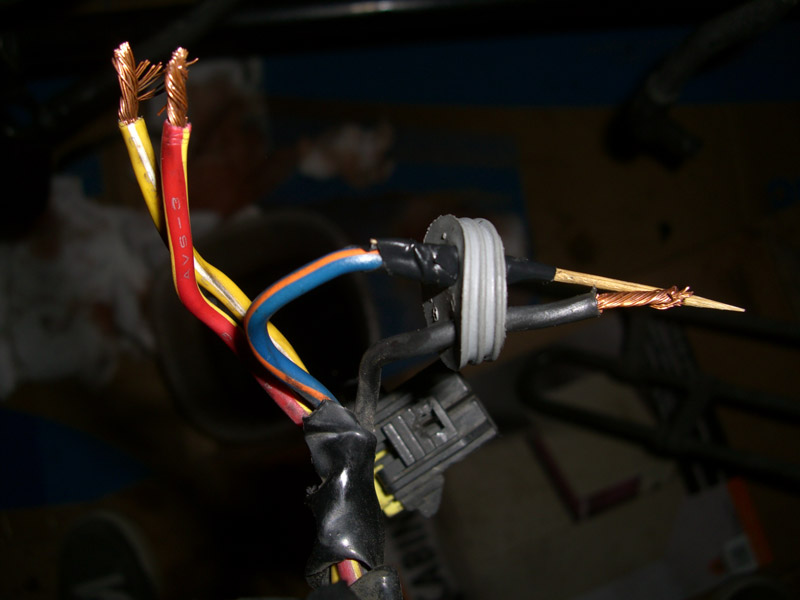
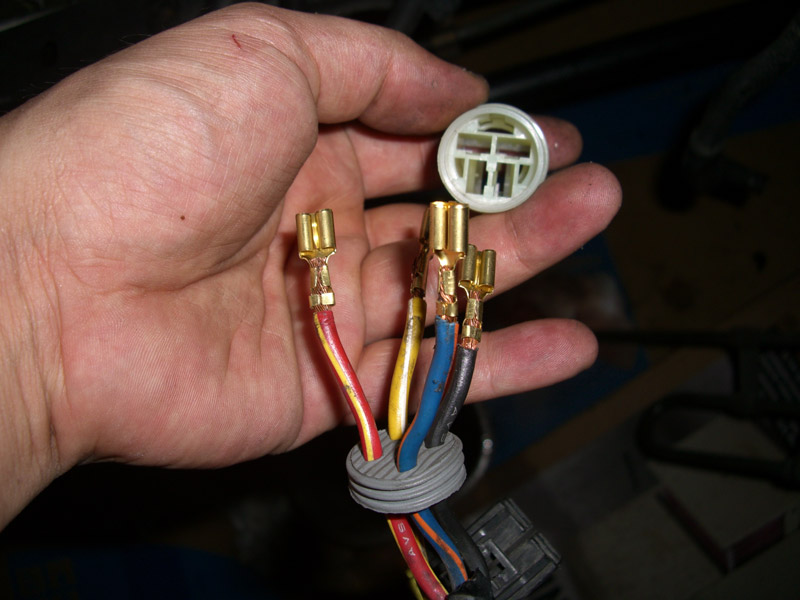
I just cut and replaced all of my original plugs on the harness and fan. But if you install all the extension and plugs on the chassis fan harness only, it'll save you some headache when you need to replace the fan motors.
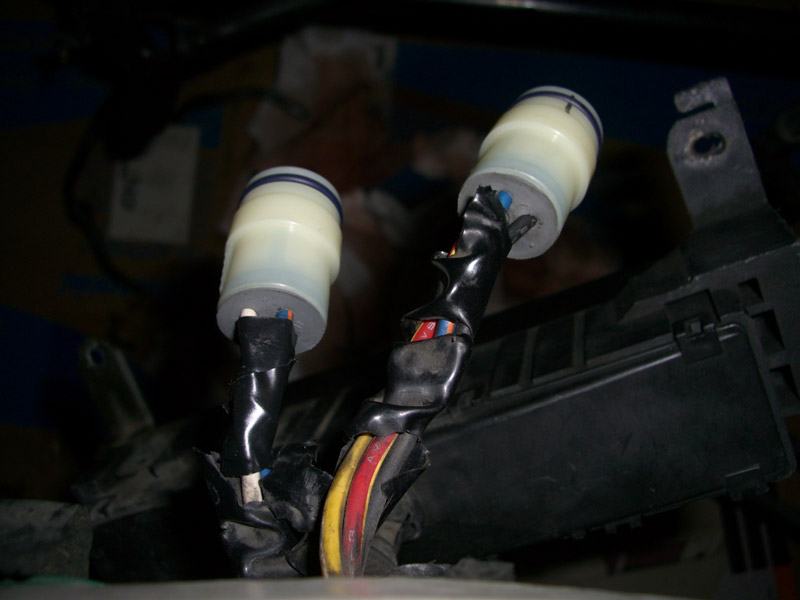
Install the fan on the radiator. Also replace those three black plugs along the top and bottom of the radiator with new blue bolt/plugs that came with the KS kit.
It was nearly impossible to put all four wires through each tiny hole by hand so i used the same technique to put wires through firewalls, using a toothpick attached to the wire with a piece of tape to help sliding it through.
I just cut and replaced all of my original plugs on the harness and fan. But if you install all the extension and plugs on the chassis fan harness only, it'll save you some headache when you need to replace the fan motors.
Install the fan on the radiator. Also replace those three black plugs along the top and bottom of the radiator with new blue bolt/plugs that came with the KS kit.
Thread Starter
Joined: Jun 2005
Posts: 1,489
Likes: 7
From: South Bay, North Cali.
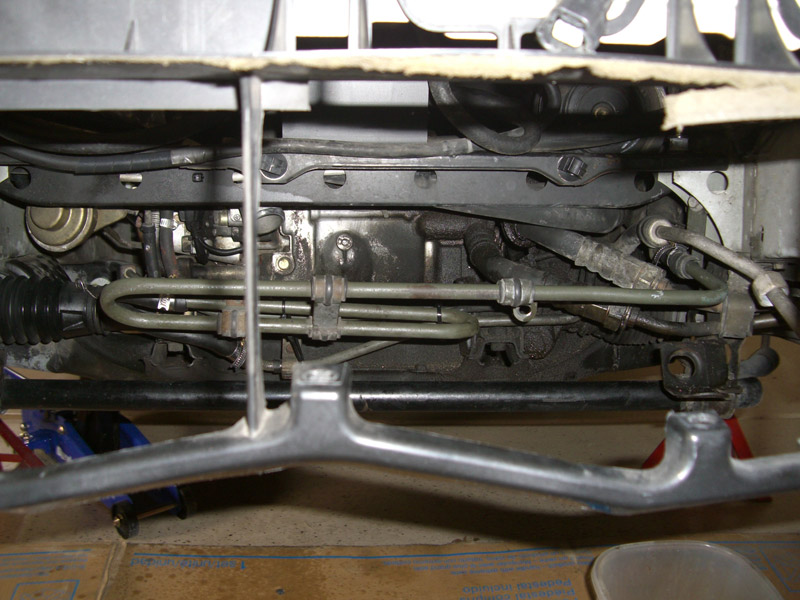
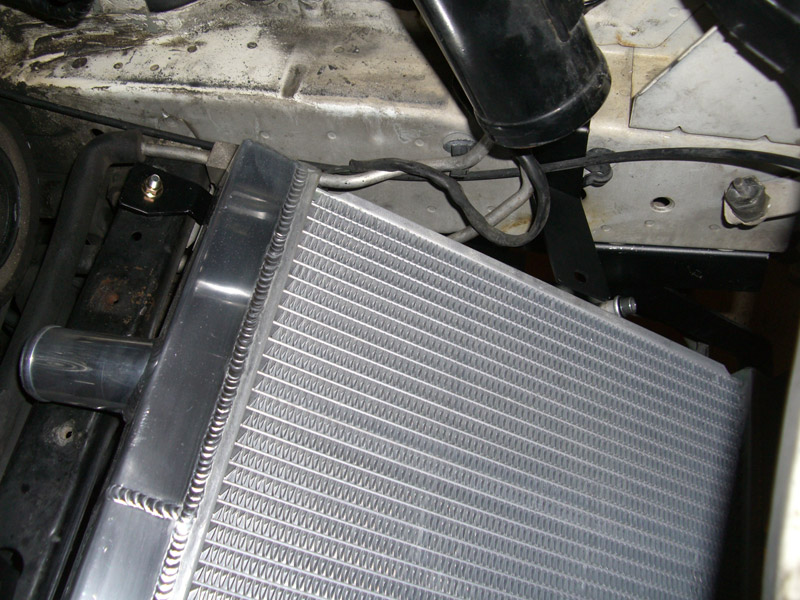
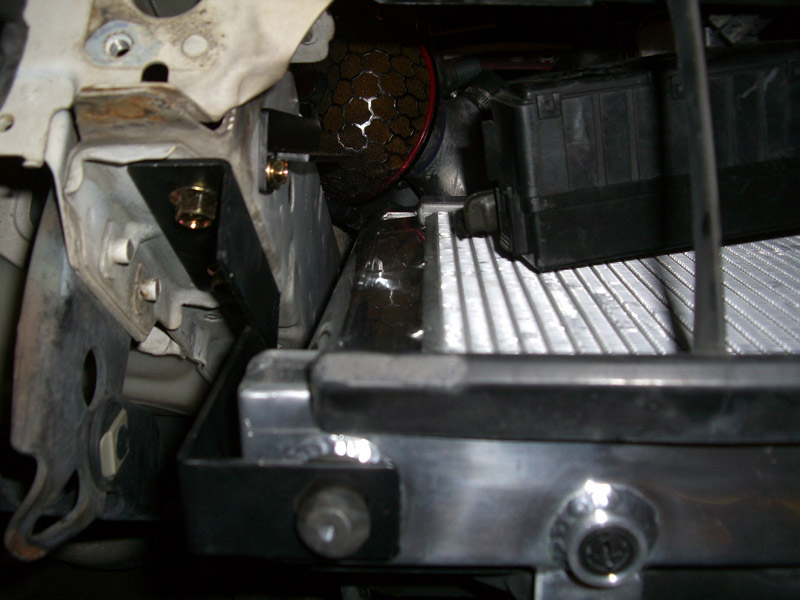
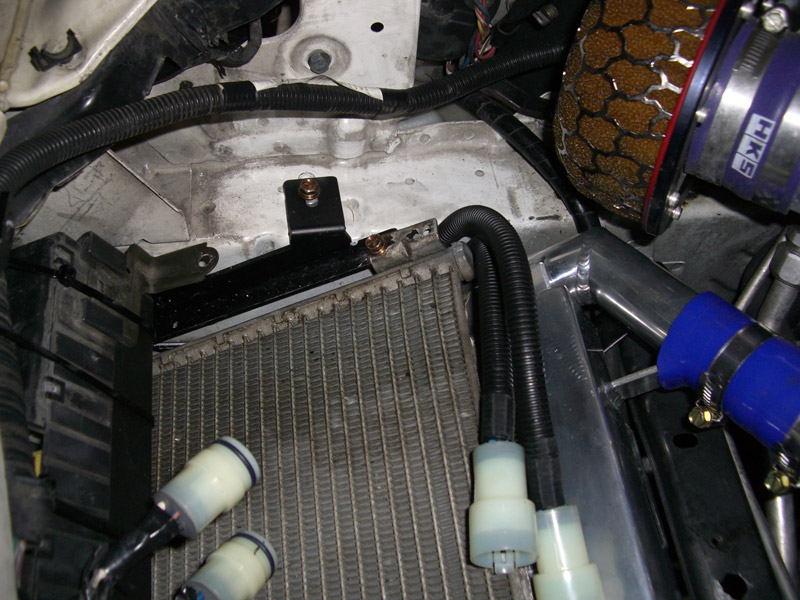
Pretty much each piece of the Samco radiator hoses require about an inch ~ 1.5" of trimming on one end or else they touch the weldings. The lower radiator hose needed a bit of force to fit through, allowing the thiner A/C hose to sit more on top of the chassis bar while bending the thicker A/C line a bit to sit under. That way, the metal attachment between the radiator hose fits really tight, perfectly, just about 1/4" away from the belt.


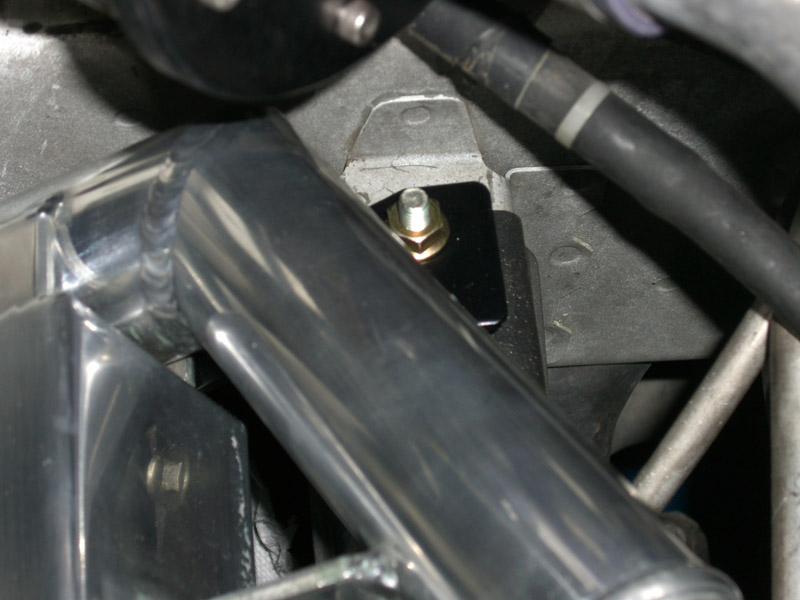
The bracket is designed for the stock long plastic AST, so the hole where it sits on is very low. Too low for my Gotham racing AST to even touch it after its bolted in from the top. So i got a rubber bolt spacer from one of my original stock intercooler brackets. With that, it fits perfectly for this AST.
The bracket is designed for the stock long plastic AST, so the hole where it sits on is very low. Too low for my Gotham racing AST to even touch it after its bolted in from the top. So i got a rubber bolt spacer from one of my original stock intercooler brackets. With that, it fits perfectly for this AST.
Thread Starter
Joined: Jun 2005
Posts: 1,489
Likes: 7
From: South Bay, North Cali.
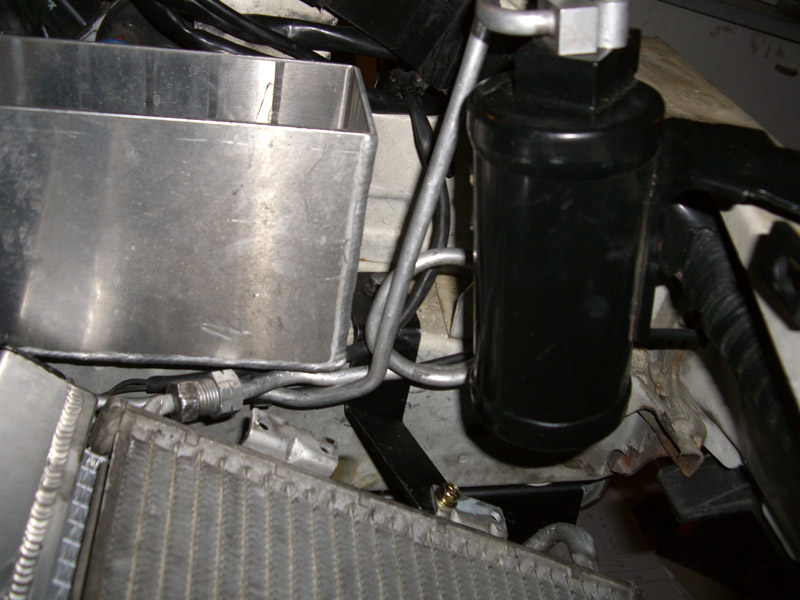
I'm not sure if the JDM versions have A/C fliped around, but no matter how i tried, i was only able to tighten it down with one of the two holes. On this passenger side, the bracket sits underneath the A/C.
The A/C bracket on the driver side is suppose to sit under the A/C, not over it like how i have it here. That's why my condensor is slightly higher on the driver side.
The easiest way to bend the A/C lines is by using some sort of metal can or pipe with a smaller diameter, bending the lines wrapping around it. for a DIY job, it'll give a smooth round bend compare to doing this only by hand. I used a K&N re-oil spray can for mine. diameter seemed a little big, so i had to tug it slightly after i was done.
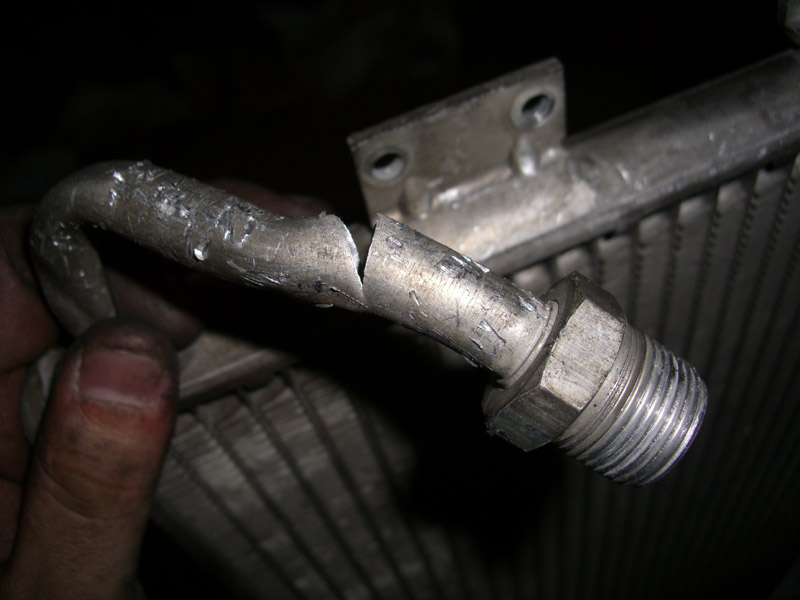
The pipe on the side of the condenser are a bit thicker and shorter, which makes them stronger and harder to bend. These A/C lines are not that bad, but you do have to be real careful not to do it too fast or they can snap like this in a blink of an eye. Because this is used as a spliter in the kit, it's still required to install it. I'll just have to get this welded or find a used to replace it.
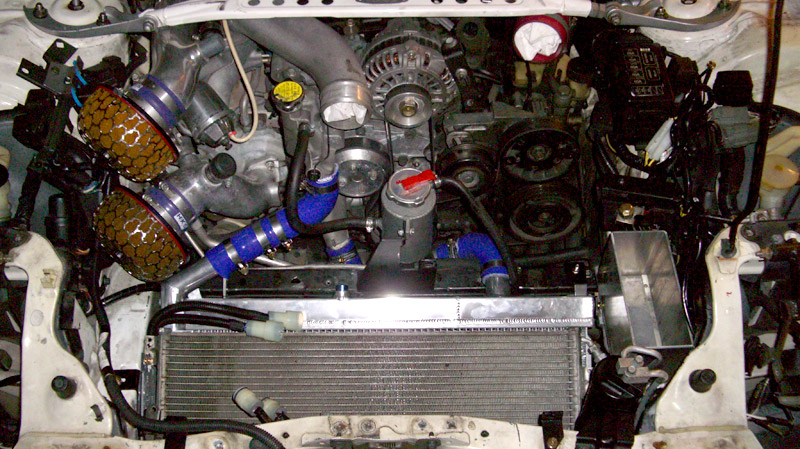
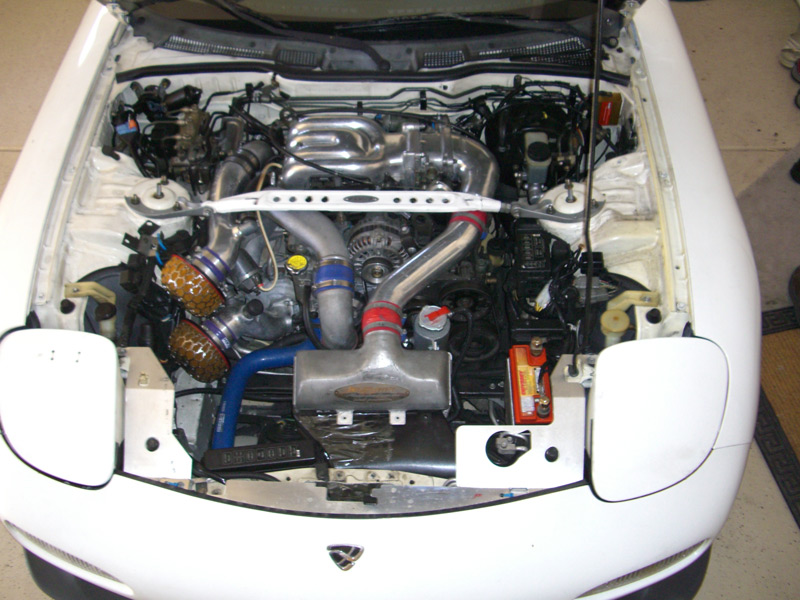
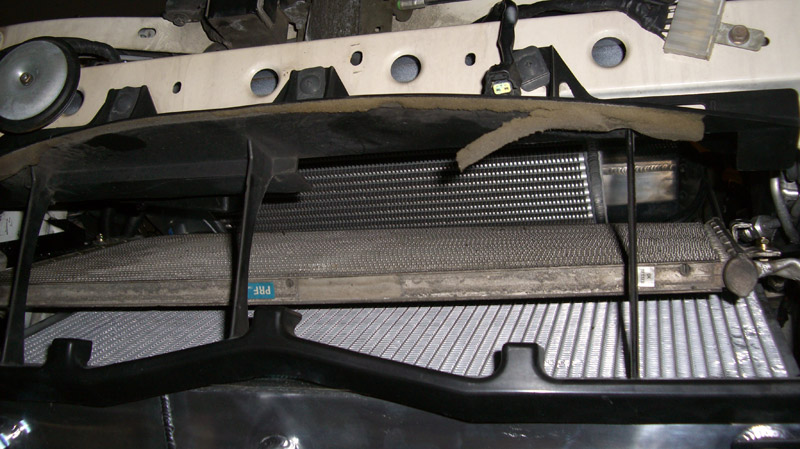
All the fundamentals are in, time for the intercooler and undertray.
The A/C bracket on the driver side is suppose to sit under the A/C, not over it like how i have it here. That's why my condensor is slightly higher on the driver side.
The easiest way to bend the A/C lines is by using some sort of metal can or pipe with a smaller diameter, bending the lines wrapping around it. for a DIY job, it'll give a smooth round bend compare to doing this only by hand. I used a K&N re-oil spray can for mine. diameter seemed a little big, so i had to tug it slightly after i was done.
The pipe on the side of the condenser are a bit thicker and shorter, which makes them stronger and harder to bend. These A/C lines are not that bad, but you do have to be real careful not to do it too fast or they can snap like this in a blink of an eye. Because this is used as a spliter in the kit, it's still required to install it. I'll just have to get this welded or find a used to replace it.
All the fundamentals are in, time for the intercooler and undertray.
Thread Starter
Joined: Jun 2005
Posts: 1,489
Likes: 7
From: South Bay, North Cali.
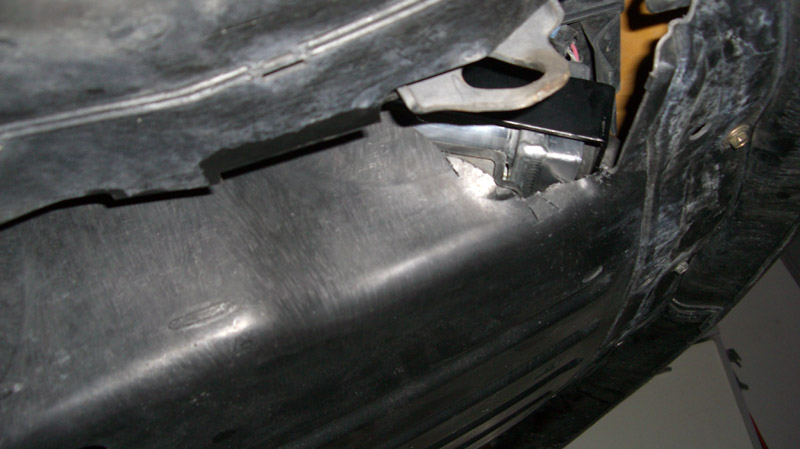
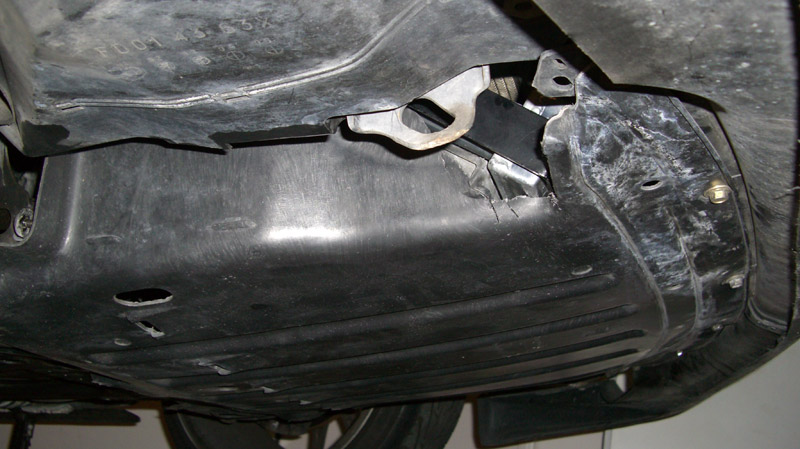
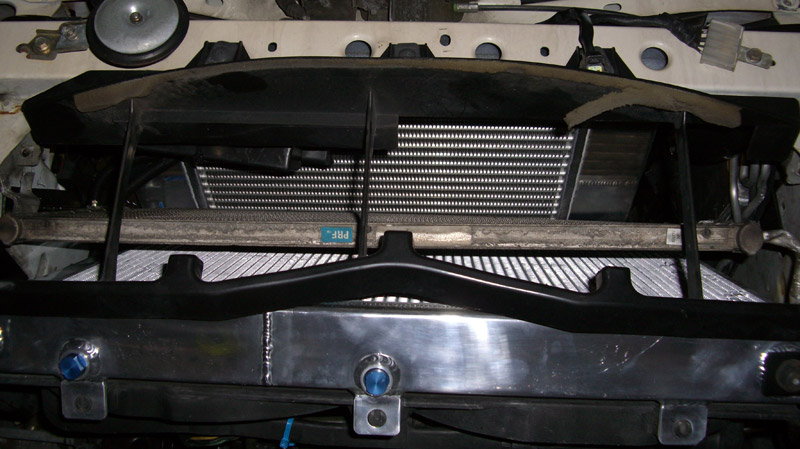
I managed to fit the undertray back on but i had to trim off the right corner due to the radiator extension. That corner is the only thing that's really getting in the way. All the bots can fit with a lot of push and tug.
The way this kit is designed, its a must to have your A/C. not only does it work as a spliter for the IC and radiator, it also fills a big 1/2" gap between the two. If you don't run your A/C, it will still need to be installed to help with the airflow.
Trending Topics
Thread Starter
Joined: Jun 2005
Posts: 1,489
Likes: 7
From: South Bay, North Cali.
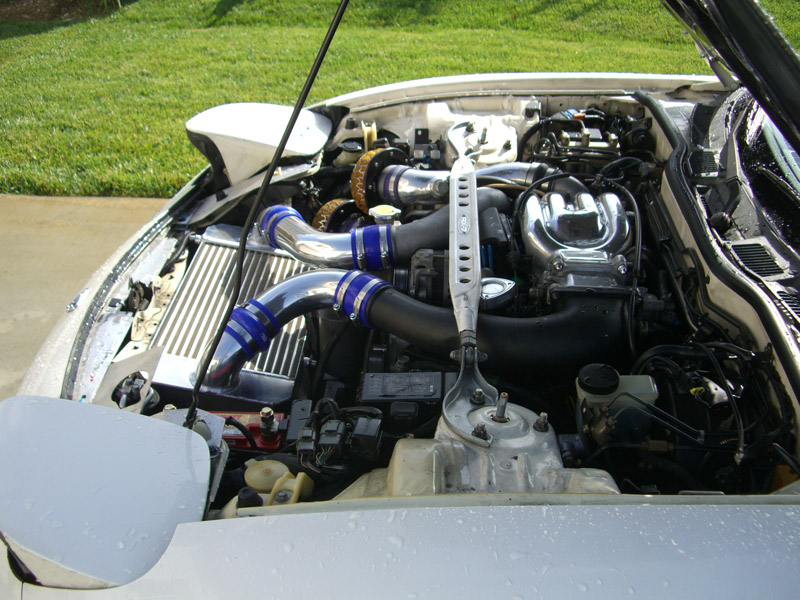
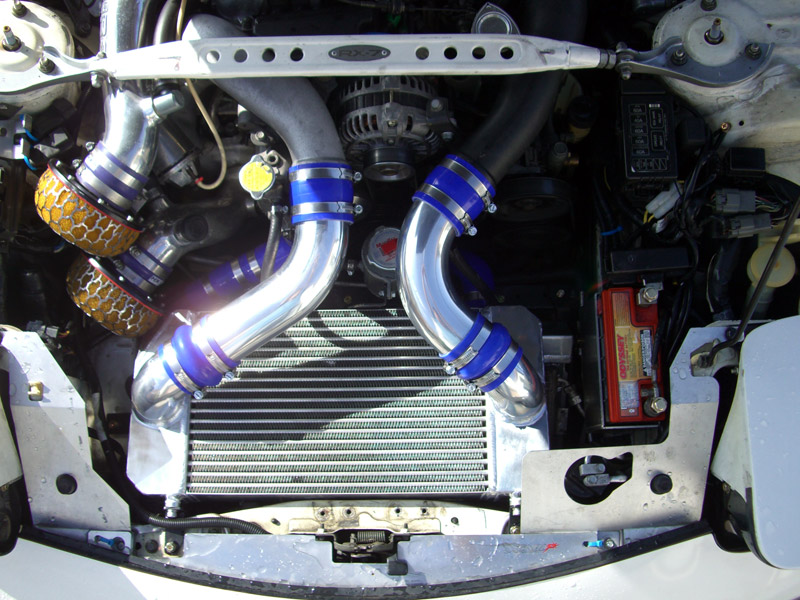
Last for the easiest part, the intercooler. Its pretty straight forward. I've noticed its easier if you mount the front brackets onto the IC first without mounting onto the chasis and bolt the rear bracket down first will make the process very easy. I'll need a machine shop to cut and bead the extended pipe so i can use the greddy elbow. But stock elbow will do for now. Next step will be working out the ducting around it to make this kit work efficiently.
So now its broken down, they're quite straight forward. But can get a bit confusing from just looking at their simple illustrated instructions in japanese. Hope these can help the next person installing this kit. Everything i installed is from the kit. Other than my common car tools and a dremel, there's not really anything else i used that didn't come in the package. Please feel free to give feedback, critique, fill-in, questions..etc. Thanks for reading
So now its broken down, they're quite straight forward. But can get a bit confusing from just looking at their simple illustrated instructions in japanese. Hope these can help the next person installing this kit. Everything i installed is from the kit. Other than my common car tools and a dremel, there's not really anything else i used that didn't come in the package. Please feel free to give feedback, critique, fill-in, questions..etc. Thanks for reading


Thanks for this writeup...it's also very helpful that you included photo/files as attachments for permanent archiving! The Knightsports looks great once installed and very sexy...keep us posted on the air/cooling temps as mentioned above as I heard all VMICs vary. I'm currently looking into a VMIC too...KS or FDNewbie's upcoming custom version.
...it was mentioned above in original post, starting early Saturday morning to late Sunday.
...it was mentioned above in original post, starting early Saturday morning to late Sunday.
Thread Starter
Joined: Jun 2005
Posts: 1,489
Likes: 7
From: South Bay, North Cali.
Thanks guys. yeah, it took me 2 full days from like 10am~2am both days counting from jacking up the car to putting it down. Originally my intention was to show rx7rage that it can be done over the weekend.. so maybe he'll put on his rotary extreme ASAP. lol
AHarada: yes sir. those are KS lights. thx to FDNewbie as well
because i'm using a smaller battery than the kit was design'd for, I need to do some major ducting there and on the passenger side. I'm sure some air escapes from the triangle gap inside the bracket where i trim'd the undertray. After they're cover'd, the temps might drop significantly more.
I've only taken one fwy drive last monday after i put the kit on. and the intake temp on my PFC drop'd from average 45 with my SMIC to 30 with this. water temp was round 85 which was what i had before with my Fluidyne. ambient temp was around 83, before the weather turn'd cold this week. That's fwy cruzing temperature. I'll update later when i get a chance to hit the tracks for track temps.
Senior Member
Joined: Apr 2004
Posts: 558
Likes: 0
From: Sydney Australia

Senior Member
Joined: Jul 2001
Posts: 734
Likes: 1
From: Oakland, CA
Awesome work, my installation took forever because i had to do lots of pipe extensions, ordered new parts that i broke and other crap. In the end it was all worth it.
My air intake temps are 19 degree celsius and water temps are 89 degrees celsius (evans coolant, AST eliminated).
My air intake temps are 19 degree celsius and water temps are 89 degrees celsius (evans coolant, AST eliminated).

http://www.fighters-garage.com/rx7.html