
Interior panel removal

Interior panel removal
I searched and ran across a few posts that dealt with this subject. However, I'm still lost as to how to remove the gauge cluster panel. I'm want to refinish them as they are pretty bad. I got the shifter panel off with ease, naturally. I know there are two screws hidden behind the cluster surround for the AC piece. My main problem there; with the cluster. Is there anyway someone can give me a complete write up on how to remove the cluster with pictures?
Thanks.
Thanks.

Remove the panel covering the driver's end of the dash... three spring clips are holding it in place, and it has an alignment post which you might just cut off once it's out of the car. Makes it much easier to remove.
Remove the bolt (8mm) holding the end of the under-dash panel in place, remove the screw on its right side (towards console) and then pop it out of place, one spring clip on the upper right, I believe. Once it is loose, disconnect the heating duct in back of it. Remove the under-dash panel.
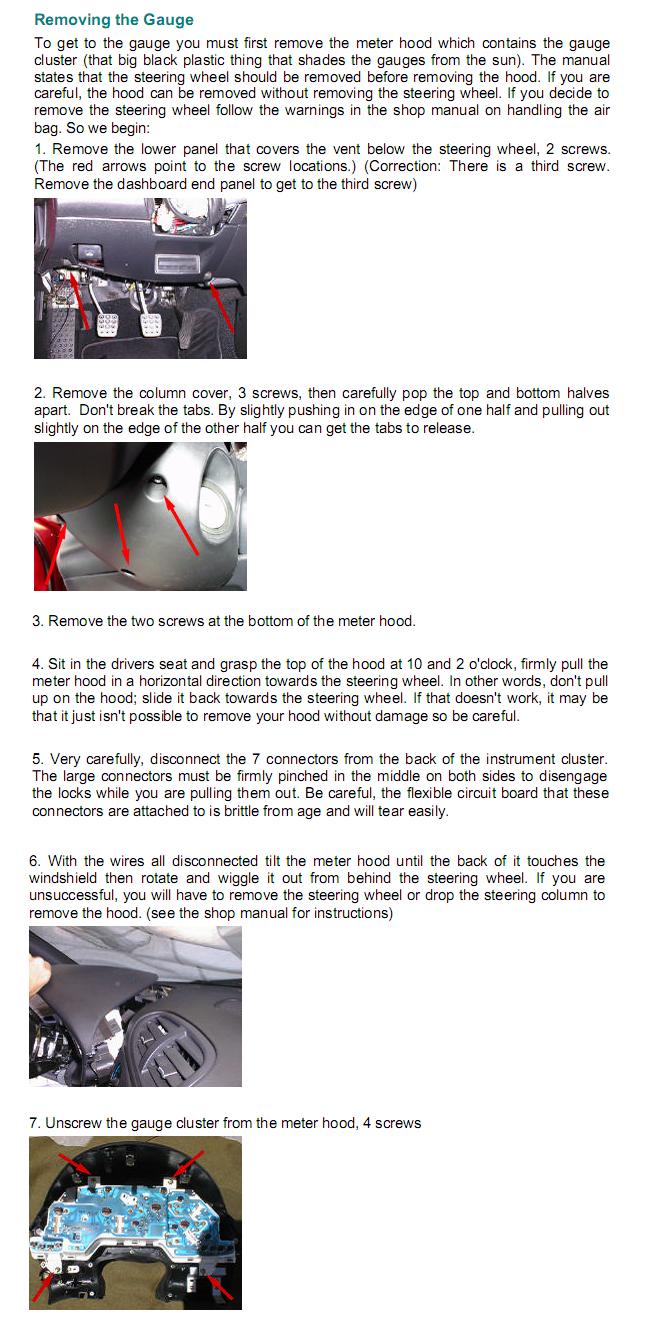
Remove the three screws holding the column cover in place, from the bottom. Two are normal screws, one is a machine screw. CAREFULLY unsnap the upper half from the lower half, starting at the driver's side. Remove the column cover.
Remove the two screws holding the instrument panel in place, one at each lower corner. The instrument panel is held in (at this point) by three large spring clips in the back of the curved hood. There is also an alignment post on the hood. Take hold of the top of the instrument assembly, one hand on each side, and wiggle it, pulling towards you and up. If you're careful, nothing horrible should happen, and it should pop loose. It will still be connected by its wiring, but you don't need to remove it completely.
Behind the right side of the instrument panel are two screws (?) I believe which are holding the climate control assembly in place. Remove the screws, and pop out the climate control assembly. Be careful popping the lower half of it loose (area around the stereo).
http://www.fd3s.net/dash_removal.html
or take a hammer and wedge to it.
Remove the bolt (8mm) holding the end of the under-dash panel in place, remove the screw on its right side (towards console) and then pop it out of place, one spring clip on the upper right, I believe. Once it is loose, disconnect the heating duct in back of it. Remove the under-dash panel.
Remove the three screws holding the column cover in place, from the bottom. Two are normal screws, one is a machine screw. CAREFULLY unsnap the upper half from the lower half, starting at the driver's side. Remove the column cover.
Remove the two screws holding the instrument panel in place, one at each lower corner. The instrument panel is held in (at this point) by three large spring clips in the back of the curved hood. There is also an alignment post on the hood. Take hold of the top of the instrument assembly, one hand on each side, and wiggle it, pulling towards you and up. If you're careful, nothing horrible should happen, and it should pop loose. It will still be connected by its wiring, but you don't need to remove it completely.
Behind the right side of the instrument panel are two screws (?) I believe which are holding the climate control assembly in place. Remove the screws, and pop out the climate control assembly. Be careful popping the lower half of it loose (area around the stereo).
http://www.fd3s.net/dash_removal.html
or take a hammer and wedge to it.

take the steering collumn plastics off by the 3 screws at the bottom. then take the two screws from the bottom of the gauge panel. then pull really ******* hard towards your chest. bingo, you are done!
Eats, Sleeps, Dreams Rotary
Joined: Apr 2001
Posts: 3,736
Likes: 10
From: Dallas, Texas
Hey do you need help? I've taken mine off a gazillion times. Give me a call.
Also, do you know anyone interested in a FEED CF hood for cheap? I might upgrade to Shine's newer one with more clearance.
Bob
Also, do you know anyone interested in a FEED CF hood for cheap? I might upgrade to Shine's newer one with more clearance.
Bob

To get at the second screw, you have to remove the panel underneith the dash (where the floor vent is). To remove that panel is 2 screws, one on each side of it. Then you have to remove (or atleast loosen) the panel that goes on the end of the dash (which is sandwhiched between the dash and the door and provides the ducting to the door vents). Then the second screw holding the gauge cluster cover will be exposed.
I've posted this picture a few times before, but just for good measure...
Writeup and photos courtesy of Dale Clark.
Trending Topics
SLOASFK, great info, thank you!
I got the steering column and lower panel off with ease... I'm just a bit lost as to where the two screws are for the instrument panel. However, I think the previous owner may have removed this at one point as I see no other screws intact... I suppose my best option is to just pull and see if it comes loose.
Bob, I sent you a PM!
Thanks to Bob (7racer) for coming over and yanking that sucker out of there for me!
Took apart all of the panels and they're going to be all refinished. I'll post up some pictures once I'm all finished. I have a friend painting them for me. We're actually going to prime it and shoot it with PPG black and clear coat. Should turn out good!
Took apart all of the panels and they're going to be all refinished. I'll post up some pictures once I'm all finished. I have a friend painting them for me. We're actually going to prime it and shoot it with PPG black and clear coat. Should turn out good!
I assume you're talking about the top "hood"? I'm actually not going to touch that, it's fine. Just the gauge face piece along with the climate control and shifter panel.
Yes, I was speaking about the cowl/top piece. I've Armorall'd mine too much and the glare from it is blinding. Look forward to the pics.
I bought one back in April and it was $90 shipped.
So, you paid $90 for the entire bezel set?
The bezels are not sold separately. You purchase the plastic gauge cover which contains the bezels:
http://mahjik.homestead.com/files/FD...h/MVC-003F.JPG
http://mahjik.homestead.com/files/FD...h/MVC-003F.JPG
The bezels are not sold separately. You purchase the plastic gauge cover which contains the bezels:
http://mahjik.homestead.com/files/FD...h/MVC-003F.JPG
http://mahjik.homestead.com/files/FD...h/MVC-003F.JPG
BTW: I've finished sanding down the panels and we are shooting them with paint tonight. I have pictures of before and after sanding. I will have pics of them after paint as well. I'll post them up once I'm finished.
Wow, the sanding/prep is actually quite a bit of work (elbow greese). However, it looks like it will be worth the hard work. It took me about two hours on each panel just to sand down and get the "gunk" off!
Thanks again for all the help/pointers guys.
Last edited by mrb63083; Oct 13, 2008 at 11:00 AM.
As promised, here is an update with photos.
Here are the panels prior to refinishing.


(forgot to snap some of the shifter panel, but it was just as bad as the other two)
Here is after wet-sanding them with 600 grit. (Note: this process is not fast. It's safe to say that I took about an hour and a half per piece.) They were slick!


After wet-sanded, I had the sprayed with primer. After the primer dried, I wet sanded again with 600 grit. Then, it was ready for the base coat (PPG) black, and clear. Turned out amazing, the photos are decent, they don't show justice!
Here they are...


The clear still needs to harden for another day or two. As soon as it's hardened, I'll install and take more photos.
Here are the panels prior to refinishing.
(forgot to snap some of the shifter panel, but it was just as bad as the other two)
Here is after wet-sanding them with 600 grit. (Note: this process is not fast. It's safe to say that I took about an hour and a half per piece.) They were slick!
After wet-sanded, I had the sprayed with primer. After the primer dried, I wet sanded again with 600 grit. Then, it was ready for the base coat (PPG) black, and clear. Turned out amazing, the photos are decent, they don't show justice!
Here they are...
The clear still needs to harden for another day or two. As soon as it's hardened, I'll install and take more photos.