
DIY: Oil Injector Lines for $10 - Step by Step Guide

DIY: Oil Injector Lines for $10 - Step by Step Guide
Alright I know how much we all love a good DIY so here's another one.
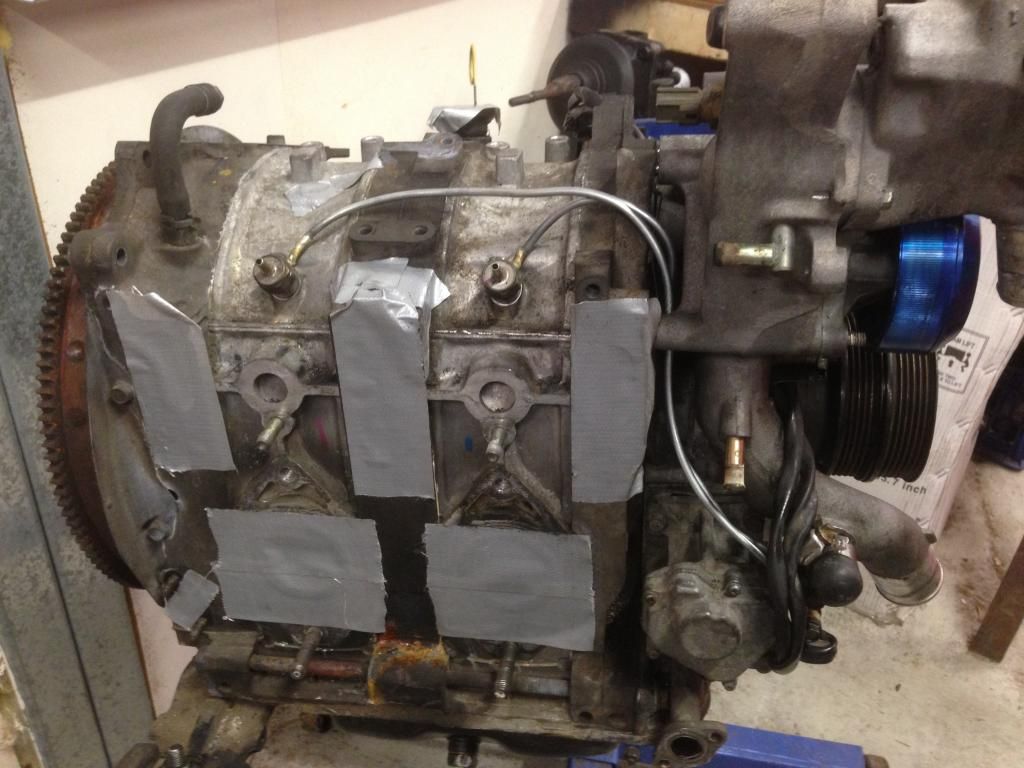
A well known issue with our great cars is the Oil Injector lines.
The Oil Metering Pump and oil injectors are there to provide lubrication to the engine internals. The achilles heel with this system is definitely the lines that deliver the oil from the pump to the injectors.
The lines are made from a Nylon type tubing. It's semi transparent, not really sure why - perhaps as a visual to confirm oil is being injected (not really needed IMO). The problem with the material they chose is that with the heat and over time, the material becomes VERY brittle. Think of trying to bend uncooked spaghetti and you're getting there!
Personally, I'm unsure of specifically how critical this is to engine life, but common sense is that without lubrication, expect accelerated wear on internals and shorter engine life.
Although I do run premix, I've retained the OMP to provide some extra lubrication on advise from other racers. I guess a more "serious" racer would **** off the OMP completely. Have seen some nice, external pumps with separate oil reservoirs so clean 2 stroke oil can be injected instead of dirty engine oil. Anyway, bit of a side issue. Back to the lines themselves.
The lines are prone to breaking whenever being handled or worse, they could crack without you noticing, for example during the rebuild process. There's not always an obvious point of failure with the lines.
One point of common failure is here, snapped completely, nice and obvious:
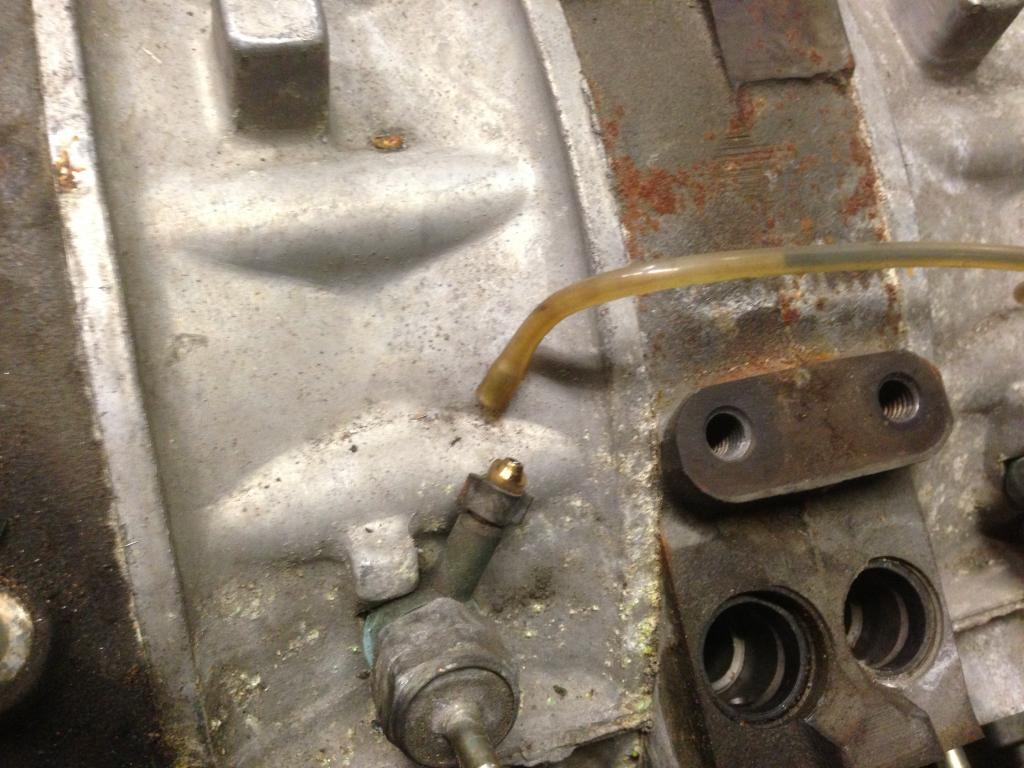
Note: this was on an engine that had only done 43,000kms from new. Proves just how fragile the lines can be.
With an engine stripped right down to bare block, you have the perfect opportunity to do something about the issue and give you peace of mind for the future. Of course you can chance it and put your secondhand brittle lines back on but you may regret it later and worse case scenario is it could end up costing you an engine if no oil at all is injected.
You have a number of options:
1. Replace with Mazda OEM lines - not sure what the list price is but I'm sure not cheap and these will always be a brittle liability.
2. Replace with SS braided hoses - not by any means a cheap option. There are a number of aftermarket reaplcements such as THESE. Or your hose supplier can probably make some up for you. Either way it will be $120-$150 for this option. Just personal opinion, but I didn't like the braided hose option for 2 reasons. Firstly - Chaffing: Braided hose is really harsh on anything it touches. Yes, can easily be covered or you can buy the coated type hose but more money again. Secondly - it's just massive overkill. Braided hose option would be able to carry pressures like 10,000 psi or something silly. The OMP lines are NOT high pressure - 100psi would be the absolute limit they would ever see, if that.
3. Blank off OMP and run premix only.
4. Replace yourself for $10 and make new hard lines.
If you wanna take option 4 like I decided to do, here's a DIY step by step guide
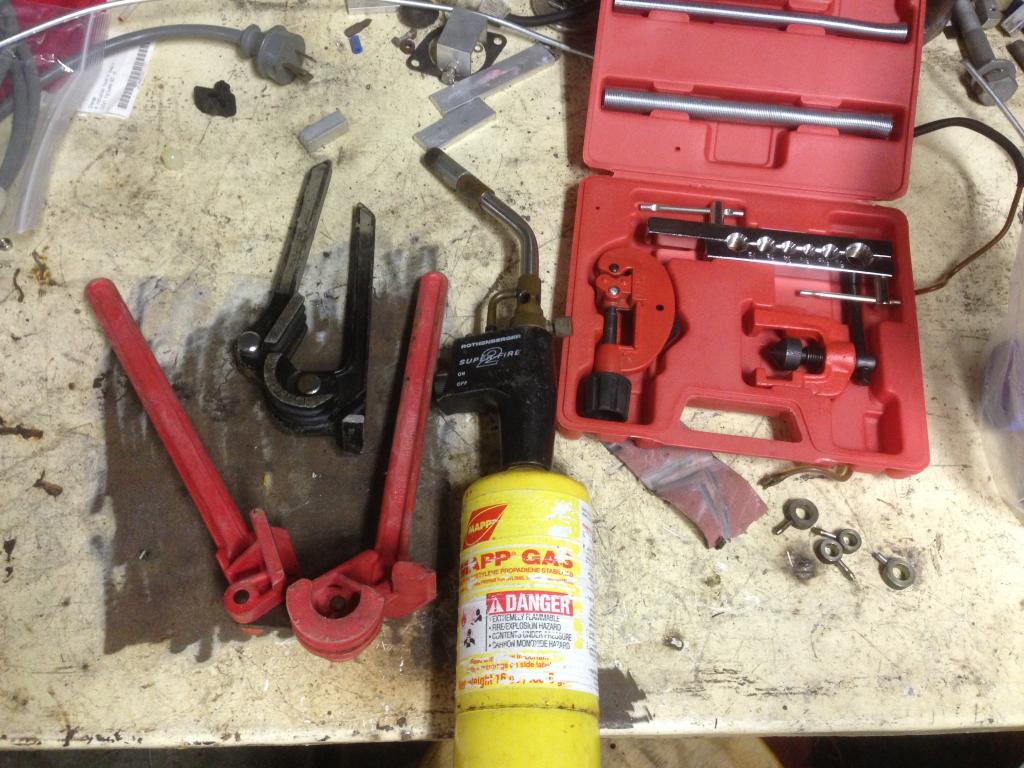
What you'll need:
Assuming you have basic tools like a work bench, bench grinder, etc, here's what I used also:
• 1m 3/16" Bundy Tube (I bought 2m from local brake specialist for $10) Length of hose you need depends on how you decide to route the lines)
• Pipe cutting / flaring tool
• Bending tool
• MAPP Gas or Oxy Torch
• Silver solder
• Flux
• Hack saw
• Stanly Knife
• Long nose pliers
• Rubber mallet
Mapp gas torch (I love these, so much faster and less mucking around than an Oxy and better for tight stuff)
Step 1 - Recover the Banjo bolts
The factory lines use small clamps to secure the banjo bolts to the lines.
Your first job is to recover the Banjo bolts. To do this, clamp the fittings with your long nose pliers (I used pointy nose vice grips) and using a bench grinder, CAREFULLY grind the tabs off.
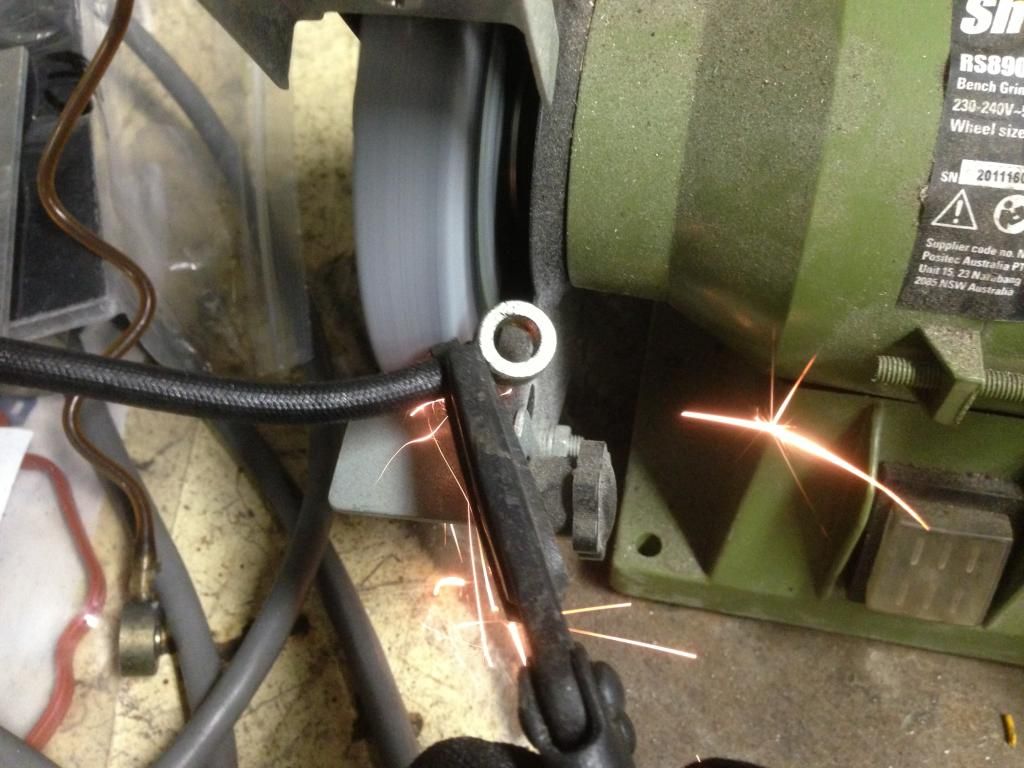
Go very slow and take your time. Obviously you're not worried about the hose but don't damage the banjo bolt.
Once you've ground the tabs away, the clips / clamps fall away.
The Banjos are still a bit of a struggle to free. I thought I could just pull them out but no luck. Just ended up running stanly knife down the plastic line to cut it away, then banjos are free.
Repeat this until you have all 4 banjos out.
Take note, the banjo bolts are two different sizes. Larger ones where the oil injectors are and smaller ones go at the pump.
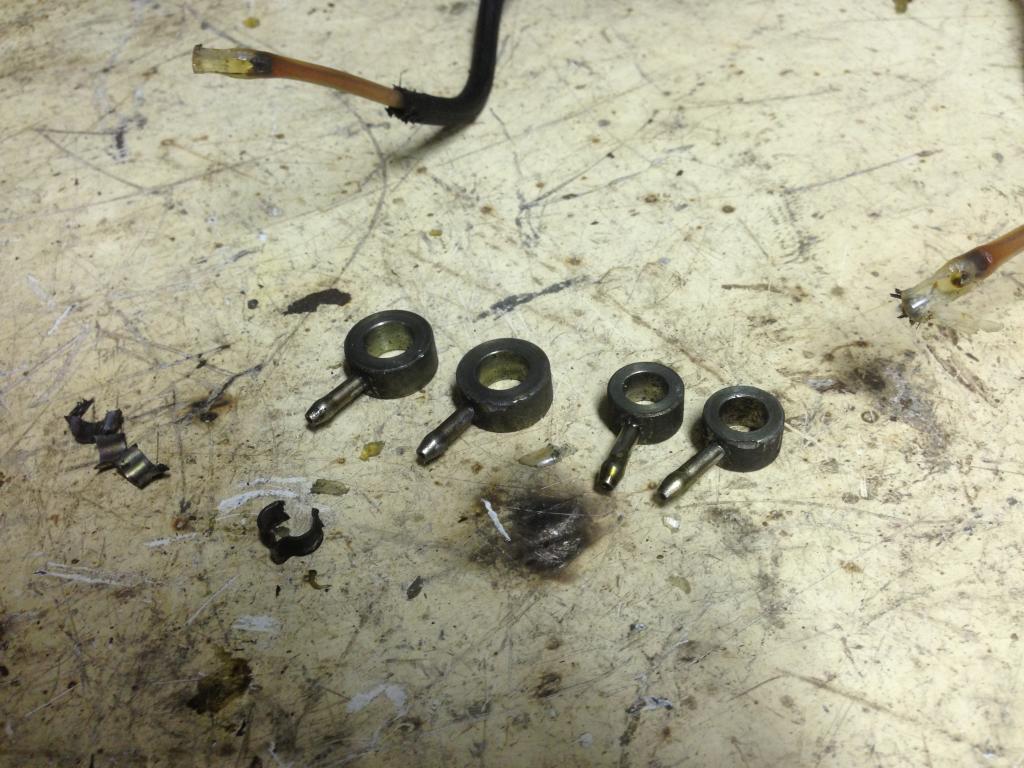
Step 2 - Cut off the nipple off the banjos
Clamp the banjos in a vice using cardboard or rag to protect the mating face, then cut off the nipples using a hacksaw.
Clean up the end of the banjo using knife in back of pipe cutter / stanly knife.
Step 3 - Flare the new pipe
To get the banjo to slip in, I needed to flare the end a little. Using the faring tool, flare the end a little.
Leave the flaring clamp tool still around the pipe, then press the banjo into the pipe. I gave it an extra tap using a rubber mallet just to make sure it was in there properly.
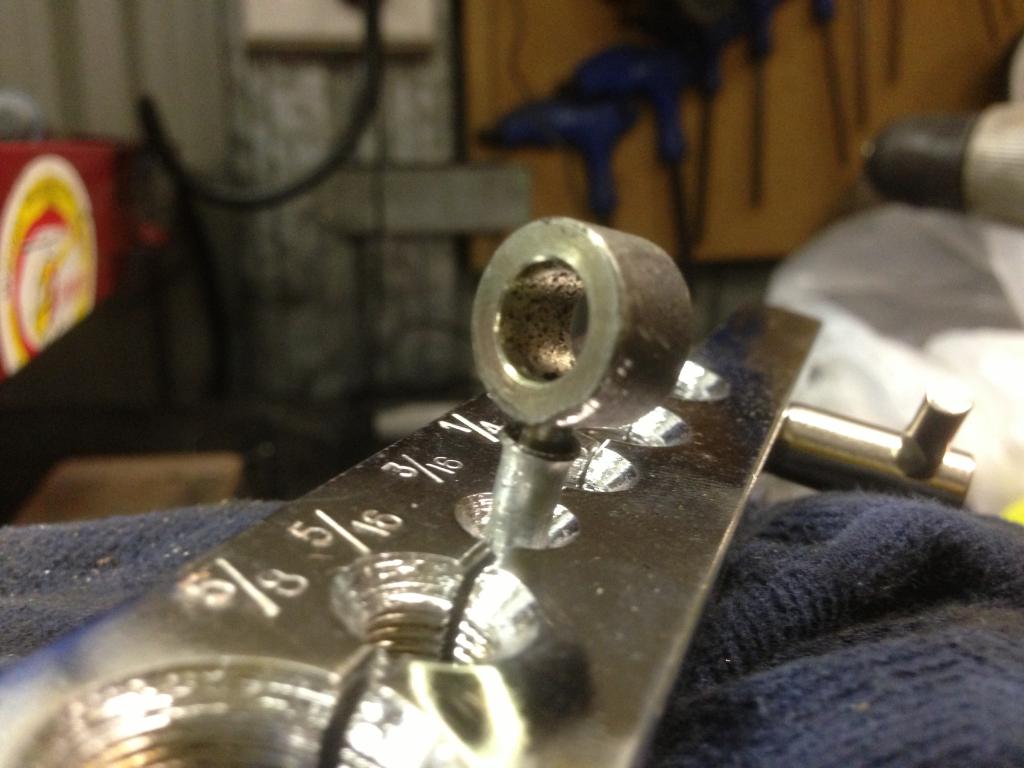
I don't recommend you drive it all the way in. I left it about 2-3mm out, just enough to get your silver solder in there and make a nice joint.
Step 4 - Silver Solder the banjo in
Using MAPP gas (or oxy), gently heat the banjo and pipe until it's nice and warm.
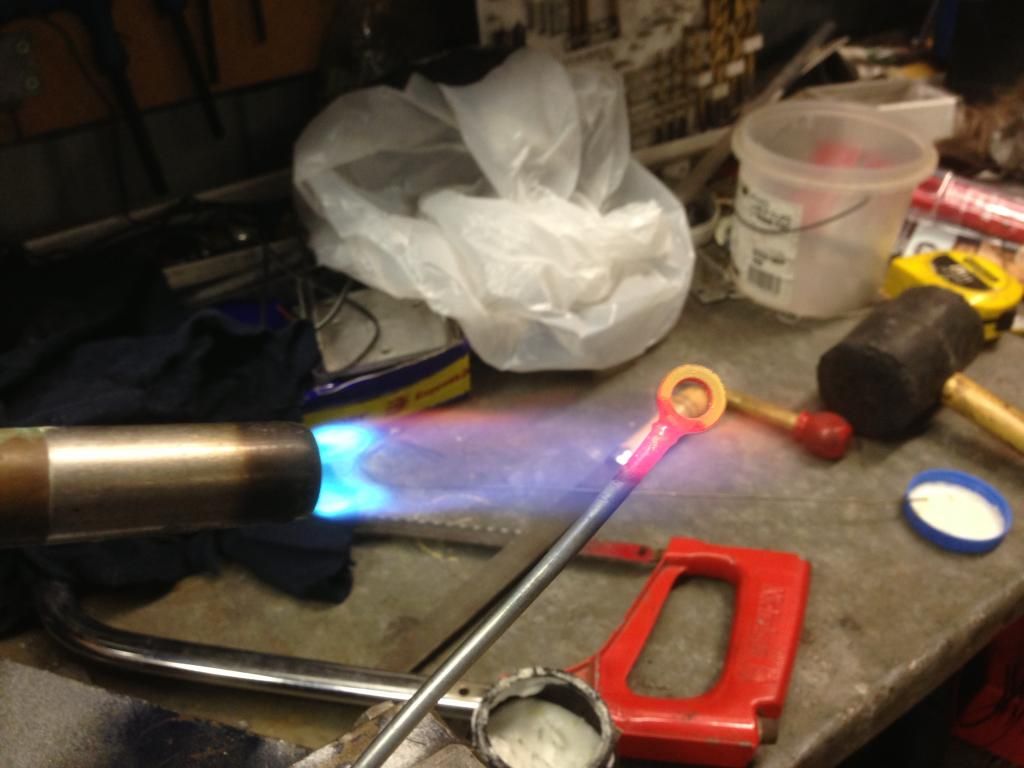
A quick dip of silver solder into flux, then solder the fitting in.
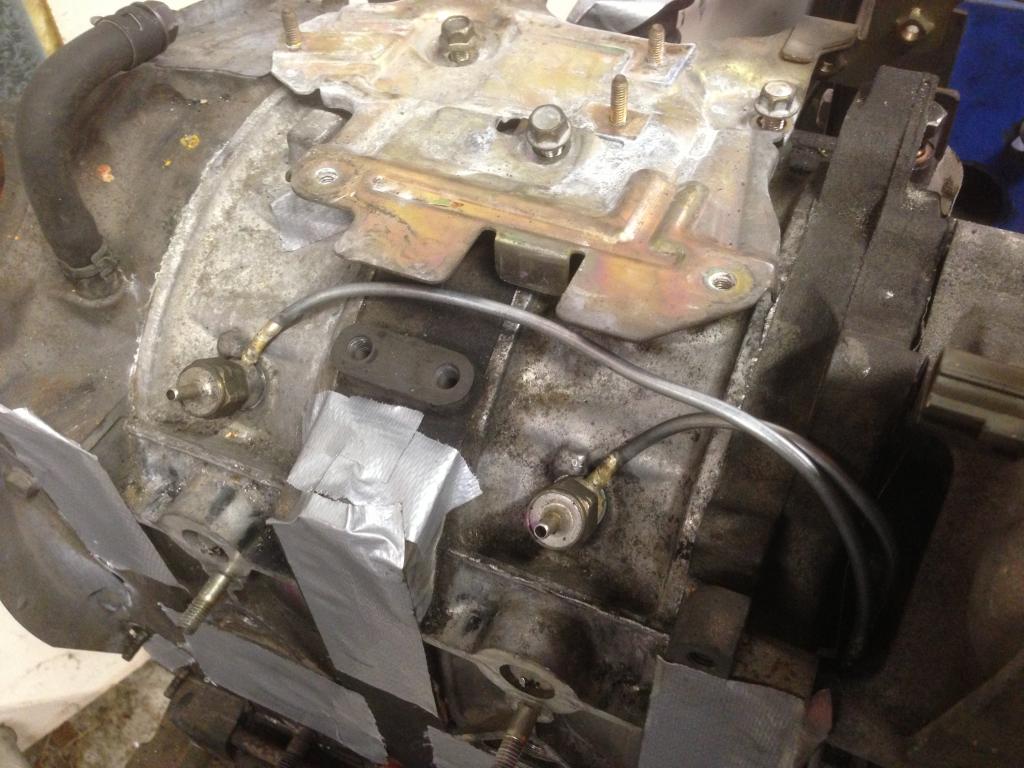
Step 5 - Decide the route for the new line
Once cooled, bolt the banjo into place on the oil metering pump. You will need to take it off and put it back on through the process of bending and routing the pipe.
The TOP outlet on the pump goes to the FRONT rotor housing. Probably doesn't matter if you run them the other way but I decided to keep same as OEM.
Now, the stock routing is up and around the waterpump / thermostat housing. I had a good look at this and couldn't really see why Mazda chose this location. Perhaps because that's the route the wiring for the OMP takes and there's some small tabs / clamps on the way. Could also be so the lines can be replaced without having to remove the water pump / thermostat housing.
I looked at it for a little while and decided it would be neater and much shorter to run the lines between the front plate and the back of the thermostat housing. There's enough room there and it would make the lines nice and short. It's not really difficult to remove the housing if for some reason one needed to get to the hard lines.
Here's how I decided to route the front line:
(Pipe bender is black tool on top of engine as seen in above photo)
With the line bolted up to the pump, work out where your bends need to be. Remove line, bend with pipe bender, put back on engine, check all clearances, adjust as necessary until you're happy.
Mark the length then cut with pipe cutting tool.
Silver solder banjo on for injector end.
Repeat steps 3-5 for the rear line.
I only ended up using about 1m of tubing. You'd need more if you wanna route them same way as OEM.
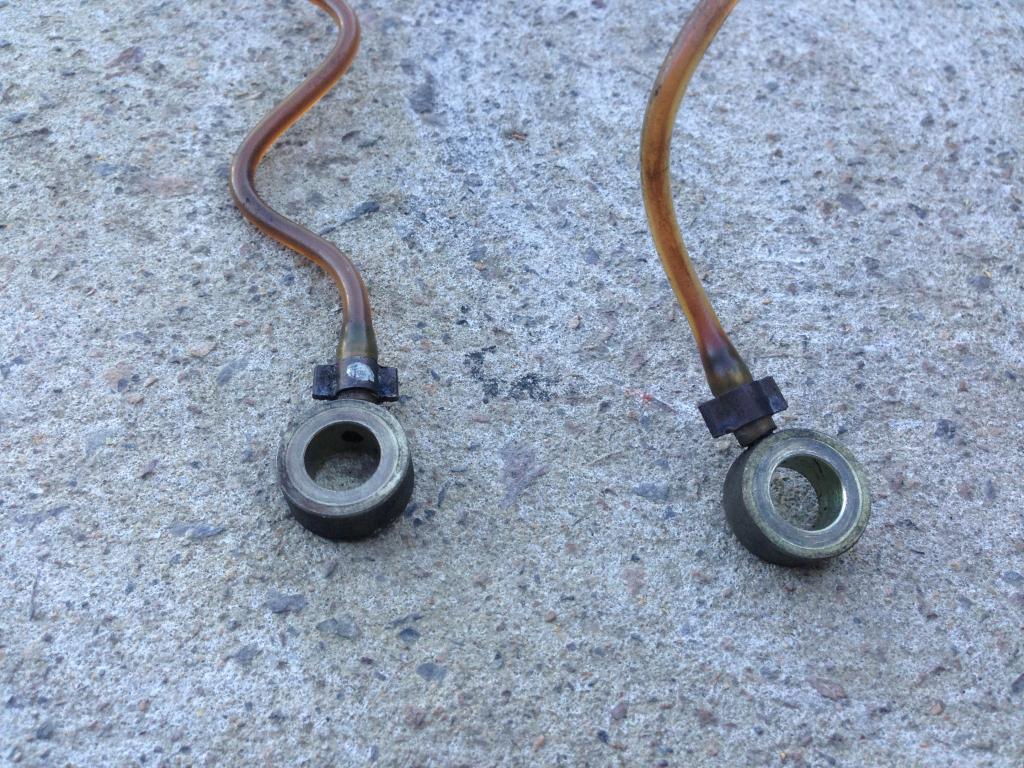
Finally, here's a pic of my new hard lines removed from the engine next to the old plastic ones (also revealing my drink of choice lol):

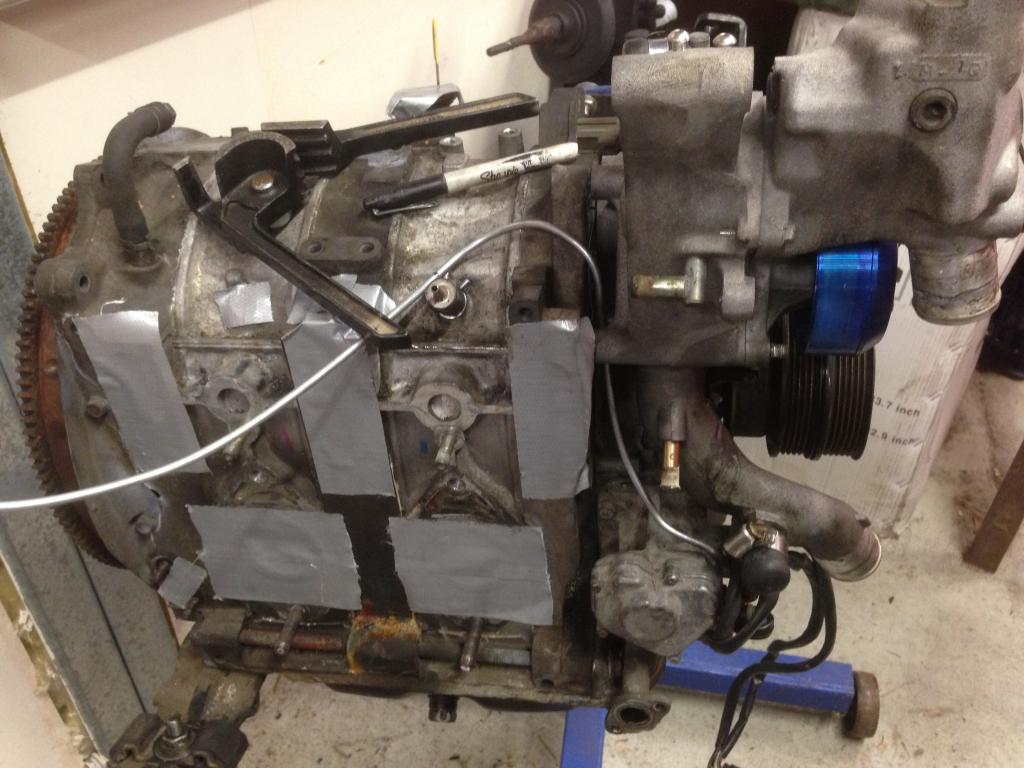
Some pics of the finished lines on the engine.
Here you can see how the new lines fit between the front plate and behind thermostat / waterpump housing:
Test fitting coil bracket to ensure adequate clearance:
Expect this job to take about 30-45 mins. Could be longer depending on if you've worked with pipes before. I've made a few hardlines up before so pretty quick at it. Took me half an hour.
A couple of general tips:
Don't be tempted to bend the tube by hand too much. you can get away with subtle "tweaking" adjustments, but if you try to make an aggressive bend without the proper bending tool, you may kink the hose (or crack the silver solder). Then you'll need to start over again.
Once you've made up the lines, take them off the engine and blow through them (holding your fingers over the banjo bolts). This ensures they aren't blocked by a tight bend. To go further, you can hold one end with your fingers and put in a bucket of water whilst blowing in the other end to check for leaks. I didn't have any.
Lastly, don't forget to replace all the copper washers before fitting to prevent leaks!
Hope this assists someone in future if considering the process.
Cheers!
A well known issue with our great cars is the Oil Injector lines.
The Oil Metering Pump and oil injectors are there to provide lubrication to the engine internals. The achilles heel with this system is definitely the lines that deliver the oil from the pump to the injectors.
The lines are made from a Nylon type tubing. It's semi transparent, not really sure why - perhaps as a visual to confirm oil is being injected (not really needed IMO). The problem with the material they chose is that with the heat and over time, the material becomes VERY brittle. Think of trying to bend uncooked spaghetti and you're getting there!
Personally, I'm unsure of specifically how critical this is to engine life, but common sense is that without lubrication, expect accelerated wear on internals and shorter engine life.
Although I do run premix, I've retained the OMP to provide some extra lubrication on advise from other racers. I guess a more "serious" racer would **** off the OMP completely. Have seen some nice, external pumps with separate oil reservoirs so clean 2 stroke oil can be injected instead of dirty engine oil. Anyway, bit of a side issue. Back to the lines themselves.
The lines are prone to breaking whenever being handled or worse, they could crack without you noticing, for example during the rebuild process. There's not always an obvious point of failure with the lines.
One point of common failure is here, snapped completely, nice and obvious:

Note: this was on an engine that had only done 43,000kms from new. Proves just how fragile the lines can be.
With an engine stripped right down to bare block, you have the perfect opportunity to do something about the issue and give you peace of mind for the future. Of course you can chance it and put your secondhand brittle lines back on but you may regret it later and worse case scenario is it could end up costing you an engine if no oil at all is injected.
You have a number of options:
1. Replace with Mazda OEM lines - not sure what the list price is but I'm sure not cheap and these will always be a brittle liability.
2. Replace with SS braided hoses - not by any means a cheap option. There are a number of aftermarket reaplcements such as THESE. Or your hose supplier can probably make some up for you. Either way it will be $120-$150 for this option. Just personal opinion, but I didn't like the braided hose option for 2 reasons. Firstly - Chaffing: Braided hose is really harsh on anything it touches. Yes, can easily be covered or you can buy the coated type hose but more money again. Secondly - it's just massive overkill. Braided hose option would be able to carry pressures like 10,000 psi or something silly. The OMP lines are NOT high pressure - 100psi would be the absolute limit they would ever see, if that.
3. Blank off OMP and run premix only.
4. Replace yourself for $10 and make new hard lines.
If you wanna take option 4 like I decided to do, here's a DIY step by step guide
What you'll need:
Assuming you have basic tools like a work bench, bench grinder, etc, here's what I used also:
• 1m 3/16" Bundy Tube (I bought 2m from local brake specialist for $10) Length of hose you need depends on how you decide to route the lines)
• Pipe cutting / flaring tool
• Bending tool
• MAPP Gas or Oxy Torch
• Silver solder
• Flux
• Hack saw
• Stanly Knife
• Long nose pliers
• Rubber mallet
Mapp gas torch (I love these, so much faster and less mucking around than an Oxy and better for tight stuff)

Step 1 - Recover the Banjo bolts
The factory lines use small clamps to secure the banjo bolts to the lines.

Your first job is to recover the Banjo bolts. To do this, clamp the fittings with your long nose pliers (I used pointy nose vice grips) and using a bench grinder, CAREFULLY grind the tabs off.

Go very slow and take your time. Obviously you're not worried about the hose but don't damage the banjo bolt.
Once you've ground the tabs away, the clips / clamps fall away.
The Banjos are still a bit of a struggle to free. I thought I could just pull them out but no luck. Just ended up running stanly knife down the plastic line to cut it away, then banjos are free.
Repeat this until you have all 4 banjos out.
Take note, the banjo bolts are two different sizes. Larger ones where the oil injectors are and smaller ones go at the pump.

Step 2 - Cut off the nipple off the banjos
Clamp the banjos in a vice using cardboard or rag to protect the mating face, then cut off the nipples using a hacksaw.
Clean up the end of the banjo using knife in back of pipe cutter / stanly knife.
Step 3 - Flare the new pipe
To get the banjo to slip in, I needed to flare the end a little. Using the faring tool, flare the end a little.
Leave the flaring clamp tool still around the pipe, then press the banjo into the pipe. I gave it an extra tap using a rubber mallet just to make sure it was in there properly.

I don't recommend you drive it all the way in. I left it about 2-3mm out, just enough to get your silver solder in there and make a nice joint.
Step 4 - Silver Solder the banjo in
Using MAPP gas (or oxy), gently heat the banjo and pipe until it's nice and warm.

A quick dip of silver solder into flux, then solder the fitting in.
Step 5 - Decide the route for the new line
Once cooled, bolt the banjo into place on the oil metering pump. You will need to take it off and put it back on through the process of bending and routing the pipe.
The TOP outlet on the pump goes to the FRONT rotor housing. Probably doesn't matter if you run them the other way but I decided to keep same as OEM.
Now, the stock routing is up and around the waterpump / thermostat housing. I had a good look at this and couldn't really see why Mazda chose this location. Perhaps because that's the route the wiring for the OMP takes and there's some small tabs / clamps on the way. Could also be so the lines can be replaced without having to remove the water pump / thermostat housing.
I looked at it for a little while and decided it would be neater and much shorter to run the lines between the front plate and the back of the thermostat housing. There's enough room there and it would make the lines nice and short. It's not really difficult to remove the housing if for some reason one needed to get to the hard lines.
Here's how I decided to route the front line:

(Pipe bender is black tool on top of engine as seen in above photo)
With the line bolted up to the pump, work out where your bends need to be. Remove line, bend with pipe bender, put back on engine, check all clearances, adjust as necessary until you're happy.
Mark the length then cut with pipe cutting tool.
Silver solder banjo on for injector end.
Repeat steps 3-5 for the rear line.
I only ended up using about 1m of tubing. You'd need more if you wanna route them same way as OEM.
Finally, here's a pic of my new hard lines removed from the engine next to the old plastic ones (also revealing my drink of choice lol):

Some pics of the finished lines on the engine.
Here you can see how the new lines fit between the front plate and behind thermostat / waterpump housing:

Test fitting coil bracket to ensure adequate clearance:

Expect this job to take about 30-45 mins. Could be longer depending on if you've worked with pipes before. I've made a few hardlines up before so pretty quick at it. Took me half an hour.
A couple of general tips:
Don't be tempted to bend the tube by hand too much. you can get away with subtle "tweaking" adjustments, but if you try to make an aggressive bend without the proper bending tool, you may kink the hose (or crack the silver solder). Then you'll need to start over again.
Once you've made up the lines, take them off the engine and blow through them (holding your fingers over the banjo bolts). This ensures they aren't blocked by a tight bend. To go further, you can hold one end with your fingers and put in a bucket of water whilst blowing in the other end to check for leaks. I didn't have any.
Lastly, don't forget to replace all the copper washers before fitting to prevent leaks!
Hope this assists someone in future if considering the process.
Cheers!


Very nice DIY!
Few things to note -
- I would be concerned that, over time, those could crack due to flex in the line. As in there's no flex relief. That could be me being over-cautious, though.
- I can't remember the exact cost on the stock OMP lines, but I remember them being reasonable. Typically they last the life of the engine. I'm rebuilding an engine now that has good OMP lines - I flexed them all over creation, no breakage and no problem. The cost of the tools is something to be considered in the project too.
- I seem to remember in the 2nd gen section someone figured out how to remake the lines out of a commonly available plastic tubing that looked and worked like the stock lines.
- I'm also with you, the stainless OMP lines are No Bueno. Pricey, abrasive, a bitch to route properly....they just aren't worth it. Unless you have a super stripped down block and they are visible and you want that look.
Dale

I thought about doing this but didn't think it would work. Nice job.
What is so special about these banjos. Removed the clams and figures is make sure that it wasn't clogged and noticed that they have like a one way valve inside. Can I substitute them with regular brake banjos?
What is so special about these banjos. Removed the clams and figures is make sure that it wasn't clogged and noticed that they have like a one way valve inside. Can I substitute them with regular brake banjos?

Thread
Thread Starter
Forum
Replies
Last Post
trickster
2nd Generation Specific (1986-1992)
25
Jul 1, 2023 04:40 PM