
Customize Your Oem Gauges

Customize Your Oem Gauges
I did this mod about a year ago and thought i was the only person to attempt something like this, but i know there is a guy that did something similar to my set up, but i had a bunch of you guys pm me asking how i got my cluster to look the way it is so here it goes. This is what you will need......
1. hyper red needle kit from (importintelligence.com) (2 Big, 3 Small)
2. hyper white 194 & 74 bulbs to replace original florescent bulbs. (autolumination.com)
3. sheet of 350&450 grit sand paper
4. (3) 194 bulb sockets from (autolumination.com)
-First off don't be afraid of this project its very easy!
-Make sure you work with everything on a towel. Its easy to pick up the face plates and it protect w/e your working with.
-wash your hands before touching gauges! and try your best not to touch the front of the gauge faces!
start disassembling your cluster keeping everything organized as you take it apart
- once you have the face plates off now your ready to take off the needles!
- HAHA I BET YOUR SAYING F! THAT. well i found the easiest way to do this!
all you have to do is is gently turn the needles one at a time all the way to the right. once it stops TAKE A PICTURE DIRECTLY ON TOP TO MARK THE SPOT!.
- once you have your pictures turn them past the stopping point while gently pulling up. This will not damage your cluster!
-pull the faces off of the gauges and put them face down on the towel.
(the front of the gauge faces is very sensitive and loves to absorb oils and become spotty, this is were clean hand play a big role to avoid finger prints.)
If you want you can wipe the faces with a damp cotton rag before putting the clear cluster cover back on.
anyways once you have the faces off begin sanding. You just want to sand until you get all of the orange off. You can use a dremel or w/e works best for you .. the goal is just to sand the orange crap off without getting too aggressive! i wouldn't recommend anything heavier then a 220 grit. Some guys have used chemicals but i don't believe in that crap. can get messy and melt other things off. Just keep it dry and sand!
- when approaching the rpm red line take a little more caution than the rest of the faces.
I had to put just a dot of red permenant marker on mine cause i got too cocky. Cant even notice though..
one your done sanding. clean the back a few times with alchohol until the wipes stop turning yellow/orange ISH . now your ready put the faces back on.
- When you put the needles back on just turn them all the way to the right until you get them to the max were the picture indicates it stops.
(the needle will turn w/o the shaft!)
I added (3) 194 leds on top of the stock locations. The picture of the socket is below. I trimmed the rubber on the sockets to help them fit inside the cluster a little better. I just used crazy glue to mount the 194 sockets. Also you can add aluminum foil in certain areas to help spread the reflection. Just keep the foil away from the electrical motors.
The needle kit comes with instructions. Not that hard.... Just need patients.
These Pictures below are the exact items i bought....
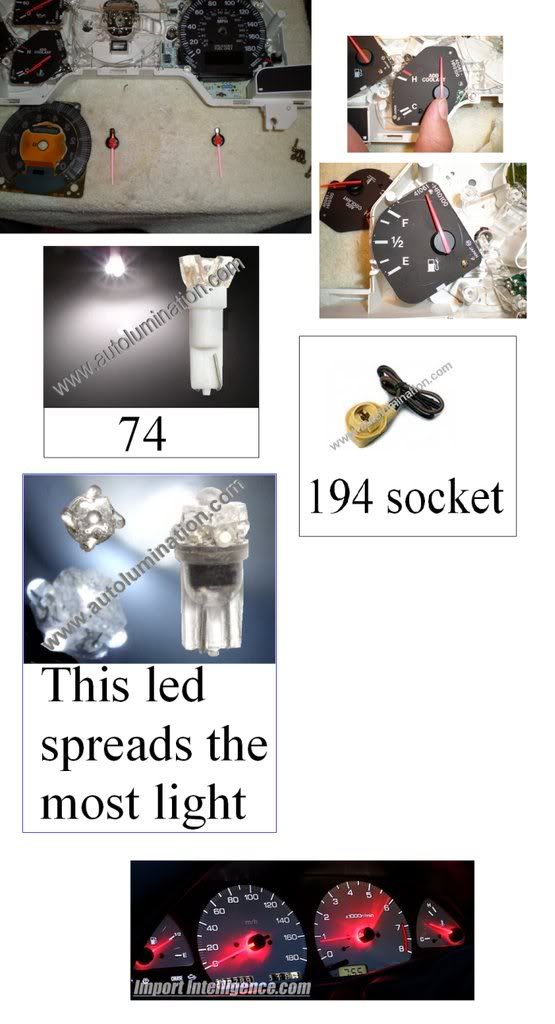
If you want to do an easy gauge mod you can change all the original bulbs with red bulbs from the same site (autolumination.com) with RED bulbs and you will have red numbers and needles. RED+ORANGE= RED!
If you have any questions please let me know. Id like to see alot more modified oem gauge clusters.
1. hyper red needle kit from (importintelligence.com) (2 Big, 3 Small)
2. hyper white 194 & 74 bulbs to replace original florescent bulbs. (autolumination.com)
3. sheet of 350&450 grit sand paper
4. (3) 194 bulb sockets from (autolumination.com)
-First off don't be afraid of this project its very easy!
-Make sure you work with everything on a towel. Its easy to pick up the face plates and it protect w/e your working with.
-wash your hands before touching gauges! and try your best not to touch the front of the gauge faces!
start disassembling your cluster keeping everything organized as you take it apart
- once you have the face plates off now your ready to take off the needles!
- HAHA I BET YOUR SAYING F! THAT. well i found the easiest way to do this!
all you have to do is is gently turn the needles one at a time all the way to the right. once it stops TAKE A PICTURE DIRECTLY ON TOP TO MARK THE SPOT!.
- once you have your pictures turn them past the stopping point while gently pulling up. This will not damage your cluster!
-pull the faces off of the gauges and put them face down on the towel.
(the front of the gauge faces is very sensitive and loves to absorb oils and become spotty, this is were clean hand play a big role to avoid finger prints.)
If you want you can wipe the faces with a damp cotton rag before putting the clear cluster cover back on.
anyways once you have the faces off begin sanding. You just want to sand until you get all of the orange off. You can use a dremel or w/e works best for you .. the goal is just to sand the orange crap off without getting too aggressive! i wouldn't recommend anything heavier then a 220 grit. Some guys have used chemicals but i don't believe in that crap. can get messy and melt other things off. Just keep it dry and sand!
- when approaching the rpm red line take a little more caution than the rest of the faces.
I had to put just a dot of red permenant marker on mine cause i got too cocky. Cant even notice though..
one your done sanding. clean the back a few times with alchohol until the wipes stop turning yellow/orange ISH . now your ready put the faces back on.
- When you put the needles back on just turn them all the way to the right until you get them to the max were the picture indicates it stops.
(the needle will turn w/o the shaft!)
I added (3) 194 leds on top of the stock locations. The picture of the socket is below. I trimmed the rubber on the sockets to help them fit inside the cluster a little better. I just used crazy glue to mount the 194 sockets. Also you can add aluminum foil in certain areas to help spread the reflection. Just keep the foil away from the electrical motors.
The needle kit comes with instructions. Not that hard.... Just need patients.
These Pictures below are the exact items i bought....
If you want to do an easy gauge mod you can change all the original bulbs with red bulbs from the same site (autolumination.com) with RED bulbs and you will have red numbers and needles. RED+ORANGE= RED!
If you have any questions please let me know. Id like to see alot more modified oem gauge clusters.

Trending Topics
you cannot just unplug the air bag light. If you take the bulb out a buzzer will start going off until you put it back in. I actually fixed this already and put a rubber sleeve over the bulb....no light ....no beeping.
you can control it just like the original. The factory bulbs will work with the oem dimmer, if you add leds and sockets use the dimmer for the power source as well. The led needle kit also comes with its own dimmer so you can also control the brightness of the needles separate from the rest.
about all of the switches in your fd have little bulbs with orange sleeves on them that make them just that much darker. you can remove the sleeves on all your switches but unfortunately the cluster does not have the sleeves on its bulbs. The bulbs on the cluster are just clear. what makes the orange on the gauges is the film thats on the back of the gauge faces. without that the faces will be completely transparent. leavening any option available, ...in your case maybe you want to sand the film off and put some orange bulbs inside the cluster. i can almost guarantee it will be alot brighter and still remain somewhat orange but brighter. its just whether or not your willing to do that much work for just a little more brightness.


P.S. another thing you guys can do is take the green arrows out of your turn signals and put some hyper white arrows. I did this to mine and it looks great. Just cut a piece off a clear plastic cup and glue it were the green turn arrow is. Then change the (2) 74 bulbs in the cluster for the signals.

I swear my car hates me!
Joined: Jun 2002
Posts: 629
Likes: 0
From: San Diego, CA
P.S. another thing you guys can do is take the green arrows out of your turn signals and put some hyper white arrows. I did this to mine and it looks great. Just cut a piece off a clear plastic cup and glue it were the green turn arrow is. Then change the (2) 74 bulbs in the cluster for the signals.


Yours came out great. And nice writeup.
I also did this, but I still need to go in and add some LEDs.
Here's some more threads if anyone is interested in doing this mod.
https://www.rx7club.com/3rd-generation-specific-1993-2002-16/hello-lovers-my-new-gauges-%2Apics-gaaalore-%2A-420936/
https://www.rx7club.com/3rd-generation-specific-1993-2002-16/write-up-hyperite-gauge-mod-white-backlighting-473379/
Another helpful link.
https://www.rx7club.com/3rd-generation-specific-1993-2002-16/gauge-mod-719337/
https://www.rx7club.com/3rd-generation-specific-1993-2002-16/gauge-mod-719337/
I would but I dont have anymore pictures from this. I believe I put one in the far right corner, one in the middle behind the 6000rpm mark and one to the far right. What you have to do is light up the cluster with the factory locations and just see where it needs more light. Then add the led sockets in those locations. Hope I helped...