
Completed my Vmount AC fabrication

Thread Starter


Joined: Jun 2002
Posts: 3,367
Likes: 87
From: Phoenix, AZ
Completed my Vmount AC fabrication
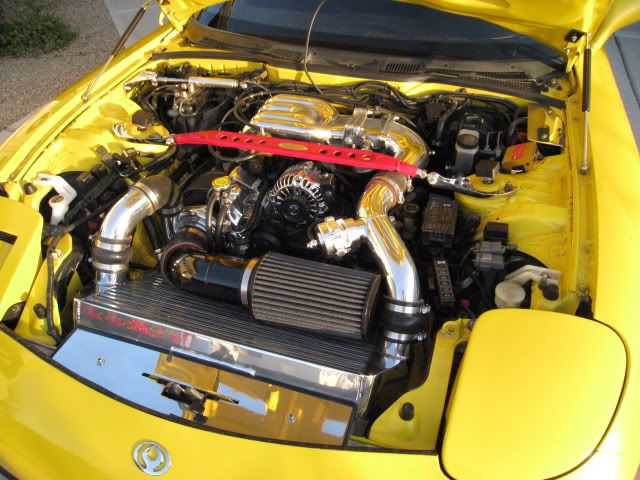
Ahhhh, cool air! Charged with R-12. After 2.5 years, I got off my lazy butt and fabbed up lines, checked for leaks, then charged the system. Working GREAT. Thanks to Fritz Flynn for an old AC line with the required ends for my extension line, and Eric Greenbank (Tripple 7s) for his guidance on evacuating and charging the system. Here are some pics of how I did it!
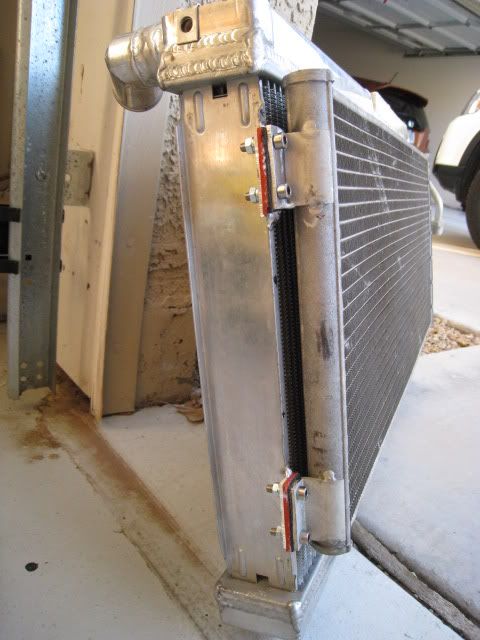
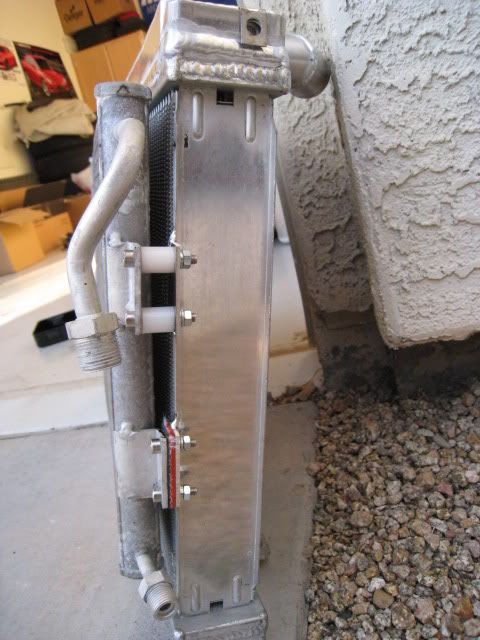
First off, I planned from the start to eventually have AC 2 years ago when designing my Monster Vmount, so I fabricated mounts for my condenser early on on my radiator. The condenser sat in the car for the past 2 years with the ends covered to minimize contamination.
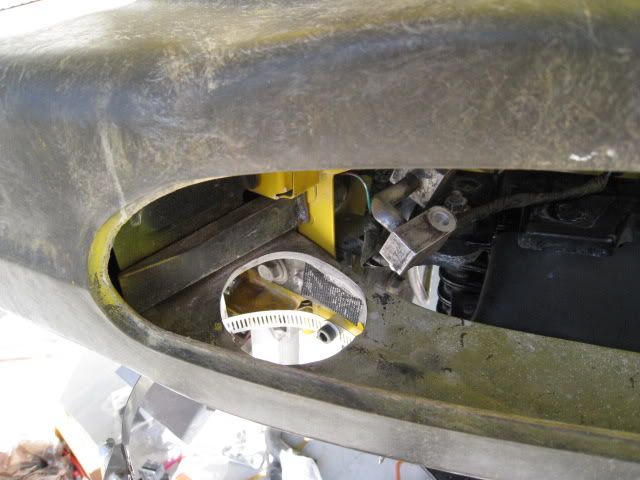
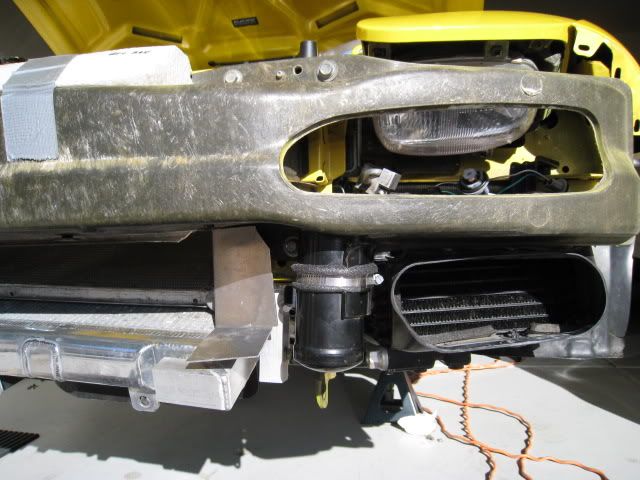
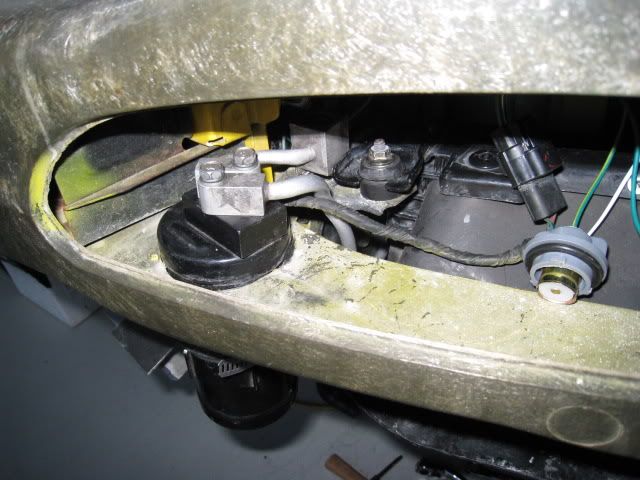
So, about a month ago, I looked at all of my stock lines and tried to identify a place to mount the dryer. Since the engine bay was extremely short on space I had to get creative. Here's what I came up with. Cut a hole in my bumper support and ran the AC dryer lines through my drivers side headlight assembly, right beside my oil cooler:
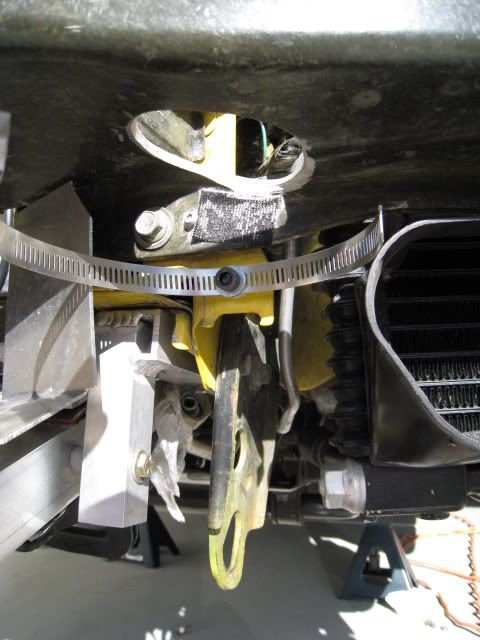
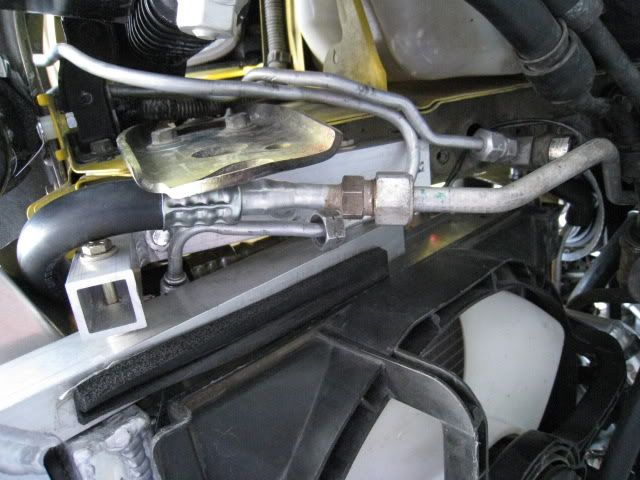
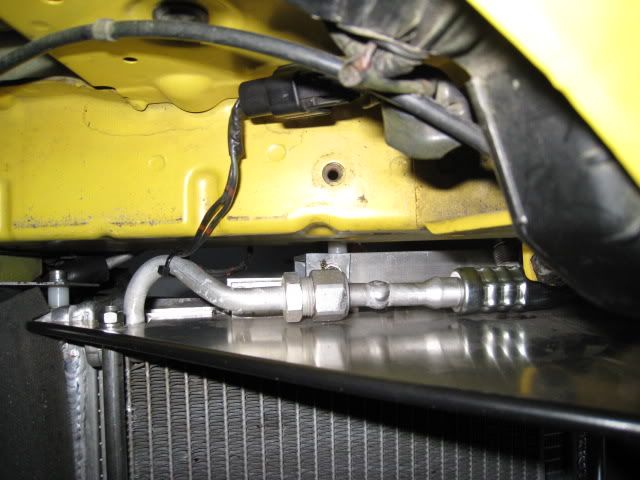
The stock high pressure line (smaller one) required no additional lengthening. Just patient and careful reshaping to get the bends I wanted. Next, I needed an extension line for my low pressure line (larger line) that comes out of the compressor and attaches to the condenser. Due to my Vmount design and shrouding, I needed to create an extension line to make this connection possible. Here's a pic of my solution (note thick black line) for looping the line around my front Vmount support bracket:
Finally, it was time to pull a vacuum and see if it held pressure. Crap, what's that hissing sound.... a leak in my condenser. Pulled it all apart, got the condenser leak welded up, pressure tested, and viola! Holds 30 inches of vacuum. After that we pulled vacuum on he car for 24 hours to make sure nothing leaked before charging the system!!
Here's a pic with the intercooler reinstalled:
This install was actually not that bad. You just need to take your time, get creative with line fabrication, and stick with it. Hopefully this thread will inspire more Vmount owners to give AC installation a shot!
I drove the past 2 years from Phoenix to So Cal for Sevenstock through the SW Deserts without AC and vowed that last year would be my last hot ride. Hopefully it will continue to hold true. So far, so good!!
First off, I planned from the start to eventually have AC 2 years ago when designing my Monster Vmount, so I fabricated mounts for my condenser early on on my radiator. The condenser sat in the car for the past 2 years with the ends covered to minimize contamination.
So, about a month ago, I looked at all of my stock lines and tried to identify a place to mount the dryer. Since the engine bay was extremely short on space I had to get creative. Here's what I came up with. Cut a hole in my bumper support and ran the AC dryer lines through my drivers side headlight assembly, right beside my oil cooler:
The stock high pressure line (smaller one) required no additional lengthening. Just patient and careful reshaping to get the bends I wanted. Next, I needed an extension line for my low pressure line (larger line) that comes out of the compressor and attaches to the condenser. Due to my Vmount design and shrouding, I needed to create an extension line to make this connection possible. Here's a pic of my solution (note thick black line) for looping the line around my front Vmount support bracket:
Finally, it was time to pull a vacuum and see if it held pressure. Crap, what's that hissing sound.... a leak in my condenser. Pulled it all apart, got the condenser leak welded up, pressure tested, and viola! Holds 30 inches of vacuum. After that we pulled vacuum on he car for 24 hours to make sure nothing leaked before charging the system!!
Here's a pic with the intercooler reinstalled:
This install was actually not that bad. You just need to take your time, get creative with line fabrication, and stick with it. Hopefully this thread will inspire more Vmount owners to give AC installation a shot!
I drove the past 2 years from Phoenix to So Cal for Sevenstock through the SW Deserts without AC and vowed that last year would be my last hot ride. Hopefully it will continue to hold true. So far, so good!!

Thread Starter
Joined: Jun 2002
Posts: 3,367
Likes: 87
From: Phoenix, AZ
Thread Starter
Joined: Jun 2002
Posts: 3,367
Likes: 87
From: Phoenix, AZ

Trending Topics


Can you please provide more details on how you bent the lines? Did you use some special tool or a particular set of steps? Did you see any of those thin lines cracking?
Moconnor and I need to do this for our setups.
Moconnor and I need to do this for our setups.

Thread Starter
Joined: Jun 2002
Posts: 3,367
Likes: 87
From: Phoenix, AZ
If you're currently NOT running AC it can't get worse right, things can be fixed so give it a shot, go slowly and think it through. Since my car is not a daily driver, I had the luxury of taking a few weeks to think and work through the process! Good luck and post up your results!
So many guys don't realize how well the FD's AC system works. It will freeze your *** out of the car, when my system is working right it will push 35 degree air out of the vents.
Good job!
Dale
Good job!
Dale
Thread Starter
Joined: Jun 2002
Posts: 3,367
Likes: 87
From: Phoenix, AZ
Thanks everyone. If you feel that its "sticky" worthy maybe we could get a mod to help with that?
One note to add is to replace all of the AC o-rings in your system and lube them before reassembly. It's very inexpensive to do and increases your likelihood of success!!
One note to add is to replace all of the AC o-rings in your system and lube them before reassembly. It's very inexpensive to do and increases your likelihood of success!!
Thread Starter
Joined: Jun 2002
Posts: 3,367
Likes: 87
From: Phoenix, AZ
Couldn't agree with you more James! Thanks!
Hey James, I know that your setup is similar to mine. Please post up some pics of your install if you have some. In fact, anyone with Vmount AC install pics, please post them here!!!
Hey James, I know that your setup is similar to mine. Please post up some pics of your install if you have some. In fact, anyone with Vmount AC install pics, please post them here!!!
Great work!
I have only one criticism: What's the deal with your air filter placement?
All of your hard work to manage fluid temps and the air filter is getting the air that's been heated by the intercooler.
A few of the vmount setups I've seen place the filter in the "V" so it gets only fresh air.
Keep up the good work!
Vince

 I love the coathanger trick, thanks for posting that.
Thread Starter
Joined: Jun 2002
Posts: 3,367
Likes: 87
From: Phoenix, AZ
Great work!
I have only one criticism: What's the deal with your air filter placement?
All of your hard work to manage fluid temps and the air filter is getting the air that's been heated by the intercooler.
A few of the vmount setups I've seen place the filter in the "V" so it gets only fresh air.
Keep up the good work!
Vince
I have only one criticism: What's the deal with your air filter placement?
All of your hard work to manage fluid temps and the air filter is getting the air that's been heated by the intercooler.
A few of the vmount setups I've seen place the filter in the "V" so it gets only fresh air.
Keep up the good work!
Vince

Full Member
Joined: May 2007
Posts: 134
Likes: 0
From: North Port, Florida
how well is that receiver-drier holding in there? any vibration on there? reason i asked is that you got it to close to the sides of the bumper and in my opinion eventually it will make a hole in the drier from vibration and rubbing on a bumper support, I would put some kind of foam around the bumper and then install drier, to be on safe side.
Thread Starter
Joined: Jun 2002
Posts: 3,367
Likes: 87
From: Phoenix, AZ
how well is that receiver-drier holding in there? any vibration on there? reason i asked is that you got it to close to the sides of the bumper and in my opinion eventually it will make a hole in the drier from vibration and rubbing on a bumper support, I would put some kind of foam around the bumper and then install drier, to be on safe side.

Thread
Thread Starter
Forum
Replies
Last Post
The1Sun
1st Generation Specific (1979-1985)
0
Sep 7, 2015 10:21 PM