
93 FD3S Auto to Manual swap, step by step.


Thread Starter
Junior Member
Joined: Oct 2010
Posts: 2
Likes: 0
93 FD3S Auto to Manual swap, step by step.
Figured that since I was able to get most of the information I needed to do the swap, I owed a clean tutorial on how I did it. Most of the information I found on the 3 main threads were really diluted, hopefully this thread will help out someone else with this swap.
Parts I used for the swap.
5spd tranny
Clutch
Man driveline
Dash from a 5spd including gauge cluster
Shifter
Clutch and Brake pedal assembly
Slave Cyl.
5 spd diff to tranny support
5spd Starter
5spd Flywheel
Might be a part or two I forgot to post here, but it should be in the install instructions.
Disconnect the battery, while you are there unbolt the breather hose from the auto transmission located on the back of the engine intake manifold. Remove the 2 14mm bellhousing bolts now, you will be glad you did when its up in the air.
In the interior of the vehicle, remove the center consol, unbolt the 4 10mm bolts from the shifter and unplug the one cable that attach's to the auto shifter. After you remove the driveline you will be able to pull the cotter pin from the shifter, then remove shifter.
Put the FD3S up in the air. Spray down the exhaust bolts where the DP and the Cat meet up. Remove said bolts. Factory Cat has two connections, one is a temp sensor, the other is the EGR BS tube, remove said connections.
With WD40, spray down the exhaust hangers, then pry out the posts with a flat head screw driver. Exhaust should be removed at this point.
There are a couple aluminum braces under the vehicle that need to be removed, keep the brace under the transmission for now, but remove the rear brace that goes thru the support beam.
remove the transmission / diff suport beam by unbolting the 4 21mm bolts off the tranmission, have someone hold the beam, remove the 5 bolts that attach the beam to the diff. With a little jiggling you should be able to remove the beam.
Place a tranny jack under the rear diff, then unbolt the 4 14mm driveline bolts. find a piece of metal to wedge under the diff to keep it from providing too much pressure on the diff mounts.
Pull the driveline.
If your tranny is level you should not leak any fluid when you pull the driveline.
Pull the cotter pin that attaches the shift linkage to the auto shifter, remove the shifter.
There is no drain bolt for the auto tranny, remove the pleuthora of bolts holding the pan on from the rear and sides, keep the front bolts on, just loosen them up a little. Pry the pan and drain the fluid. Once its drained enought remove the final bolts and drop the pan, drain and reinstall the pan.
Remove the starter by disconnecting the wires and removing the 3 14mm bolts and 1 14mm nut.
remove the electrical connections from the auto tranny and push the wiring harness into the engine bay, out of the way.
On the left side of the tranny you will see the oil lines for the tranny cooler, remove the rubber connections and drain any remaining fluid out of the lines.
At this point the tranny should not have anything else connecting to it, verify.
remove the access pannel from the bottom of the bell housing, this is where you will unbolt the torque converter from the flexplate/flywheel. It is important to note this step, there isnt a whole lot of room to work under the car, leaving the torque converter on the flywheel will keep you from dropping the tranny.
To pull the torque converter you will need a large straight screwdriver to hold the flywheel, there is a notch in the bell housing to faciliate this. Position th first bolt where you have access to it and connect a 14mm wrench to it, with a breaker bar you will be able to remove this bolt. spin the flywheel till you get to the next bolt. There are 4 bolts holding it on, and they are torqued to about 150ft lbs or so. repeat until all bolts are removed.
Tranny is now ready to be pulled place the tranny jack under the transmission, remove the 4 remaining 14 mm bolts from the bell housing (you will have to use a wobbler and a shitton of extentions to get two of them off, have fun).
Once the tranny is unbolted it should easily pull from the engine, you will need to finess it around the DP. lower and place it out of the work area.
To pull the flexplate and you are going to need a 54mm socket and a hell of an impact gun (ImaKethings hooked me up in a big way letting me borrow his BFIG, surge tank, and socket. Thanks bro. If you dont have an impact gun you will need to figure out a way to lock down your flexplate. After the bolt is out I unbolted the flexplate (6 14mm bolts) and placed a pully puller to remove the counter balance.
A quick inspection showed me that the rear main seal was starting to go bad, after a phone call Justin showed up with a new seal, and the pilot bearing. HUGE THANKS TO JUSTIN.
The seal will press in by hand with a little lithium grease. Take your time and keep it centered. The pilot bearing takes a little work but easily slides into position with a few light taps of a hammer, and a socket.
While I was there I made a blockoff plate for the exhaust gas return with a little aluminum and copper RTV, wont be needing that anymore. Also found my stock catalytic converter was toast, good thing I had picked up a new midpipe.
You are now ready to install your flywheel, place some lithium grease on the main seal and the inside of the flywheel. You will also need to slab a little lube on where the key will sit, that will hold the key into the groove so your not F'ing with it. The flywheel should slide on easily, if it doesnt recheck the key to make sure it didnt slide off the groove. Torque down the 54mm nut to 350ft lbs.
Now its time to install your clutch. You have a clutch alignment tool right? I didnt, so I used an extension and electrical tape. works for me. center the clutch disk and install the pressure plate on the guide pins (Once again ImaKethings came thru for me. I didnt pick any up, so he kindly lathed 3 of them out for me. I owe you big time bro.). finger tighten down the 6 14mm clutch bolts. Then tighten down the bolts 1 then 4, 2 then 5, 3 then 6. Tighten down a little at a time to keep everything equal. eventually it should be tight. I dont know the exact spec for the flywheel, but I can tell you its not 150lbs. All 150lbs will do is give you a broken bolt. Yea, I was pissed. I torqued them down to 36ft lbs after I extracted the stud and replaced the bolt.
Take your new throwout bearing lock ring and attach it to the pressure plate, once the tranny is installed all you need to do is actuate the clutch to have it lock into position.
Now its time to mount the tranny, make sure there are no obstructions or wiring harness's in the way. The 5spd tranny is significantly lighter then the auto, so its a lot easier to manhandle. Once its in postition and the input shaft is aligned with the clutch disk start to move it forward. Attach a driveline and rotate to help get the splines aligned. You may need to take a prybar and lift the front of the engine to give it the proper angle. slide on without using bolts to tighten it up. Attach your bell housing bolts and your ready to go.
Now its time to work the driveline. I kept my factory diff instead of buying a 5spd one. You can also remove the companion flange from the 5 spd diff and install on your auto diff, or you can do what I did. I pressed out the driveline flange U joints and swapped them from the auto to the 5 spd. Now I can use the 5 spd driveline and the auto diff.
Install the Tranny / Diff support Beam.
Install all of the aluminum braces, except for the middle one, you will need to do that after the exhaust is installed.
I installed an aftermarket midpipe due to the poor condition of the Cat. Install the rest of your exhaust.
Install the center aluminum brace.
Connect the exhaust gas return hose and the temp sensor on the Cat.
Feed down the clutch actuator and install on the transmission, leave the upper hose laying in the engine compartment
Install and wire your starter (If you have one, I am still looking for one).
Lower the vehicle, we will do wiring at a later time, with pictures.
From the driverside interior unbolt the clutch mount block off plate, 2 12MM bolts and remove the block off plate. Place the slave cyl into the mount holes and prop it from behind to keep it from pushing back when you install the clutch pedal.
Remove the brake petal assembly ( or trim down your factory brake pedal ) by removing a cotter pin and brake plunger retention pin, remove the 7 12MM bolts (4 on the face of the mount 1 above, 2 on the steering column). Replace with your new brake petal assembly.
Install the Clutch petal assembly 3 12MM bolts (2 on the face, 1 above) Make sure to align the plunger into the slave cyl.
Install the actuator hose assembly with the slave cyl. Remove the blockoff cap on your master cyl and quickly plug in the hose to the slave cyl. ensure all connections are tight. (There is no reason to replace your brake booster and master cyl, they are identical from the 5 spd to the Auto).
At this point I removed the dash, there are a metric **** ton of plastic interior pieces that need to be removed to do this, have fun and take your time. The only bolts that hold on the dash are 1 12mm bolt center dash by the defrost vent, remove access panel and remove bolt. 2 12MM bolts located driver side behind the door vent panel. 2 12MM bolts on the pass side same location. and 4 12MM bolts center console behind the leg rest panel and the opposite panel, you will need to remove the carpet panel to get to them (they are designed to be moved). Slowly pull the dash to find the plethora of cables that will need to be unplugged. Then remove dash.
Install the starter, the factory Auto harness will be used for the rest of the install. The starter harness installs the same from the auto to the man starter.
Fill the transmission with gear oil, check the service manual for factory recommended. I ran with Redline 90weight. Should take 2.5Q to fill.
The starter inhibitor can be bypassed by wiring the two larger wires on the big grey connector together. The connector should be located near the starter, it was the main harness connector to the auto tranny.
On the same harness you need to connect wire 2 and wire 7 to the reverse switch on the tranny. This will get your reverse lights to function. If you are looking at the connector, and the larger gauge wires are on the bottom, it is the top left wires. They are located right next to each other. (sorry no pics).
I changed out the entire dash rather than rewire the dash harness. Install you new harness, rewire your factory harness, or install your 5spd dash. Wire your gauge cluster, bolt up the steering column recheck all wiring harness's.
Fill the transmission shifter location with 90 weight and install the shifter center console and shift boot. Check your wiring harness connectors again.
You can run the factory automatic ECU with this setup. I picked up a PFC for my install but have yet to install it.
Test for your reverse lights, ensure your clutch line is bled, and your wiring harness's are connected properly. Start your car and break in that new clutch.
enjoy


 .
.

Full Member
Joined: Jun 2009
Posts: 85
Likes: 1
From: Chch, New Zealand
Hey, very nice guide.
My FD had an auto-manual swap before I purchased it, so I have a question regarding improvements on the swap:
- Is the auto dash cluster wiring different to a manual cluster? I am primarily concerned about the tacho, so I could just swap the guage face I guess.
- Is the reversing beeper part of the dash cluster? I would love to get rid of it :P (I assume manual cars don't have a reversing beeper).
I ran the auto ECU for a year before getting a PFC. I only got 8psi boost above 5500-6K rpm (so a 10-8-10-8 pattern). After plugging in the powerFC I get a solid 10psi all the way to 7K+. Just curious if this is a characteristic of the auto ECU.

I'm in the middle of a 5 spd swap also. But I bought a 5 spd emission harness. So it doesn't plug into the dash. Does anyone know how to fix this problem? I would use the auto harness but It's all broken.
Trending Topics
Great write up, I will definitely use this along with a few other conversion threads once I get started on mine. Also, can someone help out two40silvia in case anyone else runs into this problem in the future.
Thanks again,
Hecor
Thanks again,
Hecor
The 5 speed harness will not work with the automatic dash harness. You might be able to find a way to make it work by reading the FSM and by wiring it manually but they are not compatible otherwise. You cannot just swap the dash harness either as it's not compatible with the front ring harness (wraps under fenders, around inside front bumper and back around other fender into the side of the car under dash). You will have to swap the dash harness and the front ring harness or get another automatic emissions harness to make it work. I would recommend the full wiring swap but it's a very time comsuming (and expensive) process for relatively little gain. I ran the automatic harness for over a year and it works just fine with the manual swap.
Hey, very nice guide.
My FD had an auto-manual swap before I purchased it, so I have a question regarding improvements on the swap:
- Is the auto dash cluster wiring different to a manual cluster? I am primarily concerned about the tacho, so I could just swap the guage face I guess.
- Is the reversing beeper part of the dash cluster? I would love to get rid of it :P (I assume manual cars don't have a reversing beeper).
I ran the auto ECU for a year before getting a PFC. I only got 8psi boost above 5500-6K rpm (so a 10-8-10-8 pattern). After plugging in the powerFC I get a solid 10psi all the way to 7K+. Just curious if this is a characteristic of the auto ECU.
My FD had an auto-manual swap before I purchased it, so I have a question regarding improvements on the swap:
- Is the auto dash cluster wiring different to a manual cluster? I am primarily concerned about the tacho, so I could just swap the guage face I guess.
- Is the reversing beeper part of the dash cluster? I would love to get rid of it :P (I assume manual cars don't have a reversing beeper).
I ran the auto ECU for a year before getting a PFC. I only got 8psi boost above 5500-6K rpm (so a 10-8-10-8 pattern). After plugging in the powerFC I get a solid 10psi all the way to 7K+. Just curious if this is a characteristic of the auto ECU.
I don't recall a reversing beeper in any RX-7, automatic or manual. Do you have a video or sound clip?
Automatic cars should still get 10-8-10.
The front rotor should still fire it could be a wiring or mechanical problem. The N3A2 ECU should work fine with the N3A1 igniter. The black plug could be the automatic tranny computer or the fan control box. Do you have a picture of it? I might be wrong on the connector but I will double check tomorrow.
hey there
im about to do my 5 pd swap in a couple of months and just was wondering about a thing or two?
- i purchased a 5 spd diff , will my auto drive shaft that came with the car work with the 5 spd swap?
- will i have to tilt the engine down for the transmission to bolt up perfectly?
thanks
-scott
im about to do my 5 pd swap in a couple of months and just was wondering about a thing or two?
- i purchased a 5 spd diff , will my auto drive shaft that came with the car work with the 5 spd swap?
- will i have to tilt the engine down for the transmission to bolt up perfectly?
thanks
-scott
ok ill see if i can track down a 5 spd drive shaft and no i purchased a jdm spec 430 diff from a 5 spd, will i still need to get the right flange?
FD3S in progress
Joined: Jul 2007
Posts: 20
Likes: 0
From: Walnut Creek, CA
The front rotor should still fire it could be a wiring or mechanical problem. The N3A2 ECU should work fine with the N3A1 igniter. The black plug could be the automatic tranny computer or the fan control box. Do you have a picture of it? I might be wrong on the connector but I will double check tomorrow.
I am looking for anyone who knows anyone in Mississippi who works on rotary engines.

Junior Member
Joined: Apr 2012
Posts: 19
Likes: 0
From: CA
hi, i just bought an fd thats had a manual swap done to it and its having trouble starting up. do you need to keep the EC-AT control unit when doing this swap? (left side of the pic)
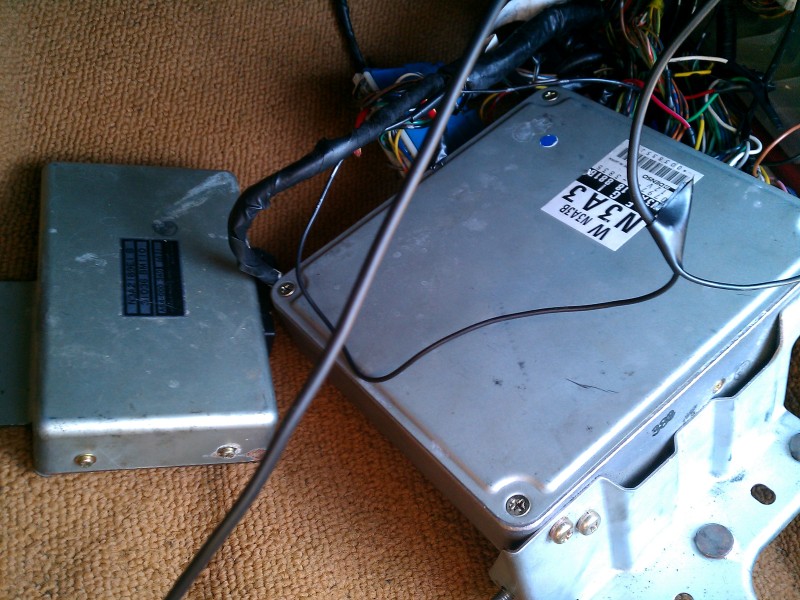
also should there be both of these plugged in?

also should there be both of these plugged in?

Junior Member
Joined: Mar 2006
Posts: 39
Likes: 0
From: Key West, FL
Hello,
I'm in the middle of my auto to manual swap. I've read all of the threads. I have two questions that were not addressed. The electrical question may have been addressed with pics about 8 years ago, but the hyperlinks are all dead at this time.
I plan on redoing the step by step list when I'm completely done to include the questions that I've run into that I didn't see answers to.
So, here are my 2 questions:
Background: I have a 1994 RX7 FD3 automatic. All of the harnesses are automatic.
I've removed everything for the tranny swap and I am waiting on a few parts to arrive.
2 questions:
#1 Question - Electrical:
There are approximately 5 electrical connector plugs on the autotranny and the same number on the car. My new manual tranny has 4 connectors and the majority have different plugs.
Do I need to connect all of the automatic plugs on the car's harness to the manual tranny connectors?
-If not, which ones will not need to be connected.
-If I do not need to connect some of the plugs, is it necessary to ground the unused plugs?
Any recommendations on connecting the nuetral switch and the clutch switch to the clutch pedal assembly?
#2 QUESTION - AT oil cooler:
-I have removed all of the AT cooler system. (AT cooler, all AT hoses)
I now have two nipples with no hose connected to them on the lower side of the radiator. The nipples were connected to the AT oil cooler hoses. Do I need to cap them or can I just leave them? I notice that there is a hose connecting the radiator to the air/water separator. If I leave the nipples un capped, will this cause any troubles with the air/water separation?
Junior Member
Joined: Mar 2006
Posts: 39
Likes: 0
From: Key West, FL
I'm answering the question I had above in this thread for anyone that may do the swap in the future.
You can remove your entire AT oil cooling system once you've done the swap. You can leave the 2 x nipples on the lower portion of your radiator uncapped. Do not remove the nipples as the AT oil cooler lines run through the inside of the radiator and radiator fluid will leak out.
To remove the AT oil cooler, remove one bolt on the bottom side of the cooler and you'll have to remove 2 other bolts from the top side by raising your headlights, removing the plastic black shroud and then removing the last 2 bolts holding the AT cooler to the frame.
I had to cut two sections of my AT oil cooler piping section to remove it due to the multiple bends in the pipe which prevented you from just removing it whole from the car.
-One note if you're removing the AT cooling line system during an Auto to Manaul tranny swap. When you disconnect sections of the AT piping (IE the two pipes that connected to the old automatic tranny, the two hoses that connect to the AT cooler) disconnect the flexible hose from one hard pipe and then bend the hose back to form a U and reconnect it to the other pipe in the pair each time you disconnect a new section of the AT oil cooling system.
This will prevent AT fluid from leaking on you and the floor throughout the process.
I hope that this helps.

Sorry I did not see this thread come back up earlier as I did my swap a few months ago and relied heavily on this thread. Chips did you find the answers to the wiring part yet?
im in the middle of my swap at the moment , im keeping my auto wiring harness and auto cluster at this time , i am swapping out for a manual ECU , for the wires connecting to the transmission not all will be used for the manual so should i just push them out of the way for now and zip tie them to something till i swap the cluster and harness?
and does the same go for the manual ECU will i have left over auto harness plugs that i dont need to plug in
and does the same go for the manual ECU will i have left over auto harness plugs that i dont need to plug in
The harnesses are different manual to auto. You need to splice and repin the manual harness to the auto dash harness. You can keeep the cluster and if you wire correctly the R will light up when you put your car in reverse even. You get rid of all the auto boxes ect. either ground your neitral safety switch or connect it correctly to the clutch pedal .
You can keep the cruise control unit as well.
There is a full writeup and pinout how to written up by a member on this forum. Its very detailed and tell you all you need to know.
You can keep the cruise control unit as well.
There is a full writeup and pinout how to written up by a member on this forum. Its very detailed and tell you all you need to know.
Here this will help you guys
https://www.rx7club.com/3rd-gen-arch...t-swap-161482/
https://www.rx7club.com/3rd-generati...4/#post2569106
https://www.rx7club.com/3rd-gen-arch...t-swap-161482/
https://www.rx7club.com/3rd-generati...4/#post2569106

Junior Member
Joined: Feb 2010
Posts: 24
Likes: 0
From: Kiev, Ukraine
Here this will help you guys
https://www.rx7club.com/3rd-gen-arch...t-swap-161482/
https://www.rx7club.com/3rd-generati...4/#post2569106
https://www.rx7club.com/3rd-gen-arch...t-swap-161482/
https://www.rx7club.com/3rd-generati...4/#post2569106
This is what I've been looking for