
4 GaugePod - catching up on writeups part 8


4 GaugePod - catching up on writeups part 8
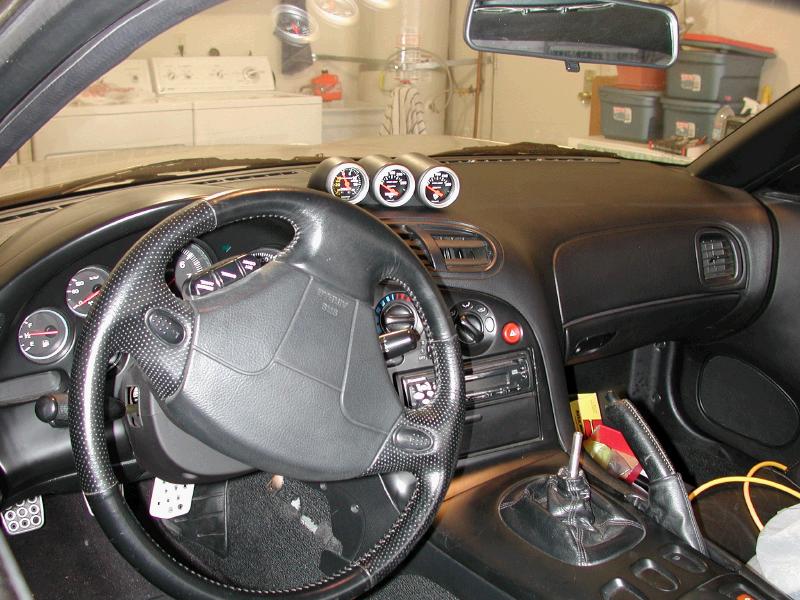
The dual A-pillar gauge mount I had in the track car was ok, but blocked some viewing space in that corner that I would liek to see when im on the track. So I emailed our gage pod specialist :-)
Frank ( Flyrx7@aol.com ) hooked me up with a very sweet 4 pod, perfect for my track car and great placement, right in the middle and not blocking of any viewing space.
I was very impressed with this piece, it was better constructed than most part I have purchased from big time vendors names. I am a picky guy, and this thing impressed me.
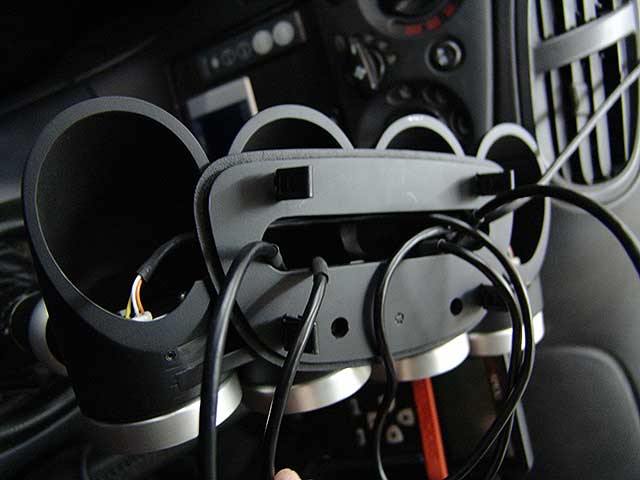
Installing the pod was easy, routing the lines to the speaker hole was not. Total PIA!!! but well worth it in the end. The pod snap in the stock center speaker location, the only suggestion I make is that if you plan on taking it on and off for test fits or whatever, take the metal clips off FIRST, then put them on when you are ready to install it for good, otherwise they may pop off when you pull it off and they fall in the center-speaker black hole of oblivion, never to be found again.
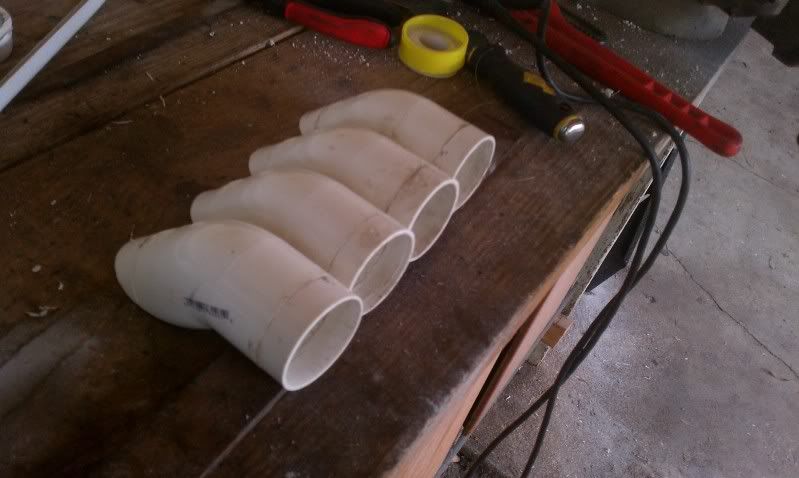
Here is a pic of my routing:
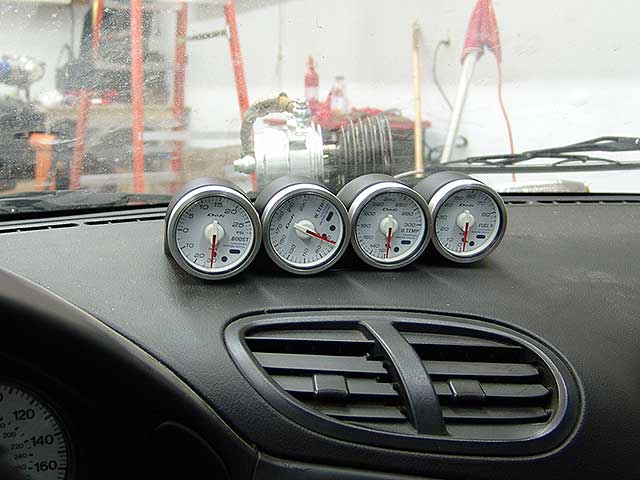
And the final setup:
Here is the link to Frank's pod info if you want one:
http://hometown.aol.com/flyrx7/Rx7-Gauge-Pod.html
Frank ( Flyrx7@aol.com ) hooked me up with a very sweet 4 pod, perfect for my track car and great placement, right in the middle and not blocking of any viewing space.
I was very impressed with this piece, it was better constructed than most part I have purchased from big time vendors names. I am a picky guy, and this thing impressed me.
Installing the pod was easy, routing the lines to the speaker hole was not. Total PIA!!! but well worth it in the end. The pod snap in the stock center speaker location, the only suggestion I make is that if you plan on taking it on and off for test fits or whatever, take the metal clips off FIRST, then put them on when you are ready to install it for good, otherwise they may pop off when you pull it off and they fall in the center-speaker black hole of oblivion, never to be found again.
Here is a pic of my routing:
And the final setup:
Here is the link to Frank's pod info if you want one:
http://hometown.aol.com/flyrx7/Rx7-Gauge-Pod.html

Full Member
Joined: Mar 2001
Posts: 213
Likes: 0
From: Charleston, WV, USA
Originally Posted by Chaosx1
I just noticed, how come on of your gauges seems to be slanted?
It's very common in racing cars to clock your gauges so you can tell at a glance (usually when the needles are straight up) what is going on.
Where does the wire go to once put through the center channel. Does it run into the space where the two dins are? OR is their another location to run the wire from the gauge to the glove box? As I am going to get the defi bf gagues and need to send wire from the control unit to the gauges than from gagues to desired parts of the engine.
yup...
Originally Posted by WVRx7
It's probably so the needle is pointing at his chosen point under ideal operating conditions. In the event of a problem, the needle goes past that point and it is obvious at a glance.
It's very common in racing cars to clock your gauges so you can tell at a glance (usually when the needles are straight up) what is going on.
It's very common in racing cars to clock your gauges so you can tell at a glance (usually when the needles are straight up) what is going on.

-Rotary4tw
Insane Burnout
Joined: Oct 2003
Posts: 1,568
Likes: 0
From: Pleasanton, CA
Great write up damian. I'm considering getting a triple gauge pod from Frank myself and this write up is very helpful.
And i'm a little but curious also as to where the wires go and how you routed them from the engine bay to the gauges.
And i'm a little but curious also as to where the wires go and how you routed them from the engine bay to the gauges.
Trending Topics
Originally Posted by WVRx7
It's probably so the needle is pointing at his chosen point under ideal operating conditions. In the event of a problem, the needle goes past that point and it is obvious at a glance.
It's very common in racing cars to clock your gauges so you can tell at a glance (usually when the needles are straight up) what is going on.
It's very common in racing cars to clock your gauges so you can tell at a glance (usually when the needles are straight up) what is going on.
Originally Posted by purerx7
Where does the wire go to once put through the center channel. Does it run into the space where the two dins are? OR is their another location to run the wire from the gauge to the glove box? As I am going to get the defi bf gagues and need to send wire from the control unit to the gauges than from gagues to desired parts of the engine.
Originally Posted by ROTORhead93
Great write up damian. I'm considering getting a triple gauge pod from Frank myself and this write up is very helpful.
And i'm a little but curious also as to where the wires go and how you routed them from the engine bay to the gauges.
And i'm a little but curious also as to where the wires go and how you routed them from the engine bay to the gauges.
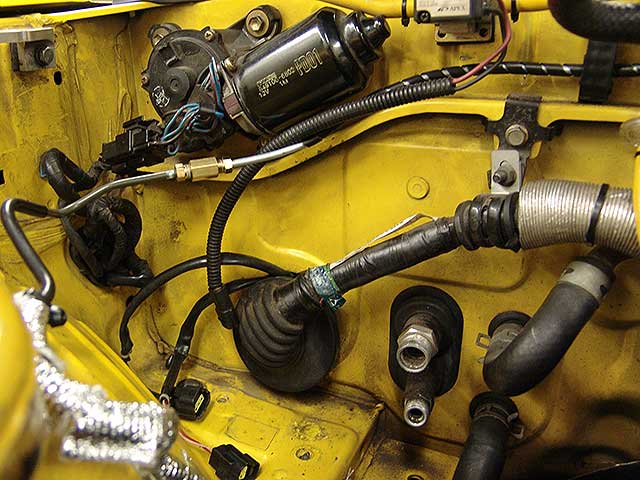
the big grommet for the main harness is down towards the bottom in the pic, notice it has connectors coming out of it, those are some of my sensor connectors. Also, I have some coming out of a hole on the other side of the firewall by the fuse box that sits above the dead pedal.
Damian,
I've been meaning to thank you for your kind words for some time now but have been forgetting. So thanks! And thanks for the video link, that was pretty cool!
Also just want to say that the spring clip advice you point out has prompted me to redesign their attachment method some. So thanks for pointing that out as well.
If you have anymore problems with the spring clips just let me know. Emperical data from a track car application would be good to know.
With all that said, I do have a few 52mm 3 and 4 gauge pods in stock for LH and RH drive, just in case someone was waiting for one. I know that since I only do limited productions throughout the year it's tough for you guys to get your hands on them, so get em' while you can!
Regards,
Frank
>>I've been meaning to thank you for your kind words for some time now but have been forgetting. So thanks! And thanks for the video link, that was pretty cool!
ur welcome :-)
>>Also just want to say that the spring clip advice you point out has prompted me to redesign their attachment method some. So thanks for pointing that out as well.
glad to help...what i ended up doing is drilling small holes in the flanges that hold the clips and getting similar clips at the auto store that 'hook' into the hole i drilled, so they stay there.
>>Emperical data from a track car application would be good to know.
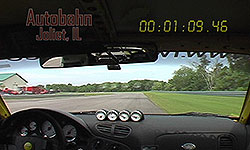
I got some track car data for ya, THE GAUGE POD ROCKS!!! I love it on my track car, get all my important gauges right in front of me but not blocking any view of the track (a pillar mounting blokced the left edge to much for me).
Here is a screen cap from one of my vids where you can see it in action :-)
ur welcome :-)
>>Also just want to say that the spring clip advice you point out has prompted me to redesign their attachment method some. So thanks for pointing that out as well.
glad to help...what i ended up doing is drilling small holes in the flanges that hold the clips and getting similar clips at the auto store that 'hook' into the hole i drilled, so they stay there.
>>Emperical data from a track car application would be good to know.
I got some track car data for ya, THE GAUGE POD ROCKS!!! I love it on my track car, get all my important gauges right in front of me but not blocking any view of the track (a pillar mounting blokced the left edge to much for me).
Here is a screen cap from one of my vids where you can see it in action :-)
Last edited by damian; Nov 1, 2005 at 12:40 PM.
Originally Posted by WVRx7
It's probably so the needle is pointing at his chosen point under ideal operating conditions. In the event of a problem, the needle goes past that point and it is obvious at a glance.
It's very common in racing cars to clock your gauges so you can tell at a glance (usually when the needles are straight up) what is going on.
It's very common in racing cars to clock your gauges so you can tell at a glance (usually when the needles are straight up) what is going on.
Also going along with that, some car manufactures, (I Think it is Porsche) Made their Tach slanted the same way so that 7-9K was pointing straight up instad of at the passegers feet, i personaly believe this is a great idea because it lets the driver focus more on the road ahead then the gauges and trying to figure out where he is sitting engine wise. Very cool Damian. and Flyrx7, those are some sweet Gauge holders you made there really show lots of qaulity (from what i can see in your work, looks very good, hell i might even get a few one day.
Pr�digy

Rotary Enthusiast
Joined: Dec 2001
Posts: 1,252
Likes: 0
From: Sunnyvale, CA
I don't like the way the gauges point away from you.
So I got a one off made by Frank to have it closer to you as it goes away to the right.
Thus the front of gauges lines up the the AC vent, and back lined up with the windshield. He did a really good job.
So I got a one off made by Frank to have it closer to you as it goes away to the right.
Thus the front of gauges lines up the the AC vent, and back lined up with the windshield. He did a really good job.

Passenger
Posts: n/a
Remember to make the clips easy to adjust up and down so that owners can adjust the orientation more. Some people may have slightly warped dashes or who knows what else so fitment will be different from person to person.
Small update and I just contacted Frank about an issue that seems to effect one brand of gauges. I recently acquired one of his pods...wow! The thought, design and workmanship is outstanding! Literally I've been waiting for the next batch of his pods for 6 months and had the chance to pick up a used one.
Unfortunately, I run the PLX Gauge system and ran into the following issues with the LHD 60mm x3 Pod.
Left Gauge: Bezel/Face fit but plug could not fit through to center
section to drop down into speaker hole.
Center Gauge: Bezel/Face did not fit at all. Plug could drop through.
Right Gauge: Bezel/Face did not fit at all. Plug could not fit through
to center section to drop down into speaker hole.
It breaks my heart to think about cutting this pod up. I could bring myself to enlarge interior holes to fit the plugs through. However there is not a solution to the gauge faces not fitting due to bumping up against the sides on the center and right sections. =(

Thread
Thread Starter
Forum
Replies
Last Post
Heedlessone
Group Buy & Product Dev. FD RX-7
288
Sep 16, 2018 07:22 PM
driftfcbuckey
The Bad & Fugly Members
10
Dec 2, 2015 05:48 PM