[Rx7 Boutique Tutorial] How to install a 99+ Cluster in your USDM FD
 09-16-09, 06:13 PM
#1
[Rx7 Boutique Tutorial] How to install a 99+ Cluster in your USDM FD
First and foremost, let me apologize about the old thread, I received a bad board and that was the reason to have to swap everything - I have asked a mod to delete it so it doesnt confuse you and because that information is just wrong. I know A LOT of you have been waiting for this tutorial, it has taken me about 40 days to finalize everything and sort out all the problems I was running into. Fortunately, I have figured out every issue and have the clusters in 100% working order with zero problems.
IMPORTANT: You need to follow my tutorial to a T, if you skip a step you run the risk of either damaging your cluster or it not working. I have done a lot of research and thought I could skip certain parts, but that just created more headaches. So, to re-illiterate, each step has a purpose, this tutorial is direct to the point and no step is useless.
Things to consider: The mileage is in KM, so the number on the mileage will go up quicker since a KM is shorter then a mile. The speedo is in KM, it is my understanding that you can take this to a cluster repair shop and have this fixed. You really only need to know a couple of conversions, I had it down to memory after a day or two. Quick conversions:
MPH KPH
5 8.0
10 16.1
15 24.1
20 32.2
25 40.2
30 48.3
35 56.3
40 64.4
45 72.4
50 80.5
55 88.5
60 96.6
65 104.6
70 112.7
75 120.7
80 128.7
85 136.8
Acknowledgments: I want to extend my gratitude to several of you who I have contacted to help me out in different parts of my tutorial. Special thanks to Dennis, SLOASFK, WankelPWR's mazdaspeed tutorial and all the other members who have contributed in someway or another. This was a huge pain to put together.
Install Time: 2 to 3 hours depending on how careful you are, someone who knows how to take off the cluster and is pretty familiar with their car can do this in an hour. I am confident, I can do the install in about 45 minutes and I know the car in and out.
Install Difficulty: Easy. If you can't install this yourself, you shouldn't be working on FD's.
Tools Needed:
Phillips Screw Driver
Wire Stripper
18 gauge BLACK wire
Assortment of connectors (pictured later in tutorial)
Wrench
electrical tape
Patience
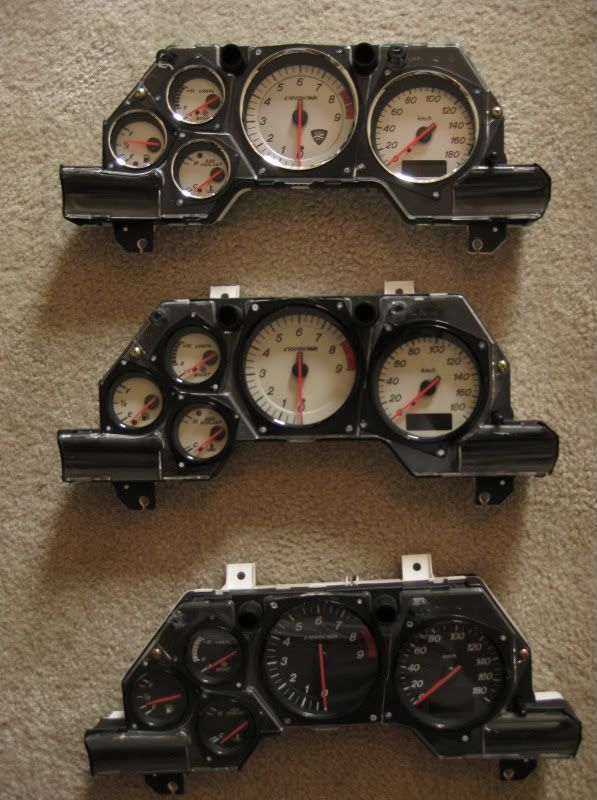
Background: In 1996 Mazda changed their clusters to a newer design. During this period, they also changed to a 16 bit ecu which is why these clusters don't work as a "straight" plug N play - however, two connections fixes this - we will go into that later. From 1996 to 2000 the cluster was black faced, green backlit, new font, italics, tach was changed to the classic 6 O'clock position which IMO looks very elegant. From 2001 to 2002 Mazda changed the faces to white and they were backlit amber. In 2002, Mazda again changed the cluster for the Spirit-r limited edition, it is still backlit amber but the faces are silver. I feel these clusters really modernize the interior, I can not say enough good things about my 2002 cluster, one of the BEST purchases I have ever made (that is A LOT of purchases) - albeit I do get them a bit cheaper then you Here is an example pictures of the three clusters, note the 2002 white is more of an off white then a pure white:
We can also get 96+ a/c panels, since they illuminate green they will match the 96 clusters- they are pricey though.
Tutorial:
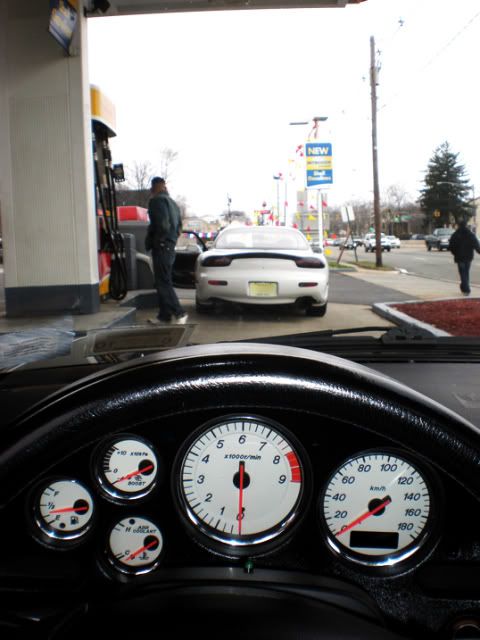
This is what we will be installing! Sexxxxxy.

Step 1:
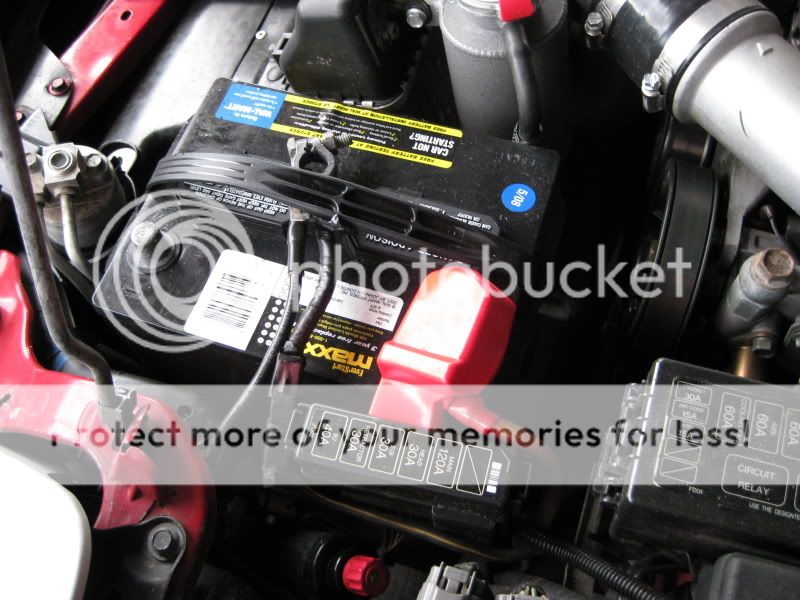
Disconnect the battery - you should always do this whenever working on your FD.
Step 2:
Diss-assemble the column cover, remove both the bottom and top piece
Step 3:
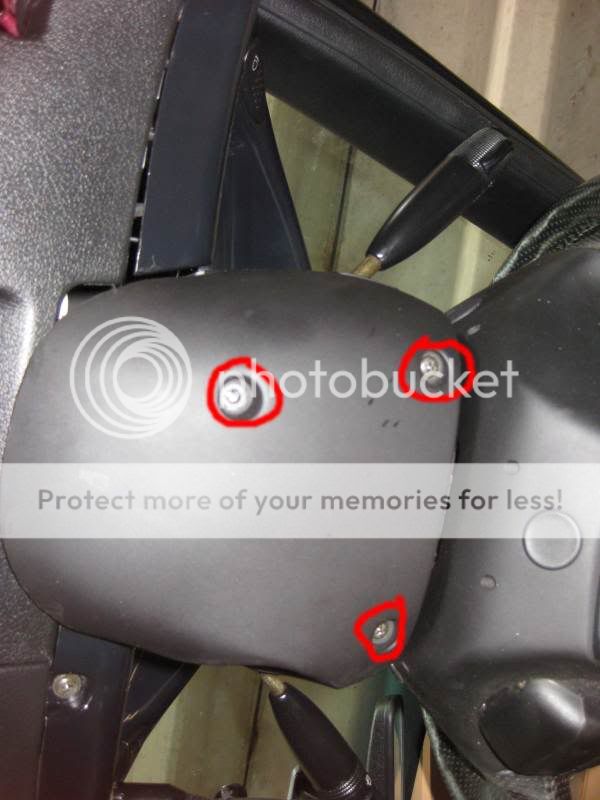
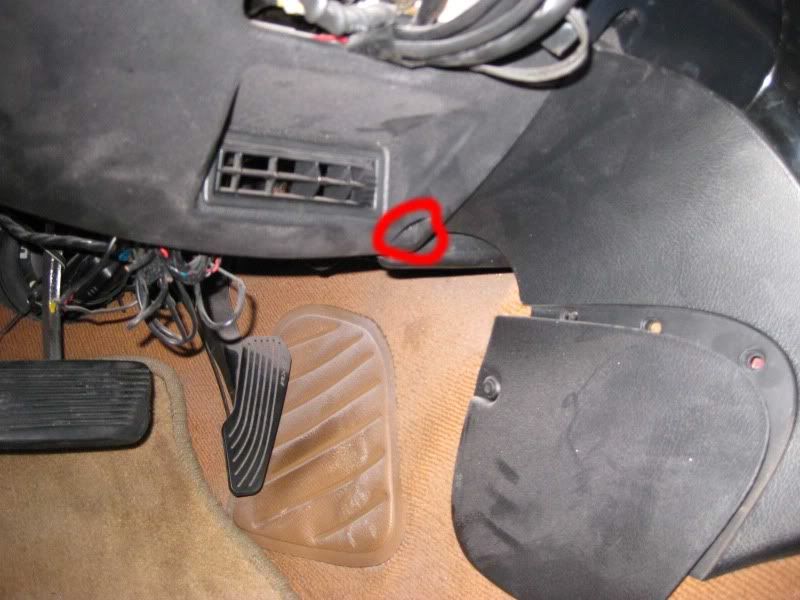
Now we need to take off the a/c panel under the dash. Their are 2 screws circled in red, after removing them it should just come off.
Left Side:
Right Side:
Step 4:
Now we need to start to diss-assemble the dash panel / cluster. Remove these two bolts:
Left Side:
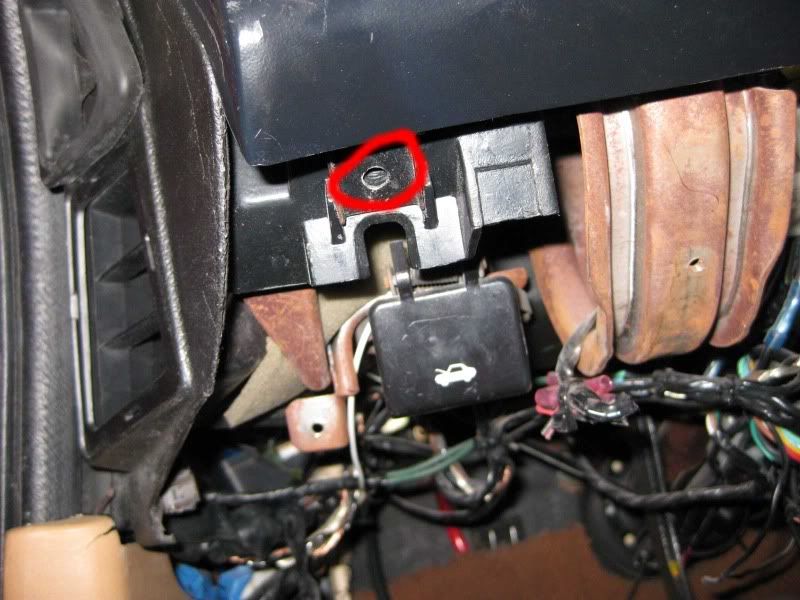
Right Side:
Step 5:
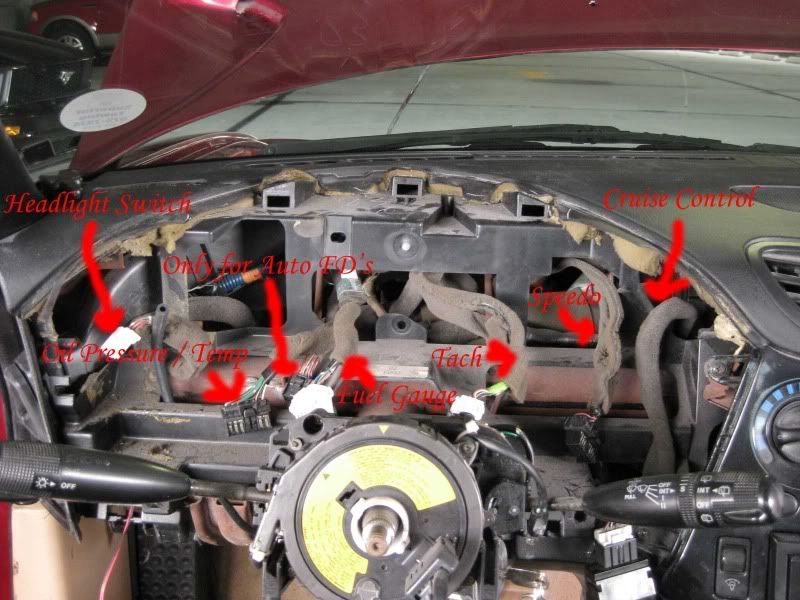
Now we need to pull the dash out. Basically the dash panel is attached to the dash by a bunch of clips, don't worry if you break any, I only have like 2 clips remaining and it still holds fine and doesn't rattle. Here you need to pull the panel out from the dash. This is what the dash will look like without the cluster, I labeled each connector so you know what it goes to:
Step 6:
Now that the panel is loose and separated from dash you need to unplug the 4 clips that go into the cluster and 3 other assorted clips. The 3 clips are to the headlight button, cruise control, and the cigarette lighter. Now the dash panel should be free from the dash.
Step 7:
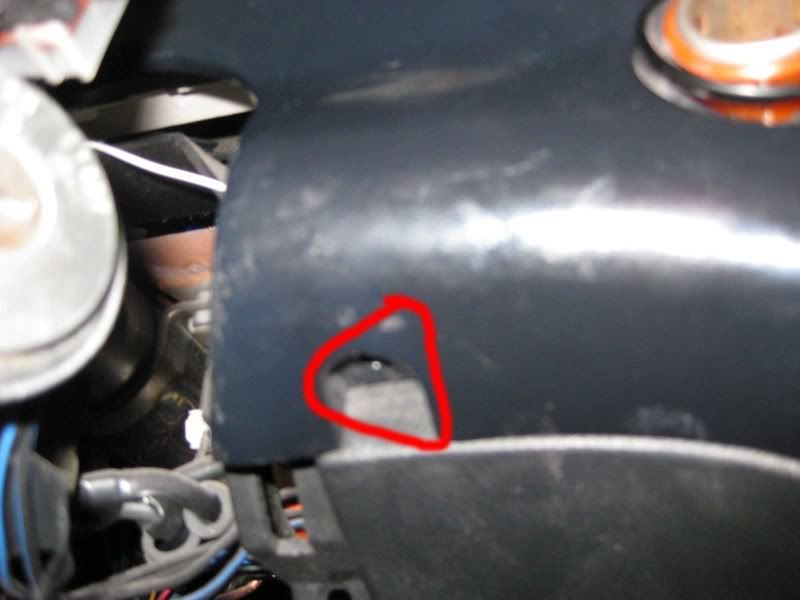
Unscrew the cluster from the dash, their are 4 screws holding the two together:
Left Side
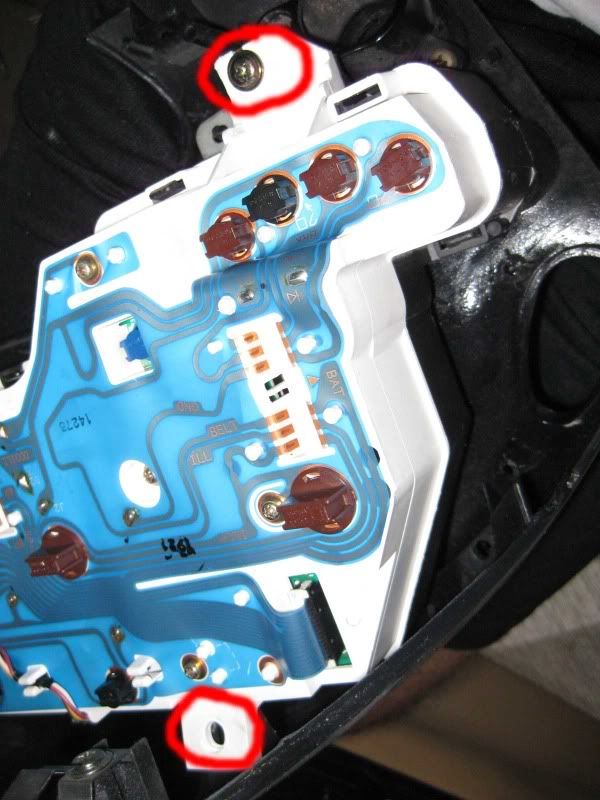
Right Side
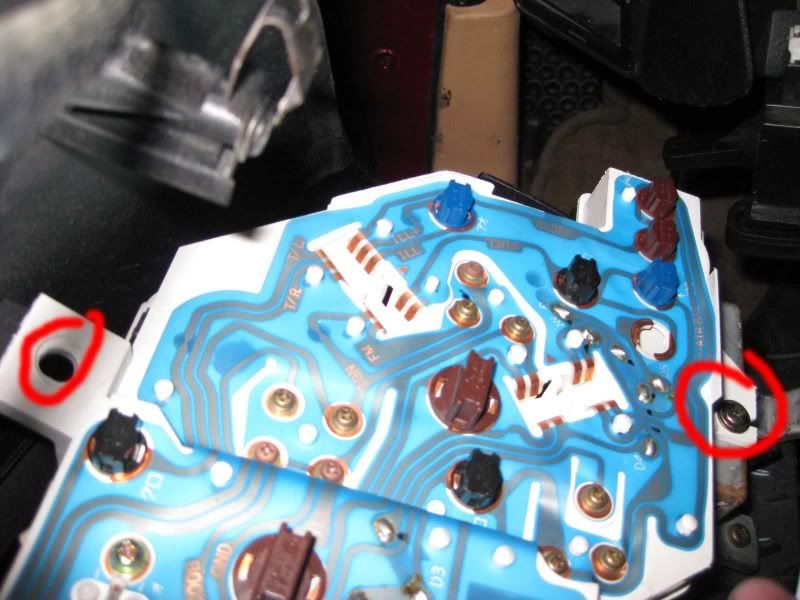
**You may notice some circled parts don't have any screws, that is because I didn't realize I should photograph something until I started taking it apart.
IMPORTANT: You need to follow my tutorial to a T, if you skip a step you run the risk of either damaging your cluster or it not working. I have done a lot of research and thought I could skip certain parts, but that just created more headaches. So, to re-illiterate, each step has a purpose, this tutorial is direct to the point and no step is useless.
Things to consider: The mileage is in KM, so the number on the mileage will go up quicker since a KM is shorter then a mile. The speedo is in KM, it is my understanding that you can take this to a cluster repair shop and have this fixed. You really only need to know a couple of conversions, I had it down to memory after a day or two. Quick conversions:
MPH KPH
5 8.0
10 16.1
15 24.1
20 32.2
25 40.2
30 48.3
35 56.3
40 64.4
45 72.4
50 80.5
55 88.5
60 96.6
65 104.6
70 112.7
75 120.7
80 128.7
85 136.8
Acknowledgments: I want to extend my gratitude to several of you who I have contacted to help me out in different parts of my tutorial. Special thanks to Dennis, SLOASFK, WankelPWR's mazdaspeed tutorial and all the other members who have contributed in someway or another. This was a huge pain to put together.
Install Time: 2 to 3 hours depending on how careful you are, someone who knows how to take off the cluster and is pretty familiar with their car can do this in an hour. I am confident, I can do the install in about 45 minutes and I know the car in and out.
Install Difficulty: Easy. If you can't install this yourself, you shouldn't be working on FD's.
Tools Needed:
Phillips Screw Driver
Wire Stripper
18 gauge BLACK wire
Assortment of connectors (pictured later in tutorial)
Wrench
electrical tape
Patience
Background: In 1996 Mazda changed their clusters to a newer design. During this period, they also changed to a 16 bit ecu which is why these clusters don't work as a "straight" plug N play - however, two connections fixes this - we will go into that later. From 1996 to 2000 the cluster was black faced, green backlit, new font, italics, tach was changed to the classic 6 O'clock position which IMO looks very elegant. From 2001 to 2002 Mazda changed the faces to white and they were backlit amber. In 2002, Mazda again changed the cluster for the Spirit-r limited edition, it is still backlit amber but the faces are silver. I feel these clusters really modernize the interior, I can not say enough good things about my 2002 cluster, one of the BEST purchases I have ever made (that is A LOT of purchases) - albeit I do get them a bit cheaper then you
Here is an example pictures of the three clusters, note the 2002 white is more of an off white then a pure white:We can also get 96+ a/c panels, since they illuminate green they will match the 96 clusters- they are pricey though.
Tutorial:
This is what we will be installing! Sexxxxxy.
Step 1:
Disconnect the battery - you should always do this whenever working on your FD.
Step 2:
Diss-assemble the column cover, remove both the bottom and top piece
Step 3:
Now we need to take off the a/c panel under the dash. Their are 2 screws circled in red, after removing them it should just come off.
Left Side:
Right Side:
Step 4:
Now we need to start to diss-assemble the dash panel / cluster. Remove these two bolts:
Left Side:
Right Side:
Step 5:
Now we need to pull the dash out. Basically the dash panel is attached to the dash by a bunch of clips, don't worry if you break any, I only have like 2 clips remaining and it still holds fine and doesn't rattle. Here you need to pull the panel out from the dash. This is what the dash will look like without the cluster, I labeled each connector so you know what it goes to:
Step 6:
Now that the panel is loose and separated from dash you need to unplug the 4 clips that go into the cluster and 3 other assorted clips. The 3 clips are to the headlight button, cruise control, and the cigarette lighter. Now the dash panel should be free from the dash.
Step 7:
Unscrew the cluster from the dash, their are 4 screws holding the two together:
Left Side
Right Side
**You may notice some circled parts don't have any screws, that is because I didn't realize I should photograph something until I started taking it apart.
Last edited by purerx7; 09-16-09 at 06:38 PM.
 09-16-09, 06:17 PM
#2
Step 8:
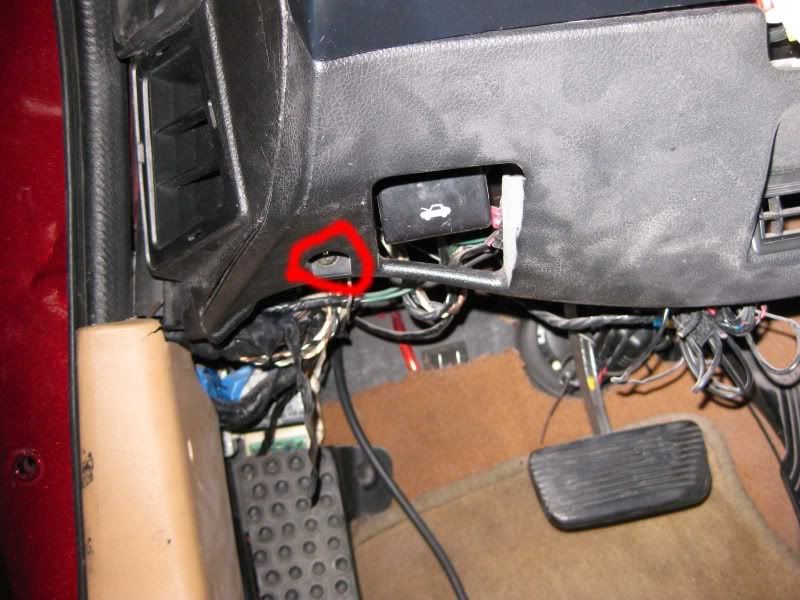
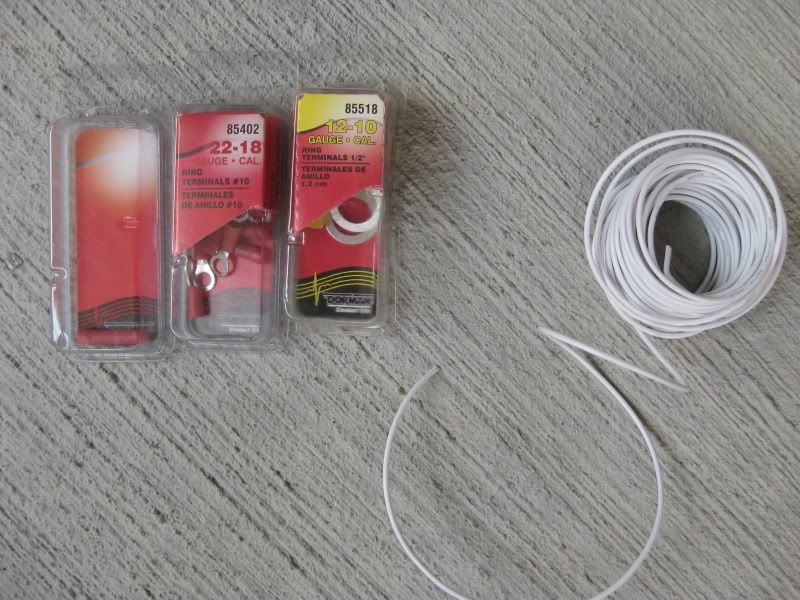
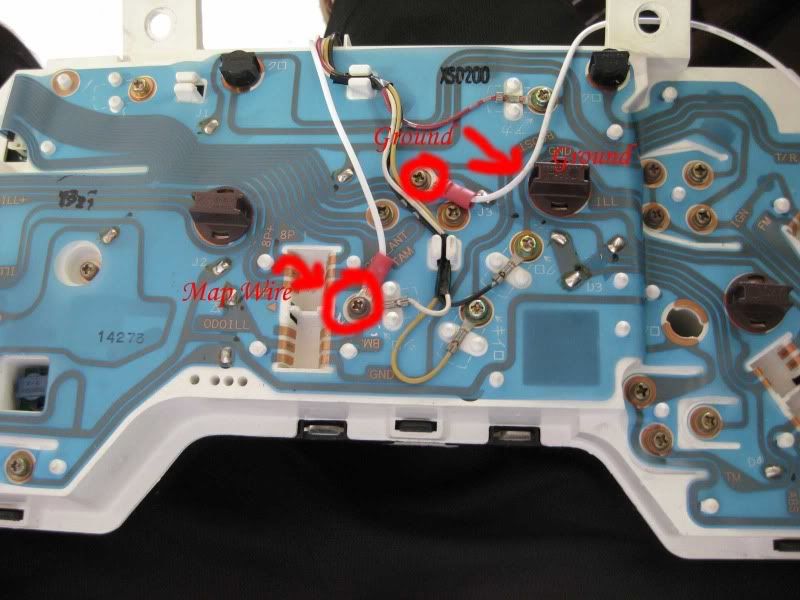
We are making progress! Put your old cluster aside and get your new 96+ cluster, we need to make some connections. First is the ground, you can use any ground you wish, I chose this one because I know it works and it was a good ground for my headunit:
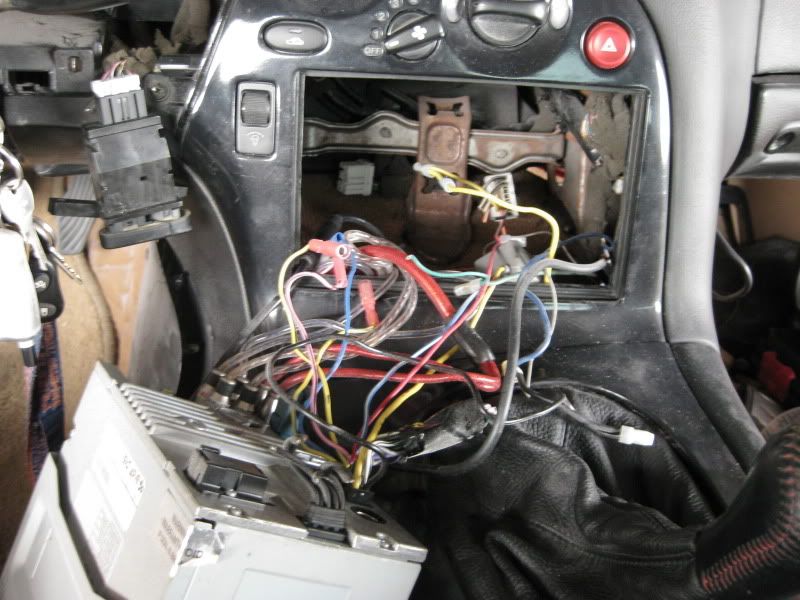
This is a picture of all the connectors we will be using. Dont make the same mistake I did, be sure to get the wire in BLACK not white. I took this picture at the end so the connector all the way to the left is a butt connector in 22 - 18 gauge ( you will need these later).
Closer shot of the ground:
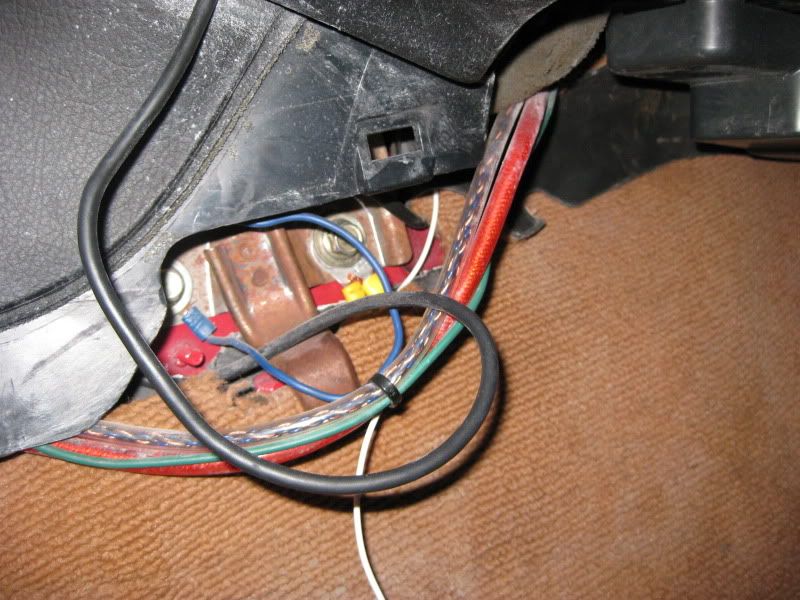
Referring to the picture of the connectors, I used the connector from the "yellow" box, it is a perfect fit for that bolt. So, you need to put the wire to the connector, ground it, then run the wire behind the headunit, to the back of the dash where the cluster resides.
Picture of running it behind the headunit, you cant see the wire in this photo:
Step 9:
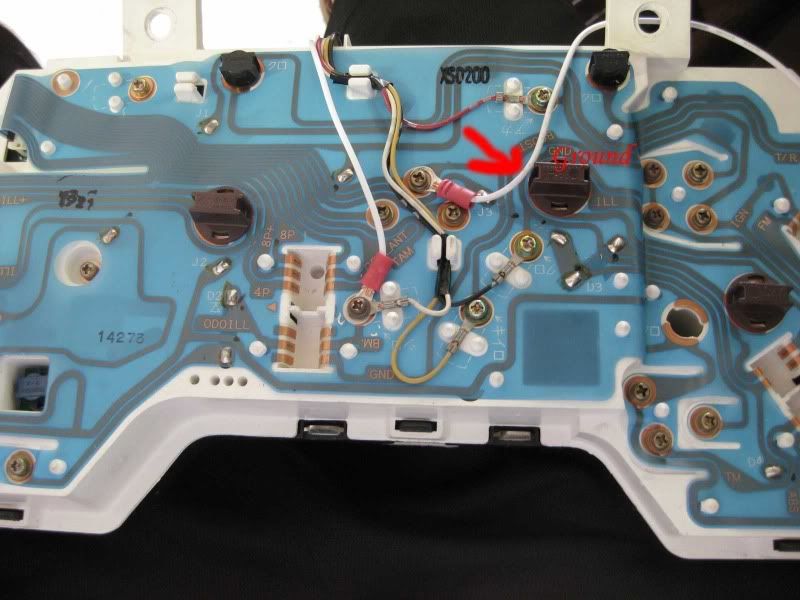
Now we need to attach the ground we just made to the back of the cluster, so take the 22 gauge ring terminal (picture above with connectors, middle package) and attach it to the other end of your ground wire. Now we are going to attach it to the back of the cluster, attach it to the bolt that I did pictured here:
Step 9:
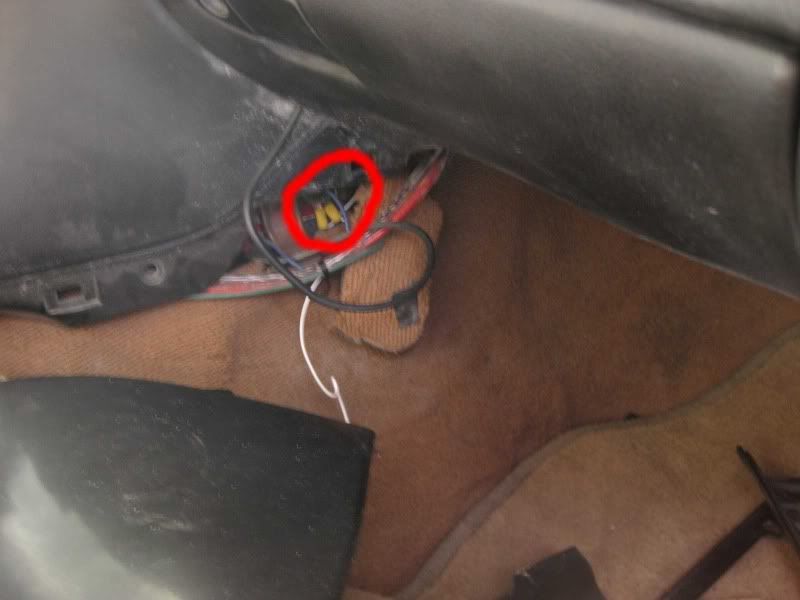
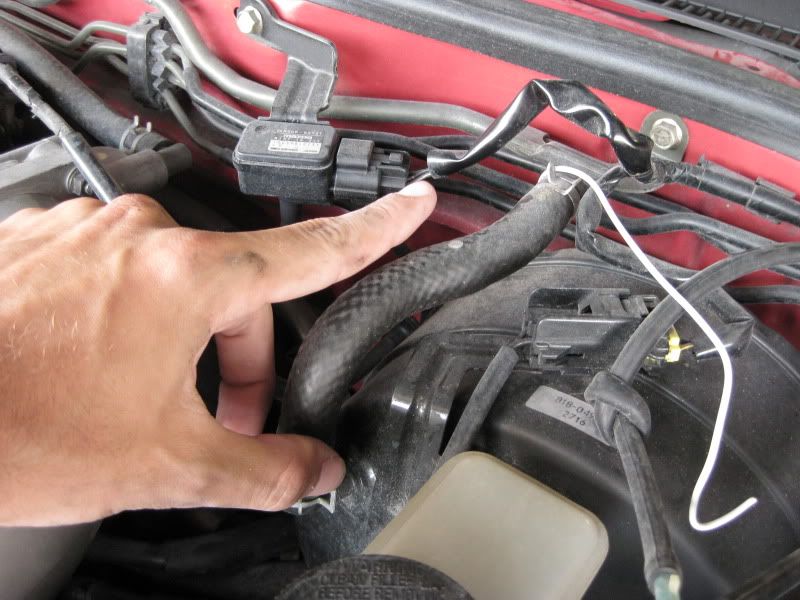
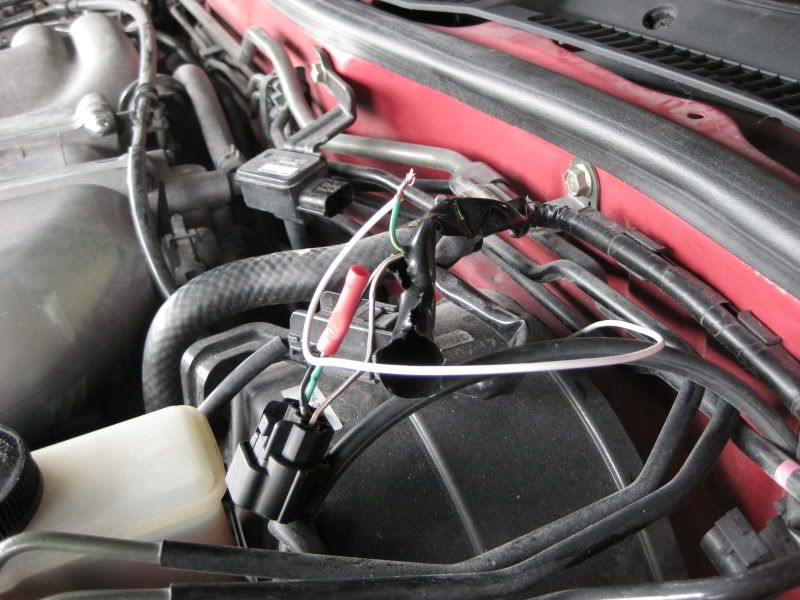
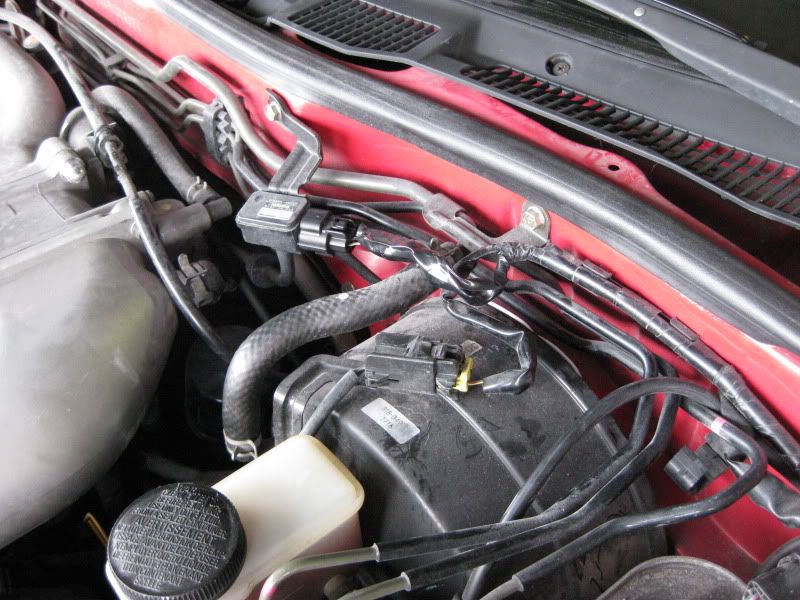
Getting closer to completion. We now need to connect the map sensor which will allow us to use the boost gauge. So, attach a 22 gauge ring terminal to one end of the wire and leave that in the dash, now we need to run the other end into the engine bay. I just ran it alongside my vacuum hose, here is the hole I drilled for them:

Notice the white wire, this is where I ran the other end of the wire too, we are going to be tapping into one of the map sensors wires. This is why I said to buy black as it wouldn't stick out in the engine bay.
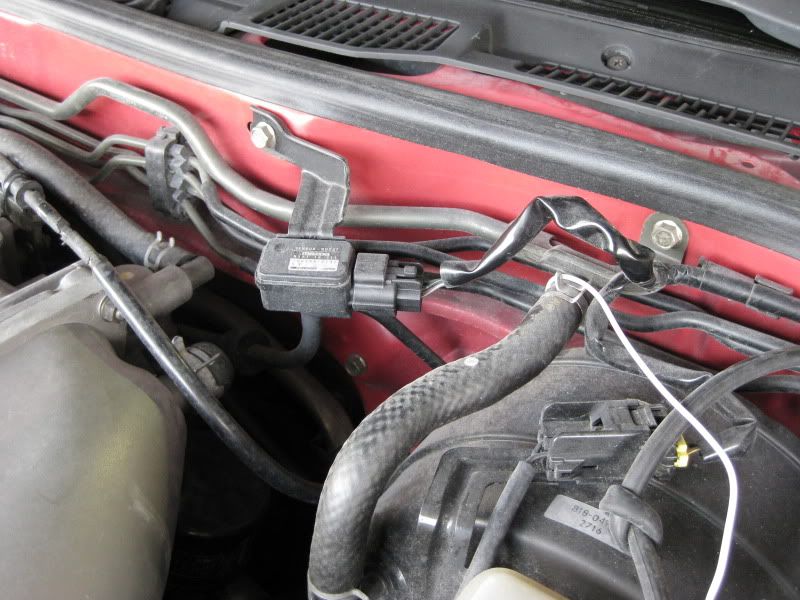
This is the map sensor, for those who do not know. Yes, I have awesome fingers.
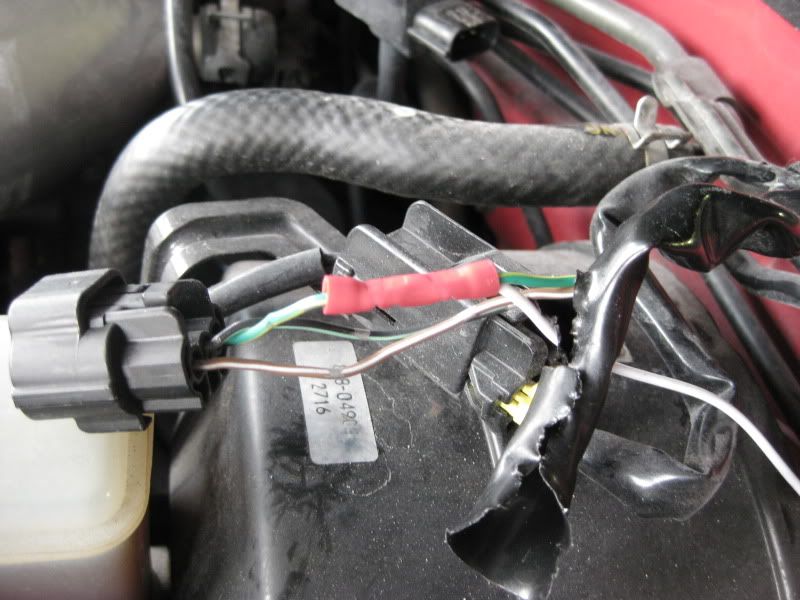
Okay, the wire we are tapping into is green with a yellow stripe and silver dots, it is clear which is the right one of the three. Here is a quick picture anyways:
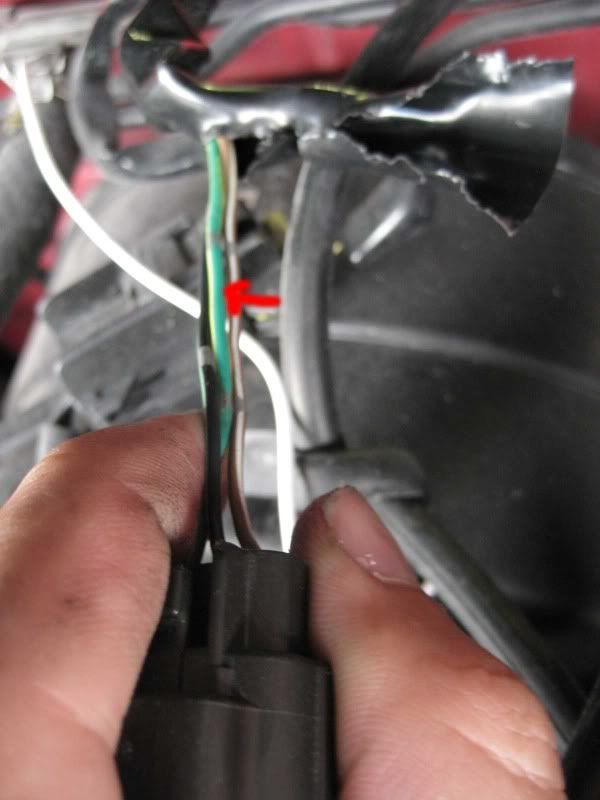
Now we need to take the wire we ran from inside the engine bay and splice into this wire. Begin by cutting the black wrap and peeling it back, like such:
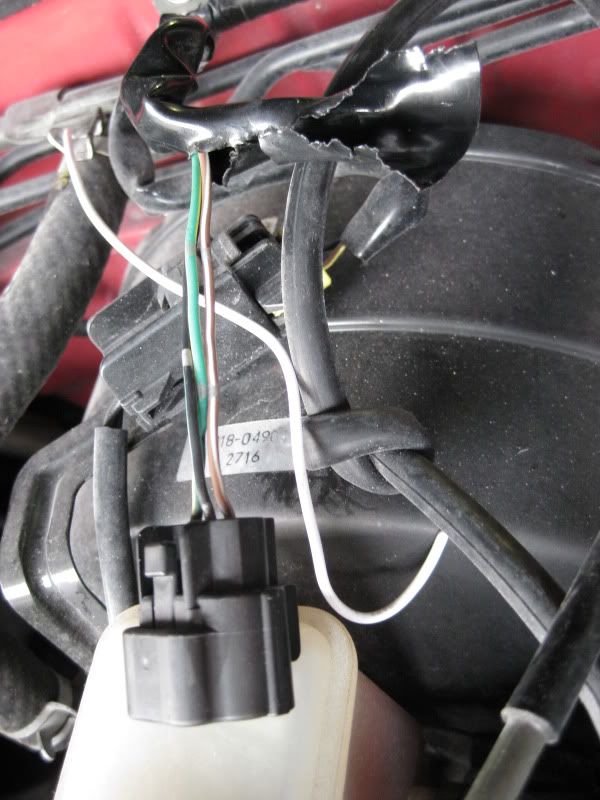
just to re-illerate on the wire we are splicing into
We are making progress! Put your old cluster aside and get your new 96+ cluster, we need to make some connections. First is the ground, you can use any ground you wish, I chose this one because I know it works and it was a good ground for my headunit:
This is a picture of all the connectors we will be using. Dont make the same mistake I did, be sure to get the wire in BLACK not white. I took this picture at the end so the connector all the way to the left is a butt connector in 22 - 18 gauge ( you will need these later).
Closer shot of the ground:
Referring to the picture of the connectors, I used the connector from the "yellow" box, it is a perfect fit for that bolt. So, you need to put the wire to the connector, ground it, then run the wire behind the headunit, to the back of the dash where the cluster resides.
Picture of running it behind the headunit, you cant see the wire in this photo:
Step 9:
Now we need to attach the ground we just made to the back of the cluster, so take the 22 gauge ring terminal (picture above with connectors, middle package) and attach it to the other end of your ground wire. Now we are going to attach it to the back of the cluster, attach it to the bolt that I did pictured here:
Step 9:
Getting closer to completion. We now need to connect the map sensor which will allow us to use the boost gauge. So, attach a 22 gauge ring terminal to one end of the wire and leave that in the dash, now we need to run the other end into the engine bay. I just ran it alongside my vacuum hose, here is the hole I drilled for them:
Notice the white wire, this is where I ran the other end of the wire too, we are going to be tapping into one of the map sensors wires. This is why I said to buy black as it wouldn't stick out in the engine bay.
This is the map sensor, for those who do not know. Yes, I have awesome fingers.
Okay, the wire we are tapping into is green with a yellow stripe and silver dots, it is clear which is the right one of the three. Here is a quick picture anyways:
Now we need to take the wire we ran from inside the engine bay and splice into this wire. Begin by cutting the black wrap and peeling it back, like such:
just to re-illerate on the wire we are splicing into
09-16-09, 06:18 PM
#3
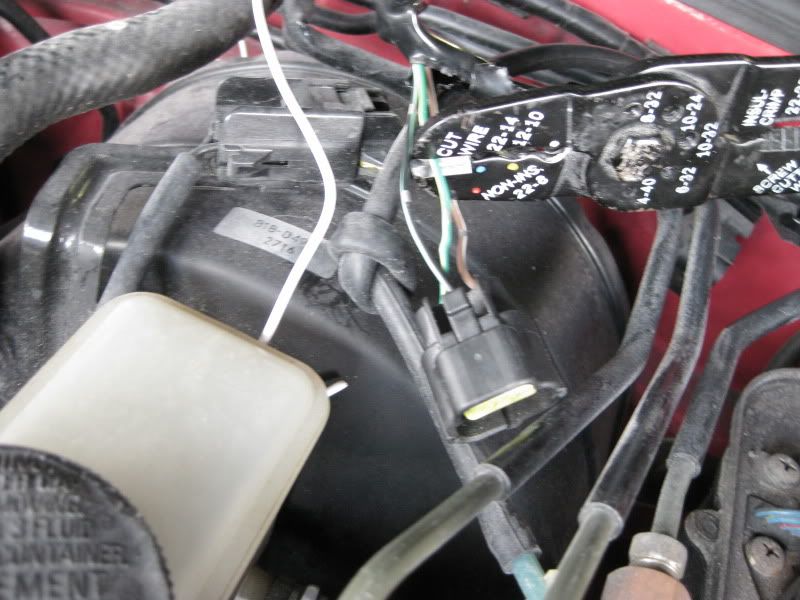
Now everyone splices wires differently, I just used the butt connectors we had because they are easy to use and I had them ready to go. If someone hadn't stolen my good soldering gun, I would have used that. Use that every you feel comfortable using.
Now wrap your connection in electrical tape:
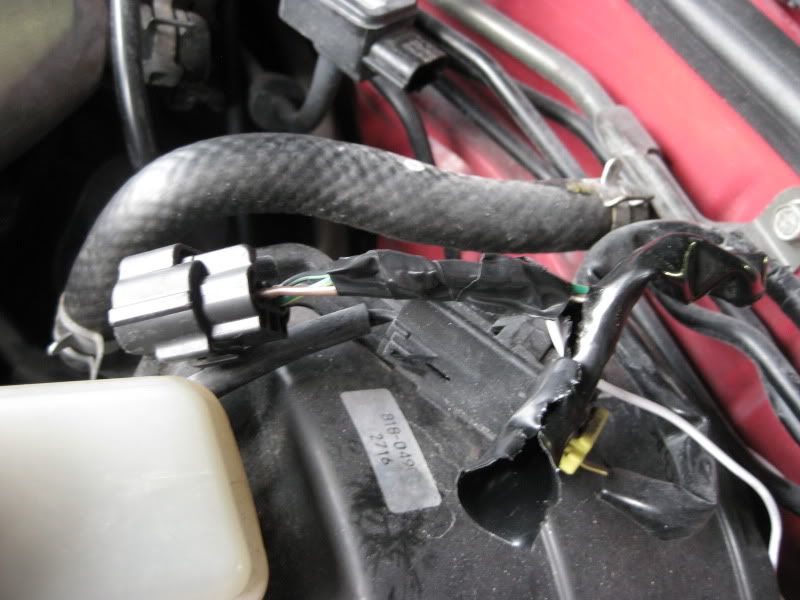
Put the black cover back, and then wrap it again with electrical tape. Looks good, besides that white wire grrrrr.
Now we need to attach the ring terminal of the map sensor wire to the cluster, make sure you put your ring terminal against the cluster first, both ring terminals still need to be screwed in, just like in the picture:
Step 10:
Now that all the wiring is done, install the cluster back into the panel. Then plug all the harnesses back into the cluster. Now, put the dash back together the same way you took it apart.
Step 11:
We are now finished. Since the oil gauge has a different voltage, the gauge will throw a red flashing light, you can get rid of this by removing the bulb behind the cluster - that is a personal choice.
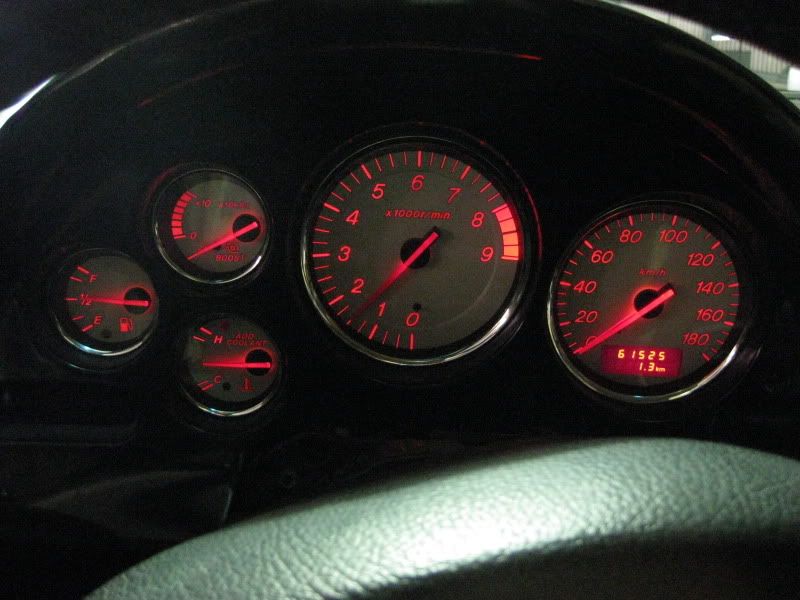
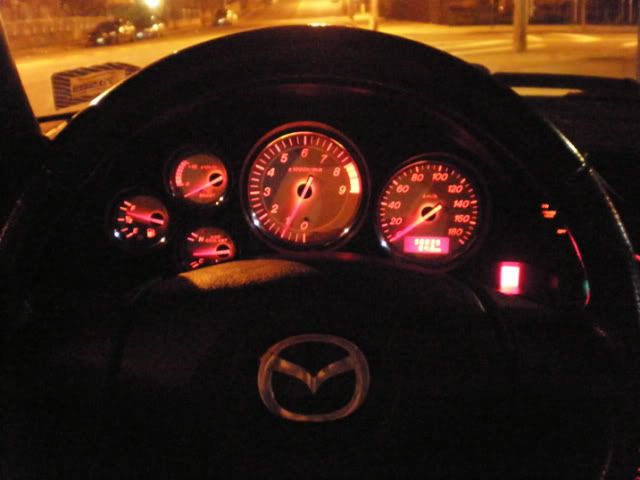
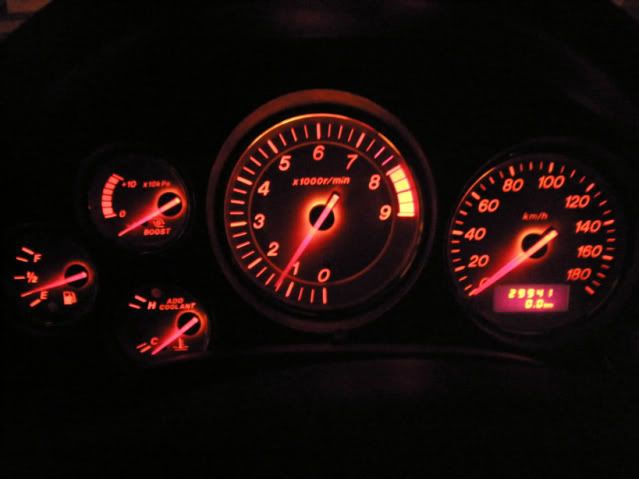
Installed day time:
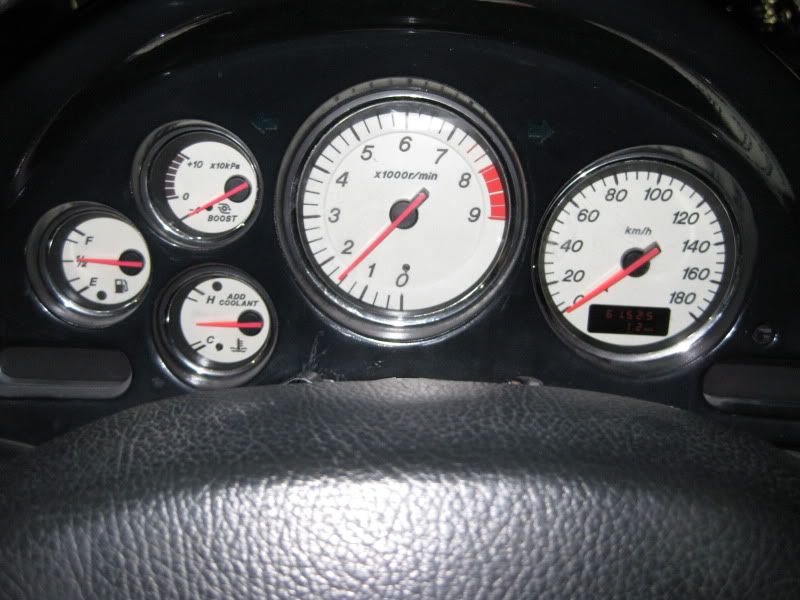
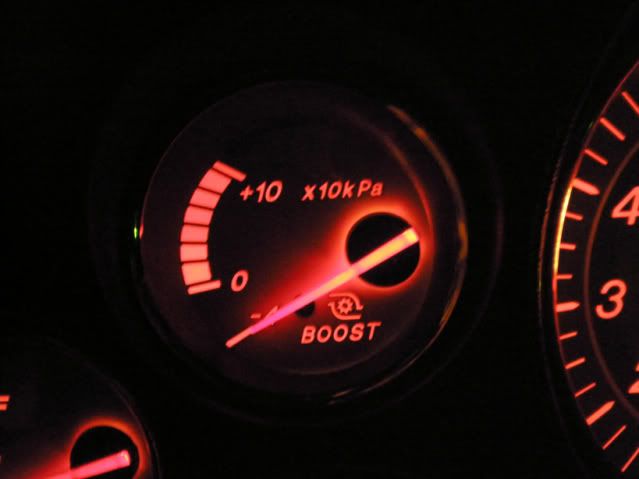
Boost gauge working!:
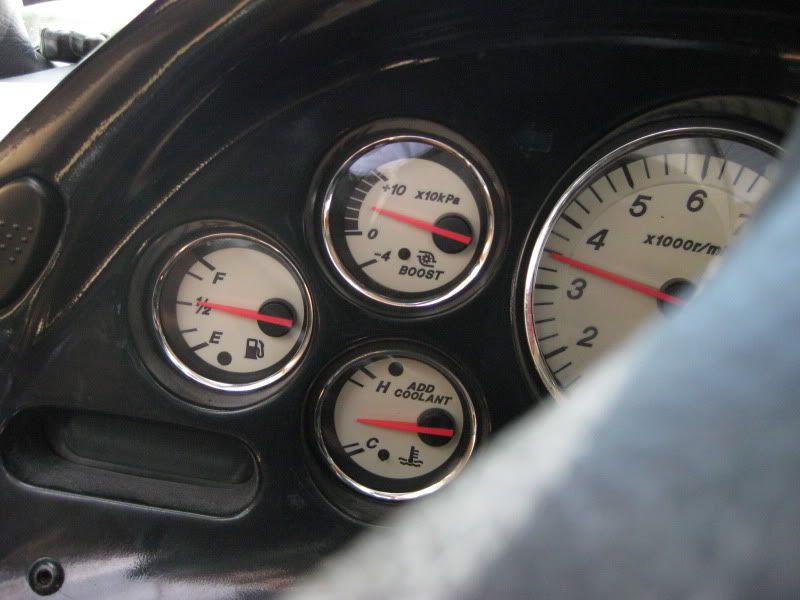
Installed night time:
A LOT of time went into this tutorial, I would appreciate any feedback and any problems you run into.
I also happen to have 3 96+ clusters for sale, here is the link to the for-sale thread: https://www.rx7club.com/3rd-generation-rx-7-1993-2002-parts-99/3-99-spec-mazda-clusters-862896/
B
Now wrap your connection in electrical tape:
Put the black cover back, and then wrap it again with electrical tape. Looks good, besides that white wire grrrrr.
Now we need to attach the ring terminal of the map sensor wire to the cluster, make sure you put your ring terminal against the cluster first, both ring terminals still need to be screwed in, just like in the picture:
Step 10:
Now that all the wiring is done, install the cluster back into the panel. Then plug all the harnesses back into the cluster. Now, put the dash back together the same way you took it apart.
Step 11:
We are now finished. Since the oil gauge has a different voltage, the gauge will throw a red flashing light, you can get rid of this by removing the bulb behind the cluster - that is a personal choice.
Installed day time:
Boost gauge working!:
Installed night time:
A LOT of time went into this tutorial, I would appreciate any feedback and any problems you run into.
I also happen to have 3 96+ clusters for sale, here is the link to the for-sale thread: https://www.rx7club.com/3rd-generation-rx-7-1993-2002-parts-99/3-99-spec-mazda-clusters-862896/
B
Last edited by purerx7; 09-16-09 at 06:23 PM.
09-16-09, 06:31 PM
#5
Well at that point I would guess you are running more then 10psi, so that would render the boost gauge useless. You could tap into the map sensor wire that goes into the ECU, I think the cluster will work without the map sensor hooked up. However, you MUST have the ground hooked up to the cluster for it to work.
Trending Topics
09-16-09, 10:12 PM
#9
You can swap in your old cluster or speedo, or buy a cluster that has mileage close to yours - problem is that since it is KM the miles go up faster because a KM is smaller then a mile. Was never a concern for me because I live in Florida and we don't have inspections. Again, I doubt the inspector will be checking that thoroughly, and swapping out the clusters will take care of this problem as well. Once you do the install, it will only take about an hour to do it again.
09-16-09, 11:15 PM
#11
Fway-ming dwagen
iTrader: (7)
Join Date: May 2008
Location: New york
Posts: 1,588
Likes: 0
Received 0 Likes
on
0 Posts
great job ona write up... I wish this was up when I was installing mine.....
This is a good thing your doing to help the community....
BTW im still tryin to get used to the MPH = KPH... my rule of thumb is if you see the Speedo needle covering your mileage screen............then it doesn't matter the number... just hope cops dont see u......lol
some extra pics of the guage... to help interest in getting one
09-17-09, 10:48 AM
#13
1 of 203 94 White PEP's
iTrader: (1)
Join Date: Sep 2001
Location: Suwanee, GA
Posts: 1,844
Likes: 0
Received 0 Likes
on
0 Posts
Damn nice write up, its bout time somebody put this up. Answered alot of questions.
I have also seen all the new gauges swapped into the old housing and it works with no modifying at all. Just something to add if you want a plug and play way of doing it. The boost gauge will not work though of course.
I have also seen all the new gauges swapped into the old housing and it works with no modifying at all. Just something to add if you want a plug and play way of doing it. The boost gauge will not work though of course.
09-17-09, 07:22 PM
#14

Well at that point I would guess you are running more then 10psi, so that would render the boost gauge useless. You could tap into the map sensor wire that goes into the ECU, I think the cluster will work without the map sensor hooked up. However, you MUST have the ground hooked up to the cluster for it to work.
FYI
10 X 10 KPa (max shown on the gage) is 14.5 psig or 29.2 psia which is just short of 2 bar.
Sure would like a set of gauges like that but I'm also over 2 bar.
09-18-09, 12:12 AM
#15
so now how do you know when you have the hold function enabled/disabled and you're in Drive? 
Nice writeup, good info for the community!
The only issue I see is you are running the wire through a hole drilled in the firewall with no grommet. You could have run the boost sensor wire through the hole where the clutch master would have gone (It's the HUGE hole directly above the one you drilled!). There are already holes in the firewall that you could use without drilling.
The following users liked this post:
pietrino (04-17-20)
09-18-09, 02:36 AM
#18
DRIVE THE ROTARY SPORTS
iTrader: (5)
Join Date: May 2003
Location: CA (Bay Area)
Posts: 4,150
Likes: 0
Received 0 Likes
on
0 Posts
I was under the impression that there WERE some black gauges with amber faces (at least, that's what my japanese FD brochure depicts) and it shows the OPTION for black or white.
09-18-09, 07:07 PM
#20
so now how do you know when you have the hold function enabled/disabled and you're in Drive?
Nice writeup, good info for the community!
The only issue I see is you are running the wire through a hole drilled in the firewall with no grommet. You could have run the boost sensor wire through the hole where the clutch master would have gone (It's the HUGE hole directly above the one you drilled!). There are already holes in the firewall that you could use without drilling.
96 to 2000: black face / green back lit
2001 - 2002: white face / amber back lit
spirit-r: silver face / amber back lit
I have no idea if it was available as an option, I have seen over 70 clusters by now and they all follow the pattern of the years I just posted above.
09-18-09, 09:07 PM
#21
100 KPa = 1 Bar
1 Bar = 1 atm (what we are breathing)
1 atm (technical) = 14.7 psia
14.7 psia = 0 psig (again what we are breathing and the engine not running)
So any engine running on boost above atmospheric is running over 1 bar and over 100 KPa. Consequently the gauge is a differential gauge based upon atmospheric pressure.
Confused???
09-19-09, 02:14 AM
#22
DRIVE THE ROTARY SPORTS
iTrader: (5)
Join Date: May 2003
Location: CA (Bay Area)
Posts: 4,150
Likes: 0
Received 0 Likes
on
0 Posts
so ALL 2001+ gauges are white face? Regardless of auto, RS, or standard spec? I have a brochure that shows a black face w/ amber but I don't see a date on it. It shows an option to order black or white cluster, but the brochure may not reflect reality. 
Good to know, thanks for sharing.
The hole is fine, I have had my main power wire that runs to my amp in that spot for over 4 years now - no issues.
To my knowledge, Amber was available from 2001+. To re-illiterate:
96 to 2000: black face / green back lit
2001 - 2002: white face / amber back lit
spirit-r: silver face / amber back lit
I have no idea if it was available as an option, I have seen over 70 clusters by now and they all follow the pattern of the years I just posted above.
09-19-09, 10:46 AM
#23
It is possible that it could be an option from Mazda, but I have never seen a 96+ black faced cluster with amber back lit. I have looked at 100s of 96+ fd's for various reasons and these are just my conclusions off that research. 2001 and 2002 is white face, more of an off white actually, then the spirit-r is silver faced - both amber back lit.