Summer 2010 Updates On My Bridgeported Turbo-NA Project
 06-23-10, 02:48 PM
#26
Engine, Not Motor
Thread Starter
iTrader: (1)
Join Date: Feb 2001
Location: London, Ontario, Canada
Posts: 29,789
Likes: 0
Received 108 Likes
on
91 Posts
I thought that installing the LSD would cure my traction problems. While it has helped, it has only helped a little.

 06-23-10, 07:58 PM
#30
+1 Great vid!
Why can't more FC owners (actually car owners in general) make videos similar to this, a few cuts/edits , go a LONG way. And the best part is its not just a lame walkaround (=gay) you actually have some shots of the car in action.
Sounds great too btw.
Why can't more FC owners (actually car owners in general) make videos similar to this, a few cuts/edits , go a LONG way. And the best part is its not just a lame walkaround (=gay) you actually have some shots of the car in action.
Sounds great too btw.
06-23-10, 09:53 PM
#31
Moderator
iTrader: (3)
Join Date: Mar 2001
Location: https://www2.mazda.com/en/100th/
Posts: 30,855
Received 2,617 Likes
on
1,854 Posts
While the hubs were cooling down I installed the new poly bushings in the front control arms. I actually felt kind of dirty plunging my lubricated fingers again and again into the tapered rear bushing hole. The control arm slipped into the well lubricated hole with very little encouragement needed.
and then drove to my friendly neighborhood garage where the car as put up on the rack and properly set up.
.
and then drove to my friendly neighborhood garage where the car as put up on the rack and properly set up.
.
its a multi person job too, which means i know the rest of the guys in ways that, um are unexpected?
properly setup to stock? negative camber is your friend!
rest of the car looks like fun!
06-24-10, 10:31 AM
#32
Engine, Not Motor
Thread Starter
iTrader: (1)
Join Date: Feb 2001
Location: London, Ontario, Canada
Posts: 29,789
Likes: 0
Received 108 Likes
on
91 Posts
+1 Great vid!
Why can't more FC owners (actually car owners in general) make videos similar to this, a few cuts/edits , go a LONG way. And the best part is its not just a lame walkaround (=gay) you actually have some shots of the car in action.
Sounds great too btw.
Why can't more FC owners (actually car owners in general) make videos similar to this, a few cuts/edits , go a LONG way. And the best part is its not just a lame walkaround (=gay) you actually have some shots of the car in action.
Sounds great too btw.
this made me LOL, as part of our 25 hour enduro thing, we repack EVERYTHING on the car, ALL of the bearings, cv joints, etc etc...
its a multi person job too, which means i know the rest of the guys in ways that, um are unexpected?
properly setup to stock? negative camber is your friend!
rest of the car looks like fun!
its a multi person job too, which means i know the rest of the guys in ways that, um are unexpected?
properly setup to stock? negative camber is your friend!
rest of the car looks like fun!
06-27-10, 02:55 PM
#34
Engine, Not Motor
Thread Starter
iTrader: (1)
Join Date: Feb 2001
Location: London, Ontario, Canada
Posts: 29,789
Likes: 0
Received 108 Likes
on
91 Posts
I have not done anything with the automatic premixing system. I am still trying to find a cheap flowmeter that can read low volumes. Few examples seem to exist. Finding small pumps designed for oil is also hard. All this stuff is available, but at the cost of $1000+ per item.
07-13-10, 03:39 PM
#35
Engine, Not Motor
Thread Starter
iTrader: (1)
Join Date: Feb 2001
Location: London, Ontario, Canada
Posts: 29,789
Likes: 0
Received 108 Likes
on
91 Posts
Just a quick little update that is too small for a thread of it's own.
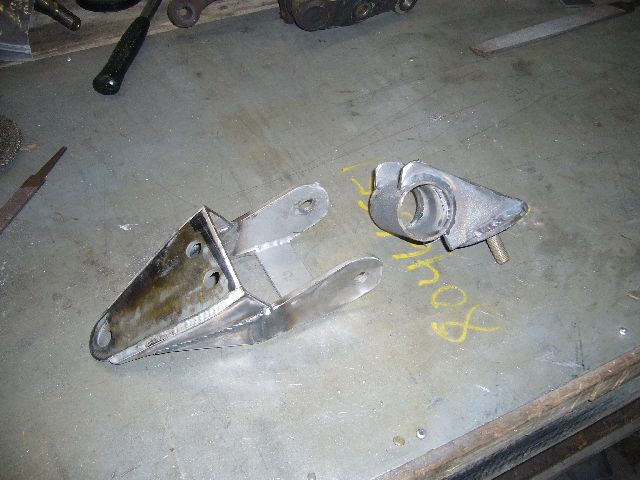
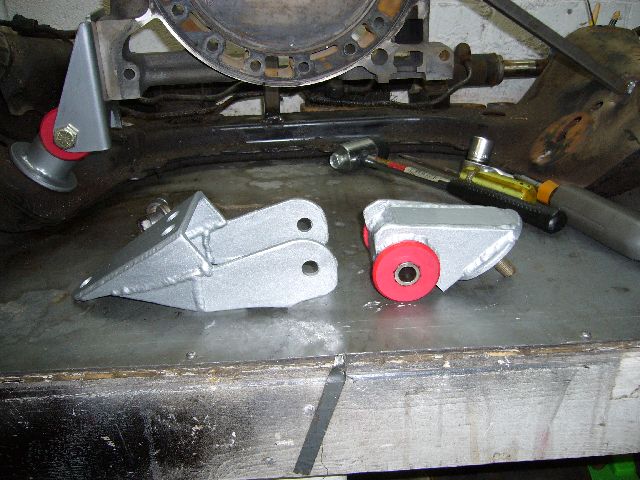
THis winter I purchased a set of AWR engine mounts. However when I was testing the passenger side for fit, I found out that it didn't actually fit my car. THe wastegate runners on my turbo manifold run right past the stock mount and were too low, occupying the same space that the AWR mount wanted to take. So I put them aside for modification, but didn't actually get around to doing it...until now.
I grabbed a spare 2nd gen subframe and a bad center iron. Then I mounted the center iron to the subframe using the AWR mounts, and then welded support braces from the iron to the subframe. That way, the iron was locked in place and I could remove the passenger mount for modification.
The mount had to be lowered a lot, so first I cut it totally apart. I cut the upper part of the mount (the flange that bolts to the center iron) in half. Then I bolted in the bushing, held it up for a while, and decided where to tack it.
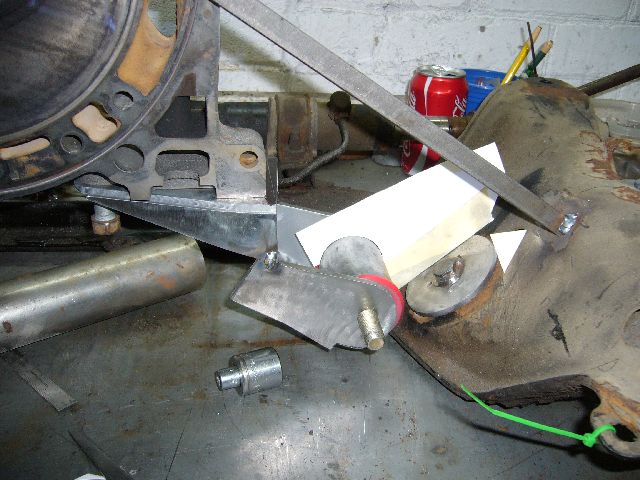
To connect the bushing to the subframe, I made a template out of cardboard before cutting any metal. The idea was to keep this part of the mount as low and away from the subframe as possible to eliminate any possibility of interference with the manifold runners, and to also keep it away from the heat.
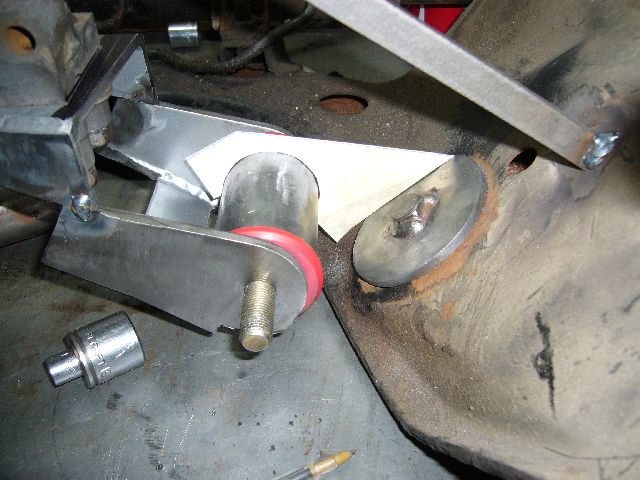
Once the steel was cut, everything was heavily tacked together. I did a lot of tacking to try and keep warp under control during final welding. Unlike rubber mounts, these have very little play so there isn't much room for adjustment once installed. Note that I also cut two little triangle pieces that connected to the oil pan area of the mount. This provides much more weld area for the piece bolted to the bushing.
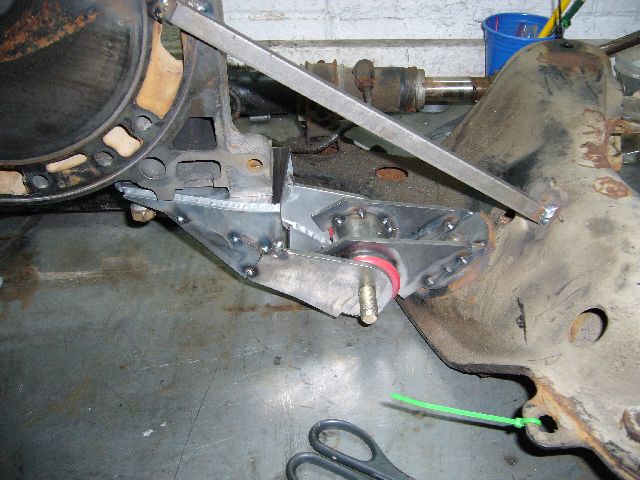
Because the mounts were powder coated from AWR, I sand blasted them prior to finish welding. Trying to TIG weld through powder coat is less then fun. I also welded a plate to the top of the subframe side of the mount for a bit more side-to-side rigidity.
After another sand blasting (actually, I blast with copper slag) I painted the mounts up with silver POR-15 (which closely matches the AWR silver powder coating) and then pressed in the bushings.
When the paint was dry, the mounts were installed on the car. It is such a pain in the butt to remove the stock driver side mount when the engine is in the car but the design of the AWR mount made installation very easy. The bottom bushing gets installed first but left loose. The top part then slips over the studs and onto the bottom piece before the bolt is passed through. I pre-assembled the passenger mount and then just angled it into place. Then I tightened up all the bolts and let the engine settle into place.
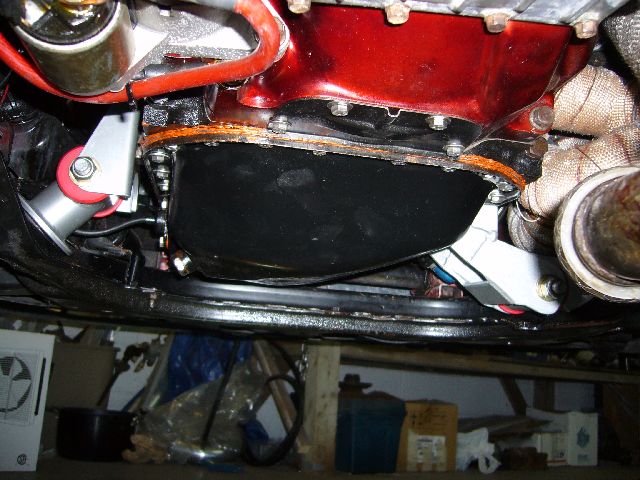
Any set of solid or poly mounts is going to transmit more vibration to the chassis, and I am definitely seeing more NVH (noise, vibration, harshness) under 3,000 RPM. But it is only a slight vibration and basically what I expected. Solid mounts used on stock port engines don't vibrate much at all. The engine is now held steady at all times, so the shifter feels far more solid. But best of all, the engine does not twist up an inch on the mounts at full throttle, which I know was stressing my solid rad pipes, intercooler piping, u-joints and transmission mounts.
THis winter I purchased a set of AWR engine mounts. However when I was testing the passenger side for fit, I found out that it didn't actually fit my car. THe wastegate runners on my turbo manifold run right past the stock mount and were too low, occupying the same space that the AWR mount wanted to take. So I put them aside for modification, but didn't actually get around to doing it...until now.
I grabbed a spare 2nd gen subframe and a bad center iron. Then I mounted the center iron to the subframe using the AWR mounts, and then welded support braces from the iron to the subframe. That way, the iron was locked in place and I could remove the passenger mount for modification.
The mount had to be lowered a lot, so first I cut it totally apart. I cut the upper part of the mount (the flange that bolts to the center iron) in half. Then I bolted in the bushing, held it up for a while, and decided where to tack it.
To connect the bushing to the subframe, I made a template out of cardboard before cutting any metal. The idea was to keep this part of the mount as low and away from the subframe as possible to eliminate any possibility of interference with the manifold runners, and to also keep it away from the heat.
Once the steel was cut, everything was heavily tacked together. I did a lot of tacking to try and keep warp under control during final welding. Unlike rubber mounts, these have very little play so there isn't much room for adjustment once installed. Note that I also cut two little triangle pieces that connected to the oil pan area of the mount. This provides much more weld area for the piece bolted to the bushing.
Because the mounts were powder coated from AWR, I sand blasted them prior to finish welding. Trying to TIG weld through powder coat is less then fun. I also welded a plate to the top of the subframe side of the mount for a bit more side-to-side rigidity.
After another sand blasting (actually, I blast with copper slag) I painted the mounts up with silver POR-15 (which closely matches the AWR silver powder coating) and then pressed in the bushings.
When the paint was dry, the mounts were installed on the car. It is such a pain in the butt to remove the stock driver side mount when the engine is in the car but the design of the AWR mount made installation very easy. The bottom bushing gets installed first but left loose. The top part then slips over the studs and onto the bottom piece before the bolt is passed through. I pre-assembled the passenger mount and then just angled it into place. Then I tightened up all the bolts and let the engine settle into place.
Any set of solid or poly mounts is going to transmit more vibration to the chassis, and I am definitely seeing more NVH (noise, vibration, harshness) under 3,000 RPM. But it is only a slight vibration and basically what I expected. Solid mounts used on stock port engines don't vibrate much at all. The engine is now held steady at all times, so the shifter feels far more solid. But best of all, the engine does not twist up an inch on the mounts at full throttle, which I know was stressing my solid rad pipes, intercooler piping, u-joints and transmission mounts.


Thread
Thread Starter
Forum
Replies
Last Post