
Summer 2010 Updates On My Bridgeported Turbo-NA Project

Thread Starter
Joined: Feb 2001
Posts: 29,798
Likes: 128
From: London, Ontario, Canada
Summer 2010 Updates On My Bridgeported Turbo-NA Project
It has been a busy April and May for me. With the good weather coming early, I was kind of caught with my car sitting in my shop. And there was a local meet at the end of May that has become somewhat of a tradition, so I needed to work my butt off to get the car back on the road. The last update, posted at the end of April, was already out of date as much of the work presented in this update was well on the way to being completed. So here is that work, and probably the last update on this project in a long time save for some dyno graphs. For you see, aside from a few minor issues, I can stick a fork in it because it's done. Well, as done as something like this can ever be. I'm contemplating some body mods but that won't be for a while (I have a '76 Cosmo to restore).
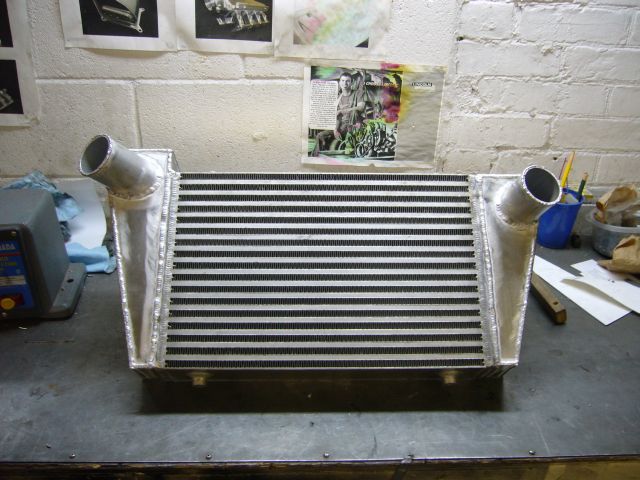
Without further rambling, let's get to it. We finished off the last update with new end tanks fabricated for the intercooler. The old tank modifications I performed years ago were just nasty, so I cut them off and made new tanks from scratch. My butt dyno might just be due for calibration, but it sure feels like the car has picked up some power on the new tanks.
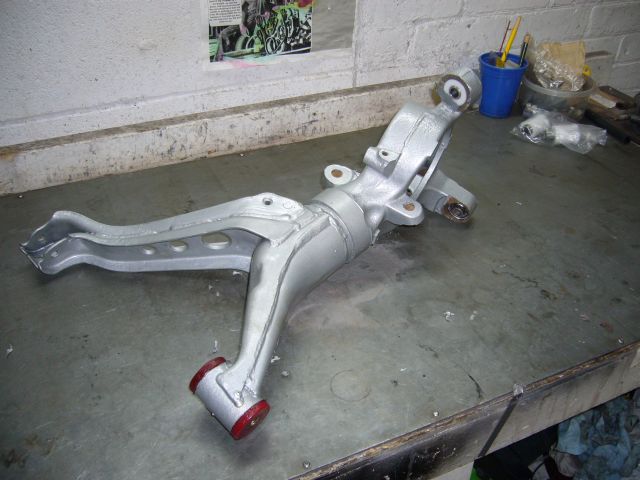
In the last thread, I had painted the rear suspension stuff in POR-15 after it was all sand blasted. Here is the drivers swing arm all painted up with the poly pivot bushing and Delrin upper hub bushings installed. The stock lower pillow ball was pressed back into place. Note that for anyone replacing the rear trailing arm bushings, there is one minor trick. The stock rubber bushing has an outer metal sleeve, and this sleeve can become one with the trailing arm after many years. If your trailing arm bushing bore still has flared ends after removing the bushings, the sleeves are still in place! Cut/press them out and the new bushing will fall into place. I did not notice these sleeves were from the old bushing, which caused me two days frustration in trying to install the new bushings...
It was then time to reassemble the rear suspension. I purchased new dog bone links from Mazda, as well as new trailing arm cam bolts and plates. Really, much of the hardware is brand new save for a few washers and bolts that were in fine shape. The link arms seemed fine when removed from the car, so I just painted them and reinstalled.
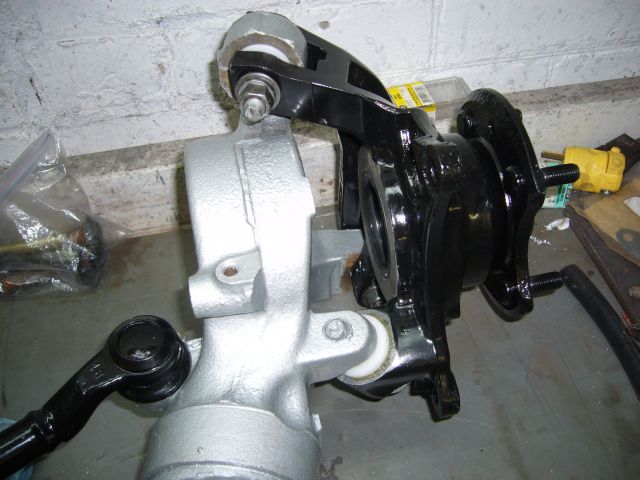
The hubs went on easily. All the hardware was near perfect (looks like it is Dacral coated) with the exception of the toe bushing bolts, but they were just cleaned up on the wire wheel. Actually, one of these bolts was stuck inside the original DTSS bushing sleeve. The sleeve tore from the bushing as I removed the bolt. I needed to cut the sleeve in half with a Dremel and then pry it off the bolt. The subframe bushings are also new.
Here's a closeup showing the Delrin bushings. The lower bushing is the toe steer eliminator. Kind of wish I had painted the bushing flanges, now that I see how the hub fits. Meh, live and learn I guess. The hubs went out to the machine shop where new bearings were installed and then I just shot them with black paint.
Without further rambling, let's get to it. We finished off the last update with new end tanks fabricated for the intercooler. The old tank modifications I performed years ago were just nasty, so I cut them off and made new tanks from scratch. My butt dyno might just be due for calibration, but it sure feels like the car has picked up some power on the new tanks.
In the last thread, I had painted the rear suspension stuff in POR-15 after it was all sand blasted. Here is the drivers swing arm all painted up with the poly pivot bushing and Delrin upper hub bushings installed. The stock lower pillow ball was pressed back into place. Note that for anyone replacing the rear trailing arm bushings, there is one minor trick. The stock rubber bushing has an outer metal sleeve, and this sleeve can become one with the trailing arm after many years. If your trailing arm bushing bore still has flared ends after removing the bushings, the sleeves are still in place! Cut/press them out and the new bushing will fall into place. I did not notice these sleeves were from the old bushing, which caused me two days frustration in trying to install the new bushings...
It was then time to reassemble the rear suspension. I purchased new dog bone links from Mazda, as well as new trailing arm cam bolts and plates. Really, much of the hardware is brand new save for a few washers and bolts that were in fine shape. The link arms seemed fine when removed from the car, so I just painted them and reinstalled.
The hubs went on easily. All the hardware was near perfect (looks like it is Dacral coated) with the exception of the toe bushing bolts, but they were just cleaned up on the wire wheel. Actually, one of these bolts was stuck inside the original DTSS bushing sleeve. The sleeve tore from the bushing as I removed the bolt. I needed to cut the sleeve in half with a Dremel and then pry it off the bolt. The subframe bushings are also new.
Here's a closeup showing the Delrin bushings. The lower bushing is the toe steer eliminator. Kind of wish I had painted the bushing flanges, now that I see how the hub fits. Meh, live and learn I guess. The hubs went out to the machine shop where new bearings were installed and then I just shot them with black paint.
Thread Starter
Joined: Feb 2001
Posts: 29,798
Likes: 128
From: London, Ontario, Canada
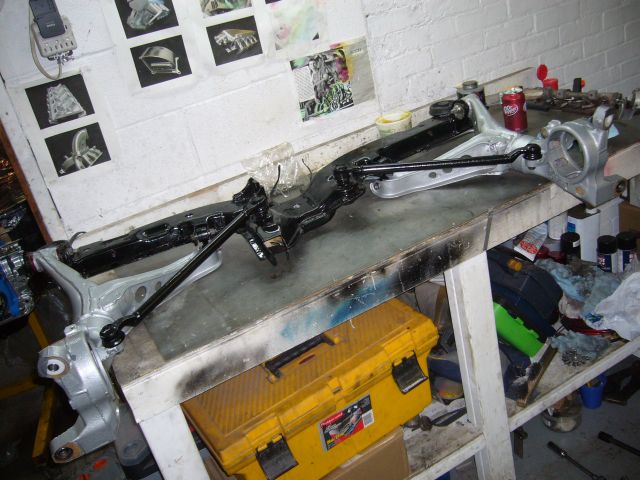
The new Mazda Comp diff mount was installed before the differential was bolted to the subframe. This is a GXL LSD (remember, my drivetrain is NA save for the transmission) that was fully rebuilt by a local shop. I wish I had sent the snout out for sand blasting and then POR-15'd it, because I think the black rocker-guard paint won't last very long. If it was not such a pain in the *** to remove the diff I would blast it myself (I recently purchased a sand blasting pot after adding up all the money I have spent on blasting lately).
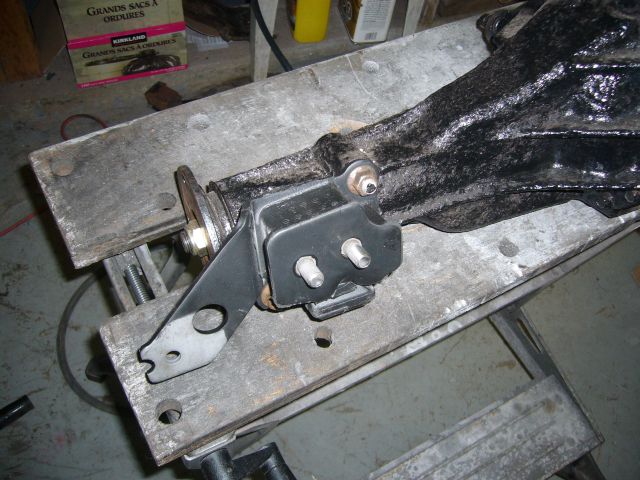
The diff was then bolted to the subframe. The rear diff mounts are also Mazda Comp. This rear end assembly, that started as light individual components, is now pretty heavy.
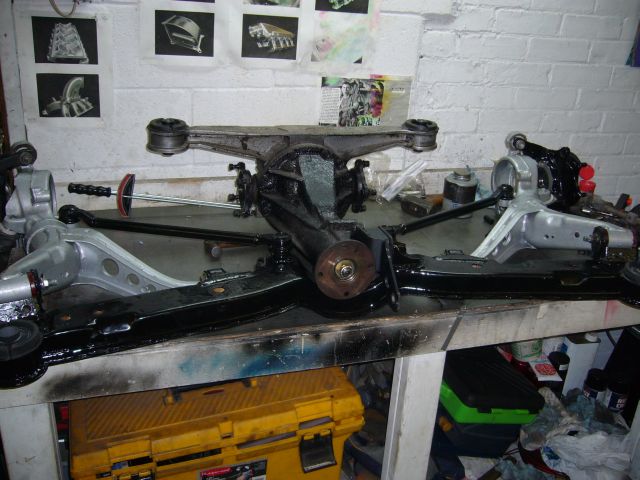
Don't let dropping the subframe and diff intimidate you, it is actually pretty easy. Just make sure to keep all hardware soaked in PB Blaster for a few days prior and clean up all the threads before you try to remove bolts. Getting it back into place is equally as easy if you have three jacks and a helper. It probably took all of 10 minutes to raise the rear subframe assembly back into place and bolt it down (bolt it up?). After that I set about reconnecting the struts and then reinstalling the stabilizer bar. The stabilizer bar got poly bushings as well, from the Energy Suspension set.
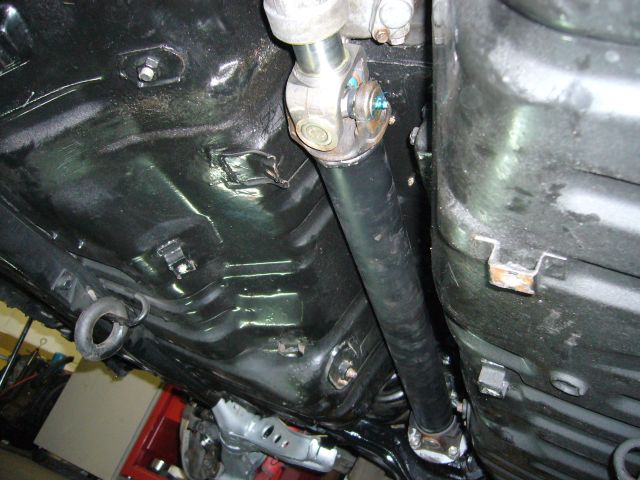
With my snout fully lubricated, I eased the driveshaft into the tail end of the transmission, then joined the rear of the shaft to the mating surface on the differential. Note the grease fittings on the shaft assures it will be well lubed into the future no matter how much of a pounding it takes.
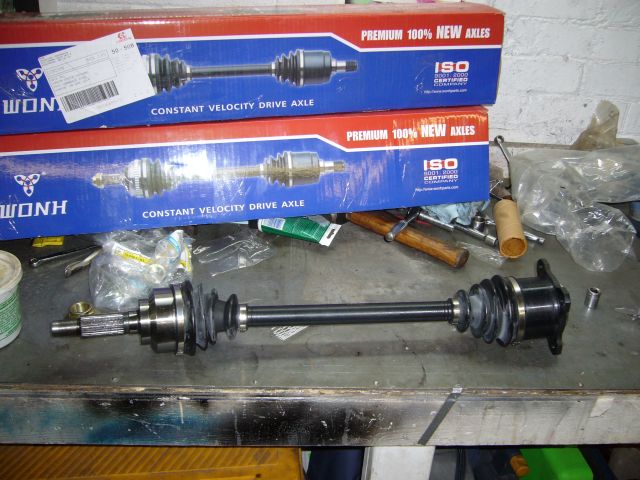
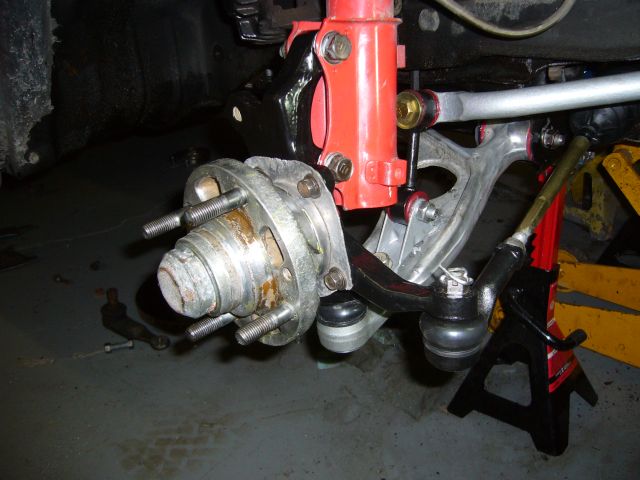
From the local driveline shop, I picked up some brand new CV axles. Not bad for $85 each. The only thing that annoyed me is that the hub-side nut was different on the new part. Coarser threads and no crimp area. I used plenty of red Loctite in the absence of a punch.
The diff was then bolted to the subframe. The rear diff mounts are also Mazda Comp. This rear end assembly, that started as light individual components, is now pretty heavy.
Don't let dropping the subframe and diff intimidate you, it is actually pretty easy. Just make sure to keep all hardware soaked in PB Blaster for a few days prior and clean up all the threads before you try to remove bolts. Getting it back into place is equally as easy if you have three jacks and a helper. It probably took all of 10 minutes to raise the rear subframe assembly back into place and bolt it down (bolt it up?). After that I set about reconnecting the struts and then reinstalling the stabilizer bar. The stabilizer bar got poly bushings as well, from the Energy Suspension set.
With my snout fully lubricated, I eased the driveshaft into the tail end of the transmission, then joined the rear of the shaft to the mating surface on the differential. Note the grease fittings on the shaft assures it will be well lubed into the future no matter how much of a pounding it takes.
From the local driveline shop, I picked up some brand new CV axles. Not bad for $85 each. The only thing that annoyed me is that the hub-side nut was different on the new part. Coarser threads and no crimp area. I used plenty of red Loctite in the absence of a punch.
Thread Starter
Joined: Feb 2001
Posts: 29,798
Likes: 128
From: London, Ontario, Canada
Everyone who knows me, also knows that I have literally spent 10 years trying to get the perfect rotary exhaust note. I was so close with the latest setup on my car, but there was a "concussion" at idle and a resonance (felt as a pressure in the cabin) at certain engine speeds. The 3" Vibrant Ultra-Quiet resonator I originally installed was doing a great job but I wanted to shift the frequency a little to fix these issues. There was space in my midpipe for another resonator so I picked up a Vibrant 3" x 12" bottle style resonator.
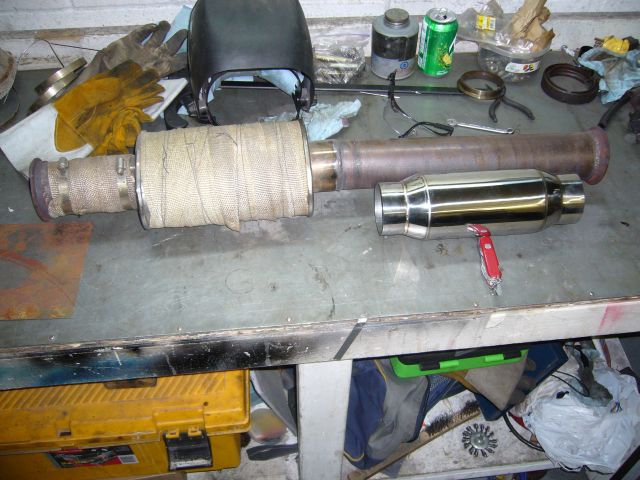
Measured, cut, welded and done. I then heat wrapped it. At the same time I also double heat-wrapped my downpipe.
This resonator has made a huge difference. The car is nice and loud when I'm on the throttle above 3500 RPM, but below that around town it is nice and quiet. Not stock quiet, of course, more like RB Rev II quiet. The idle still has the bridgeport pulsing but the concussion of it is gone. And no more resonance on the highway.
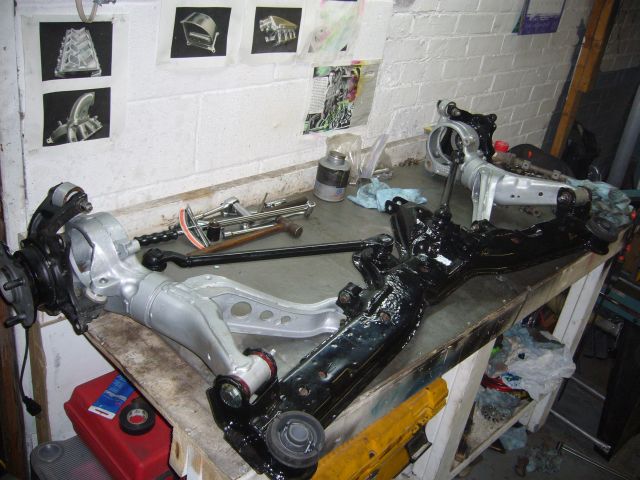
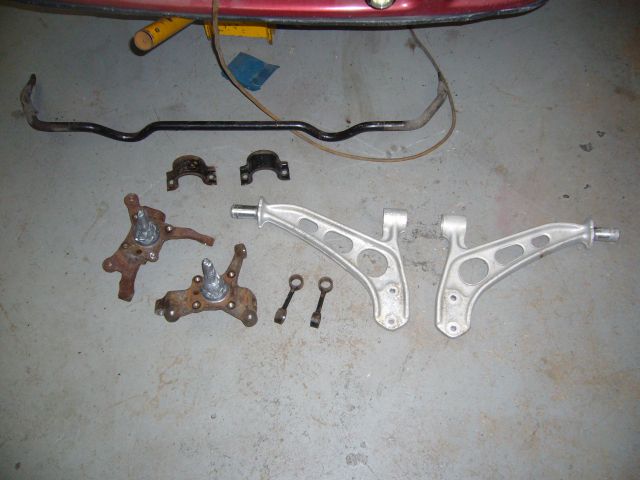
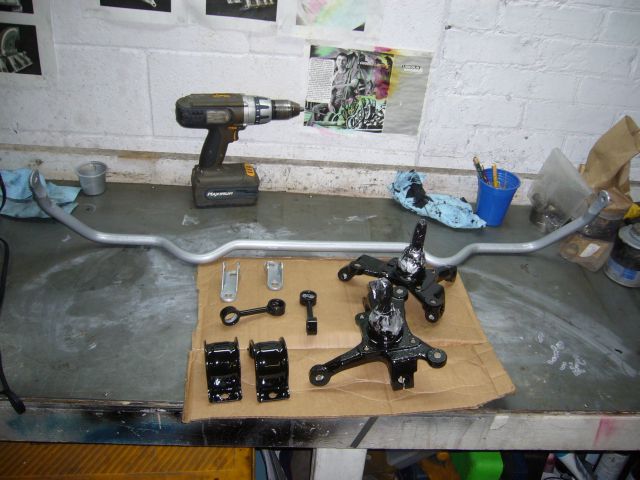
Now, it is time to move to the neglected front end. With 270K on the chassis, every bit of the front end suspension/steering was well past worn out. Bearings have been worn for 100K or so, bushings were a disaster, tie rods were loose, etc. The first step was do disassemble it all. Then, as I enjoy pushing out bushings, I removed the bushings from the front control arm. This is in most cases fairly easy to do with a large vice and a selection of sockets and tubing. The rear pivot bushing was just cut off with a Sawzall.
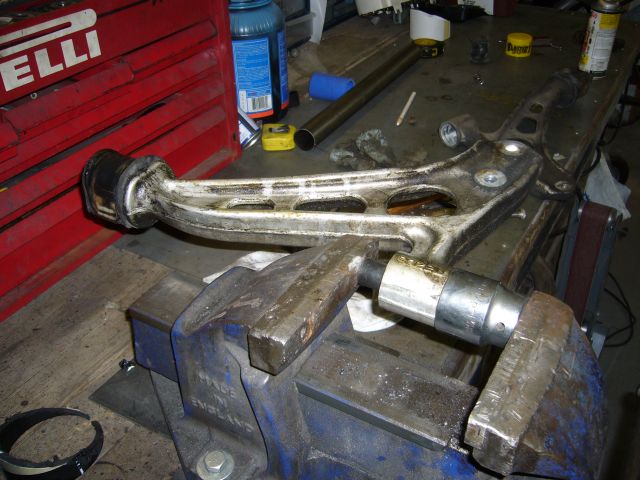
All the front end stuff was prepared for blasting. Everything in this image was blasted (as well as the sway bar end link mounts, not shown) except the control arms. They just got a quick cleanup on the wire wheel.
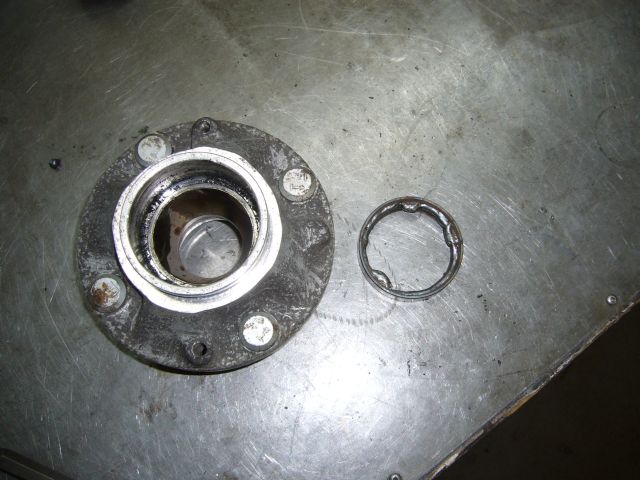
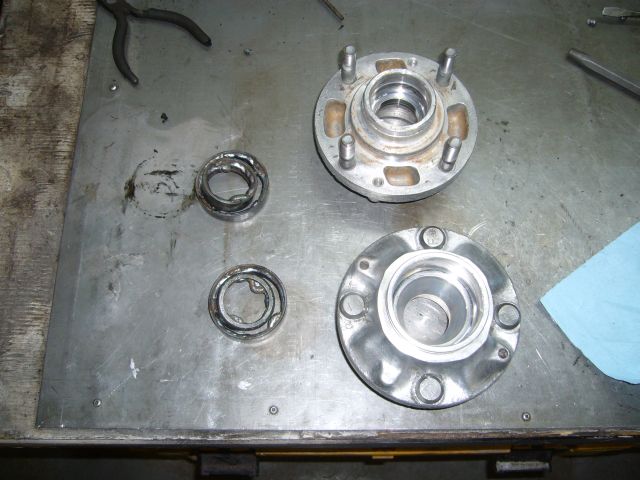
Removing bearing races from 2nd gen front hubs is very easy, if you know the trick. There is no need to risk damaging the hub by grinding out an area to use a punch, like many of the vendors suggest. If you have access to a MIG welder (and almost everyone does in some way or another), then you can have the races out in a few minutes. Clean up the hub and remove all the grease. Then, weld a few "ears" inside the bearing race. Then run a full bead along the inside of the race to get it nice and hot. Once the hub is fully cool, just bang it on the bench a few times and the race will drop out. If you need to use a punch, then punch against the little ears you have welded in (this picture shows three). If you are careful with the welder, there is no risk in damaging the hub.
Measured, cut, welded and done. I then heat wrapped it. At the same time I also double heat-wrapped my downpipe.
This resonator has made a huge difference. The car is nice and loud when I'm on the throttle above 3500 RPM, but below that around town it is nice and quiet. Not stock quiet, of course, more like RB Rev II quiet. The idle still has the bridgeport pulsing but the concussion of it is gone. And no more resonance on the highway.
Now, it is time to move to the neglected front end. With 270K on the chassis, every bit of the front end suspension/steering was well past worn out. Bearings have been worn for 100K or so, bushings were a disaster, tie rods were loose, etc. The first step was do disassemble it all. Then, as I enjoy pushing out bushings, I removed the bushings from the front control arm. This is in most cases fairly easy to do with a large vice and a selection of sockets and tubing. The rear pivot bushing was just cut off with a Sawzall.
All the front end stuff was prepared for blasting. Everything in this image was blasted (as well as the sway bar end link mounts, not shown) except the control arms. They just got a quick cleanup on the wire wheel.
Removing bearing races from 2nd gen front hubs is very easy, if you know the trick. There is no need to risk damaging the hub by grinding out an area to use a punch, like many of the vendors suggest. If you have access to a MIG welder (and almost everyone does in some way or another), then you can have the races out in a few minutes. Clean up the hub and remove all the grease. Then, weld a few "ears" inside the bearing race. Then run a full bead along the inside of the race to get it nice and hot. Once the hub is fully cool, just bang it on the bench a few times and the race will drop out. If you need to use a punch, then punch against the little ears you have welded in (this picture shows three). If you are careful with the welder, there is no risk in damaging the hub.
Thread Starter
Joined: Feb 2001
Posts: 29,798
Likes: 128
From: London, Ontario, Canada
How does this trick work, you ask? Well, molten metal (from welds) shrinks as it cools. So the bead heats up the bearing race and as the weld cools, the race shrinks inward ever so slightly. The heat also breaks any bond the race has with the hub so it is free to fall out once cooled. But make sure to let the hub cool fully, because aluminum expands much more then steel and will actually jam the race in place if you try to remove it when still hot.
While the hubs were cooling down I installed the new poly bushings in the front control arms. I actually felt kind of dirty plunging my lubricated fingers again and again into the tapered rear bushing hole. The control arm slipped into the well lubricated hole with very little encouragement needed.
Speaking of lubrication, is anyone else totally annoyed by the weird lube included with the Energy Suspension poly bushings? At the same time it manages to be both slippery and sticky while possessing some kind of unholy staying power. Get one drop of it on something, and it will be slippery/sticky forever. The only thing that seems to take it off is thinner.

The front end stuff was painted in POR-15. I much prefer the coverage of black POR-15 to that of silver but since I had an open can of silver (once a can is opened, its shelf life is limited) I figured I would paint the front stabilizer bar to match the rear.
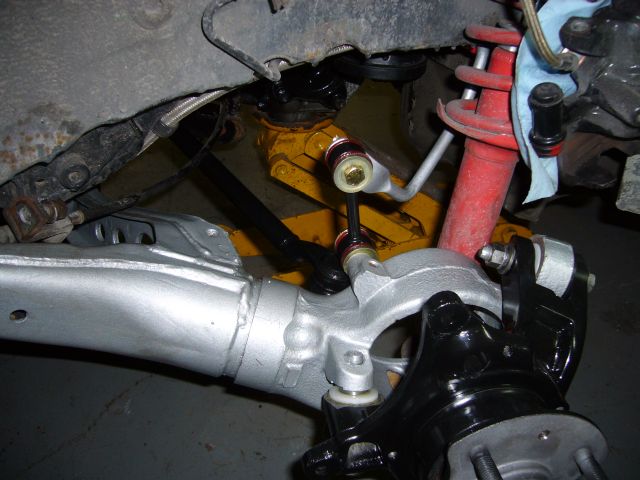
I then reassembled the front end. The ball joints and tie rod ends (inner and outer) are brand new. If you are doing this job, do not damage the rubber tie rod to steering rack boot. They don't seem to be available anywhere. Luckily I had a spare FC front subframe in the basement I was able to pull one from.
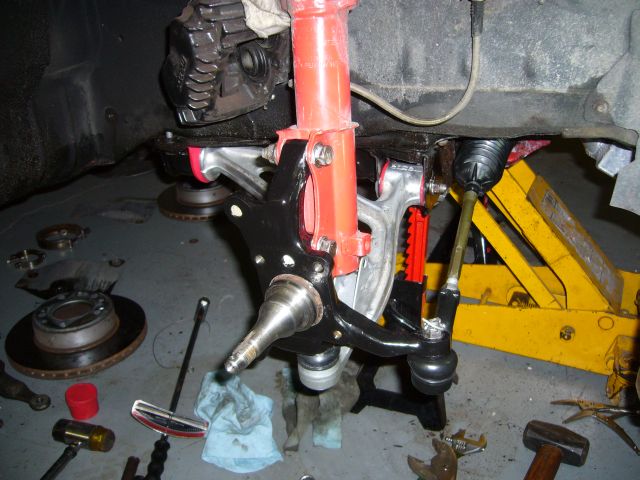
Once the new bearings were packed and installed on the front hubs, they were reinstalled onto the car. I packed them with loads of Castrol high-temp bearing grease. Remind me to look at another set of hubs to see if there is an easy way to install a grease nipple. At the same time, I bolted up the stabilizer bar. All new hardware, of course. Note that I cut away the brake rotor dust shield. It was in terrible shape and since it had to be trimmed to fit the larger 4 piston rotors anyway, I figured I would just make it go away. I can handle a little more dust on my brakes. The center part was kept because it provides shielding to the grease seal at the back of the hub.
While the hubs were cooling down I installed the new poly bushings in the front control arms. I actually felt kind of dirty plunging my lubricated fingers again and again into the tapered rear bushing hole. The control arm slipped into the well lubricated hole with very little encouragement needed.
Speaking of lubrication, is anyone else totally annoyed by the weird lube included with the Energy Suspension poly bushings? At the same time it manages to be both slippery and sticky while possessing some kind of unholy staying power. Get one drop of it on something, and it will be slippery/sticky forever. The only thing that seems to take it off is thinner.
The front end stuff was painted in POR-15. I much prefer the coverage of black POR-15 to that of silver but since I had an open can of silver (once a can is opened, its shelf life is limited) I figured I would paint the front stabilizer bar to match the rear.
I then reassembled the front end. The ball joints and tie rod ends (inner and outer) are brand new. If you are doing this job, do not damage the rubber tie rod to steering rack boot. They don't seem to be available anywhere. Luckily I had a spare FC front subframe in the basement I was able to pull one from.
Once the new bearings were packed and installed on the front hubs, they were reinstalled onto the car. I packed them with loads of Castrol high-temp bearing grease. Remind me to look at another set of hubs to see if there is an easy way to install a grease nipple. At the same time, I bolted up the stabilizer bar. All new hardware, of course. Note that I cut away the brake rotor dust shield. It was in terrible shape and since it had to be trimmed to fit the larger 4 piston rotors anyway, I figured I would just make it go away. I can handle a little more dust on my brakes.
The center part was kept because it provides shielding to the grease seal at the back of the hub.
Thread Starter
Joined: Feb 2001
Posts: 29,798
Likes: 128
From: London, Ontario, Canada
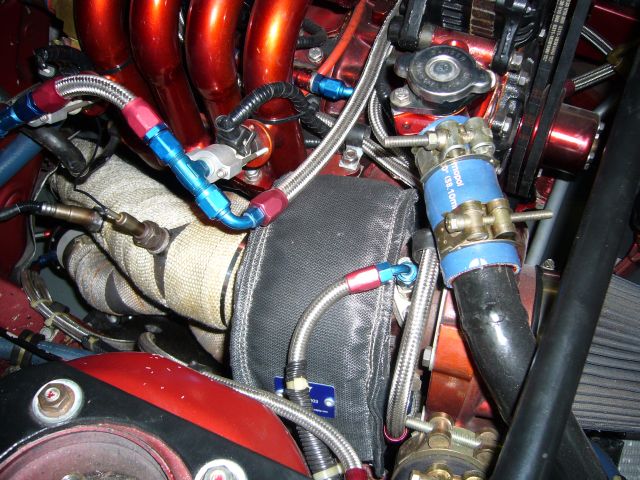
When I originally installed the GT40R, I covered the turbine housing with a DEI turbo blanket. It looked awesome...for about a week. After that, the aluminum coating began flaking off. After a few more months, it was just a naked piece of heat wrap surrounding the turbo. It continued to deteriorate to the point where it was starting to just fall apart. Additionally, it really was not a good insulator. Everything in the area was still being baked by heat and with the proximity to the secondary injector and fuel hoses, I have never been happy about the situation. A lot of people have been very happy with the PTP turbo blankets and from what I have seen of them, the quality is very high. So I ordered one from PTP's eBay store and it arrived about a week later. I'm quite impressed with the materials used and the quality of the item.
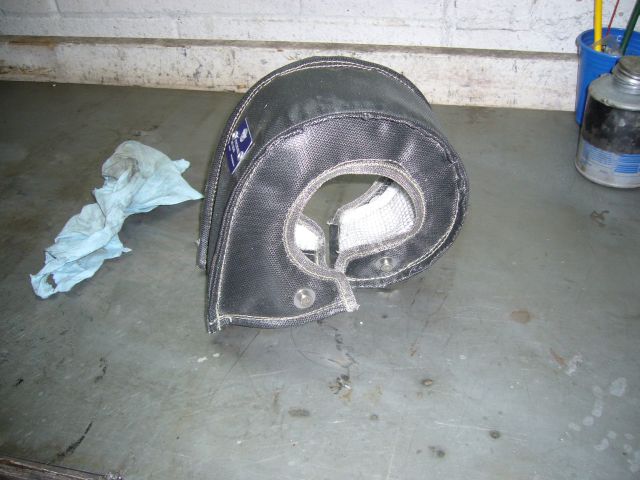
I thought it was going to be a real pain in the *** to install this thing, but actually, it was rather easy. After I removed my oil feed hose the blanket rolled right onto the turbine housing. The only slightly annoying part was using the supplied stainless steel safety wire to secure the blanket. Trying to twist that stuff in an area of limited access was not fun, and the wire is quite sharp at the ends.
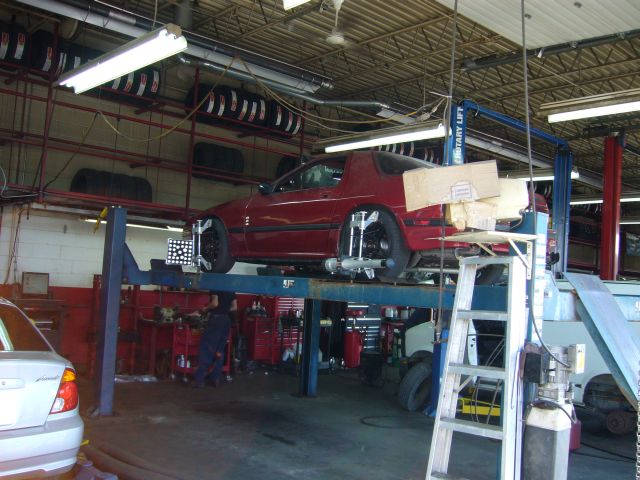
Because the entire suspension was disassembled, the car needed to be totally realigned. Actually, the car has needed an alignment since I've owned it but I have not bothered knowing that the effort would have been pointless with the worn out suspension. I did the best I could to line up the front wheels with a tape measure and then drove to my friendly neighborhood garage where the car as put up on the rack and properly set up.
After all this work, the car drives better then new. And it should, considering that there is a better then new drivetrain underneath it. No more clunks, rattles, grinding, floppy steering or pulling. I'd love to give an accurate evaluation of the DTSS elimination, but I don't think I can. Since I changed everything else at the same time, the car feels nothing like before. However I think I can say that without the DTSS, the rear feels far more conventional. I hesitate to say "predictable" because I always liked how the DTSS would make the car turn in, and I learned to drive with it instead of against it. Now, the rear end feels kind of "limp" and some throttle is necessary to bring it into line. I think this is what most drivers would want, but I'm still on the fence about it.
What's next? Well, not too much. Sometime this summer I will need to book some dyno time to fine tune at 16 PSI. I did some crude street tuning at that boost last year but there is little that can be done on the street at these power levels while remaining legal and safe. And ultimately, I want to have a dyno sheet showing 501 RWHP.
My rear quarter panels are a bit rough (a consequence of the car spending 12 years in Canadian winters before I bought it) so I need to put some thought into what will be done. On the one hand, a set of new Mazda quarters can be welded in and then the car repainted. On the other hand, a complete wide body is looking more and more appealing. The wide body, however, is a fairly large commitment. Whatever the solution, it won't be for a while because I have some other projects that need attending to.
I thought it was going to be a real pain in the *** to install this thing, but actually, it was rather easy. After I removed my oil feed hose the blanket rolled right onto the turbine housing. The only slightly annoying part was using the supplied stainless steel safety wire to secure the blanket. Trying to twist that stuff in an area of limited access was not fun, and the wire is quite sharp at the ends.
Because the entire suspension was disassembled, the car needed to be totally realigned. Actually, the car has needed an alignment since I've owned it but I have not bothered knowing that the effort would have been pointless with the worn out suspension. I did the best I could to line up the front wheels with a tape measure and then drove to my friendly neighborhood garage where the car as put up on the rack and properly set up.
After all this work, the car drives better then new. And it should, considering that there is a better then new drivetrain underneath it. No more clunks, rattles, grinding, floppy steering or pulling. I'd love to give an accurate evaluation of the DTSS elimination, but I don't think I can. Since I changed everything else at the same time, the car feels nothing like before. However I think I can say that without the DTSS, the rear feels far more conventional. I hesitate to say "predictable" because I always liked how the DTSS would make the car turn in, and I learned to drive with it instead of against it. Now, the rear end feels kind of "limp" and some throttle is necessary to bring it into line. I think this is what most drivers would want, but I'm still on the fence about it.
What's next? Well, not too much. Sometime this summer I will need to book some dyno time to fine tune at 16 PSI. I did some crude street tuning at that boost last year but there is little that can be done on the street at these power levels while remaining legal and safe. And ultimately, I want to have a dyno sheet showing 501 RWHP.
My rear quarter panels are a bit rough (a consequence of the car spending 12 years in Canadian winters before I bought it) so I need to put some thought into what will be done. On the one hand, a set of new Mazda quarters can be welded in and then the car repainted. On the other hand, a complete wide body is looking more and more appealing. The wide body, however, is a fairly large commitment. Whatever the solution, it won't be for a while because I have some other projects that need attending to.
While the hubs were cooling down I installed the new poly bushings in the front control arms. I actually felt kind of dirty plunging my lubricated fingers again and again into the tapered rear bushing hole. The control arm slipped into the well lubricated hole with very little encouragement needed.

Glad you got her back on the road... Give it a few days to break in all the bushings and you will enjoy it even more.
By the way, was there any other reason besides you didn't want the old stock bushings on the mount for the hub on the control arm in the rear besides you just wanted to go with fresh delrins in there? I left my stockers on since I removed the DTSS which I saw would essentially eliminate the function of the spherical bearings the control arm had and just turn them into solid bushings in a way....
Trending Topics
Speaking of lubrication, is anyone else totally annoyed by the weird lube included with the Energy Suspension poly bushings? At the same time it manages to be both slippery and sticky while possessing some kind of unholy staying power. Get one drop of it on something, and it will be slippery/sticky forever. The only thing that seems to take it off is thinner.
Joined: May 2006
Posts: 3,881
Likes: 3
From: Jacksonville, Tampa & Tallahassee
Very well done, you seem to be doing everything in the opposite order that I am.
I redid the suspension and now I'm trying to figure out how to make power, lol.
I redid the suspension and now I'm trying to figure out how to make power, lol.

Thread Starter
Joined: Feb 2001
Posts: 29,798
Likes: 128
From: London, Ontario, Canada
Oh, I never did say I didn't like it, I just said it made me feel kind of dirty. And in general, anything that makes you feel kind of dirty is a good thing.
I have about 700KM on the car now and the bushings seem to be working quite well.
The stock upper rubber bushings were mangled upon removal from the trailing arm, so there wasn't much point in putting them back in and it seemed odd to buy new ones from Mazda. I was hoping to buy a Delrin replacement for the pillow ***** but since it's not available, and I didn't want to bother machining one, I just put the stock pillow ***** back in. They were damaged upon removal as well, but I just welded them solid.
I didn't think of trying that. I'll give it a go if I need to. I really hope I don't have to re grease these things very often.
Yeah, I went with the fun stuff first.  Then it became very obvious that with this much power, the suspension is vitally important.
Workbench clutter has always been an issue with me. There are 3 benches in my shop, and they always seem to be covered in crap. But I do try to clean up after every job.
Glad you got her back on the road... Give it a few days to break in all the bushings and you will enjoy it even more.
By the way, was there any other reason besides you didn't want the old stock bushings on the mount for the hub on the control arm in the rear besides you just wanted to go with fresh delrins in there? I left my stockers on since I removed the DTSS which I saw would essentially eliminate the function of the spherical bearings the control arm had and just turn them into solid bushings in a way....
By the way, was there any other reason besides you didn't want the old stock bushings on the mount for the hub on the control arm in the rear besides you just wanted to go with fresh delrins in there? I left my stockers on since I removed the DTSS which I saw would essentially eliminate the function of the spherical bearings the control arm had and just turn them into solid bushings in a way....
The stock upper rubber bushings were mangled upon removal from the trailing arm, so there wasn't much point in putting them back in and it seemed odd to buy new ones from Mazda. I was hoping to buy a Delrin replacement for the pillow ***** but since it's not available, and I didn't want to bother machining one, I just put the stock pillow ***** back in. They were damaged upon removal as well, but I just welded them solid.
Hey Aaron great work! When I re-greased the ES poly bushings on my Miata, I was told by the race shop to use citrus degreaser to clean them off. Picked up a can from Canadian Tire (Motomaster brand, orange label). The grease is no match for that stuff, makes cleanup a lot easier with a nice citrus scent. Another big plus is it wont harm the poly bushings either!
Then it became very obvious that with this much power, the suspension is vitally important.Workbench clutter has always been an issue with me. There are 3 benches in my shop, and they always seem to be covered in crap. But I do try to clean up after every job.


When i did them the first time on my miata, they were still moving nicely after one track season. I guess it all depends on what conditions you drive in. Over the winter I took them apart again in order to add zerk fittings to all of the control arms. On the miata its a 2 piece bushing, with a 1-2 mm gap in between. I put the zerks in the middle so that the grease would be able to work its way in. I will probably grease maybe once a season for good measure.
Thread Starter
Joined: Feb 2001
Posts: 29,798
Likes: 128
From: London, Ontario, Canada
I didn't even think of adding grease fittings. It would be fairly easy to do this on the FC front control arms on the rear mount by just drilling a grease channel in the arm. The local fastener store actually sells bolts with grease channels built in so that would make both the fronts and rears pretty easy. I guess if I have to take the stuff off to grease, I'll perform this mod.
On the fasttrack!
iTrader: (22)
Joined: Oct 2006
Posts: 2,494
Likes: 2
From: virginia beach, virginia
you know with the poly bushings, i learned a trick a long time ago, and i works well. i found that no matter how much ******* grease i used, it always squeeked. i learned to take teflon tape and wrap it around the sway bar, the lower control arm, anywhere the poly bushing sits. cured my squeaking problem, and i didnt have to redo it every month.
Lloyd
Lloyd
Thread Starter
Joined: Feb 2001
Posts: 29,798
Likes: 128
From: London, Ontario, Canada
I'm happy with the poly bushings. I am comparing them to worn OEM rubber of course, but they are tight without being overly harsh. Delrin is only for track cars, in my opinion. On a street car, everytime you go over a bump, it will feel like the car is about to fall apart.
Joined: May 2006
Posts: 3,881
Likes: 3
From: Jacksonville, Tampa & Tallahassee
Really? I was thinking of going w/ Delrin for the FCA busings as those don't really compress or absorb much (if any) vibrations. Gotta keep the stock ones in the rear though due to MMR camber adjusters.
Thread Starter
Joined: Feb 2001
Posts: 29,798
Likes: 128
From: London, Ontario, Canada
I've been in cars with Delrin bushings before and they are horrid. Putting Delrin into any of the suspension pivots seriously increases the amount of NVH transmitted to the chassis. I would think that the fronts would actually be worse then the rears for this, because at least the rear subframe is rubber mounted.
A set of rear trailing arm Delrin bushings came with my Mariah DTSS eliminator set but I'll likely just sell them.
A set of rear trailing arm Delrin bushings came with my Mariah DTSS eliminator set but I'll likely just sell them.
Joined: Dec 2006
Posts: 2,859
Likes: 13
From: Sterling Heights, MI
Once again, awesome. It's a real treat having 2 Project Tina updates in such a short time frame . I'm hoping to do something similar to my car very soon (bushings, etc), it's a big help having a visual of everything  . Can't wait to see those dyno sheets.
. I'm hoping to do something similar to my car very soon (bushings, etc), it's a big help having a visual of everything
Nice work as always Aaron. I've been eying some more parts for my FC to possibly get it going before winter hits and I don't feel like doing anything to it.
For the rack boots, Autohausaz.com shows they have them. They have good prices, with OEM suppliers.
For the rack boots, Autohausaz.com shows they have them. They have good prices, with OEM suppliers.
Thread Starter
Joined: Feb 2001
Posts: 29,798
Likes: 128
From: London, Ontario, Canada
On the weekend, I made a little video of the car which includes a little launch footage and some good exhaust noise.
http://www.youtube.com/watch?v=cEDp20F0R-c
I'm thinking about booking some dyno time for next week but it depends on how busy I am at work since the dyno is only opened during the day throughout the week.
http://www.youtube.com/watch?v=cEDp20F0R-c
I'm thinking about booking some dyno time for next week but it depends on how busy I am at work since the dyno is only opened during the day throughout the week.
