
She Followed Me Home, Honest

The intake is one of my primary projects as I prepare for the next work session and I've already found a really nice part (from a Dodge Durango of all things) that is so close to perfect I'm sure it won't work.
Find out soon.
Last edited by clokker; Jun 24, 2015 at 08:56 PM.
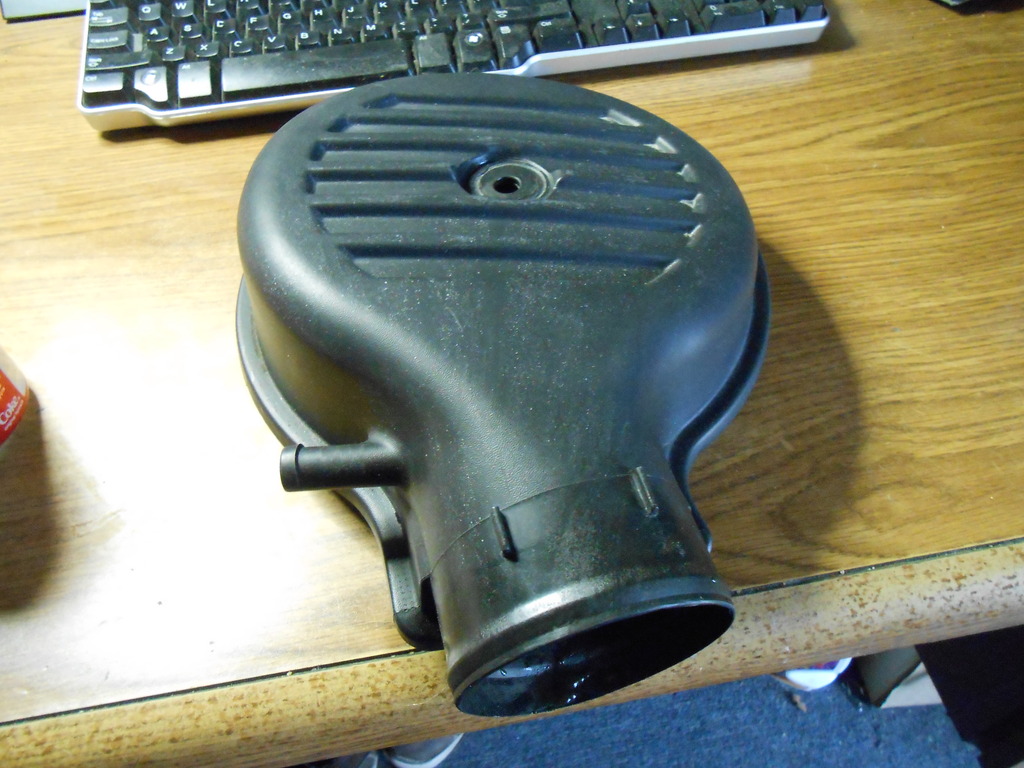
Spectre makes a pretty nice cast alloy version that is just differently enough shaped that I know it will work but I'll try this first.
Cause it was $95 cheaper.
Kind of out of the blue, a whole different project came together today.
Long time ago I ran across a few vague mentions of a FC gas tank swapped into a Z.
The V-8 swappers like it because it has room for mufflers on either side and already has an in-tank, high pressure pump for their FI.
I wanted it because the external pumps we've tried are unbearably noisy (and believe me, I've gone to extreme lengths to isolate them...) and I hate the whole monkey cluster venting system of the original.
Problem is, now that we're carbed, we need a low pressure pump and they aren't easy to find.
Unless, purely by chance, you stumble across the info (on HAMB, where else?) that early Toyotas use low pressure, in tank units and Rock Auto sells 'em cheap.
Sure enough, $50 shipped got me a pump from a 76 Corolla (with sock) that puts out 8psi. Our carb wants 6.5psi and we have a regulator to dial it back that slight amount, so it's good.
Now that I've acquired the parts and am fiercely ambitious to try, watch this turn into a nightmare for some reason that no one ever mentions.
Not sure that Corolla pump will have enough flow capacity to support the horse power of the Z-car engine. The memories are a bit foggy (way too many beers ago) but I sort of remember that Ford in the early '80's used some low pressure electric fuel pumps in the F-150 just before switching to EFI. Not sure if they were in-line or in-tank units though. Since the car was originally EFI, you should still have a return fuel line. I would recommend using a low pressure return style (bypass) fuel pressure regulator with your carburetor setup. That helps to greatly reduce the dead head loading on the fuel pump (vs. using a non-return style dead head regulator with no return fuel line) and allows the fuel pump last a lot longer.
You could have used the original EFI in-tank fuel pump with the carburetor setup - you just would have had to used a low pressure return style (bypass) fuel pressure regulator with a high enough flow capacity rating to bypass most of the fuel flow almost all of the time. Something like the Mallory #4309 or an Aeromotive equivalent.
Turbine in-line electric fuel pumps are fairly quite. You maybe able to quite down a rotary vein or gerotor in-line fuel pump by using an anti-vibration mount kit (like the ones that are sold for say a MSD 6AL ignition control box). Just not sure if they are rated to hold the weight of the pump though - you may end up shearing the rubber. Most in-line pumps come with mounting brackets with rubber isolators. The key is to also add rubber washers under the mount brackets between it and the uni-body/frame and also under the head of the fastener between it and the mount brackets to completely isolate the bracket and help prevent it from transmitting any vibration/noise from the pump to the vehicle. Of course the vibration/noise can still be transmitted by hard fuel line too, so you can use short sections of the properly rated SAE rubber fuel line to further dampen any vibration/noise.
Last edited by DeaconBlue; Jun 25, 2015 at 10:50 AM.

Were I more energetic, this tank would go into my car and the Z could have mine.
But I'm not.
I appreciate and share your concerns Deacon, time will tell if the system needs upgrading.
Just getting the tank and carb in place is the main goal now and I'm sure it will at least idle as is.
And don't overestimate our power output- on a good day we might see 140 or so at the wheels.
Our FPR can be configured as a bypass or deadhead, I'll make it bypass.
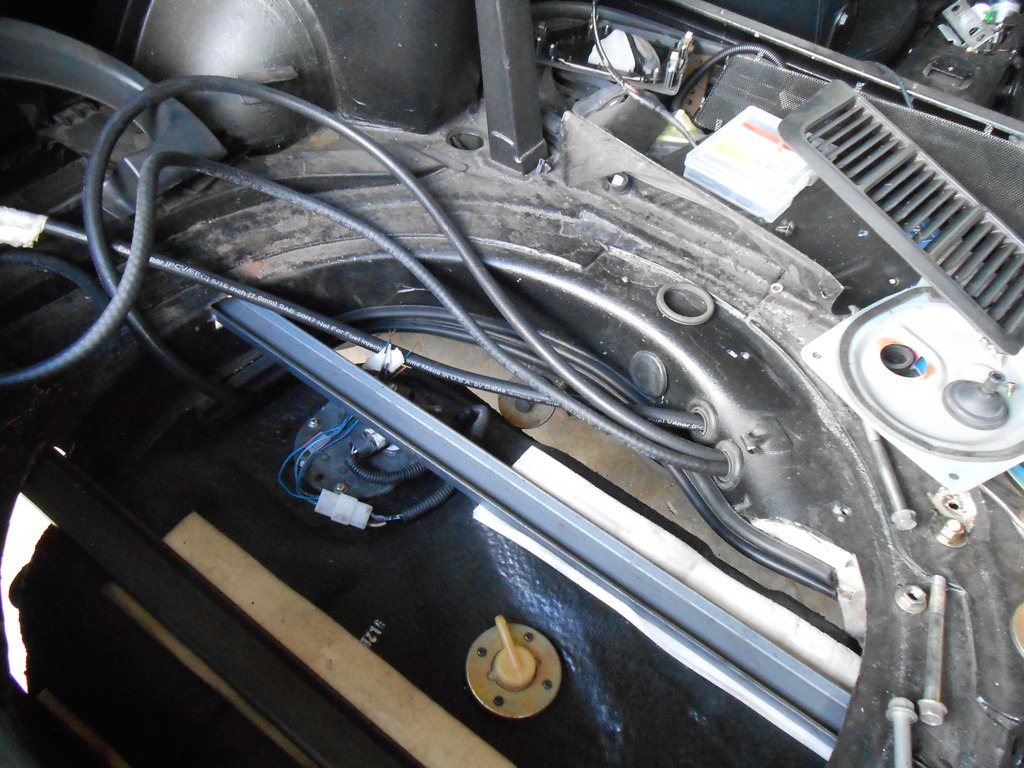
I also need to junkyard a suitable charcoal canister for the tank vent.
Since the valve cover, block breather and canister will all attach to the intake/airbox, I kinda have to get that built as well.
For a variety of reasons (primarily to minimize the amount of wiring to modify), I'm moving all the efan components onto the shroud. It'll be self contained with the fan/shroud, only requiring external power and ground.
I still have a fairly shocking number of good size projects before she can start again.
Next Wed. I move back over to Sigfrid's for three weeks of serious clokker/Z bonding.
But I'm not.
I appreciate and share your concerns Deacon, time will tell if the system needs upgrading.
Just getting the tank and carb in place is the main goal now and I'm sure it will at least idle as is.
And don't overestimate our power output- on a good day we might see 140 or so at the wheels.
Our FPR can be configured as a bypass or deadhead, I'll make it bypass.
I also need to junkyard a suitable charcoal canister for the tank vent.
Since the valve cover, block breather and canister will all attach to the intake/airbox, I kinda have to get that built as well.
For a variety of reasons (primarily to minimize the amount of wiring to modify), I'm moving all the efan components onto the shroud. It'll be self contained with the fan/shroud, only requiring external power and ground.
I still have a fairly shocking number of good size projects before she can start again.
Next Wed. I move back over to Sigfrid's for three weeks of serious clokker/Z bonding.
I may be on a roll here:
I had almost convinced myself this Dodge tophat wouldn't fit but it just might work out.
I ran over to Sigfrid's today to drop off all the parts I've gathered and test fit this hat.
Had it not been promising (which is all it is right now), I'd have picked up the Spectre part before moving over there Wednesday.
I'll need to remove the carb to get a better view of how the hat sits on the carb throat flange, it's possible I can drop even lower. I've already used the beltsander to remove the mounting lip on the hat bottom...that gained almost 1/4" of clearance.
If it's contacting the hood- and I'm not certain it is- it'll be right where the inlet tube connects, so I need to get one one and see if it makes things worse.
I figure the first attempt will be with my old stock FC intake tube, which is kinda shaped the way I think it might go. It also has the two vent bungs, one of which I need and the other will get plugged.
If this pans out, it will be, as Chris Harris would say, "Mega!".


Prep for the upcoming work session is complete, at least as much as I can envision right now.
I have everything to finish the efan except the trigger(s). Apparently BMW uses a dual temp sensor (comes in two flavors- 180/195 and 195/210) with a 14mm boss (should screw right into our thermostat housing, which is riddled with ports) but the yard had no cars to look at and I won't get it till I know the pigtail is available.
Speaking of pigtails, I may have found the correct connector for the fuel tank bulkhead...I really hope so because I'm dead in the water without it.
Find out tomorrow.
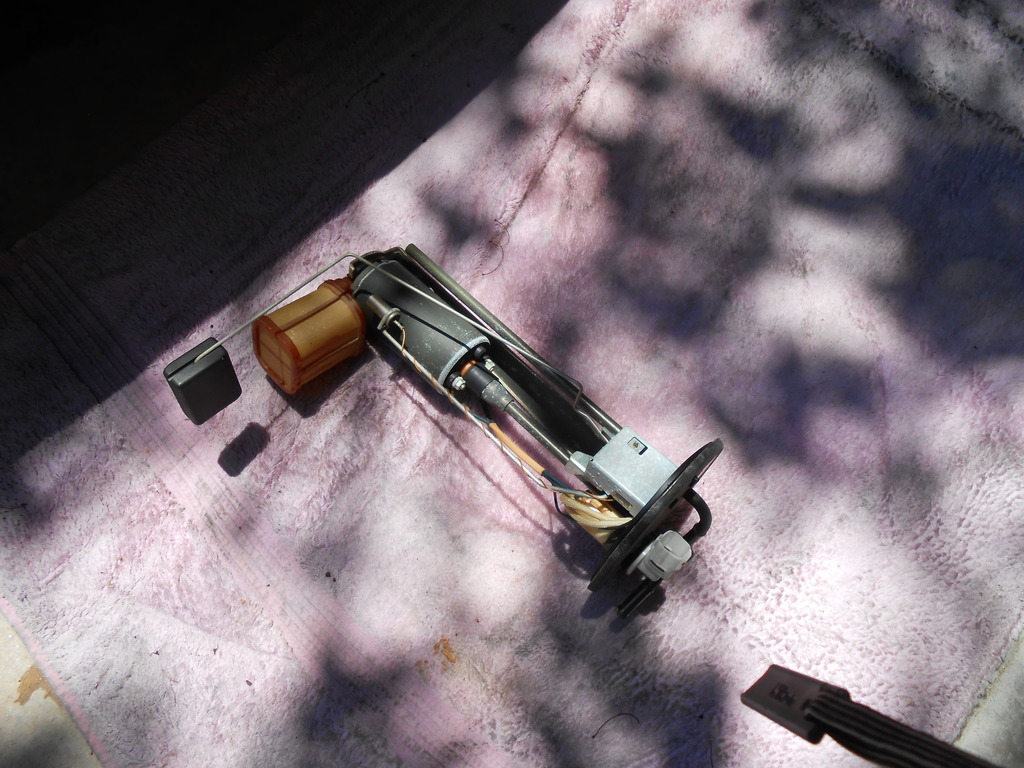
Also concerning the tank...A few months ago we were trying different pump/filter combos and I recently picked up a pre-filter we'd tried (and ultimately, discarded). It had been sitting for quite a while and was all dried out.
It was FULL of powdered rust, it poured out on my lap.
Recall that very early on I had the tank cleaned/sealed professionally but I now question the efficacy of their work.
Since we now have a "new" tank (verified clean), a freshly rebuilt carb (they did a very nice job) and a new pump, I've decided all the fuel lines need to go as well...I want to be absolutely certain our fuel system is optimal.
I'll have to spend some time underneath pondering options, so I don't yet know exactly how we'll do this. My initial preference is to run uninterrupted soft lines the whole way but we'll see.
Finally, the intake.
I'm operating under the assumption that the Dodge tophat is going to work, so the rest of the intake must fit in with it, not just physically but also aesthetically.
I spent several hours in the yard, specifically looking for an airbox and was having no luck.
So I readjusted my perspective/concept and took a chance on something completely different.
Since the car is not at my house, I spend a lot of time staring at the pics (for every pic in this thread I have about 10 that don't get posted, my Z Photobucket folder has nearly 600 pics in it) and I've started to get the feeling the overall bay design is getting a bit precious/twee.
A bit too Alison and not enough Elena (if you're into gratuitous pop culture references...) and maybe the intake design could be more free form to add some contrast.
I have no idea if this donor box (1990 Lexus GS400) will even fit anywhere useful, so again, we'll see.
Of course, we have a fallback.
We can always run a tube from the tophat through the stock 4" hole in the radiator support/bulkhead and cap it with a K&N.
This probably the most efficient/effective arrangement, I only resist because it's so obvious and generic.
Too easy, in other words.
Next three weeks will be interesting.
I have everything to finish the efan except the trigger(s). Apparently BMW uses a dual temp sensor (comes in two flavors- 180/195 and 195/210) with a 14mm boss (should screw right into our thermostat housing, which is riddled with ports) but the yard had no cars to look at and I won't get it till I know the pigtail is available.
Speaking of pigtails, I may have found the correct connector for the fuel tank bulkhead...I really hope so because I'm dead in the water without it.
Find out tomorrow.
Also concerning the tank...A few months ago we were trying different pump/filter combos and I recently picked up a pre-filter we'd tried (and ultimately, discarded). It had been sitting for quite a while and was all dried out.
It was FULL of powdered rust, it poured out on my lap.
Recall that very early on I had the tank cleaned/sealed professionally but I now question the efficacy of their work.
Since we now have a "new" tank (verified clean), a freshly rebuilt carb (they did a very nice job) and a new pump, I've decided all the fuel lines need to go as well...I want to be absolutely certain our fuel system is optimal.
I'll have to spend some time underneath pondering options, so I don't yet know exactly how we'll do this. My initial preference is to run uninterrupted soft lines the whole way but we'll see.
Finally, the intake.
I'm operating under the assumption that the Dodge tophat is going to work, so the rest of the intake must fit in with it, not just physically but also aesthetically.
I spent several hours in the yard, specifically looking for an airbox and was having no luck.
So I readjusted my perspective/concept and took a chance on something completely different.
Since the car is not at my house, I spend a lot of time staring at the pics (for every pic in this thread I have about 10 that don't get posted, my Z Photobucket folder has nearly 600 pics in it) and I've started to get the feeling the overall bay design is getting a bit precious/twee.
A bit too Alison and not enough Elena (if you're into gratuitous pop culture references...) and maybe the intake design could be more free form to add some contrast.
I have no idea if this donor box (1990 Lexus GS400) will even fit anywhere useful, so again, we'll see.
Of course, we have a fallback.
We can always run a tube from the tophat through the stock 4" hole in the radiator support/bulkhead and cap it with a K&N.
This probably the most efficient/effective arrangement, I only resist because it's so obvious and generic.
Too easy, in other words.
Next three weeks will be interesting.
Joined: Mar 2001
Posts: 31,863
Likes: 3,245
From: https://www2.mazda.com/en/100th/
neat
for the BMW part i'd suspect it has the square bosch fuel injector style plug, or a pig tail to a plug like that. not sure which BMW you're using, but they do sell the connectors separate RealOEM.com - Select Your BMW Model as i recall the Germans had the connectors in a spot that wasn't obvious, they do mistrust electricity.
for the fuel tank, i think id add an extra inline filter before the carb, one of those cheap parts store ones should do, its a little extra insurance. once the thing has run for a while, you can check to see if the filter is clogged, and either change it, or remove it.
This from a 1995 535 (?) but the same part was used in multiple models for several years.
According to the ever reliable internets.
Joined: Mar 2001
Posts: 31,863
Likes: 3,245
From: https://www2.mazda.com/en/100th/
it occurs on these turds RealOEM.com - Part Search
here is a list of all the electrical crap, i don't see the connector, but RealOEM.com - Online BMW Parts Catalog
here is a list of all the electrical crap, i don't see the connector, but RealOEM.com - Online BMW Parts Catalog
Progress report:
The first two days went blindingly fast, mostly because I knew exactly what had to be done and had the parts to do it.
The efan wiring was relocated and finalized and the electric choke on the carb is connected.
I still need a trigger for the fan but that's not critical atm.
I then spent several hours trying to make the Lexus airbox work but alas, no.
Even after removing the giant stock AFM bracket, the space is too weird...I could get the box hooked up but it just didn't look right.
I have temporarily reverted to a generic tube/K&N, which will get us running and give me time to think of something better.
The tank swap was what I really wanted to do and it was next.
My only info was a few vague "Oh, and I swapped in a FC gas tank" mentions in some Z build threads...the kind of infuriatingly casual statement that leaves you panting for more- never forthcoming- details.
I was going in blind and therefore, cautiously.
This is the type of project that requires major commitment from the very start.
No changing your mind and going back to stock- first thing you do is hack out the spare tire well.
I was under the (naively simplistic) impression that this well was a simple circle, spot welded to the floorpan- and maybe it was on the 240Z, but not the 280.
I'd give my left nut for a plasma cutter but as it is a grinder w/ cutoff disc, a jigsaw and some pliers had to suffice.
I am constantly frustrated knowing how proper tooling would produce so much nicer results than my shadetree rubewrangling.
Anyways, now on day two of cutting fitting.
Like I said, I'm being cautious and creeping up on the cuts and the whole thing is more difficult working solo. Raising the tank and trying to accurately/repeatedly position it in midair whilst precariously balanced on a floor jack AND simultaneously eyeball interference points...well, it's a pain is what it is.
None of the original mounting is going to work, neither the straps or the the hang points.
I plan on using the FC straps and front shield plate and fabbing brackets to bolt to.
No idea yet what that will look like.
I'll get pics tonight.
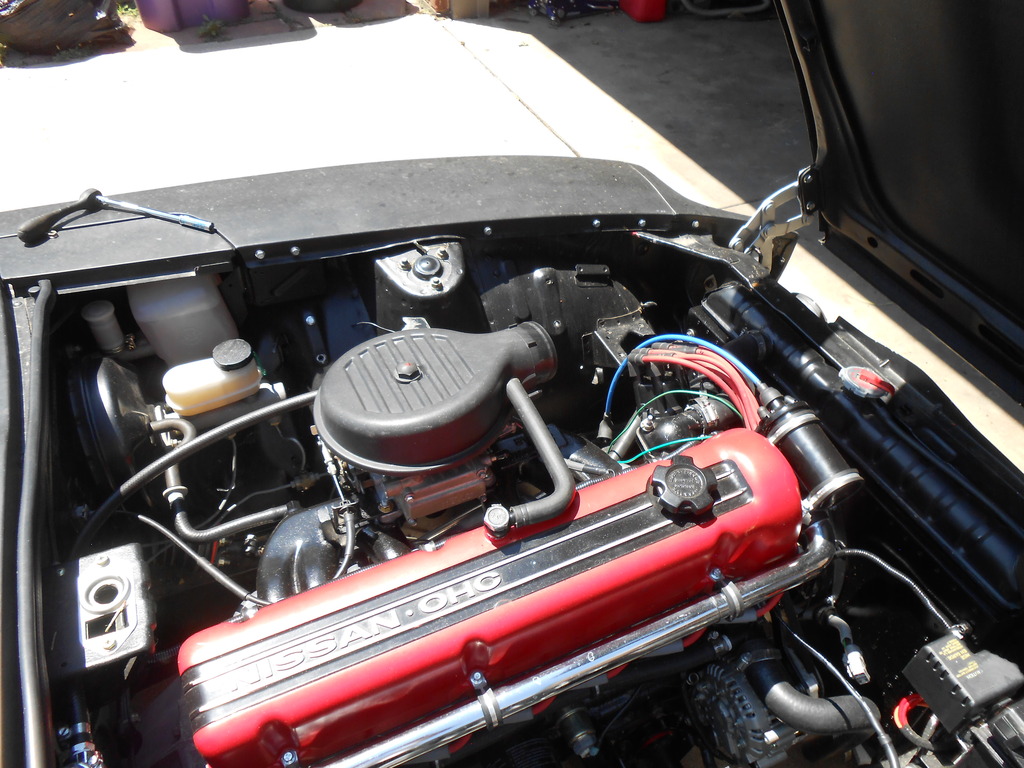
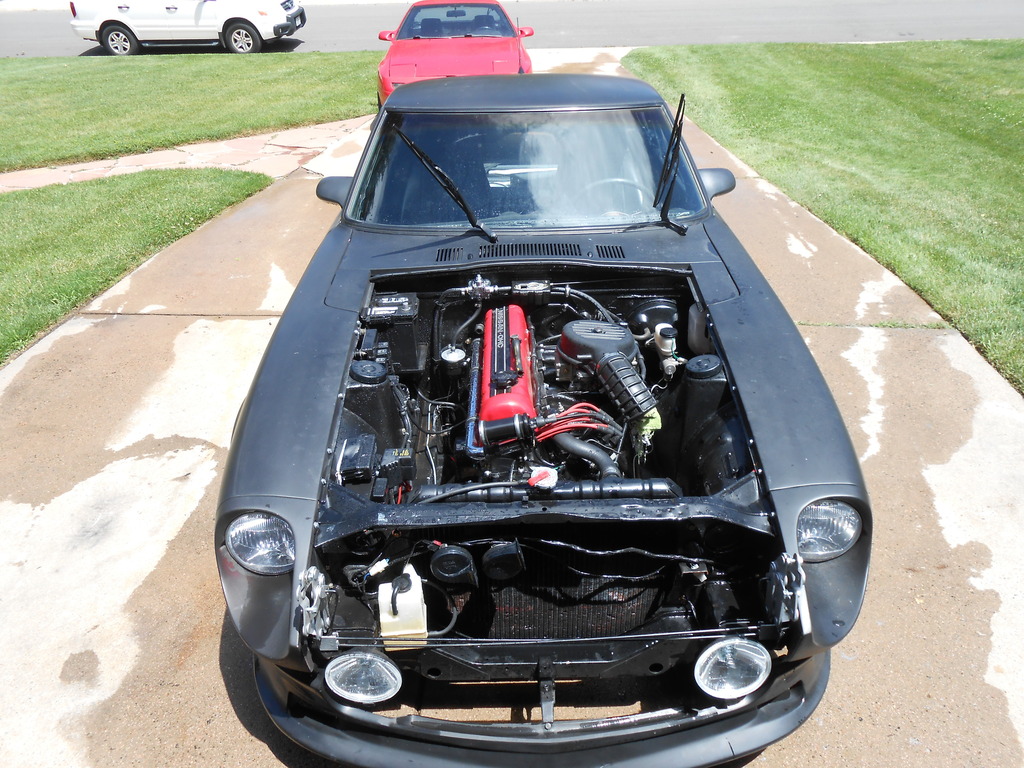
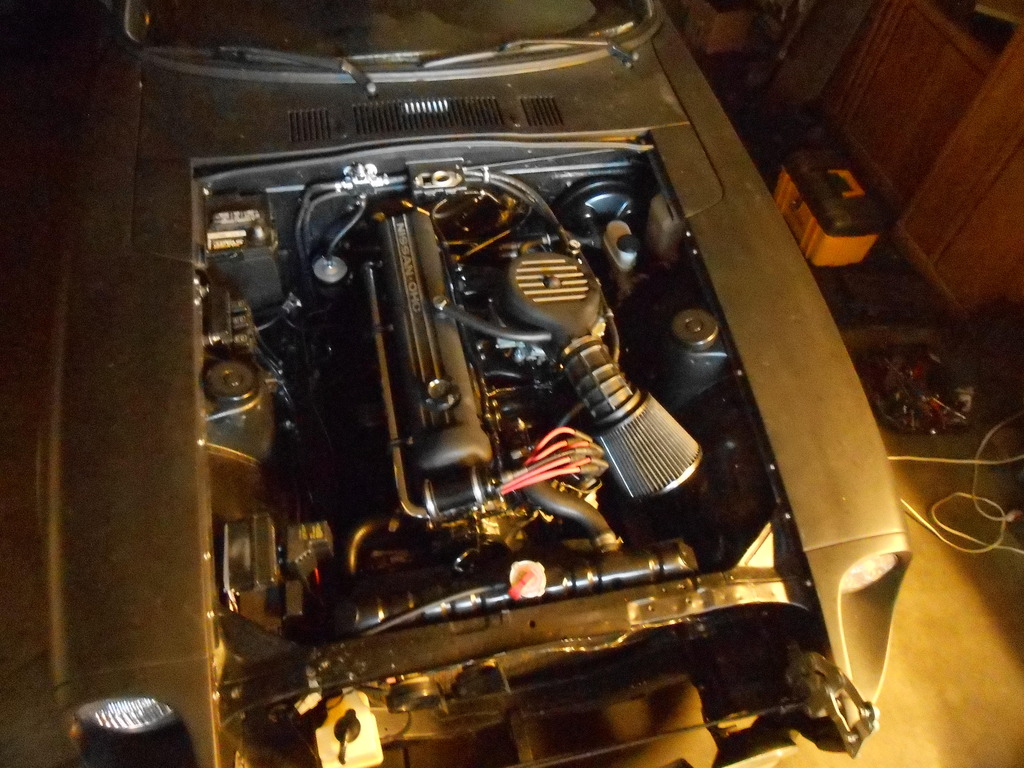
An overview of the bay as she sits currently:
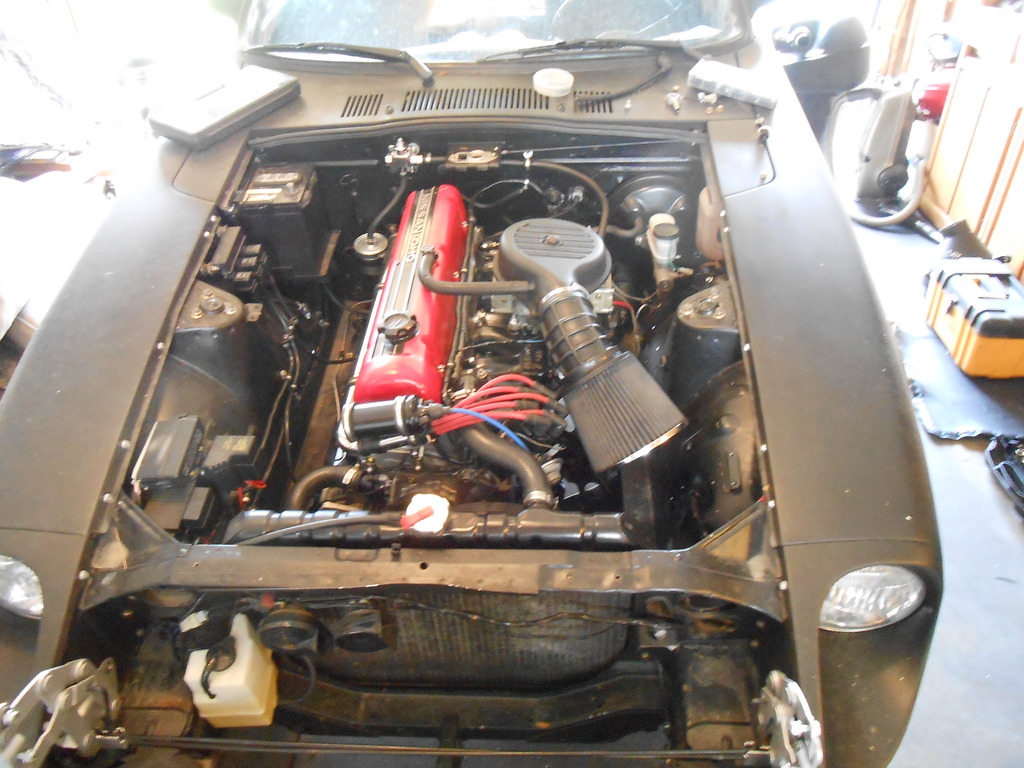
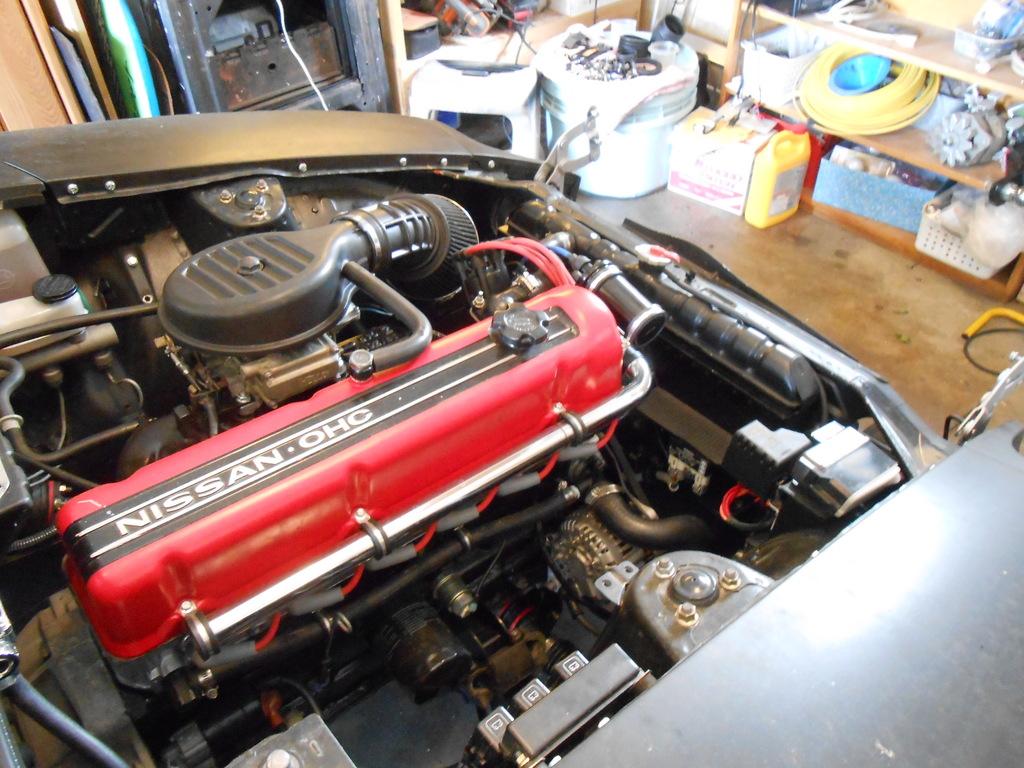
The intake will probably change at some point but is complete as pictured.
Crank/valve cover breathers are plumbed to the intake and there is provision for the evap as well.
This will serve to get us running.
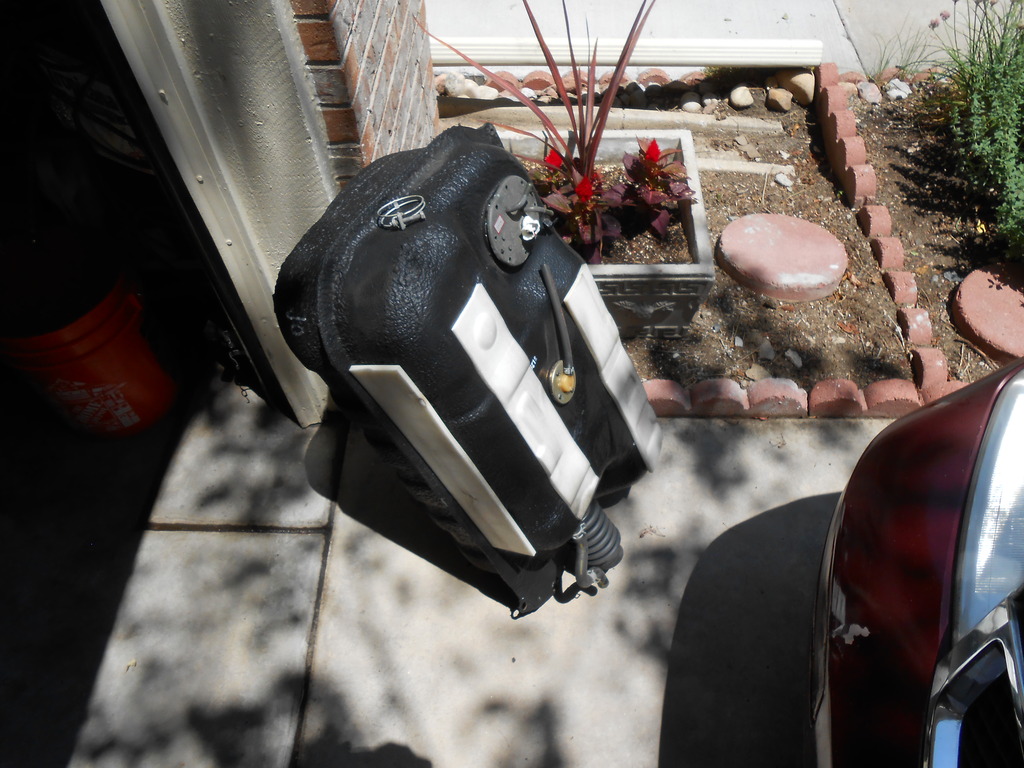
Here are the two tanks side by side:
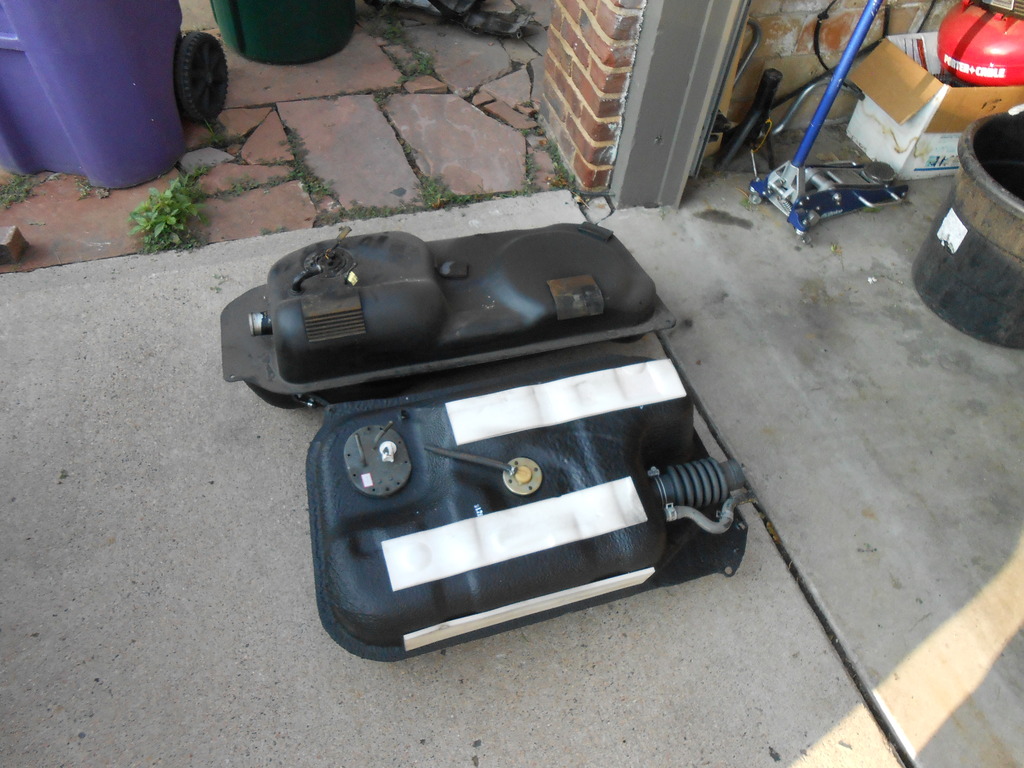
The Z tank is about 8" longer (wider?) an inch shorter and very similar in depth.
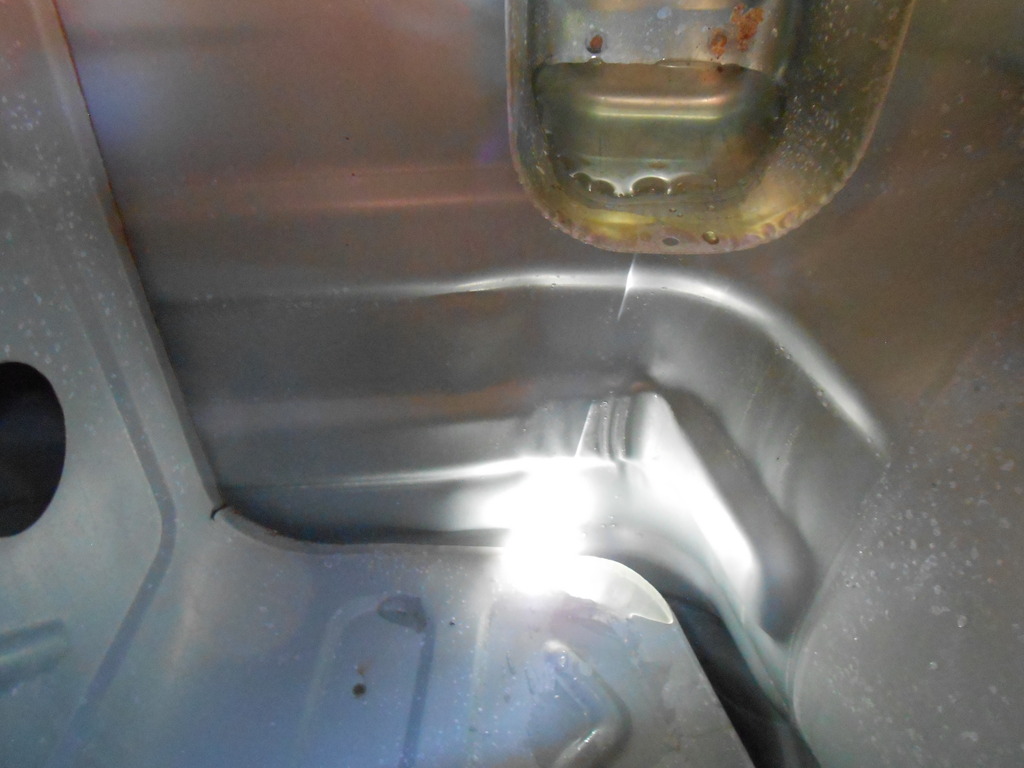
Here is the initial cut of the wheelwell and test fit:
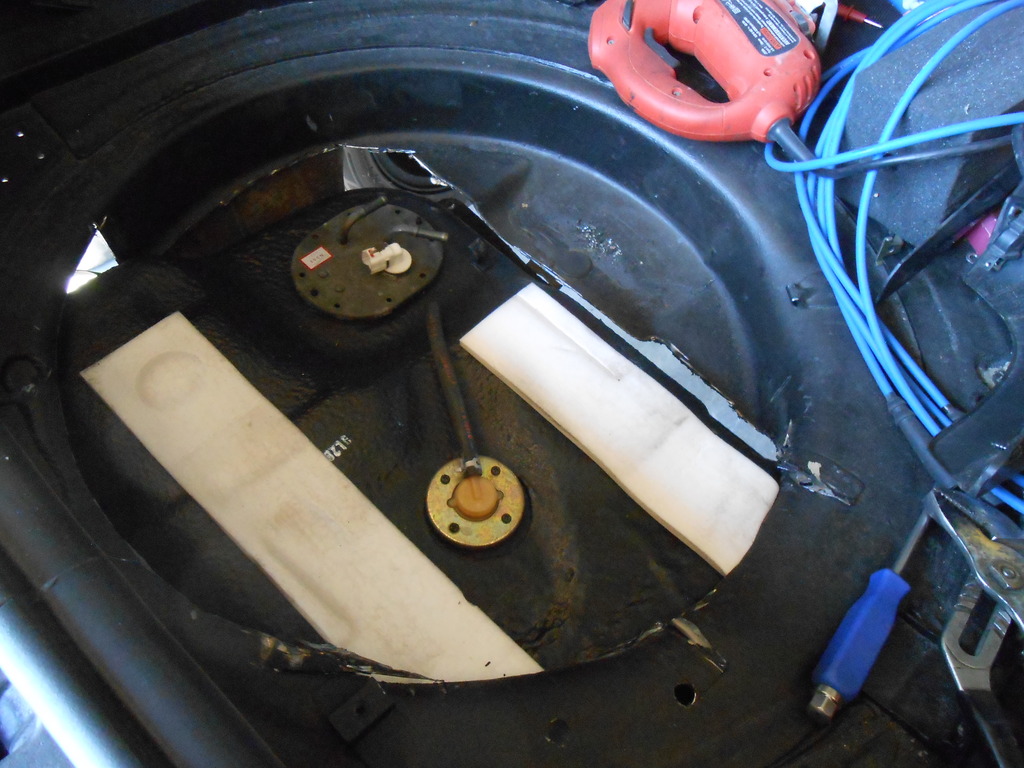
Since this pic I've cut/fitted, cut/fitted, cut/fitted....you get the idea...lots of cutting and precariously balancing the tank on a floorjack to see what happened.
I got the tank to snug up beautifully, it may tuck up better than stock.
I then cleaned up the cuts and cut away to provide hose access.
And ran into a procedural issue.
Half the tank now has nothing above it, it can just rise into the cabin.
I need to make the cover plate so the tank has something to butt into and retain it.
I can't really clamp the tank up to a floor that doesn't exist yet.
I can't begin to figure out the straps till I can repeatedly put the tank in position.
It's the Sunday of a long holiday weekend and I haven't the material on hand because I'd always figured the cover plate was more cosmetic and would be done last.
Bugger.
I can fill the down time by stripping out the old fuel line and some other detail work but the main project languishes for a while till suitable material is procured.
The intake will probably change at some point but is complete as pictured.
Crank/valve cover breathers are plumbed to the intake and there is provision for the evap as well.
This will serve to get us running.
Here are the two tanks side by side:
The Z tank is about 8" longer (wider?) an inch shorter and very similar in depth.
Here is the initial cut of the wheelwell and test fit:
Since this pic I've cut/fitted, cut/fitted, cut/fitted....you get the idea...lots of cutting and precariously balancing the tank on a floorjack to see what happened.
I got the tank to snug up beautifully, it may tuck up better than stock.
I then cleaned up the cuts and cut away to provide hose access.
And ran into a procedural issue.
Half the tank now has nothing above it, it can just rise into the cabin.
I need to make the cover plate so the tank has something to butt into and retain it.
I can't really clamp the tank up to a floor that doesn't exist yet.
I can't begin to figure out the straps till I can repeatedly put the tank in position.
It's the Sunday of a long holiday weekend and I haven't the material on hand because I'd always figured the cover plate was more cosmetic and would be done last.
Bugger.
I can fill the down time by stripping out the old fuel line and some other detail work but the main project languishes for a while till suitable material is procured.
Where is the fuel inlet? Looks like its on the opposite side of the car from the 2nd to last photo?
edit: Brain fart...I just scrolled back and saw that the inlet is on the passenger side.
edit: Brain fart...I just scrolled back and saw that the inlet is on the passenger side.
Last edited by driftxsequence; Jul 5, 2015 at 08:18 AM.
Yeah sorry, the tanks were not oriented the same in the pic, the fill ports are on the same side.
It's hard to know till the tank is final installed but the FC outlet is pretty close to the original lo cation, maybe 3-4" offset. Shouldn't be too difficult.
I have a complete FC fill neck assembly that might prove useful because a potential issue just occurred to me.
The Z has a non vented gas cap and pushed all the pressure into an external vent tank (metal, of course) that typically dumped to atmosphere or, in later models, into an evap system.
The FC has a vented cap.
If I connect the FC main tank vent to the top of the Z fill neck, I've essentially done nothing since the Z cap is sealed.
Hmm.
Jeez, this project is a nightmare, primarily because I'm working alone in a poorly equipped space.
The knottiest problem has been how to hold the tank in position so I can see what's going on.
Balancing on a jackstand is not a viable method, as I've discovered.
I've discovered this multiple times now.
Even a blind squirrel finds a nut sometimes and in that tradition, I finally figured out how to proceed.
Only took two and a half days.
I made up the new cover plate, a 27" circle, from 1/4" ABS plate.
It is only held in with two bolts at the moment as I need the tank in position to see where clearance exists (and where it doesn't) for more fasteners.
The original driver side tank strap is close enough for mock up, it holds the tank roughly in position and the other side is suspended with coat hangers. Primitive, but good enough.
At least now I have relatively unfettered access and can see how dire the mount situation is.
The tank is decidedly crooked in these pics, there's a bracket I left thinking it'd clear but it doesn't.
Also, there is no padding on the driver side, I'll have to get something.
But, we can at least get an idea.
Well, the tank is finally mounted but not done yet.
I thought physically hanging it in place was going to be the hard part (and it was) but now I've run into the filler neck and that's proving knotty as well. As is my lack of a bulkhead electrical connector.
The new fuel lines are almost finished.
Decidedly old school/shadetree, they are just one piece solid rubber hose, no hardlines, minimal connections. The fuel feed and return are run through aluminum tube for the 4' run under the cabin.
Not the elegant solution I'd prefer but should be fine and at least now the entire fuel system is new and sparkling. New filters, pump, tank, FPR, hoses and rebuilt carb.
This thing had better work.
I used 25' of Gates hose (5/16") for the feed and return lines and 15' of 1/4" for the evap line.
Thank goodness for Rock Auto...they get $.75/ft for the 5/16" hose, Autozone wants $1.89.
Today I'm hoping the junkyard will solve my remaining issues...but I fear it won't.
Much as I hate to admit it and fully aware of the damage it does my junkyard rep, I can't magically come up with anything that mates the FC tank to the Z filler neck.
Nothing even comes close.
Fortunately, we live in an age where a company called Filler Neck Supplies exists.
Tuesday I'll have the Gates hose and coupler that should make the connection possible.
By then all the supporting work will be finished also.
This project has been way more involved than I expected.
I know, right?
When that popped up at the top of the results I couldn't take it seriously either.
In retrospect, imagine if they had been unable to help me...if Filler Neck Supply comes up blank, I'm pretty comprehensively fucked.
I might have to hire meercat's <STRIKE>imaginary</STRIKE> fabricator Robban to never build the custom tube I'd need.
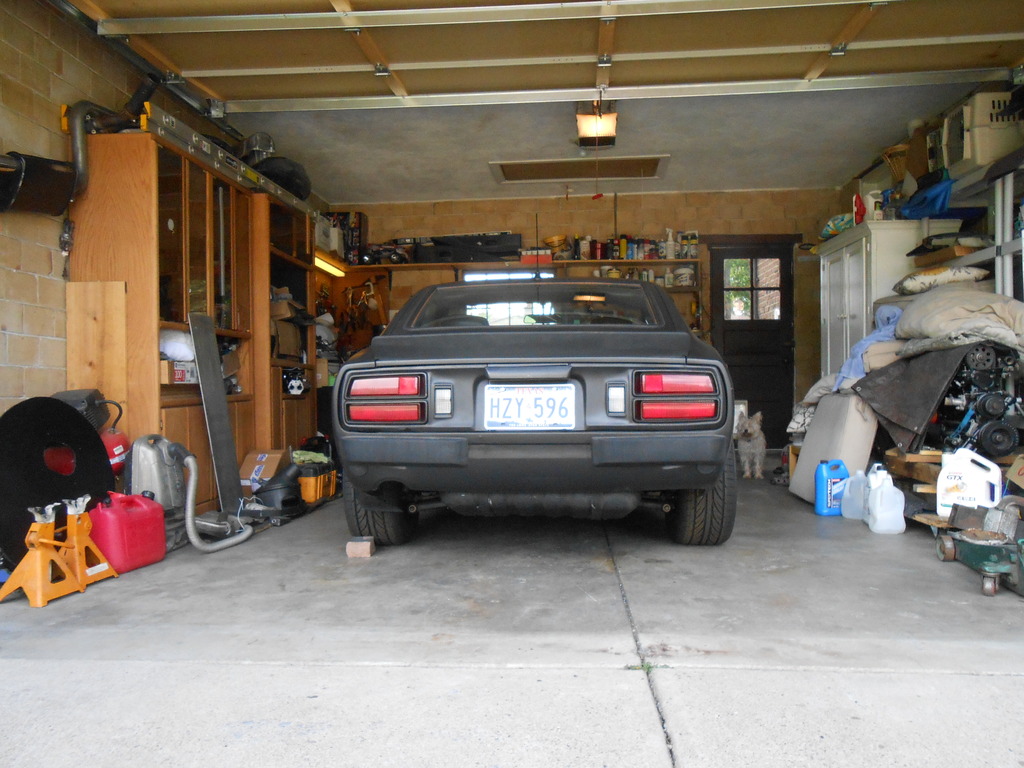
After months of benign neglect followed by weeks of massively intrusive surgery, I treated her to a spa day.
She cleans up pretty well, especially considering that we never finished the full dip job.
I'm guessing Sigfrid will want to put real paint on her next.
I bolted the tank in to finish the hoses and electrical:
And the money shot:
For comparison, here's the original tank:
She cleans up pretty well, especially considering that we never finished the full dip job.
I'm guessing Sigfrid will want to put real paint on her next.
I bolted the tank in to finish the hoses and electrical:
And the money shot:
For comparison, here's the original tank:
Last edited by clokker; Jul 12, 2015 at 07:23 AM.
Oh, what a long, strange trip it's been.
My 19 day housesit/car flog is over, I'm back on a working computer (the laptop I use when I'm at Sigfrid's is a nightmare) and I'm declaring total success.
It was a near thing though, could have gone either way right up until the end.
Project cars go through stages and for the longest time feel like an unending series of steps as you attempt to turn a pile of parts into a cohesive, working whole.
Yesterday, the Z crossed the threshold and morphed from a massive series of individual projects into a CAR...albeit one with no interior.
I suppose it's more of a mental adjustment than physical reality but my perception of her has changed completely. She became SHE, a personality and presence all her own, a complete entity instead of a pile with potential.
Enough with the metaphysical drivel...
Jason (spectre6000) came over on Saturday during my darkest hour.
Friday I had tried to start the car and failed...failed so spectacularly that a kinghell backfire blew a hole in the valve cover.
Not as dire as it sounds and all my fault.
I questioned everything I had done, the default opinion being I must have screwed up.
Jason had several theories...we explored them all.
At that point I was only concentrating on things I could actually deal with immediately; if it was a sticking /burnt valve (a very real possibility) or something mechanically devastating, there was nothing I could do about it before Sigfrid returned the next day.
Also, I had to get the car back together and out of the garage so the wife unit could park there.
Jason finally noticed that the choke wasn't choking and informed me that the carb has mechanical accelerator jets...the day before when she wouldn't start I had pumped the pedal and apparently just flooded the intake track. The plugs were black soot.
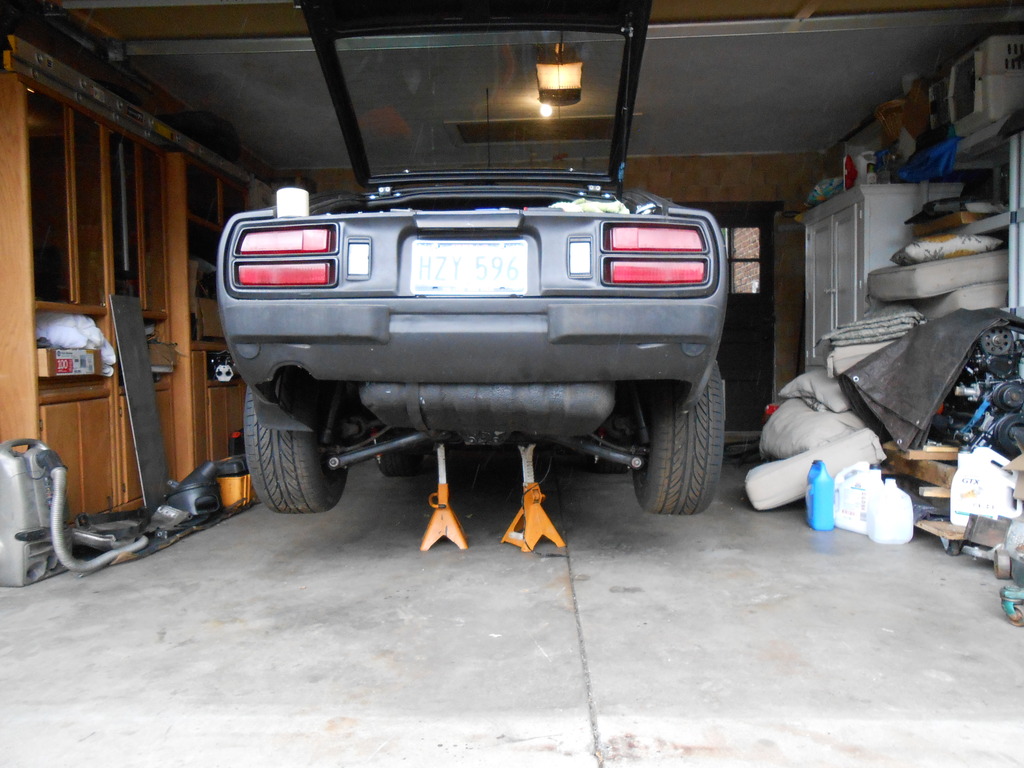
I started reassembly and by 5am Sunday morning she looked like this:
With only headers installed she's way too loud to start on whim, so I waited till noon to make the second attempt. I googled info on choke adjustment (easy) and reenabled the bypass on the FPR and...
She fired right up and idled.
Just like that.
No smoke, no drama, no weirdness.
Just ran.
******* amazing and I can't describe the wave of relief and joy I rode the rest of the day.
I even drove her up and down the street, noise be damned.
Needs some adjustment but for the first time ever, she actually responds to tuning changes.
Of course, the engine could still be (and probably is) in need of work- specifically, the head- but it sounds pretty healthy so far.
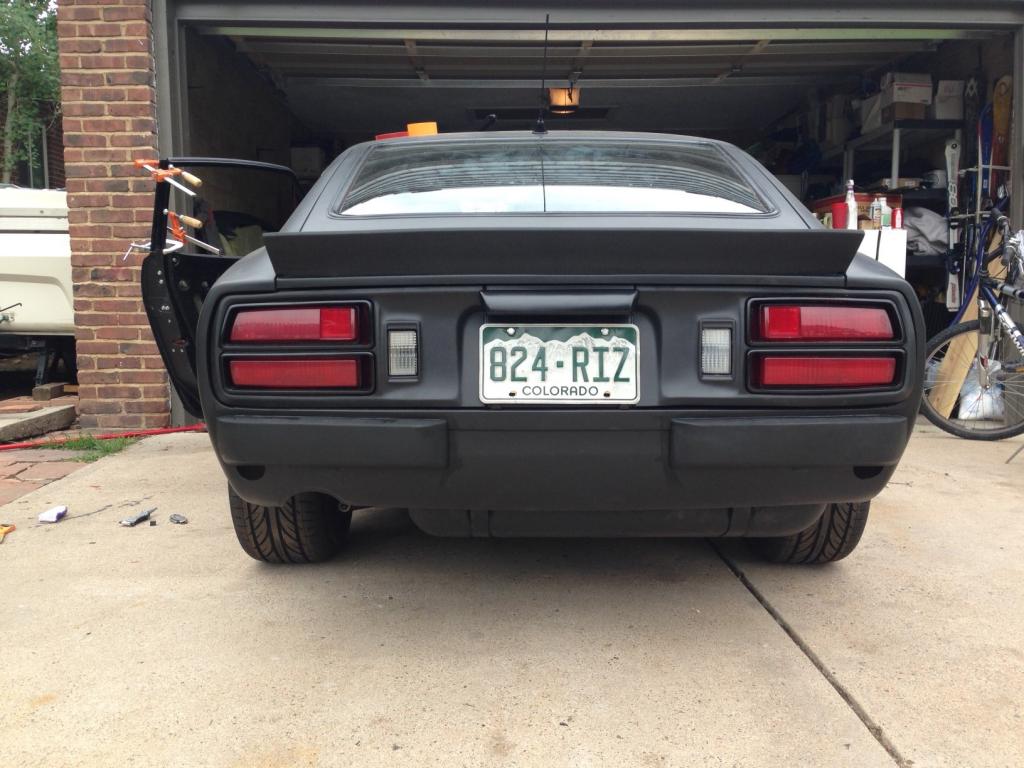
I cleaned out the interior and for the first time in forever she's clean and intact.
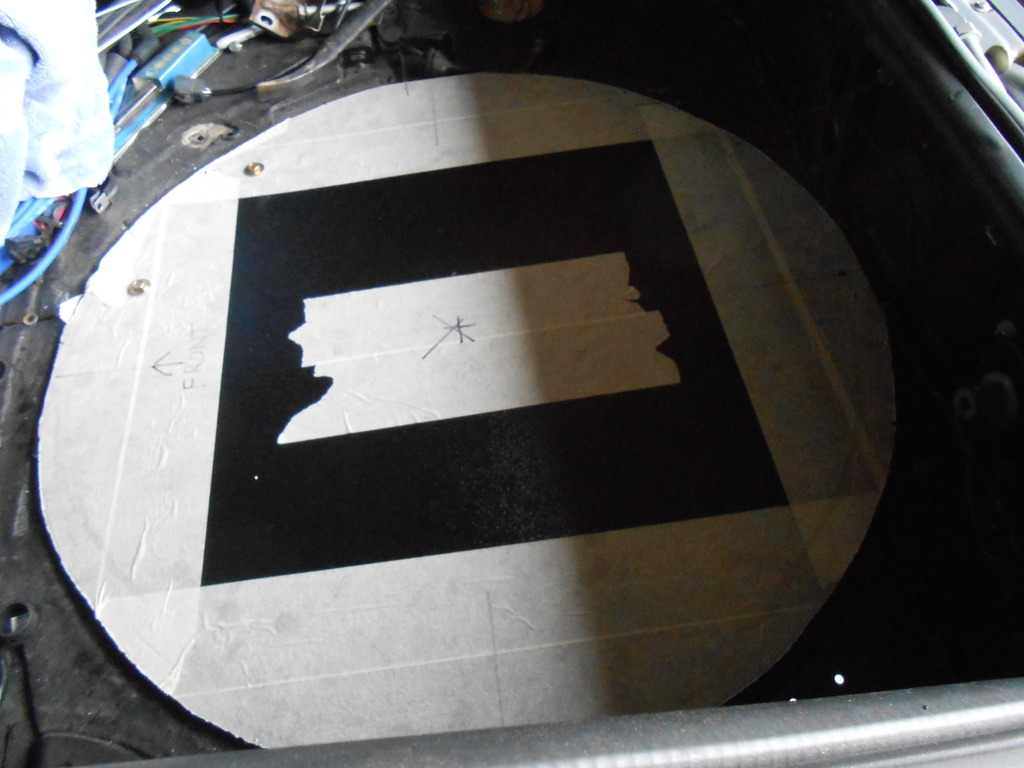
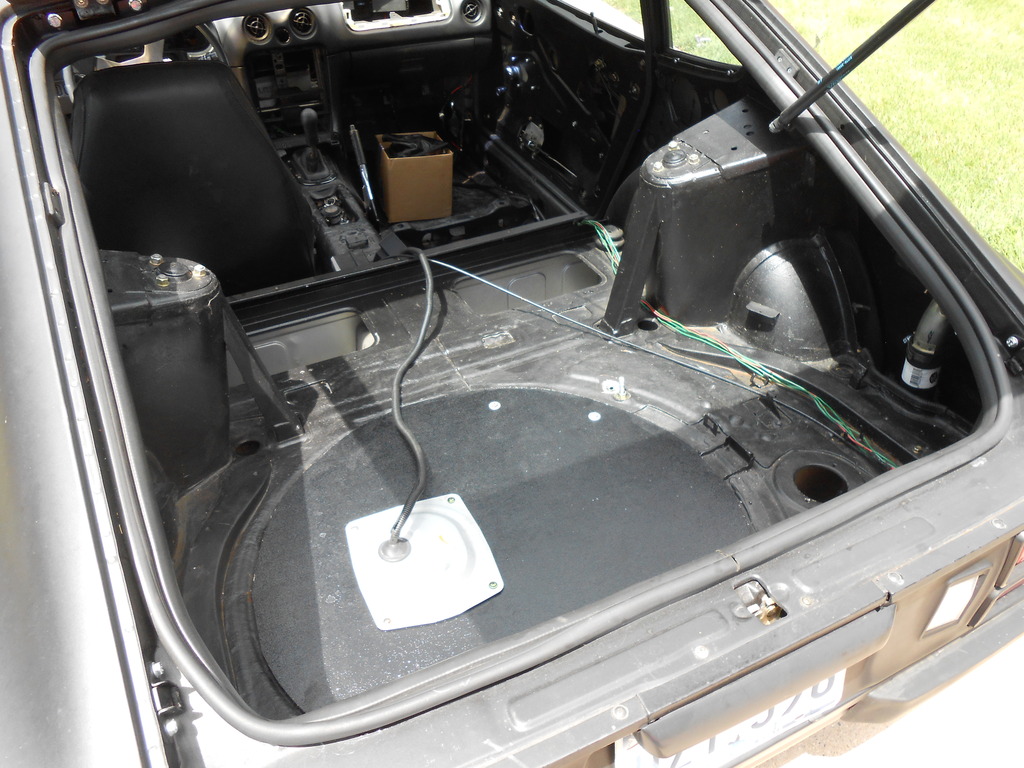
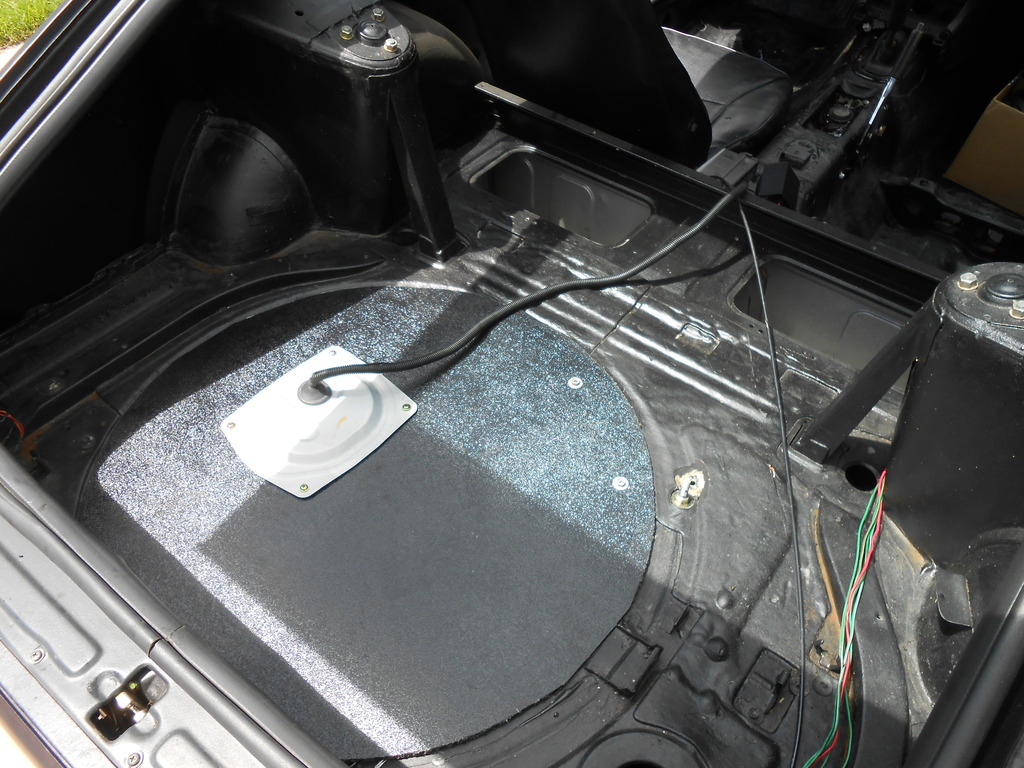
Here's the new rear deck with spare tire cover and fuel tank access plate installed:
My favorite profile of the car:
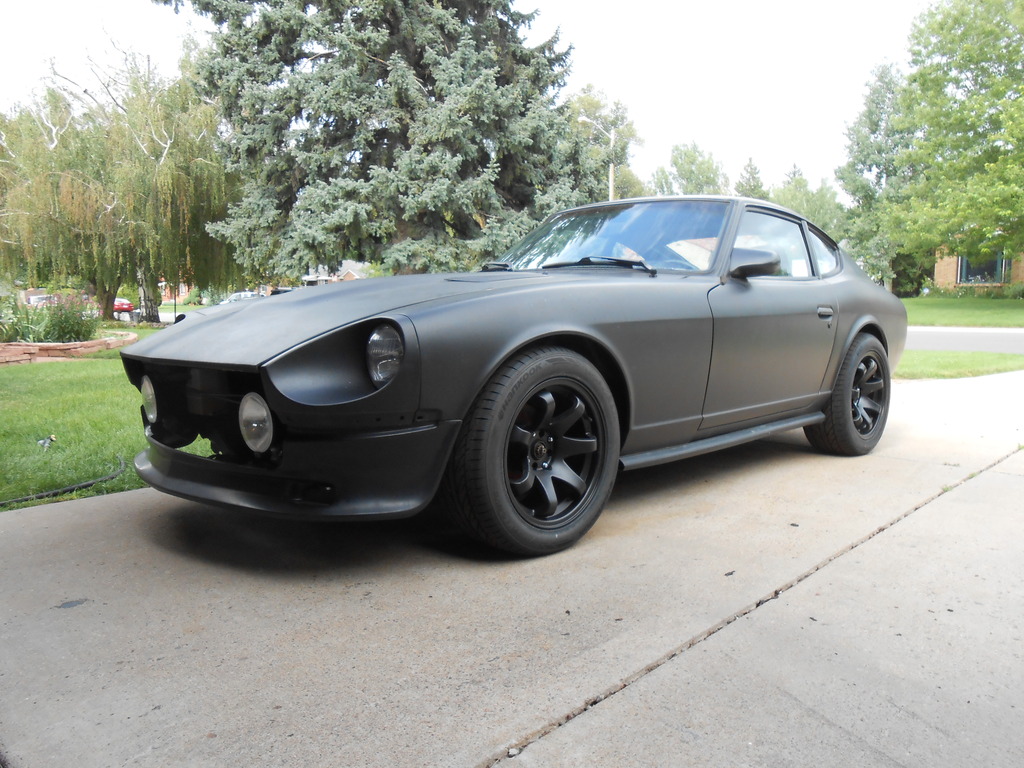
I think she looks bitchin.
My 19 day housesit/car flog is over, I'm back on a working computer (the laptop I use when I'm at Sigfrid's is a nightmare) and I'm declaring total success.
It was a near thing though, could have gone either way right up until the end.
Project cars go through stages and for the longest time feel like an unending series of steps as you attempt to turn a pile of parts into a cohesive, working whole.
Yesterday, the Z crossed the threshold and morphed from a massive series of individual projects into a CAR...albeit one with no interior.
I suppose it's more of a mental adjustment than physical reality but my perception of her has changed completely. She became SHE, a personality and presence all her own, a complete entity instead of a pile with potential.
Enough with the metaphysical drivel...
Jason (spectre6000) came over on Saturday during my darkest hour.
Friday I had tried to start the car and failed...failed so spectacularly that a kinghell backfire blew a hole in the valve cover.
Not as dire as it sounds and all my fault.
I questioned everything I had done, the default opinion being I must have screwed up.
Jason had several theories...we explored them all.
At that point I was only concentrating on things I could actually deal with immediately; if it was a sticking /burnt valve (a very real possibility) or something mechanically devastating, there was nothing I could do about it before Sigfrid returned the next day.
Also, I had to get the car back together and out of the garage so the wife unit could park there.
Jason finally noticed that the choke wasn't choking and informed me that the carb has mechanical accelerator jets...the day before when she wouldn't start I had pumped the pedal and apparently just flooded the intake track. The plugs were black soot.
I started reassembly and by 5am Sunday morning she looked like this:
With only headers installed she's way too loud to start on whim, so I waited till noon to make the second attempt. I googled info on choke adjustment (easy) and reenabled the bypass on the FPR and...
She fired right up and idled.
Just like that.
No smoke, no drama, no weirdness.
Just ran.
******* amazing and I can't describe the wave of relief and joy I rode the rest of the day.
I even drove her up and down the street, noise be damned.
Needs some adjustment but for the first time ever, she actually responds to tuning changes.
Of course, the engine could still be (and probably is) in need of work- specifically, the head- but it sounds pretty healthy so far.
I cleaned out the interior and for the first time in forever she's clean and intact.
Here's the new rear deck with spare tire cover and fuel tank access plate installed:
My favorite profile of the car:
I think she looks bitchin.
Joined: Mar 2001
Posts: 31,863
Likes: 3,245
From: https://www2.mazda.com/en/100th/
congratulations! i think you were due for the thing to co-operate. i've had some Rx7's like this, it can take a while to convince them than you're the right guy

