
She Followed Me Home, Honest

Today's two main projects were:
and:
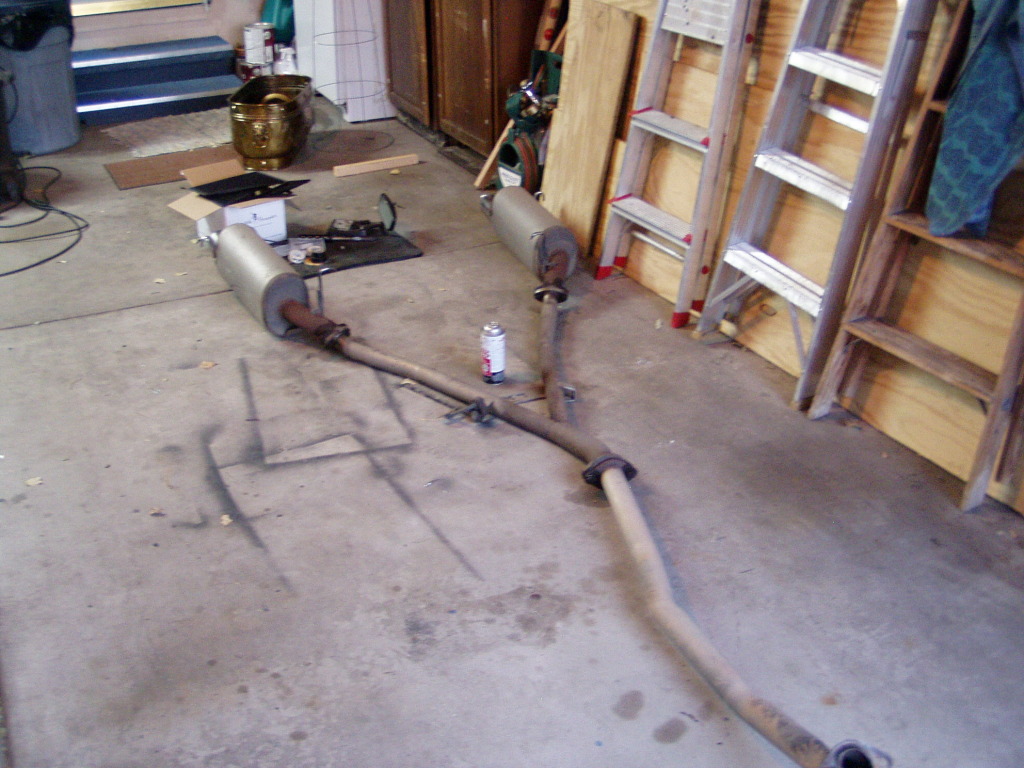
The hardware on the RB exhaust was solid rust, I started soaking it in Deep Creep yesterday and today, with the help of a torch, I was able to free it up.
Decided the best place to store the mufflers was on the car itself, so I cleaned and shined 'em:
I bought this system used four years ago and it's held up amazingly well.
Say what you will about the performance but the RB's build quality is quite good.
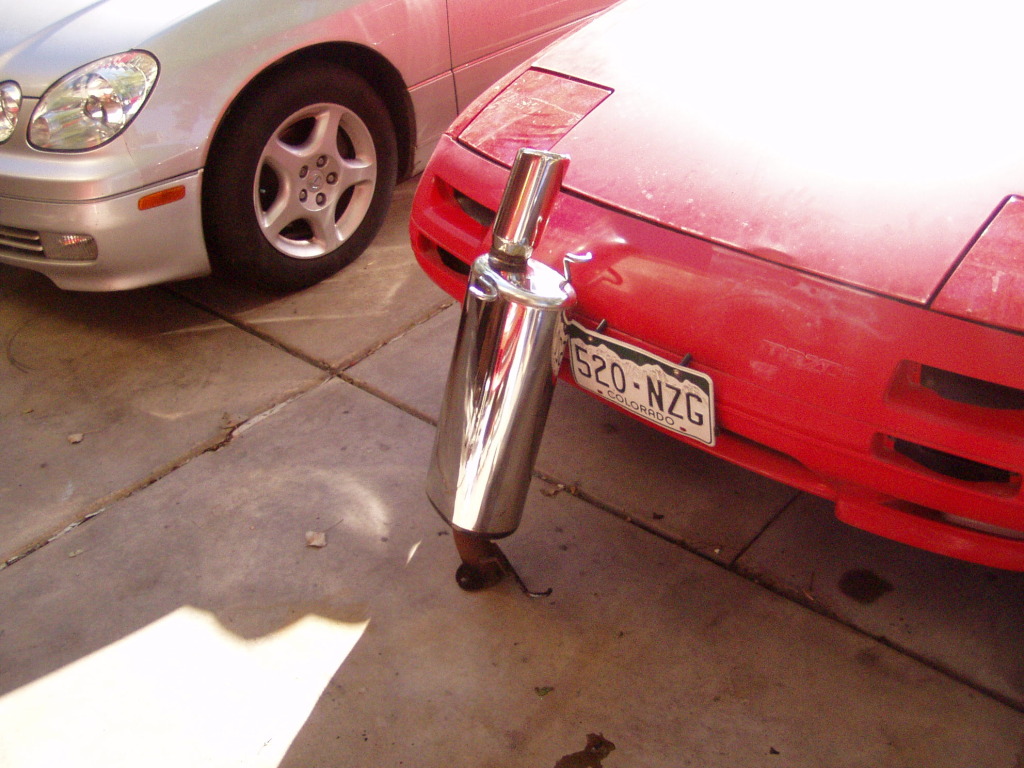
Except for the way the mufflers hang.
Many have noted that the driver side muffler sits lower and slightly off center in the bumper cutout, mine did too.
I thought it was the y-pipe but with just the mufflers hanging, the misalignment is obvious.
Pondering solutions now but have plenty of time to figure it out.
I'd like to keep it simple, if possible.
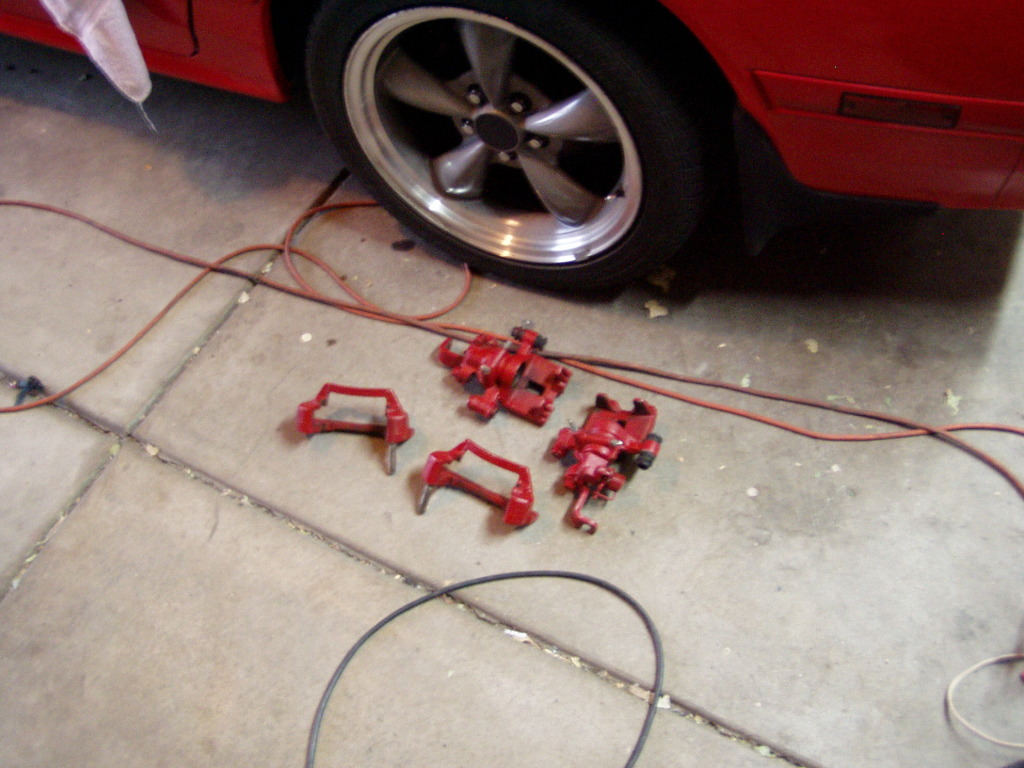
The red rear calipers needed to become black, which they did a few hours later:
I know y'all are envious of my paint booth...I'm a lucky guy.
While the rear wheels were off they got the same cleaning that the fronts did last week. Here's why:
Later I'll be removing the rear calipers and rotors from the GTU and tossing them in the '91.
They ain't great but the new owner might appreciate having some brakes, if only for the ability to use the parking brake.
Not sure what else I'll get up to later, it's siesta time now.
and:
The hardware on the RB exhaust was solid rust, I started soaking it in Deep Creep yesterday and today, with the help of a torch, I was able to free it up.
Decided the best place to store the mufflers was on the car itself, so I cleaned and shined 'em:
I bought this system used four years ago and it's held up amazingly well.
Say what you will about the performance but the RB's build quality is quite good.
Except for the way the mufflers hang.
Many have noted that the driver side muffler sits lower and slightly off center in the bumper cutout, mine did too.
I thought it was the y-pipe but with just the mufflers hanging, the misalignment is obvious.
Pondering solutions now but have plenty of time to figure it out.
I'd like to keep it simple, if possible.
The red rear calipers needed to become black, which they did a few hours later:
I know y'all are envious of my paint booth...I'm a lucky guy.
While the rear wheels were off they got the same cleaning that the fronts did last week. Here's why:
Later I'll be removing the rear calipers and rotors from the GTU and tossing them in the '91.
They ain't great but the new owner might appreciate having some brakes, if only for the ability to use the parking brake.
Not sure what else I'll get up to later, it's siesta time now.


Joined: Mar 2001
Posts: 31,859
Likes: 3,243
From: https://www2.mazda.com/en/100th/
neat, way simpler than making custom nuts, i have my own, thank you
Joined: Mar 2001
Posts: 31,859
Likes: 3,243
From: https://www2.mazda.com/en/100th/
Except for the way the mufflers hang.
Many have noted that the driver side muffler sits lower and slightly off center in the bumper cutout, mine did too.
I thought it was the y-pipe but with just the mufflers hanging, the misalignment is obvious.
Pondering solutions now but have plenty of time to figure it out.
I'd like to keep it simple, if possible..
The RB hangers are fairly substantial, bending them would be no trivial matter.
I'm going to try slipping some thick wall rubber hose (like for a brake booster) over the outboard hanger which should effectively "shorten" it (thus raising and pulling the muffler over.
Might work.
I removed the rear brakes today and it was weird.
The rest of the car has been eerily clean but the rear hubs were packed with dirt, I couldn't even see the bolts holding the dust shield on.
The dust shields are now gone (can anyone explain what good they really do?) and I scrubbed the hubs clean (well, relatively speaking).
Under the crap, everything looks good, I'm even hoping the DTSS is still functional so I can see what that's all about.
Considering disconnecting the rear sway bar, I know a lot of roadracers prefer it and I'm interested in experimenting.
Not that I normally go fast enough to notice, but still...
My RB mufflers sit at different angles but it has been long enough that I am not bothered by that. Back when I cared I tried to zipties, but that wen't nowhere. What I AM bothered by is that the mufflers keep falling off the rubber doughnuts.
As far as I am aware, removing the rear swaybar is done in addition to stiffer suspension like coilovers. I don't believe its a recommended mod with stock suspension.
And awesome build btw! I love the attention to detail.
As far as I am aware, removing the rear swaybar is done in addition to stiffer suspension like coilovers. I don't believe its a recommended mod with stock suspension.
And awesome build btw! I love the attention to detail.
The problem is, the shorter than hanger (which is what I need), the harder it gets to install. I suspect the right doughnut would be well nigh impossible.
Originally Posted by farberio
As far as I am aware, removing the rear swaybar is done in addition to stiffer suspension like coilovers. I don't believe its a recommended mod with stock suspension.
It was just a random thought I had as I scrubbed crap off the rear hub.
Originally Posted by farberio
And awesome build btw! I love the attention to detail.
I have lots more time than money, so detail is all I have to work on at the moment.
Besides, once she does hit the road, I'll know the basics have been handled.
Fate smiled upon me again today as the '91's new owner volunteered to bring an engine hoist over Tues. morning.
Prior to that I'd been imagining increasingly bubba-like methods of pulling the keg sans hoist and by myself.
To prepare I began stripping all the peripherals, expecting more difficulty as I got down to the exhaust manifold but nothing fought back.
Even the manifold heat shield bolts came right out.
I'd figured that if I could get to the bare manifold, I'd Deep Creep them overnight and tackle them in the morning but even the four exhaust stud nuts spun right off.
Some days you do eat the bear, apparently.
About an easy hour tomorrow and it's ready to pull.
That means I can get back on the GTU much sooner than expected, I think I'll concentrate on the interior again, get it all back together.
Things are going too well, I'm getting nervous.
As far as the muffler alignment goes, I'll throw in my 2-cents
I bought a used Greddy P Extreme exhaust system of a guy around here a while back and it had somewhat similar issues with the driver side muffler. The solution I came up with is a lot more drastic than the ones you propose, but here is what I did:
After thinking and looking and thinking some more I found that the flange on my cat-delete pipe was the reason that the exhaust hung that way! It was rotated a little too much towards the passenger side and that threw the entire assmebly behind it high and to the right... with a little help from a band-saw and a friend with a welder it was fixed and the exhaust sat nice and straight until I sold the car a few months back.
Mabe that helps, maybe it's too much trouble; who knows? I just thought I'd chime in. looks great so far!
Joined: Mar 2001
Posts: 31,859
Likes: 3,243
From: https://www2.mazda.com/en/100th/
just unbolt the endlinks and pivot/ziptie it out of the way. we did Spec E30, which has a similar rear suspension to the FC, and we found the rear bar or not boiled down to driver preference. so try it.
Of course, I may adjust the muffler only to have the y-pipe throw it off again, who knows?
Upon further thought though, it makes sense to leave it alone and become familiar with this chassis which has 100k fewer miles on it than my old one.
After I get a feel for it, I may try the swaybar delete later.
Engine/trans ready to remove:
The OEM fan shroud sure makes a handy tool tray.
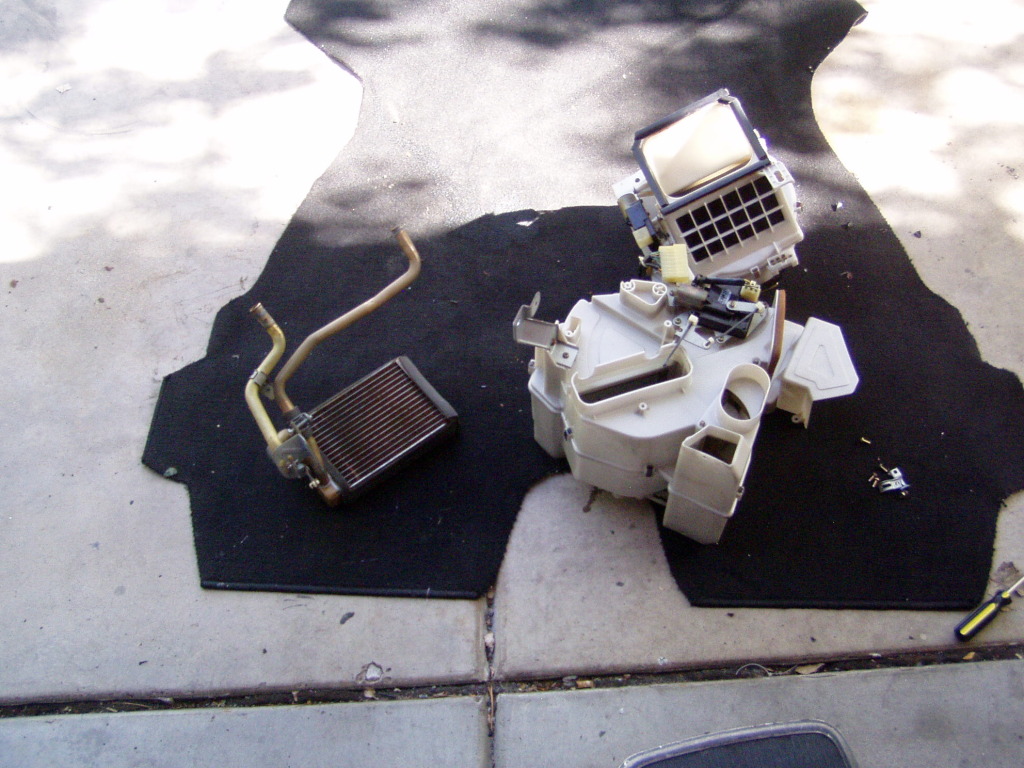
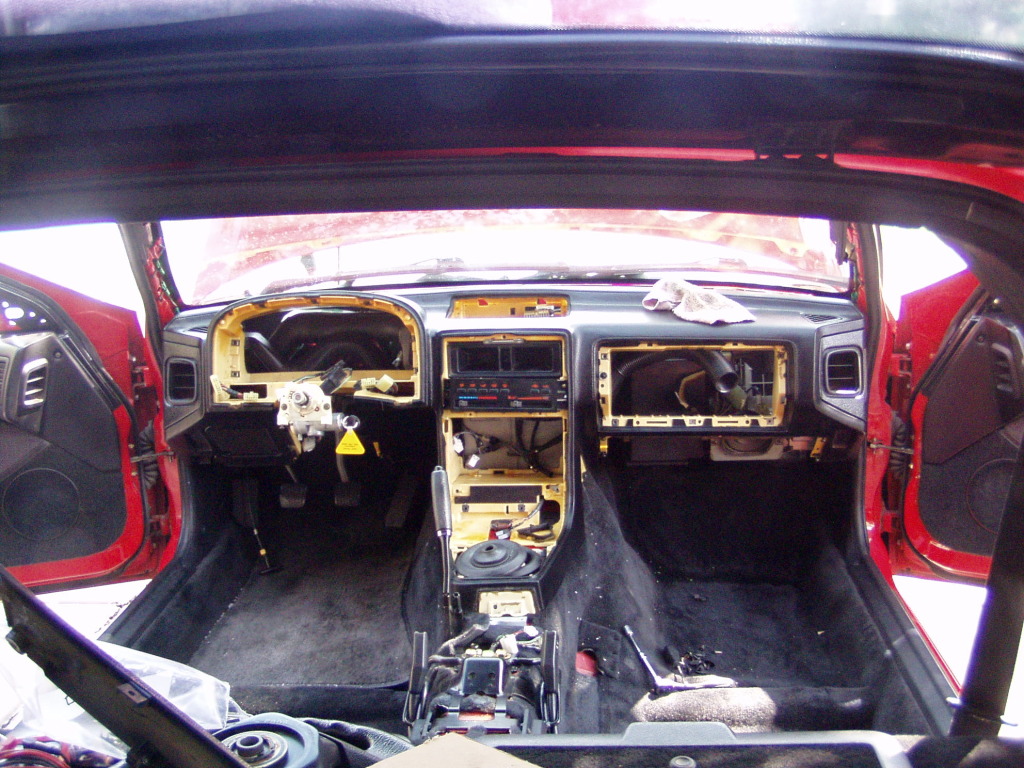
Since I plan on concentrating on the interior again, I needed to get the HVAC system cleaned/buttoned up.
I washed some of the vents and took the blower assembly apart:
When I first looked a few weeks ago I thought the sealing foam was OK but that was wrong, the flapper door seal was quite crumbly.
Seems like the stock foam tape seal was an easy solution for Mazda but hardly an ideal one, I'm exploring other options.
The OEM fan shroud sure makes a handy tool tray.
Since I plan on concentrating on the interior again, I needed to get the HVAC system cleaned/buttoned up.
I washed some of the vents and took the blower assembly apart:
When I first looked a few weeks ago I thought the sealing foam was OK but that was wrong, the flapper door seal was quite crumbly.
Seems like the stock foam tape seal was an easy solution for Mazda but hardly an ideal one, I'm exploring other options.
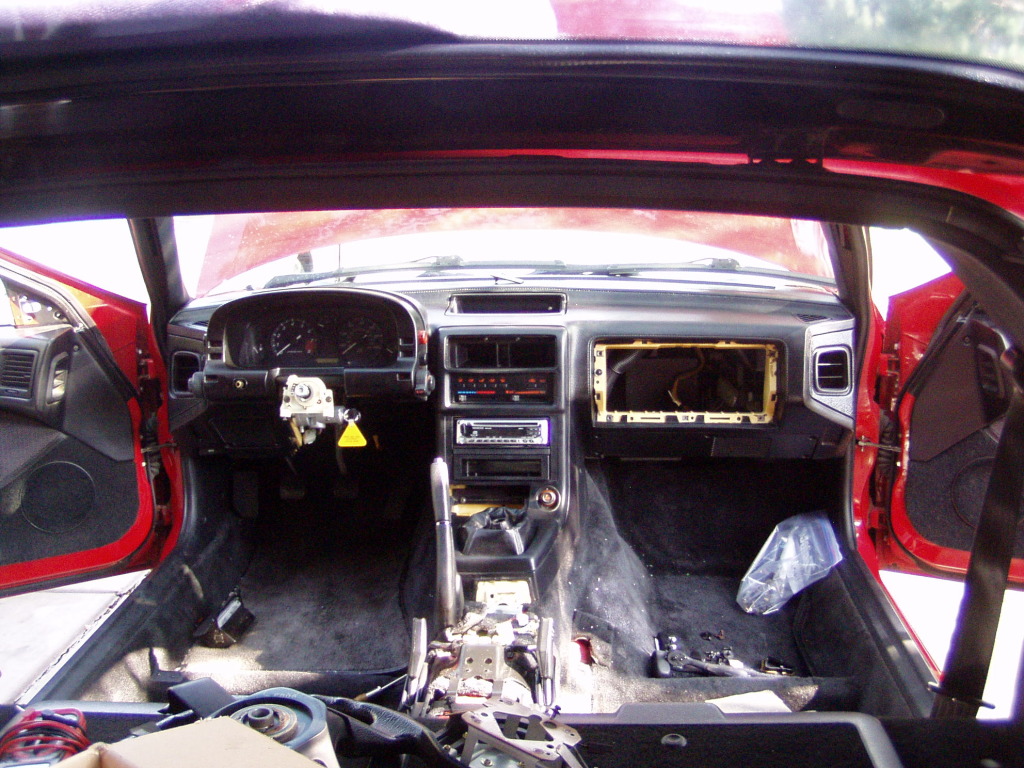
More HVAC action (yes, it's boring...this is the end of it, promise):
Removed the central section w/ the heater core.
The foam in this box was in good shape and splitting the box would destroy it, so I opted not to.
I did remove the core, just to see what it looked like:
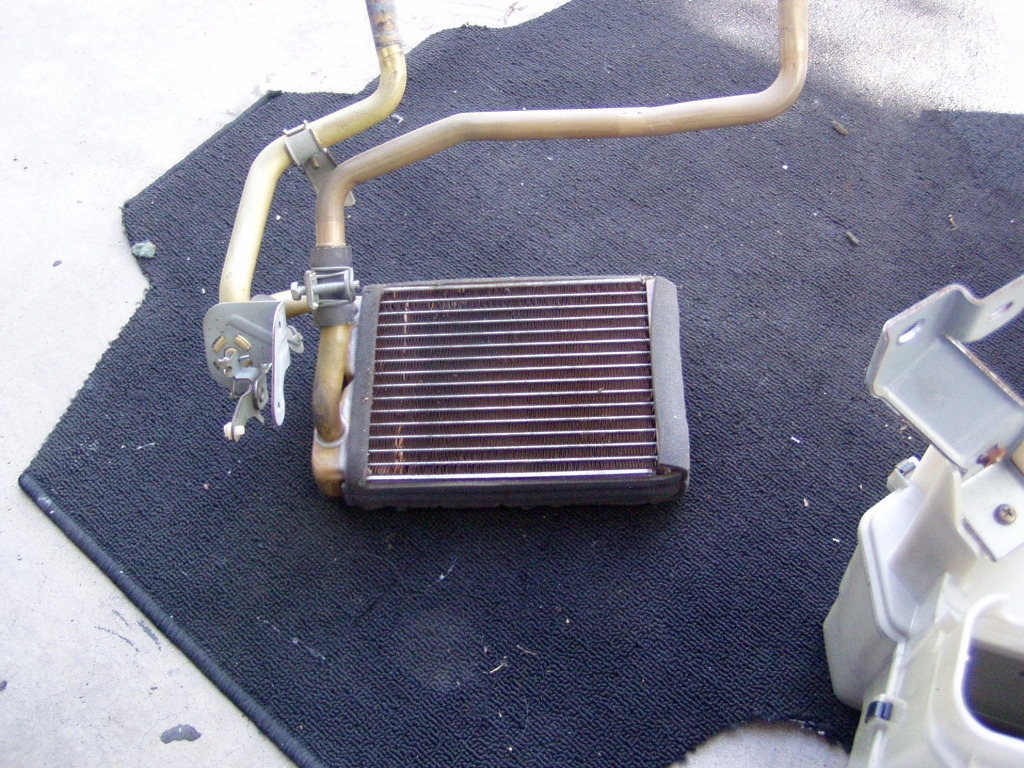
Perfect condition, not even very dusty.
I blew out the core and the box and reinstalled it.
My solution for the blower unit sealing is a bit unorthodox, time will tell how effective it is:
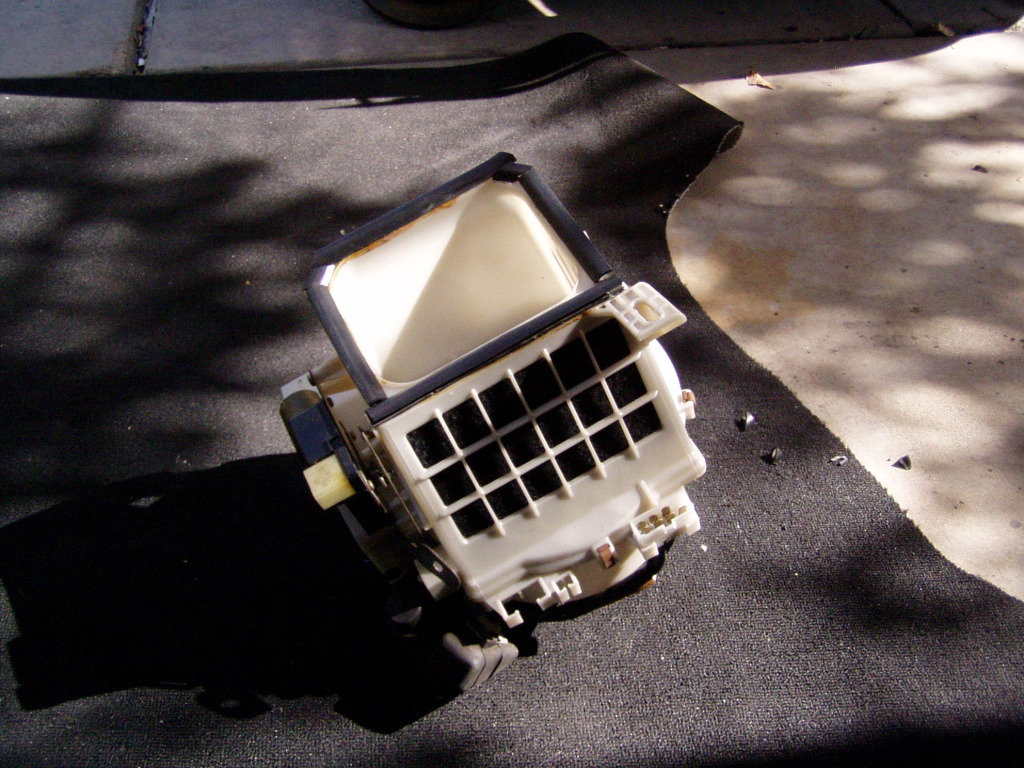
The seal between the fresh air intake and the box is made from some rubber trim I had, I think it should work fine and won't turn to dust like the foam.
The flapper door was a riskier choice, I used the material from the passenger bin "bag" (removed for the battery relocate) and covered the entire sides instead of just the perimeter.
It too seems to work well but time will tell.
Fortunately, the blower box is easily removed with the dash in situ, so if need be, I can redo it later.
Tomorrow I'll replace the EM harness and all this boring stuff can go back in, never to be seen again.
I hope.
Then the dash can go back in, the switchgear hooks up and I can see how my new bay harness works.
A pic of the lights shining will look pedestrian to you all but will make me very happy.
Removed the central section w/ the heater core.
The foam in this box was in good shape and splitting the box would destroy it, so I opted not to.
I did remove the core, just to see what it looked like:
Perfect condition, not even very dusty.
I blew out the core and the box and reinstalled it.
My solution for the blower unit sealing is a bit unorthodox, time will tell how effective it is:
The seal between the fresh air intake and the box is made from some rubber trim I had, I think it should work fine and won't turn to dust like the foam.
The flapper door was a riskier choice, I used the material from the passenger bin "bag" (removed for the battery relocate) and covered the entire sides instead of just the perimeter.
It too seems to work well but time will tell.
Fortunately, the blower box is easily removed with the dash in situ, so if need be, I can redo it later.
Tomorrow I'll replace the EM harness and all this boring stuff can go back in, never to be seen again.
I hope.
Then the dash can go back in, the switchgear hooks up and I can see how my new bay harness works.
A pic of the lights shining will look pedestrian to you all but will make me very happy.

Junior Member
Joined: Jan 2012
Posts: 37
Likes: 0
From: North Atlanta, GA
Joined: Mar 2001
Posts: 31,859
Likes: 3,243
From: https://www2.mazda.com/en/100th/
i think there are two (which means there are 3!), there is an ABS and non ABS, i dimly recall we had the wrong one and had to get the correct one at some point. i think the difference is how the master cylinder mounts, cause you can bolt the wrong booster in the car....
the third would be if the GSR or type R had different ones, its easy to check the Honda website has the parts catalogs online.
as an aside the ABS systems from the integras are actually standalone, they have a separate wiring harness and everything, so its theoretically swappable to a different car/chassis. its also a 4 channel system, every wheel is controlled, unlike the FC/FD which are only 3 channel.
Since I'd promised no more HVAC pics, you'll have to do without visual aids this time because installing it was yesterday's primary focus.
It's really not a difficult job except that the car is temporarily trapped in the garage and I can't open the passenger door, so I was pretzeled into odd positions to get to everything.
Prior to the install I cleaned up the section of the EM harness that runs from the firewall to the strut tower and put the harness back in the car. The rest of the harness will get tarted up with the engine in place.
There were a number of small details to handle in prep for the dash install as well.
I needed to get battery +12v up to the gauge harness to keep the odometer memory active in the Miata gauge cluster and I wanted a better ground solution for the stereo install. The PO had done a neat job of installing the system except for the ground, so I fixed that.
When I put the bin structure in place I forgot to reconnect the lights, it's been a while since I've had bins at all and I totally spaced that. It's a stupid little detail that was nagging me and I'm determined to make everything that's on the car functional, so a few minutes later it was done.
Also ran a tap through all the interior capture nuts, including the seat mount points.
Today I concentrate on the dash itself prior to installing it.
Ductwork/vents to clean and a few broken mount tabs to repair. Karack already noted that most FC's have broken lower gauge bezel tabs, mine are as well and it pisses me off, so I'll figure out something.
I'm kinda in "piddly ****" mode till Friday when the new owner picks up what's left of the '91, so I'm just trying to deal with some of the myriad little details I've noticed so far.
After the old hulk is gone I'll be able to roll out of the garage and have better access to the GTU for the final interior install.
After the frenzy of stripping the engine, it's nice to just potter around a bit.
Now that j9fd3s has polluted this thread with actual information, I guess I'll do the same instead of just rambling to myself.
Today's project was prepping the dash for install.
Fix a few broken tabs, wash the ductwork.
Here's the relevant advice...
Unless you have a truly compelling reason to do so (and slightly dusty ducts does NOT qualify), leave the inside of the dash alone.
It's a total nightmare.
The ductwork is overlaid by the dash harness and disassembly is absurdly difficult.
I didn't realize till I was already knee deep how risky it was, every turn of the screwdriver is asking for some of the 20 year old plastic to break or crumble.
Fortunately, I emerged unscathed- five hours later- but was freaking out most of the time.
Basically, the risk/benefit ratio is heavily weighted towards risk and the only real benefit I can now see is that I get to be the completist ******* who says "Oh yeah, I took the whole dash apart and even washed the ducts".
So, I'm now that guy and it's just not worth it.
But it's done and no damage occurred, so there's that.
Haven't gotten around to the tabs yet because after the harrowing duct ordeal I went back to revisit a detail that's been bothering me...the fuel pump.
After my initial inspection, I'd concluded that the pump was probably OK despite marinating in seven year old gas.
I've since been castigating myself for that decision because in my heart of hearts, I knew the pump was probably all gummed up internally and I'd let it slide out of laziness, not good judgement.
So, back into the gas tank I went.
Figured I just swap the whole assembly with the '91's and boy was that a surprise.
The '91 had a N326 part # instead of the expected N351, had no bulkhead connector (just a long pigtail instead) and was about 2" shorter altogether.
I think my old car had a S4 gas tank all this time, which would explain why I could never get more than @13-14 gal. into it when I was expecting 17 or so.
I don't know but they definitely weren't the same, although it looked like the pumps would interchange.
That's what I ended up doing.
Not sure it's going to work, there were some detail differences, specifically, how the pump mates to the hardline, but we'll see when I finally get power hooked up.
I think I'm going to relay the pump anyway and just use the convoluted Mazda circuitry to trigger the relay...that should keep the ECU happy and provide a better power source to the pump in case I need to replace it with aftermarket.
The stock Mazda pump is over $300 and there's no way that's happening, fingers are crossed for now.
I also decided it would be useful to have rotors on the car, so until funding allows, I'll be reusing my old ones.
I wirebrushed all the usual rust and hit them with some paint before taking them for skimming.
The lathe will leave a nicer, more defined edge than I could achieve by masking (and this way is much easier).
I don't really expect the paint to last but at least they'll be clean and look nice for the initial install.
That's how I spent my day...terror, rank gas and tons of rust dust.
And the neighbors wonder why I think this is fun.
Actually, sometimes I wonder myself.
Oh, I also pulled the motor/trans from the '91 and it's sitting on a cart.
Jeebus the tranny is filthy, it appears to be seeping oil from every orifice (which is weird because I never saw any drips in the driveway).
The oil had completely soaked the mount rubbers, they were just goo.
Again, this is odd because the car shifted just fine...I've had replacement rubbers for a few years, just waiting for signs I needed to use them, but I never noticed a thing.
I guess one just habituates as the car slowly deteriorates, either that or I'm more oblivious than I realize.
The '91 departed today:
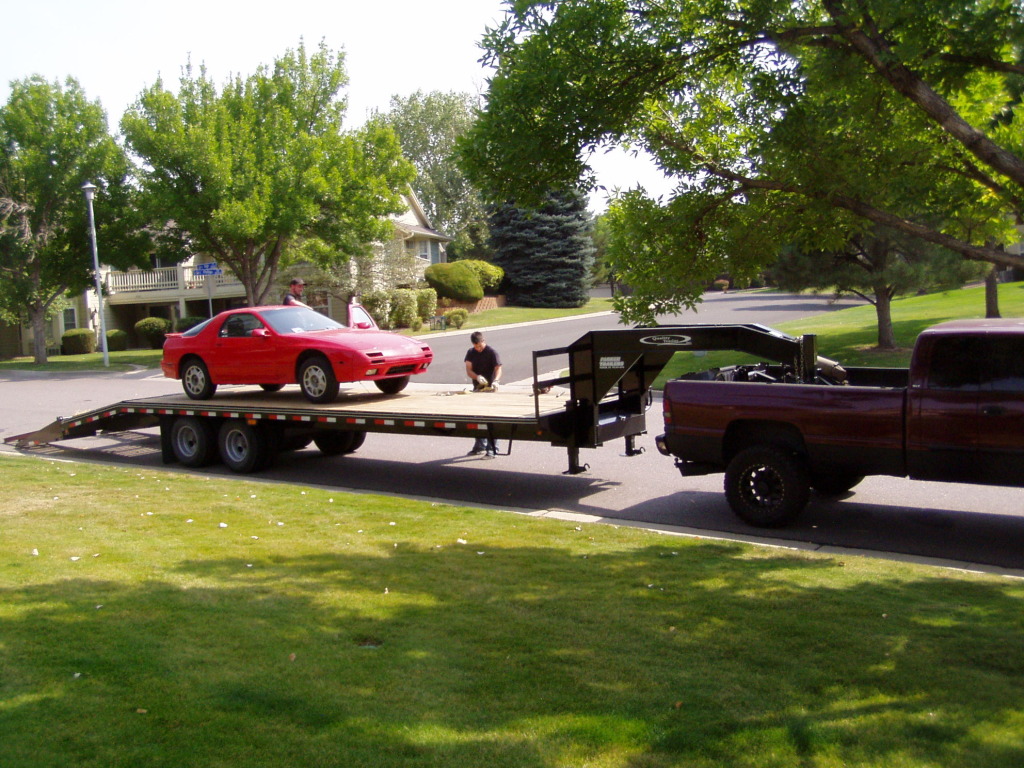
Say "buh-buh" as she rolls away:
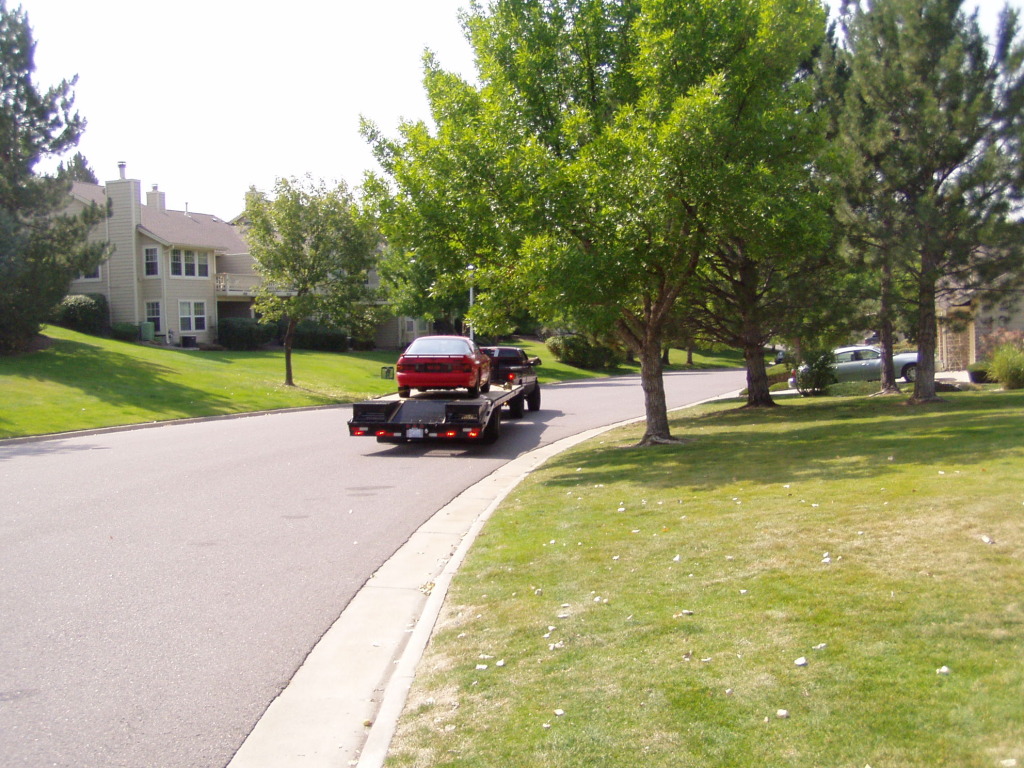
I thought it would be cool to give her a Viking sendoff but the new owner claimed time issues and there simply wasn't room in his schedule for a bonfire and proper immolation.
Part of our arrangement included this:
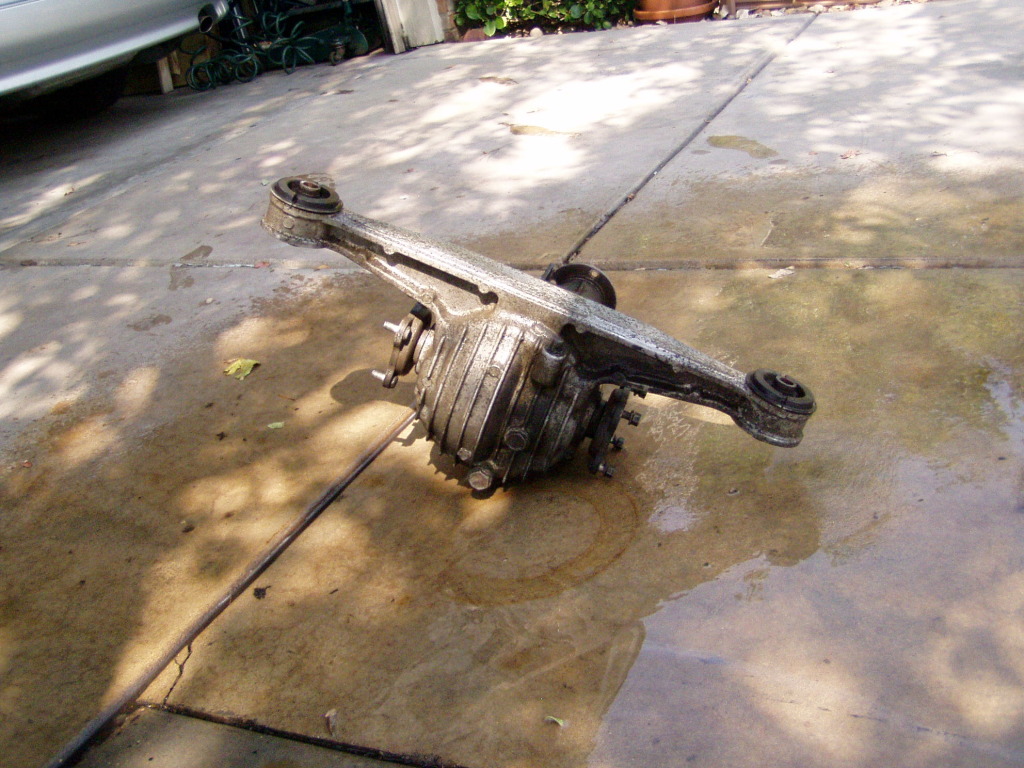
A S4 clutch pack LSD, reputed to bolt right in to my NA GTU.
Stock axles and driveshaft will work, I was assured.
I have limited knowledge of the varieties of Mazda LSDs- mainly because I didn't have one- so I'll have to research and see exactly what I now have.
The past few days I was offered some quick cash to help a friend's business meet a deadline, so work stopped on the car as I fed the kitty.
I've done a lot of little detail stuff but nothing of consequence.
That changes however, now that she can roll out of the garage and I can access the passenger side.
The interior can go back in, for starters.
I'd like to get the brakes installed, even if just the parking brake at first.
I'm still tweaking the install and have two lines left to fab.
The front rotors aren't back from resurfacing yet, either.
After the passenger caliper is rebuilt the rear brakes will be ready for complete/final install.
I hope the weather is nice this weekend.
Say "buh-buh" as she rolls away:
I thought it would be cool to give her a Viking sendoff but the new owner claimed time issues and there simply wasn't room in his schedule for a bonfire and proper immolation.
Part of our arrangement included this:
A S4 clutch pack LSD, reputed to bolt right in to my NA GTU.
Stock axles and driveshaft will work, I was assured.
I have limited knowledge of the varieties of Mazda LSDs- mainly because I didn't have one- so I'll have to research and see exactly what I now have.
The past few days I was offered some quick cash to help a friend's business meet a deadline, so work stopped on the car as I fed the kitty.
I've done a lot of little detail stuff but nothing of consequence.
That changes however, now that she can roll out of the garage and I can access the passenger side.
The interior can go back in, for starters.
I'd like to get the brakes installed, even if just the parking brake at first.
I'm still tweaking the install and have two lines left to fab.
The front rotors aren't back from resurfacing yet, either.
After the passenger caliper is rebuilt the rear brakes will be ready for complete/final install.
I hope the weather is nice this weekend.
Boring, lets see some more interior air duct pics!!!! 
The S4 LSD only came in the GXL and the 88GTU if memory serves me right.
And that was some truck/trailer to haul that 7 away. It looks soooo small sitting on that trailer.
The S4 LSD only came in the GXL and the 88GTU if memory serves me right.
And that was some truck/trailer to haul that 7 away. It looks soooo small sitting on that trailer.
A big day (finally!), all the prep paid off and things actually got completed.
Started by fabbing up the two remaining front brake lines, the chassis hardlines are all finished.
I spent more time than was reasonable tweaking the prop valve location but space in that area is at a real premium and my hardware options were limited.
It's not bad but something is a bit off, I can't quite get what I want.
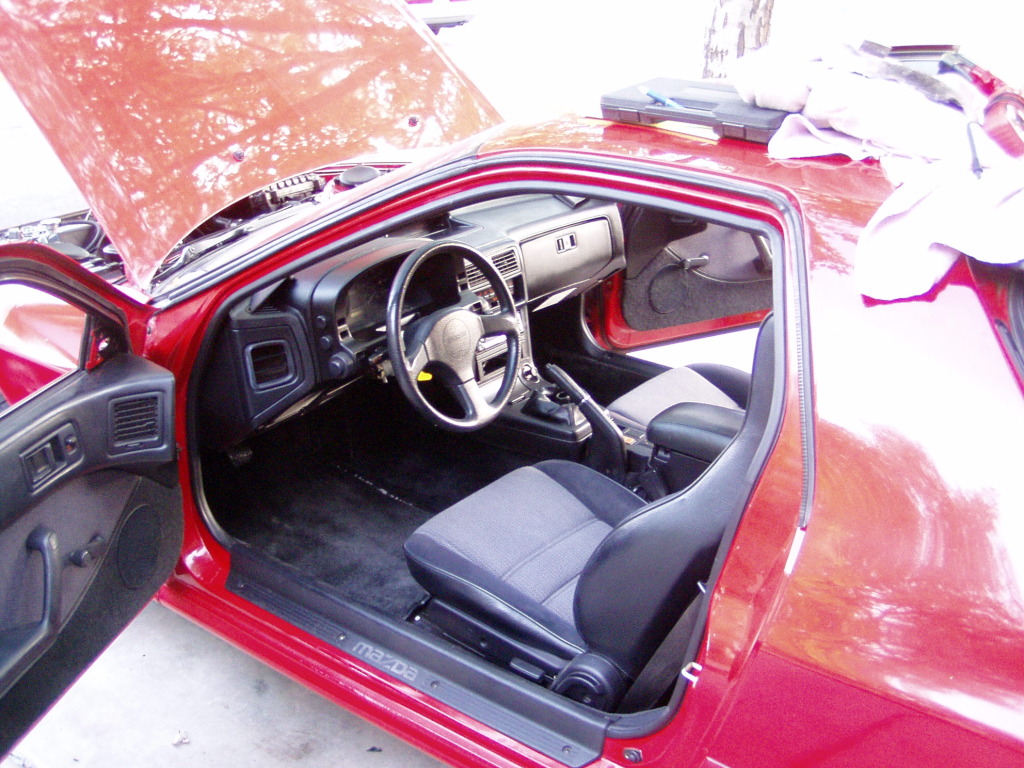
Decided to get on the interior, so in went the dash:
(For those so afflicted- you know who you are- there is some pretty explicit duct showing in this picture. Enjoy it while you can, I'm not sure how long Photobucket will host this ****...)
With the dash secure (about 30 minutes, working alone), other parts started appearing:
Until finally, this:
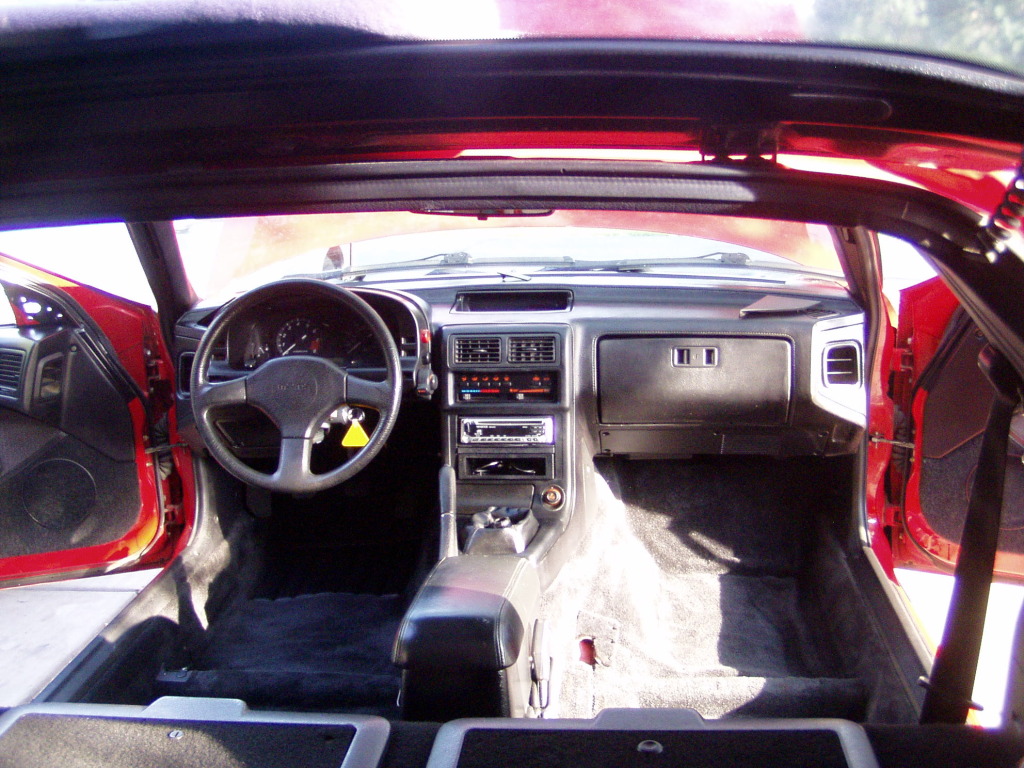
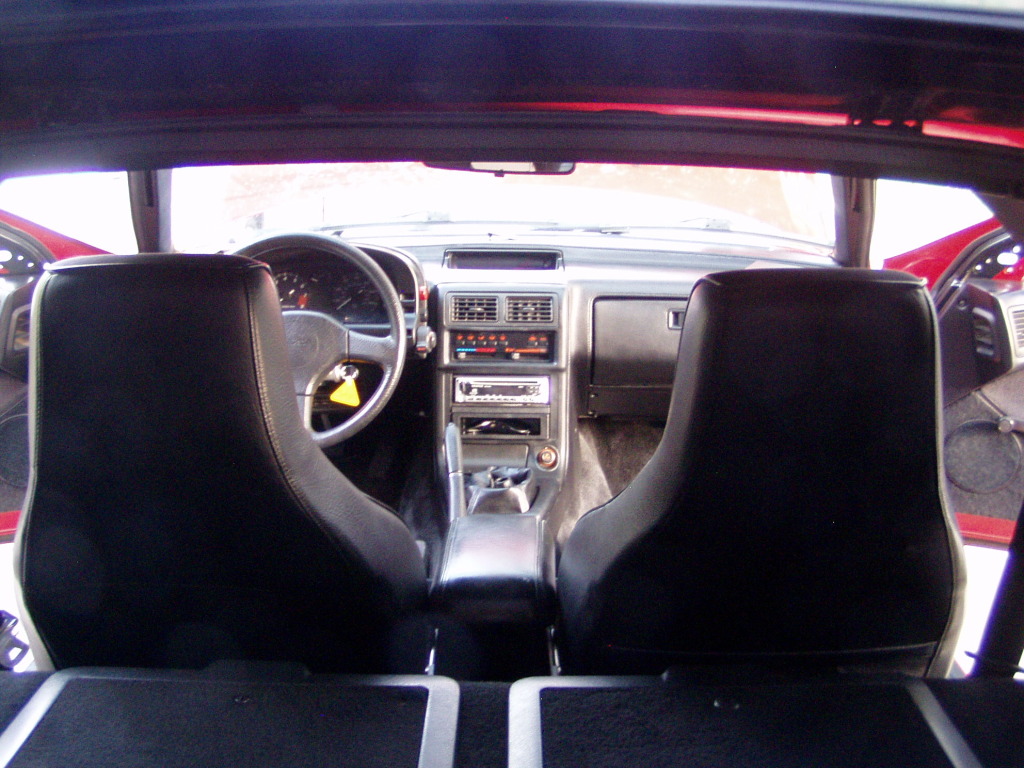
Seats too:
Tomorrow I'll make the final battery connections (still have to mount the cutoff switch/breaker on the bin plastic) and the GTU will be hot for the first time in years.
In a good way, I hope.
I'm aflutter with anticipation.
Started by fabbing up the two remaining front brake lines, the chassis hardlines are all finished.
I spent more time than was reasonable tweaking the prop valve location but space in that area is at a real premium and my hardware options were limited.
It's not bad but something is a bit off, I can't quite get what I want.
Decided to get on the interior, so in went the dash:
(For those so afflicted- you know who you are- there is some pretty explicit duct showing in this picture. Enjoy it while you can, I'm not sure how long Photobucket will host this ****...)
With the dash secure (about 30 minutes, working alone), other parts started appearing:
Until finally, this:
Seats too:
Tomorrow I'll make the final battery connections (still have to mount the cutoff switch/breaker on the bin plastic) and the GTU will be hot for the first time in years.
In a good way, I hope.
I'm aflutter with anticipation.
Everything works (with a few minor exceptions).
Cigarette lighter,non-functional (no idea why yet).
Dome light, non-functional (bulb socket broken)
That's it.
I had to swap the wiper switch for a backup, the original was fried.
The horn contact and slipring were gummed up, cleaning with acetone followed by 400 grit sandpaper restored the horns.
The clock works too.
While testing the blower fan, the car smelled like fresh laundry because of the drier sheet in the duct...not sure how I like it but it's worth trying for a while.
The passenger side low beam filiment is burned out, I'll need new headlights.
Wish I could upgrade but I'll probably just get some Silverstars for now.
All in all, a good day.

Thank you.
This is also a first for me too, never before have the stars aligned so that I had so much more time than money and cleaning/inspecting were the only options.
I spent a lot of time doing weird piddly stuff though, so the real essentials could be done pretty quickly...maybe a week, with dedication.
I've noticed a serious dearth of coverage on the nuts 'n bolts of a build/new purchase.
I'd like to think the posters are skipping over the pedestrian out of kindness to the readers but given the number of build threads that only discover major flaws well down the road, I suspect that most people only look at their cars superficially.
If one were to get all the mickey mouse detail work out of the way in the beginning, your entire future experience with the car changes. Never again will that last bloody bolt (it's usually the last one or the hardest one to reach) hold up the install of the latest bling thing.
You no longer need to expect to pay a pound of flesh or a bucket of blood just to complete a job.
Everything will just be right.