
She Followed Me Home, Honest


Full Member
Joined: Sep 2011
Posts: 191
Likes: 4
From: Germany/Stuttgart
I installed new omp lines 2 weeks ago and had the same question, too. The FSM says the lines are all seeing the same amount of oil. I found that information hidden in the lubrication system part of the manual.
if you are having any fitment issues with them let me know and we can get it straightened out, i haven't had anyone give me any feedback as far as some situations not fitting. they will require a little shoe horning though.
No, I don't believe there are any fitment issues, I was just hoping to make the install a little neater.
Given that it's quite an important subsystem, Mazda seems to have rather haphazardly tacked the OMP and it's lines onto the engine.
Given that it's quite an important subsystem, Mazda seems to have rather haphazardly tacked the OMP and it's lines onto the engine.
yea, they are a bit too fat for the stock brackets, they still fit with a little creative bending of the metal. most people probably just use stainless wire ties or zip ties but i know you want it to look as clean as possible. zip ties might not look quite kosher here, heh. put the brackets in a vice and move the bend points out so the opening is a little wider would be my suggestion.
Well, we're on a roll, so another oddball question:
I've installed the cat and it's delivery air pipe.
I don't plan on reusing the stock exhaust manifold and that was the mount point for the top of the air tube, so the pipe is just floating in the air up by the firewall.
Seems kinda halfassed, what do people with headers do about this pipe?
I've installed the cat and it's delivery air pipe.
I don't plan on reusing the stock exhaust manifold and that was the mount point for the top of the air tube, so the pipe is just floating in the air up by the firewall.
Seems kinda halfassed, what do people with headers do about this pipe?

I was doing some post-prandial surfing and ran across this pic:
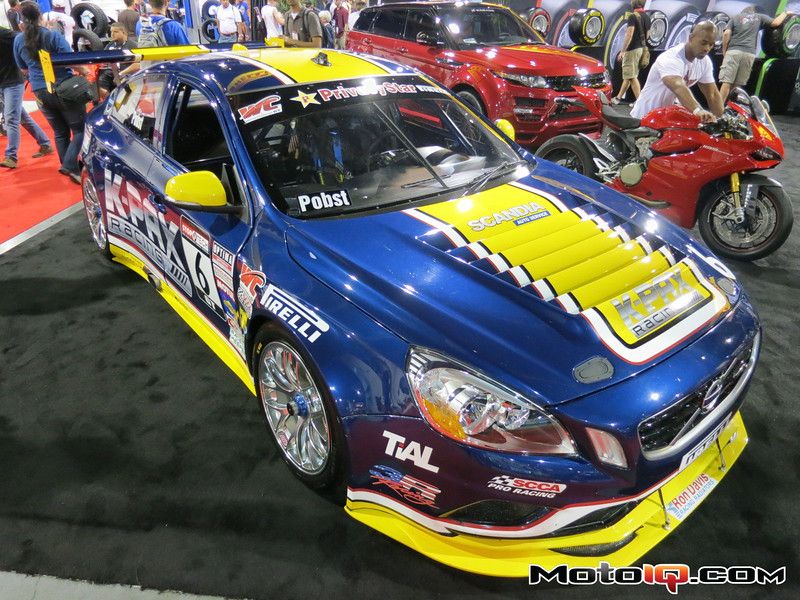
K-Pax, based here in Denver, is the team from whom I purchased my trans oil as they closed out the race season.
My oil could have ended up in this very car.
But it didn't, so it can drip from my car instead.
K-Pax, based here in Denver, is the team from whom I purchased my trans oil as they closed out the race season.
My oil could have ended up in this very car.
But it didn't, so it can drip from my car instead.
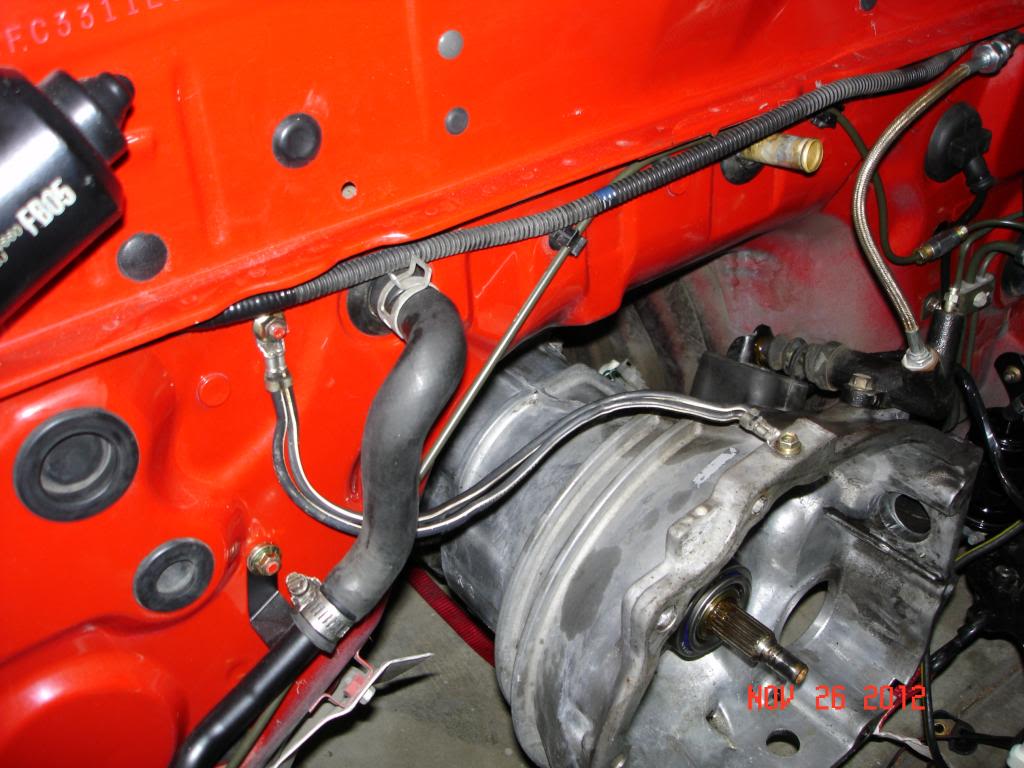
This is how I'd like to route the OMP lines:
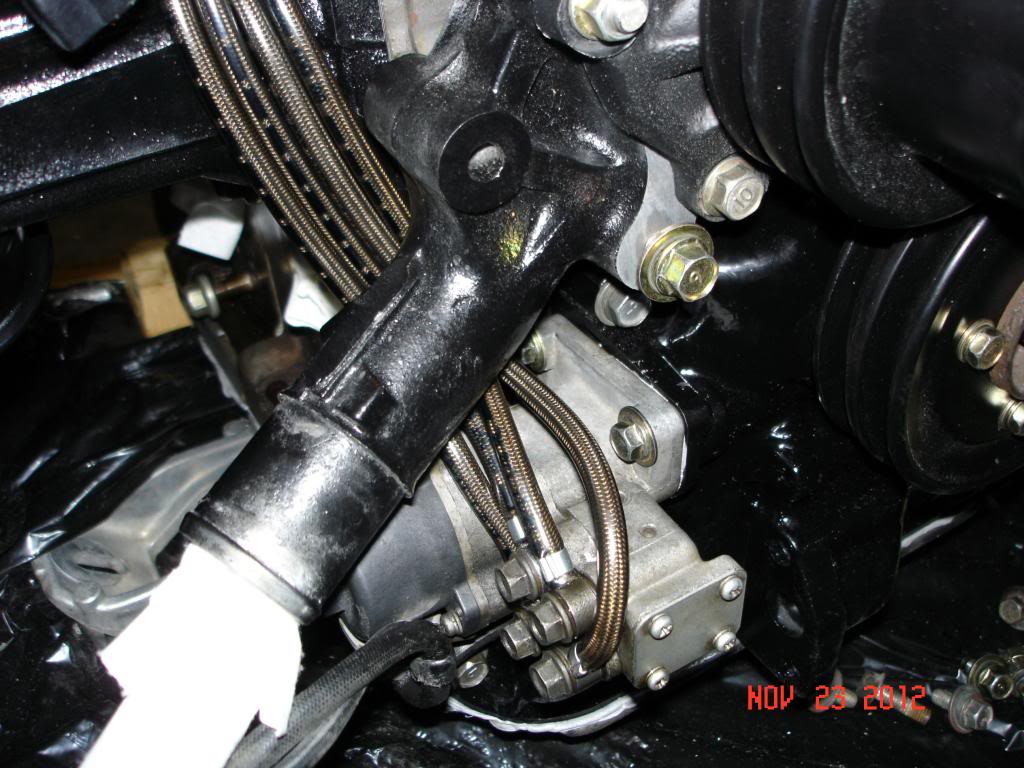
It's only temporary as I await a new OMP o-ring but if anyone sees a problem (Ben?), please pipe up now.
This route keeps the lines completely free of the airpump belt and requires no brackets, so I'm rather enamored of it.
It's only temporary as I await a new OMP o-ring but if anyone sees a problem (Ben?), please pipe up now.
This route keeps the lines completely free of the airpump belt and requires no brackets, so I'm rather enamored of it.
Didnt know you were waitin on that o ring.
I hope the s4 one fits on yours, it should.
Its an oval one right?
Kinda bad timing for shipping cus of the holidays and stuff
maybe tomorrow eh. hopefully
I think Monday at the latest
I hope the s4 one fits on yours, it should.
Its an oval one right?
Kinda bad timing for shipping cus of the holidays and stuff
maybe tomorrow eh. hopefully
I think Monday at the latest
that routing will be fine and probably works better for a stock-ish setup.
just be sure it clears the rear smog pump leg when it is installed.
the S4 o-ring is a little bit smaller than the S5/S6 OMP o-ring, so you will probably have to stretch it to fit and still use some silicone as a leak prevention since the o-ring may not seal properly when stretched.
just be sure it clears the rear smog pump leg when it is installed.
the S4 o-ring is a little bit smaller than the S5/S6 OMP o-ring, so you will probably have to stretch it to fit and still use some silicone as a leak prevention since the o-ring may not seal properly when stretched.
Last edited by RotaryEvolution; Nov 24, 2012 at 04:40 PM.
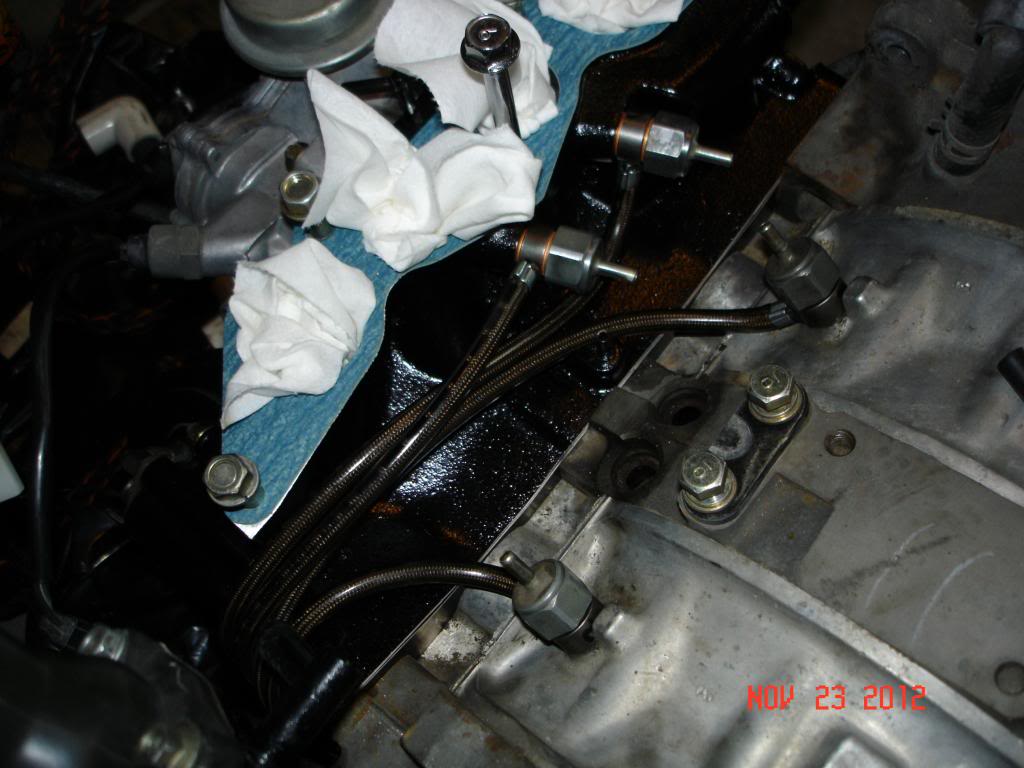
I'd like to express my thanks to TougeMonster, the o-ring arrived in yesterday's mail and was promptly installed.
I used a schmear of sealant as well.
OMP system, done.
Thanks again, guy.
More little stuff got checked off as well...confirmed that the reverse warning lights work and jumpered the fuel pump to prove operation.
The pump has been the source of a minor worry ever since I swapped it from the '91.
To recap, my '91 had a smaller S4 fuel tank for some weird reason and the whole fuel pump/bulkhead arrangement is subtly different.
(On a side note, the S4 bulkhead electrical setup is much nicer than the S5's weenie little connector...I wish I had kept it)
I had been somewhat concerned about my shadetree adaption but it all seems to have worked out.
Fuel flow is healthy, and the lines are all clear.
It's funny, my pile 'o parts has dwindled to practically nothing and I'm seeing things that have been buried for months now.
One part in particular- the brake booster vacuum hardline, banished early on from the firewall- I've been searching all over for, and it finally appeared, under my nose the entire time.
It will be reconfigured for a more stealthy run.
My supply of nice junkyard hardware is also severely depleted.
I have reused very little of the car's original hardware, there are literally pounds of rusty, crap looking nuts and bolts left over.
Fortunately, I've already allocated 95% of the remaining visible stuff and any subpar hardware can be swapped out later.
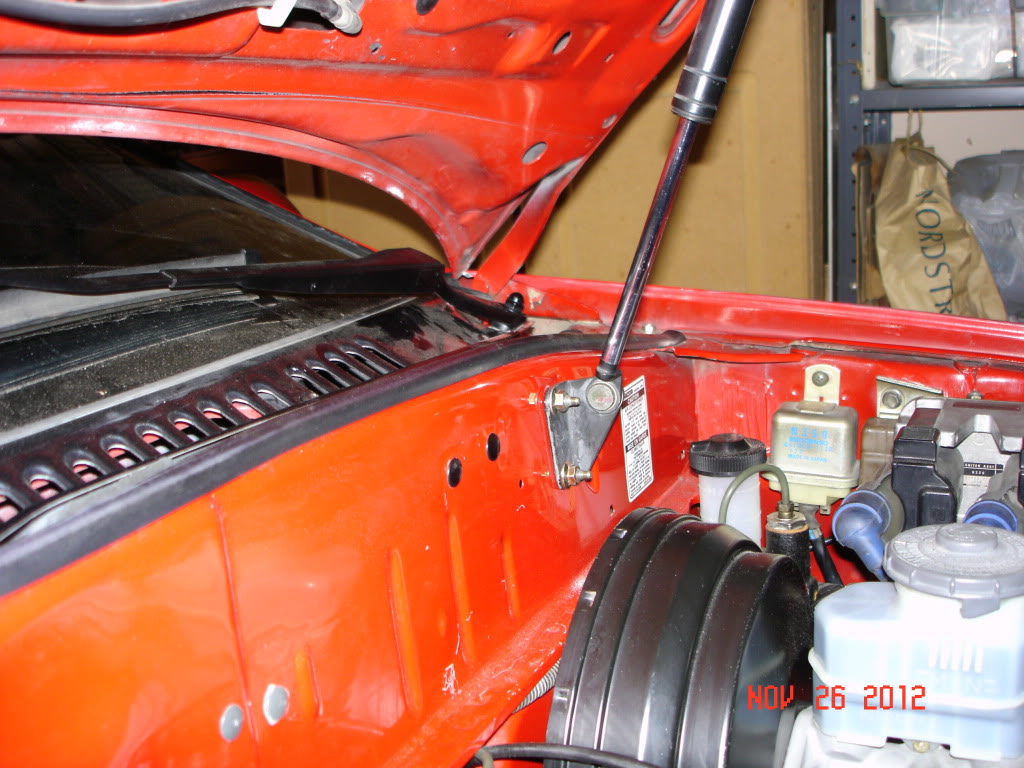
Today I plan on stripping the bay for engine install...basically, the radiator comes out and the hood comes off.
The hood is somewhat of a PITA due to the hood strut, which bolts through the firewall and requires access through the wiper cavity...so the wipers and lower windshield garnish have to be removed as well.
I need to figure a way to modify that, essentially I need capture nuts (nutserts) or a studded plate to simplify the process.
I have a plan...
I used a schmear of sealant as well.
OMP system, done.
Thanks again, guy.
More little stuff got checked off as well...confirmed that the reverse warning lights work and jumpered the fuel pump to prove operation.
The pump has been the source of a minor worry ever since I swapped it from the '91.
To recap, my '91 had a smaller S4 fuel tank for some weird reason and the whole fuel pump/bulkhead arrangement is subtly different.
(On a side note, the S4 bulkhead electrical setup is much nicer than the S5's weenie little connector...I wish I had kept it)
I had been somewhat concerned about my shadetree adaption but it all seems to have worked out.
Fuel flow is healthy, and the lines are all clear.
It's funny, my pile 'o parts has dwindled to practically nothing and I'm seeing things that have been buried for months now.
One part in particular- the brake booster vacuum hardline, banished early on from the firewall- I've been searching all over for, and it finally appeared, under my nose the entire time.
It will be reconfigured for a more stealthy run.
My supply of nice junkyard hardware is also severely depleted.
I have reused very little of the car's original hardware, there are literally pounds of rusty, crap looking nuts and bolts left over.
Fortunately, I've already allocated 95% of the remaining visible stuff and any subpar hardware can be swapped out later.
Today I plan on stripping the bay for engine install...basically, the radiator comes out and the hood comes off.
The hood is somewhat of a PITA due to the hood strut, which bolts through the firewall and requires access through the wiper cavity...so the wipers and lower windshield garnish have to be removed as well.
I need to figure a way to modify that, essentially I need capture nuts (nutserts) or a studded plate to simplify the process.
I have a plan...

i do conversions on the series 5's to use the series 4 pump housing, the series 5/6 connectors are quite weak, but will be fine for stock pumps. it is only when you throw in larger pumps that the connector starts to show its weakness and usually gets burnt to a crisp.
but the series 4 pump housing requires modification to make it work properly (pump extended and clamped to the base), since it is shorter due to the 16 gallon tank. the level sender can be switched over, just an FYI if you ever need to do such a thing.
but the series 4 pump housing requires modification to make it work properly (pump extended and clamped to the base), since it is shorter due to the 16 gallon tank. the level sender can be switched over, just an FYI if you ever need to do such a thing.
Last edited by RotaryEvolution; Nov 25, 2012 at 11:51 AM.
The trans rear seal is basically two parts- the sealing lip that rides on the driveshaft snout and an outer "dust" shield...kind of a bellows affair.
My plug fit into the outer bellows and would have worked fine except that the bellows has a hole in it (presumably to bleed out air as the seal is compressed) and oil was perfectly fine with dribbling out of the hole.
To really work, you need to get to the inner seal, which is exactly what a dummy driveshaft flange would do.
Oh well...I'd followed the fill specs from the FSM- which are wildly optimistic- and needed to drain off the excess anyway.
Originally Posted by clokker
The hood is somewhat of a PITA due to the hood strut, which bolts through the firewall and requires access through the wiper cavity...so the wipers and lower windshield garnish have to be removed as well.
I need to figure a way to modify that, essentially I need capture nuts (nutserts) or a studded plate to simplify the process.
I have a plan...
I need to figure a way to modify that, essentially I need capture nuts (nutserts) or a studded plate to simplify the process.
I have a plan...
I took a small chunk (approx. 1 1/12 x 2 1/2 ") of 1/4" plate aluminum, slid it behind the firewall holes to mark the hole spacing and then drilled/tapped it 6mm x 1.00.
I didn't have any 6mm studs conveniently laying around (the obvious and perfect parts would have been the old studs from the waterpump snout but I've already repurposed them for the thermostat cover), so I just screwed in longer bolts from the back of the plate, retained with red Locktite.
The studs were a close fit through the firewall holes but just to make sure the plate didn't fall out (in, actually) I smeared Goop over the mating face prior to install.
A lot of words to describe a simple concept (which I took no pics of yet) but it completely solves the issue of mounting the hood strut without also disassembling the wipers/garnish to gain access.
In a way, this little enhancement is the example for the benefits of my financially imposed snail's build pace.
I've thought of doing this before but never took the time to actually follow through because the car was always running...places to go, people to see.
With a dead car and little cash, but large amounts of time to spend, I'm finally knocking off the piddly **** that always would have been "nice" but was never "pressing" (after all, I rarely remove the hood).
I also just rediscovered a bit of personal "history" on the shortblock.
I'll cover it in a future post...


Joined: Mar 2001
Posts: 31,859
Likes: 3,243
From: https://www2.mazda.com/en/100th/
Well, we're on a roll, so another oddball question:
I've installed the cat and it's delivery air pipe.
I don't plan on reusing the stock exhaust manifold and that was the mount point for the top of the air tube, so the pipe is just floating in the air up by the firewall.
Seems kinda halfassed, what do people with headers do about this pipe?
I've installed the cat and it's delivery air pipe.
I don't plan on reusing the stock exhaust manifold and that was the mount point for the top of the air tube, so the pipe is just floating in the air up by the firewall.
Seems kinda halfassed, what do people with headers do about this pipe?
the older cars don't have that bracket at all and are totally fine.
having had mostly S4's and GSL-SE's that bracket surprised me, the older cars don't have it. the question is how can it NOT rattle like crazy? somehow it doesn't, but metal on metal with some movement and it should make horrible noises.
the older cars don't have that bracket at all and are totally fine.
the older cars don't have that bracket at all and are totally fine.
Fatigue and eventual cracking seems like a probable outcome.
I am reassured by your testimony however, although it doesn't eliminate my dislike of having a bracket so obviously not used.
Ah well, I shall no doubt have other, more dire situations to deal with.
A bit of minor catch up...
Here is the new mount arrangement for the hood strut:
And the revised transmission grounding strap:
This piece was an "on spec" junkyard acquisition...something I had no immediate use for but was too cool to pass up. What makes it unusual is the ratio of wire gauge to eyelet diameter- that's a lot of cable for small, 6mm eyelets.
Usually you'd see something this beefy bolted to a larger stud.
It's found a new, perfect home now, replacing the odd original setup.
And now, the small historical engine factoid.
When I first got the RX, one of the original projects was gauges and an efan.
This lead to a search for suitable locations for sending units/triggers and a thin wisp of info (concerning Canadian block heaters) took me to a spot on the lower front iron.
Not terribly accessible because of AC/PS, this location still looked very promising although general forum consensus held that it was a "deadend channel", unsuitable for anything.
I decided to not only try it but also to prove it was either good or bad for a sensor.
So I installed a VDO temp sending unit and set the gauge up to receive ground through either the original location by the oil pressure unit or this new spot.
There was absolutely no difference in readings...the new location was identical to OEM.
I also tried a fan trigger in this spot, which worked fine.
Eventually, my experiments ended and the last sensor was just used as a plug...till a few days ago when I fished a fairly large allen headed plug from my hardware bucket and realized what it was.
Here's the location with the old sensor in place:
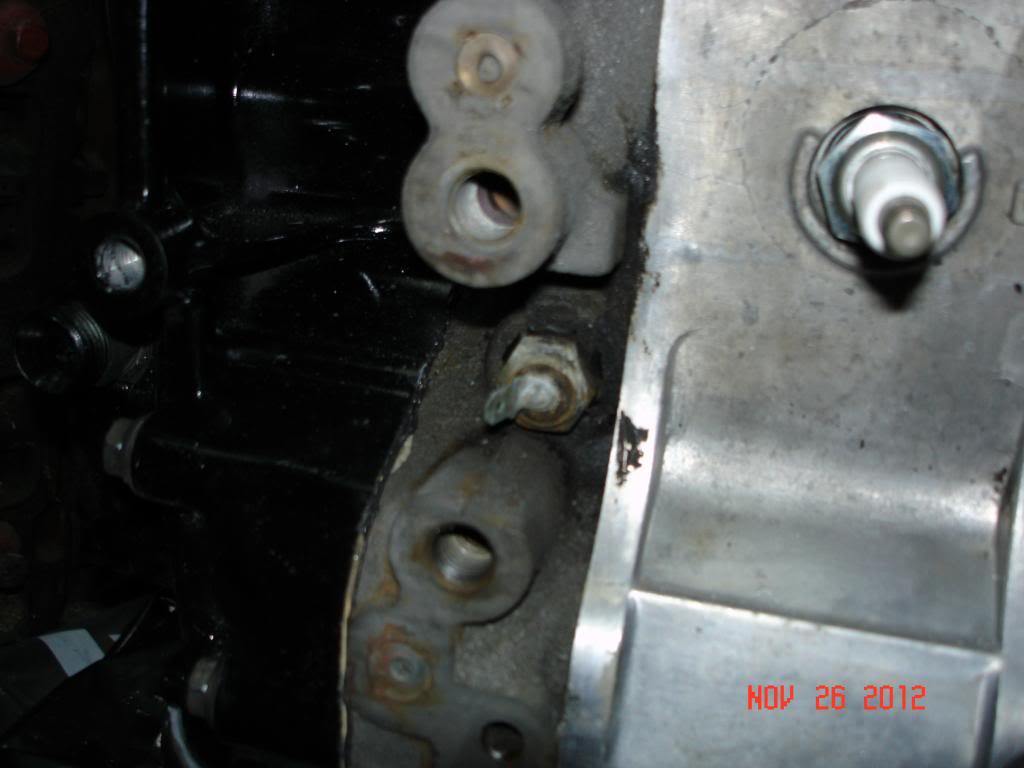
Sensor removed, next to original plug:
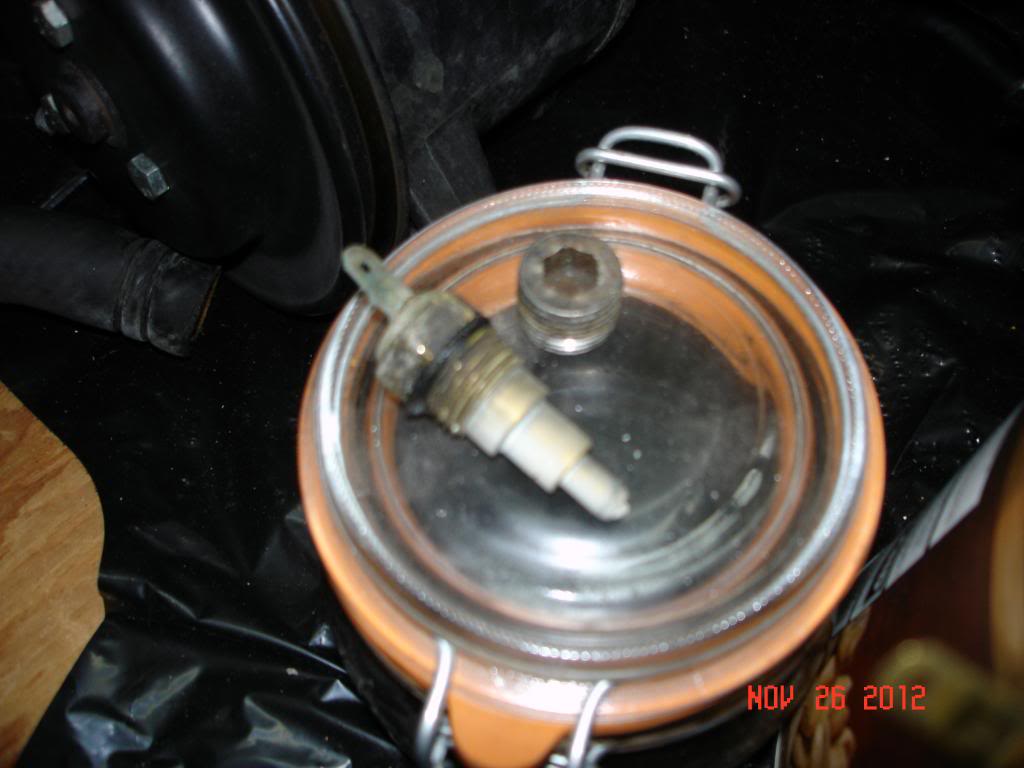
Original plug, back home at last:
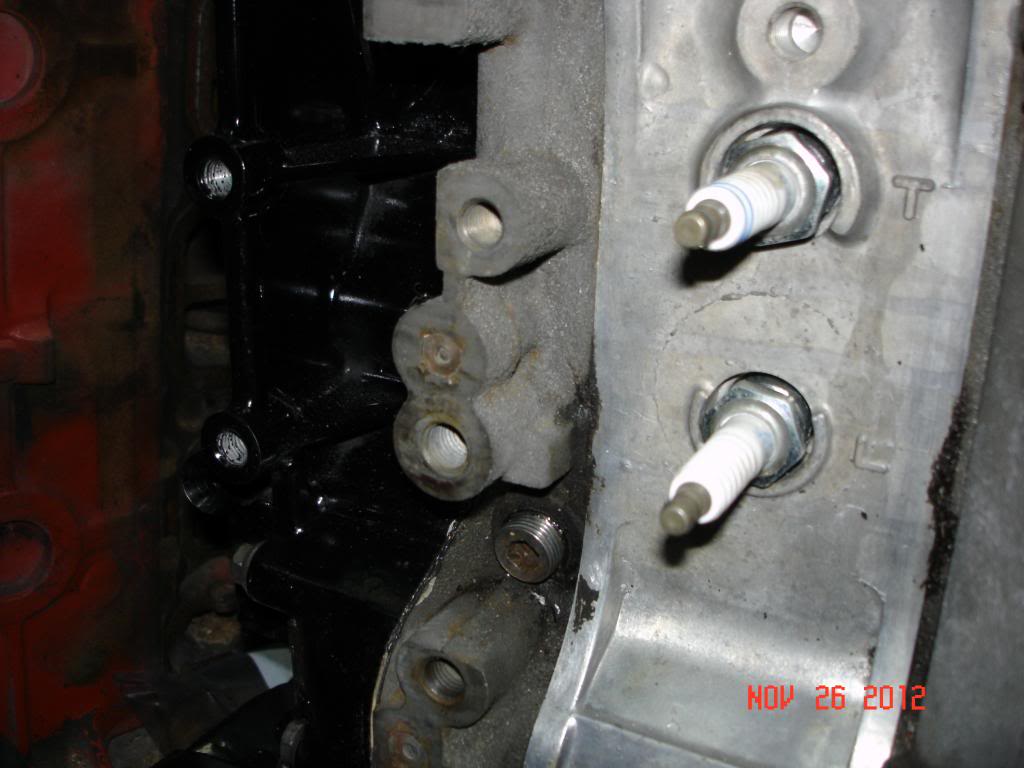
BTW, I'm still confident this location is suitable. Were I not already fully functional with a different arrangement, I'd use it again.