
Rat nest headache....(detailed)

Thread Starter
2nd Gen. Enthusiast
Joined: Feb 2006
Posts: 388
Likes: 0
From: New Hampshire
Rat nest headache....(detailed)
Ok, I didn't intend on doing this "mod" until i had the motor rebuilt, but the metal fuel line on the vac rack popped a leak. Anyway, I got the work done and it started right up, no problem. I backed it out of the garage to let it warm up so i could set the idle. Shortly after moving it I realized I had the twin scroll solenoid vac lines backwards. Shut it off, fixed it and started it up again. Let it run some more and it started idling real low. I bumped the throttle and it came up above 1000 for a few seconds. then it died. It hasn't started since. I have put oil in the spark plug holes twice now, trying to get it to start.
After reviewing a few of the better threads on emissions removal I found that the vac lines on the UIM were hooked up incorrectly. I went back to the attached vaccum diagram and put the lines as shown and described, using new silicone hoses.
FPR -> diagonal nipple in LIM
Primary injector Bleed -> 2nd nipple down, firewall side
Oil injector bleed -> 3rd nipple down, firewall side
Cold start assist (yes I kept it) -> 1st and 4th nipples, firewall side
Twin scroll -> 1st nipple, front side, -> check valve -> TS solenoid -> actuator
Boost sensor, guage and BOV -> nipple on UIM below BAC valve (kept that too)
Also I have removed the EGR, ACV, Split air pipe, and what ever part was mounted to the firewall side of the UIM. I also did the TB mod while things were apart.
The motor is obvoiusly flooded, but I have never had it flood this bad. Usually I just use my fuel pump cut switch and it starts in seconds. Is there something wrong in the way I have things set up? Thanks for any help.
RR87
ok well i used that same diagram a capped the the thing in the middle of the lim and ran the PD, oil injector line,and vac line on the lim between the oil injectors to the back of the uim then on the front i capped all except a place for the bypass valve
I'm a boost creep...
Joined: Jan 2002
Posts: 15,608
Likes: 8
From: Auckland, New Zealand
Originally Posted by Rotary_Rocket_87
Primary injector Bleed -> 2nd nipple down, firewall side
Oil injector bleed -> 3rd nipple down, firewall side
Oil injector bleed -> 3rd nipple down, firewall side
Cold start assist (yes I kept it)
Twin scroll -> 1st nipple, front side, -> check valve -> TS solenoid -> actuator
Boost sensor, guage and BOV -> nipple on UIM below BAC valve (kept that too)
The motor is obvoiusly flooded, but I have never had it flood this bad. Usually I just use my fuel pump cut switch and it starts in seconds. Is there something wrong in the way I have things set up?
Forgot to attach the vaccum diagram....
Thread Starter
2nd Gen. Enthusiast
Joined: Feb 2006
Posts: 388
Likes: 0
From: New Hampshire
ok, I have four nipples on the firewall side, third one down is the larger one. Then there are three on the front side.
I kept the CSA setup so I can push water into the motor (to steam clean carbon off the rotors) every few months, but I might just ditch it and use another spot to do this.
I have the check valve positioned correctly, going to the horzontal nipple on the solenoid. The vertical nipple leads to the actuator. I got this from the FSM page 4B-53.
Thread Starter
2nd Gen. Enthusiast
Joined: Feb 2006
Posts: 388
Likes: 0
From: New Hampshire
Update for those interested:
Took the UIM off again today. $hit canned the cold start assist valve and blocked it off. While doing so I found that the ACV block off plate had bent, creating a huge vaccum leak. I think this happened the other day after my first high (10 psi)boost run with my FCD. I replaced that with some thicker aluminum. Put her all back together and cleaned the spark plugs again. Adjusted the TPS. Pop, sputter, cough, die. I need new plugs.
I hope that is all I need to finish this as I am running out of gasket material to make UIM gaskets with.
Thread Starter
2nd Gen. Enthusiast
Joined: Feb 2006
Posts: 388
Likes: 0
From: New Hampshire
I revised the vaccum diagram that I had posted previously. This revision is to delete the secondary injector air bleed line, as the S4 Turbo doesn't have this.
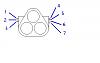
Also I have included a diagram showing the nipples on the UIM near the throttle body. The following is how I have my car hooked up.
1: To Twin Scroll solenoid, by way of check valve
2: Capped
3: To BOV and boost sensor
4: Capped
5: To Primary Ijnector Air bleed
6: To Oil injector Air bleed
7: Capped
Key Search words: rat's nest removal, vaccum diagram, emissions removal, vaccum rack removal
Trending Topics

Thread Starter
2nd Gen. Enthusiast
Joined: Feb 2006
Posts: 388
Likes: 0
From: New Hampshire
Thanks for the help. I got the car running the other day. Just needed new plugs after I fixed that ACV block off plate.
So I took the car for the first run after all this work (and adding a FCD) and what a difference. My roommate owned this car in high school, and it is just as I remember it and then some. I figured out that the solenoid that was actuating the Twin Scroll was shot, so I was lagging bad. I now boost really quick, and in third gear I am getting full boost (10 psi)before 3000rpm.
So I took the car for the first run after all this work (and adding a FCD) and what a difference. My roommate owned this car in high school, and it is just as I remember it and then some. I figured out that the solenoid that was actuating the Twin Scroll was shot, so I was lagging bad. I now boost really quick, and in third gear I am getting full boost (10 psi)before 3000rpm.
Joined: Feb 2006
Posts: 2,897
Likes: 2
From: Renton/Bellevue/Seattle WA
Ok well I went out and did some stuff this morning. I got some numbers .... but remember again im not sure if the 88 gtu had stock turbo stuff or what....
anyways Im new at using this tool so my readings are very (estimated) haha. Its in inches
t2
rear sway: .553 inch
half shaft: 1.031
other shaft thing: .881
driveshaft: 2.951
88 gtu
rear sway: .560
half shaft: .954
other shaft thing: .879
driveshaft: 2.254
again those are my readings, and you have to remember like a peice of dirt could easily be 100s of an inch. Personally I think they are the same. (the sway bars) I dont see how the NA could be thicker than the t2.
Hope that helped.
Here are some pictures 4 MB http://files.filefront.com/rx7rearsw.../fileinfo.html
 Wrong thread maybe?

 Now I know. haha how weird.

Thread
Thread Starter
Forum
Replies
Last Post
Turblown
Vendor Classifieds
12
Oct 17, 2020 03:25 PM
demetlaw
3rd Generation Specific (1993-2002)
6
Oct 2, 2015 06:22 PM
joel(PA)
Race Car Tech
0
Oct 1, 2015 10:25 AM