New 13b first start. with Loud BOOM. Timing question
 12-01-11, 07:40 PM
#1
They live We sleep
Thread Starter
iTrader: (1)
Join Date: Feb 2009
Location: Dot Island
Posts: 919
Likes: 0
Received 0 Likes
on
0 Posts
New 13b first start. with Loud BOOM. Timing question
OK First off i swear i timed it the right way. But its a new engine. And I cant keep fooling with it unless i am sure the timing is correct.. because it went BANG. so maybe it was Flooded. But im not sure..
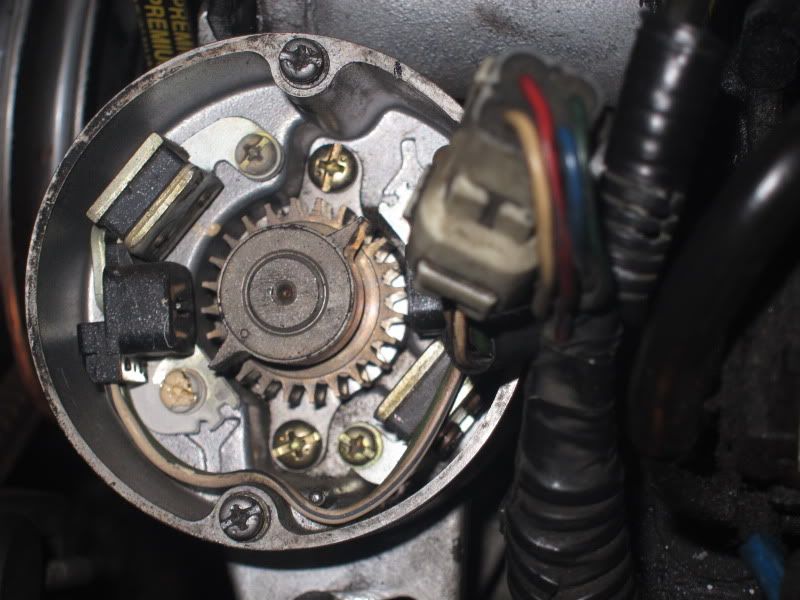
When i put the engine together i rotated the #1 rotor to tdc. With Front mark on crank pointing to the timeing marks. i then took the cas and lined up the dot to the Left black thingy. I know in this photo its not Lined up. but that was after i turned it over. If i dont have a mirror and the engine is in the car, what is the best way to make sure the rotor is in the correct location? thanks. in advance.
When i put the engine together i rotated the #1 rotor to tdc. With Front mark on crank pointing to the timeing marks. i then took the cas and lined up the dot to the Left black thingy. I know in this photo its not Lined up. but that was after i turned it over. If i dont have a mirror and the engine is in the car, what is the best way to make sure the rotor is in the correct location? thanks. in advance.
 12-01-11, 07:49 PM
#2
Full Member
iTrader: (1)
Join Date: Apr 2011
Location: wilmington nc
Posts: 160
Likes: 0
Received 0 Likes
on
0 Posts
I never tried it on a rotary but with bikes I always stick a screw driver down the spark plug whole, and rock the engine back and forth until the screw driver gets to its highest point. Ill try this tomoro in my car and report back lol.
 12-01-11, 08:22 PM
#7
Senior Member
iTrader: (1)
Join Date: Oct 2004
Location: San Leon
Posts: 320
Likes: 0
Received 0 Likes
on
0 Posts
Look at this from that thread
Align the LEAD mark on the pulley with the fixed pin on the front cover.
Remove the flat black cover on top of the CAS held with two screws.
Look at the rotor of the CAS and how it has two *pointers* on its top area.
Then look at my attached jpg. The pointers should be cutting across the corners of the square looking, black, reluctors. IF so, then the CAS is installed right. IF not, then unlock the CAS and rotate it til the pointers cut across the corners of the black reluctors.
And or read this thread if needed: https://www.rx7club.com/showthread.p...=CAS+TOP+COVER
Trending Topics

 sig'd
12-02-11, 08:07 AM
sig'd
12-02-11, 08:07 AM
#14
Senior Member
iTrader: (1)
Join Date: Oct 2004
Location: San Leon
Posts: 320
Likes: 0
Received 0 Likes
on
0 Posts
Make sure to follow break in procedure. Here is a good guideline ---->http://www.rotaryresurrection.com/2n...p_breakin.html
02-06-12, 01:08 PM
#16
Rotary Freak

The "pointers" will be seen as cutting across the CORNERS of the two black reluctors inside the CAS, not the center of the reluctors.

Thread
Thread Starter
Forum
Replies
Last Post
trickster
2nd Generation Specific (1986-1992)
25
07-01-23 04:40 PM

