
How To: Rebuild your OMP

So in the midst of doing my current motor build, Ive decided to unblock my OMP and use it in addition to premix.
I may invest in the 2 stroke pump from RA later but time will tell.
I'm not sure if there is or ever was a write up for this but I figured i'd share my little experience.
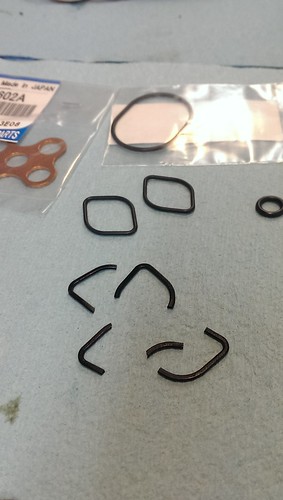
Given that our cars are 20+ yrs old you can bet those O-rings are more or less there just for show now, Crumbled at my mighty strength.
Obviously first things first, unbolt your OMP from the front cover via two 10mm bolts.
Undo all of your oil lines and set them aside. Now we can begin.
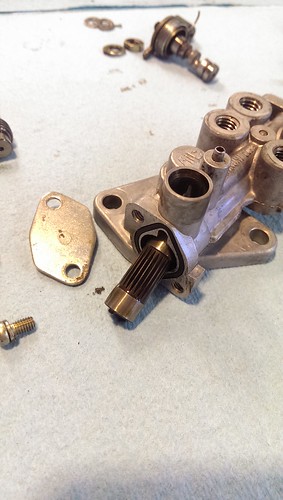
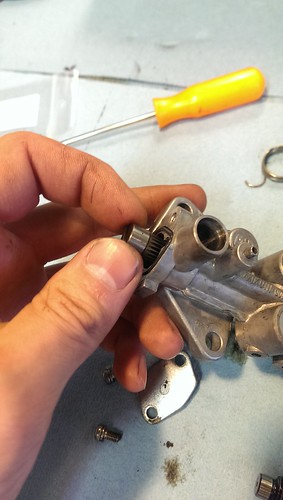
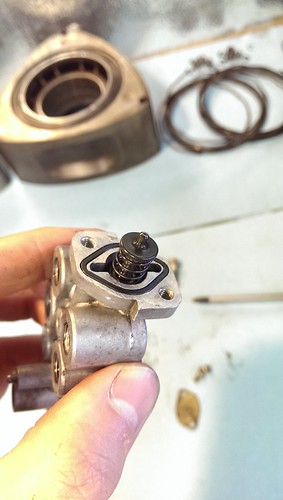
Begin with removing the screws holding the front plate on.
Once thats off, you will see the inner spring. Go ahead and remove it.
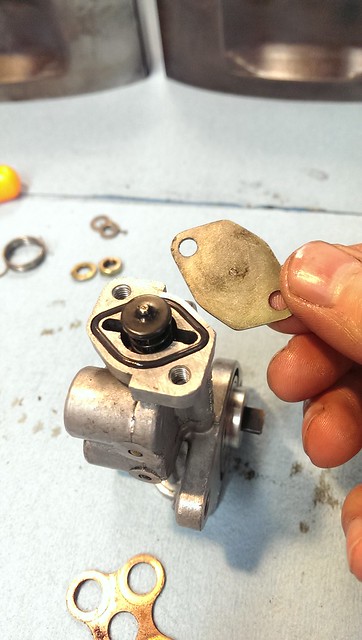
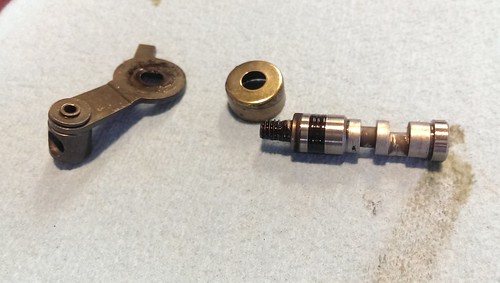
Once thats out you will see the inner piston?? Not sure the specific name but pull that sucka out too.

Go ahead and undo the OMP Rod arm and remove it.
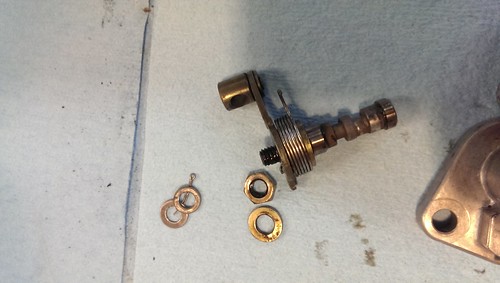
Once its out you'll see your first set of seals, while your at it,
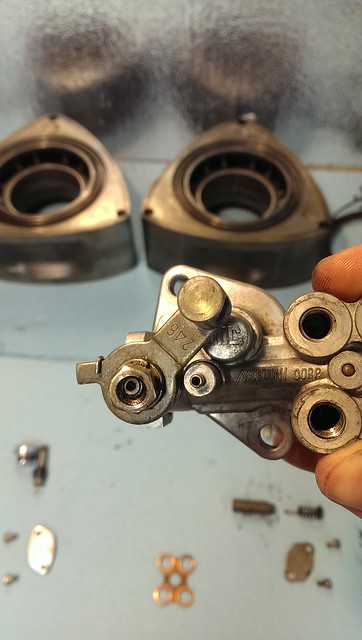
undo the screws on the back of the OMP and and remove the pump gear.
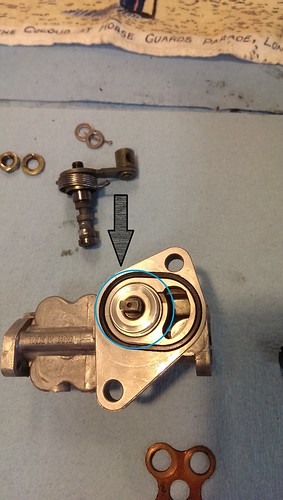
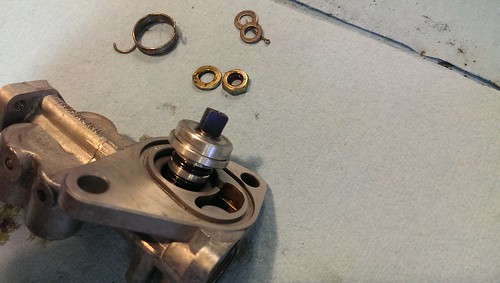
Now that you have the guts out, flip it over so your looking
at the mating surface for the front cover. Go ahead get a gooooood grip
on the **** (pffffttt..) and pull.
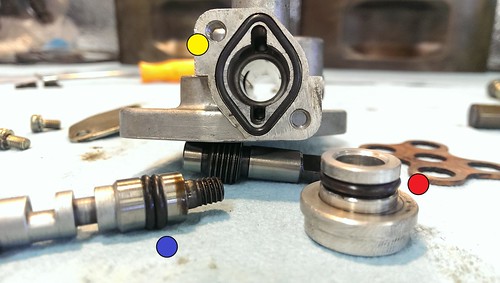
Quick Overview of Said Parts...
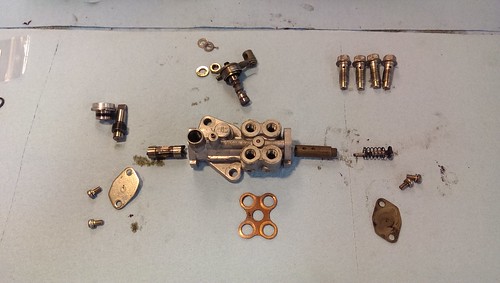
And heres what wer're working with. I love the forum so much I
decided to share my MS Paint skills with you all.. Just like my
sons learning books, match the colors.
IN THERE LIKE SWIMWEAR
I may invest in the 2 stroke pump from RA later but time will tell.
I'm not sure if there is or ever was a write up for this but I figured i'd share my little experience.
Given that our cars are 20+ yrs old you can bet those O-rings are more or less there just for show now, Crumbled at my mighty strength.
Obviously first things first, unbolt your OMP from the front cover via two 10mm bolts.
Undo all of your oil lines and set them aside. Now we can begin.
Begin with removing the screws holding the front plate on.
Once thats off, you will see the inner spring. Go ahead and remove it.
Once thats out you will see the inner piston?? Not sure the specific name but pull that sucka out too.
Go ahead and undo the OMP Rod arm and remove it.
Once its out you'll see your first set of seals, while your at it,
undo the screws on the back of the OMP and and remove the pump gear.
Now that you have the guts out, flip it over so your looking
at the mating surface for the front cover. Go ahead get a gooooood grip
on the **** (pffffttt..) and pull.
Quick Overview of Said Parts...
And heres what wer're working with. I love the forum so much I
decided to share my MS Paint skills with you all.. Just like my
sons learning books, match the colors.
IN THERE LIKE SWIMWEAR
The most hated line in all repair manuals..
Assemble in reverse order!
MAKE SURE TO DO THIS ONE LAST..
Or you will fight the spring putting the rear half in.
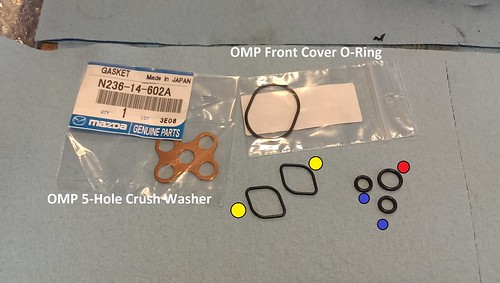
After screwing the front plate back on your just about
done. Go ahead and throw the new Crush washers on
and put it all back onto the front cover. I am still waiting
for my housings to be shipped back to assemble my motor
So I have no pictures of it looking all sexy on the front cover haha.
And just like that your OMP isn't pissing oil from every crack :]

Hope this can be useful to a few of you. Figured ive taken enough
information from the community. Time to give back.
It only took about an hour incl. cleaning. So hopefully
some of you will fix the horrid leak most of us have had.
Assemble in reverse order!
MAKE SURE TO DO THIS ONE LAST..
Or you will fight the spring putting the rear half in.
After screwing the front plate back on your just about
done. Go ahead and throw the new Crush washers on
and put it all back onto the front cover. I am still waiting
for my housings to be shipped back to assemble my motor
So I have no pictures of it looking all sexy on the front cover haha.
And just like that your OMP isn't pissing oil from every crack :]
Hope this can be useful to a few of you. Figured ive taken enough
information from the community. Time to give back.
It only took about an hour incl. cleaning. So hopefully
some of you will fix the horrid leak most of us have had.

nice write up, pineapple sells the seals and includes a DVD as well, no mention of the s5 though Mechanical OMP Kit & DVD
Excellent write up. The picture with the dots in diff colors showing where they go is commendable. But I'm just wondering why there are two 'yellow' dot ones. Only see one place using them. No?
Joined: Feb 2001
Posts: 29,798
Likes: 128
From: London, Ontario, Canada


Does anyone have a write up for the s5, or is Aaron's write-up close enough to use? Also, I'm assuming the oil lines are going to be bad on mine (just preparing for the worst.) Do I have to go through Mazda to get new lines?
Trending Topics
talking head
Joined: Apr 2008
Posts: 2,775
Likes: 15
From: Perth, WA, OZ
i did one in 2008 and in metric JIS .. but imageshack has since stolen all my images
s5 is different mostly around the lever ( it is a plunger under the stepper motor )
though the bare pump is no more mechanically challenging to rebuild
s5 is different mostly around the lever ( it is a plunger under the stepper motor )
though the bare pump is no more mechanically challenging to rebuild
Wow. Pulled an Ahole move and never checked this thread! Sorry if its too late but.
As far as i'm aware they are not serviceable..However..I have 3 spare's lying around here somewhere. I may crack one open to find out. Maybe ill start that journey tomorrow. I'll keep you Updated here or another thread specific to the S5 if it looks promising.
bumpstart, Aaron Cake, Rob XX 7
- Either my search-fu is rusty or I don't know the word "search" lol
Had I known there were already threads I wouldnt have wasted server space.
Thanks! I hate reading DIY or How to's and not being able to comprehend whats going on. So...Do unto others as you would like yourself? sure?
Yea those 2 yellow dots are for those two o-rings. When you take it apart theres one on each side of the OMP.
Nope! Unless you want to put your wallet to go on suicide watch. You can make new ones for less than $40. They are made out of much better material and will not bake like the OEM ones. There's a write up already on here with the website for materials./ Ill find it.
bumpstart, Aaron Cake, Rob XX 7
- Either my search-fu is rusty or I don't know the word "search" lol
Had I known there were already threads I wouldnt have wasted server space.
Yea those 2 yellow dots are for those two o-rings. When you take it apart theres one on each side of the OMP.
Nope! Unless you want to put your wallet to go on suicide watch. You can make new ones for less than $40. They are made out of much better material and will not bake like the OEM ones. There's a write up already on here with the website for materials./ Ill find it.

Thread
Thread Starter
Forum
Replies
Last Post
Jeff20B
1st Generation Specific (1979-1985)
73
Sep 16, 2018 07:16 PM