
fmic setup pics


Originally Posted by PatrickT
*bump*
no comments, criticism, praise ? ;(
no comments, criticism, praise ? ;(
Full Member

Joined: Nov 2006
Posts: 161
Likes: 45
From: Germany Southwest
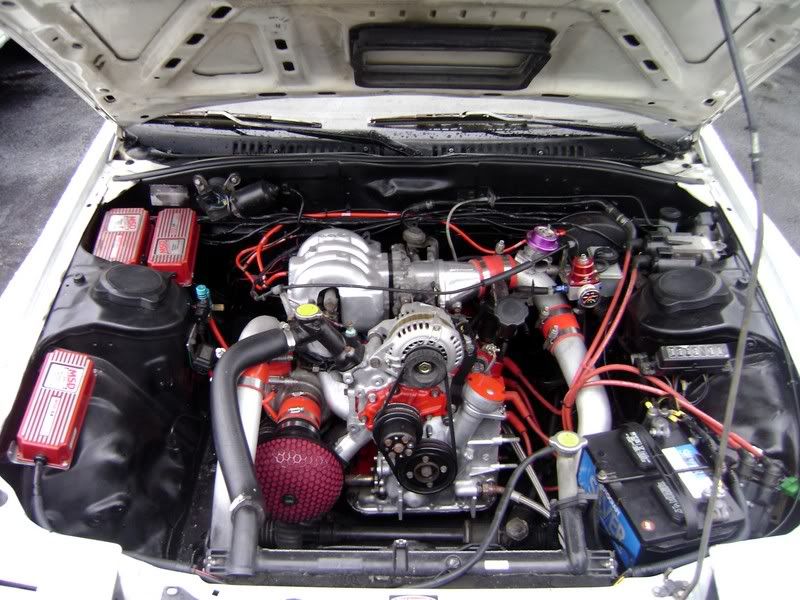
Yes me neither, I wanted to make the piping as short as possible.
The plates holding the radiator at the upperside have the shape of a triange.
You can see it on picture 2 , between the air filter and the intercooler.
The triangle has two bended areas to make contact to the radiator and the surface at the chassis the radiator is mounted stock.
I prototyped a lot to find out the perfect measures of the triangle,
I will take fotos of it tomorrow, and I think I have the measures somewhere.
-Patrick
long live the monster BP
Joined: Nov 2005
Posts: 483
Likes: 0
From: New Zealand
Originally Posted by PatrickT
Yes me neither, I wanted to make the piping as short as possible.
The plates holding the radiator at the upperside have the shape of a triange.
You can see it on picture 2 , between the air filter and the intercooler.
The triangle has two bended areas to make contact to the radiator and the surface at the chassis the radiator is mounted stock.
I prototyped a lot to find out the perfect measures of the triangle,
I will take fotos of it tomorrow, and I think I have the measures somewhere.
-Patrick
The plates holding the radiator at the upperside have the shape of a triange.
You can see it on picture 2 , between the air filter and the intercooler.
The triangle has two bended areas to make contact to the radiator and the surface at the chassis the radiator is mounted stock.
I prototyped a lot to find out the perfect measures of the triangle,
I will take fotos of it tomorrow, and I think I have the measures somewhere.
-Patrick
Are you using the stock radiator?
If so hows cooling with it on that much of a lean? Do you have any coolant filling issues?
Full Member
Joined: Nov 2006
Posts: 161
Likes: 45
From: Germany Southwest
Hi
yes its the stock radiator, I thought I can switch later to a Koyo if I want to,
as they should be interchangeable.
I think first cooling improved because I�ve removed the A/C cooler,
but with my additional cover plate now and cut underfloor covering I think it
impoved even more.
Last time I drove on the Autobahn constantly 60 mph and didnt have to switch the e-fan on, with 25 �C ambient temp.
I want a thing to control the fan speed , now I switch it manualy or at 95�C it also starts like the A/C fan.
I air bleed the radiator by removing the sensor on top of the radiator,
with my first setup I had a few issues, but now it seems fine.
Good night its 0:33 AM in Germany now....
-Patrick
Originally Posted by PatrickT
Yes me neither, I wanted to make the piping as short as possible.
The plates holding the radiator at the upperside have the shape of a triange.
You can see it on picture 2 , between the air filter and the intercooler.
The triangle has two bended areas to make contact to the radiator and the surface at the chassis the radiator is mounted stock.
I prototyped a lot to find out the perfect measures of the triangle,
I will take fotos of it tomorrow, and I think I have the measures somewhere.
-Patrick
The plates holding the radiator at the upperside have the shape of a triange.
You can see it on picture 2 , between the air filter and the intercooler.
The triangle has two bended areas to make contact to the radiator and the surface at the chassis the radiator is mounted stock.
I prototyped a lot to find out the perfect measures of the triangle,
I will take fotos of it tomorrow, and I think I have the measures somewhere.
-Patrick

Full Member
Joined: Nov 2006
Posts: 161
Likes: 45
From: Germany Southwest
Finally here are the pics:
I had/have big problems reaching the site.


In the meantime I removed the battery holder at the bottom

This doesn�t look that nice but it works, maybe Ill replace it sometime.
-Patrick
I had/have big problems reaching the site.
In the meantime I removed the battery holder at the bottom
This doesn�t look that nice but it works, maybe Ill replace it sometime.
-Patrick
Senior Member
Joined: Dec 2002
Posts: 556
Likes: 1
From: singapore
Interesting V-mount concept, PatrickT
Was it hard to relocate the stock radiator like that ?
Here is an idea, why extend the top intercooler duct plate to the front bumper like a radiator panel cover. That way you would get more air to the intercooler.
It is hot and humid over here :P i would not dream about taking out my A/C ..heehee.. :P Did you bead those intercooler pipes ?
Full Member
Joined: Nov 2006
Posts: 161
Likes: 45
From: Germany Southwest
Interesting V-mount concept, PatrickT
1
Was it hard to relocate the stock radiator like that ?
2
Here is an idea, why extend the top intercooler duct plate to the front bumper like a radiator panel cover. That way you would get more air to the intercooler.
3
It is hot and humid over here :P i would not dream about taking out my A/C ..heehee.. :P
4
Did you bead those intercooler pipes ?
thx
1
I tried a lot , first the angle was not flat enough, so I relocated the oil cooler.
Than it was to low, and i was afraid of scratching the ground. But finally I got it.
2
I thought this is exactly what I did
3
These days yes, but there are plenty of cooler months to come.
4
I welded on some material at the ends on the outside to prevent the hoses from pulling away.
-Patrick

Thread Starter
Senior Member
Joined: Nov 2005
Posts: 316
Likes: 0
From: Ohio
What do most of you guys mount ur ic onto? All I have that really looks possible to mount it on is a cylinder/tube of metal i nthe front of the frame. Also how do you guys avoid hitting the headlight motors...?
Rotorhead
Joined: Feb 2001
Posts: 9,136
Likes: 39
From: Charlottesville, Virginia, USA
It should go in an area of high pressure (low velocity) if possible, which would be either near the turbo or throttle body. If it simply doesn't fit in one of those locations, then it's still OK, but just not optimal. Some things to think about: Closer to the throttle body means less vacuum tubing and slightly faster response, closer to the turbo means less plumbing if using a bypass valve with the stock AFM rather than a blow-off valve with a standalone EMS.
Custom built professionally by Spearco with a 2-248 bar & plate core as per specs designed by SPiN Racing to my requests. This one is a little large, but fits in the car without chopping up the bumper or blocking the brake ducts, although the stock hood latch needs to be replaced with hood pins.

If I had a 13BT engine, I would have gone with a slightly smaller custom bar & plate with an H-mount and end tanks that feed directly with minimal bends like this:

If I had a 13BT engine, I would have gone with a slightly smaller custom bar & plate with an H-mount and end tanks that feed directly with minimal bends like this:
Rotary Love
Joined: Jun 2006
Posts: 140
Likes: 0
From: Glendale, AZ
Thread Starter
Senior Member
Joined: Nov 2005
Posts: 316
Likes: 0
From: Ohio
Im putting my fmic on right now, my question is can I leave the stock pipe the bov connects to on and connect a pipe there, and can I leave the BACV and ditch the black valve that connects to the factory ic and plug those 2 tubes up?
Rotorhead
Joined: Feb 2001
Posts: 9,136
Likes: 39
From: Charlottesville, Virginia, USA
https://www.rx7club.com/attachment.p...5&d=1173209884
The other advantages are natural convection cooling (heat rises), and keeping the intercooler isolated from the radiator and oil cooler feed air and discharge air. Unfortunately, you really need a custom modified hood and custom intake ducting to make this work properly because the intercooler needs its own air supply and discharge vent. More pics below. FYI the intercooler intake looks a little too small to me... the cross-sectional area should be about 1/4 that of the intercooler core.
https://www.rx7club.com/2nd-generation-specific-1986-1992-17/blue-tii-update-fresh-paint-newer-eng-bay-pics-585548/
https://www.rx7club.com/2nd-generation-specific-1986-1992-17/pics-blue-tii-engine-bay-teardown-build-up-342353/
