
Air Mix Motor Test and Repair

Thread Starter
Joined: Feb 2005
Posts: 2,012
Likes: 0
From: Dallas, TX
Air Mix Motor Test and Repair
I remember talking with someone in a thread a while ago about whether or not it was possible to rebuild the air mix motor when it stops working correctly, but I just searched and it looks like the thread is gone - so now that I have the answer, I thought I'd start a new one and post it for all the happy people out there with the stuck on hot/cold problem and shallow pockets. 
Yes, the air mix motor is repairable, generally speaking, at least mine was, let me go through the procedure for it.
Requires - Philips Screwdriver, 2 Alligator Clips, a 9 volt battery, a metal paperclip
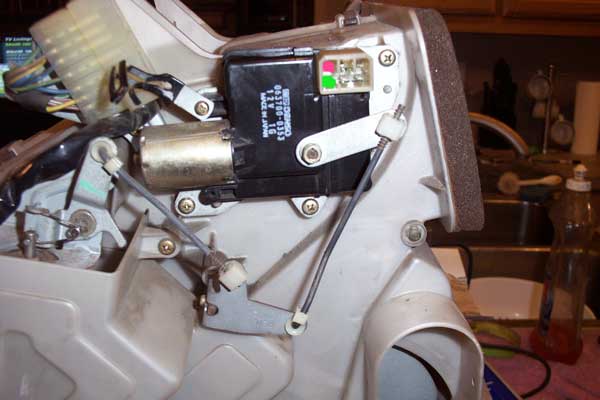
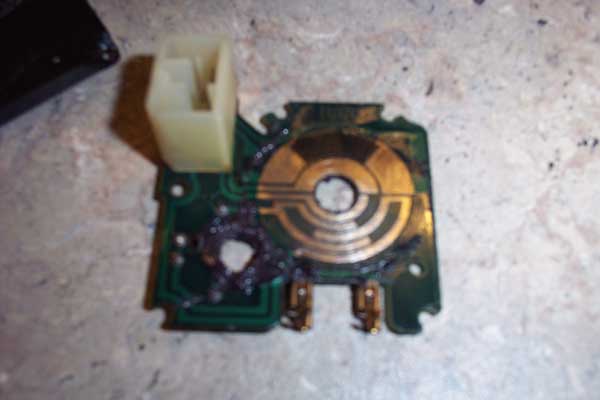
Before you start, you can check the motor to see if it's truly at fault, or if the problem is in the Climatron - using the alligator clips, connect one side of the battery to the red, and the other side to the paperclip, which you'll use to touch to the green without contacting the other clip. If it does nothing, then reverse the leads at the battery side. If it still does nothing, continue onward.
If it were working properly, touching the battery one way would make it turn the crank to a certain point where it will stop - reversing the polarity will make it go the other way to a point where it will stop. That's what makes the little flap between the hot side and cold side open and close. If it works fine, then there's nothing wrong with this box and you can stop now.
1> Remove the three screws that hold the air mix motor on the side of the heater core box
2> Carefully pop the plastic snap off, then pull the metal arm out of the hole. It's hard to describe correctly, but you should be able to figure out how it comes off by looking at it. Now put the airbox aside.
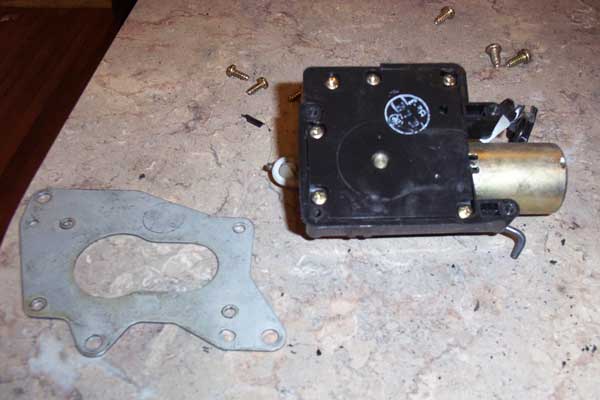
3> Remove the 4 screws holding the mounting bracket and set it aside
4> Remove the 7 screws here, and gently pry the back cover off - there's a bushing that fits over one of the wheels that provides some positive pressure, so rocking gently should let it come free.
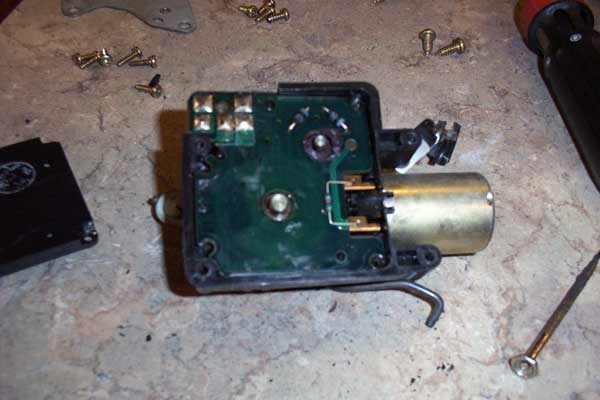
5> The two black things are diodes - if you set your multimeter to ohms you should get high resistance one direction, and open when you reverse the leads. I didn't list a multimeter as required because these almost never go bad. There's also a 1k ohm resistor across the motor leads. It, obviously, should read about 1k ohm. You should also be able to see if you have burnt traces or cold solder joints (looks like a hole around the pins on the plug) In this view, the two pins on the right side of the plug are the ones that go to the motor.
6> If you look at the right side of the picture, you'll see two little brass claws on either side of the resistor. If you ohm those claws, you'll get the resistance of the windings in the motor - for mine, the resistance was about 20. If you couldn't get movement before, connect your alligator clip leads from the battery to each side and you should be able to drive the motor. If you can't, you might as well stop now, because none of the rest of this will help you. If you do, the rest of these instructions will probably cure your problem. You can reverse the polarity to drive it the other way, if it makes you feel better. When you're done playing, make sure that the arm matches the orientation that it's in from the first picture, because without using the pins of the plug, it's possible to end up in a position that it can't recover from, which was the whole problem with mine to begin with. The motor had ridden completely past the stop and it wasn't able to drive itself the other direction.
Yes, the air mix motor is repairable, generally speaking, at least mine was, let me go through the procedure for it.
Requires - Philips Screwdriver, 2 Alligator Clips, a 9 volt battery, a metal paperclip
Before you start, you can check the motor to see if it's truly at fault, or if the problem is in the Climatron - using the alligator clips, connect one side of the battery to the red, and the other side to the paperclip, which you'll use to touch to the green without contacting the other clip. If it does nothing, then reverse the leads at the battery side. If it still does nothing, continue onward.
If it were working properly, touching the battery one way would make it turn the crank to a certain point where it will stop - reversing the polarity will make it go the other way to a point where it will stop. That's what makes the little flap between the hot side and cold side open and close. If it works fine, then there's nothing wrong with this box and you can stop now.
1> Remove the three screws that hold the air mix motor on the side of the heater core box
2> Carefully pop the plastic snap off, then pull the metal arm out of the hole. It's hard to describe correctly, but you should be able to figure out how it comes off by looking at it. Now put the airbox aside.
3> Remove the 4 screws holding the mounting bracket and set it aside
4> Remove the 7 screws here, and gently pry the back cover off - there's a bushing that fits over one of the wheels that provides some positive pressure, so rocking gently should let it come free.
5> The two black things are diodes - if you set your multimeter to ohms you should get high resistance one direction, and open when you reverse the leads. I didn't list a multimeter as required because these almost never go bad. There's also a 1k ohm resistor across the motor leads. It, obviously, should read about 1k ohm.
You should also be able to see if you have burnt traces or cold solder joints (looks like a hole around the pins on the plug) In this view, the two pins on the right side of the plug are the ones that go to the motor. 6> If you look at the right side of the picture, you'll see two little brass claws on either side of the resistor. If you ohm those claws, you'll get the resistance of the windings in the motor - for mine, the resistance was about 20. If you couldn't get movement before, connect your alligator clip leads from the battery to each side and you should be able to drive the motor. If you can't, you might as well stop now, because none of the rest of this will help you. If you do, the rest of these instructions will probably cure your problem. You can reverse the polarity to drive it the other way, if it makes you feel better. When you're done playing, make sure that the arm matches the orientation that it's in from the first picture, because without using the pins of the plug, it's possible to end up in a position that it can't recover from, which was the whole problem with mine to begin with. The motor had ridden completely past the stop and it wasn't able to drive itself the other direction.
Thread Starter
Joined: Feb 2005
Posts: 2,012
Likes: 0
From: Dallas, TX
Continuing onward, gently pull the circuit board loose from the gears and you should be looking at this:
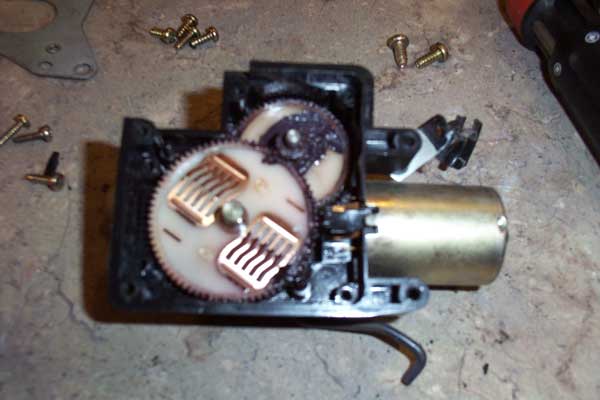
The brass fingers you see here are what makes contact with the traces on the front of the board you just removed - this is what tells the motor when to stop going each direction. What generally happens is with age, the contacts don't hold as well as they once did, which means the power doesn't get to the motor anymore, and you're left with a nonworking unit. These steps will cure that.
Here's the bottom side of the board -
7> Using a piece of fine grained sandpaper, or some rubbing alcohol, or a pocket knife or whatever, clean the corrosion off the brass fingers where they contact the board. Also clean the traces on the board. Be careful not to sand the traces off, or break the brass fingers, because if either happens, you'll have to replace it.
8> Everything should be shiny and new looking, now - the next thing I like to do, is add a little contact pressure. You can do this by carefully grabbing those little brass fingers near the base, and bending them back a little so they stand up taller. The spring pressure of that brass is what makes the contact that makes the motor move, so adding height will make it fit snugger and press tighter.
9> Same thing goes for those little brass claws that go to the motor tines. Clean them up, clean the contacts on the motor itself, then give the claws a little pinch so that they'll grip tighter.
10> Reassembly is the reverse of removal - before you get it all back together though, I like to the circuit board back in and put one screw in it to hold it while I test it out. That way, if it doesn't work, I won't have to take 14 screws out again to fix it.
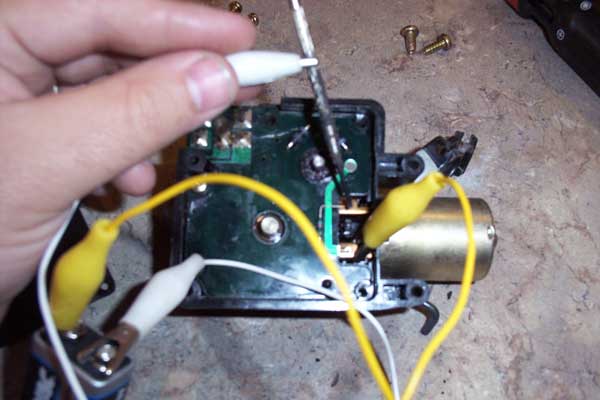
Remember that testing at the motor pins like this will only tell you if the motor works, it won't tell you if the brass fingers and circuit board works - for that, you'll have to go back to the pins from the first picture (although you can get to them a lot easier since you've got access to the back of the connector socket now.)
Also, if you've tried everything and it STILL doesn't work at the socket but works at the motor, make sure the arm is in the correct range! If the arm is out of range, no power will get through the armature to the motor! Line it up using the pictures above.
If you can't drive either one, make sure your 9 volt is good, too.
Hopefully this will save someone the trouble of begging or borrowing a new used air mix motor! (Thank you, Tessai and Frankenrex!)
The brass fingers you see here are what makes contact with the traces on the front of the board you just removed - this is what tells the motor when to stop going each direction. What generally happens is with age, the contacts don't hold as well as they once did, which means the power doesn't get to the motor anymore, and you're left with a nonworking unit. These steps will cure that.
Here's the bottom side of the board -
7> Using a piece of fine grained sandpaper, or some rubbing alcohol, or a pocket knife or whatever, clean the corrosion off the brass fingers where they contact the board. Also clean the traces on the board. Be careful not to sand the traces off, or break the brass fingers, because if either happens, you'll have to replace it.
8> Everything should be shiny and new looking, now - the next thing I like to do, is add a little contact pressure. You can do this by carefully grabbing those little brass fingers near the base, and bending them back a little so they stand up taller. The spring pressure of that brass is what makes the contact that makes the motor move, so adding height will make it fit snugger and press tighter.
9> Same thing goes for those little brass claws that go to the motor tines. Clean them up, clean the contacts on the motor itself, then give the claws a little pinch so that they'll grip tighter.
10> Reassembly is the reverse of removal - before you get it all back together though, I like to the circuit board back in and put one screw in it to hold it while I test it out. That way, if it doesn't work, I won't have to take 14 screws out again to fix it.
Remember that testing at the motor pins like this will only tell you if the motor works, it won't tell you if the brass fingers and circuit board works - for that, you'll have to go back to the pins from the first picture (although you can get to them a lot easier since you've got access to the back of the connector socket now.)
Also, if you've tried everything and it STILL doesn't work at the socket but works at the motor, make sure the arm is in the correct range! If the arm is out of range, no power will get through the armature to the motor! Line it up using the pictures above.
If you can't drive either one, make sure your 9 volt is good, too.
Hopefully this will save someone the trouble of begging or borrowing a new used air mix motor! (Thank you, Tessai and Frankenrex!)
Thread Starter
Joined: Feb 2005
Posts: 2,012
Likes: 0
From: Dallas, TX
Wow, I gotta say, I didn't expect that thread to fall as flat as it did. Good thing I didn't waste my time writing a full detailed rebuild of the transmission with pictures or something.


Joined: Sep 2005
Posts: 25,581
Likes: 136
From: Smiths Falls.(near Ottawa!.Mapquest IT!)
I honestly love the initiative that some guys take to repair stuff of this caliber.
I used to be like that until age crept up on me..NOW I just say screw it and get a used part..(Yep..age says Why buy new?..heh..!..it'll survive longer than you will!)
I used to be like that until age crept up on me..NOW I just say screw it and get a used part..(Yep..age says Why buy new?..heh..!..it'll survive longer than you will!)

This should go to archive. I think maybe there just isn't the people looking for the info right now but it is still a very good write-up. I hope it does go to archive so I can use it if I need to. Either that or run the printer.
Trending Topics
Joined: Oct 2003
Posts: 1,600
Likes: 49
From: Norcal/Bay Area, CA
Very useful info since good used parts are getting harder and harder to find.
I'm even more invested in the total replacement having seen and installed the Miata system in the Z.
If you've never seen one, the NB series climate control panel is functionally and (almost) physically identical to ours but is completely mechanical. The only electrical component is the fan speed switch and it's the same as ours but everything else is just cables and levers to do EXACTLY the same thing as our stepper motors and electronic switches.
Because it's winter and my system currently works well, I'm loathe to monkey around right now (not to mention that the semi-frozen dash plastic would crumble even worse than normal) but I have a Miata control panel and can easily compare it to our Logicon for rough fitting ideas. Frankly, it looks almost bolt in.
Assuming the control panel is not a dealbreaker/real obstacle, the next big issue is the cables and how easily they could be adapted to our stock mixer box after the motors have been removed. That's the kind of thing I need to be real hands on to figure out and that would require dash removal which again, ain't happening soon*.
Unless...
Just going by (my admittedly faulty) memory, the actual Miata mixing box (the big center box on the tunnel with the heater core) is VERY similar to ours, even the weird inlet mount flange is the same. It is already set up to toollessly use the cables and the only real question would be how easily the Miata heater core would adapt to our firewall passthroughs.
Either approach seems feasible without extreme difficulty and once done, the vagaries of the complex stock system are eliminated forever.
*Unless- and this is only in the thought stage as yet- I somehow stumbled into a complete Miata dash, which I would attempt to swap into Sprocket in a heartbeat.
Cosmetically, the exterior of my dash is very good but the underlying yellow plastic structure is literally falling to pieces. I can barely affix, much less align, the switch bezel to the gauge cowl- the two bottom mounts are gone (for the second time) and the three cowl mounts are all cracked.
If I could pick a project to pursue right now, that'd be it.
thanks for the info!!
i have a problem with my heat not blowing out the floor, only out the defrost and dash vents
could this be my problem or is it more likely to be the button on the logicon?
i will try this test tonight and see it the actuator works or not
i have a problem with my heat not blowing out the floor, only out the defrost and dash vents
could this be my problem or is it more likely to be the button on the logicon?
i will try this test tonight and see it the actuator works or not

Junior Member
Joined: Jun 2023
Posts: 6
Likes: 2
From: Green Bay, Wisconsin
I see OP was disappointed in the response to this thread when he posted it. But here I am, 17-1/2 years later, being helped by this great post. Thanks @Richter12x2 !

Thread
Thread Starter
Forum
Replies
Last Post
Shield
2nd Generation Specific (1986-1992)
3
Oct 5, 2009 12:37 PM